All Activity
- Past hour
-
Excellent job on all of them. Engine compartment detailing is very well done.
-

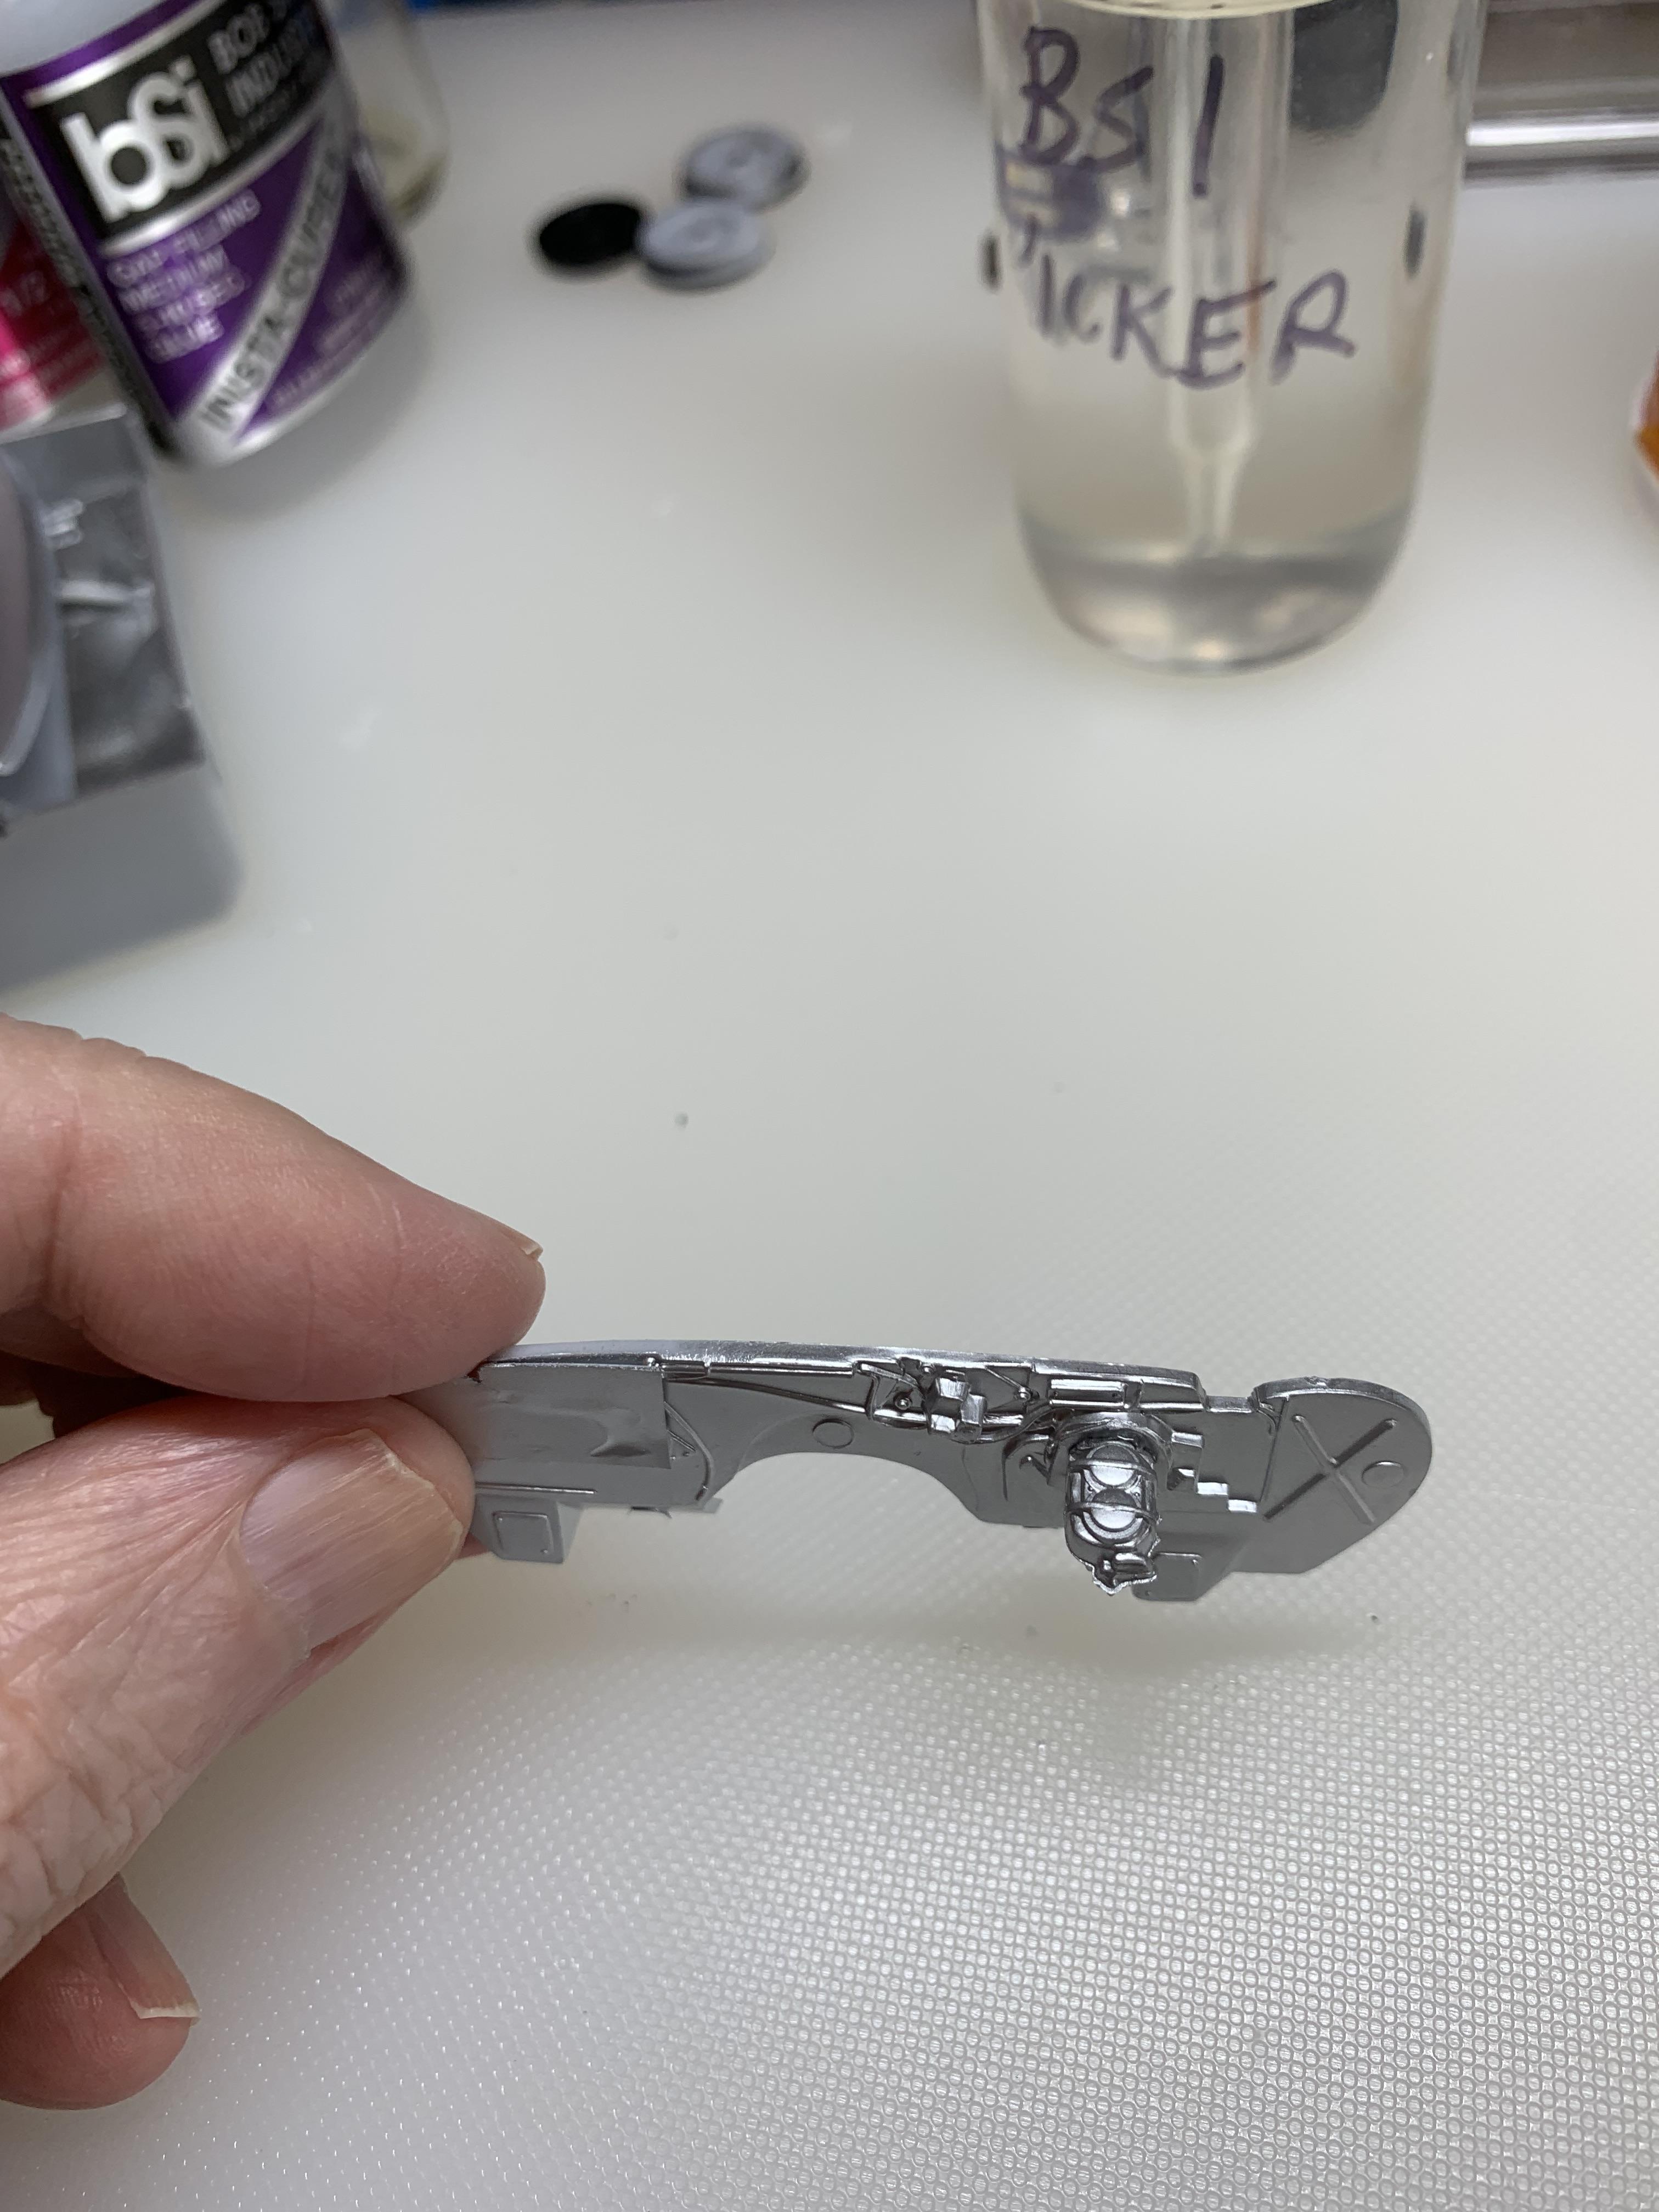
How do you prep your glue surfaces???
StevenGuthmiller replied to Vinny G's topic in Model Building Questions and Answers
I agree. Since I’ve begun using the glues that I use, joint strength has never been a problem. As a matter of fact, my models generally get handled quite a bit initially, and often get dragged 300 miles or so, one way, multiple times during a season to a number of shows, and in all honesty, over the past ten years or so since I’ve begun going to shows, I’ve never once had a part fall off in transit. Apparently the paint and glue bond is pretty good to be able to withstand 600 miles of bouncing around on bad Minnesota roads, and that’s just one trip of several. Sometimes I think glue joint strength gets a little over emphasized. We build static models that aren’t supposed to get a lot of rough handling anyway, so how strong does it need to be? Steve -
I added a couple of little tabs to the body in front of where the tabs on the hood are located. It seens to keep the hood from skewing off to one side. Knowing this kit however, by the time I get to final assembly, the hood may well sit wonky again.😬

-
Outstanding. Looks really good, very cool seeing one of these built.
-
Very nicely done. I like the Lavender and dark grey metallic combo. Your interior is exceptional and overall, your build is very cool.
- 1 reply
-
- 1
-

-

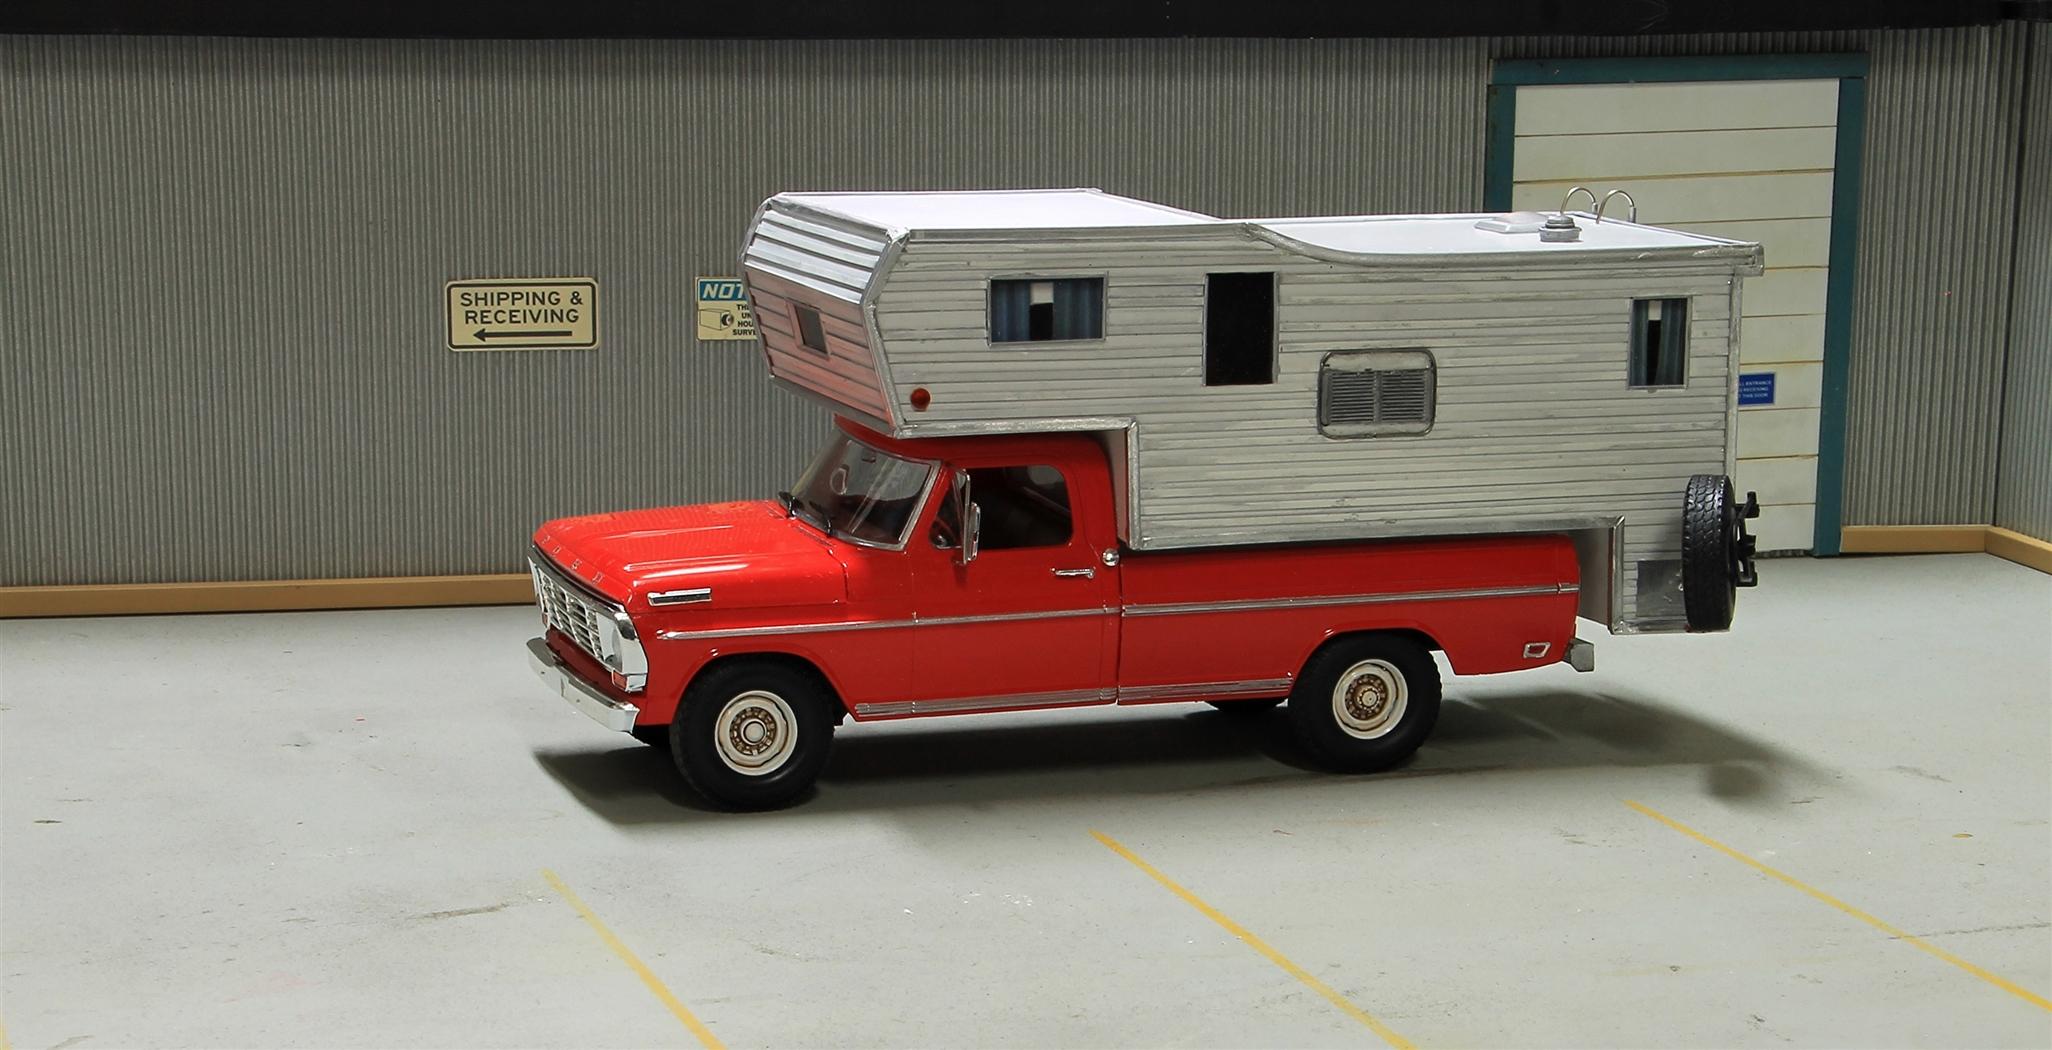
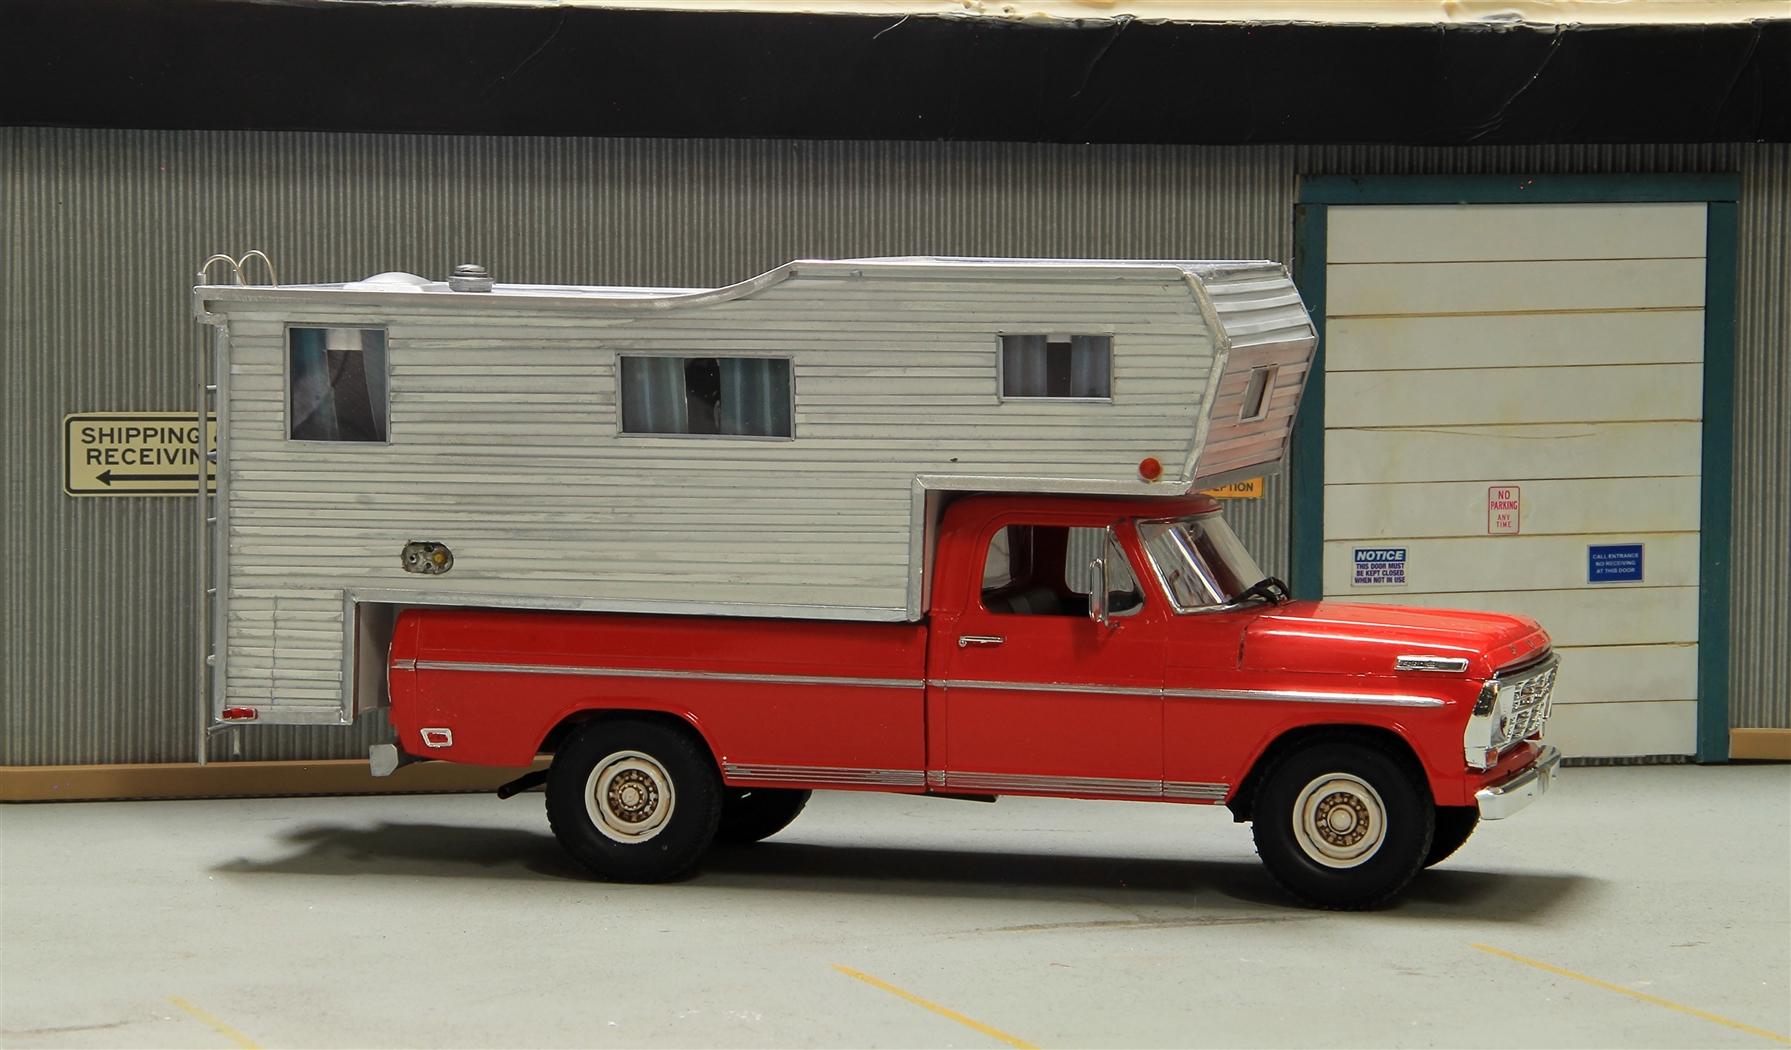
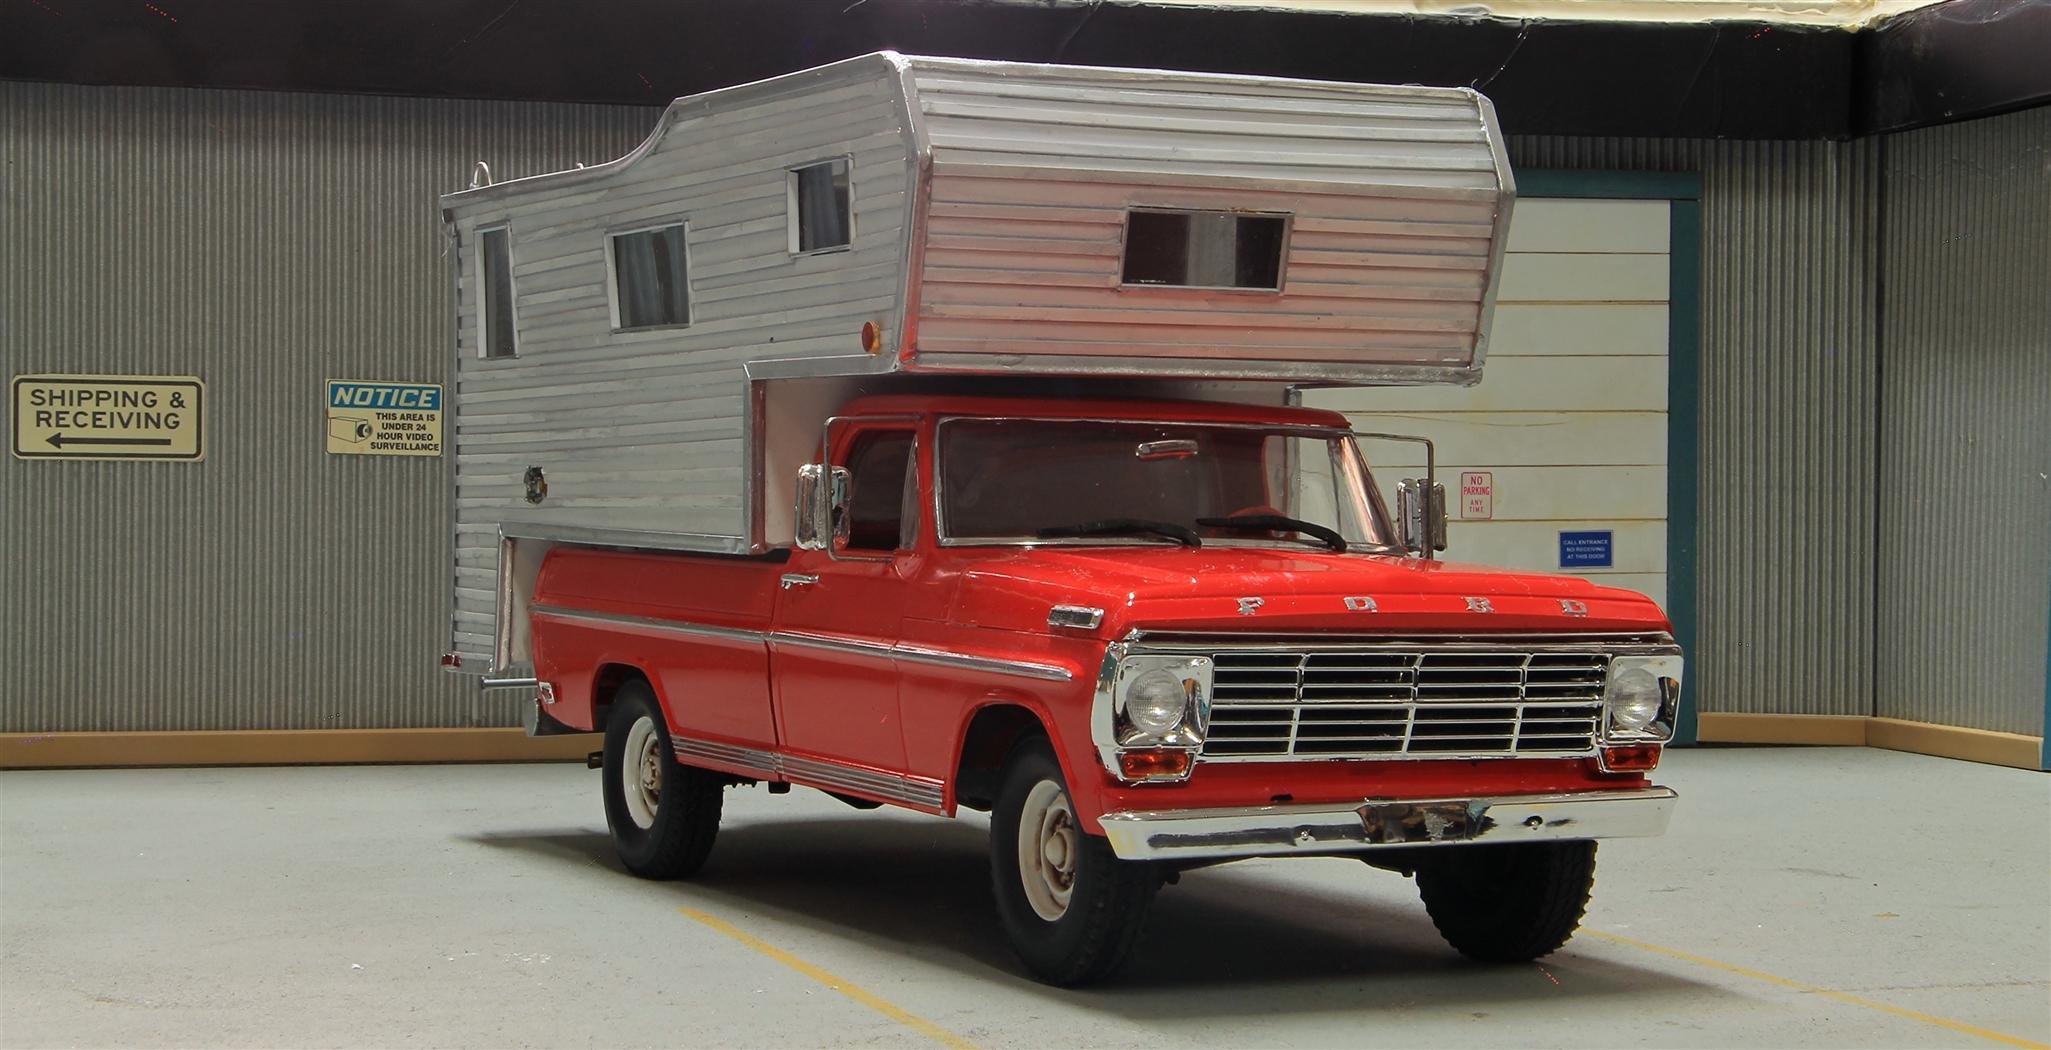
Moebius F 250 w/camper.
Jim B replied to happy grumpy's topic in Model Trucks: Pickups, Vans, SUVs, Light Commercial
Great looking Ford. -

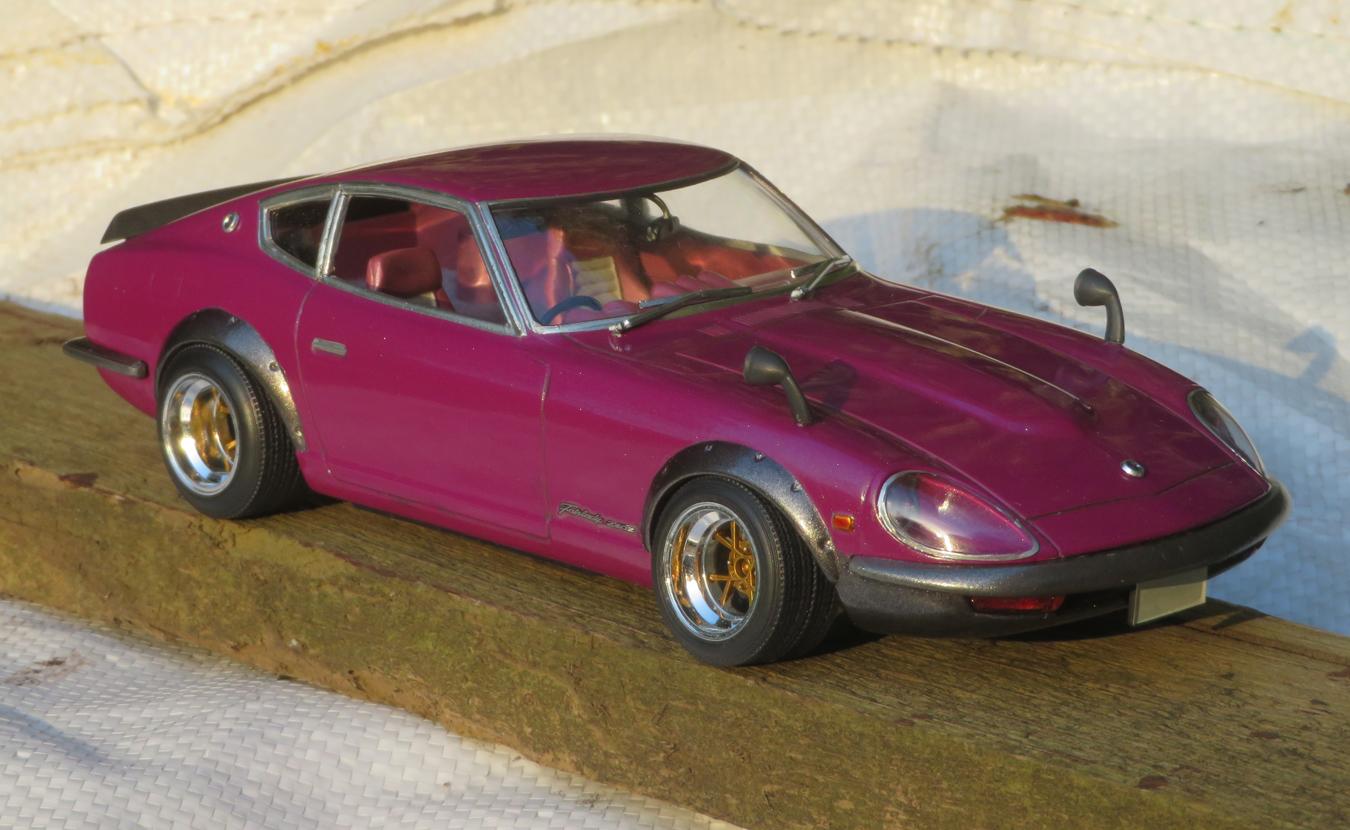
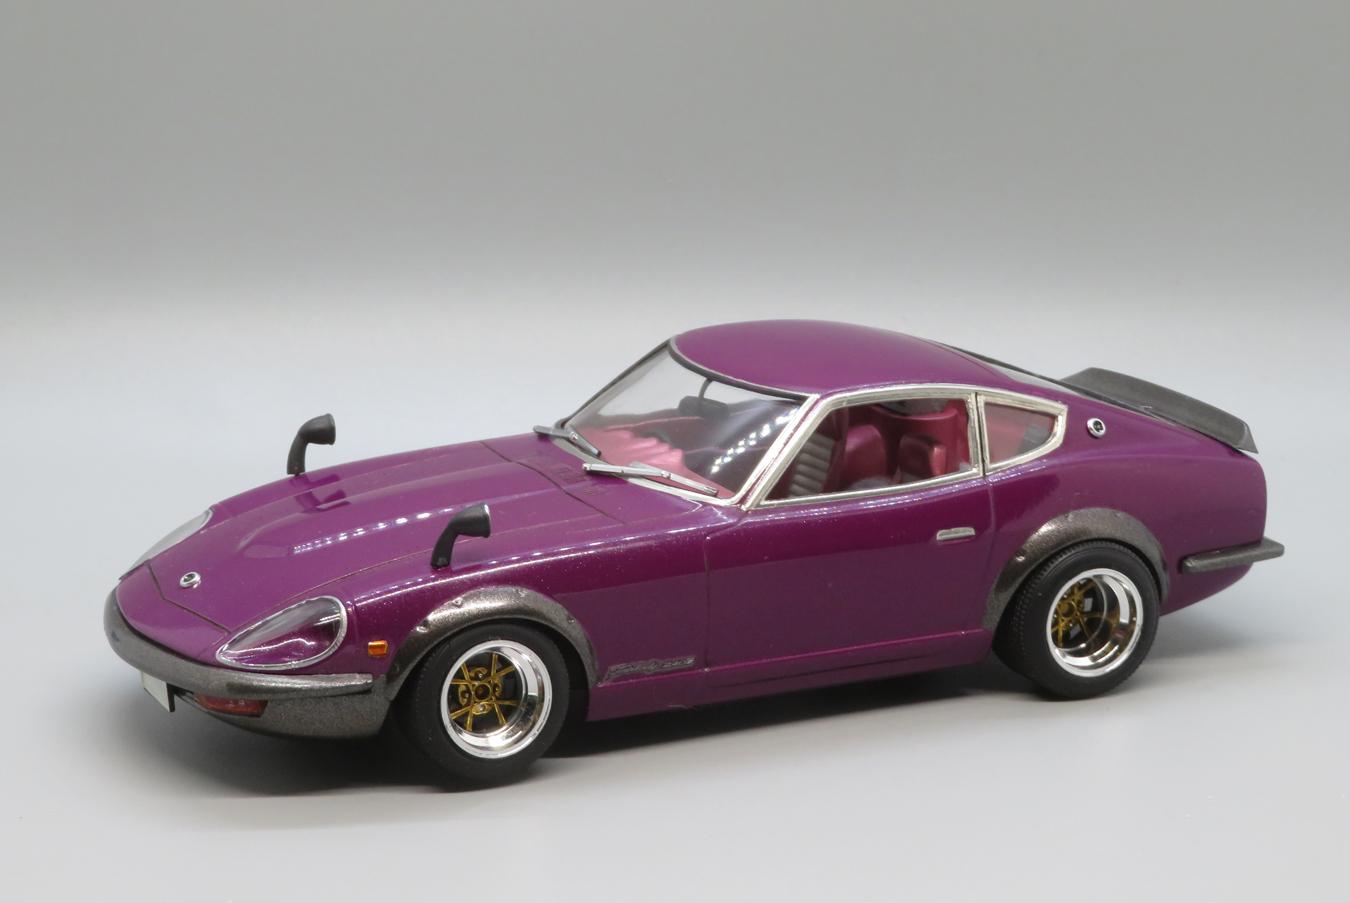
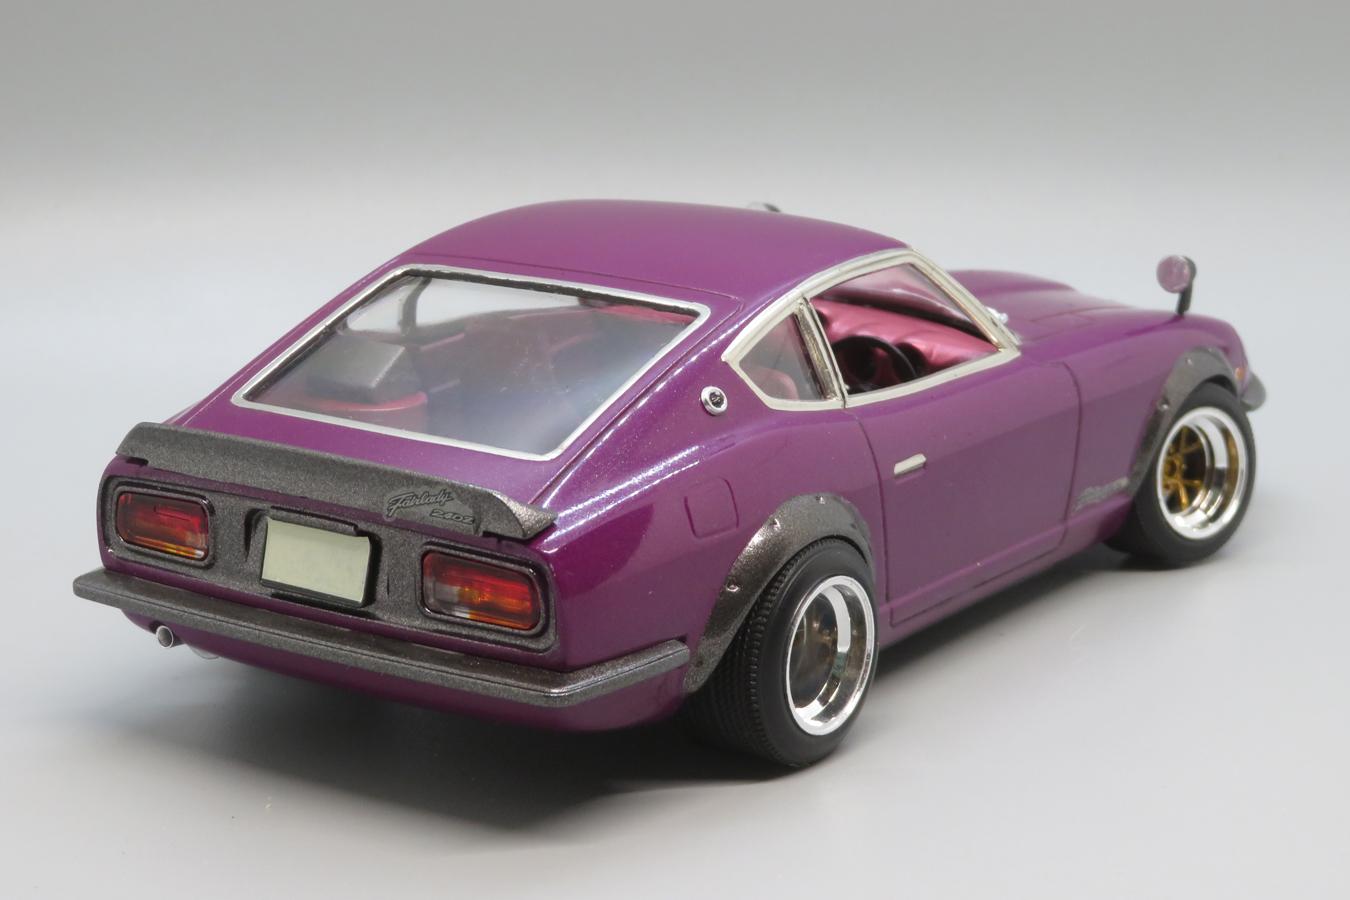
1979-ish Tamiya Datsun 280ZX - Quick Refresh
karbuildr replied to Spottedlaurel's topic in Model Cars
Ya done good. Looks a hundred percent better now, well done. -
Nice looking Fairlady. Good save.
-
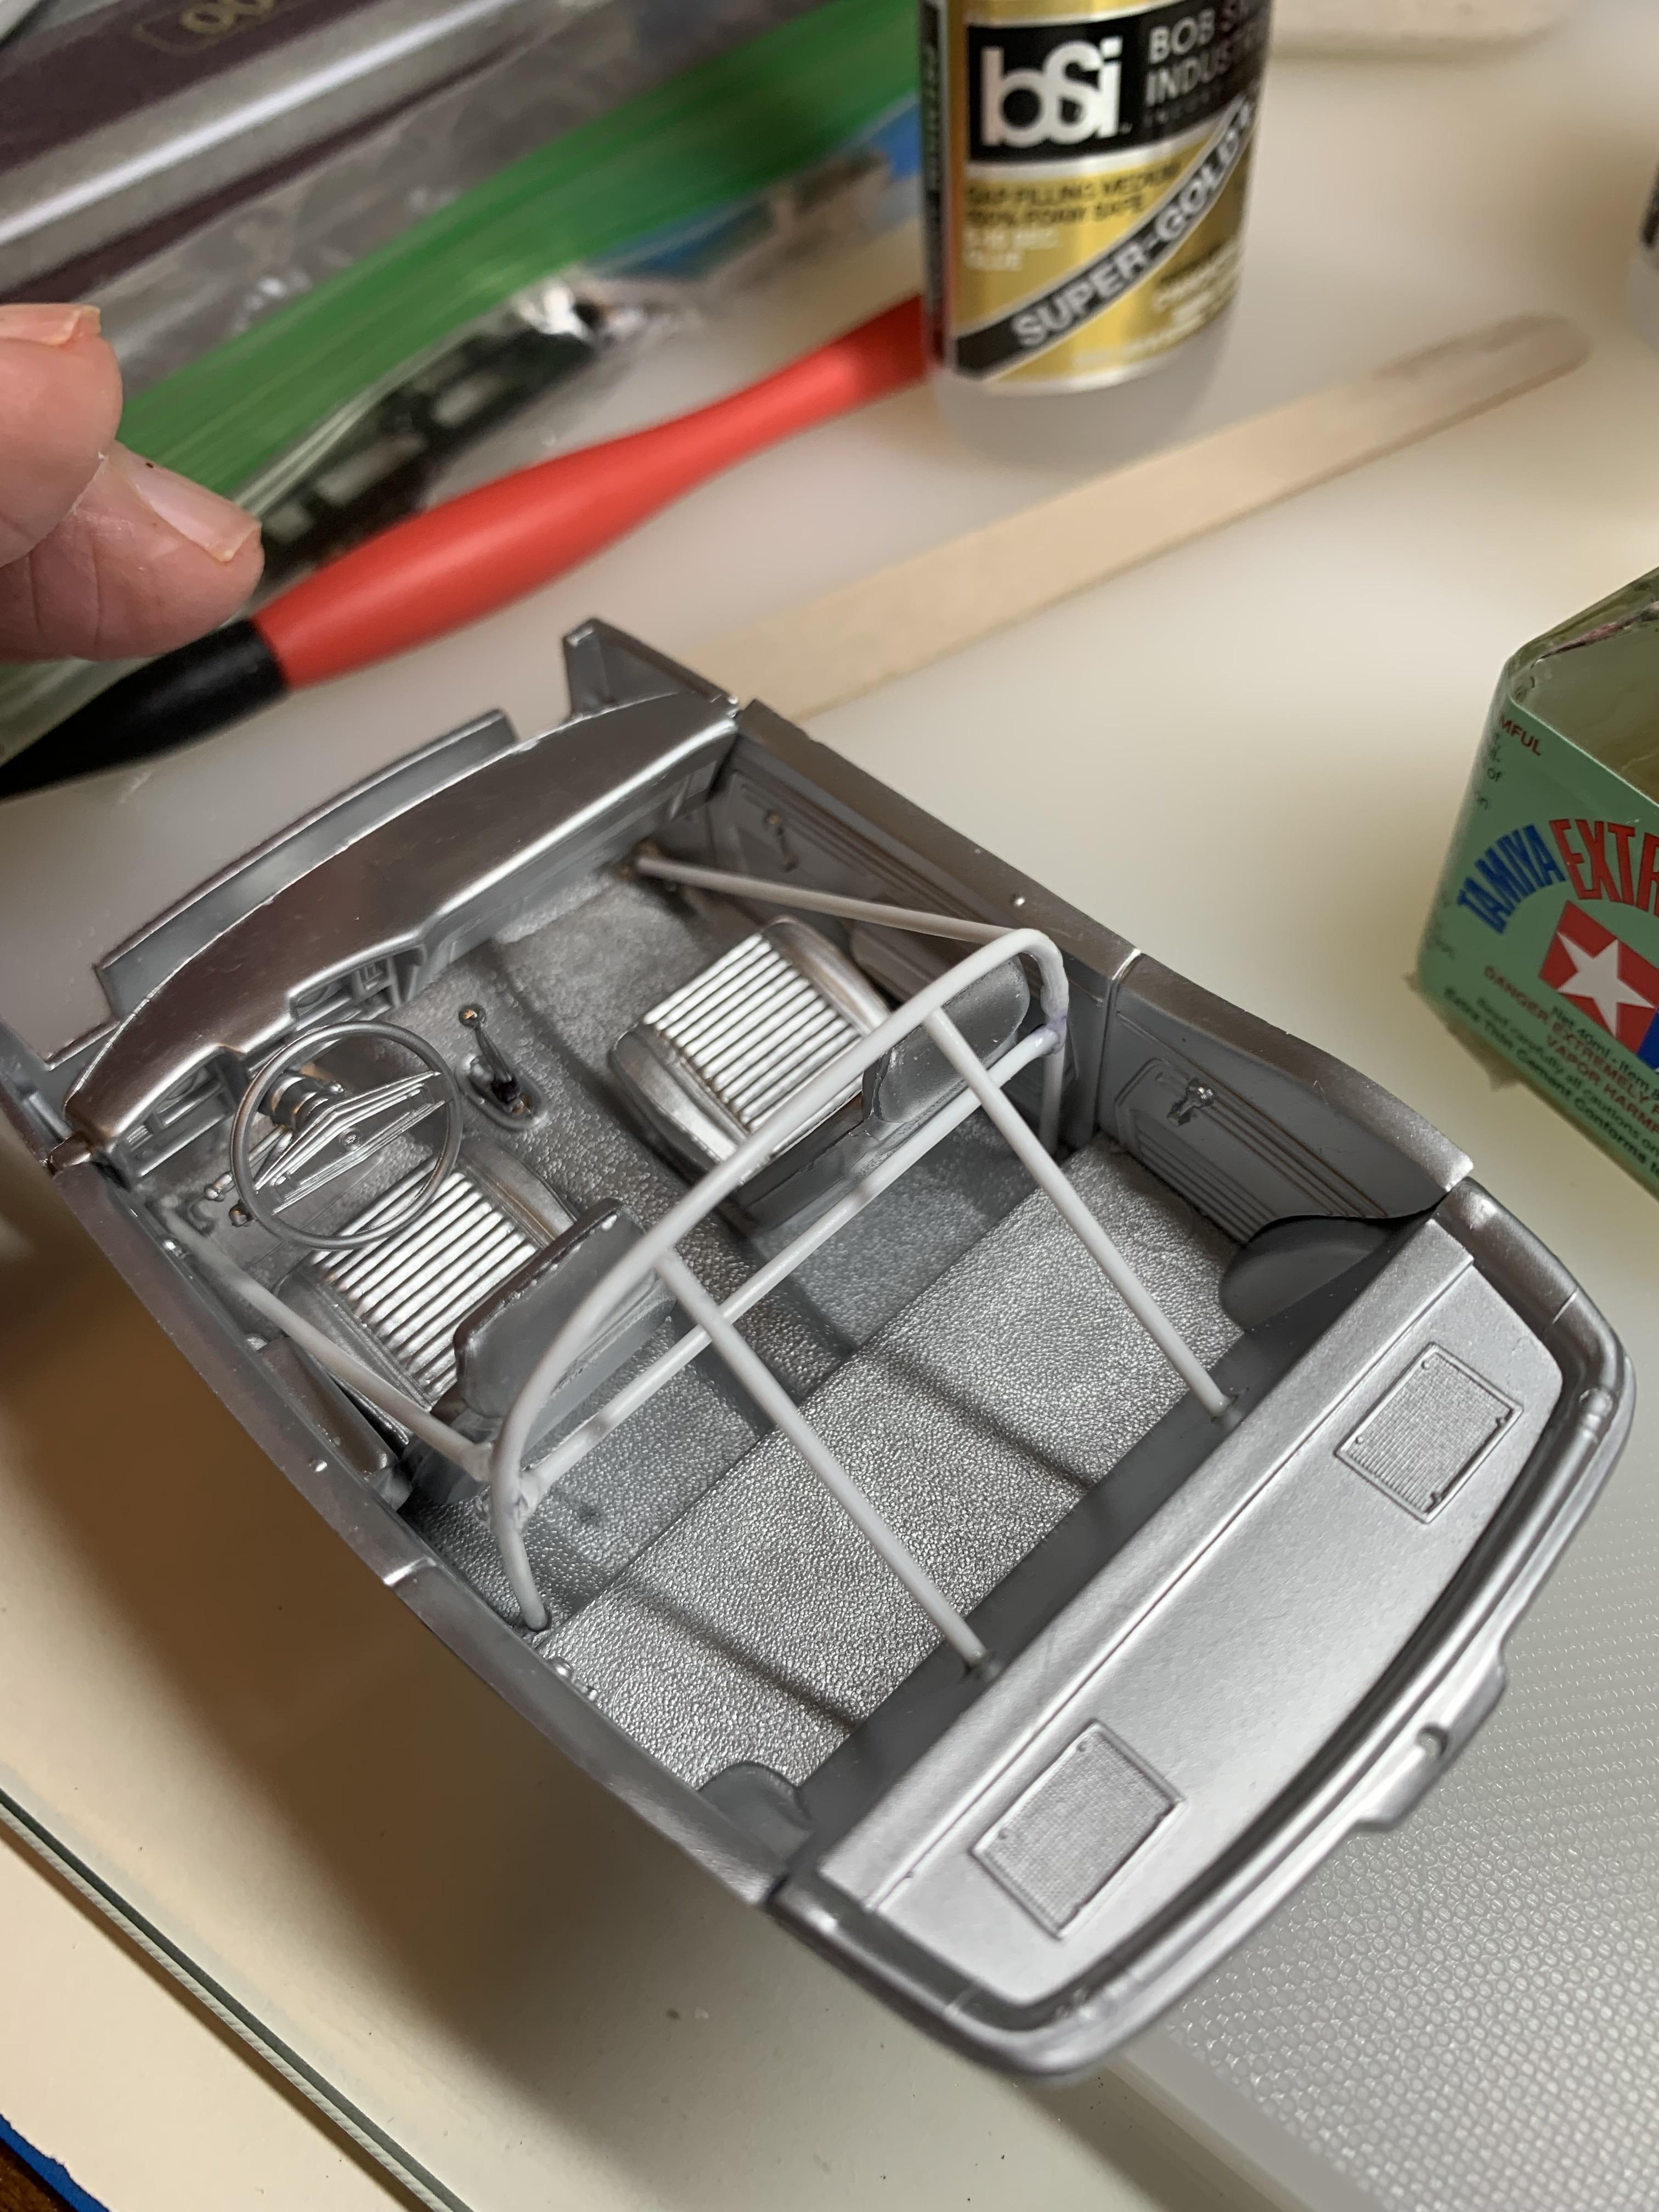
The first of my Datsun/Nissan Z builds off the bench, before I get on with the more detailed Tamiya kit. WIP thread here: Built largely OOB, with Aoshima Bilbo wheels fitted with tyres off another kit (possibly Fujimi). Suspension lowered and a lot of fettling done to get the different wheels sitting in the arches (more or less anyway). I deleted the engine and 'box, as there isn't really any other underbonnet detail and opening the bonnet up would have been a chore. Window trims done with BMF, and on the wipers and headlight fairing surrounds I used a Gundam chrome marker. Paint was where I wanted to get a little experimental, and it's certainly not a stock 1:1 colour. I used Tamiya TS-37 lavender, then their pearl clear and topped it off with my first use of Mr Hobby gloss clearcoat. After the clear was applied I then did some tedious masking and painted the moulded-in arch flares, rear panel, bumpers, spoiler etc with un-cleared Tamiya dark metallic grey. I do enough black interiors so I thought I'd have some fun this time. I used TS-59 pearl light red, finished with flat clear to tone it down. Accents were brush-painted light grey enamel, with felt used for carpeted areas - a little overscale perhaps, but it gave a bit of texture when seen through the glass or buried down in the footwells. Compare and contrast with the Monogram 280Z I built back in 2020: The Fujimi kit is probably more accurate, but it has one or two shortcomings and I'm still fond of the basic Monogram version. I'm pleased with how the paint turned out. The pearl catches natural light nicely and the Mr Hobby gave it a good shine without being too thick. I attempted to capture it here, but we're not seeing much sun at the moment: Doing this has been a good exercise in learning a bit more about the Z, which will be useful to me when I buld the more detailed Tamiya kit as my CBR entry this year. Thanks for looking.
-

How do you prep your glue surfaces???
NOBLNG replied to Vinny G's topic in Model Building Questions and Answers
I rarely mask attachment points anymore. I either scrape the paint off and use Tamiya thin if it’s a structural joint, or use epoxy or CA over the paint. -
 Does anyone know of a source to get decals like the below? There are stripes the run up along the top edge of each front fender and door and then meet over the roof of the car:
-

Return of the 1/25 MPC '68 Coronet/Super Bee RT Convertible...
Carmak replied to '70 Grande's topic in Car Kit News & Reviews
To anyone looking to make a correct 68 Super Bee - All 68 Super Bees were 2dr. post sedans with pop out rear qtr. windows and bench seats. The 2dr hard top and the 2dr post sedan shared the same roof and window opening shape but a post as shown below would need to be added.
-

Is There Room For Another 41 Plymouth or Two?
customline replied to LennyB's topic in WIP: Model Cars
When I was a mere child, I was in possession of a scrapbook full of tobacco stamps my grandfather, who had been a butcher/ store owner back in the '20s, '30s, and '40s had saved (for me) and, after he was gone, I had no idea what they were. There were also many foreign postage stamps and such but I was not interested in them. I wish I had kept track of them. Stupid kid. 💩. Yes, I was a stupid kid. I admit it. 🥺 perhaps I still am . -
Hot is what I'm feeling since I got off my rump and have been mowing the grass so I decided to take a break and see who's saying what?
-

AC 289 Sports MkIII, starting with a Monogram Cobra
Matt Bacon replied to Matt Bacon's topic in WIP: Model Cars
Apologies... I know it's been a while since the last progress report. A combination of going away for a long weekend somewhere hot and having to take several goes to get the next bit right has slowed things down somewhat... not to mention the fact the lawn is growing at a ridiculous rate and needs repeated attention! You need some kind of engine bay walls to hang some of the key components off. The base kit gets away with none, mostly by not including things like a battery or coil. The boxing in of the wheel wells provides the walls, but it took several attempts. In the end I used White Tak to take a profile of the body interior to get the shape of the end wall right and let that set in place, and then drew the bonnet edge profile onto plastic card to get the top curve of the inner fender. Finally some careful measurements along the chassis tubes sorted out where I needed gaps for the suspension components. The battery is sourced from spares and I built a tray for it to sit in. Trying to get everything to fit in and join up the plumbing and wiring is complicated by the fact that you have three main assemblies to bring together, and many bits of cable and tube that connect from one to another. For example, the upper radiator hose runs from the black "rubber" tube on the left hand end of the shroud over the hood hinge to the front of the engine, which is attached to the chassis. The battery cable runs round the firewall and down to the starter motor on the bell housing.... etc. The eagle-eyed will notice I've relocated the coil; on my reference pictures it's clearly alongside or ahead of the distributor, so it needed to move further forward. I hope I won't need to separate the assemblies again now, and can just start joining things up. It'll be interesting to see if I can run the steering column in something vaguely approximating the right place, and fit the two frame braces that connect the transverse hoop at the firewall to the front suspension frame uprights.... somehow. best, M. -
 Funny you should say that, as after grafting the two hoods, I am now rethinking the scoop as looking a bit too "racey"... I may cut it off and try a more stylized scoop.
 -

Trumpeter Ford GT40 with my twists
kensar replied to kensar's topic in WIP: Other Racing: Road Racing, Land Speed Racers
Thanks for commenting everyone. I'm pleased others are getting build tips from my posts as that is the point in it. Loosely following the kit instructions, I started working on the front end. I reduced the diameter of the suspension mounting points and shortened the camber adjustment in order to place a nut and shaft there. The as-molded kit parts are on the left and my mods on the right. I lathed off the grooved lines of the brake disc and made some disc faces on the lathe from aluminum, which I glued on the plastic backing. I found the brake discs were not concentric with the hub - how do you screw that up? The right-most part is how the disc was molded. I have completed most of the left front suspension by assembling the kit parts with some modifications for adding details. I added brake lines and crossover tubes. I didn't cut out the back of the calipers because it appears that will not be visible. I painted in a significant amount of flat black around the calipers and nearby parts, but absolutely none of it shows in the photos. I have read in other builds of this kit that the front ride height is about 2mm too high. I am using Icon Automotive tires (I waited about 2 years to get them) which are about 2mm larger diameter than the kit tires. The front ride height is determined by the length of the front shocks, so I shortened them about 1.3mm to be on the safe side (I would rather err on the low side of the ride height). After finishing the right side suspension, I will move on to the torsion bar setup. Thanks for looking in. -
.thumb.jpg.d0926de2d8346363976c7c0a63bd15d7.jpg)
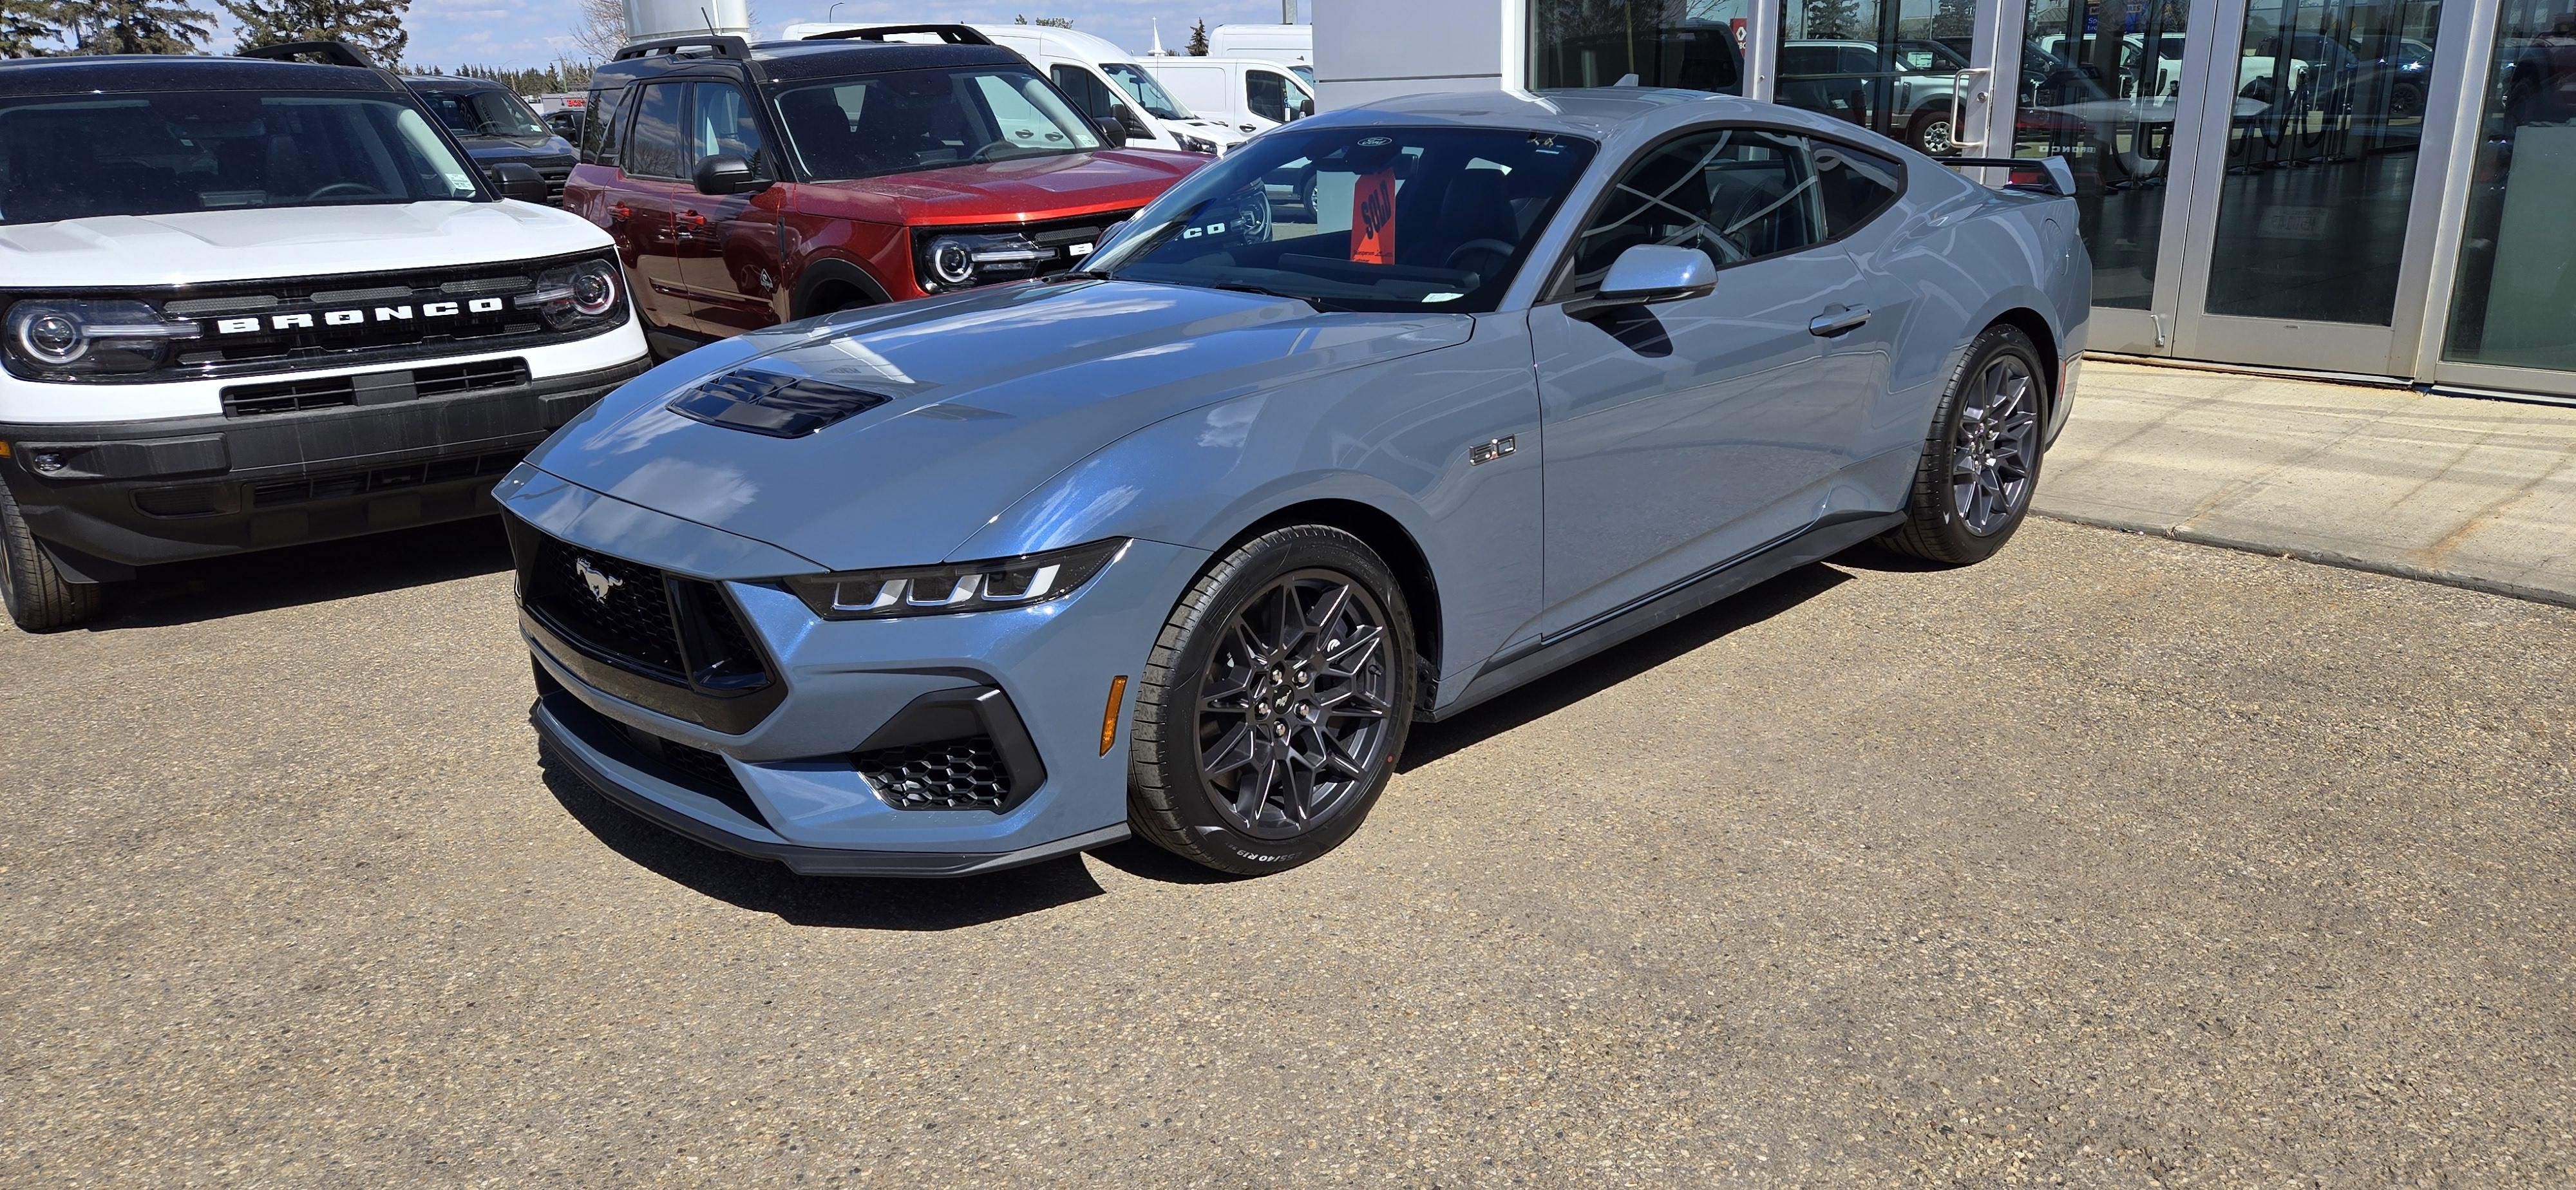
What did you see on the road today?
iamsuperdan replied to Harry P.'s topic in General Automotive Talk (Trucks and Cars)
Vapor Blue on the new Mustang GT looks amazing in the sun.
-

1969 Camaro A/SA (possibly Thomas Arnett’s)
R. Thorne replied to R. Thorne's topic in WIP: Drag Racing Models
Master cylinder, tach, and grill work.
-
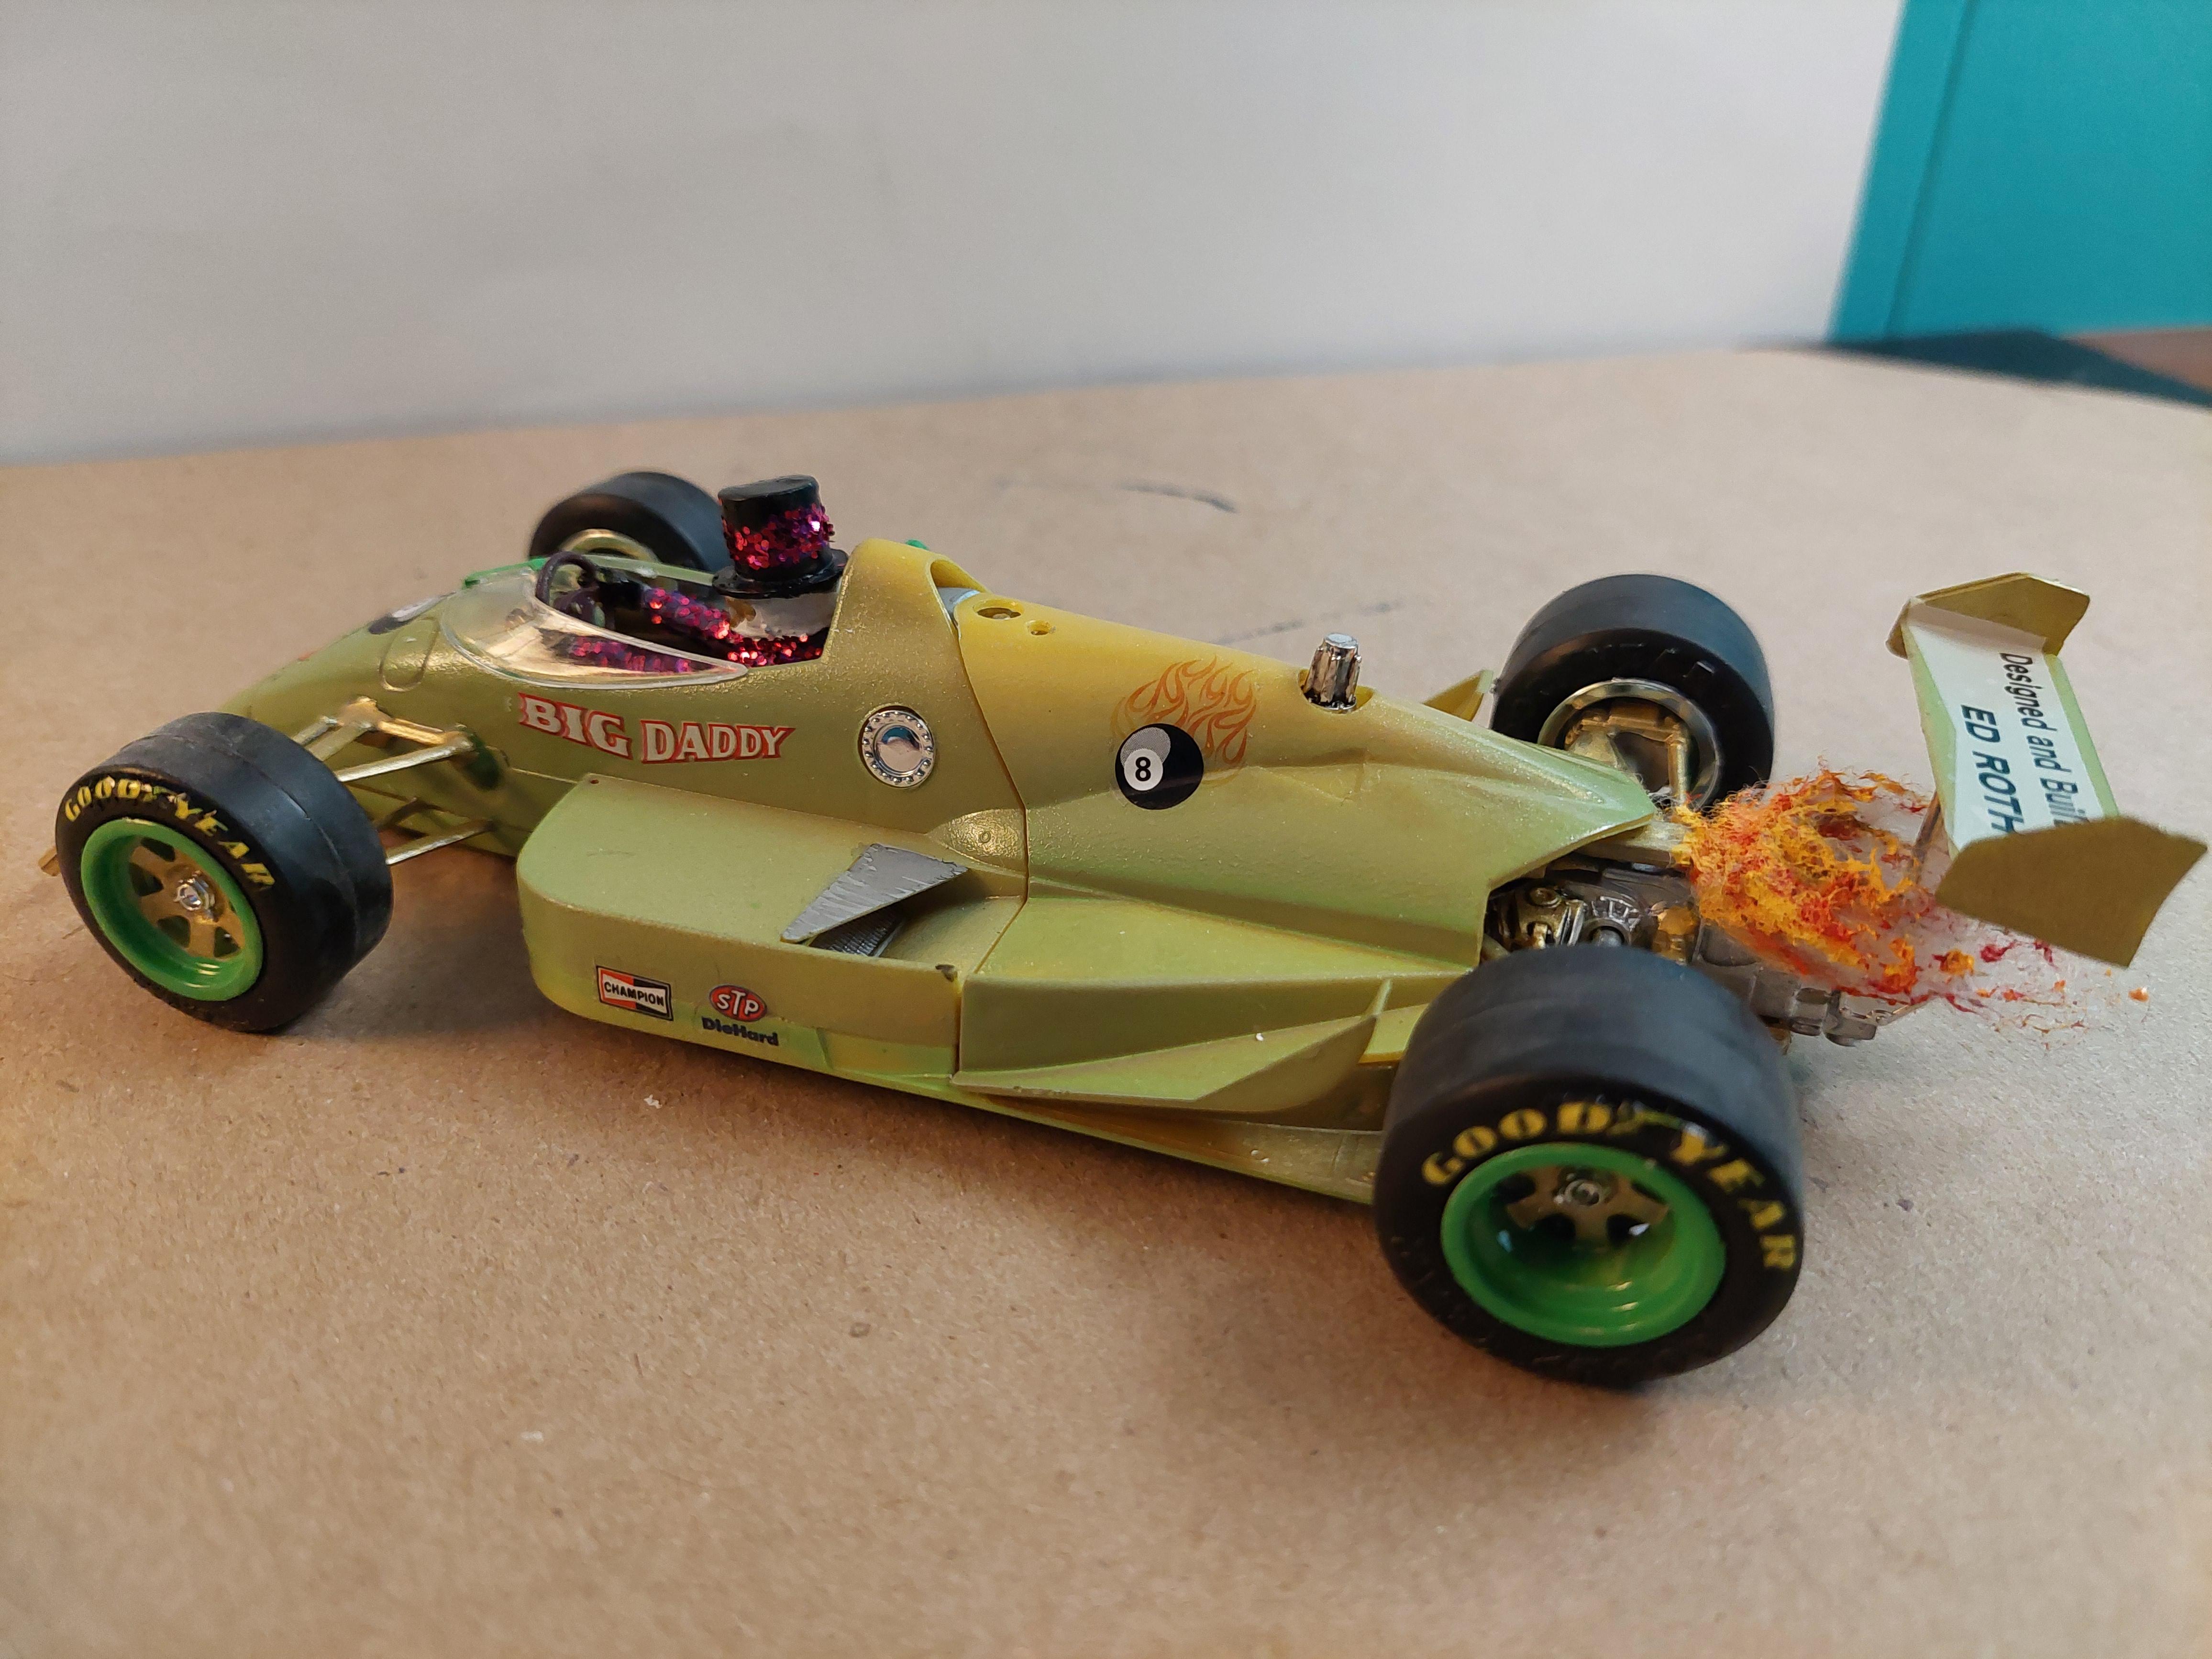
 What do you do with a 1989 era Indy car when you've had it for awhile and it never gets a 2nd look, have some fun with it..
-
How do you prep your glue surfaces???
R. Thorne replied to Vinny G's topic in Model Building Questions and Answers
I used to scrape the paint off with various devices but, now I just use ca glue in thin, medium, or thick, to vary the drying time. If strength is a major factor (seldom for me), then scraping and model cement is the answer. -
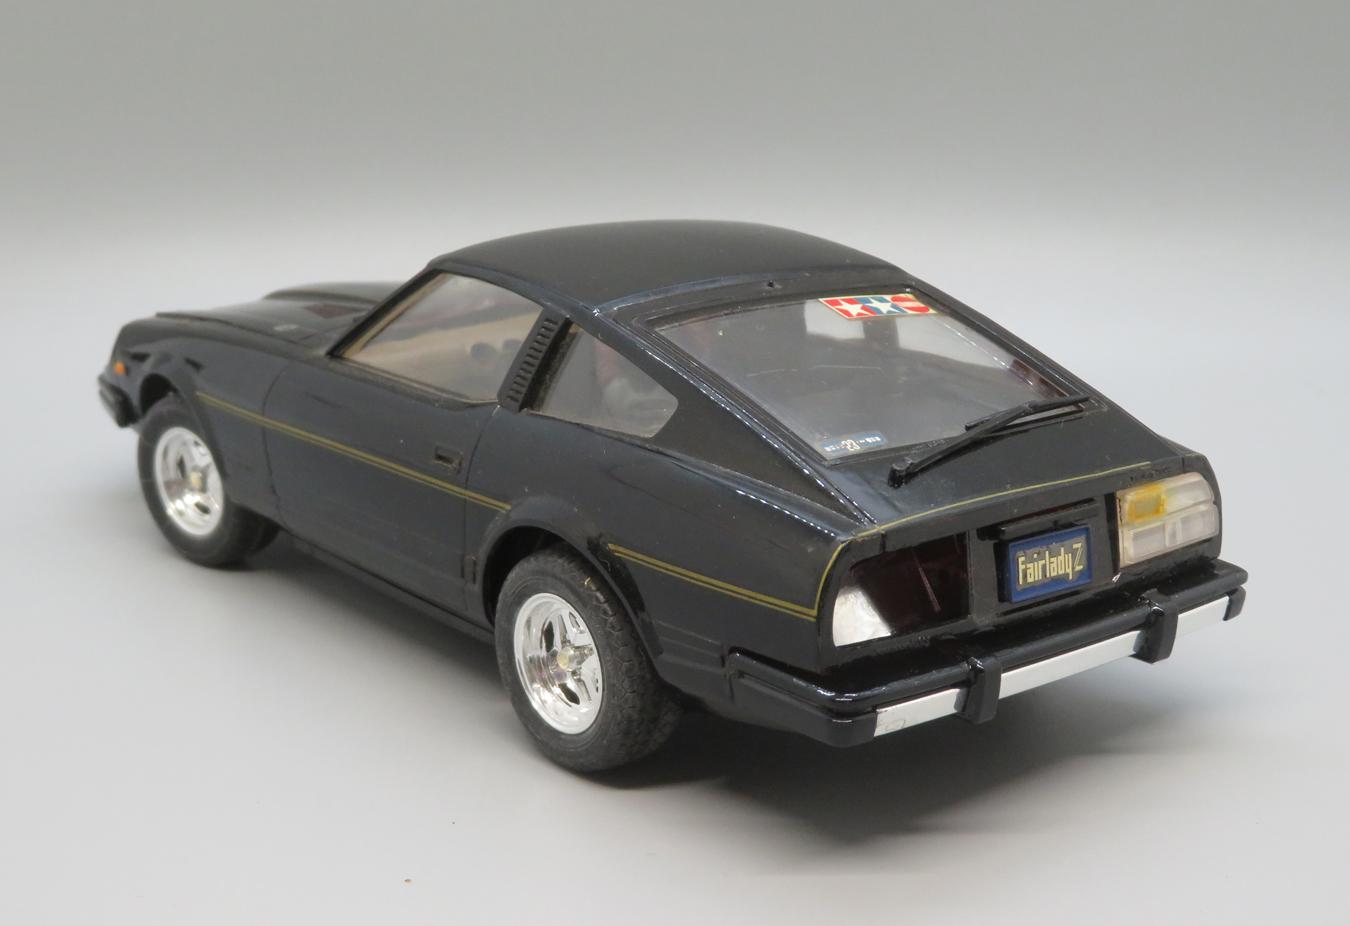
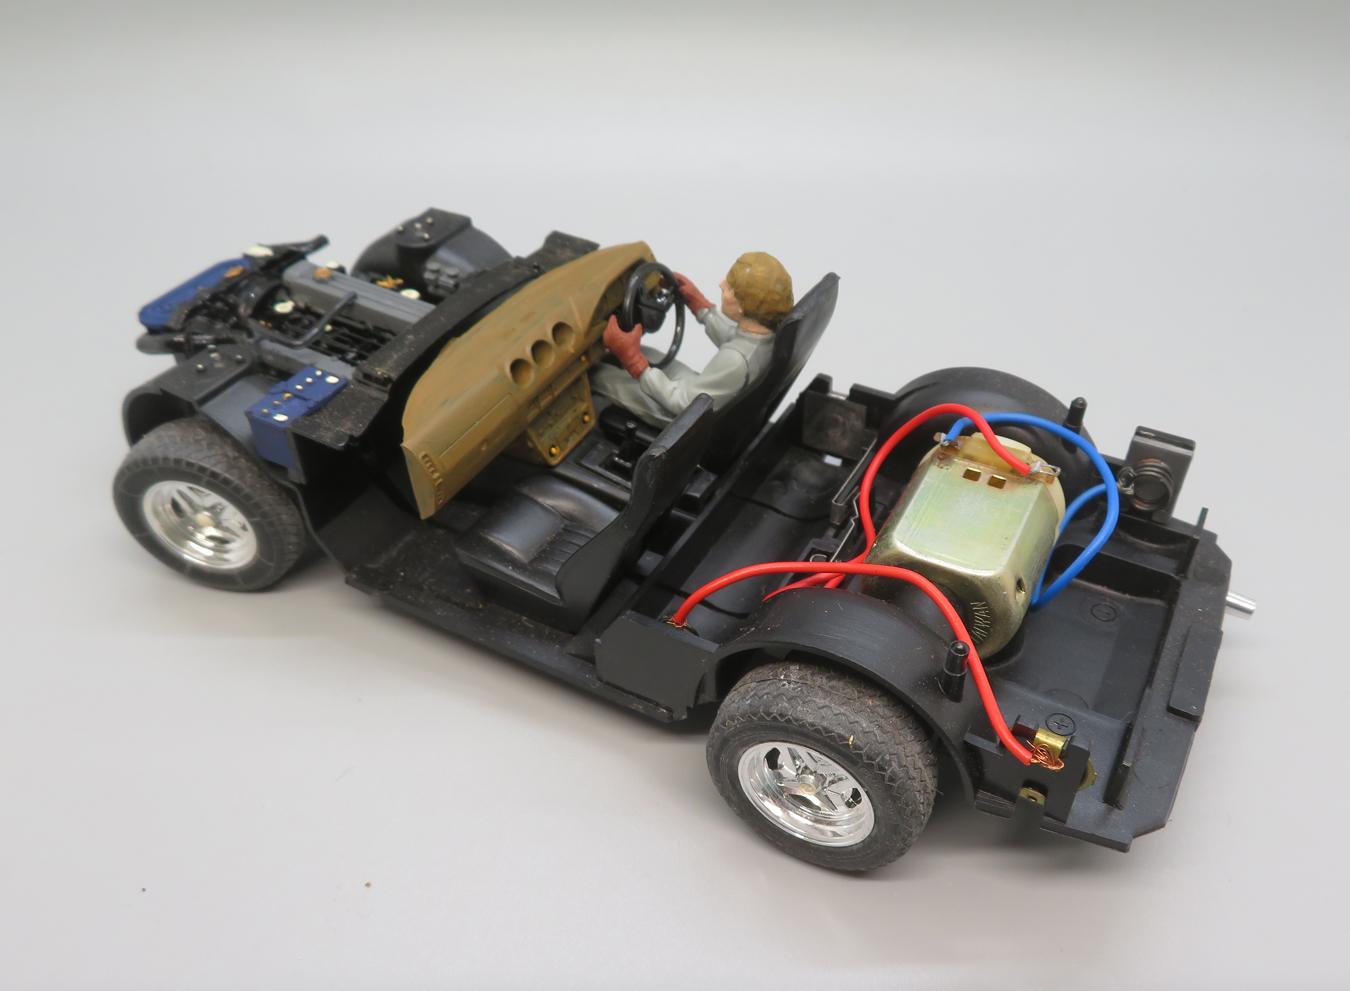
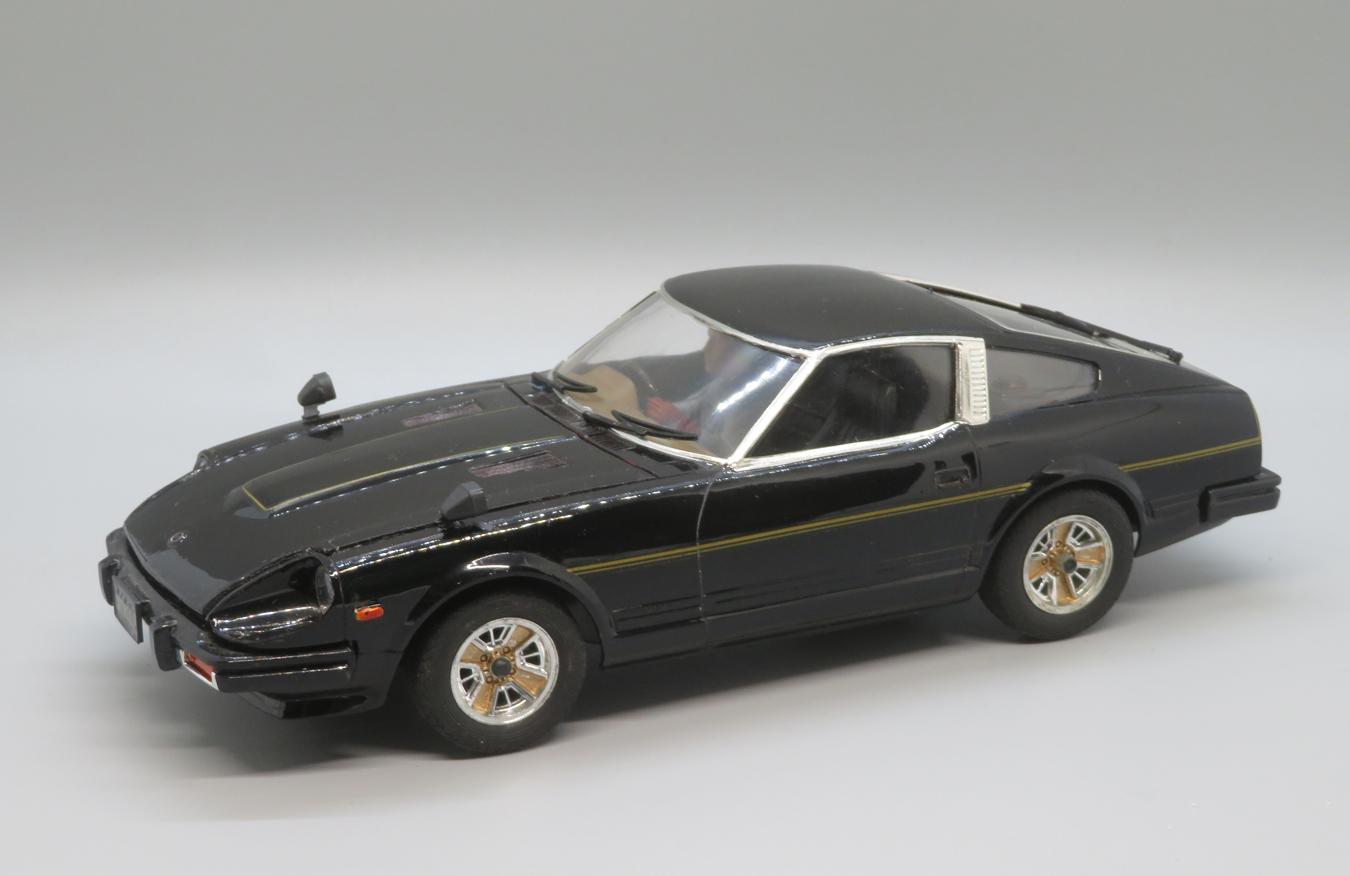
I bought this built kit off eBay recently, thinking it would be something I could strip and rebuild (eventually). As purchased: Built completely OOB, brush-painted enamel bodywork, some parts loose, but glass clear of glue. The paint was at a similar level to what I'd have been doing in the mid '80s, and it was dusty from years of display/storage. But, it was intact and I wondered if there was a chance of salvaging it and getting it on display rather sitting in a box awaiting its turn. Engine neatly done. Minimal detailing on the interior. It had been built with the motor - I popped in a couple of AA batteries, switched it on and it scooted across the garage floor with a fair turn of speed! Good job I'd set it heading for something soft.... I spent a couple of weekends on it while I was finishing off another build. I removed the body and gave it a wash and resin polish. The glass wasn't going to come out, so I worked around that. I applied BMF to the window trims, replaced the wheels and tyres with those from a different Tamiya issue of the 280ZX, located the missing rear light inside the body and painted the lenses with clear red and orange, then put it all back together. After: Applying foil with the glass in place was an interesting experience, but I manged to do it without any collateral damage. I'm pleased with how it turned out, a nice testament to the original builder. It looks good on the shelf and with the worn pinstripes it has the look of a slightly timeworn 1:1 survivor. Makes for a neat comparison with the 240ZG I completed the same day: I still have an unstarted version in the stash for when I want to build one my own way: Thanks for looking!
-
 I have build a few of these but this one was real hurdle, a lot of parts were warped, frame chassis, box hood , I suspect the parts were removed too early, some of them were like yellowish. The camper is scratch built using mainly evergreen styrene and aluminum tubes for the ladder, I wanted to make this as an old beaten up camper fitted over a brand new truck. Definitely not my best work but, hey, win some , lose some, right? Anyway here it is , warts and all. It took a lot of CA to hold all those warped parts and if that glue ever gives, this kit will pop in all directions. Warping aside, my main gripe with this kit is the headlight bezels, how could they get this so wrong? I guess there must be a reason for it. Anyway, Moebius has got it right more times than not ,so , fair enough. I'm just glad they did those beautiful kits. As usual, thanks for taking the time.
- 1 reply
-
- 1
-

- Today
-
Very nice model, Rich - I was thinking the same as Gary (NO race car this time?) but I now remember other non-racers from you, f. e. the Jaguar E's and some more...
-
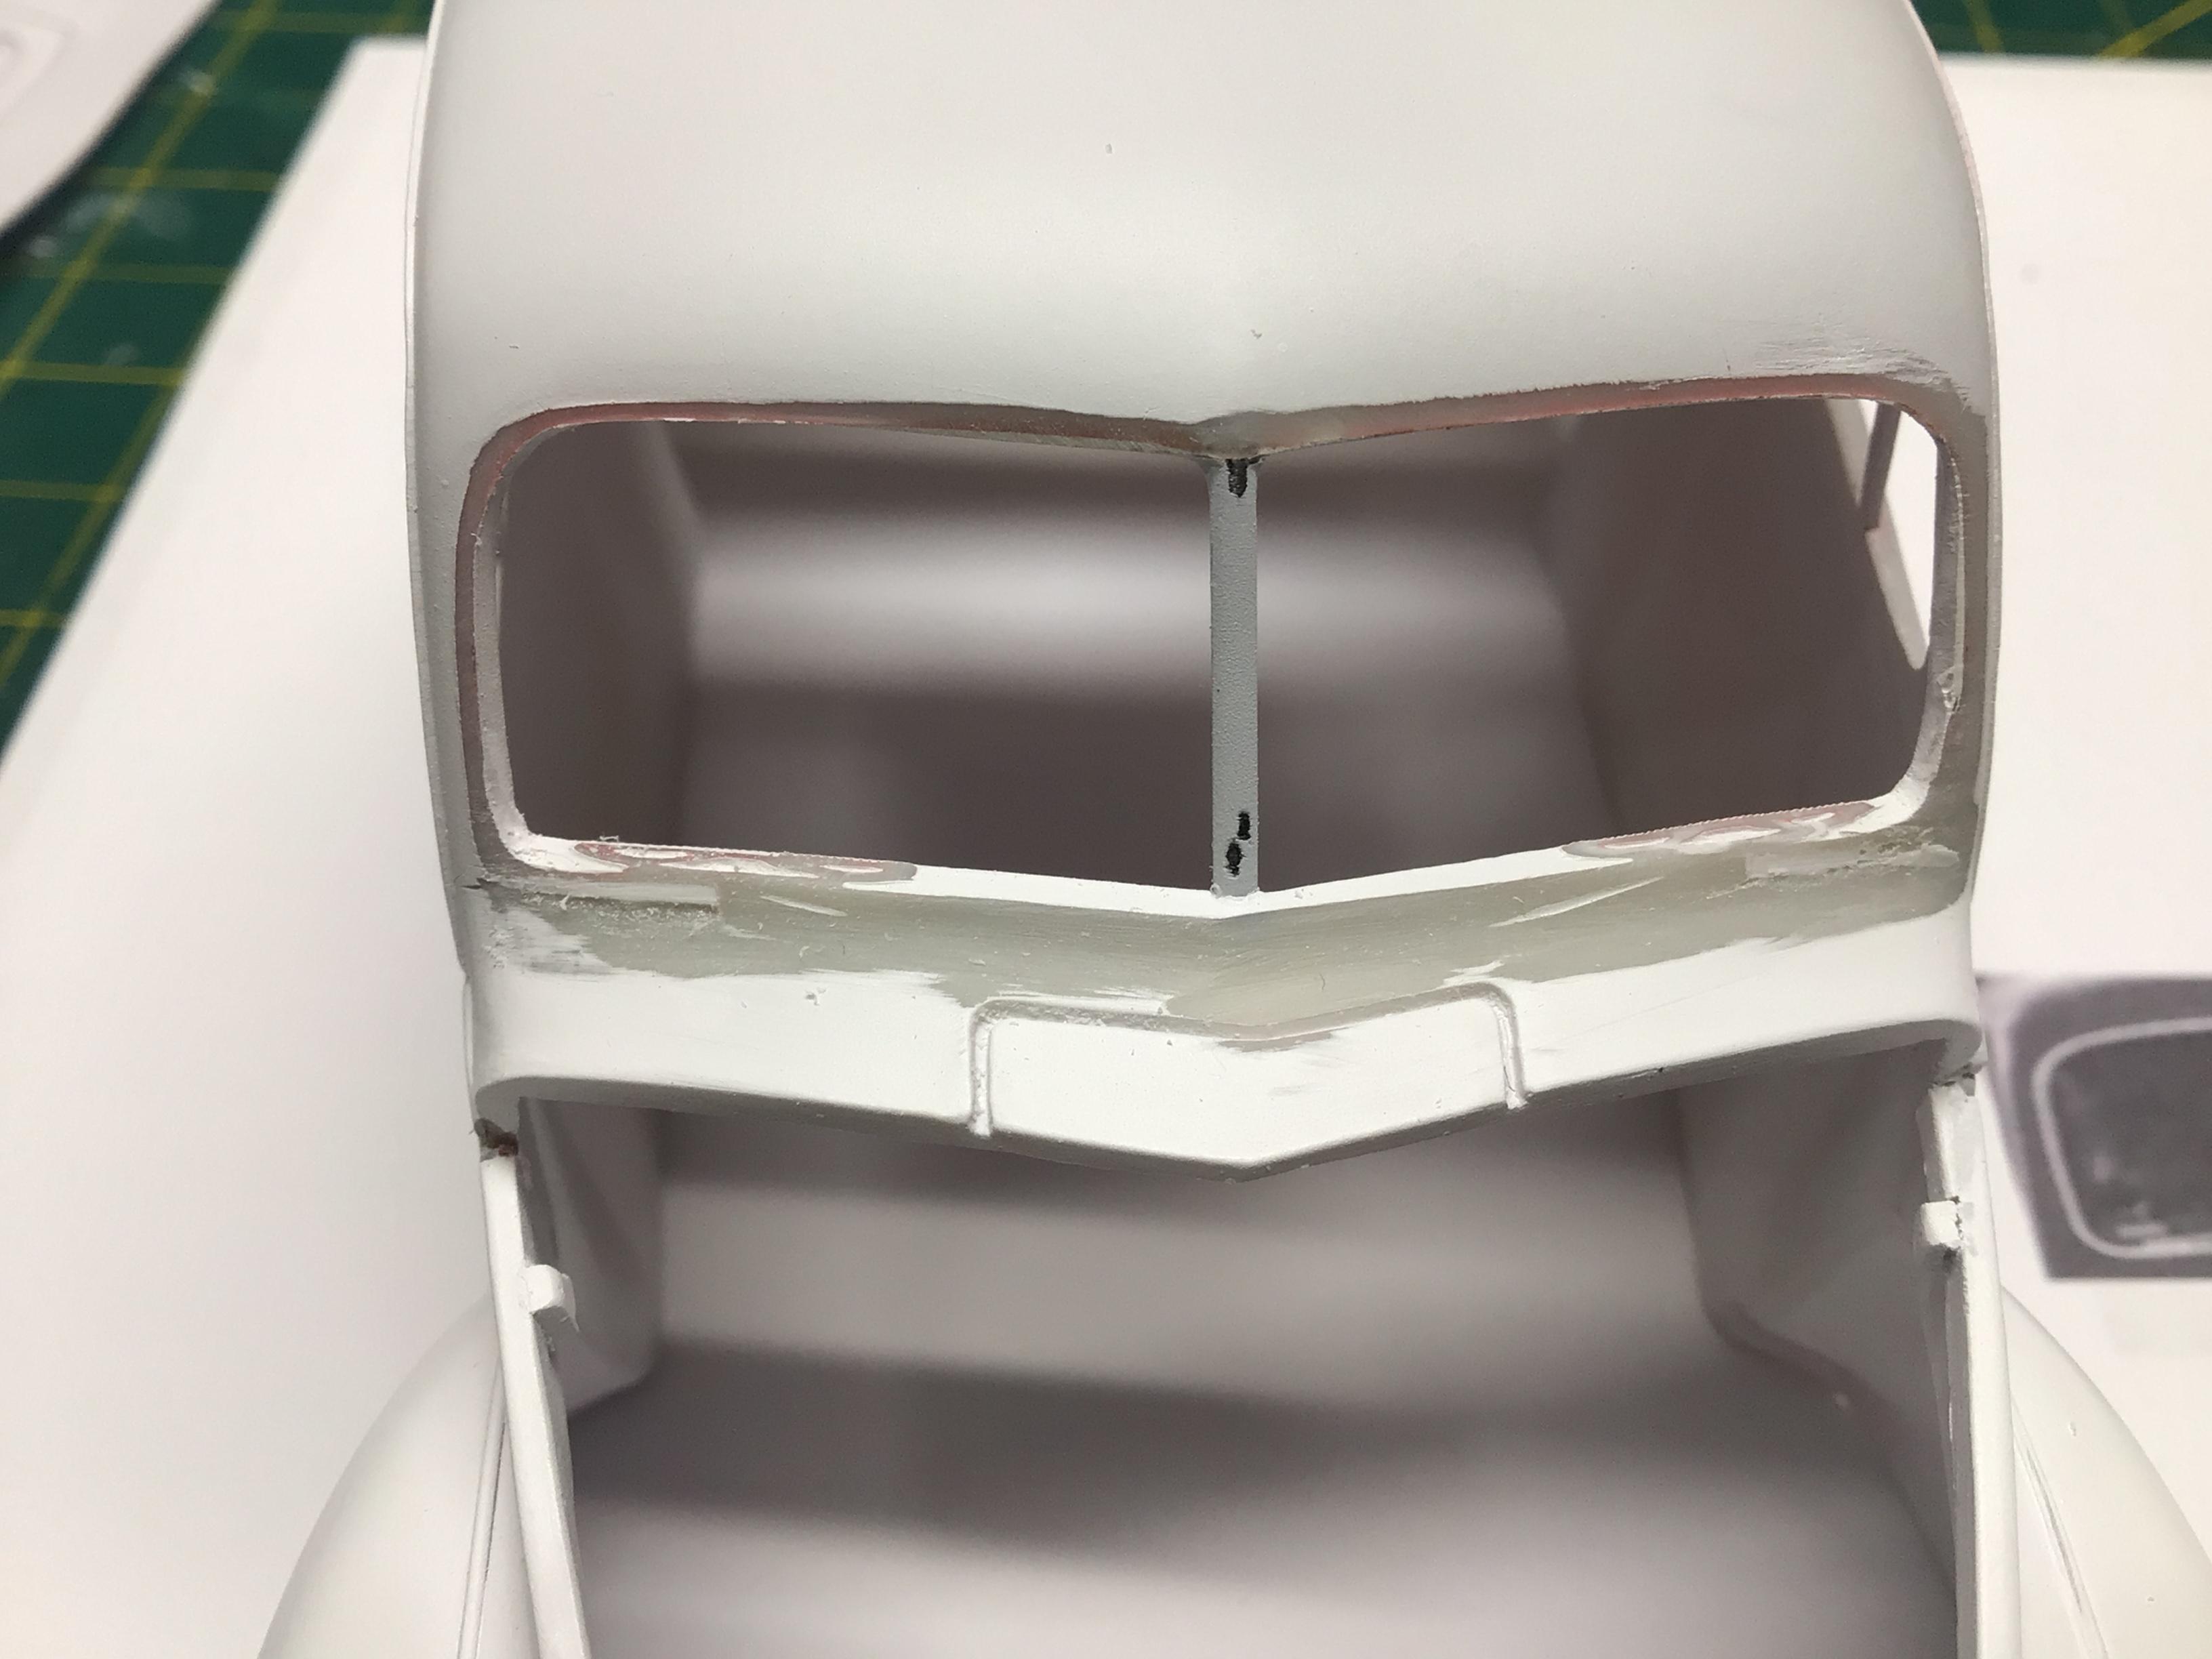
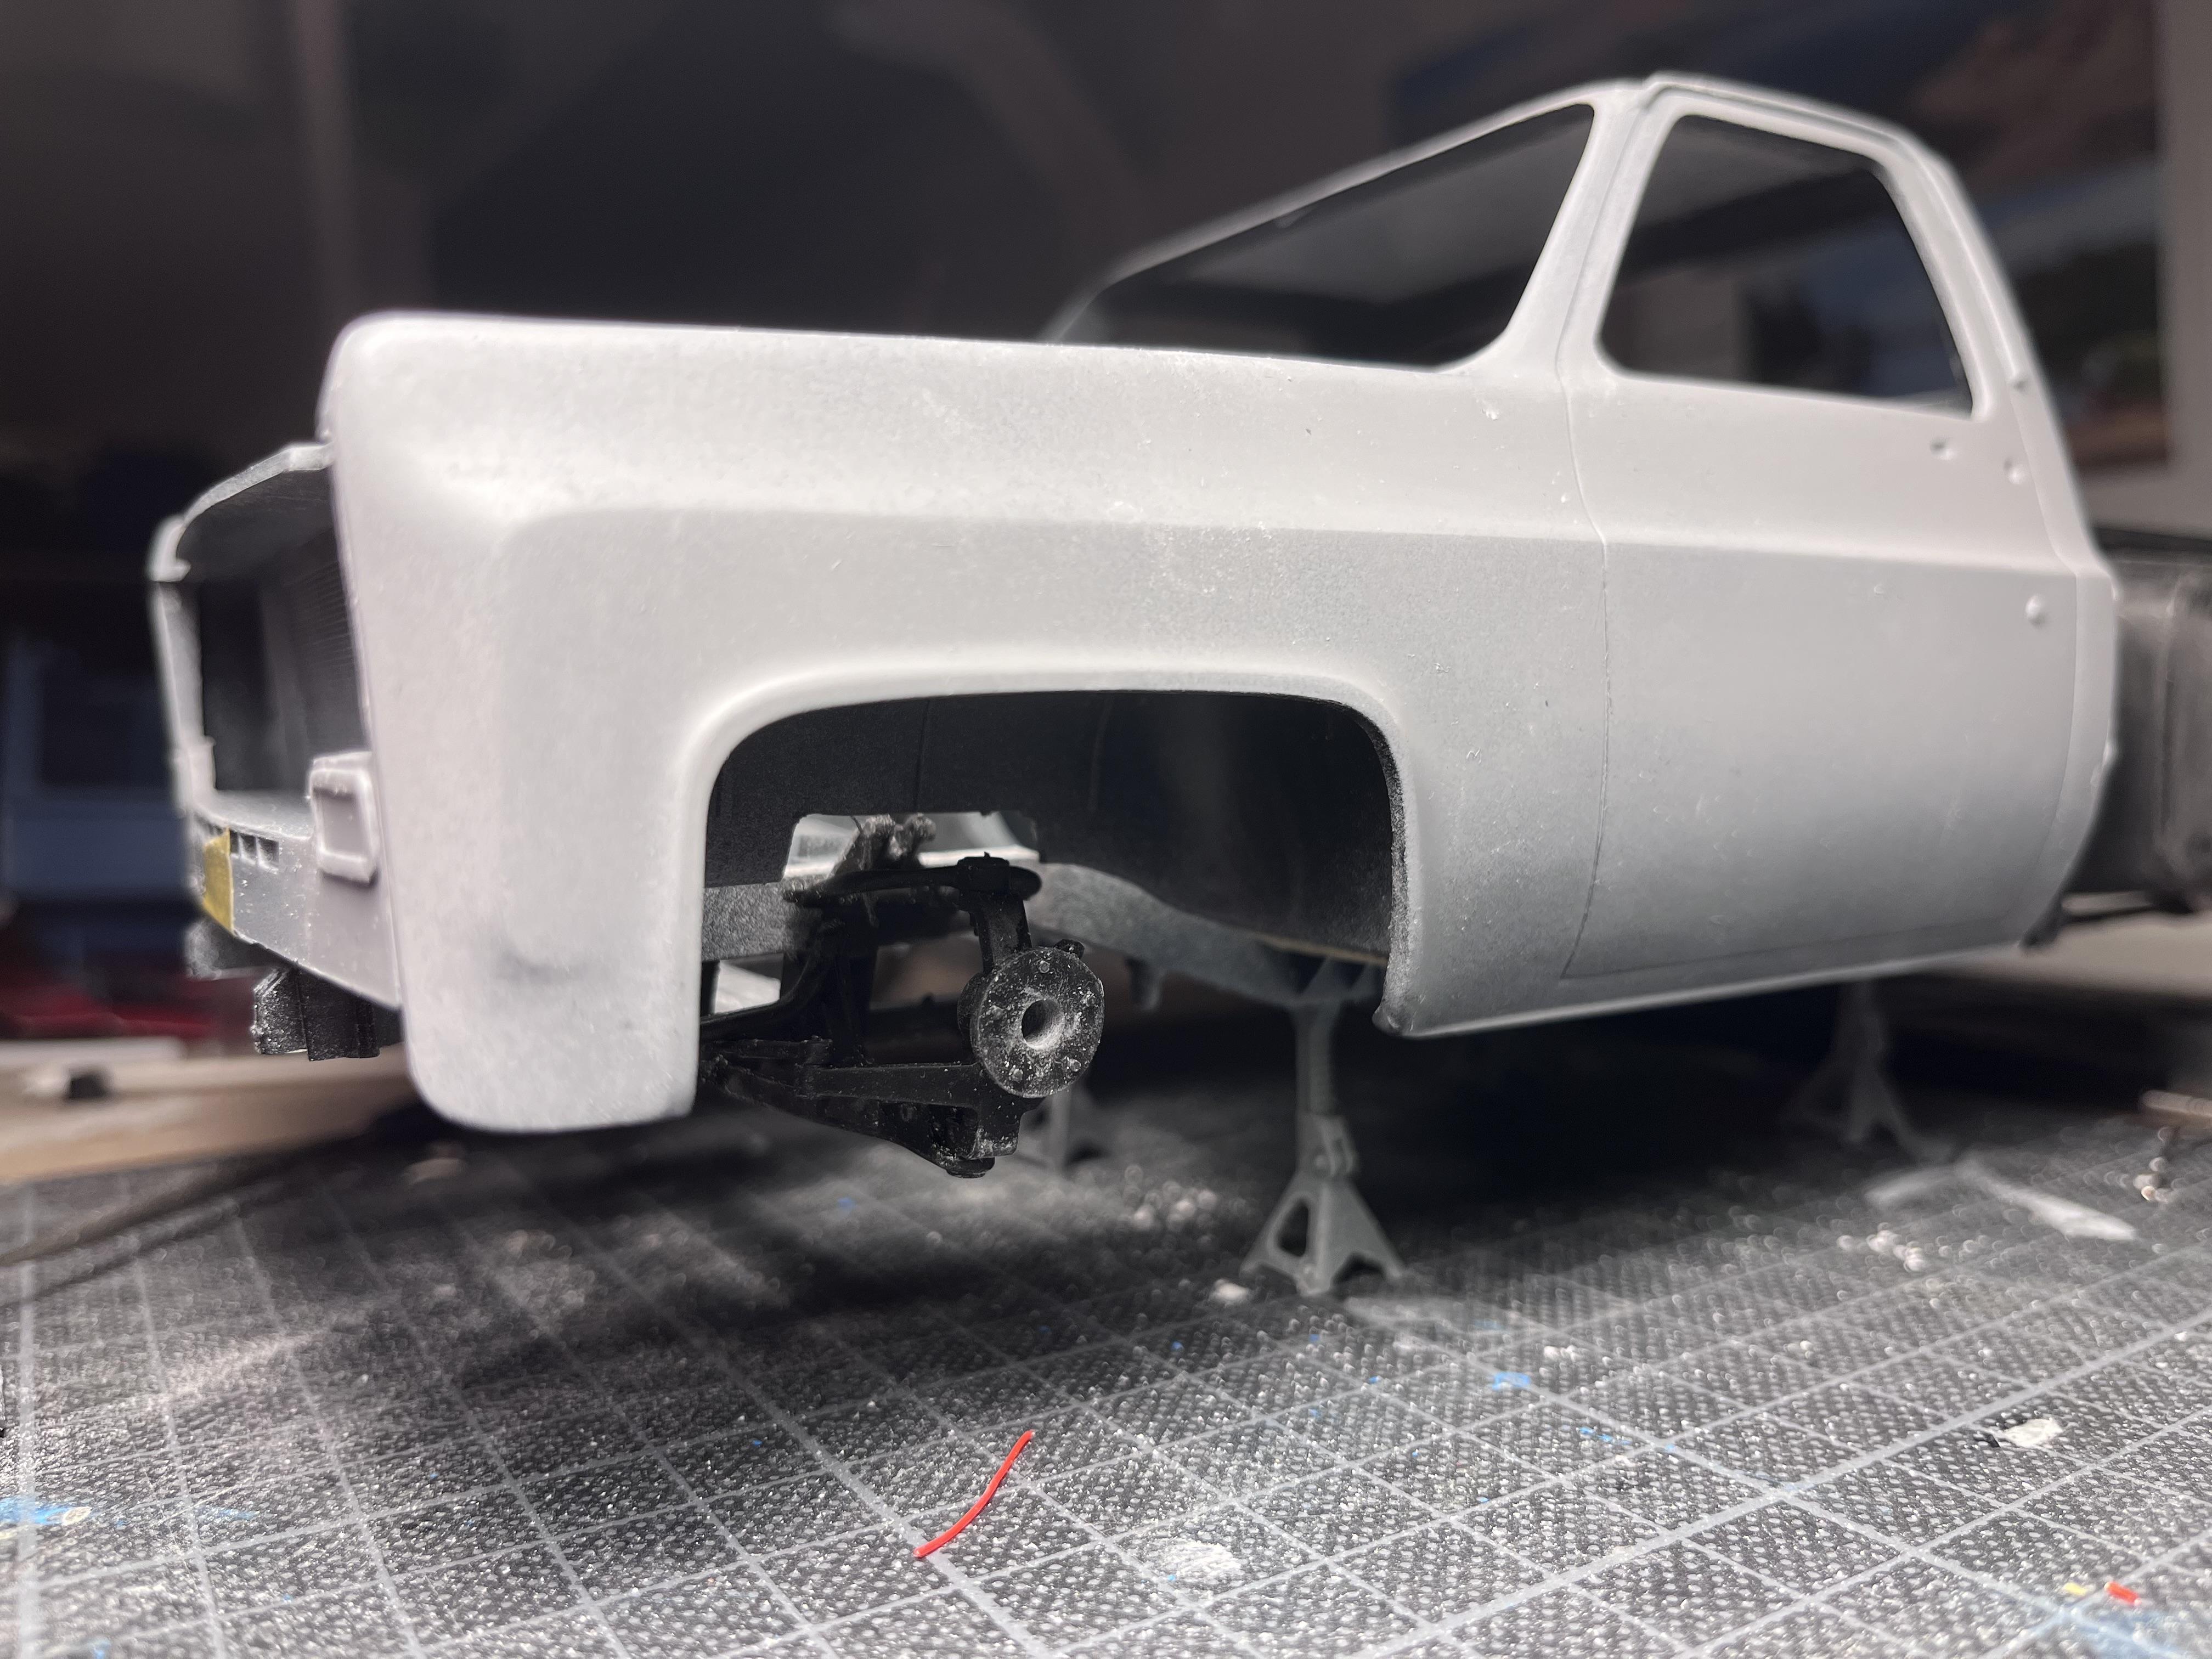
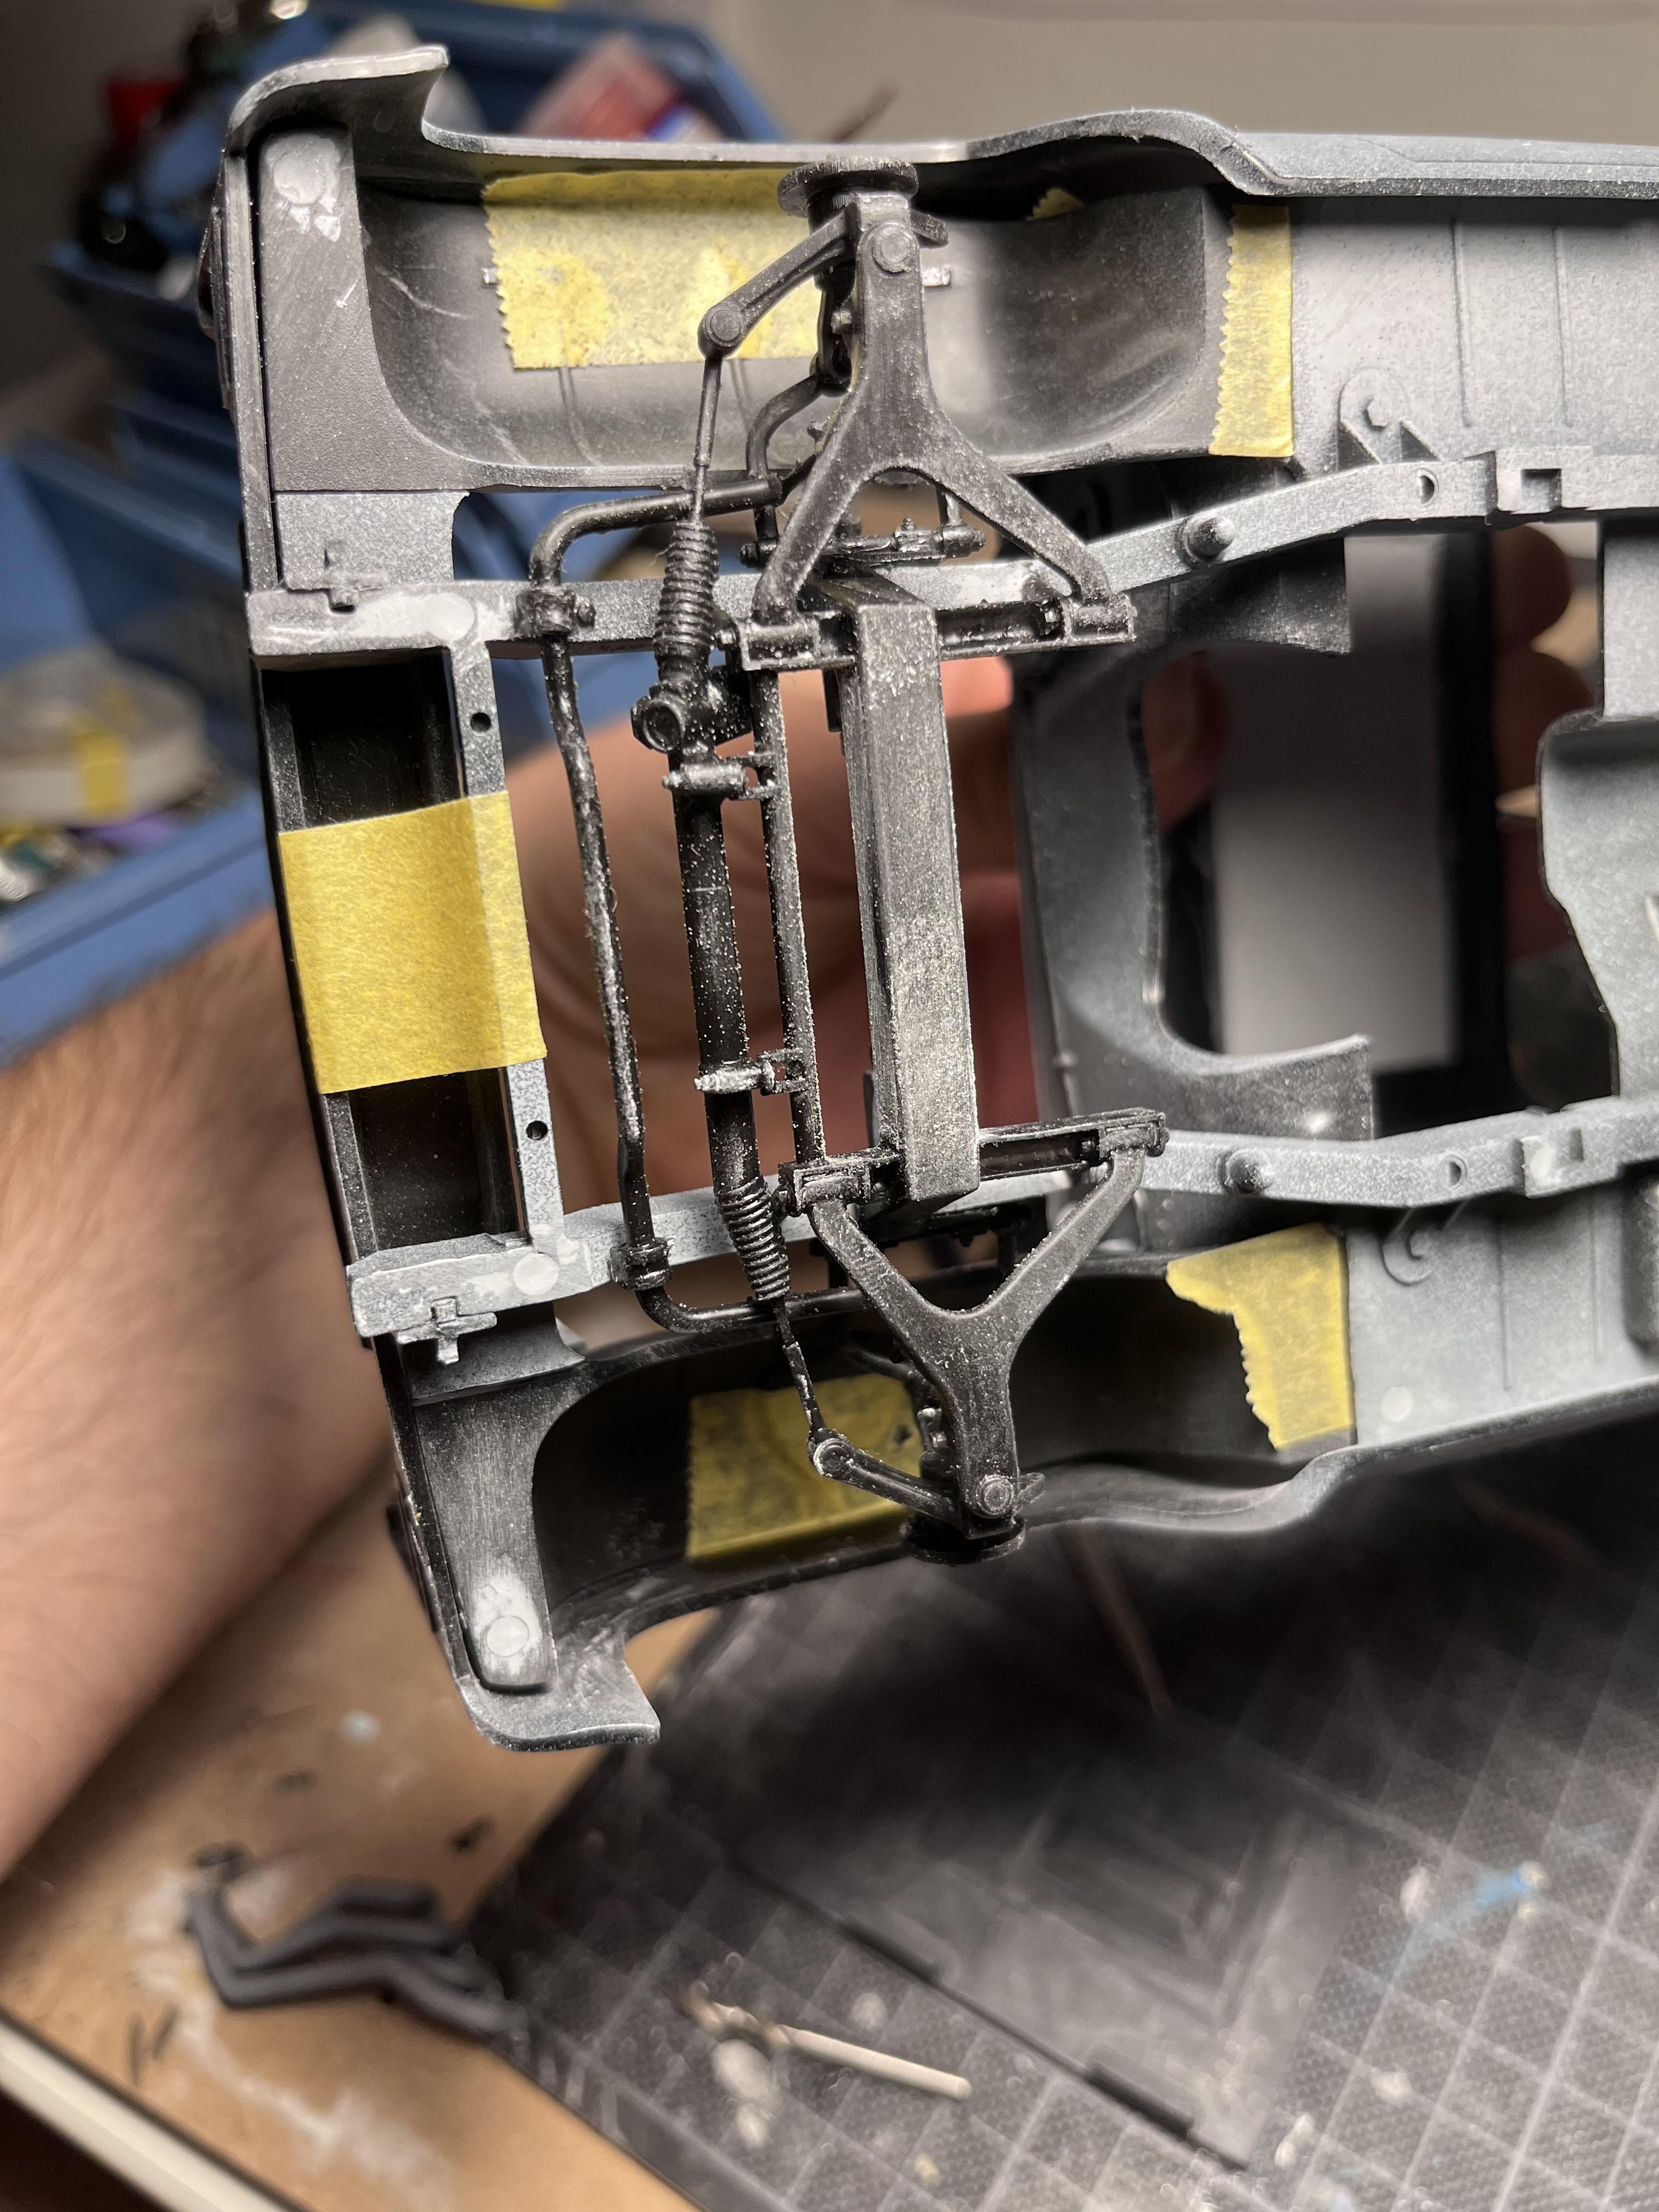
 Made some progress now when the Porsche is done. roof is sanded and primed to look for imperfections. Front suspension is in. Next is to drill and tap them so I can have them turning.