ScaleDale Posted July 18, 2013 Author Share Posted July 18, 2013 Hi, again. With the comments regarding Future Attractions PE and fasteners from Scale Hardware and R&B Motion, I thought I’d step out of my timeline to where I am today to show you the rear suspension that is built using components from these folks. The 4 link came with brackets, rods and rod ends but no instructions or photos of the assembled part. I eventually went to SummitRacing.com and downloaded installation instructions for a 4 link and got it together correctly. I opted for better rod ends from RB Motion and connected everything with 0.85mm threaded hex nuts and bolts. All of the holes had to be opened up a bit with micro drills and a pin vise. The rear end is the 9 inch Ford from FA and includes spacers and nice disk brakes and calipers that aren’t in the picture. It comes with a steel tube axel, but I dropped it with heavy molded rubber slicks tacked on and bent it. I was able to push it out and replaced it with some 1.6mm wire core rod from Plastruct. It’s strong and has some flex. The coil over shocks were a real pain to work with even though they came with a nice clear diagram for assembly. The tolerances were so tight that a coat of paint rendered them unusable and I had to drill the resin core out in able to slip the tube through it. I eventually broke it and built my own from RB Motion tube, styrene tube and rod ends. the only remaining FA artifact is the spring itself and a small resin insert that managed to survive somehow. Having rod ends on both ends gives me more mounting options. The wheelie bars required a lot of fabrication, and Scott makes that clear on his web page. The wheels, housings and back axel are in the kit. I used tubing and rod ends to construct the rest after another trip to Summit. Good thing they don’t charge for downloads! It’s not exactly square. Using a Dremel and CA just isn’t exacting science. I was going to “X” the top bars to square it out, but was so relieved to finish this that I’m not going to. It is a model. Back to the past tomorrow. Dale Quote Link to comment Share on other sites More sharing options...
ScaleDale Posted July 19, 2013 Author Share Posted July 19, 2013 (From July 11) Hi, again. I have the chassis finished and the interior as detailed as I get on these things. Fitting the seat under the secondary roll cage was a bit of a hassle with the tight clearances I allowed but I managed OK. The seat is out of the Double Dragster kit in my parts box. The dash is from a road race Camaro I got free and has way too many instruments for drag racing. I scratch built the shift light and dash cowl. The transmission with the engine kit is a Lenco and these cars run gear boxes from Liberty Gears so I scratched up a Liberty style shifter and tunnel to go over the Lenco control rods. The motor is finished except for the radiator and headers and is glued in at this point. It’s out of the Jukebox Ford Pro Sportsman kit and the valve covers are generic “modern pro stock” from Competition Resins. I drilled out the spark plug holes to match the pattern I found in my research of the motor used in the current Ford Pro Stock cars. The distributor is scratch built and uses telephone wire. It took me three tries to get one that didn’t look either too big or small. I have the first round of several minor eye surgeries to clear up cataracts due in around two weeks from today (today being July 11), so I need to work on anything requiring depth perception before that. I’m not sure how long I’ll have one eye (then the other) patched. Thanks for your time. More to come. Dale Quote Link to comment Share on other sites More sharing options...
ScaleDale Posted July 20, 2013 Author Share Posted July 20, 2013 This is finally it for the chassis. After tonight the wheels and tires will be epoxied in place and it will be waiting for the finished body work and that will be that. In the process of mounting the 4 link, I lost one of the springs and had to scratch build my own from wire. Now there isn’t anything left at all of the coil overs from Future Attractions except a good idea of how to do this. Some things just work out like that. When I did a test fit of the tires on the suspension and body the fit was way too tight. The "Modern Pro Stock/Super Stock" tires from Competition Resins scaled out to 18 inches wide and around 34 inches in diameter which seemed a bit on the big side. I took a tour through YellowBullet.com forums, usual source of drag race BS and found a post from a Goodyear employee that stated the NHRA Pro Stockers run 16 inch tread slicks. I put them on my drill and turned them down with course sandpaper and they fit OK now. When the suspension was mounted and set, the wheelie bars touched the ground so I had to pop the axle and cut the upper bars to shorten them. I added sleeves of styrene tube painted red to join the cut sections and decided to just leave them separate rather than try to replace the axle with everything in place. What I wound up with was a set of working independently adjustable wheelie bars mounted to a stainless steel adjustable 4 link suspension. In 1:25 scale. Impressive! And now I will return to the body shop. I'm still not firmed up on a paint scheme, though. With the amount of body work I've done I seem to be leaning towards something dark to cover all the hacks, but then again a lighter color will let me goof with decals more. The paint on the Larry Morgan car is beyond my skill level but I think I could do the red on the Cunningham car. Or just go my own way. I'll figure it out. Thanks for your time. Dale Quote Link to comment Share on other sites More sharing options...
DrKerry Posted July 21, 2013 Share Posted July 21, 2013 Way kool!!!! Quote Link to comment Share on other sites More sharing options...
ScaleDale Posted July 21, 2013 Author Share Posted July 21, 2013 Way kool!!!!Thanks. I have a safety box that I keep finished sub assemblies like this in while I work on other components and I found the rear tire sheet metal in the box when I went to stash this. Forgot about it... Seems like I'm never done.Dale Quote Link to comment Share on other sites More sharing options...
W-409 Posted July 21, 2013 Share Posted July 21, 2013 I've been watching your progress since you started this one. A lot of work already done on this one, and it really shows. The body and chassis are both very nice pieces of art! Great work. Quote Link to comment Share on other sites More sharing options...
ewaskew Posted July 22, 2013 Share Posted July 22, 2013 I like to scratch build a lot myself and I know whats involved in something like this. You have done a very nice job with everything you have done so far on this one,it should be a very cool well built model when its finished. Quote Link to comment Share on other sites More sharing options...
ScaleDale Posted July 22, 2013 Author Share Posted July 22, 2013 (edited) Thanks to all for the kind words of encouragement. They are very much appreciated. I jumped over here from another forum that just didn't get drag racing and I'm glad I did. This is my last out-of-date post for this project and will bring everything up to where I am with the body. (July 14) I separated the front end from the rest of the body by marking a line just ahead of the leading edge of the door and scoring it with the back side of a fresh razor knife. After the cut I added a thin strip of sheet styrene to each edge to replace the lost material and maybe add a bit since the front wheels came in a bit on the short side. I didn’t like the ragged look so I added a shroud of thin styrene to overlap the cut and filled it with thinned putty. To make the connecting joints, I went with a bayonet mount thing with tabs to center the front and a tube and rod setup for joining them. The rods are wire covered with a plastic material from Plastruct and are both strong at a small dimension and flexible. all in all it works pretty well. I have several coats of putty and repeated trips to sanding land done and the car is in primer and ready for the first coats of paint. I’m going with a red and white paint scheme of some sort. Not real firm yet. the white is ready to be sprayed so I’ll do the whole car in it and make my decision from there. See you all soon. Dale Edited July 22, 2013 by ScaleDale Quote Link to comment Share on other sites More sharing options...
brett Posted July 22, 2013 Share Posted July 22, 2013 looking good, cant wait to see what paintjob you come up with Quote Link to comment Share on other sites More sharing options...
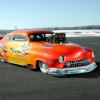
ScaleDale Posted July 22, 2013 Author Share Posted July 22, 2013 Maybe this with Racing White and Mica Red. Dale Quote Link to comment Share on other sites More sharing options...
GoatGuy Posted July 24, 2013 Share Posted July 24, 2013 You're going about this as a true craftsman. Looking forward to more. Quote Link to comment Share on other sites More sharing options...
ScaleDale Posted July 25, 2013 Author Share Posted July 25, 2013 You're going about this as a true craftsman. Looking forward to more. Thanks for the compliment. I do the best I can. I got through my eye surgery thing yesterday OK and should be back at the bench in a day or two.I did a final fit of the front end and scoop Monday and the plug wires on the engine were just a bit too big and prevented the hood from setting like I want so I had to pop the distributor and make a new one with thinner wire. Should be able to get it in today or tomorrow depending on my depth of field vision. My left eye es a bit screwed right now.Dale Quote Link to comment Share on other sites More sharing options...
Bill Edman Posted July 26, 2013 Share Posted July 26, 2013 nice dale Quote Link to comment Share on other sites More sharing options...
ScaleDale Posted July 27, 2013 Author Share Posted July 27, 2013 Things are going well in the paint shop. I have three coats of Racing White on it. It seems a bit dull, so I added two coats of Pure White and will overcoat that with Pearl White. The paint will be two-tone so it will have masking tape on it for a few days while I overspray the white with red. My usual way of doing this is to put a good coat of finishing wax on the body before the tape to keep it from sticking. I replaced my pesky distributer with one with smaller wires that will let the carb hat sit low enough for the front end to fit OK. I also glued the front and read wheels and tires in place, so all it's waiting for is the body. Pics when I have 'em. Dale Quote Link to comment Share on other sites More sharing options...
PappyD340 Posted July 27, 2013 Share Posted July 27, 2013 Very NICE Dale, I think it's gonna be sweet!! Quote Link to comment Share on other sites More sharing options...
ScaleDale Posted August 1, 2013 Author Share Posted August 1, 2013 Hi, folks. I survived the paint shop! The colors are Mica Red and Pure White laid over Racing White which had too much of an egg shell tone for my taste. The green tape is a "high performance" auto masking tape from 3M that I got from the auto store and the yellow is Yellow Frog Tape, the delicate surface stuff. A little of the red bled through the tape onto the white but it was easy enough to burnish off. The rewired distributor lets the body and hood scoop set where I want them and the overall look is pretty good. The wheelbase is a bit off, but I had expected that from some of the issues I ran into placing the axles in the frame. Now to work on decals and finish this thing up. Thanks for your time. Dale Quote Link to comment Share on other sites More sharing options...
ScaleDale Posted August 10, 2013 Author Share Posted August 10, 2013 (edited) Finished the paint and decals. Most of them are from the Net with a few from the Slixx Pro Mod grill set and Drag Goodies sheets. The engine has been rewired so that the scoop and body agree with each other better now. It has been clear coated with a semi gloss from Tamiya and waxed to seal in the decals and protect the paint. Now I need to bear down and do the details like the parachutes and their mounts and install the windows. Finally looks like a Race Car. Thanks for your time. Dale Edited August 10, 2013 by ScaleDale Quote Link to comment Share on other sites More sharing options...
Truck parts Posted August 11, 2013 Share Posted August 11, 2013 That's one great looking model.Someday I will have to try to build something like that. Quote Link to comment Share on other sites More sharing options...
ScaleDale Posted August 11, 2013 Author Share Posted August 11, 2013 ^^^ Thanks for the kind words. I've been at this one for two months and I'm finally getting to the end of the tunnel. Dale Quote Link to comment Share on other sites More sharing options...
Johnny1973 Posted August 12, 2013 Share Posted August 12, 2013 Looking good,Great craftsmanship looking forward to seeing this finish. Quote Link to comment Share on other sites More sharing options...
ScaleDale Posted August 12, 2013 Author Share Posted August 12, 2013 Looking good,Great craftsmanship looking forward to seeing this finish. Thanks. I got the parachutes mounted today with PE washers for rings and little orange safety flags. I messed with 1.2mm rod half the day trying to build a cage of some sort to mount them on and gave up. I epoxied them to the tail. Works for me. Sometimes simple beats fancy hands down. Dale Quote Link to comment Share on other sites More sharing options...
DrKerry Posted August 12, 2013 Share Posted August 12, 2013 Looks awesome Dale!!!!!! Quote Link to comment Share on other sites More sharing options...
Mike Kucaba Posted August 12, 2013 Share Posted August 12, 2013 Your perseverance is to be commended!! From where you started to where you are now is a tremendous accomplishment. This is shaping into a fabulous build-up and somewhat of a tutorial. Thumbs up!! Quote Link to comment Share on other sites More sharing options...
ScaleDale Posted August 12, 2013 Author Share Posted August 12, 2013 Looks awesome Dale!!!!!! Your perseverance is to be commended!! From where you started to where you are now is a tremendous accomplishment. This is shaping into a fabulous build-up and somewhat of a tutorial. Thumbs up!! Thank you both for the comments. This build has been quite a learning experience. I'm working on the windshields now. Screwed up the front one with some liquid cement but had a spare in my parts box. I think I can finish it this week, but I've learned not to push things. I have a broken security light to replace and there is a Lucas Oil Regional and Divisional race at the local track Thursday through Sunday, so I might go soak up the 1:1s. Dale Quote Link to comment Share on other sites More sharing options...
DrKerry Posted August 13, 2013 Share Posted August 13, 2013 There ya go, go clear your head a bit at the track!!!! Quote Link to comment Share on other sites More sharing options...
Recommended Posts
Join the conversation
You can post now and register later. If you have an account, sign in now to post with your account.
Note: Your post will require moderator approval before it will be visible.