John Goschke Posted March 13, 2013 Share Posted March 13, 2013 (edited) One of the things that bugs me about many old annual kits is the out-of-scale and, more often than not, inaccurate shape of the vent windows. It might seem like nit-picking but fixing these issues goes a long way to enhancing the appearance of a model and making a funky old kit look better than it really is. In the case of a kit where the shape of the opening is right (AMT "old tool '57 Chevy, for example), all that needs to be done is to cut a new window glass out of some clear packaging material, acetate, or styrene that’s has a more correct scale thickness, outline it with a BMF “frame” after removing the ridge the kit maker used to represent the frame for the vent window glass and gluing some sheet styrene inside the opening for the new window fit against. The new window is installed from the outside. In some cases, such as AMT's '59 and '60 T-birds, the shape of the existing frame and opening may need to be corrected with some careful knife and file work. Sometimes it's easier to cut the frame out to reshape it, then reinstall. In some cases the frame is best replaced entirely. All of AMT’s 3-in-1 annual Ford Galaxie hardtop and convertible kits from ’60 through ’62 (and Mercury, ’61 and ’62) suffer from an inaccurate vent window shape that’s too triangular, too “pointy” at the top, and too thick overall. On the real car, the vent window frame and glass have a small flat section at the top and the rear vent frame and window channel, rather than being vertical, is angled back a bit at the top. Additionally, none of the hardtop kits have any representation of weatherstripping or window channel for the rear quarter window. On my rebuild of this original ’61 Starliner I decided to make new scratch vent window frames and add some strip styrene to represent weatherstripping and the channel for the rear quarter glass. Using available photo reference and a pattern taken from the model after the old vent window was carefully cut out, a new frame was cut out of some sheet styrene and carved, filled and sanded to shape. The ridge inside the frame was made by cementing thin sheet styrene to the back of the frame and cutting out the opening, leaving the thin ridge for the glass to sit on. The rear vent window channel is a separate piece. Some refinement is needed, but here’s the driver’s side thus far. I'll try to add more pics of the process when I work on the passenger's side and finish up the driver's side. Edited January 7, 2019 by John Goschke Quote Link to comment Share on other sites More sharing options...
MrObsessive Posted March 13, 2013 Share Posted March 13, 2013 Thanks for posting this John! That's something that's bugged me too for some time. Not to mention..........the vent window "glass" is always a bit too deep inside the frame. The glass should fit nearly flush for a really nice appearance as you're showing with the added plastic ridge. Your "weatherstrip" detail reminds me that I have to do the same thing on my '59 Chevy Impala WIP when I get back to it. That's sorely missing on both the '59 and '60 kits, and it was something I've always noticed on the 1:1's. Quote Link to comment Share on other sites More sharing options...
Ron Hamilton Posted March 13, 2013 Share Posted March 13, 2013 That's gonna be nice!!!!! Quote Link to comment Share on other sites More sharing options...
deja-view Posted March 14, 2013 Share Posted March 14, 2013 Looks good John. If you could scribe the front door gap at the front fender panel for a little more separation it would give more realism. About 3/8" +- was pretty standard back then. Quote Link to comment Share on other sites More sharing options...
John Goschke Posted March 14, 2013 Author Share Posted March 14, 2013 (edited) Thanks, guys! Yeah, Bill, I don't think there are that many hardtop kits out there that don't need some kind of weatherstripping detail added! Good luck with the Impala. Roger, your point about that rear door line was a good (and scary) one, so since Google is my friend, I did an image search to check it. Here's a pretty good side view showing that apparently it does have that slight angle! Seems amazing somehow that AMT picked up that subtle detail! Would not have wanted to rescribe that one. However, since I've already decided not to correct the interior to a true hardtop configuration, I'd have probably just left it. Does look like I need to thin down my vent window frame a bit (Like I said, needs refinement.) Ken, thanks, I'll check that gap. I did do a fair bit of blocking and rescribing there, particularly at the top where it meets the A pillar. Looks goofy with the skirts!... Edited March 14, 2013 by John Goschke Quote Link to comment Share on other sites More sharing options...
Elliot949 Posted March 14, 2013 Share Posted March 14, 2013 I love the 60/61 starliners... Quote Link to comment Share on other sites More sharing options...
Draggon Posted March 14, 2013 Share Posted March 14, 2013 John, your obsession is why your models are always outstanding. Quote Link to comment Share on other sites More sharing options...
Joker Posted March 14, 2013 Share Posted March 14, 2013 John, your obsession is why your models are always outstanding. Church ! Quote Link to comment Share on other sites More sharing options...
MrObsessive Posted March 14, 2013 Share Posted March 14, 2013 Looks goofy with the skirts!... I think it looks great! Might look a little better though if there wasn't that anodizing on the quarter panels. BTW, this is one of my favorite years of Galaxies! It was the last of the fins for the big Fords------and it's a '61 (like me) so it can't be all bad! Quote Link to comment Share on other sites More sharing options...
Sixx Posted March 14, 2013 Share Posted March 14, 2013 Well John, not only does your work look awesome so far...but so does your photos!!!! So clear and in focus!!!! Quote Link to comment Share on other sites More sharing options...
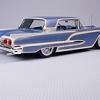
John Goschke Posted September 21, 2018 Author Share Posted September 21, 2018 This project is a rebuild of a model I built in 1976! Some things will remain from the original build, including the 401 horse, 390 cid FE motor swapped in from the AMT '34 Ford Pickup kit that I added wiring to "back in the day" using stiff floral arrangement wire. I repainted the seats and side panels in the correct stock pattern for this build but the rest of the interior, including the dash, is from '76. The big change for the rebuild is that I'm correcting the shape of the vent windows and adding weather stripping to side window openings. I've also changed the wheels to my new period-perfect favorites – Revell '57 Ford wheels, plated by Little Motor Kar Co. This shot of an AMT '61 Ford Sunliner shows the incorrect vent window that was also present on my Starliner... Quote Link to comment Share on other sites More sharing options...
StevenGuthmiller Posted September 21, 2018 Share Posted September 21, 2018 What else are you doing under the hood John? Hopefully getting rid of those screw posts? Also, you might want to address the tail lights. I think using a set of the custom bezels from the '63 Galaxie kit was a fairly convincing fix. Steve Quote Link to comment Share on other sites More sharing options...
afx Posted September 21, 2018 Share Posted September 21, 2018 Looks like another great project John - I'll be following. Quote Link to comment Share on other sites More sharing options...
DumpyDan Posted September 21, 2018 Share Posted September 21, 2018 Nice, will be watching John. Quote Link to comment Share on other sites More sharing options...
espo Posted September 21, 2018 Share Posted September 21, 2018 Your vent window / moldings look perfect. Amazing how much better this looks. Your wheels and tires are just what you would expect on this model. Quote Link to comment Share on other sites More sharing options...
John Goschke Posted September 23, 2018 Author Share Posted September 23, 2018 On 9/20/2018 at 10:44 PM, StevenGuthmiller said: What else are you doing under the hood John? Hopefully getting rid of those screw posts? Also, you might want to address the tail lights. I think using a set of the custom bezels from the '63 Galaxie kit was a fairly convincing fix. Steve I doubt I'll bother with the screw posts, Steve, but will give it some thought. Being a custom it'll be displayed with hood closed more often than not. I like those bezels, and I've got that kit so will dig it out of the stash and check them out to see how they might work with my custom lenses. Quote Link to comment Share on other sites More sharing options...
John Goschke Posted September 23, 2018 Author Share Posted September 23, 2018 On 9/21/2018 at 6:49 AM, afx said: Looks like another great project John - I'll be following. Thanks, JC! On 9/21/2018 at 8:53 AM, DumpyDan said: Nice, will be watching John. THanks, Dan! The goal is to finish by December! On 9/21/2018 at 10:23 AM, espo said: Your vent window / moldings look perfect. Amazing how much better this looks. Your wheels and tires are just what you would expect on this model. Thanks, David! I'm glad I took the time to re-do the vent windows. Of course if I want my models to be consistent I'll have to do the windows on the '61 ragtop and the '62s, which have the same problem! Quote Link to comment Share on other sites More sharing options...
StevenGuthmiller Posted September 23, 2018 Share Posted September 23, 2018 15 hours ago, John Goschke said: I doubt I'll bother with the screw posts, Steve, but will give it some thought. Being a custom it'll be displayed with hood closed more often than not. It's one of those details that I just can't seem to avoid anymore. It just gnaws at me if I don't do it. I remember seeing a really nice '63 Ford at a show recently that was exceptionally well done. But being displayed with the hood open, the first thing that jumped out at me were the screw posts. Since then, I do it on every old annual style kit that I build that has an engine. Steve Quote Link to comment Share on other sites More sharing options...
James2 Posted September 25, 2018 Share Posted September 25, 2018 Absolutely love it! Quote Link to comment Share on other sites More sharing options...
dino246gt Posted September 25, 2018 Share Posted September 25, 2018 I don't see any screw posts! That looks awesome! Quote Link to comment Share on other sites More sharing options...
MININORTHFORDMAN Posted September 25, 2018 Share Posted September 25, 2018 its gonna look good Quote Link to comment Share on other sites More sharing options...
John Goschke Posted January 4, 2019 Author Share Posted January 4, 2019 The Tamiya Black is down and masking is comppleted for the Gunmetal panel outlines... Quote Link to comment Share on other sites More sharing options...
John Goschke Posted January 7, 2019 Author Share Posted January 7, 2019 Here she is with color shot and the tape pulled..... \ Quote Link to comment Share on other sites More sharing options...
Ron Hamilton Posted January 7, 2019 Share Posted January 7, 2019 Wow! You're going to make me build mine. Mine will be stock of course. That Black/Gray with the Red/White interior looks great! Quote Link to comment Share on other sites More sharing options...
afx Posted January 7, 2019 Share Posted January 7, 2019 Another great custom John - very nice. Quote Link to comment Share on other sites More sharing options...
Recommended Posts
Join the conversation
You can post now and register later. If you have an account, sign in now to post with your account.
Note: Your post will require moderator approval before it will be visible.