alangarber Posted May 22, 2014 Share Posted May 22, 2014 That is looking sweet Quote Link to comment Share on other sites More sharing options...
Old Buckaroo Posted May 22, 2014 Share Posted May 22, 2014 That Pete looks so menacing. Quote Link to comment Share on other sites More sharing options...
redneckrodder Posted May 24, 2014 Share Posted May 24, 2014 That looks mean good work Quote Link to comment Share on other sites More sharing options...
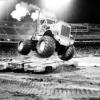
Superpeterbilt Posted December 14, 2014 Author Share Posted December 14, 2014 Ive been itching to build a competitor for the Peterbilt. Ive been building it in my head for months now and finally had to get to work. This truck will also have twin Allison engines, but this time they will be side-by-side. As a result I needed a wider hood, so I visualized a twin needle nose hood. It took several attempt to get something I was happy with. I chopped an AMT KW cab and used a Revell KW long hood. I used the Aussie KW chassis and stretched it out. As for the rest of the body, I didnt want to do the same thing as the Pete. I came up with a Corvette stingray style rear body. I cut up half of an AMT tanker and quickly got what I was looking for. For the rear fenders I used four Kw front fenders. I widened the frame up front similar to a Mack DM to let the engines sit down in the frame. Heres what I have so far, still a lot of work to do on both. Tell me what ya think. WARNING!! Lots of KW's were harmed during this project Quote Link to comment Share on other sites More sharing options...
Superpeterbilt Posted December 14, 2014 Author Share Posted December 14, 2014 Quote Link to comment Share on other sites More sharing options...
Petetrucker07 Posted December 14, 2014 Share Posted December 14, 2014 Now this is gonna be wild. Lookin good so far. Quote Link to comment Share on other sites More sharing options...
kilrathy10 Posted December 16, 2014 Share Posted December 16, 2014 Man, you're really going all out on these.....Good stuff.... Quote Link to comment Share on other sites More sharing options...
Old Buckaroo Posted December 16, 2014 Share Posted December 16, 2014 Wow, that hood has me seeing double ! Awesome idea and fabrication Terry. Projects like this always makes the hobby exciting. Quote Link to comment Share on other sites More sharing options...
Superpeterbilt Posted December 16, 2014 Author Share Posted December 16, 2014 Wow, that hood has me seeing double ! Awesome idea and fabrication Terry. Projects like this always makes the hobby exciting. Thank you Sean. Its very rewarding when it actually looks like what I see in my head. I promise its only going to get better! Stay tuned Quote Link to comment Share on other sites More sharing options...
Mopar - D Posted December 16, 2014 Share Posted December 16, 2014 Terry great set of builds you have going on here. Looking forward to seeing more! Quote Link to comment Share on other sites More sharing options...
Superpeterbilt Posted December 20, 2014 Author Share Posted December 20, 2014 Thanks a lot guys. I got a little further along on some bodywork. I used 2 halves of the transformers from the lowboy kit to make the rear fenders. I have to say, these things have come in handy. If you look a the front fenders on the Pete drag truck, they are also made from these. This is a big step with tying in the rear end with the stinger body. Lots of plastic fab to go Quote Link to comment Share on other sites More sharing options...
kilrathy10 Posted December 27, 2014 Share Posted December 27, 2014 (edited) Aww, Man....Those fenders look awesome.....I've got a boatload of those things laying around.....I've been saving them, but thanks to you, I now know what for....Now why didn't I think of that????? Another awesome tip form Terry, Boys..... Edited December 27, 2014 by kilrathy10 Quote Link to comment Share on other sites More sharing options...
Superpeterbilt Posted December 27, 2014 Author Share Posted December 27, 2014 Aww, Man....Those fenders look awesome.....I've got a boatload of those things laying around.....I've been saving them, but thanks to you, I now know what for....Now why didn't I think of that????? Another awesome tip form Terry, Boys..... Thanks JT. Ive always been into scratch building stuff for my models, but before I discovered Evergreen & Plastruct, I had to rob what I needed from other kits. So I was always looking at the shapes of things. Then the discovery of evergreen just seemed like.......finding a boat after swimming and swimming and swimming Quote Link to comment Share on other sites More sharing options...
kilrathy10 Posted December 27, 2014 Share Posted December 27, 2014 Yeah....I'm with you there.....I JUST ordered some square rod for a car hauler I'm about to get onto.....I didn't know I could get the stuff from plastic-models.....That free shipping they're having is awesome.....I'm loading up on all kinds of stuff....And I felt the same way when I discovered this place downtown that sells 4' x 8' .060 plastic sheets for just over $20 each......I about went CRAZY......I've been a scratch building fool, ever since.....Couldn't believe I could get that much plastic for that..... Quote Link to comment Share on other sites More sharing options...
truckabilly Posted December 27, 2014 Share Posted December 27, 2014 I am not so much into customs but this is something special. Both rigs are awesome and this double nose KW is the wildest thing Ive seen. Brilliant ideas and top class execution. Wonderful!!! Quote Link to comment Share on other sites More sharing options...
disabled modeler Posted December 27, 2014 Share Posted December 27, 2014 VERY COOL...! Those are just too wild Terry...! Quote Link to comment Share on other sites More sharing options...
olsbooks Posted December 27, 2014 Share Posted December 27, 2014 Just caught this one. WOW! Delusions of grandeur usually remain just that.. What is so great is you are indeed making it happen! Very, very clever, creative, and well done! Kudos, applause, whistles, holding up bic lighters and waiving them, throwing roses at the stage, and assorted other types of fanfare. Quote Link to comment Share on other sites More sharing options...
Superpeterbilt Posted December 27, 2014 Author Share Posted December 27, 2014 Thanks guys Im glad you like them. Quote Link to comment Share on other sites More sharing options...
Tesla Posted December 27, 2014 Share Posted December 27, 2014 The KW is unbelievable!!! Your ideas for this are great! Quote Link to comment Share on other sites More sharing options...
Superpeterbilt Posted January 1, 2015 Author Share Posted January 1, 2015 Happy new year!! Quote Link to comment Share on other sites More sharing options...
MeatMan Posted January 1, 2015 Share Posted January 1, 2015 Absolutely radical!! Quote Link to comment Share on other sites More sharing options...
Superpeterbilt Posted January 9, 2015 Author Share Posted January 9, 2015 Not a huge update, but a big piece of the body nonetheless. I still needed engine clearance after widening the hood. I made two large cutouts on the side of the hood that mimic the shape of the air cleaner cutouts, but very exaggerated. This gave me the clearance I needed, and added a new design feature to the body. The body is getting close to being complete.I also decided on some wheels. I have the Paystar 5 holes out back, and my resin 5 holes up front. Quote Link to comment Share on other sites More sharing options...
Old Buckaroo Posted January 9, 2015 Share Posted January 9, 2015 Man that looks cool. Hey Terry, I am pretty sure I have the wheels from the " Turnpiker Pete" if your wanting more of a "racey look" Quote Link to comment Share on other sites More sharing options...
Dirt Demon Posted January 11, 2015 Share Posted January 11, 2015 quite the imagination on these!....Great work so far! Quote Link to comment Share on other sites More sharing options...
Superpeterbilt Posted July 12, 2015 Author Share Posted July 12, 2015 The KW build stalled out due to builders block, but I had a breakthrough with the wheels. I didn't want to use stock truck wheels for this, so after some digging I found some 1/16 car tires and rims that I liked. The tires are from the MPC 1/16 Cobra, and the rims are resin off ebay. The tires are the proper diameter of a 1/25 truck, and the width is about the same as the doubles. I'm using a set of 5 hole Alcoas on the front, but the holes will be turned into slots to match the rears. The resin wheel will have the lugs and hubs removed and replaced with truck hubs. I also started getting some more of the body built, and started build the Daytona style wing. Quote Link to comment Share on other sites More sharing options...
Recommended Posts
Join the conversation
You can post now and register later. If you have an account, sign in now to post with your account.
Note: Your post will require moderator approval before it will be visible.