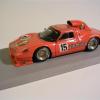
surfjunke Posted December 14, 2013 Share Posted December 14, 2013 (edited) This project started out as a 1/18 Paul's Model Art/Minichamps die cast. The die cast was for the Le Mans winning Rothsmans car. The Rothsmans markings were all covered up with "Racing" decals. I was asked if I could convert this European spec long tail, twin turbo car to a short tail, single turbo IMSA spec car. This was to be built as a curb side. I was happy I did not have to do all the engine bay mods. The first order was to disassemble the car. The whole in the rear deck is for another long tail IMSA Lowenbrau 962 I am working on. Next up was making a template from oak tag & marking the cut lines on the rear deck. The surgery was done with a fiberglass cut off wheel on my Black & Decker Wizard. I did later remove the wing end plates for the short tail version. There was a Naca duct in the middle of the rear deck that was also carefully removed. The whole was filled with 40 thou Evergreen plastic. It will be saved for later use. I new rear deck was cut fro 30 thou plastic. The engine inlet scoop was drawn up & laid out on more oak tag & then transferred to some 30 thou plastic. A hole was cut into the top piece for that Naca duct that was removed earlier. The 3 plastic pieces were first glue together with Solva Set liquid plastic cement. When dry I made a nice smooth clean fillet on the inside joints with baking soda. This then has thin CA glue applied. BE WARNED, the chemical reaction between these is EXTREMELY BAD! I wear a respirator when doing this. Then I can file, sand & shape the nice round corners needed for the outside shape. I have heard that baby power is not near as toxic & I will give it a try. The underside of the rear deck needed to be built. Again, Evergreen plastic sheet & shapes were used. Here is the rear deck ready for primer. The new rear wing end plates were drawn out, transferred to oak tag & then to 30 thou plastic. The main body only needed to have the turbo inlet holes filled on both sides. The last mod to do was the chassis pan. The chassis on the left is the modified piece. The right is the stock die cast piece. Next was the primer, putty & sand phase. Paint was Tamiya acrylic white. Followed by the decals from Pattos Place & the Dupont 2 part clear. The wheels used were resin pieces I bought online from Legende Miniature from France, beautiful castings. Sorry I did not take more pics, but the car is now finished. You can see the finished car in the Under glass section. Edited December 15, 2013 by surfjunke Quote Link to comment Share on other sites More sharing options...
Mike Kucaba Posted December 15, 2013 Share Posted December 15, 2013 Very nice and cutting diecast is quite the challenge. I saw the Under Glass too and the build finished very sharp! But...what is Oak Tag? Quote Link to comment Share on other sites More sharing options...
surfjunke Posted December 15, 2013 Author Share Posted December 15, 2013 (edited) Thank you for the comment, Mike. Oak tag is a heavier, stiffer type of paper. It is mostly used as file folders to put inside of the hanging folders in file cabinets. They can be bought at Staples or any other office supply store. Here is a pic to help. As can be seen, this one has been cut up & used. Sorry that I do not have a complete folder. The last few folders I have are all cut up & this was the biggest piece I currently have. This has been my favorite material for years for making templates. Hope this helps, Mike. Edited December 15, 2013 by surfjunke Quote Link to comment Share on other sites More sharing options...
Mike Kucaba Posted December 15, 2013 Share Posted December 15, 2013 Excellent idea. I remember Ed Roth building a car body in Car Modeler (the old one ) many years ago. Quote Link to comment Share on other sites More sharing options...
Recommended Posts
Join the conversation
You can post now and register later. If you have an account, sign in now to post with your account.
Note: Your post will require moderator approval before it will be visible.