
Clutch
-
Posts
42 -
Joined
-
Last visited
Recent Profile Visitors
3,262 profile views

Clutch's Achievements
MCM Regular (3/6)
-
Oh yeah, that's cool as! Very neat project.
-
I remember building this kit, pretty sure I built a nice lookin' glue bomb out of it! Yours looks awesome, nice work!
-
That's cool, very original.
-
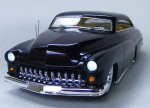
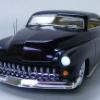
Now that I know the interior, undercarrige and engine fit, I've started on the paint job. After something different, a month ago or so I was looking through some of the builds here on mcm for insperation and I found I paint job that I really liked. I can't remember the builders name but I'm pretty sure it was a '53 Chevy. He marbled the roof and dashboard using smoke, from burning sprue in a candle. Then he used clear orange overtop. I thought it looked amazing and wasn't that hard to do. So I gave it a go. But instead of going for a bright clear colour which makes the effect really stand out, I tried to blend it all together using different shades of grey, more of a suttle look. Base colour is light gun metal with a silver fade, along the bottom of each sides, nose and rear. Didn't really like the nose fade so I taped off the body and hit the roof and fenderds with silver. With the base colour down and body taped, I burnt some sprue in a candle and held the body in the black smoke. The soot from the smoke lightly sticks to the body and leaves a marble effect. I only wanted this on the roof and front fenders. A light clear coat to seal it in. At this stage, if I was to have sprayed clear red or blue overtop the marble, it would've really popped. But I'm after more of a dark horse and I went with Tamiya clear smoke overtop the whole body, blending it all together. Once it dries, I'll give it a layer of clear pearl for some dazzle and then a few good clear coats. I want this thing to look like liquid. Thanks for looking, all comments welcome!
-
Thanks! You're right Lunajammer, the one piece floor makes it hard to customize the body. It's because the rear fenders don't line up. The only way I could see around that was to cut the floor out and glue the fenders to the body before painting. Progress; I've made a 3 link suspension to replace the rear leaf springs.
-
That's a super nice colour for a Tbird. Clear and polish will make it pop even more.
-
Hey Tim! That's how the Boner Shaker should look.
-
That's a mean lookin bike. Not really into the CF thing but it works so well on this beast. Looks like a weapon not to be messed with! Awesome detailing too!
-
Nice work with the interior, also interested in where the speakers came from.
-
69 Daytona Pro Mod 1/16th scale updated 4/3/12 ..It's a wrap!
Clutch replied to Romell R's topic in WIP: Drag Racing Models
Threaded coilovers, now I've seen everything! Lovin the build. -
Very cool, I don't think I'd ever chop into a die-cast. I know it would've been quite difficult to do but you made it look easy, well done.
-
Thanks guys! Glad you like it so far. Hey Tim thanks man, good to see you over here too. Small update, Just completed my first RHD dash convertion. Well almost finished, still need to figure out a steering wheel and clean it up a bit but I'm very happy with how it turned out.
-
Wicked build man, the paint job is outstanding. Gets right up in your face,love the mods too. Great build.
-
Holy smokers!!! You're skills are breathtaking! I love everything on this build.
-
The interior is almost finished, need arm reats and window/door handles. -I first made cardboard temples using the cardboard from Evergreen packaging, then traced the shape on to 0.5mm styrene. -Used 1.0mm half rod for the rolled pannel and 0.5mm rod for some trim. -The chrome strip along the back is styrene covered in bmf and the decal is from Revell's '41 Chevy Pickup kit. - Painted flat black and black flocking. Now working on channeling the floor. I added 4mm blocks to lift the body.