blackbeard Posted January 1, 2014 Share Posted January 1, 2014 dave that's looking fantastic build keep the updates coming Quote Link to comment Share on other sites More sharing options...
outlaw105 Posted January 2, 2014 Share Posted January 2, 2014 (edited) Beautiful work... wow I didnt realize how big this car(1/8th) was until i saw your hand in the picture!!! Holy smokes batman!! lol Edited January 2, 2014 by outlaw105 Quote Link to comment Share on other sites More sharing options...
futurattraction Posted January 2, 2014 Share Posted January 2, 2014 Impressive work, Dave... Quote Link to comment Share on other sites More sharing options...
Magic Photos Posted January 2, 2014 Share Posted January 2, 2014 Love the Sonny motor, great work Dave. Quote Link to comment Share on other sites More sharing options...
stump Posted January 3, 2014 Share Posted January 3, 2014 Holy smokes......Dave, AWESOME work on the rear end cage work and chute support. Hope you do not mind me borrowing your pics to use as guidance? They are without a doubt, the BEST source of information for ALL us guys you know. Mostly because you take the time and effort to show everything in such great detail, more than a bloke can get from most chassis shop sites. As you say, it may not always be exactly as 1:1, but it sure looks the goods. Two thumbs up again mate. PS: Yes, back at the bench, though I'm tackling a couple of little ones (1/25) which I thought I'd never do again. Gotta get to a shop and get hold of some more tubing for the big girl, the stuff I have is not the easily bendable kinda tube. Quote Link to comment Share on other sites More sharing options...
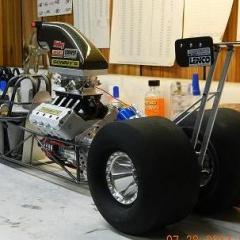
comp1839 Posted January 4, 2014 Author Share Posted January 4, 2014 fabricated and mounted the upper strut mount gussets and front motor plate mounts. also started to assemble the rear wheels. Quote Link to comment Share on other sites More sharing options...
blackbeard Posted January 4, 2014 Share Posted January 4, 2014 this build is coming along greatly will continue to follow this Quote Link to comment Share on other sites More sharing options...
Armornv Posted January 5, 2014 Share Posted January 5, 2014 Dave this is so awesome. That head on shot of the motor sitting in the chassis is just plain ridiculous (in a good way of course!). This car is going to be sick when it's done! Quote Link to comment Share on other sites More sharing options...
Mooneyzs Posted January 5, 2014 Share Posted January 5, 2014 Dave....these updates are out of this world man. Love the progress and attention to detail you put into everything. Every update this build gets better. Quote Link to comment Share on other sites More sharing options...
GoatGuy Posted January 5, 2014 Share Posted January 5, 2014 Dave the chute brackets look great and I love how you mounted the front hubs with brackets so they would be stable to determine where they attach to the frame. Thanks for sharing. Quote Link to comment Share on other sites More sharing options...
futurattraction Posted January 5, 2014 Share Posted January 5, 2014 Everything looks super, Dave. I love the lightening holes in the motor plate and the bolt detail in your rear wheels. How difficult was it to solder the strut mount gussets? Did you have to do much to fit them to the strut mounts? They look like they fit pretty well. Quote Link to comment Share on other sites More sharing options...
LeadFred Posted January 5, 2014 Share Posted January 5, 2014 I´ll think this is "art" The construction of this makes me feel good,just to look at it. Thanks Fred Quote Link to comment Share on other sites More sharing options...
comp1839 Posted January 5, 2014 Author Share Posted January 5, 2014 hey, outlaw 105, scott, mike, greg and henry. thanks guys. sorry for the lack of a reply earlier. outlaw 105, yup, they're pretty big. it takes a long time to build them. awesome amounts of fun. greg, glad you're back at the bench and of course i don't mind if you borrow the pics. henry, clint and chris, thanks a ton guys. dave, glad you like the way i mount the front hubs. it allows me to set the front end geometry and then build the chassis to meet the strut. scott, it probably wouldn't be to hard for most of you to solder the gussets in. i have a problem with shaking at times. the fitment of the gussets is as tight as i can make them. Quote Link to comment Share on other sites More sharing options...
Prostreet Posted January 6, 2014 Share Posted January 6, 2014 Awesome work as usual Dave, that Hemi looks sick sitting between the rails. Quote Link to comment Share on other sites More sharing options...
hacked Posted January 9, 2014 Share Posted January 9, 2014 just ''WOW'' unreal or to real not sure. stunning Quote Link to comment Share on other sites More sharing options...
comp1839 Posted January 19, 2014 Author Share Posted January 19, 2014 joe and jeff, thanks so much for the comments. i'm a little late, i know but,.......... still working on all the front suspension / steering pieces. the front struts needed steering arms so i carved a pair up and put receiver grooves in the struts for them. Quote Link to comment Share on other sites More sharing options...
comp1839 Posted January 19, 2014 Author Share Posted January 19, 2014 still making more front mounting and steering clevis'. also started on a steering rack. Quote Link to comment Share on other sites More sharing options...
dpride Posted January 19, 2014 Share Posted January 19, 2014 Looking good, hope you made a load of those tiny parts while the mill was 'setup'. The last time I made clevises and rod ends, I made many copies......just in case. I think the hardest part about making these intricate parts is covering them with a shield or body panel. Nice work. Quote Link to comment Share on other sites More sharing options...
blackbeard Posted January 19, 2014 Share Posted January 19, 2014 dave love those updates looking great Quote Link to comment Share on other sites More sharing options...
Mooneyzs Posted January 21, 2014 Share Posted January 21, 2014 Dave... I love seeing your updates. Your work is always so clean, perfect and nice. Those parts are looking sweet. Keep the updates coming. Quote Link to comment Share on other sites More sharing options...
futurattraction Posted January 21, 2014 Share Posted January 21, 2014 What Chris said... Quote Link to comment Share on other sites More sharing options...
comp1839 Posted January 22, 2014 Author Share Posted January 22, 2014 dave, thanks, i know what you mean sometimes you just hate covering up all the little details. henry, chris and scott thanks guys. i appreciate your comments and thoughts. so, after making all those little parts i had to put them to good use. the lower arms are just mocked on for now. need to install all the extra hardware later. Quote Link to comment Share on other sites More sharing options...
comp1839 Posted January 22, 2014 Author Share Posted January 22, 2014 here's a few of the whole thing. Quote Link to comment Share on other sites More sharing options...
Magic Photos Posted January 22, 2014 Share Posted January 22, 2014 WOW all I can say Dave, just WOW great work and still thanks for sharing. I just keep learning. Quote Link to comment Share on other sites More sharing options...
blackbeard Posted January 22, 2014 Share Posted January 22, 2014 I agree with magic photo's Quote Link to comment Share on other sites More sharing options...
Recommended Posts
Join the conversation
You can post now and register later. If you have an account, sign in now to post with your account.
Note: Your post will require moderator approval before it will be visible.