Car Man Posted May 31, 2013 Share Posted May 31, 2013 hey man that is great can u show the slicks you are using Quote Link to comment Share on other sites More sharing options...
tyrone Posted June 16, 2013 Author Share Posted June 16, 2013 Thanks alot fellas... I really appreciate the kind words.. I messed around with the rear end on this one today, I used a rear end from the prostock cutlass again.. I cut the axles off and ran a piece of tube through the middle and the added the four link brackets from dirt modeler... I cut the tube longer than needed once I decide on what wheels I'm gonna use I'll shorten them as needed... here's a few mock up pics... still needs a little tweeking here and there,,, thanks for looking and comments welcome.... Quote Link to comment Share on other sites More sharing options...
tyrone Posted June 16, 2013 Author Share Posted June 16, 2013 Quote Link to comment Share on other sites More sharing options...
Prostreet Posted June 17, 2013 Share Posted June 17, 2013 Looking sweet Tyrone, Are the pins in the links from dirt modeler? Quote Link to comment Share on other sites More sharing options...
Mooneyzs Posted June 17, 2013 Share Posted June 17, 2013 Tyrone... Nice work bud. This is looking great!! You have these things down and can build them in your sleep Quote Link to comment Share on other sites More sharing options...
PappyD340 Posted June 17, 2013 Share Posted June 17, 2013 Very very NICE so far Tyrone!! Quote Link to comment Share on other sites More sharing options...
Len Woodruff Posted June 17, 2013 Share Posted June 17, 2013 Nice job Tyrone locking for more updates. Quote Link to comment Share on other sites More sharing options...
Jim Whalen Posted June 17, 2013 Share Posted June 17, 2013 Hi, Your work is incredible and I would very much like to do a promod build one day so I always enjoy looking at your builds. Maybe one day I'll be brave enough to start one! Looking forward to seeing more of this '69 Camaro. Quote Link to comment Share on other sites More sharing options...
TedsModeling Posted July 13, 2013 Share Posted July 13, 2013 I don't recognize the Flash Point body, Tyrone. Is this the 68 Camaro with your own body work? Quote Link to comment Share on other sites More sharing options...
tyrone Posted July 16, 2013 Author Share Posted July 16, 2013 (edited) I don't recognize the Flash Point body, Tyrone. Is this the 68 Camaro with your own body work? Ted this is the latest 69 Camaro body from flashpointe... It's up on there website.... I like this one much much more than the first body they had... I built one as a red and white Yenko pro mod a few years back... I sold it 2 weeks ago to make room for this one..... Edited July 17, 2013 by tyrone Quote Link to comment Share on other sites More sharing options...
tyrone Posted July 16, 2013 Author Share Posted July 16, 2013 what's up fellas... glad to see the site is back up and going... I've been making some progress on this one... I made up the wheelie bars from styrene tube... I've also made up the side exit headers from styrene rod and tube..... I've opened up and hinged the doors, and I've also picked out a hood scoop fitted it to the body, I've been doing some sanding on the body also.. the body lines on here were kinda thick, so I sanded them down a bit.. I also added some styrene to the lower rocker panels to give it a little lower stance... thanks for looking and comments welcome..... here's a few pics of the chassis with firewall done..... here's a few of the styrene pieces added to the side rockers to get the stance I was after... Quote Link to comment Share on other sites More sharing options...
tyrone Posted July 16, 2013 Author Share Posted July 16, 2013 here's some pice of the wheelie bars...and mock ups of the engine.... also got the doors opened up... Quote Link to comment Share on other sites More sharing options...
tyrone Posted July 16, 2013 Author Share Posted July 16, 2013 here the doors have been hinged and mounted, and some pics of finished headers... Quote Link to comment Share on other sites More sharing options...
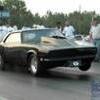
tyrone Posted July 16, 2013 Author Share Posted July 16, 2013 and here's where it stands now... I laid a coat of primer on to see where is stands.. I really like this body alot over the first one they had... This is my new favorite lol... gonna throw the kitchen sink at this one lol... thanks for looking and comments welcome... sorry for all the pics.... Quote Link to comment Share on other sites More sharing options...
tyrone Posted July 16, 2013 Author Share Posted July 16, 2013 and a few more... Quote Link to comment Share on other sites More sharing options...
stump Posted July 16, 2013 Share Posted July 16, 2013 Posted by Tyrone, Today, 01:01 PM gonna throw the kitchen sink at this one lol... Nah man, don't throw the sink at it........I'll have it. Kidding. Looking FANtastic as always Tyrone, one can always use your builds as great inspiration, whether it be 1:25 and even 1:12. Great work man. Quote Link to comment Share on other sites More sharing options...
Jim Whalen Posted July 16, 2013 Share Posted July 16, 2013 (edited) Hi, It's coming along nicely - thanks for putting the pics up. Edited July 16, 2013 by Jim Whalen Quote Link to comment Share on other sites More sharing options...
futurattraction Posted July 16, 2013 Share Posted July 16, 2013 Looks like you made excellent use of the time that the MCM site was down... I really like this body, too, Tyrone. Looking very cool - as always! Quote Link to comment Share on other sites More sharing options...
1320wayne Posted July 17, 2013 Share Posted July 17, 2013 Looking good, as usual Tyrone. Quote Link to comment Share on other sites More sharing options...
tyrone Posted July 22, 2013 Author Share Posted July 22, 2013 Thanks alot fellas for the kind words ... I appreciate it... I've been working on this one this weekend... I got the rear end, and wheelie bars painted..I've also added the disc brakes to the rear.. I got the drivers floor done.. and I have been tinkering around with the chassis still.. I added some braces for the windshield area and I have been added my dzus fastener brackets for the front end below the headers and for the floor area and electronics board... I've also been working on the engine.. I used the kit engine from the prosportsman kit on this one again I robbed the intake from the pro stock cutlass kit... and I also grinded the molded water pump off the engine plate and made a more modern csi style pump from styrene... crank trigger is from futurattraction.. I used bolthead details from protech.. and I've also got the headers painted... thanks for looking and comments welcome... Quote Link to comment Share on other sites More sharing options...
tyrone Posted July 22, 2013 Author Share Posted July 22, 2013 A few more.. Quote Link to comment Share on other sites More sharing options...
brett Posted July 22, 2013 Share Posted July 22, 2013 thats a beautiful looking rear end there T, great work all round (as usual). Quote Link to comment Share on other sites More sharing options...
stump Posted July 22, 2013 Share Posted July 22, 2013 Man, this just gets better......now, who has the pop-corn. Quote Link to comment Share on other sites More sharing options...
Red rocket 10 Posted July 23, 2013 Share Posted July 23, 2013 Outstanding my friend ! Another hit on the way ............ Leonard Quote Link to comment Share on other sites More sharing options...
pharr7226 Posted July 23, 2013 Share Posted July 23, 2013 Awesome work T. I love the weld on the headers and wheelie bars. You get better with every build. Quote Link to comment Share on other sites More sharing options...
Recommended Posts
Join the conversation
You can post now and register later. If you have an account, sign in now to post with your account.
Note: Your post will require moderator approval before it will be visible.