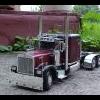
rottin1 Posted February 11, 2007 Share Posted February 11, 2007 Here's my 3rd build. I bought one of these Revell snap trucks just to see what it was all about. I kind of like this kit! The motor is a nice looking Cat with some nice detail to it. I chose for the color, Duplicolor Camel metallic with Black fenders. I added a set of resin full rear fender and painted them Black as well. I've taken the fuel tanks and stipped the Chrome off them. I'll be painting them Black as well with aluminum straps. I'm in the process of filling in the seam lines on the end of the tanks right now.I'll be making a texas bumper for it with bumper guide poles. No bumper lights in this one. In the pic you'll see the mocked up version of the bumper. I'll build the the one for this truck later.The one I'm building will be a touch shorter. I use that as a reference. I've also mocked up the stacks to see what it would look like. Those are the stacks I'll be using on this truck. I'll also be adding a visor, battery box mudflaps and deckplates. After I get this one finished, I have the Revell Chrome tanker to build to go with this tractor. Thanks for looking! Johnny Quote Link to comment Share on other sites More sharing options...
pete359driver Posted February 11, 2007 Share Posted February 11, 2007 quite a largecar, i like it! 8) Quote Link to comment Share on other sites More sharing options...
mackinac359 Posted February 12, 2007 Share Posted February 12, 2007 I like that color. Tim Quote Link to comment Share on other sites More sharing options...
rottin1 Posted February 19, 2007 Author Share Posted February 19, 2007 Ok I managed to get a few things done on my Pete snap truck. Like I said before I stripped the Chrome plating off the tanks because I wanted painted tanks instead. I finished the tanks by clearing then and then adding the straps. I wet sanded the front fenders and then cleared them. Then I glued the fenders in place.I also added a chrome strip between the fender and the hood. I want to wet sand the rear fenders and shoot them with clear again. I also painted the air breather Black and added straps to them also. I'll post pics of it tomorrow night. The bumper you see in these pics is the one I will be using on this truck. I did some shopping with Mo'aluminum! Thanks Jamie!! Thanks for looking! Quote Link to comment Share on other sites More sharing options...
mackinac359 Posted February 19, 2007 Share Posted February 19, 2007 That is gonna look nice! Tim Quote Link to comment Share on other sites More sharing options...
pete359driver Posted February 20, 2007 Share Posted February 20, 2007 agreed, this one has my attention! Quote Link to comment Share on other sites More sharing options...
SpreadAxle Posted February 20, 2007 Share Posted February 20, 2007 In a word: SWEET!!!!!!!!!!!!!!!!!!!!!!!!!! Quote Link to comment Share on other sites More sharing options...
rottin1 Posted February 23, 2007 Author Share Posted February 23, 2007 I managed to get a little more work done on my Little Big truck. I've gotten the roof lights and horns glued on. I also stripped the chrome off the antennas, coiled some wire around them and then painted them Black. After the Black had dried, I dipped them in Red paint to represent the antenna caps.I used BMF around the windshield trim, bunk vents,door handles,hood and fender extensions. I mounted the air breather and lubrifiner. As for the back of the truck, I added full deckplates right from the back of the sleeper to the end of the frame. I also added some spot light mounts to the back of the bunk to kind of hide the spot where the bunk snaps into the truck.I put in a couple of pics of the side of the truck so you could see my fuel tanks and straps.I cut off one of the sleeper steps, because they where to long. I managed to blend in the seam on the tanks so you can see them anymore. All I have to finish is putting on the visor, bunk work lights, mount the bumper, mount the straight pipes and battery box mudflaps. Hope you enjoy! http://i159.photobucket.com/albums/t121/ro.../MVC-011F-2.jpg http://i159.photobucket.com/albums/t121/ro.../MVC-008F-2.jpg http://i159.photobucket.com/albums/t121/ro.../MVC-010F-1.jpg http://i159.photobucket.com/albums/t121/ro.../MVC-007F-2.jpg http://i159.photobucket.com/albums/t121/ro.../MVC-009F-1.jpg http://i159.photobucket.com/albums/t121/ro.../MVC-005F-2.jpg I also need to scratch build a light bar for the back of the truck. I should have this all done by this weekend. I'll also add a pic of the motor detail when finished. Quote Link to comment Share on other sites More sharing options...
Jim B Posted February 23, 2007 Share Posted February 23, 2007 Looks awsome! If you didn't know, you'd never guess that it's a snap kit. Great job. Hope mine comes out half as good. Jim Quote Link to comment Share on other sites More sharing options...
rottin1 Posted February 23, 2007 Author Share Posted February 23, 2007 Thank's Jim for the kind words. I really like this kit and just bought another to make into a day cab! I'm going to work on that and the Chrome tanker for this one. That was my whole point in building this model, trying to make it not look like a snap kit. I'm glad you like the results. I'm sure yours will be as nice!! I'm looking forward to completing this, this weekend!! Quote Link to comment Share on other sites More sharing options...
Jim B Posted February 23, 2007 Share Posted February 23, 2007 It's been so freekin' cold here in Syracuse, I'm sure Rochester is the same. Where are you painting? I tried the basement, but the paint stinks up the whole area. Quote Link to comment Share on other sites More sharing options...
Old Albion Posted February 23, 2007 Share Posted February 23, 2007 Johnny, The paint colour and finish are superb!! I'm very impressed, wish I could paint half as good as that. Great work! Quote Link to comment Share on other sites More sharing options...
Brinx Posted February 24, 2007 Share Posted February 24, 2007 This is my first post. I decided here was best as there seems to be some fellow upstaters here. Johnny, those colors are perfect together. They put me in mind of of Cletus Snow's W900 from the first "Bandit" film. Brinx (anyone seen my gloves?) Quote Link to comment Share on other sites More sharing options...
rottin1 Posted February 24, 2007 Author Share Posted February 24, 2007 Jim: You guys would probably cringe when I tell you how I paint! I have an attached shed off the back off the house. It's mainly a storage shed with no heat at all. It does have lighting. When I paint, I usually get a bunch of parts ready to paint , all at one time. I then put a kerosene heater in the room to warm it up for a while. When I think it's warm enough to paint, I remove the kerosene heater, then paint. I bring all my painted parts inside to dry. It's a crude place to paint, but so far (knock on wood) I've had some pretty good results. One of these days, I am going to construct a paint booth in my build room, so I won't have to worry any more about painting in "the shed". Brinx: You know, your right! I never thought about that! It's almost Cletus's color!!!! I had a friend with that same paint job as "Snowman's" ride, and it was a beautiful looking ride for sure. Old albion: If it's any consolation, I never thought I was that good at painting myself untill people like you guys compliment it, then you know your doing well!! Thanks for all the compliments you guys!! Much appreciated for sure!! Quote Link to comment Share on other sites More sharing options...
rottin1 Posted February 26, 2007 Author Share Posted February 26, 2007 Here's another update on my Snap truck. I have the stacks mounted. The bumper and the visor are also mounted. I have only a few other small things left to mount, such as the bunk work lights, pogo stick, air lines rear light bar and license plates. Thanks for looking. http://i159.photobucket.com/albums/t121/ro...59/MVC-030F.jpg http://i159.photobucket.com/albums/t121/ro...59/MVC-031F.jpg http://i159.photobucket.com/albums/t121/ro...59/MVC-029F.jpg http://i159.photobucket.com/albums/t121/ro.../MVC-030F-1.jpg http://i159.photobucket.com/albums/t121/ro.../MVC-029F-1.jpg Quote Link to comment Share on other sites More sharing options...
rottin1 Posted March 4, 2007 Author Share Posted March 4, 2007 Ok I'm finished. I added the air line box, airlines and light cord. I also added mudflaps off the back of the rear full fenders. Bunk work lights were also added. Rear light bar was finally added as well. The finishing touch was the Pete logo on the mudflaps. Now I'm off to work on my 359 daycab. This was a FUN kit to build!! http://i159.photobucket.com/albums/t121/ro...59/MVC-062F.jpg http://i159.photobucket.com/albums/t121/ro...59/MVC-061F.jpg http://i159.photobucket.com/albums/t121/ro...59/MVC-059F.jpg http://i159.photobucket.com/albums/t121/ro...59/MVC-060F.jpg Quote Link to comment Share on other sites More sharing options...
mackinac359 Posted March 4, 2007 Share Posted March 4, 2007 Wow! That turned out nice! Tim Quote Link to comment Share on other sites More sharing options...
Old Albion Posted March 6, 2007 Share Posted March 6, 2007 Johnny, This is a great looking truck, superb! Quote Link to comment Share on other sites More sharing options...
Diesel Gypsy Posted March 8, 2007 Share Posted March 8, 2007 I've been following this build & am mightly imperssed with it. Thats some paint job, well done. Take care when painting in your shed johnny, if you forget to remove the heater before you spray you'd make an explosion so big we'd hear it here in the UK Quote Link to comment Share on other sites More sharing options...
Recommended Posts
Join the conversation
You can post now and register later. If you have an account, sign in now to post with your account.
Note: Your post will require moderator approval before it will be visible.