Mj-Styro Posted July 16, 2006 Share Posted July 16, 2006 Hi guys! found my way over here awhile ago........ Finally after a 3 month wait i got the build shop up and ready to build again and started on the last project i packed up for the move..... Started the door jambs and threshold and it looks like it is coming along pretty well......... Before the move........... and now Also started the exhaust (using Alum rod i bent it whole and stuck the chrome mufflers out of the re-issue kit of the 69 Galaxie-Will paint them red when ready) Quote Link to comment Share on other sites More sharing options...
MrObsessive Posted July 16, 2006 Share Posted July 16, 2006 Comin' along great MJ! That's how the doors should open on a '60 Ford...........you're doin' great there! Where'd the wagon body come from? Is that an old Hubley kit? Quote Link to comment Share on other sites More sharing options...
Mj-Styro Posted July 16, 2006 Author Share Posted July 16, 2006 Sorry i read everywhere and couldnt find a picture count per-post so i am guessing 3 or 4 max......... Heres acouple more views of the Street Machine Wagon Shot of the front axle made from a piece of sqaure Alum stock,the ends were drilled out and a plastic rod was inserted then drilled all the way thru and i am using the stock 60 starliner spindles....(right now i have a piece of copper wire holding it togather to i am ready to add the pins.... Heres an overall and i think i have the stance perfect (the way i was hoping it would turn out) Quote Link to comment Share on other sites More sharing options...
Mj-Styro Posted July 16, 2006 Author Share Posted July 16, 2006 Comin' along great MJ! That's how the doors should open on a '60 Ford...........you're doin' great there! Where'd the wagon body come from? Is that an old Hubley kit? Resin body from Drag City Casting..... The master was the 60 starliner so the use of the 60 starliner to build from makes everything fit great!! How ya been Bill? been awhile.anything new on the bench? Quote Link to comment Share on other sites More sharing options...
MrObsessive Posted July 16, 2006 Share Posted July 16, 2006 Resin Body?? You're a braver man than I! I've been doin' fine! I've been working on a '59 Buick resin which is somewhere in the list of topics......... Here's the addy if you want to check it out..... http://www.modelcarsmag.com/forum/viewtopic.php?t=524 I may be posting new pics of the interior later today.........it's takin' awhile due to fabricating a whole new interior because the Modelhaus one is just too incorrect. No slam at Don and the gang............he only repopped what was part of the original Craftsman kit. Look forward to seein' more of that '60 Ford! Quote Link to comment Share on other sites More sharing options...
Jairus Posted July 16, 2006 Share Posted July 16, 2006 Sorry i read everywhere and couldnt find a picture count per-post so i am guessing 3 or 4 max......... There is no limit to the number of pictures in a post. However, that said, rule of thumb is keep the count to 5 or 6 per post. And then, break up your "article" into multiple posts. The system creates a new page after a specific number of postings are ... ah, posted regardless of the length of the posts. If a few LONG entry’s are posted with tons of pictures, the result is a really long page with a relatively long wait for the page to load. Neat wagon by the way! Bill, as soon as you finish a couple of resin cars you'll be hooked! Working with resin is no more difficult than plastic, just.....different. Quote Link to comment Share on other sites More sharing options...
MrObsessive Posted July 16, 2006 Share Posted July 16, 2006 Bill, as soon as you finish a couple of resin cars you'll be hooked! Working with resin is no more difficult than plastic, just.....different. Yeah, I'm learning that as I go along with this '59 Buick. One of the more difficult things with resin is replacing trim that may have been accidentally sanded away. I think I have found a cure for that though! :twisted: Actually, months ago, I had started on one of Lemans Miniatures resin kits............the '69 Lemans winner GT-40. I gave up on it due to the resin not "behaving". The body (particularly the doors) was warped, but since building the Buick, I have figured out how to straighten body panels and have them "stay put". 8) Quote Link to comment Share on other sites More sharing options...
Irvin Arter Jr. Posted July 16, 2006 Share Posted July 16, 2006 nice wagon MJ, hope to see some color on it soon Quote Link to comment Share on other sites More sharing options...
Mj-Styro Posted July 16, 2006 Author Share Posted July 16, 2006 nice wagon MJ, hope to see some color on it soon I hope so soon!!! but i dont wanna rush the color you know........deep gloss black sounds about right wouldnt ya say?? soon asi get some other things done i may start to paint it in the next couple weeks or so......... THANKS! Quote Link to comment Share on other sites More sharing options...
Mj-Styro Posted August 8, 2006 Author Share Posted August 8, 2006 dragged this old post back up with an update......... Made a Drag link from scratch tonight as well as a fuel Rail for the two 4's...... Also filled the door jambs with some two part putty (more on them at a later date).... And put in a Pre-wired Dist............... Quote Link to comment Share on other sites More sharing options...
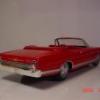
Mj-Styro Posted August 9, 2006 Author Share Posted August 9, 2006 I couldnt help it! i grabbed the rattle can and my air brush jar and went to town Also painted the new Drag link,wheels (detail paint) and i was wondering if it could be done and i guess so! the white plastic rod i brush painted with gloss black,then dry brushed again quite a few layers of Aclad ll which really worked!!!! then hit it with stop light red,line was done with steel paint.......... Second Sorry for the bad pics!!! it got dark on me! LOL tomorrow or the next day i will wet sand with polishing cloths and get it ready for another coat of paint............ Quote Link to comment Share on other sites More sharing options...
Bruce Poage Posted August 9, 2006 Share Posted August 9, 2006 The project continues to look great. Can I see some pics of the shop? My stuff has been packed for 12 months. Now I'm in a new location and ready to build a new plastic room. I'm always looking for ideas. Thanks. Quote Link to comment Share on other sites More sharing options...
Mj-Styro Posted August 9, 2006 Author Share Posted August 9, 2006 The project continues to look great. Can I see some pics of the shop? My stuff has been packed for 12 months. Now I'm in a new location and ready to build a new plastic room. I'm always looking for ideas. Thanks. Thanks! its gettin there still alot to do with it yet.......... Here ya go, the first set of pictures is the build room,the last set of pitures is the storage room,hope these help...... http://public.fotki.com/drasticplasticsmcc...new_hobby_room/ Quote Link to comment Share on other sites More sharing options...
Wildrice Posted August 13, 2006 Share Posted August 13, 2006 That would be a fun ride if it was real. Great work on the wagon MJ. Quote Link to comment Share on other sites More sharing options...
Mj-Styro Posted August 13, 2006 Author Share Posted August 13, 2006 Got a little model time this early evening...... i spent it well................ Made a fuel line from fire wall to Fuel Rail.....(High pressure Aircraft rubber line with AN fitting's red) LOL Added Air cleaner and V/Stacks to the carbs, and added valve stems on the tires so i can air them up now LMAO!!! :twisted: Quote Link to comment Share on other sites More sharing options...
Stingray69 Posted August 14, 2006 Share Posted August 14, 2006 Thats really cool man! The engine is wicked! Quote Link to comment Share on other sites More sharing options...
Mj-Styro Posted August 16, 2006 Author Share Posted August 16, 2006 messed around with the exhaust tonight and decided i should add Lake pipes.....doesnt look to bad! have the exhaust glued inplace except for the lakers! had to work on the chassis a bit but got it to fit pretty good, And also added the back bumper.......... Will work on the hood later in the week.......(needs to be repainted) Quote Link to comment Share on other sites More sharing options...
Wildrice Posted August 16, 2006 Share Posted August 16, 2006 Looks great MJ. One sweet ride. Quote Link to comment Share on other sites More sharing options...
Recommended Posts
Join the conversation
You can post now and register later. If you have an account, sign in now to post with your account.
Note: Your post will require moderator approval before it will be visible.