Chris D
-
Posts
106 -
Joined
-
Last visited
1 Follower

Recent Profile Visitors
2,174 profile views


Chris D's Achievements
MCM Friend (4/6)
-
When I was a kid I think I built one of these models. Certainly didn't look that great! Chris D
-
Looks great! love the color and details. Probably another one I have to add to my "want to build list". Chris D
-
Wow, great job, love the color and the details. Love the car, I think I have to build one of these! Chris
-
Pictures gone Chris D
-
 Hi Guys, The windshield was saved, thank you! Rather than starting with sandpaper, I went straight for the polish. I used two different ones, a "course" and a "fine". Course and fine were determined by using them on various models over the past year. Took a bit of work but probably spent less than 10 minutes to polish out the fogging left by the accelerator. Car is posted in "under glass" it is the "Big Tub" car. Chris
 -
Thanks for the kind words everyone! Chris D.
-
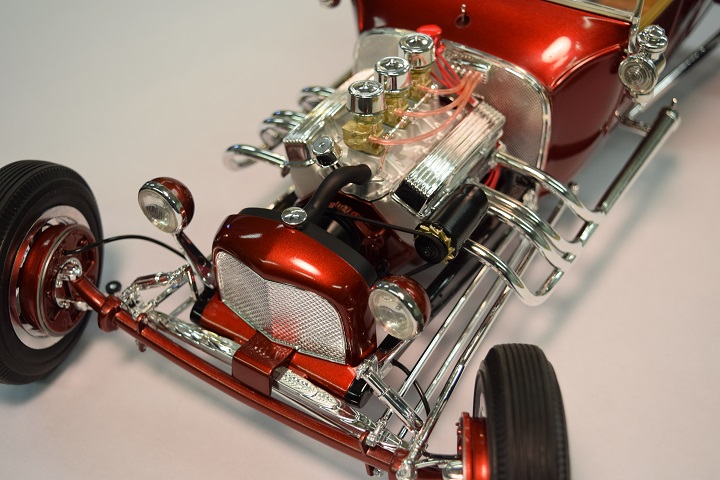
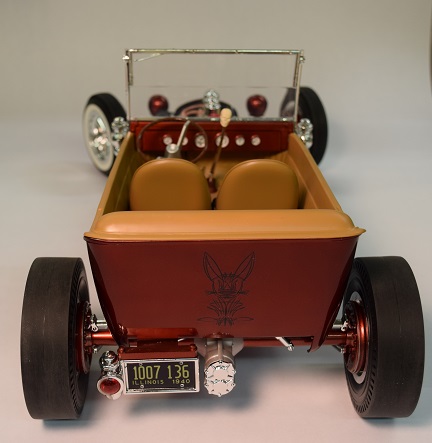
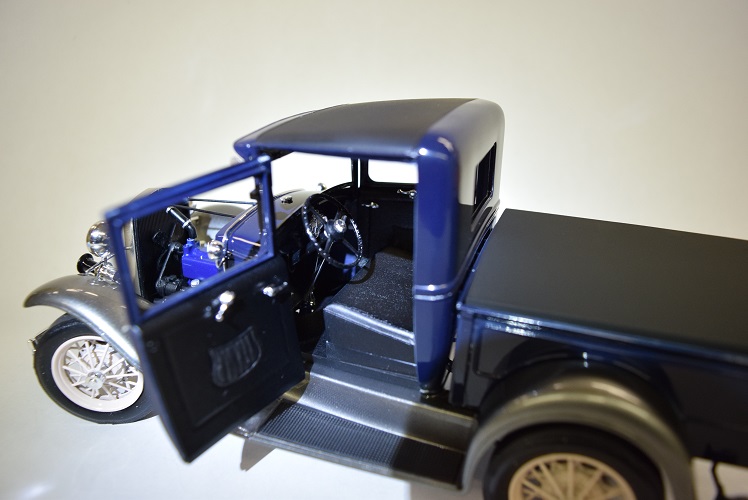
Hi all, Just finished up my Revell 1/8 scale big tub. Didn't take any progress pics and probably should have. The kit is expensive (around $100.00 I think), but the quality is very good and frankly it was a pleasure to build. Being big scale, it screams for lots of detail but I just wasn't up to the task and tried to follow close to box stock. The paint is Tamiya, base coat was Gunmetal then Clear Red sprayed over that to achieve the candy color. While the paint job didn't turn out the best, the color turned out great, just what I was looking for. Even the tan interior came out looking spot on for what I was looking for. Unfortunately, the flocking on the floor is a perfect match for the color of the painted surfaces so its hard to tell there is flocking. I screwed up the windshield by getting super glue accelerator on it. I asked in the forum here how to fix it and thankfully the suggestions worked perfectly. I simply polished it with two different car polishes and the fogging was gone. Here are the pics... Thanks for taking a look! Chris D

-
Gimme some picture pointers.
Chris D replied to chunkypeanutbutter's topic in Model Building Questions and Answers
Hi Miles, I think most of the points are already covered but I'll throw in my thoughts too. Camera, anything digital should work, I use a simple Nikon point&shoot coolpix or my bigger Nikon digital SLR , even my Iphone. All of them take good pictures if I spend a few minutes to get things ready for a good picture. Get close, and if needed set camera to Macro mode so you can obtain focus lock. Use a background, either a diorama, or, plain white paper. 11 x 17 paper is a good size to work with for most models. Have it curl up at the back like the photo (Mike's post) above so that you have continuous back drop with no lines etc. Light from above AND behind. Simple clamp on lights from the hardware store are fine or you can get more fancy photo lights. Use the lights from behind to cast a shadow and to highlight the color of the subject. The shadow adds depth to the image. Highlighting the color is important for some colors like candy and metalics. If it is nice outside, shoot outside with the sun to your back and slightly off to one side (so that you are not creating a shadow). Shoot the photo with the sun lower on the horizon (Morning or Evening) to get shadows. The sun light creates a nice natural color which adds to the realism of the photo. Use a tripod and the self timer on the camera. The tripod keeps the camera stable to reduce blurr and the self timer eliminates movement in the camera when taking the photo. The slightest movement can cause blur. If using a cell phone or Tablet computer, CLEAN THE LENS!!!! The lenses on these are always exposed and almost always have an oil film on them which will cause all sorts of nasty problems with the photo - most often blurr and flare with light. Depending on how dirty and with what, it can also cause exposure problems and color problems. Take a LOT of photos, each one with the subject moved slightly different. Getting the color to pop on a car can be tricky and sometimes just a slight change in angle brings it out brilliantly. Try to shoot the car from an height angle as if you were standing there in the same scale as the model. Remember, you are 1:1, the model is 1:25 (or other scale). To add realism, try to have the camera at a scale height of a person. Easy gauge, shoot some pictures of a real car so you familiarize yourself how the photo should look if it were 1:1 scale. Shoot a bunch of photos,with digital, they are FREE. Review all the photos you took and throw away the crummy ones and keep the good ones. Depending on what I am photographing, I may take as many as 50 or 100 photos of a subject, then keep only 5 or so. Again, digital photos are free, its not like the film days :-) Hope that helps a little bit, Chris D -
Wow, Thanks for all the suggestions and comments. I think I will attempt the polishing method first to see what that yields. Failing that, I will try to hunt down the elusive Pledge floor product (AKA Future). I have looked for that from time to time, but will make a bigger effort if it solves this problem. If all that fails, I have Williams contact information above and will reach out to you - thank you very much! Chris D
-
Hi all, Perhaps someone can help me save myself from my own stupidity. Working on the model T model, and I glued the glass to the frame using Testors window glue, that went fine. Then I had to add a trim piece on the window frame and used super glue. It didn't set quick enough so I hit it with accelerator. of course, the accelerator caused the glass to "fog" or whatever it is called. I tried wiping it off with a dry cloth, didn't help. Then I tried to wipe it clean with ISO alcohol and while wet, the glass was clear again but as it dried the problem came back. I don't think this kit is in production anymore (Revell Big Tub) so I am kinda stuck with finding a fix for the problem. Just to clarify, I did not get CA glue on the windshield, just the accelerator. Chris D
-
garage diorama fully detailed and fully scratch build ...
Chris D replied to crazyrichard's topic in WIP: Dioramas
Richard, I have been amazed by this project and it really is a masterpiece! Chris -
very nicely done! Chris D.
-
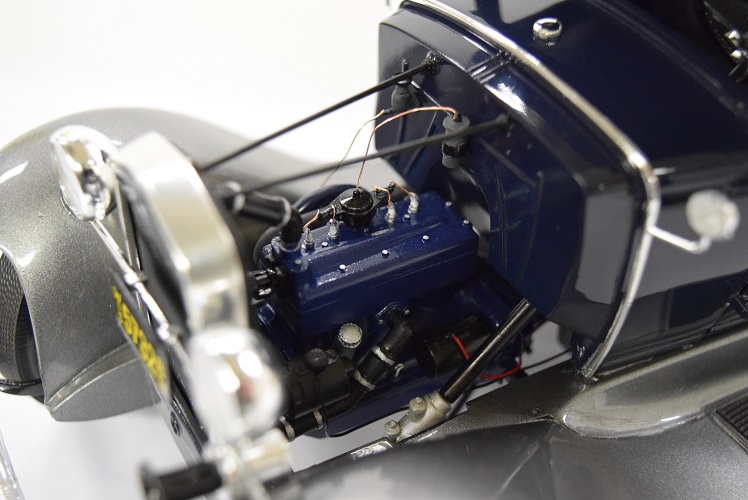
Thanks for the kind words everyone! I think part of what made it so disappointing is that the model could have been so much better. The kit offered a lot of little detail parts, many of which has so much flash I nearly destroyed them cleaning it off. The warped body and other panels was enough to drive me insane. Eventually I just gave up on the hood assembly. Again, thank you for the kind words, it certainly has taken the sting out of this build. Chris D.
-
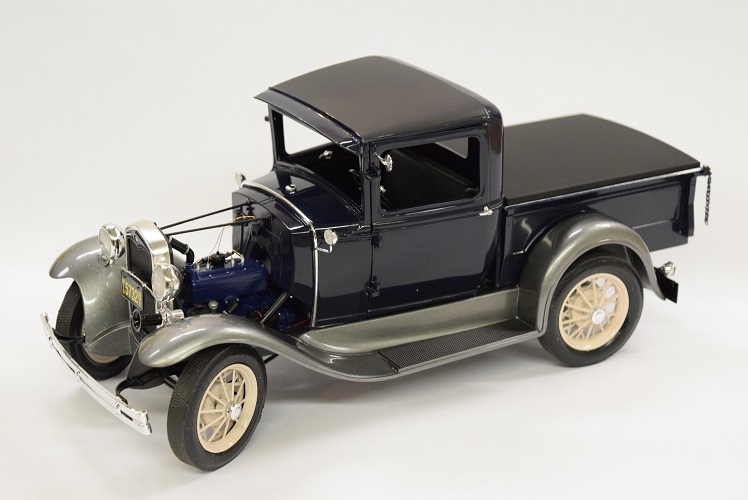
Hi all, I finally finished this "disappointment". When I bought the kit I really had high hopes for all the cool detail it offered, however, warped components, excessive flash, etc. made it a not so fun project. I will be the first to admit, my lack of skills and patience didn't bode well. I am sure you guys could have done a much better job with this kit. Here are a few photos of the completed car.. Thanks for taking a look Chris D.
-
garage diorama fully detailed and fully scratch build ...
Chris D replied to crazyrichard's topic in WIP: Dioramas
This is such a fun thread to watch Rich, you are a great artist! Chris D