Ron Hamilton Posted August 18, 2008 Share Posted August 18, 2008 (edited) I picked up this beauty on EBAY about 9 years ago. Sorry I do not have the pictures of the car when I started on it, but I can say that it was rough! The "previous owner" had glued coach lamps on the roof pillars, and side pipes on the sides of the front fenders. The saving grace on this one was that it was not painted or sanded on. The problem with it was that the "previous builder" used enough glue to weld the parts together, and then some. I had to cut those items off of the car, and do some serious bodywork on those areas. When I got the car, I was a little miffed when I tried to get it apart, I had to cut it apart, as the "previous builder" used a lot of glue to hold it together, and it was moulded in RED PLASTIC. The front bench seat was missing, and 2 stock wheel covers were not included, as the "previous builder" used the "custom" pieces, and painted the red plastic with good old Testors white enamel with a brush, after the interior parts were "glue welded" in. The 1976 Caprice was recently reissued, so the plan was to re-do the interior tub from it for this one, as well as any other parts I needed for the build. Fortunately, The Modelhaus had some of the missing parts in its line, so I ordered and recieved the parts from them. I was a so irritated about the condition of the body of this car, that I considered backdating the '76 body into a '71 by "installing" the '71 specific parts into the '76 body. I had done the interior using plastic strips, but I was not really happy with the result. So I worked on the body, getting it pretty smooth, and applied the first coat of primer after I deepened the door lines, cut in the appropriate body separation lines, and doing the prelinary blocking. From the above photos, this is where I am with the body. I still have to do some additional straightening on the roof panel to eliminate a couple of dips in the roof where the "glue welded" window unit was installed, as well as on the front header panel above the headlamps. A couple of years ago, I was able to score a complete promo interior, and a chassis with '71 Chevrolet wheelcovers and whitewall tires, so I will probably use most of those parts. The MPC parts leave a lot to be desired when it comes to the underhood area and engine, so I plan to substitute parts from the AMT '70 Monte Carlo SS, which will yield a much better underhood area, engine and firewall detail. This is going to be a long term project, as I plan to add a vinyl roof, and scratchbuild a set of fender skirts. I also have to decide on which '71 Chevrolet color combination to paint it Classic Copper with a Beige Vinyl Roof and Sandlewood Interior. Edited August 18, 2008 by Ron Hamilton Quote Link to comment Share on other sites More sharing options...
gilsdropshop1 Posted August 18, 2008 Share Posted August 18, 2008 this one is going to come out clean! more pics of prog. please. Quote Link to comment Share on other sites More sharing options...
Marc @ MPC Motorsports Posted August 19, 2008 Share Posted August 19, 2008 Great work, Ron. I don't know about you, but I love resurrecting old build models, especially when they turn out like this. Quote Link to comment Share on other sites More sharing options...
Ron Hamilton Posted August 19, 2008 Author Share Posted August 19, 2008 I scratchbuilt the fender skirts, and filled in the sink marks in the roof today. Quote Link to comment Share on other sites More sharing options...
kelson Posted August 19, 2008 Share Posted August 19, 2008 Great job so far on the glue bomb, would never know looking at the pics can't wait to see it completed. Quote Link to comment Share on other sites More sharing options...
rollinoldskoo Posted August 19, 2008 Share Posted August 19, 2008 use a revell 65 impala chassis, motor, firewall and radiator support for even better results Quote Link to comment Share on other sites More sharing options...
62SS Posted August 19, 2008 Share Posted August 19, 2008 One of my Holy Grails. Nice save on this one Ron. Keep us posted. Cant wait to see it finished. Ed Quote Link to comment Share on other sites More sharing options...
Ron Hamilton Posted August 19, 2008 Author Share Posted August 19, 2008 use a revell 65 impala chassis, motor, firewall and radiator support for even better results The '71 was a completely different car from the '65-'70, but I may have some use for some of the parts. I am going to look at the track of the suspension, and the wheelbase. I was actually planning to make this a wire axle buiild, utilizing the original chassis I have. I may even do it as a curbside, and glue the hood shut. I don't build for contests, only for myself and the members of the board's enjoyment. Thanks for the suggestion though, as using the Revell kit may cut doen on building time, and give me some added detail. Quote Link to comment Share on other sites More sharing options...
Ron Hamilton Posted August 20, 2008 Author Share Posted August 20, 2008 I installed the vinyl roof seams, the fender skirts, and re-primed the car to check my work. While the primer dries, it's on to the interior chassis and powertrain. Quote Link to comment Share on other sites More sharing options...
John E. Bowers Jr. Posted August 20, 2008 Share Posted August 20, 2008 Looking really good Ron. It would be a cryin' shame to cement the hood closed on this one! Maybe the AMT 1970 Impala could offer something here, although I do realize that it's very lacking in the 'fine detail' department. Quote Link to comment Share on other sites More sharing options...
rollinoldskoo Posted August 21, 2008 Share Posted August 21, 2008 The '71 was a completely different car from the '65-'70, but I may have some use for some of the parts. I am going to look at the track of the suspension, and the wheelbase. I was actually planning to make this a wire axle buiild, utilizing the original chassis I have. I may even do it as a curbside, and glue the hood shut. I don't build for contests, only for myself and the members of the board's enjoyment. Thanks for the suggestion though, as using the Revell kit may cut doen on building time, and give me some added detail. here's a 76 caprice a good friend of mine built here with a 65 chassis and such.... he shaved the firewall... Didn't think I could finish it this year but had to do one more for 06. :biggrin: Quote Link to comment Share on other sites More sharing options...
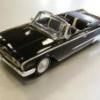
Ron Hamilton Posted August 21, 2008 Author Share Posted August 21, 2008 (edited) Here's my phantom '76 Caprice Convertible. It's also in primer, and is further along than the '71 Impala, as the only thing I have to do to this one is paint it. I am considering changing it over to a '75, by changing the front clip, and adding replica stock wheels and tires. Edited August 21, 2008 by Ron Hamilton Quote Link to comment Share on other sites More sharing options...
rollinoldskoo Posted August 21, 2008 Share Posted August 21, 2008 I am considering changing it over to a '75, by changing the front clip, and adding replica stock wheels and tires. http://www.layitlow.com/forums/index.php?s...727&st=420# Quote Link to comment Share on other sites More sharing options...
studebot Posted August 21, 2008 Share Posted August 21, 2008 Did you know they actually came from the factory with a 396. I think. Not many ? Quote Link to comment Share on other sites More sharing options...
Ron Hamilton Posted August 21, 2008 Author Share Posted August 21, 2008 Did you know they actually came from the factory with a 396. I think. Not many ? Actually the 400 Turbo Jet. Hmmmm. Quote Link to comment Share on other sites More sharing options...
Ron Hamilton Posted August 31, 2008 Author Share Posted August 31, 2008 http://www.layitlow.com/forums/index.php?s...727&st=420# I am a little low on modeling funds now. If I keep going into that site, I'm going to be broke! Quote Link to comment Share on other sites More sharing options...
Ron Hamilton Posted August 31, 2008 Author Share Posted August 31, 2008 I painted the car, and rubbed out the finish, which was the Testors' Color which is closest to '71 Chevrolet Classic Copper, with Tamiya Clear lacquer. While it is not the exact shade, It looks pretty good, but I have to touch it up a little. A final glaze and wax will come one the Bare-Metal is done. I also added a black vinyl roof, using the Testors’ two-part spray. The finish is a little coarse to me for 1/25 scale, but it is not going no where. I cleaned up the Promo interior. I have to fill the holes from the convertible boot in, and paint it either black, or beige. The dash detail is very crisp. I hope that I can pick it out properly. Now, on to the Bare-Metal Work. 1971 Impala Quote Link to comment Share on other sites More sharing options...
John E. Bowers Jr. Posted August 31, 2008 Share Posted August 31, 2008 This one is looking great Ron! Quote Link to comment Share on other sites More sharing options...
Ron Hamilton Posted September 1, 2008 Author Share Posted September 1, 2008 I did the "Bare Metal" trim on the Impala last night. Everything was going along pretty well until I decided to remove a pin from underneath the hood, in order for the hood to be better aligned with the body. The brittle plastic cracked right at that point. I cleaned up the "wound" to install a new patch. So now, I have to repair that area, and re-paint the hood. I am going to repaint the header panel at the same time. Fortunately I used lacquer paint. Quote Link to comment Share on other sites More sharing options...
Daniel Lynch Posted September 2, 2008 Share Posted September 2, 2008 He is very nice here too! I didn't see on an other forum all of the work you do on your Impala! Bravo! Excellant travail! Daniel Quote Link to comment Share on other sites More sharing options...
Recommended Posts
Join the conversation
You can post now and register later. If you have an account, sign in now to post with your account.
Note: Your post will require moderator approval before it will be visible.