Pocherphile Posted March 9, 2014 Share Posted March 9, 2014 (edited) I guess since the Mercer is on the back burn @ the moment............you know the saying, idle hands are. Since coming here, I have been introduced to a kit mfg I had until now, never heard of. I for many years was a FF builder, you know, those little stick, paper and rubber band airplanes. Still have of few of my fav's tucked away for future builds. So when I saw that these little jewels were 2 of my loves, old cars and made of balsa.......... @ 1st sight. I will give a shout out to Frank right here for making these kits known to me. Well, I have after discovering these little wood/card/metal/plastic kits.......my Hobby Funds continue to drop. I have as of today amassed a small collection of them and still have others coming. Could not stand it, just had to give one of these a try.....and that is the subject of this thread. Of course we are talking about a line of kits that 2 of them I have, are dated 1949.........6 years before I was born......... The quality of the material, you will not get today.........this was when balsa was the best you could get, not this balsa, we get now days. Tight, holds its shape w/o warping. What was the diff, age of the tree when harvested! So w/o further ado..............1900 Packard built as it came in the small cardboard box in 1949. I will replace the wheel/tires, these did not fair so well, and a new set of lights. Other wise, she will be built from wood, covered w/tissue to add strength and to take doping better before painting.........Red. One must read, read, read, study, study the plans.......did I say look the plans over. Amount of info is staggering, all of it is there and the written instructions spell it out f/you. I started with the box shaped body or carriage which ever suits ya. As with balsa construction, parts are mocked up, jigged and then glued once you understand how each part fits, does it sit on, up to or across.......is too late if you just start gluing from jump street. Photos are of cutting out and dry fitting the body together. Edited March 10, 2014 by Pocherphile Quote Link to comment Share on other sites More sharing options...
Cato Posted March 9, 2014 Share Posted March 9, 2014 Rick, Will you fill the grain with sanding sealer before or after assembly? I'm guessing it would be difficult after. Quote Link to comment Share on other sites More sharing options...
f1ford48 Posted March 9, 2014 Share Posted March 9, 2014 I never thought about the dope and tissue paper- good way to get rid of the grain. looks like the market for Hudsons is going up!!! Quote Link to comment Share on other sites More sharing options...
Pocherphile Posted March 9, 2014 Author Share Posted March 9, 2014 (edited) Rick, Will you fill the grain with sanding sealer before or after assembly? I'm guessing it would be difficult after. Using the tissue keeps me from having to load up the wood w/sanding filler.......after all this is water w/a filler additive and a bonding agent.........I am afraid of how the wood might re-act after the amount of time that has gone by...........this balsa is dry, I dare say any moisture remains in this wood........cured out completely. The tissue is added to the doped wood, then is bonded w/more dope that in turn makes the paper almost a super thin plastic film because of the dope, the paper adds a enormous amount of strength to the structure. Now over this I can add a layer of sanding filler to fill any pores of the paper that are not filled, sand, prime and should have a really slick surface to paint..........thats the idea anyway....... Oh, the tissue will be the good stuff..........Japanese tissue, almost like silk, takes to shapes easily and is outstanding to paint over. Rick Edited March 9, 2014 by Pocherphile Quote Link to comment Share on other sites More sharing options...
Cato Posted March 9, 2014 Share Posted March 9, 2014 Senility is a bad thing-I forgot all about the old tissue and dope. I've built a ton of flying RC planes that way-then graduated to 3/4 oz. glass cloth and resin............. Quote Link to comment Share on other sites More sharing options...
Pocherphile Posted March 9, 2014 Author Share Posted March 9, 2014 (edited) Senility is a bad thing-I forgot all about the old tissue and dope. I've built a ton of flying RC planes that way-then graduated to 3/4 oz. glass cloth and resin............. Used that on Out Riggers........90+ MPH on water.......... .........scale miles per hour. Edited March 9, 2014 by Pocherphile Quote Link to comment Share on other sites More sharing options...
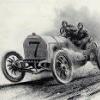
Pocherphile Posted March 9, 2014 Author Share Posted March 9, 2014 (edited) One of the parts of this hobby I enjoy is reading up and researching the subject.........there are numerous stories of how these Mfg's tried to out do one another. One of my favorite little bits of factoid I found for these types of autos was they would demo how and what the little cars could do...........read that a Oldsmobile was demoed climbing up the steps @ the Capitol Bldg, Washington DC. Heres a news flash......try that today, better yet other than a 4 wheel drive, what vehicle from the showroom floor could even think of doing this? Speaking of 4 wheel drives........check the photo out, the orignal 4 wheeler albit, 2 wheel drive cross country.......... Rick PS: Check the guy out, he is in to what he is doing, leaning forward from all that HP moving up-hill........you just gotta love this stuff........it ain't American if'n you don't. Edited March 9, 2014 by Pocherphile Quote Link to comment Share on other sites More sharing options...
Pocherphile Posted March 11, 2014 Author Share Posted March 11, 2014 Well another Monday has come and gone, down time @ home with my little wood car............ Am playing with scrape balsa to determine best glue type for construction, taking dope and paint............CA, CA Gel, PVA, Balsa Glue (tube type......Duco), UHU.........etc, etc. Sadly, yes, I do have all these types of glue............one of my favorite type glue comes from Poland, sticks to high heaven, goes on like contact and when you bring the two parts together......better be where you want them. Seems the stuff is used to put leather shoe bottoms on with......... Use this for ship and leather work on Pochers. I like that it does not soak thru what is being glued. Also am debaiting.........top on or topless. Quote Link to comment Share on other sites More sharing options...
Cato Posted March 11, 2014 Share Posted March 11, 2014 Top on-it's harder. Quote Link to comment Share on other sites More sharing options...
Pocherphile Posted March 11, 2014 Author Share Posted March 11, 2014 Top on-it's harder. I will cheat..........top off of Aurora 1904 Olds is a perfect fit, matches in shape and also has the fold up/down bars w/it as well............... this is also the source for the white tires, can always build the Olds w/o top and using another set of tires. Thanks for the in-put and making a choice.............. Rick Quote Link to comment Share on other sites More sharing options...
Pocherphile Posted March 15, 2014 Author Share Posted March 15, 2014 Progress on the little Packard.........do not for a min. think those little box's of a few sheets of wood, card, wire and plastic parts is a weekend project.......well I guess they could be if one was to just throw one together! Fit and re-fit of parts insure they were square and flat against ea. other. Dug out a couple of my ole ship building tools to make this task easier. I bought these years ago, and I have never regretted I did.......Fourmost Miter Sander, Miter Cut and Miter Saw......if you work w/wood, these are a must and I have used them w/sheet plastic as well. I also used another wood building tool, Easy Built Models Magnetic Build Board w/mags......... if you ever do use, you will find all sorts of uses for it. What you see was about 4 hours work of squaring and truing up all the parts that make the carrage/body. I also posted I was tring to figure what glue to use.......I used uni-flex Technical-T120, this is a CA from Poland f/working with wood, metal, plastic and card........good stuff. Does not bleed thru wood. So I will let the photos speak from here. Still some work w/sanding block and a few parts to complete the body.......over all, well pleased with how this turned out. Oh yea, the 1st Grade Balsa was a pleasure to work with. Quote Link to comment Share on other sites More sharing options...
Pocherphile Posted March 15, 2014 Author Share Posted March 15, 2014 Steps of truing up the belly pan............#1 Trim pan down to match the formers. Quote Link to comment Share on other sites More sharing options...
Pocherphile Posted March 15, 2014 Author Share Posted March 15, 2014 #2 Squaring the sheet/belly pan.......... Quote Link to comment Share on other sites More sharing options...
Pocherphile Posted March 15, 2014 Author Share Posted March 15, 2014 (edited) #3 Gluing starts.............. Edited March 15, 2014 by Pocherphile Quote Link to comment Share on other sites More sharing options...
Cato Posted March 16, 2014 Share Posted March 16, 2014 (edited) Cripes-your JIGS are better than my finished MODELS! ...and why is there never a crumb of sanding schmutz on your bench??? You're from another planet-right?? Edited March 16, 2014 by Cato Quote Link to comment Share on other sites More sharing options...
Pocherphile Posted March 16, 2014 Author Share Posted March 16, 2014 My wife says I am beyond anal when it comes from being a neat nut.............even @ work my co-workers are amazed I work and keep everything neat and clean as I go. Is just one of those traits I kept from my days as a GI. I know guys who work in complete chaos...........and do a great job.........but not for me. Quote Link to comment Share on other sites More sharing options...
Harry P. Posted March 16, 2014 Share Posted March 16, 2014 ...and why is there never a crumb of sanding schmutz on your bench??? Yeah, it's like watching surgery. Geez... my workbench doesn't look anywhere near that spotless. In fact, it looks more like a tornado just hit! Quote Link to comment Share on other sites More sharing options...
Cato Posted March 17, 2014 Share Posted March 17, 2014 Ah---the guy's an alien from the neatest planet in the system... Quote Link to comment Share on other sites More sharing options...
f1ford48 Posted March 17, 2014 Share Posted March 17, 2014 I think this may be the most EXACT HM ive seen go together. I used titebond on the Old 16 body but wood like to try your glue [-lil humor on that last sentence] I did not ever consider about the balsa quality-but is does make sense. just like the full size lumber you get these days. Quote Link to comment Share on other sites More sharing options...
f1ford48 Posted March 17, 2014 Share Posted March 17, 2014 Rick- heads up- theres a very rare H M on ebay -I have not seen and with a top- item # 390797018687 1904 Stevens Duryea appears mint. good bidding! FS Quote Link to comment Share on other sites More sharing options...
Pocherphile Posted March 17, 2014 Author Share Posted March 17, 2014 Cato..........you say the same thing my wife says all the time, am I from the same planet! But I assure all, I am a son of the third rock from the Sun! Cato.......neatness is a curse sometimes. I spend too much time cleaning and not building. Harry.........I am sure as you have said, you have alot going on and that is why your builds look like miniature works of art, you do not worry about clutter, but completion........that is where I need to be. I will admit, some of this comes from ship building, dust is the enemy, especially while rigging using bee wax on the thread, so I just have a habit of a clean work station. Frank.........you can order the CA, and pay w/Pay-Pal, just do not be in a hurry to get, I wished now after using, this is the first time I have, I had of ordered more than 1 bottle. The glue was ordered to help in the building of card models........GPM.com Also, you know me too well, already have the kit on the watch list and will try to get if I can. After the work this weekend on the Packard, I am now hooked on these kits and hope to build many of them. And yes, the balsa in these old kits is some of the best you will ever get the chance to work with.....look @ the photos, the wood is as flat as it was when milled for the kit. Sands smooth and is easy to shape. I did add a extra brace to the inside of the boxed in area of the body just for my own peace of mind, I am sure it was redundant. You build the body then the undercarriage sep and join the two..........pretty simple little kit, just take the time to true everything and it will turn out square. I still have a few things to do to the body and then on to the carriage. Glad too see everyone watching the progress. Rick Quote Link to comment Share on other sites More sharing options...
Cato Posted March 17, 2014 Share Posted March 17, 2014 What was the result of the Pocher RR you bid for on the 'bay?? Quote Link to comment Share on other sites More sharing options...
Pocherphile Posted March 17, 2014 Author Share Posted March 17, 2014 (edited) What was the result of the Pocher RR you bid for on the 'bay?? Lost it............was not paying attention! Edited March 19, 2014 by Pocherphile Quote Link to comment Share on other sites More sharing options...
Pocherphile Posted March 18, 2014 Author Share Posted March 18, 2014 More progress.......this was some of the toughest jobs of the build.......seat and the two little pieces that tie seat and body together. Water was used for the small pieces. Took about 4 hours of work to get to the point of seat being glued to carrage. Quote Link to comment Share on other sites More sharing options...
Pocherphile Posted March 18, 2014 Author Share Posted March 18, 2014 (edited) It makes me stop and reflect........these were designed and kitted for sale not long after WWII. Pretty much the norm for the period, model in balsa.......ie: Cleveland Models, some of the most detailed out of box flying models one could hope to complete, f/example a 1/4 scale B-17. If you do find one of these kits today, will set you back $1000.00. But what has my attention is what the modelers during this time period had to work with..........straight pins/sewing type, cleous glues, banana oil, razor blades, really, you took a double edge and broke it in half, no x-acto back then! Also no CA either for helping in a tight spot to hold a part in place. As I have been working on this what looks to be a simple little balsa model car, I am reminded of how easy we have it now days and to be very honest, this kit has had some moments and again I will state, do not let the simplistic look of the kit fool you, it is a builders kit in every sence.........give one a try and see what I am talking about. For Frank to turn out the model he did of Ole 16, took a masters touch to get it too look as good as it does. My hat off to you Frank for a job well done. These little cars are not plastic formed parts that all you do is glue them together and paint, you make the part and that is the appeal of these kits too me. Rick Edited March 18, 2014 by Pocherphile Quote Link to comment Share on other sites More sharing options...
Recommended Posts
Join the conversation
You can post now and register later. If you have an account, sign in now to post with your account.
Note: Your post will require moderator approval before it will be visible.