shafer Posted February 2, 2013 Share Posted February 2, 2013 the whole build is in the workbench Quote Link to comment Share on other sites More sharing options...
bbowser Posted February 2, 2013 Share Posted February 2, 2013 Clyde, you need to slow down and smell the paint fumes! Great build BTW. Quote Link to comment Share on other sites More sharing options...
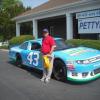
Green Duster Posted February 2, 2013 Share Posted February 2, 2013 Way to go Clyde! Another masterpiece! Quote Link to comment Share on other sites More sharing options...
wheaton79chris Posted February 2, 2013 Share Posted February 2, 2013 wow Clyde awesome job Quote Link to comment Share on other sites More sharing options...
shafer Posted February 3, 2013 Author Share Posted February 3, 2013 thanks guys Quote Link to comment Share on other sites More sharing options...
MAGNUM4342 Posted February 4, 2013 Share Posted February 4, 2013 Nicely done Clyde. Are you going to add the white pinstripes? Quote Link to comment Share on other sites More sharing options...
shafer Posted February 4, 2013 Author Share Posted February 4, 2013 Nicely done Clyde. Are you going to add the white pinstripes? dont know - pinstripes are too thick- paint requires such a steady hand. Quote Link to comment Share on other sites More sharing options...
MAGNUM4342 Posted February 4, 2013 Share Posted February 4, 2013 I bought a cheap paper cutter at a craft store. I then cut straight strips from a sheet of white decal paper. Sometimes you might have to cut a curved corner section by hand but it works pretty good otherwise. Quote Link to comment Share on other sites More sharing options...
JMChladek Posted February 5, 2013 Share Posted February 5, 2013 (edited) There is a brand of Japanese tape I like to use called "Aizu" which is just like Tamiya tape, only cut into finer widths (.4mm, .7, 1.5, 2, 2.5 mm). I find it works VERY well for pinstriping. How you use it that way is to use the skinny Aizu tape to place the pin stripe line down that you want to paint, than run some other tape (either Aizu if you still need the flex or something wider like Tamiya) on each edge with no overlap to mask the borders. Once things look good, pull the Aizu tape pinstripe off and viola!... now you have a nicely exposed pinstripe of (hopefully) constant width to spray white into. I admit this probably works best with the long straight pinstripes on the fenders, doors and the back edge of the red going up over the roof. But, with proper care, I don't see why it couldn't be used for all the striping. Some other form of temporary mask could also be tacked down as I see it around the tight corners and the real trick would just be trying to get the widths constant on the curves. Very nice build BTW. I plan to start my own Petty Charger build very soon and will be referencing yours for my approach to certain things. Aizu tape can be found at Hobbylink Japan (HLJ.com). But it can also be found in the states at Starshipmodeler.com (look for it under the "tools" section of the hobby shop). Edited February 5, 2013 by JMChladek Quote Link to comment Share on other sites More sharing options...
MAGNUM4342 Posted February 5, 2013 Share Posted February 5, 2013 That just seems like a long way to go to get stripes. Think about it, you're actually taping the car three times before you even mask the larger areas. First there's the tape line you lay down where the stripe should be, then you have to lay tape inside the red and outside over the blue. Why wouldn't you just mask off for the red, then after spraying the white base, go around the edge with the Aizu and then spray the red? Quote Link to comment Share on other sites More sharing options...
JMChladek Posted February 5, 2013 Share Posted February 5, 2013 (edited) That just seems like a long way to go to get stripes. Think about it, you're actually taping the car three times before you even mask the larger areas. First there's the tape line you lay down where the stripe should be, then you have to lay tape inside the red and outside over the blue. Why wouldn't you just mask off for the red, then after spraying the white base, go around the edge with the Aizu and then spray the red? Actually, I would do the white pinstripe AFTER the blue and red are down so that the white traps the edges of the red and the blue. Typically that tends to be the way it is done anyway even on full size cars. But, if one wanted to, they could primer the body in white, than mask the pin-stripe, than do the red (since it is a dayglo color it should go on white) and finally the blue as long as care is taken not to pull off the pinstripe mask. So when all is said and done, pull off the white stripe mask and if everything went well, a nice perfect white stripe with everything trapped just nice to it. Only problem as I see it is if a lot of blue and/or red is built up, it might produce a bit of a step. Sure, it may seem a bit convoluted, but masking tape is relatively cheap and if one is going to do it, might as well do it right. You know the tape is going to have to be pitched in the trash anyway after use, so it isn't like one is wasting tape all that much as you are still spending more money on paint than anything. Besides, by doing a similar technique, I was able to achieve nice results doing THIS: Yes, it is not a car model. It is a replica of the Moonraker space shuttle from the Bond films (1/72 scale with the completed model standing about 3 feet tall). But, by using a combination of skinny Aizu tape and Tamiya tape, I was able to not only mask perfectly straight stripes that remained at constant widths, I was also able to use Aizu to help mask off a skinny pinstripe that ran parallel to the fatter ones. I did this by laying down the tape next to one another side by side and pulling up the mask for the pin stripe I wanted to spray orange along with the fat lines (and the gray area behind the orange stripes). I also used the same technique to do the black lines on the rudder split for the tail. The results were superior to what I could have achieved with either decals or trying to hand paint that. With a little finesse, I could have given these lines some gentle curves as well. Sharper curves would have been a bit trickier, but still possible. Tape is a tool and it can be used a lot of ways. Sure, doing it this way might mean more work, but believe me the results could look pretty crisp and clean if the time and care is taken to do it properly. The best part about using paint is you don't have to worry so much about dealing with the sometimes translucent nature of white decal stripes. Masking might take a couple hours, but painting on the white stripe might take 20 minutes tops with an airbrush (including cleanup time). A spraycan would be a little trickier due to the high flow nature of the paint, but it would still theoretically be possible. Edited February 5, 2013 by JMChladek Quote Link to comment Share on other sites More sharing options...
MAGNUM4342 Posted February 5, 2013 Share Posted February 5, 2013 That's essentially what I said. The reason for spraying and taping the white first is because of the neon STP red. Neons are typically very soft paints that tear easily and pick up dust and tape gum like a magnet, so you want to spray the neon red last. You also want a white base under the Petty blue to make it pop. So my process has always been- Flat white over all. Mask off the pinstripe and the parts that will be red and spray the blue. A paint step won't be an issue if you lay down light coats. I also tend to score the tape edge before I remove any tape. The blue will gas out and cure faster than the red and be a harder paint in the end. Once it's cured peel off all but the stripe and mask off the blue. Once the red is on I recommend not touching the car at all for at least a week. Tamiya neon red TS-36 is often used for the red because it's one of the few neon paints that will come out glossy and stay glossy. Testors racing red is a better match for STP red but comes out flat. If you use the testors, make sure to wear gloves until the paint has been clearcoated. Quote Link to comment Share on other sites More sharing options...
shafer Posted February 5, 2013 Author Share Posted February 5, 2013 I have some white stripes from a previous petty decal kit so i am going to cut them down with a sheet cutter and wetside them in place piece by piece. Quote Link to comment Share on other sites More sharing options...
navistar Posted February 6, 2013 Share Posted February 6, 2013 why not just buy a roll of pactra trim tape .seen it for under 5 dollars on ebay comes indifferent colors one roll has widths from1/32 up to 1/4 ibelieve seems it would make a nice clean pinstripe. Quote Link to comment Share on other sites More sharing options...
MAGNUM4342 Posted February 6, 2013 Share Posted February 6, 2013 why not just buy a roll of pactra trim tape .seen it for under 5 dollars on ebay comes indifferent colors one roll has widths from1/32 up to 1/4 ibelieve seems it would make a nice clean pinstripe. It would work, except for being too thick and the first warm day the corners will lift. Trust me I tried it years ago. Quote Link to comment Share on other sites More sharing options...
Hayabusa Posted February 6, 2013 Share Posted February 6, 2013 I´m not sure but I believe Mike´s Decals will sell a complete decal set with the white pinstripes. Ok, you will end up with decals that you don´t really need but maybe it´s worth it? Don´t know when it will be available, march/april maybe? Seems to be a kit that goes together pretty well. Quote Link to comment Share on other sites More sharing options...
roadhawg Posted February 6, 2013 Share Posted February 6, 2013 Use white automotive pinstriping tape, the kind body shops use. Stick some to a clean piece of glass. File the groove in an X-Acto knife to hold 2 blades (or simply clamp 2 blades together with a small pair of vice grips). Using a straightedge, cut out your pinstripe with your homemade "stripe cutter", and apply just like a real car. It's not too thick and it WILL stay put. That's what its made for. Quote Link to comment Share on other sites More sharing options...
Recommended Posts
Join the conversation
You can post now and register later. If you have an account, sign in now to post with your account.
Note: Your post will require moderator approval before it will be visible.