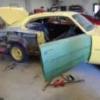
sak Posted October 7, 2012 Share Posted October 7, 2012 (edited) This will be my next project I think. Chevrolet chevelle. It is a big block model but I want it to be just a regular chevelle SS. So I removed the 396 badge on the back. The whole tail light panel seems to be different so I will have to try to build a new one. But a question for chevelle experts... these round circles under the frame. Are these supposed to be hollow, and the springs and shocks go through the holes? If so...it seems that one of the pivots for the upper control arms sits right on top of these holes. And the spring would be half on the control arm and half just resting on nothing. Cannot seem to find any pictures of a bare chevelle frame. And one more thing...It will be a 283 or 327 when I am done. I have a small block motor but don't have an intake. If anybody has an intake from the amt nova. I think that one will work the best. It has a extra extension on the front for the black tube thing. Not sure what it is really called. Edited October 7, 2012 by sak Quote Link to comment Share on other sites More sharing options...
severin681 Posted October 7, 2012 Share Posted October 7, 2012 Nice custom fab stuff going on there. Good start. Lookin forward to see what you do. Thanks for sharing! Quote Link to comment Share on other sites More sharing options...
exnyman Posted October 7, 2012 Share Posted October 7, 2012 Another tip: the Malibu SS script that is on the front fender of a Z16 (as the Revell kit is modeled as) should be on the rear 1/4 panel on a standard SS. Can't wait to see this one finished as my cousin had a Danube Blue 65 Malibu SS with light blue interior when I was a kid. Quote Link to comment Share on other sites More sharing options...
Bartster Posted October 7, 2012 Share Posted October 7, 2012 The tube thing is the oil filler tube. l love these cars, carry on. Quote Link to comment Share on other sites More sharing options...
Craig Irwin Posted October 7, 2012 Share Posted October 7, 2012 That "hole" in the frame is the spring pocket for the coil. It should not go all the way through the frame.Think of it this way, the top of the coil sets against the bottom of the upper frame rail, and the bottom sets in the lower control arm {"A" frame). The coil compresses as the control arm moves up and down.. Quote Link to comment Share on other sites More sharing options...
sak Posted October 7, 2012 Author Share Posted October 7, 2012 (edited) Thank you Craig Irwin. Yeah now that you explained it, I can't understand how I could have been so stupid. The top of the spring would need something solid, otherwise it would not compress. And also thank you exnyman as well. I did not even notice that until you pointed that out. I suppose I will need to add a photoetched malibu ss badge if I decide to carry on with my plans. Bah its too bad model car garage does not sell individual badges instead of an entire kit. Edited October 7, 2012 by sak Quote Link to comment Share on other sites More sharing options...
sak Posted October 13, 2012 Author Share Posted October 13, 2012 I am beginning to work on that tail light panel. I thought I would try to make pictures as I go in case somebody would like to do this also. I carved out the part of the body around the brake lights and glued a piece of evergreen behind the panel. I will build it up with pieces of flat or round plastic to get it to look right. These are what I was using for a reference. Not sure what one is correct but I am going with the silver one. Quote Link to comment Share on other sites More sharing options...
1972coronet Posted October 13, 2012 Share Posted October 13, 2012 I am beginning to work on that tail light panel. I thought I would try to make pictures as I go in case somebody would like to do this also. I carved out the part of the body around the brake lights and glued a piece of evergreen behind the panel. I will build it up with pieces of flat or round plastic to get it to look right. These are what I was using for a reference. Not sure what one is correct but I am going with the silver one. Perhaps the difference is : 1.) Mid-Year Change ; 2.) Different Assembly Plant , and ; 3.) Different (local) Supplier , or ; 4.) One of them is Customised Keep up with the great work ! Quote Link to comment Share on other sites More sharing options...
sak Posted October 18, 2012 Author Share Posted October 18, 2012 A bit more progress. I work slow. Quote Link to comment Share on other sites More sharing options...
cobraman Posted October 18, 2012 Share Posted October 18, 2012 Coming along nicely. Quote Link to comment Share on other sites More sharing options...
Greg Pugh Posted October 18, 2012 Share Posted October 18, 2012 Nice start here! I'll be watching this one! Quote Link to comment Share on other sites More sharing options...
Duntov Posted November 6, 2012 Share Posted November 6, 2012 Nice work here!!!! Quote Link to comment Share on other sites More sharing options...
sak Posted April 22, 2013 Author Share Posted April 22, 2013 Quote Link to comment Share on other sites More sharing options...
Wonderbread Kustomz Posted April 23, 2013 Share Posted April 23, 2013 Looking really good! Quote Link to comment Share on other sites More sharing options...
freakshow12 Posted April 23, 2013 Share Posted April 23, 2013 Coming along nicely. Quote Link to comment Share on other sites More sharing options...
jeffbrad Posted April 23, 2013 Share Posted April 23, 2013 The red car is a Z16 with the black trim. Silver trim is regular Malibu SS Quote Link to comment Share on other sites More sharing options...
rasafyff Posted April 23, 2013 Share Posted April 23, 2013 The red car is a Z16 with the black trim. Silver trim is regular Malibu SS The red car can't be a z16.It has the SS emblems on the quarter panel I think the black car doesn't have black on the trim pieces because it's a black car. Quote Link to comment Share on other sites More sharing options...
Tumbler75 Posted April 24, 2013 Share Posted April 24, 2013 (edited) Ok. I guess I'm gonna have to come in and clear this up. I have a 1:1 1965 Chevelle Malibu 2dr Non SS 396 Hardtop Coupe. My car is body colored around the taillights and between the trunk moldings. Mine specified on the build sheet "Body Color" in a note from the dealer on how the car was ordered. http://www.chevelles.com/forums/showthread.php?t=317382 I've seen these cars with the "Argent Silver," Silver, Satin or Gloss Black, and Body Color between the trunk molding. It all depended on dealers and customers when new, and restorers/customizers now that these cars are 48 years old. The only 1965 Chevelle to have a totally different Trunk Molding Set was the Z16 Models. As you can see in the link above both the SS and Non SS version look virtually identical except for the badging being on the passenger side noting it as a SS car. Now back to the build. I really appreciate your work and effort in documenting this build as well as you are! This gives me hope to be able to replicate my 1:1 car. Keep up the outstanding work you are doing. I can't wait to see more. Rock on man! Edited April 24, 2013 by Tumbler75 Quote Link to comment Share on other sites More sharing options...
rmvw guy Posted April 24, 2013 Share Posted April 24, 2013 I too, owned a 1:1 '65 Chevelle Malibu SS back in 1966. Mine was dark navy blue and had the silver in back. I remember seeing black on red and even body color on non SS cars. I am also trying to replicate my car in 1/25 scale. One problem I ran into is changing the Malibu emblems to the rear quarter. I think the only ones mounted to the front fender must have been on the Z-16. I think there is a photo etch set available somewhere. Also I need 327 badges. Yours is coming along nicely, I love the pin knobs on the dash. Quote Link to comment Share on other sites More sharing options...
Ron Hamilton Posted April 24, 2013 Share Posted April 24, 2013 I am going to enjoy this thread. My first car was a '65 Malibu with a lot of road rash. When Revell first brought this kit out, I had wished that they did it as a non Z-16, but we have what we have. The contour of the rear quarter windows kind of bugged me, so I built a phantom Z-16 convertible out of mine. Do yourself a favor, and buy a Model Car Garage '65 Chevelle Photoetch Ser. It will give you the emblems to do the car you wish to do. The detail work you are putting into your build will be enhanced with this kit. In my stash, I have a R&R Resin '65 Malibu SS 2-Door hardtop, which was not a bad re-pop of the AMT Craftsman Annual Kit, with an opening hood. I may do my Malibu SS 2 Door Hardtop using a Craftsman Built-up that I have. The project is a little ways off, but this is how I plan to do it: The Craftsman kit body is fantastic, in that the hood has to be opened, and components added. The old cratsman kit also has a correct set of "SS" wheelcovers. The promo style mounting bosses have to be removed from them to work with the wheelbacks. The absolute best '64-'67 GM "A" chassis in scale is from the AMT '66 Olds 442, and that is the one I am going to use. It has a separate frame and floorboard, as well as all of the underhood components. The engine will come from the AMT '66 Nova. With the exception of the oil pan with the front sump, if you are going to do a 4-speed car, this is a great powertrain, requiring only a correct rear sump oil pan to work. The air cleaner has to be modified, but a the best unit shapewise is in the JoHan '65 Cadillac. The oval snorkel(s) have to be added. The Revell '64 Impala has a nice 327/300 V8 with a powerglide. The center console has to be modified to adapt the automatic shifter and quadrant. The Revell '64 also has a beautiful set of Goodyear "Power Cushion" tires. The AMT '65 El Camino had some nice interior parts for the project (Bucket seats and console). Now I could also go the way you are going, and use the Revell Z-16 kit, and do the mods you are doing to the kit, which is far more cost effective, and satisfying. I may take mine, and do a '65 Malibu 2 Door Hardtop. I'll have to scratchbuild the front bench seat, as well as the side mouldings, which I will pattern from the AMT wagon, and I will use a set of wheelcovers from that kit. I want to do a set of '65 Chevelles, including an El Camino, Malibu Wagon (AMT Kits), a 300 2 Door Wagon (Jimmy Flintstone Resin), and a 300 2 Door Sedan. I did a phantom '65 Sedan Delivery from an AMT '65 Wagon back in 1997. What color are you going to paint yours?? I know it is going to be great judging from what I am seeing so far. Quote Link to comment Share on other sites More sharing options...
DR JAY Posted April 24, 2013 Share Posted April 24, 2013 I like the shape your project is taking. I enjoy builds that require fabrication and modifications such as you are doing here...I understand and respect the work that goes into them! I'm watching this one... Quote Link to comment Share on other sites More sharing options...
Dirkpitt289 Posted April 24, 2013 Share Posted April 24, 2013 WOW, great work fixing the back end. I also love the replacement knobs on the dash. very creative Quote Link to comment Share on other sites More sharing options...
Jantrix Posted April 24, 2013 Share Posted April 24, 2013 I have this kit too. I'll be paying attention. Looking good. Quote Link to comment Share on other sites More sharing options...
sak Posted April 25, 2013 Author Share Posted April 25, 2013 Will paint it a very light blue metallic. Quote Link to comment Share on other sites More sharing options...
sak Posted May 9, 2013 Author Share Posted May 9, 2013 Quote Link to comment Share on other sites More sharing options...
Recommended Posts
Join the conversation
You can post now and register later. If you have an account, sign in now to post with your account.
Note: Your post will require moderator approval before it will be visible.