Rusty Irons
-
Posts
61 -
Joined
-
Last visited
Recent Profile Visitors
1,830 profile views


Rusty Irons's Achievements
MCM Regular (3/6)
-
Great fifty eight Phil. Those doors fit real nicely and the dash board is very well done. An extra nice build all around!
-
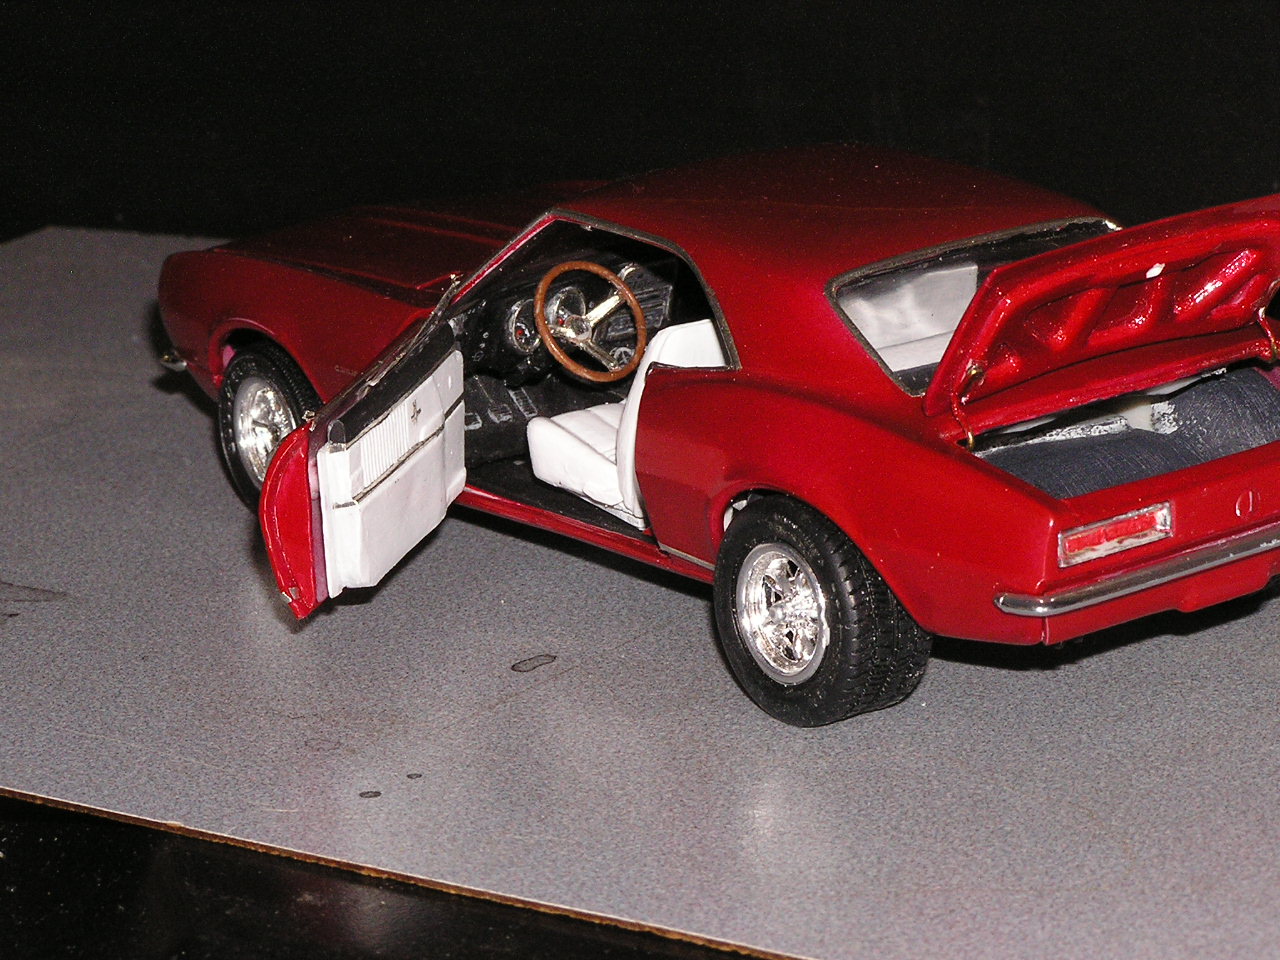
I think I have the door, the trunk and the hood fitted about as well as I ever will. I had to remove the spring from the trunk. It held the trunk open just fine but when it was closed it was a tad bit high and I didn't like the way it looked. I think a bit of touch up on some of the BMF and maybe the wing window and I will call this one done. Here are a few more photos.

-
That's interesting Daniel. I drove past First United Methodist Church today. I must admit, I haven't been inside for a number of years now. My sister lives in your area Centennial CO.
-
Thanks, Patrick. I saw some pics of a Camaro online with this color combo and I thought the contrasting colors were very cool so I tried it out and I am glad I did. Thanks, Daniel. I will look for a parts pack with the Goodyear poly-glass tires. They sound much better than anything I have in my stash of parts. Yes, I have been here in Great Falls for most of my days but I lived about 2 years in Seattle as a young man.
-
Thanks Rusty. I have had enough time to work out a couple trouble spots since my last post. I had some problems with my trunk latch that I am still working on but I was able to work out the wing window to an acceptable version from an old blister pack cut to size. I'm not to sure I like the tires or not I don't have many on hand to choose from. I also need a door latch and a little work under the hood and she will be about ready to post in the under glass section. Yahoo!
-
I didn't forget about this thread I started last year. I was just to busy with other things to spend any time on my model building. So I reluctantly put my building aside for a few months. I am happy to say a few weeks ago I got started again and I have made a fair bit of progress. I thought I should post and show you how she looks so far. I still need to sort out the trunk latch and a few other things. Here are a few photos to show you.
-
I would like to read that article Patrick. I am always interested in working features on model cars. I am fairly new to the hobby, this being my third model car build. I tried a few torsion bar spring ideas but the leaf spring was so easy to make that I went down that path instead. I am still thinking of how I would like to latch the trunk. I like the idea of a magnet but I am still looking for a source for a magnet small enough to do the job. It seems that once you open a door or a trunk there is always one more little detail that has to be added.
-
I have been slowly refining some of the details of the trunk and some of door jam details before I painted the body parts. One glaring problem with the kit is the seats are too high to look right. The easiest way to fix that was to remove the floor from the tub which I did. Now the seat will have to be installed after the rest of the tub is installed. I figure some putty and some flocking should look get the floors looking good. looking at the interior with the door open the seats and the floor look better down lower.
-
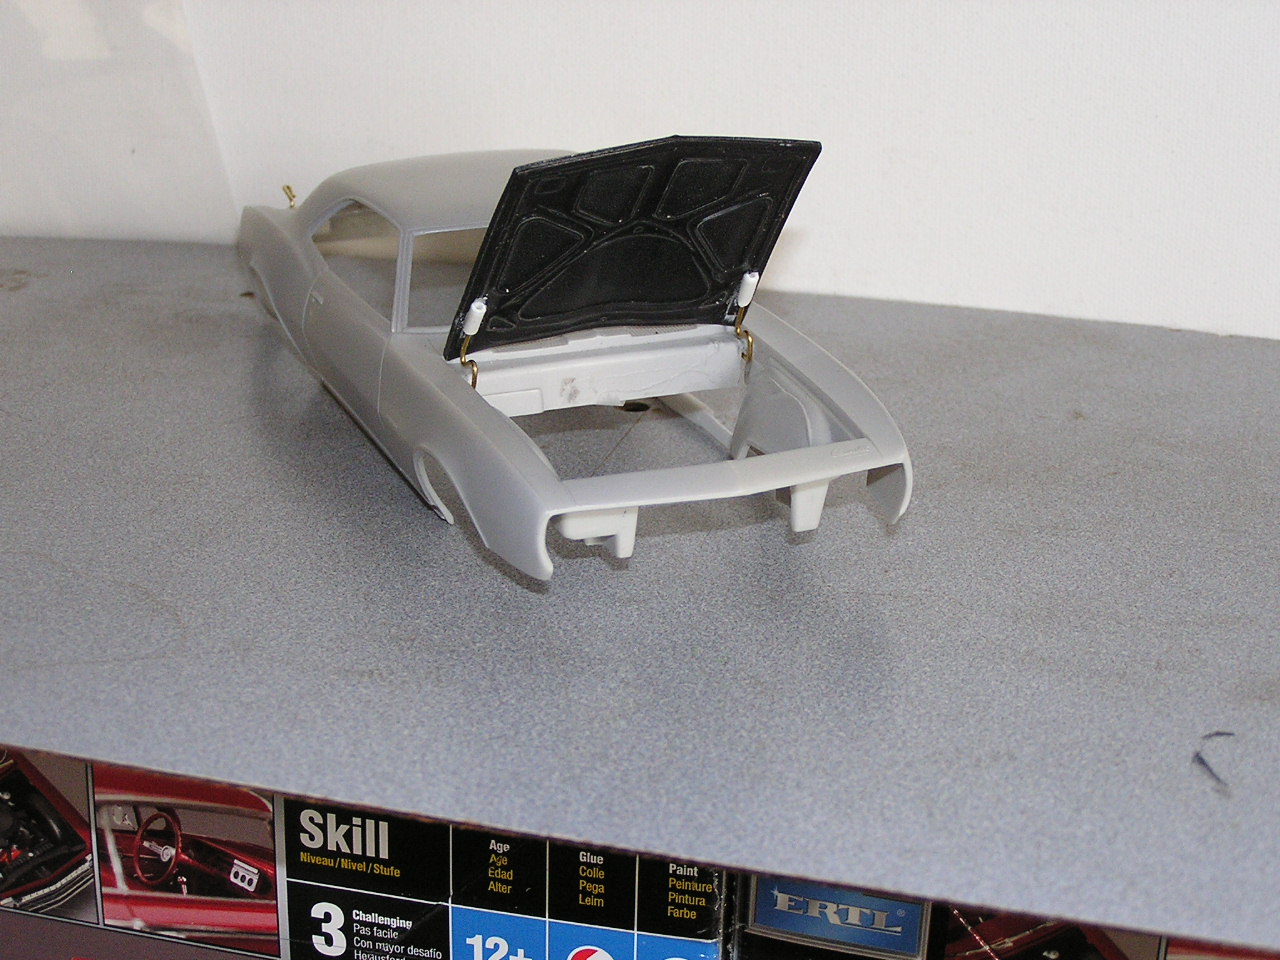
I added a way to lift and hold the hood open. You can still remove the hood for photos by lifting it of the hinges. The hood in the photos is one of my extra hoods. I have been using this extra hood to test the fit. I think I can get a cleaner install on the next one.
-
 This looks like a fun kit to build. The subject is much less complicated than your last one was. The scale is also larger with this boat than your ship was. The kit quality looks much better with this kit. The first wood ship kits were hardly kits at all. Most early wood model kits were not much more than a basswood plank, some dowels, a few spools of thread, a piece of cloth along with a drawing or two and that was your kit. They have come along way with the laser cut wood pieces in the modern kits. Most of the old kits just printed the shape of the piece on a thin piece of wood and it was up to you to cut the piece out. I have an old kit of the Santa Maria that has nice wood but is almost more like a scratch build than a kit. Using a small scroll or band saw is the only practical way to build one of these old kits.
 -
Thanks David! I like the magnet idea. I will look for some mini magnets. If they are small enough I think I could hide one under the area where the hood latch is located.
-
Thanks Marty! The hinge is easy to make. This is my first hinge of this type that I tried. I did a cleaner install of a similar door hinge on my 64 GTO build. One thing about installing a hinge in such a small space is how to attach it. The nice thing about installing this hinge is you can connect the two ends of the coiled wire that forms the tube section of the hinge directly to the body of the car or to the door. The hinge is only two pieces. The door is made from two parts. The outer part of the door fits on the inner part after hanging the door on the hinge. The halves fit together on the two pairs of tubes that are glued inside.
-
I will be watching this one. I really like a model with working doors!
-
Thanks Steve! Thanks Ray! Thanks Rex! One thing I wanted was to have the trunk stay up when opened. My plan is to have a spring lift and hold the hinge. The trunk will be held closed by a wedge fit at the same location as the trunk latch on the full scale car. A small pin with a detent will hopefully hold the trunk closed with any luck. My plan is to have a plastic strip act as the spring. In the photo I have a plastic strip taped in place and in the other photo I am pressing the hinge down into the closed position. I have confidence that this spring will work as planed . I tried a few types of springs and this was the easiest to fit in such a tight space.
-
Thanks Michael. Sorry about the multi posting. I would be happy to delete one if I could figure out how to do it.