comp1839 Posted November 16, 2013 Author Share Posted November 16, 2013 thanks guys. got some more updates. machined up a master cyl. and some mounts for the chassis. also made the brake pedal. Quote Link to comment Share on other sites More sharing options...
blackbeard Posted November 17, 2013 Share Posted November 17, 2013 that's looking fantastic dave coming along nicely Quote Link to comment Share on other sites More sharing options...
Magic Photos Posted November 17, 2013 Share Posted November 17, 2013 Great work Dave, you just keep amazing us. As I said before I just keep learning from you. Thanks Quote Link to comment Share on other sites More sharing options...
comp1839 Posted November 18, 2013 Author Share Posted November 18, 2013 so, i made a really low dollar chassis jig. went to home depot and got a piece of mdf. cut it down and made my chassis lines. made some suspension mounting fixtures with some aluminum angle. done. now i can start making all of the tubing fit. Quote Link to comment Share on other sites More sharing options...
blackbeard Posted November 18, 2013 Share Posted November 18, 2013 that's a great idea for a low dollar jig and that's coming out greatly Quote Link to comment Share on other sites More sharing options...
Prostreet Posted November 18, 2013 Share Posted November 18, 2013 Dam Dave, that thing is going to look sitting on the ground. excellent work my friend. Quote Link to comment Share on other sites More sharing options...
Mooneyzs Posted November 18, 2013 Share Posted November 18, 2013 Dave... this build has me blown away. That master cylinder looks great. The break pedal is awesome. And I love the home maid jig you made. that is some awesome work to keep everything straight. I am going to have to borrow that idea on how you did your jig. You have me wanting to see more of this build. Looking forward to more. Quote Link to comment Share on other sites More sharing options...
comp1839 Posted November 18, 2013 Author Share Posted November 18, 2013 thanks guys. it is a lot of effort to keep this thing straight and square.......actually, more like a pain in the butt. LOL! Quote Link to comment Share on other sites More sharing options...
stump Posted November 19, 2013 Share Posted November 19, 2013 thanks guys. it is a lot of effort to keep this thing straight and square.......actually, more like a pain in the butt. LOL! Hehehe, hey Dave, you know, if you're tired of messing with this thing, you know where to sent it, right? Must excuse myself if anyone gets some drool and dribble splashed their way......my keyboard is a mess. GORGEOUS work Dave. Oh, and I really must get myself some of those kool tools you showed....I have benders, the not very successful spring style...they are hopeless. Looking forward to the next update mate, I just can't get enough of this ride. Cheers Greg Quote Link to comment Share on other sites More sharing options...
comp1839 Posted November 20, 2013 Author Share Posted November 20, 2013 (edited) hey greg, good to hear from you. how are things in the great down under? here is a part i consider an important detail. most of you don't or won't care and that's fine but, i like to set up the 4 link and rear as close to true as possible. i use an alignment bar (tube in this case) to get the pinion center line in line with the motor and trans. at this point i can make the 4link bars since there centers are now set. special note to mike here. you'll see why i said you should move your driveshaft loop higher in the chassis from this shot. Edited November 20, 2013 by comp1839 Quote Link to comment Share on other sites More sharing options...
Magic Photos Posted November 20, 2013 Share Posted November 20, 2013 Thanks Dave love the work you do. Quote Link to comment Share on other sites More sharing options...
Prostreet Posted November 21, 2013 Share Posted November 21, 2013 Nice Dave, i didn't do that in my 57 build and got lucky. I will be doing it in my next build for sure. Quote Link to comment Share on other sites More sharing options...
Red rocket 10 Posted November 21, 2013 Share Posted November 21, 2013 Dave that chassis Jig is amazing Leonard Quote Link to comment Share on other sites More sharing options...
Mooneyzs Posted November 21, 2013 Share Posted November 21, 2013 Dave... it looks awesome with the tranny and rear end mocked up with the alignment tube... This is just Killer!!! Quote Link to comment Share on other sites More sharing options...
comp1839 Posted November 21, 2013 Author Share Posted November 21, 2013 thanks guys!!! i'll be doing some work on the four link bars tonight. have to get to a spot where i can hold up a bit. just picked the block (for the '37) so it's time to start. re-assembling the real thing. Quote Link to comment Share on other sites More sharing options...
blackbeard Posted November 22, 2013 Share Posted November 22, 2013 sounds like you have the 37 chevy out doing donuts very soon Quote Link to comment Share on other sites More sharing options...
Red rocket 10 Posted November 22, 2013 Share Posted November 22, 2013 Good to here your back on the 37, can't wait to see it ! Leonard Quote Link to comment Share on other sites More sharing options...
Armornv Posted November 22, 2013 Share Posted November 22, 2013 This is so amazing. I can't even think of any words to describe it. Fantastic work. (as if you haven't heard it a million times already) lol. Out of curiosity, and forgive me if you already have, but I'd really like to see an overall pic of say the body next to something well known like a dollar bill, just to get an idea of how big this monster actually is. Don't want to trouble you for it or get you sidetracked, but I just can't picture the size of these larger scale cars. Anyway, stellar build so far. I'll be watching for sure! Quote Link to comment Share on other sites More sharing options...
stump Posted November 22, 2013 Share Posted November 22, 2013 Hey Dave, I'm doing pretty good, thanks mate. Be even better once I get my modelling seat warmed up again. ALL this work you are doing for yourself, as well as for us guys, is driving me closer and closer to the bench, thank you. And good luck with the 1:1 build man, can not wait to see that thing fire up. Quote Link to comment Share on other sites More sharing options...
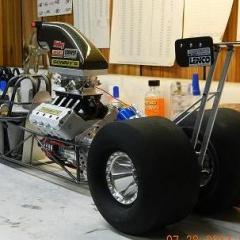
comp1839 Posted November 23, 2013 Author Share Posted November 23, 2013 (edited) thanks guys!!! much appreciated. clint, sorry, i didn't get a shot of the body next to a dollar for you but, how about i just give you the length? the total length on the body is about 25.5". hope that works for ya. greg you need to get back to the bench asap. i can hear it calling you all the way over here.hehe. o.k. so, i was out n the shop making stuff so i made up a fixture to hold the shocks at exactly the right length. it's piece of aluminum with four .062" pins on 2.200" centers and the center hogged out so the shocks will stay at that length while the j.b. weld dries. the rod ends are r.b.motion units, of course. also made the tube ends for the lower four link bars. the lower bars will be 3/16" aluminum tube while the uppers will be 5/32". yes that requires the ends to be different between the 2 sets of bars. also working on some tire detail. the wear indicators will be drilled in to the rubber replicating the real deal. Edited November 23, 2013 by comp1839 Quote Link to comment Share on other sites More sharing options...
Prostreet Posted November 23, 2013 Share Posted November 23, 2013 Gees Dave that the best you can do lol, Outstanding work on those rod ends and shocks. If i ever get my mill i'm going right for a 1/12 promod. Quote Link to comment Share on other sites More sharing options...
Magic Photos Posted November 24, 2013 Share Posted November 24, 2013 OK Dave you have gone to far. LOL GREAT DETAIL. Quote Link to comment Share on other sites More sharing options...
Armornv Posted November 24, 2013 Share Posted November 24, 2013 No problem Dave. The measurements will definitely suffice. As well as the picture of that massive hunk of a tire in your hand lol! Fantastic work! Quote Link to comment Share on other sites More sharing options...
comp1839 Posted November 24, 2013 Author Share Posted November 24, 2013 made some mods to the rear end fixtures so i could see the scale to measure the link lengths. milled some windows in the sides. then we got on with making the lower links. next, back to shop to make the upper link tube ends. then fabbed the upper links. all the time the line up bar is in place making sure the rear geometry is held in place. Quote Link to comment Share on other sites More sharing options...
comp1839 Posted November 24, 2013 Author Share Posted November 24, 2013 shot of the rear 4 link form the top. a wishbone will be the next thing on the agenda. Quote Link to comment Share on other sites More sharing options...
Recommended Posts
Join the conversation
You can post now and register later. If you have an account, sign in now to post with your account.
Note: Your post will require moderator approval before it will be visible.