James Moparbuilder Tester
-
Posts
13 -
Joined
-
Last visited
Recent Profile Visitors
1,192 profile views


James Moparbuilder Tester's Achievements
MCM Member (2/6)
-
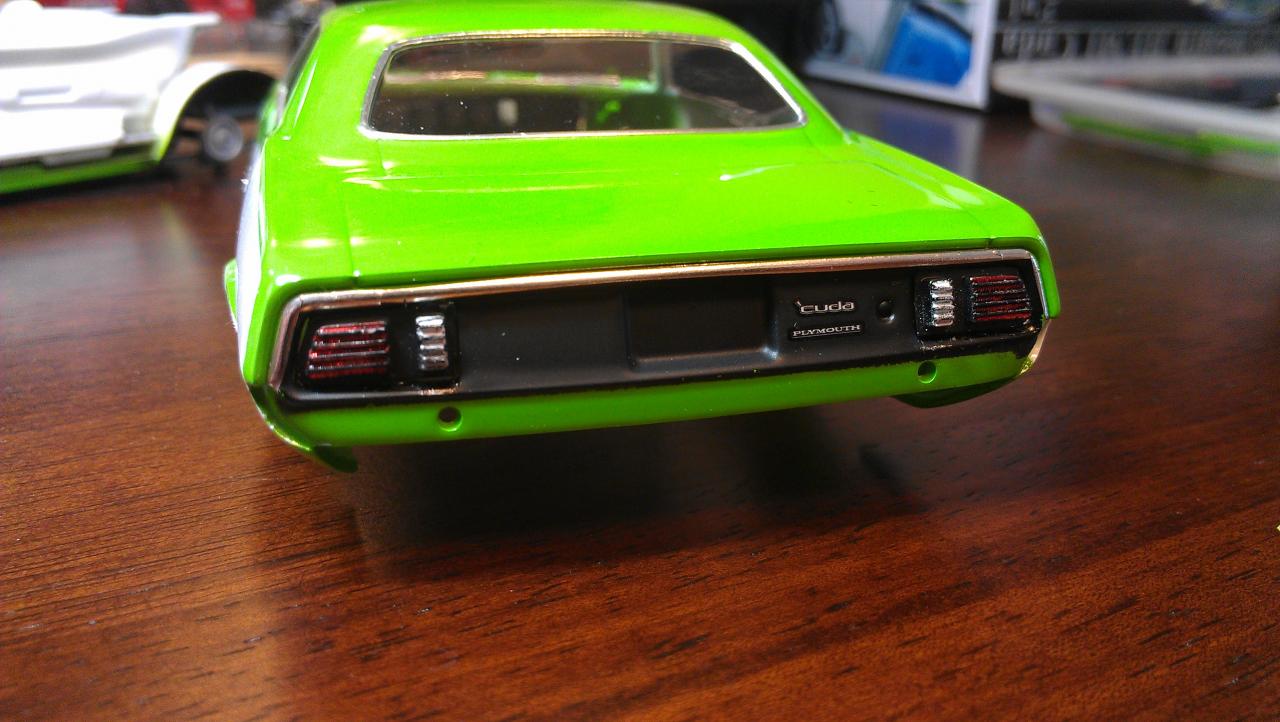
 The build is a little further along now than the posting is... The side gills are photoetched pieces from Model Car Garage's 1/24th scale set. I used a piece of pinstripe tape to temporarily attach them to the body and used future floor wax to "glue" them to the body. Meanwhile I did some work on the interior while waiting to attach the Fred Cady billboard stripes and clear coat the body. The body is now decaled, cleared and windows are installed. The grille is mounted to the body. Tail lights are mounted as well. The engine is complete with only basic plug wire and paint details. The next posting will most likely be the finished car. James
-
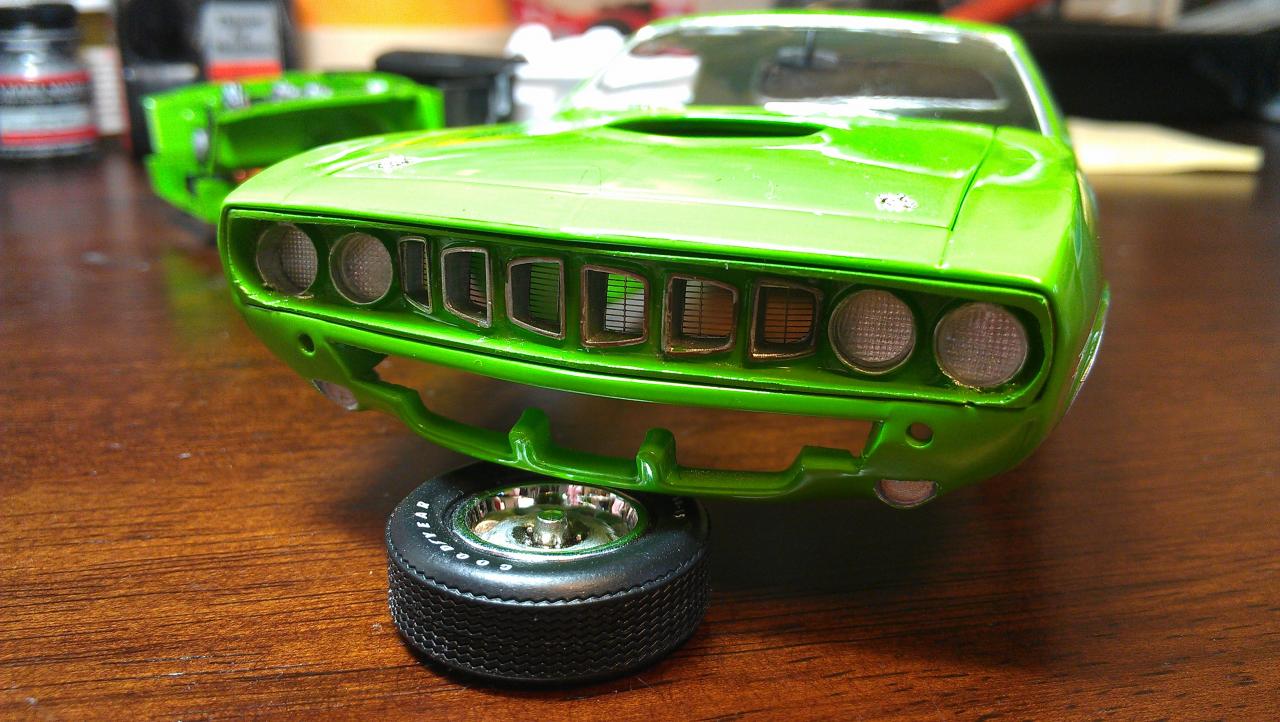
More updates on the 71 Cuda project: The Grille has photoetched "cheese grater" parts and screen behind. The headlights are from the parts box with some cigarette paper behind for reflections. The Chassis is straight out of the box airbrushed with Tamiya acrylics: The engine and interior are built and painted but I want to add the final details to them before I post any pictures. Stay tuned... James
-
The new Revell kit has a far superior stock interior and chassis than the Johan kit does. I figured it would be easier to convert the 70 Cuda kit into a 71 than to adapt the new interior and chassis to the old Johan body. Besides I would have to add the fender gills to the Johan anyways. The tailpanel was an easy conversion too. The 1/24th scale lights fit in the back of the new kit.
-
I will be adding photoetched gills to the fenders (from the Model Car Garage kit). As for the taillights, suprisingly the 1/24 scale ones from the Monogram Hemi Cuda kit drop right into place into the new 1/25th scale body. James
-
Hey guys, I started a new project this weekend. I cut the front end off of the Johan 71 Cuda kit and fit it to the new Revell 70 kit. I smoothed out the seam for the lower panel and fixed the grille, then painted the body with Testors Green Go lacquer. I added two sets of Fred Cady Hemi billboard decals to the sides. I will let the decals dry for a couple days before I shoot some clear on the body to seal them. James
-
1971 Plymouth Roadrunner
James Moparbuilder Tester replied to James Moparbuilder Tester's topic in Model Cars
Oh, thats right.... 1st loser, not 2nd loser... LOL -
1971 Plymouth Roadrunner
James Moparbuilder Tester replied to James Moparbuilder Tester's topic in Model Cars
Thanks folks for the wonderful comments. I truly am proud of this build. Michael Schmauder, Kevin Wallenhorst and I went to the Mopar Nationals yesterday for the contest. As a trio, we took all of the "best of show" trophies, plus Kevin took the 1st for his Daytona, Mike took 3rd with his 70 Challenger. I took home the Mopar Collectors Guide pick of the show with this Roadrunner. It was a good day! To answer a few questions you guys have: I did use a picture of a 69 6bbl car for reference with the carb linkage, fuel lines and vacuum hoses. Very keen eye there The reason I used so many parts from different kits is that the parts that I used were better detail. The old MPC kit doesn't give you much detail to start with in the chassis and engine. Thanks again, James "Moparbuilder" Tester -
I finished this model yesterday for the Mopar Nationals model contest this weekend. The paint is Curious Yellow from Model Car World with PPG Urethane clear, body decals are from Keith Marks and under hood decals are from Last Detail and Mike's Scale Speedshop. Here is a list of the models that I used to make it: MPC 71 Roadrunner - Body, Interior tub, seats AMT 71 Charger - Chassis, inner fenderwells, carbs, Revell 69 Charger - Engine heads, valve covers, fan belts, tires AMT 69 GTX - Engine block, 6 bbl intake, 4 speed trans Monogram 71 GTX - Go wing, chins spoilers, pistol grip shifter AMT 71 Duster - Wheels Photoetched wipers, seat belt buckles, scratchbuilt radiator hose with clamps, mesh for cowl vents.
-
1969 Daytona in Silver and red - Completed!
James Moparbuilder Tester replied to KevinMoparFord's topic in Model Cars
I can vouch for this build. It is definitely contest worthy. Great build Kevin. -
I've never been a fan of this particular kit, but you made a nice replica out of it. Congrats!
-
Nice build ! What is especially impressive to me is the quality of the photographs. What kind of booth are you using?
-
Nice build. I've done 4 of them so far. I have another 2 that I want to build (replicas of the real ones I had).
-
Very nice build. Awesome work