Ira Posted April 3, 2013 Share Posted April 3, 2013 GREAT PROGRESS ALBIE!!! Quote Link to comment Share on other sites More sharing options...
Albie D Posted April 5, 2013 Author Share Posted April 5, 2013 Thanks for the kind words guys! Had a mishap though. I managed to sand out the few specks of dust without disturbing the base coat. Was feeling ambitious so got set up to clear it with some Summit Racing brand 2 part clear I had left over from a 1:1 motorcycle paint project. Talk about a negative reaction! I don't know if it was caused by the lacquer thinner used in the base coat, the age of the clear (over 2 years, but stored airtight in a relatively cool, dark place), or a simple compatibility issue between the Testors' Enamel and Summit urethane, but the clearcoat ate right through the base coat. Childhood memories of baking Shrinky-dinks came to mind. I've got so many variables going on I'll just call it a loss and stick to the system all the way through next time. Lesson learned. Good thing is it didn't attack the Metalizer prime coat or harm the plastic, so long story short, I dropped the Rivi off at the purple pool. Two steps back, but I'm looking at it as an opportunity to make it even better....after screaming a few choice expletives of course! Quote Link to comment Share on other sites More sharing options...
JasonFL Posted April 5, 2013 Share Posted April 5, 2013 (edited) Another amazing build by Albie. Man I love your style and I'm jealous as hell of the cool custom treatments you've done to the front and rear of this car. Filling those headlights in and putting that floating grill in there was perfect. I love how you made the rear all smooth with the frenched in plate. There's so much you can do with tail light options. Personally I think the round ones would look good we're you have placed them or maybe even lower next to the plate box. The other red taillights to me look way to big so I wouldn't use them and the chrome spear looking ones don't look half bad. If it were me I might go with one big thin LED light across the back or maybe 2 on each side or even 4 with 2 LEDs (one on top of the other) on each side. Hope that makes sense, sorry for all the reading, I'm sure you'll come up with something killer. Sucks about the paint but I think that color was perfect, good luck with round 2. Can't wait to see this thing all laid out with the rear and paint done. Keep it up, you know I'll be watching for sure. Edited April 5, 2013 by JasonFL Quote Link to comment Share on other sites More sharing options...
vintagedragfan Posted April 5, 2013 Share Posted April 5, 2013 Nice work Albie, gonna be awesome Quote Link to comment Share on other sites More sharing options...
Albie D Posted April 5, 2013 Author Share Posted April 5, 2013 Mutual respect all around!! The work done on this forum is amazing and the single biggest inspiration to me. I love all the different build styles everybody has. Its easy to see the builders personality come through in their work and I can bet I'd be able to tell who built what if everything was put side by side. The sheer talent and skill level displayed makes me want to try and catch up. And that's the fun part.. Jason, what's up with the Merc? We want to see some progress! Quote Link to comment Share on other sites More sharing options...
JasonFL Posted April 7, 2013 Share Posted April 7, 2013 Mutual respect all around!! The work done on this forum is amazing and the single biggest inspiration to me. I love all the different build styles everybody has. Its easy to see the builders personality come through in their work and I can bet I'd be able to tell who built what if everything was put side by side. The sheer talent and skill level displayed makes me want to try and catch up. And that's the fun part.. Jason, what's up with the Merc? We want to see some progress! I know what you mean, if it wasnt for everyone on here I would of never attempted half the things I've done. Haha...well the Merc is coming along, very slowly but surely. Got the rear suspension all figured out but couldn't fit the exhaust so now I'm trying to decided were I want to run them. Maybe some side pipes. I'm gonna have to build them from scratch cause the chrome ones they gave aren't long enough. I'll keep you up to date, thanks for the interest. Quote Link to comment Share on other sites More sharing options...
charlie8575 Posted April 7, 2013 Share Posted April 7, 2013 Ouch! I really liked that color treatment, too. Repeat? I'm actually contemplating a '65 sooner rather than later, although mine will be a stock build. I have a couple of them, and will be doing a couple of different color treatments. Cream with a green interior (saw a 1:1 like that, and it's really sharp), and then I'm thinking maybe silver with a black interior. Sorry I didn't catch you at the show. Keep your eye open for me and say howdy next year, unless you see me at Classic Plastic. I'm planning on being there, as well. I might even have a model or two with me. Charlie Larkin Quote Link to comment Share on other sites More sharing options...
slusher Posted April 7, 2013 Share Posted April 7, 2013 Sorry to hear about your paint reaction Albie, l have been enjoying your build. Glad to hear your going to repaint.. Quote Link to comment Share on other sites More sharing options...
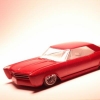
Albie D Posted June 7, 2013 Author Share Posted June 7, 2013 (edited) Color round two.. After stripping the body, re-prepping the bodywork, and laying another coat of Metalizer, the Rivera was ready for paint..again. I vowed to stick to the system, but I always like to add my twist to things. This time the paint is straight up Stop Light Red, but with a very heavy dose of Kustom Shop mini flake. Still a little out of scale, but the bass boat look looks killer on this build! After the base had cured for a week, I decided to use Testor's Wet Look Clear straight from the can. After a few rounds with the fine grit, here are the results. Once again these hastily taken shots don't do this paint justice, but I was psyched with the finish and had to snap a few.. ">http:// ">http:// ">http:// ">http:// ">http:// Got the interior done. Not super detailed, but inline with the rest of the build and gets the vibe across.. ">http:// Sooo, next is my favorite part of the build. Waxing, detailing, BMFing, assembling, then spending a few good hours just staring at the build, having a victory beer or two and trying to come up with a name. Thanks for checking it out! Edited June 7, 2013 by Albie D Quote Link to comment Share on other sites More sharing options...
PappyD340 Posted June 7, 2013 Share Posted June 7, 2013 Albie I loves that color it looks sweet on the Buick!! Quote Link to comment Share on other sites More sharing options...
exesivefire Posted June 7, 2013 Share Posted June 7, 2013 That is really sharp! Quote Link to comment Share on other sites More sharing options...
Wonderbread Kustomz Posted June 7, 2013 Share Posted June 7, 2013 Oh man that is so sweet! Quote Link to comment Share on other sites More sharing options...
Del Austin Posted June 7, 2013 Share Posted June 7, 2013 The new paint job looks killer. Love the interior and the Astro Supremes. This is one sweet Rivie! BTW I vote for the ovalish shaped tailights. The oval shape seems to fit the long flowing sleek lines of the riviera best IMO. either way I love your build so far. Quote Link to comment Share on other sites More sharing options...
Albie D Posted June 7, 2013 Author Share Posted June 7, 2013 Thanks guys. 'Im still deciding on the taillight treatment. Problem is I am trying to prevent that "stuck on look". I tried sanding down the backside of the round lenses, which worked o.k. but its difficult getting the contour correct. I've got some red sprue that might make a nice strip-type light though, we will see... Im just glad the difficult bit is behind me.. Quote Link to comment Share on other sites More sharing options...
JasonFL Posted June 10, 2013 Share Posted June 10, 2013 Nailed the paint job, such a beautiful color. Can't wait to see it in the sun. My vote is still for the red thin strip LED tail lights or maybe even do them in clear, goes better with the orange paint and white interior. Lookin' good Albie. Finish her up. Quote Link to comment Share on other sites More sharing options...
epi4561 Posted June 14, 2013 Share Posted June 14, 2013 That is looking real sharp!!!!! I love that color. As far as the taillights go, I think you should build taillight assy's that fit flush into the rear fender points and leave the trunk area alone. Just my $.02 anyway. Quote Link to comment Share on other sites More sharing options...
Albie D Posted June 14, 2013 Author Share Posted June 14, 2013 That is looking real sharp!!!!! I love that color. As far as the taillights go, I think you should build taillight assy's that fit flush into the rear fender points and leave the trunk area alone. Just my $.02 anyway. Ya know, I was thinking the same thing.. Too late now though, let me say I'm THROUGH bodyworking and painting (and re-bodyworking and painting) this piece. I think I've got something almost as cool though... Thanks for all the suggestions guys! Quote Link to comment Share on other sites More sharing options...
Dragfreak Posted June 14, 2013 Share Posted June 14, 2013 Beautiful paint work!! Quote Link to comment Share on other sites More sharing options...
Tonioseven Posted June 15, 2013 Share Posted June 15, 2013 This thing is so freakin' COOL!!! Quote Link to comment Share on other sites More sharing options...
Recommended Posts
Join the conversation
You can post now and register later. If you have an account, sign in now to post with your account.
Note: Your post will require moderator approval before it will be visible.