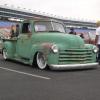
RocknRolla Posted February 2, 2013 Share Posted February 2, 2013 (edited) This is my latest project so far! Thanks for checking this out guys Edited February 3, 2013 by RocknRolla Quote Link to comment Share on other sites More sharing options...
RocknRolla Posted February 3, 2013 Author Share Posted February 3, 2013 The last three pics is of last nights and todays progress ! Quote Link to comment Share on other sites More sharing options...
ryanm Posted February 3, 2013 Share Posted February 3, 2013 That looks great is that the revell kit i want one Quote Link to comment Share on other sites More sharing options...
RocknRolla Posted February 3, 2013 Author Share Posted February 3, 2013 Yeah it is the revell kit,it's really nice to build! Quote Link to comment Share on other sites More sharing options...
Tom Geiger Posted February 3, 2013 Share Posted February 3, 2013 This is starting to look like something I'd like! Here's mine! Quote Link to comment Share on other sites More sharing options...
horsepower Posted February 3, 2013 Share Posted February 3, 2013 I liked it in Purple. Quote Link to comment Share on other sites More sharing options...
RocknRolla Posted February 3, 2013 Author Share Posted February 3, 2013 Nice old beater Tom ! Looks great Quote Link to comment Share on other sites More sharing options...
James2 Posted February 3, 2013 Share Posted February 3, 2013 I like your direction, should be a good'n. Quote Link to comment Share on other sites More sharing options...
RocknRolla Posted February 3, 2013 Author Share Posted February 3, 2013 Thanks James Quote Link to comment Share on other sites More sharing options...
RocknRolla Posted February 4, 2013 Author Share Posted February 4, 2013 This is where I'm at with the 65 as of now ! Quote Link to comment Share on other sites More sharing options...
gonzo64nova Posted February 4, 2013 Share Posted February 4, 2013 Cool build RocknRolla, I really like the low stance and weathered look. Quote Link to comment Share on other sites More sharing options...
RocknRolla Posted February 4, 2013 Author Share Posted February 4, 2013 Thanks Gonzo64nova ! Quote Link to comment Share on other sites More sharing options...
RocknRolla Posted February 5, 2013 Author Share Posted February 5, 2013 Added the wood flooring today and weathered it ! Quote Link to comment Share on other sites More sharing options...
RocknRolla Posted February 6, 2013 Author Share Posted February 6, 2013 Thanks KC Quote Link to comment Share on other sites More sharing options...
tribalgt03 Posted February 6, 2013 Share Posted February 6, 2013 that looks legit..great work Quote Link to comment Share on other sites More sharing options...
rmvw guy Posted February 6, 2013 Share Posted February 6, 2013 I like where you are going with this one. I really think they are more interesting when they aren't so shiny sometimes. Quote Link to comment Share on other sites More sharing options...
Davewilly Posted February 6, 2013 Share Posted February 6, 2013 Nice rat.... Quote Link to comment Share on other sites More sharing options...
RocknRolla Posted February 6, 2013 Author Share Posted February 6, 2013 The wood in the back dried out nicely Thanks for all the comments guys Quote Link to comment Share on other sites More sharing options...
RocknRolla Posted February 12, 2013 Author Share Posted February 12, 2013 Just a quick update on the truck,I got the bumpers and grille painted and weathered ! Quote Link to comment Share on other sites More sharing options...
tribalgt03 Posted February 12, 2013 Share Posted February 12, 2013 Just a quick update on the truck,I got the bumpers and grille painted and weathered ! thats awesome..how do you do that..I want to try it out Quote Link to comment Share on other sites More sharing options...
RocknRolla Posted February 13, 2013 Author Share Posted February 13, 2013 (edited) I used the salt technique bud,primed the parts in a rusty colour then i matte varnished them after it had dried,then i used an atomiser and lightly misted the parts with water then sprinkled salt on,let that dry off then i top coated over that,just a couple of light coats of paint,let that dry then just brush it off! I left it for a day and i then went in with the sponge and added some more rust effects then gave it a light wash! Hope that helps man thats awesome..how do you do that..I want to try it out Edited February 13, 2013 by RocknRolla Quote Link to comment Share on other sites More sharing options...
RocknRolla Posted February 13, 2013 Author Share Posted February 13, 2013 I just wanted to see what it looked like with the bumpers on,nothing is glued yet ! Quote Link to comment Share on other sites More sharing options...
RocknRolla Posted February 14, 2013 Author Share Posted February 14, 2013 My first wired engine,just got the headers to do and add the plug boots plus coil ! Quote Link to comment Share on other sites More sharing options...
RocknRolla Posted February 19, 2013 Author Share Posted February 19, 2013 Its 99.99% finished,hope all you guys like it! Quote Link to comment Share on other sites More sharing options...
Tom Geiger Posted February 19, 2013 Share Posted February 19, 2013 I'll give 'er the thumbs up! I especially like your seat cover. How did you make that? Where did you find the fabric with the stripes in the right scale? Very cool. I also like your black pickup bed floor. Note that Chevrolet painted those boards black at the factory. Everyone who has done them in shiny wood has over restored / customized their truck. One suggestion I could make would be to include the heater hoses. See them on the left side of the below photo: Mine stand a little too tall though! There is also a hose from the power brake booster from the intake manifold. Quote Link to comment Share on other sites More sharing options...
Recommended Posts
Join the conversation
You can post now and register later. If you have an account, sign in now to post with your account.
Note: Your post will require moderator approval before it will be visible.