Dave Van
-
Posts
6,587 -
Joined
-
Last visited
5 Followers


Recent Profile Visitors
20,137 profile views


Dave Van's Achievements
MCM Ohana (6/6)
-
Atlantis Models has bought another lot of tooling/molds.....
Dave Van replied to Dave Van's topic in Car Kit News & Reviews
When Model King was working with Revell doing reissues and I was helping, we looked at this Renwal kit.......which I think could be viable. Thanks
-
Atlantis Models has bought another lot of tooling/molds.....
Dave Van replied to Dave Van's topic in Car Kit News & Reviews
Revell bought all Renwal tooling that was still in inventory 20 some years ago and reissued a number of them. But no talk of the Revival tooling has ever come up. Atlantis should have all that Renwal tooling now. But with Atlantis looking at the Revell 62 Mopar stuff.....who knows! -
Ollie's strike again
Dave Van replied to GLMFAA1's topic in General Automotive Talk (Trucks and Cars)
I think some kits, rocket launcher, are $19.99.....so maybe that is it. My store is down to 007 police cars and Barris Ricshaws. I(f they mark down the police kits I may bite..... -
I like that a LOT!!! NOT another belly button!!!!
-
Atlantis Models has bought another lot of tooling/molds.....
Dave Van replied to Dave Van's topic in Car Kit News & Reviews
I hold out hope that that tooling is arounds....seems we'd seen if it was..... -
Looks like it cvould be nice. I'll keep my Modelhaus which was $60 at intro...........
-
I use Solvaset by Walthers. They have been making it since 1934.......I've been using it for 40 years. As a decal manufacture ....here is my way.... Regardless of decal type here is how I apply decals. I cut the decal from the sheet as close to the image as possible. I have a small pair of scissors that are sharp and easy to cut around small images. Using tweezers I dip the decal in warm water for about 10 seconds. I place decal on a damp paper towel and allow the decal to ‘cook’ as its called. This can vary by decal paper maker. It can be anywhere from 30 seconds to a minute or two. When decal moves easily on paper backing it is ready to apply. On surface of model put two or three drops of water. With tweezers place decal on model body where you want to apply. With your finger move the decal image off the paper just enough to use your tweezers to pull the decal paper from under the decal image. This will keep as much air out from under the decal. Position the decal image in the exact spot you wan tit. With the slightly damp paper towel blot the water from the decal. Making sure the decal is positioned in the correct spot, make a squeegee from the damp paper towel and from the center of the decal out to the edge squeegee out all the water and some of the glue. This will keep the decal from turning yellow as it ages. Apply Solvaset in a light coat. After the decals dry for a day or two I apply a coat of Future Floor Shine with a 1 in wide soft sable brush that is only used for Future. Allow to dry overnight and all should be good!!! Good luck!
-
Nice work!!
-
Chrysler Monte Carlo Concept Hawk/Moebius mashup 1:24 scale
Dave Van replied to ea0863's topic in Model Cars
GREAT idea and build!!! -
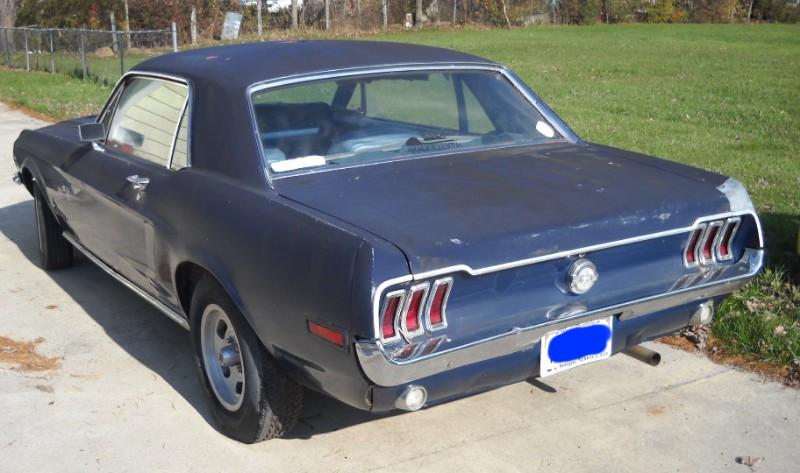
There have been some 67-68 coupe resin bodies done, no plastic kit in 1/25. BUT the issue is they used a 65/66 coupe roof which is 100% wrong. I owned a 68 coupe for many years and the roof shape and rear window is very different. I'd like to see R2/AMT do a GOOD coupe with their fastback kit.
-
What's with the U.S.Post office these days?
Dave Van replied to styromaniac's topic in The Off-Topic Lounge
Of late delivery has been REALLY slow. Add to it tracking not working make it very frustrating at best. I do get my package in the end.....but what is going on??? -
Atlantis Models has bought another lot of tooling/molds.....
Dave Van replied to Dave Van's topic in Car Kit News & Reviews
You're GOOD!!!! -
Atlantis Models has bought another lot of tooling/molds.....
Dave Van replied to Dave Van's topic in Car Kit News & Reviews
I see a few movie car builds in those Revell 62 Mopar kits.....hope we get them all.......... Someone in the hobby biz said 2025 at Atlantis was going to be BIG!! -
I like the sedans too. My favorite road car was a 1999 Concorde. A GREAT hiway car. I just could not pass up the looks of the coupe!
-
Not fantastic but it has sensors al around from side mirrors to the back...so it alerts you to anything around you. Thx