ScaleDale Posted June 19, 2013 Share Posted June 19, 2013 (edited) Hi. I’m going to be converting a Revell 2010 Mustang into a Pro Stock car using the racers of Larry Morgan and Jim Cunningham as 1:1 references. There are a lot of body tweaks like narrowing and body extensions used in these cars and doing this with a stock model kit will require a bunch of body work that I haven’t done before, so bear with me on this. I found a blueprint on-line for a Pro Stock Camaro built by Five Star Race Car Bodies that included NHRA approved body measurements and I used that as my guide to determine how much I could alter the Mustang. It’s all educated guesswork References: To mark the cut lines I trimmed a strip of styrene and glued it to the centerline of the body since that would hold it in place best and I was going to toss it anyway. After I cut the body the long way I put it back together to match things up before cutting the front off for the nose extension. I glued all the headlights in to add to the structural strength after I cut it. The only part of the front end that needs to be real is the headlights. The grill and running lights can be simulated. I have a decal for that. I cut and extended the hood after trimming out the center portion to fit the hood scoop. The scoop is really a hat that locks tight to the carbs and the hood slides over it. The scoop I got from Competition Resins scaled out to something like 50 inches long, so I cut that down while I was at it. ProStock cars all have bowed hoods but I decided to not try that given that I have already destroyed one Mustang trying to do all this. I have the feeling that I might need to do this to clear the tunnel ram intake and carbs, and my plan is to cut the raised portion out of the center of the hood and elevate it as needed, then use sheet styrene to build out to the edges of the hood. But only if needed. The front end is a lift off deal so I glued the hood on and used it as a marker to fit the rest of the front end in place. The stiffness of the hood kept pulling the nose up, so I glued a strip of styrene between the tail and nose to pull it down. I put a cross piece in place to position the remains of the front wheel wells while I added reinforcing stuff and got to the putty stage. Kinda looks like I crucified the poor thing. More body work to be done today. Wish me luck. Dale Edited August 20, 2013 by ScaleDale Quote Link to comment Share on other sites More sharing options...
Bill Edman Posted June 21, 2013 Share Posted June 21, 2013 i like it Quote Link to comment Share on other sites More sharing options...
Len Woodruff Posted June 21, 2013 Share Posted June 21, 2013 Interesting build. Looking to see more progress. Quote Link to comment Share on other sites More sharing options...
ScaleDale Posted June 21, 2013 Author Share Posted June 21, 2013 Here is a shot of the body work I have done so far. I’m a bit ahead of my pics and may add another later today. The front end is a bit messed up from the cutting and all so I decided to forgo the headlights and filled the grill edge to edge with epoxy putty. I have a Slixx decal that will give me a simulated grill and headlights. Not NHRA approved for Pro/S, but it’s a model. I’m also going to let the hood bow slide for now and not fully finish that ares. Since the hood scoop fits to the top of the carbs and the front end slides on over that, I may need to raise the center of the hood to clear that assemble, but I won’t know how much until I have the frame and motor set. So I’m not going to invest a lot of time in finish work on the hood in case I wind up reaching for the saw and putty. Pic: Than ks for your interest in my project. Dale Quote Link to comment Share on other sites More sharing options...
Car Man Posted June 21, 2013 Share Posted June 21, 2013 more please Quote Link to comment Share on other sites More sharing options...
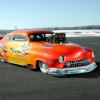
ScaleDale Posted June 21, 2013 Author Share Posted June 21, 2013 ^^ I can do that Here is the car as it stands now. I tacked a strip of styrene to either end of the front bumper and let the tension of the material form a more natural curve than I was able to get with putty, then filled the gap with epoxy as recommended by folks over in Q&A. It worked out well. The insides of the weel wells are trimmed with narrow strips of sheet styrene and I trimmed the running board off and replaced it with a work in progress spoiler, trimmed the rear wells, too. I,ve roughed the whole body with 400 and will go over that with 600 and 1500 today, but that will do for body work until I get closer to painting. With the nose stretched I'm not sure about the looks of the stock hood bump and may smooth that down into an even transition to the leading edge of the hood. Need to look at my reference pics again. The scoops really dominate the front views of these cars. I'm pulling parts from the '55 Chevy Pro Sportsman kit amd narrowed the interior panels to fit. I'm going to cut it between the floor and wheel tubbs so that the floor can be installed in a real full tube frame rather than becoming a base that the frame is built on like in the Revell kits. The tubbs will mount to the rear frame extension. The last pic is a chassis I built just to see if I was nuts enough to try this or not. I did the design based off the generic Pro Mod chassis from Chassis Works. If you want to get to know what frames look like, go over to ChassisWorks.com and have a look. Thanks for your time and comments. Got to do some computer work to design the chassis now. Dale Quote Link to comment Share on other sites More sharing options...
iBorg Posted June 21, 2013 Share Posted June 21, 2013 I'm impressed. You've attempted something I don't thing I'd even think about building. Mike Quote Link to comment Share on other sites More sharing options...
Mooneyzs Posted June 21, 2013 Share Posted June 21, 2013 Dale... Awesome build man. I will be following this one for sure. The body is looking great and I am sure it's a lot of work to cut up but will be well worth it in the end. keep up the great work Quote Link to comment Share on other sites More sharing options...
azers Posted June 22, 2013 Share Posted June 22, 2013 You should look at resin casting the body when it is done and keep working off the resin body. With all the cut and pasting to the original body your bodywork may show up later in the final product. Besides you could then sell us copies of your bodie to recoup some of your cost. Just a idea.Interesting project so far. Followimg it with interest. Quote Link to comment Share on other sites More sharing options...
brett Posted July 12, 2013 Share Posted July 12, 2013 Nice work Dale, that body looks great so far Quote Link to comment Share on other sites More sharing options...
ScaleDale Posted July 12, 2013 Author Share Posted July 12, 2013 Since the site has been down for a while, I decided to break my updates up into sections and keep working on the Mustang. I’ll post a few pics and updates each day until I get caught up to where I actually am on this. I gave the body a coat of primer to show all the defects and set it aside until I get closer to the final stages of construction. A guy can only take so much sanding, you know. To build the chassis I’m going to use a variety of styrene rod to make it look more real. 2 mm for the main rails and 1.6 and 1.4 mm for supports and cross braces. I made a jig the last time I did a chassis and it turned out to be more of a hastle than it was worth so this time I’m going to work in sections and take my time rather than try to assemble the whole thing at once. It actually fell apart when I last did this. To get the dimensions right, I took pictures of my body and used them as overlays in PhotoShop and my drawing program, Illustrator, as guides. I stuck a scaled copy of a ChassisWorks Avenger ProMod in the frame as a guide and adapted it to the Mustang body. I used a different color for the floor, side walls, roll cage and tail piece so I could tell what was what from the top view. I printed this out as a pattern while I did my building. Here’s the body as it stands now (6/25). The primer really brought out the areas that need more work. More to come tomorrow. Thanks for looking. Dale Quote Link to comment Share on other sites More sharing options...
PappyD340 Posted July 12, 2013 Share Posted July 12, 2013 FANTASTIC job so far Dale, keep those updates coming!! Quote Link to comment Share on other sites More sharing options...
ScaleDale Posted July 13, 2013 Author Share Posted July 13, 2013 Written 6/25 With the floor of the frame done, I started on the harder part, everything with a curve to it. I’ve worked with styrene rod and a heat gun before and the results sometimes aren’t pretty. If the gun is too hot (they all are) or you hold it too close or too long the rod turns to live spaghetti and goes all weird on you. Then it cools and you’re stuck with the results. Fun. To form the sides of the main cage, I traced a pattern on a block of wood and cut it with my little table saw and sanded it smooth. I taped two pieces or rod together to get the sides the same and molded them around the pattern with the heat gun. This took several tries with a few variations but I was able to get something usable. Initial fit was too tight but I decided to break it down and cut it a bit rather than make another. The 55 Chevy Pro Sportsman kit has been a donor for this project and the floor pan and wheel tubs fit my developing chassis pretty well. The tail section is built and setting, and I’ll show that in the next post. 6/26 Two of the harder parts of the chassis turned out to be the hoop at the back of the drivers cage and the tight double cage that encloses the drivers seat. I gave up on styrene rod for these and used a product from Plastruct that is really a wire covered on plastic. Some builders don’t like it because Tamiya thin cement won’t react with it, but Plastruct Plastic Weld works fine. It bonds this stuff to styrene like, well, glue. It’s very strong and really attacks the surface. It breaks it down to the point that you can work it with a knife and truly weld the pieces together. I used it for all of the chassis work on this project. It’s too strong for most model applications but works great for sticking stuff fast and strong. Using the wire rod allowed me to bend key parts to fit very tightly. Here’s the chassis with the tail piece and wheel tubs blocked in place. I cut out the center of the tubs to use the frame to hang the rear suspension from. That will come from the 55 Sportsman with some add-ons coming from Future Attraction. And with all of the side cross bracing and the drivers personal cage. It’s probably a bit over braced, but I want it to be strong. Here is a shot of the fit on the body and frame. I gave the hood scoop a trial fit on the carbs and I needed to open up the hood some more, That’s why I’m not doing any more body work for a while. I’m really pleased with the fit. Thanks for the time. More to come tomorrow. Dale Quote Link to comment Share on other sites More sharing options...
cruz Posted July 13, 2013 Share Posted July 13, 2013 Very cool, I'll be watching!!! Quote Link to comment Share on other sites More sharing options...
cobraman Posted July 13, 2013 Share Posted July 13, 2013 Great work ! Quote Link to comment Share on other sites More sharing options...
slusher Posted July 13, 2013 Share Posted July 13, 2013 Awsume body work, great work so far... Quote Link to comment Share on other sites More sharing options...
ScaleDale Posted July 15, 2013 Author Share Posted July 15, 2013 (6/27 in the Time of Black Out) Hi, again. I got the last of the chassis finished and sprayed with grey primer yesterday and last night. The little bike basket thing on the front end was difficult to do because the material for it was so small at 1.2 mm. It’s a part of Larry Morgan’s car and a lot of the other Pro Stockers have it too. It holds the fuel cell, radiator and stuff like that. They also hang weights on it if they are under the NHRA weight limit. It turned out pretty good, I think. I’m going to paint the chassis with Tamiya Gun Metal and do the rear sheet metal in one of the Alclad aluminum colors. Dark aluminum, maybe? Some PE from Future Attraction showed up today and I’m going to use their 4 Link rear suspension kit, wheelie bar and strut front. I need to see if I can run down some really tiny nuts and bolts to attach it all together. Enjoy the pics and thanks to my assistant, Dogbert. The color of the chassis in primer didn’t really show up until I let him into the photo booth. Thanks for your time. More to share in a dayh or two. Dale Quote Link to comment Share on other sites More sharing options...
PappyD340 Posted July 15, 2013 Share Posted July 15, 2013 Very NICE scratching Dale, looks great so far, keep up the good work!! Quote Link to comment Share on other sites More sharing options...
vintagedragfan Posted July 15, 2013 Share Posted July 15, 2013 very nice work on the body and chassis Dale!! Quote Link to comment Share on other sites More sharing options...
3men2s Posted July 15, 2013 Share Posted July 15, 2013 WHAT AN ASOME JOB SO FAR Quote Link to comment Share on other sites More sharing options...
DrKerry Posted July 15, 2013 Share Posted July 15, 2013 Very kool stuff here!!!!! Quote Link to comment Share on other sites More sharing options...
ScaleDale Posted July 17, 2013 Author Share Posted July 17, 2013 (From July 7, in the Time of the Blackout) Hi, again. I’ve finished my chassis and painted the frame rails with Tamiya Gunmetal and the back sheet metal with Alclad dark aluminum. All in all it looks pretty good to me. Most of the last few days have been spent working on the front suspension and it’s mounts. I got a set of front struts and springs from Scott at Future Attraction and took a few days to paint and assemble them. It was pretty straight foreword for me but some of the parts seemed impossibly small. Such is the nature of PE and the aftermarket in general. The greatest challenge so far has been fabricating upper suspension mounts and lower control arms. I used 1.6 mm rod for the lower arms and the same size 1/2 round for the upper mounts. My heat gun allowed me to get the bends in the lower arms nice and smooth but I had to cut the loop off to make sure the hub would fit to the strut axle when it was assembled. A piece of 2 mm tube formed a boot for the bottom of the strut to set in. The top mount is only a single piece so I made a hook at the end to loop it around the top chassis rail for a more secure fit. It still fell off several times before I managed to get it epoxied in place. I’m not a suspension expert, so let me know if I did anything wrong for the next time I use these things. It just barely fits the body and I had to remove the styrene trim from the inside of the front wheel wells and may need to trim them foreword a bit. I got a wing installed on the body and it settled while the glue set so I had to pop it off and start over. It’s on it’s 2nd or 3rd trip through sanding land now. Enjoy the pics and let me know what you think. If you have any ideas as to how to make the front end stronger, please pass them on. Thanks for your time. More to come in a few days. I will try to get up to date before next Wednesday when I have to take a break from building. Dale Quote Link to comment Share on other sites More sharing options...
PappyD340 Posted July 17, 2013 Share Posted July 17, 2013 Looking good Dale, I just ordered and recieved a set of those front coil overs from Scott at Future Attraction too for a project I have been working on, quality parts!! Keep the updates coming! Quote Link to comment Share on other sites More sharing options...
krazyglu Posted July 17, 2013 Share Posted July 17, 2013 Looking good, I like what you have going on here. Here is a link to the smallest hardware that I know of, be warned though it's not cheap and a specialty screwdriver/ nut wrench are required for something this small http://www.scalehardware.com/ Quote Link to comment Share on other sites More sharing options...
ScaleDale Posted July 18, 2013 Author Share Posted July 18, 2013 (edited) Looking good Dale, I just ordered and recieved a set of those front coil overs from Scott at Future Attraction too for a project I have been working on, quality parts!! Keep the updates coming! The front end is probably the most straight foreword assembly he has, but some of the photos in the instructions are out of order. The tolerances are very tight, so don't paint anything until you're ready and handle it as little as possible. Looking good, I like what you have going on here. Here is a link to the smallest hardware that I know of, be warned though it's not cheap and a specialty screwdriver/ nut wrench are required for something this small http://www.scalehardware.com/ I am currently finishing a 4 link suspension and wheelie bar from Future Attractions for this project and have been using rod ends and tubes from R&B Motion and 0.85mm threaded nuts and bolts from Scale Hardware for it. I have two of those 1mm hex wrenches. Quite a trip working with stuff this small. Edit: Here is a lower cost source for scale fasteners with minimum orders of 144 pieces. JI Morris and Co Thanks for the interest and support. Dale Edited July 18, 2013 by ScaleDale Quote Link to comment Share on other sites More sharing options...
Recommended Posts
Join the conversation
You can post now and register later. If you have an account, sign in now to post with your account.
Note: Your post will require moderator approval before it will be visible.