RatRod Posted March 9, 2008 Share Posted March 9, 2008 Here is the latest project bike. I have been challenged to a bike build on another forum, so I 'll show the progress here.... When the bikes are finished we will exchange the bikes, that way 2 winners!! He is a drag racer down under so I wanted to build a modern street bike with a vintage drag bike style. Here's a few shots of the early mock up.... Shhhhhhhh, mum's the word..... Quote Link to comment Share on other sites More sharing options...
Brendan Posted March 10, 2008 Share Posted March 10, 2008 Is that a scratch-built frame? Or did you modify it? Looking good! Keep us posted. Would like to see what he sends you when you get it. Quote Link to comment Share on other sites More sharing options...
fatherdevine Posted March 10, 2008 Share Posted March 10, 2008 Ratrod, there are many talented builders here on this site, but you are one of the builders that I am always eager to see with new topics. I am so inspired by the work that you are doing with R/M choppers that I ran out and bought a bunch of the kits. One day I will actually get the guts to take a razor saw to them. None the less, this project bike is just as impressive as all the other ones you have blessed us to view. Keep up the great work. Quote Link to comment Share on other sites More sharing options...
Raul_Perez Posted March 10, 2008 Share Posted March 10, 2008 Very nice, John...very nice!! Quote Link to comment Share on other sites More sharing options...
fordsixty Posted March 10, 2008 Share Posted March 10, 2008 WOW super cool!! how much of that is fabricated? looks really good, john. Quote Link to comment Share on other sites More sharing options...
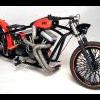
RatRod Posted March 10, 2008 Author Share Posted March 10, 2008 Thanks guys, this one will be wild!!! I cut the frame apart, and stretched it out quite a bit, the entire upper frame is scratch built, along with the oil & fuel tank mounts. The forks were shortened in three places to get the right ride height. The aluminum oil & fuel tanks were turned in my Makita gear drive drill using a good file, sanding sticks, and triple grit polisher, but I'm keeping a spun look to all the aluminum. Also the wheels were made by cutting out the centers, and making solid thick sheet plastic centers, with aluminum sheet inserts that were spun in my drill.....and away we go!!! Quote Link to comment Share on other sites More sharing options...
cruz Posted March 10, 2008 Share Posted March 10, 2008 Love the frame on this bike, intimidating!!!! Quote Link to comment Share on other sites More sharing options...
Ken Posted March 10, 2008 Share Posted March 10, 2008 Ratrod, there are many talented builders here on this site, but you are one of the builders that I am always eager to see with new topics. I am so inspired by the work that you are doing with R/M choppers that I ran out and bought a bunch of the kits. One day I will actually get the guts to take a razor saw to them. None the less, this project bike is just as impressive as all the other ones you have blessed us to view. Keep up the great work. I can only second this comment. I did actually start one of the revell choppers due to your inspiriation. Not to hi-jack your thread, but here is my take. I gotta work out how to get it to sit lower. I look forward to your updates as they keep me movtivated to work on mine. Yours newest will definitely blow away the receiptiant. He is one lucky guy. Quote Link to comment Share on other sites More sharing options...
RatRod Posted March 10, 2008 Author Share Posted March 10, 2008 Tony & Ken, I'm glad my builds inspire you, and anytime you have a question, feel free to ask!!! Ken, your bike is looking great!!! Love the tank work. To lower that soft tail cut a 1/8" section out of the upper bar, and make a pie cut in the lower joint, and then put it back together, that will lower the rear of the bike. The forks your using have really long legs, you could probably take a good 3/8" out of just the legs alone (I took a 1/4" out of the legs in the above bike) Just remember that when you start lowering take small amounts until your bike sits level and balanced. I got faith you can do it!!! Quote Link to comment Share on other sites More sharing options...
Ken Posted March 10, 2008 Share Posted March 10, 2008 The tank construction is completely ripped off from you. Just sheet plastic sandwhiched together. Then I just carved away anything that didn't look like the tank I wanted Putty also helps smooth things out. Yeah, the front forks are really long. I actually switched them out for a set out of one of the other bikes, which one escapes me right now. That lowered the front end enough. I thought about sectioning the upper bar and pie cutting the lower. Of course, then that leads to repositioning the belt drive and such, but it should be too much work Keep the updates coming and I will try to start my own thread on mine to keep you apprised of the going ons. Thanks for the ideas. Quote Link to comment Share on other sites More sharing options...
RatRod Posted March 13, 2008 Author Share Posted March 13, 2008 Got a little more done on the mock up today. Scratch built a seat, handlebars, small headlight, and that wicked fuel injection unit!! I also got the fuel, and oil tank caps turned. Still have several small details to make, the it's off to paint, and final assembly..... Quote Link to comment Share on other sites More sharing options...
fatherdevine Posted March 13, 2008 Share Posted March 13, 2008 Great Job John, that bike is looking killer. By the way, what size tubing are you using for the frame, and handlebars? I am thinking 1/8" for the frame, and 3/32" for the handlebars. Am I even close? Thanks for the help! Quote Link to comment Share on other sites More sharing options...
RatRod Posted March 13, 2008 Author Share Posted March 13, 2008 Tony, your correct on the handlebar size 3/32", but most of the frame work is the thicker, nicer pieces of sprue from the kits!!! I do use 1/8" rod, like the support under the seat, but the Revell frame is bigger than 1/8", so the sprue plastic seams a tad closer. I don't think either company Plastruct, or Evergreen make a rod 5/32" (which might be a little to big) It works!!! Quote Link to comment Share on other sites More sharing options...
RatRod Posted March 17, 2008 Author Share Posted March 17, 2008 Got the injection unit all finished today!! This is made up from plastic & aluminum rod, and tubing, with a touch of sheet aluminum & wire. Quote Link to comment Share on other sites More sharing options...
Raul_Perez Posted March 18, 2008 Share Posted March 18, 2008 Very nice, my old friend! Quote Link to comment Share on other sites More sharing options...
Smart-Resins Posted March 18, 2008 Share Posted March 18, 2008 I like that. Very well done! Jody Quote Link to comment Share on other sites More sharing options...
fatherdevine Posted April 12, 2008 Share Posted April 12, 2008 Hello! I was wondering if John was home and if he is still working on that beautiful motorcycle? Can't wait to see some updates! Keep up the good work. Quote Link to comment Share on other sites More sharing options...
RodneyBad Posted April 12, 2008 Share Posted April 12, 2008 The one thing about Bike builds is Every little detail counts.. And Every little and Large Detail looks Most Excellent... That is turning into one Awesome Drag Bike... A makita drill for a lathe? Sweet work.. Quote Link to comment Share on other sites More sharing options...
RatRod Posted April 12, 2008 Author Share Posted April 12, 2008 Sorry guys, no updates as yet, I haven't had time lately to do any work on this build since I went back to work (funny how that works....lol) I do need to get it done pretty quick though, and will post the finished product when I do!!! Quote Link to comment Share on other sites More sharing options...
Ken Posted April 15, 2008 Share Posted April 15, 2008 Don't worry John, I kind of got sidetracked by life myself the last few weeks. I hope to get back on the bike in the next couple of weeks. I too will post updates when they occur Quote Link to comment Share on other sites More sharing options...
Mr.1/16th Posted April 17, 2008 Share Posted April 17, 2008 THIS THREAD HAS SOME BAD A$$ SKILLZ UP IN HERE Quote Link to comment Share on other sites More sharing options...
Recommended Posts
Join the conversation
You can post now and register later. If you have an account, sign in now to post with your account.
Note: Your post will require moderator approval before it will be visible.