Ajay Posted March 22, 2008 Author Share Posted March 22, 2008 Thanks for the feedback guys - it's much appreciated - just hope I get get this one finished without an mishaps. Got round to adding the last few details on the engine - namely the coil, starter motor and fuel line for the carbs. Think that's the engine done now apart from the radiator hoses - so I'm off to chop up the interior next - should be fun !. Thanks for looking Andy Quote Link to comment Share on other sites More sharing options...
dub Posted March 22, 2008 Share Posted March 22, 2008 Simply beautiful! I have to say, I don't know if I would try the carb linkages now either. I'm sure it can be done right, but it could look too busy if not. You have a good package here. I'd call it done if it were on my bench! Quote Link to comment Share on other sites More sharing options...
OLDERGUY Posted March 22, 2008 Share Posted March 22, 2008 (edited) That is one great looking flat head Edited March 22, 2008 by OLDERGUY Quote Link to comment Share on other sites More sharing options...
Ajay Posted March 23, 2008 Author Share Posted March 23, 2008 Think I've sorted out the interior in terms of fitment - I had to take an angled peice out of the bottom of the door panels to follow the raked body but after a dry run it seems to fit ok. As you won't be able to see much through the windows I'm just going with the stock interior plus seat from the AMT Vickie kit (as it's not as tall as the stock seat) and painting it black. I still need to raise the tunnel to get some clearance on the transmission. Thanks for looking Andy Quote Link to comment Share on other sites More sharing options...
Bernard Kron Posted March 23, 2008 Share Posted March 23, 2008 Think I've sorted out the interior in terms of fitment - I had to take an angled peice out of the bottom of the door panels to follow the raked body but after a dry run it seems to fit ok. As you won't be able to see much through the windows I'm just going with the stock interior plus seat from the AMT Vickie kit (as it's not as tall as the stock seat) and painting it black. I still need to raise the tunnel to get some clearance on the transmission. Nice choice of seat to go with the stock side panels. The photo also shows off the nice clean work on the frame rails. And what is their to say about that beautiful engine?! You're taking the post-rat-rod look to a new level. Looking forward to seeing more. B. Quote Link to comment Share on other sites More sharing options...
Guest Davkin Posted March 23, 2008 Share Posted March 23, 2008 Wow! That engine is beautiful! If I didn't look at the previous photos I'd have thought you used a machined aluminum pulley set. I really like that attitude of the chop, well, the whole build really. David Quote Link to comment Share on other sites More sharing options...
Ajay Posted March 24, 2008 Author Share Posted March 24, 2008 Just an update on a few bits & peices - the lower interior panel shows the amount that had to be trimed to accomodate the body rake . Thanks for looking Andy Quote Link to comment Share on other sites More sharing options...
Ajay Posted March 24, 2008 Author Share Posted March 24, 2008 Last update for a while as it's back to work tomorrow after the Easter break. Interior's all together now (although not alot of it will be seen once it's inside the body). Thanks for looking Andy Quote Link to comment Share on other sites More sharing options...
OLDERGUY Posted March 24, 2008 Share Posted March 24, 2008 I'm not callin your 32 a rat. To me it says hot rod. Quote Link to comment Share on other sites More sharing options...
OLDERGUY Posted March 25, 2008 Share Posted March 25, 2008 Ajay, I've got a chop in progress of the 32 3 wind. also i need to know what putty you are using. Your chop looks great, seems to have a rake to it. i went 3/16 which might have been to far, using Bondo glazing putty it's not working very well, might be to old. Haven't did a chop for yrs. used to use something called green stuff, was a glazing putty also. What would you recommend. Any answer will be appreciated. Buy the way the flathead is perfect. Quote Link to comment Share on other sites More sharing options...
Ajay Posted March 25, 2008 Author Share Posted March 25, 2008 Ajay, I've got a chop in progress of the 32 3 wind. also i need to know what putty you are using. Your chop looks great, seems to have a rake to it. i went 3/16 which might have been to far, using Bondo glazing putty it's not working very well, might be to old. Haven't did a chop for yrs. used to use something called green stuff, was a glazing putty also. What would you recommend. Any answer will be appreciated. Buy the way the flathead is perfect. To be honest it's been a few years since I chopped the top so I don't recall which putty I used at that time - it may have been regular auto body repair filler. Best thing I can suggest is to try & fill any gaps with sheet plastic - it provides strength and reduces the amount of putty required with less chance of the putty subsequently cracking (apologies if I'm "teaching granny how to suck eggs" here). These days I tend to use Tamiya Epoxy Putty (quick type) followed by regular auto knifing putty to fill the sanding scratches. Hope above helps Regards Andy Quote Link to comment Share on other sites More sharing options...
MojaveRacer208 Posted March 26, 2008 Share Posted March 26, 2008 I used 3M Spot Putty or red Glazing Putty way back in the 60s until Squadron introduced their "Green Stuff". I am still sure it is re-packaged 3M Spot Putty. Both are still available. The following link... http://tinyurl.com/33v3wn ...will get you to Squadron Putty at about $3 a tube. A lot of modelers fall for the magazine guys' whine about shrinkage of this type of putty, and use automotive 2-part putty in brands such as Evercoat. I have NEVER had shrinkage problems with spot putty, and have an AMT 67 Corvette model which I stopped development of radical bodywork on in early 1971 (we had a large earthquake). The 5/16" thick fender flares are still perfect, even with only partial primer coverage. The key is to NOT apply the stuff with a skiploader. Those fenders were built up in many layers. You don't have to mix up a batch to use it either, nor do you have to buy enough to remodel the Statue of Liberty, or worry about the catalyzer going bad. ...but "to each his own", or "whatever blows up your skirt" Quote Link to comment Share on other sites More sharing options...
Ajay Posted March 30, 2008 Author Share Posted March 30, 2008 Phew - getting close to completion now - this ones certainly suffered from the "make one alteration & cause yourself several others" syndrome but the chassis went together without any major headaches. Just a few small bits & pieces left to do - still got to add the scallops to the body. Thanks for looking Andy On relection I think I might swap the headlights for the smaller ones in the kit Quote Link to comment Share on other sites More sharing options...
Smart-Resins Posted March 30, 2008 Share Posted March 30, 2008 Man I am really lovin the way this thing is looking! Jody Quote Link to comment Share on other sites More sharing options...
OLDERGUY Posted March 31, 2008 Share Posted March 31, 2008 Andy, stick with the big bug eye headlights, Your 32 is lookin real fine. Now, whats happening with Merc nbr. 2? Thanks for the input on putty[2 guys], Igonna gine one of the others a try, and the gaps were filled with plastic, probabably not enough. Get the 3 window done and head back to that Merc nbr. 2. Quote Link to comment Share on other sites More sharing options...
Darrell Gwinn Posted March 31, 2008 Share Posted March 31, 2008 Now thats how a hot rod should look! Quote Link to comment Share on other sites More sharing options...
Raul_Perez Posted March 31, 2008 Share Posted March 31, 2008 Andy, stick with the big bug eye headlights, Your 32 is lookin real fine... I'll second that!! The big lights, the flathead and the steel wheels all tie together very well to an older look. Quote Link to comment Share on other sites More sharing options...
kasteer Posted April 1, 2008 Share Posted April 1, 2008 I'm lovin everything about that rod! Looks aggressive and mean! I Love it. Quote Link to comment Share on other sites More sharing options...
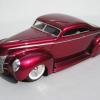
Ajay Posted April 6, 2008 Author Share Posted April 6, 2008 Early on the in the build I decided to add some scallops to break up the black on the body so I spent some time this morning masking up with Tamiya tape. and despite there being 3 inches of snow this morning ! braved the cold in the garage and airbrushed them Tamiya Candy Lime Green. I've swapped the headlights to the smaller ones as imo they're visually more more balanced with the chopped grill. Thanks for looking Andy Quote Link to comment Share on other sites More sharing options...
Smart-Resins Posted April 6, 2008 Share Posted April 6, 2008 That is just about perfect if you ask me. Jody Quote Link to comment Share on other sites More sharing options...
ajulia Posted April 6, 2008 Share Posted April 6, 2008 Shes an absolute star gazer!! peace ajulia Quote Link to comment Share on other sites More sharing options...
kasteer Posted April 7, 2008 Share Posted April 7, 2008 Looks Awesome with those great scallops on it! She's a beauty!!!!!! Quote Link to comment Share on other sites More sharing options...
Nate Posted April 7, 2008 Share Posted April 7, 2008 Man that thing is awesome! Great hot rod! Quote Link to comment Share on other sites More sharing options...
Raul_Perez Posted April 7, 2008 Share Posted April 7, 2008 That is just about perfect if you ask me. Jody Shes an absolute star gazer!! Looks Awesome with those great scallops on it! She's a beauty!!!!!! Man that thing is awesome! Great hot rod! Not much more to be said, Andy!! GREAT BUILD!! Thanks for sharing, Quote Link to comment Share on other sites More sharing options...
Ajay Posted April 7, 2008 Author Share Posted April 7, 2008 Thanks for the interest guys - 2 months on one project is way past my normal build time but hopefully I should have it finished next weekend. Cheers Andy Quote Link to comment Share on other sites More sharing options...
Recommended Posts
Join the conversation
You can post now and register later. If you have an account, sign in now to post with your account.
Note: Your post will require moderator approval before it will be visible.