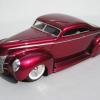
Ajay Posted February 3, 2008 Share Posted February 3, 2008 I've got a bit of "modellers block" at the moment (a combination of being busy at work and the winter weather - maybe it's Seasonal Affective Disorder !) and I keep picking kits up, looking at them and then putting them away again ! - I'm sure you've all been there at one time or another. Anyway delving into the "started but never finished" pile I came across a 32 body that I'd chopped awhile back & looking at it again the germ of an idea started to grow - here's a very rough mock-up. There's still a heck of lot more to do but hopefully I'll find the motivation to stick with it. Thanks for looking Andy Quote Link to comment Share on other sites More sharing options...
Tonioseven Posted February 3, 2008 Share Posted February 3, 2008 I like where this is going Andy! If there's anything I can do to help with this one, just holler out! Quote Link to comment Share on other sites More sharing options...
kasteer Posted February 3, 2008 Share Posted February 3, 2008 Hey, that looks familiar... LOL I'm doing the 32 Rat Rod chopped and channeled too (see other topic). Yours looks great! Keep wprking on it and keep posting pics. I love that look! Eric Quote Link to comment Share on other sites More sharing options...
ajulia Posted February 4, 2008 Share Posted February 4, 2008 hello there friend! That is one mean lookin chop and the hieght from the ground is just crazy I love the stance " Keep on wit the keepin on Thanx for sharing!!!! Peace Ajulia Quote Link to comment Share on other sites More sharing options...
Joe Handley Posted February 4, 2008 Share Posted February 4, 2008 Dang, that puppy is low! Quote Link to comment Share on other sites More sharing options...
dub Posted February 4, 2008 Share Posted February 4, 2008 I love it! That is one really evil chop job. :ph34r: Any hop ups planned for the flatty? Keep us posted! Quote Link to comment Share on other sites More sharing options...
Nick F40 Posted February 4, 2008 Share Posted February 4, 2008 Now that is a chop! Man, once she hit the floor, next thing you know, she got low, low ,low ,low. Quote Link to comment Share on other sites More sharing options...
Gray Smith Posted February 4, 2008 Share Posted February 4, 2008 Heck yeah Ajay...nice chop and channel..I've planning a raked forward chop myself on my Dohc Deuce project... Looks great even in this early stage, I can't wait to see more! Keep updated man..I love seeing 32's Gray Quote Link to comment Share on other sites More sharing options...
Ajay Posted February 9, 2008 Author Share Posted February 9, 2008 Thanks for the interest guys - spent today trying to figure out the front & rear suspension (in the original pic it was just resting on the front axle) - the frames been "z'd" front and rear and the front crossmember raised slightly in the frame slightly in an attempt to get it down in the weeds - I'd like it lower but I think this as about as low as it will go. Thanks for looking Andy PS/ Dub - I'm thinking on using a Replicas & Minatures S.CO.T blower on the flattie. Quote Link to comment Share on other sites More sharing options...
evilone Posted February 9, 2008 Share Posted February 9, 2008 LOOKIN REAL NICE MAN I CANT WAIT TO SEE IT DONE Quote Link to comment Share on other sites More sharing options...
dub Posted February 9, 2008 Share Posted February 9, 2008 PS/ Dub - I'm thinking on using a Replicas & Minatures S.CO.T blower on the flattie. Very cool! Can't go wrong with Norm's stuff; his products are tops! You have the stance perfect, don't need to lower it any more. Thanks for the update. This rod is gonna be killer! Quote Link to comment Share on other sites More sharing options...
Ajay Posted February 10, 2008 Author Share Posted February 10, 2008 Just a quick mock up of the engine - should make for an interesting view through the windscreen when the carbs are added ! Now the hard work begins Thanks for looking Andy Quote Link to comment Share on other sites More sharing options...
Bernard Kron Posted February 10, 2008 Share Posted February 10, 2008 Just a quick mock up of the engine - should make for an interesting view through the windscreen when the carbs are added ! Now the hard work begins Thanks for looking Andy Real radical and real sharp! I'm working on a similar project, but w/o chop, less radical stance, enclosed engine compartment, and with the weird self-imposed rule of trying to use as much of the original kit (RMC Good Guys 3-Window) as possible. Is that an aftermarket grill shell (2†chopped Replica’s & Miniatures?) This is one area where I’m thinking I’ll break my own rule since p/e grills look so cool! Quote Link to comment Share on other sites More sharing options...
Ajay Posted February 10, 2008 Author Share Posted February 10, 2008 Thanks for the reply It's actually a Model Car Garage one (MCG-203 - "32 Ford 6in chopped Horizontal bars grille & resin surround") Cheers Andy Quote Link to comment Share on other sites More sharing options...
Bernard Kron Posted February 10, 2008 Share Posted February 10, 2008 Thanks Andy. I was going to try the 2" R&M but now I'm sure that wouldn't be enough. I'm going with the 4"MCG instead, with vertical bars. Quote Link to comment Share on other sites More sharing options...
Ajay Posted February 20, 2008 Author Share Posted February 20, 2008 Just a small update on the suspension. I had some Replicas & Minatures finned brake drums lying around in the spares box and thought they would be in keeping with the look I was aiming for so these have now been grafted onto the front & rear axles. I had to widen the track of the rear axle with sprue so that the rear tyres didn't foul the lowered body and used the metal axle pins from the RM 29 P/U superglued to the inside of the brake drum to accept the mounting point on the rims. For the front suspension the drums have been drilled out so that the mounting point on the rim fits inside the drum. and just a couple of pics with the suspension & wheels blu tacked together showing the final stance. Still lots to do - so much for it being a quick project to get rid of modellers block !. Thanks for looking Andy Quote Link to comment Share on other sites More sharing options...
evilone Posted February 20, 2008 Share Posted February 20, 2008 KEEP IT UP BRO I CANT WAIT TO SEE MORE Quote Link to comment Share on other sites More sharing options...
Matt T. Posted February 20, 2008 Share Posted February 20, 2008 Heck yeah! Keep on it. I like it. Quote Link to comment Share on other sites More sharing options...
Raul_Perez Posted February 20, 2008 Share Posted February 20, 2008 (edited) Andy, That's going to look really cool sitting next to your Model A Roadster!! I'm pretty sure that you've broken through the modeler's block...now get on with it, Son, and get those cars finished!! Edited March 2, 2008 by Raul_Perez Quote Link to comment Share on other sites More sharing options...
Ajay Posted February 21, 2008 Author Share Posted February 21, 2008 Been considering the colour ut colour for this one - I'm thinking matt black with lime green wheels, engine block and perhaps scallops - something along the lines of this RM chopper I built towards the back end of 2006 . Not entirely original but I reckon it would suit the syle of the car. Thanks for the interest guys Cheers Andy Quote Link to comment Share on other sites More sharing options...
Raul_Perez Posted February 21, 2008 Share Posted February 21, 2008 Very sharply contrasting colors work well when they're proportionally balanced, like your bike. It should look really good!! Regards, Quote Link to comment Share on other sites More sharing options...
dub Posted February 22, 2008 Share Posted February 22, 2008 That's moving right along! I think the black and green will look great together. It kind of reminds me of the Mr. Yuck stickers from years ago. I'm sure you didn't have them in 'ol Blighty so I'll fill you in. Us Yanks used them on household chemicals to keep kids from drinking them. They were black and bright green with a "yuck" face(gross, not ha ha) on them. There's a name for the build for you! Here's a pic: Quote Link to comment Share on other sites More sharing options...
Ajay Posted March 1, 2008 Author Share Posted March 1, 2008 With the suspension sorted I spent some time today working on the engine. For simplicities sake I've used the basic flathead block & engine mounts from the new Revell 32 Sedan As the Z'd frame makes the engine sit higher than stock I've had to shorten the front mounts, and to get the engine to sit level modify the rear mount and enlarge the transmission tunnel. I've added a R & M front cover with side mounted distributor and drilled out the munting points for all the pulleys. I tried various carbs and aircleaners but I think I'll go with the R&M's ones pictured as they're quite small and stop it from looking too cartoonish. The finned heads are from Model Car Garage. Because if the changes to the frame I've had to keep mocking the engine up to check alignments & ground clearance etc but I think I've ironed out most of the issues now. Interior will be the next headache as it'll have to be reduced in height. This one's certainly turning into one of the more involved projects I've done for a while !. Thanks for looking Andy Quote Link to comment Share on other sites More sharing options...
Smart-Resins Posted March 1, 2008 Share Posted March 1, 2008 I am liking the way this one is going.I am planning a truck build soon.Where did you get that vintage blower? Thanks Quote Link to comment Share on other sites More sharing options...
Dan Helferich Posted March 1, 2008 Share Posted March 1, 2008 Great '32 Andy. It has that "Bad Attitude" I love. The colors from your chopper will look killer on it. Keep us up to date! Quote Link to comment Share on other sites More sharing options...
Recommended Posts
Join the conversation
You can post now and register later. If you have an account, sign in now to post with your account.
Note: Your post will require moderator approval before it will be visible.