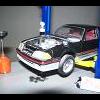
Wayne Buck Posted January 8, 2010 Share Posted January 8, 2010 Well I thought I was done with slot cars the last time around but I got sucked in once again! A few weeks ago, I went into my local slot racing place to look at the model kits there and found out they had put up a drag strip. The road course racing got to be too expensive for me since I always wanted to have the best stuff and... well, you know how that goes, but I did always want to try out the drag racing stuff. This is my first attempt at building one of these. Hopefully it works ok. Not sure if I'm gonna go with gloss or satin black, but I'm pretty sure I'm going to paint it some form of black. Could I ask you experienced guys a question? I still have to make the wheelie bar. How high should it be off of the track surface, if at all? And how long should it be? I'm not trying to build a rocket ship really. Just want something reliable and fun to play with. Tips and ideas are welcome! Quote Link to comment Share on other sites More sharing options...
PlasticWagens Posted January 11, 2010 Share Posted January 11, 2010 (edited) Wayne, How you have your WRP chassis setup/built currently is going to give you a lot of troubles. First off you chose a nice chassis for bracket racing that is farily easy to build and very consistant when built properly. Issues- 1) The main rails are also suppose to be your wheelie bars. You need to run the rails individually from the guide plate all the way back, not cut off at the motorbox (not with this chassis). 2) You have soldered the wheelie bar wheele gusset in front of the motorbox. The gusset will tie in the back of the wheelie bar rails and give you a spot to attach your wheelie bar wheels. 3) Your rear body mount needs to float and also needs to be located behind the wheels. How you currently have that tied in will have the car deslotting on the first pass and with that rare resin body you do not want that. Fixes- 1) De-solder the chassis and clean up the guide flag plate and motor box. 2) I am assuming that you are using this for bracket racing and running either a Pro Slot FX motor or Parma 501/502. Get stainless .072 tubing for your main rails or .069 piano wire. 3) Measure and cut your main rails. You want your wheelie bars just shy of 5 inches from the rear axle centerline. With that wheelbase you could do 4 3/4 inches, but personally just under inches from the rear axle centerline to the wheelie bar axle centerline is ideal. 4) The rearward tabs with the oval slots on the motorbox are intended for your rear body mount. The are sloted to provide the body to be able to float which is a key part of getting the cars down the track without hopping. How your current set up is will not allow the body to float and it has tied the two main rails together which can lead to catostrophic deslots around mid track. 5) A good rule of thumb for initial wheelie bar height settings is a business card thickness. Use your setup block and make sure the braids are installed when doing so. Remember all tracks have different braid depths so you will need to check / tune at your track before making that first pass. I have literally built over 200 of these chassis's and I really like them for bracket racing. I made a tutorial a couple years back on tips and how to's for these. I will find and revamp it and get it posted here this week. Hopefully thes quick tips help and the photo's clear up what I have expressed. Feel free to email me at matt@slotwagens.com should you need any further assistance, I will be happy to help. Edited January 11, 2010 by PlasticWagens Quote Link to comment Share on other sites More sharing options...
Wayne Buck Posted January 11, 2010 Author Share Posted January 11, 2010 Wayne, How you have your WRP chassis setup/built currently is going to give you a lot of troubles. First off you chose a nice chassis for bracket racing that is farily easy to build and very consistant when built properly. Issues- 1) The main rails are also suppose to be your wheelie bars. You need to run the rails individually from the guide plate all the way back, not cut off at the motorbox (not with this chassis). 2) You have soldered the wheelie bar wheele gusset in front of the motorbox. The gusset will tie in the back of the wheelie bar rails and give you a spot to attach your wheelie bar wheels. 3) Your rear body mount needs to float and also needs to be located behind the wheels. How you currently have that tied in will have the car deslotting on the first pass and with that rare resin body you do not want that. Fixes- 1) De-solder the chassis and clean up the guide flag plate and motor box. 2) I am assuming that you are using this for bracket racing and running either a Pro Slot FX motor or Parma 501/502. Get stainless .072 tubing for your main rails or .069 piano wire. 3) Measure and cut your main rails. You want your wheelie bars just shy of 5 inches from the rear axle centerline. With that wheelbase you could do 4 3/4 inches, but personally just under inches from the rear axle centerline to the wheelie bar axle centerline is ideal. 4) The rearward tabs with the oval slots on the motorbox are intended for your rear body mount. The are sloted to provide the body to be able to float which is a key part of getting the cars down the track without hopping. How your current set up is will not allow the body to float and it has tied the two main rails together which can lead to catostrophic deslots around mid track. 5) A good rule of thumb for initial wheelie bar height settings is a business card thickness. Use your setup block and make sure the braids are installed when doing so. Remember all tracks have different braid depths so you will need to check / tune at your track before making that first pass. I have literally built over 200 of these chassis's and I really like them for bracket racing. I made a tutorial a couple years back on tips and how to's for these. I will find and revamp it and get it posted here this week. Hopefully thes quick tips help and the photo's clear up what I have expressed. Feel free to email me at matt@slotwagens.com should you need any further assistance, I will be happy to help. Thanks a lot!! Just the info I was looking for! I couldn't really find any information online about building these chassis and every picture I found of one was different from the next, so I just made my best attempt. I had no idea what the gussets were for. So, I need to just slide the rear pin-tubing through the slots and let it float in there (no solder)? Could I just solder the wheelie bar wire parallel to the main rails or do they have to be one solid piece of wire to work right? And yeah, that is a pro slot fx motor. I just wanted to build something to play with and possibly bracket race if I like it enough. Quote Link to comment Share on other sites More sharing options...
richafflerback Posted January 11, 2010 Share Posted January 11, 2010 Where is your local raceway? I'm building the same chassis now for a 07 shelby mustang pro stock car. We race at Speedzone in mt holly usually every saturday. Quote Link to comment Share on other sites More sharing options...
PlasticWagens Posted January 12, 2010 Share Posted January 12, 2010 Definately solid rail front to back. Do not solder the pin tube to the motor box. If you look closely I install brass collets on either side to limit the amount of body sway the car will have. Also I slot the back of them for easy body removal. Simply remove the front pins and slide the body and rear mount off as one. Also whenever possible locate your front body mounts infront of the front wheels. The car I used for the example is a full float body as this particular body is famous for getting a lot of air under it so it needs the additional float and it needs to be stiffened in a different way. Quote Link to comment Share on other sites More sharing options...
Wayne Buck Posted January 12, 2010 Author Share Posted January 12, 2010 Where is your local raceway? I'm building the same chassis now for a 07 shelby mustang pro stock car. We race at Speedzone in mt holly usually every saturday. We race at Sonny's Fastlane in Beachwood. The drag races are on Friday nights. I haven't ran on the drag strip yet though. Quote Link to comment Share on other sites More sharing options...
Wayne Buck Posted January 12, 2010 Author Share Posted January 12, 2010 Definately solid rail front to back. Do not solder the pin tube to the motor box. If you look closely I install brass collets on either side to limit the amount of body sway the car will have. Also I slot the back of them for easy body removal. Simply remove the front pins and slide the body and rear mount off as one. Also whenever possible locate your front body mounts infront of the front wheels. The car I used for the example is a full float body as this particular body is famous for getting a lot of air under it so it needs the additional float and it needs to be stiffened in a different way. Thanks for the advice! I will make those changes and I guess I should try the car out before I paint it. hehe That's a great idea about slotting the holes! The whole reason I put the mounts in front of the back wheels was because I couldn't get the body on easily with it behind the wheels. Now I can see the light! If she stays on her wheels, I'll give her some nice shiny black paint. Quote Link to comment Share on other sites More sharing options...
PlasticWagens Posted January 13, 2010 Share Posted January 13, 2010 Worst case scenario send me the parts and i will build the chassis and mount the body for you. I have parts if necessary as well. Quote Link to comment Share on other sites More sharing options...
Wayne Buck Posted January 13, 2010 Author Share Posted January 13, 2010 Worst case scenario send me the parts and i will build the chassis and mount the body for you. I have parts if necessary as well. Thanks, Matt! If I have any problems I'll let you know. Quote Link to comment Share on other sites More sharing options...
Recommended Posts
Join the conversation
You can post now and register later. If you have an account, sign in now to post with your account.
Note: Your post will require moderator approval before it will be visible.