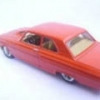
Agnaldo Posted May 20, 2012 Share Posted May 20, 2012 (edited) Sorry, I use google translator. Hello, friends, okay? A new model on the workbench. This is my second model, then, a lot of patience, because they lack experience and technical skills. The chosen after much analysis was the '53 Ford Victoria, the Lindberg. It seems to be a great kit comes with chrome trim already, which makes it easier for those who do not have the slightest practical BareMetal. Well, the initial proposal is to keep the original wheels and make it very low (giving even an ant beetle), Cadillac all black with chrome and maintained, which will enhance and highlight black enough. Here are some photos from the beginning. The kit. Guys, look at the reference there, only it's a '51 Victoria. Maybe I do not do well with the red roof, I'll just need a red like that, because I have not. The only difference is that I do with the chrome. Some photos I took to get an idea. The kit comes with a white band for the tire. Edited May 20, 2012 by Agnaldo Quote Link to comment Share on other sites More sharing options...
Agnaldo Posted May 20, 2012 Author Share Posted May 20, 2012 I work slowly, little do the same. You can see the tray and the front suspension was lifted in its original angle. I stuck with JET to give more firmness. It was pretty cool, poor sanding. I also worked in the back, the same gig I did in the Fairlane. I put shims to lift the suspension and therefore put the wheel further into the fender. I still have a few tucked. It also shortened the sleeves of the axes that would no longer fit. It was lopsided, but hard to do right. But its okay, you'll be good I think. As the wheel would not fit, had to open more fenders, easy thing, but it takes you to the JET harden everything. Quote Link to comment Share on other sites More sharing options...
Agnaldo Posted May 20, 2012 Author Share Posted May 20, 2012 (edited) I lowered a little more, stirring in the suspension. Edited May 20, 2012 by Agnaldo Quote Link to comment Share on other sites More sharing options...
Agnaldo Posted May 20, 2012 Author Share Posted May 20, 2012 I took one worked in the front and rear suspension, it was a little high in front. Follow the pictures of the sleeves I made from pieces of gall kit, sanding to the desired point. Here in place. This had to cut the front wheel housings. Then I'll have to plug one part to hide the wheels. Now the scheme mounted on the chassis. The time was with the chassis. Now with the body and the wheels to see it down. Hopefully I do not have to mess around in the drive shaft tunnel. Quote Link to comment Share on other sites More sharing options...
Agnaldo Posted May 20, 2012 Author Share Posted May 20, 2012 (edited) The problem is that there's no way to stay in the position of the chassis with the body, it becomes more distant, and I'm still settling, since everything is sanded in place, but it's working. I had to sanding parts marked in red, it was pretty hard to figure out where the problem was, but were in various parts, bad to see. Now is better. space was huge, more than 5 mm, is now getting what I want. But I wanted to put these pictures to give you a look at how the look will be if I change the direction of the wheels. New moon hubcaps that won the Schumann friend here in Brasil. As he said he would not use, said he would give me. Thanks friend. Photos. Well, although I will continue posting the results here. What they found with these caps? Soon shooting photos with the suspension mounted box and new rear wheels that did. Edited May 20, 2012 by Agnaldo Quote Link to comment Share on other sites More sharing options...
Agnaldo Posted May 20, 2012 Author Share Posted May 20, 2012 (edited) I removed the details of wall trims fire, finished modify the internal side of the engine and spent vault to hit, because the mass of wheels would not enter as it was before. The one part I spent the other mass, acrylic powder and only JET liquid, to see the difference in results. Well, I decided I was going to make the exhaust coming out the side. Imagine my apreenssão when it comes to just the second kit, making bullshit. Well, as I take the risk, at least in the world of plasti, I sent bala, or better, drill ... I think it was cool, but in time to force overreacted to the hole and had to coordinate. Put the escape in position with tape and filled the hole with JET and acrylic powder. Then I sent a little mass to maintain the level. Here he has hit and the batter sanded. I know that seems ugly yet, but when I know how send primer. Deepening the doors and trunk, gave a few escapades and had to put weight to conceal the risks. Here already sanded. Edited May 20, 2012 by Agnaldo Quote Link to comment Share on other sites More sharing options...
Agnaldo Posted May 20, 2012 Author Share Posted May 20, 2012 Primer on all the pieces, but I photographed only now little bodyshell. looks like sandpaper, but is half aspera, but uniforma coverage. Must have 6 layers of primer Suggestions are welcome. Hugs. Quote Link to comment Share on other sites More sharing options...
Modlbldr Posted May 20, 2012 Share Posted May 20, 2012 Agnaldo- That 53 Ford is a GREAT kit. I am in the process of working on one too. Your progress is looking good. I like the stance. (I'm not a fan of the Moon disks, though.) Keep it up. Here's a photo of mine in progress. It has an 06 Mustang interior and a 65 Mustang roof. Later- Quote Link to comment Share on other sites More sharing options...
tooltas Posted May 21, 2012 Share Posted May 21, 2012 i used the 49 merc by amt babymoons Quote Link to comment Share on other sites More sharing options...
Foxer Posted May 21, 2012 Share Posted May 21, 2012 That was a lot of work lowering it, but it looks very good! Quote Link to comment Share on other sites More sharing options...
rmvw guy Posted May 21, 2012 Share Posted May 21, 2012 Nice looking custom, keep it going please! Quote Link to comment Share on other sites More sharing options...
Guest Darkside Customs Posted May 21, 2012 Share Posted May 21, 2012 Very nice work so far... Not tryin to hijack your topic, but the red and black do go great.... Quote Link to comment Share on other sites More sharing options...
Agnaldo Posted May 21, 2012 Author Share Posted May 21, 2012 (edited) Modlbldr, Was very good your modification. Place the roof of Mustang in Victoria should have given a lot of work, but it was perfect. I really enjoyed the interior, was very modern. I don't have all this ability, since I'm in the second kit. Thanks for sharing with us. Congratulations. Tooltas, Pretty cool caps of Mercury as well, but I'll use the original caps of the kit. Thank you. Foxer, Thanks, really gave a lot of work to make the new suspension, but liked the result. Thank you. rmvw guy, Thanks buddy, how nice that is enjoying the customization. Thank you. Darkside, No problem posting here not, I am glad to be able to be doing a job that you like, because when I was starting my work saw his and found it very good, and using as reference. I want to make black cadillac and with red roof. Let's see what I will do. Continue to follow that will have more updates soon. Thank you. Hugs for all. Edited May 21, 2012 by Agnaldo Quote Link to comment Share on other sites More sharing options...
Agnaldo Posted September 9, 2012 Author Share Posted September 9, 2012 (edited) Guys, having problems with the paint peeling all, sealer applied to plastic and everything improved. The chassis is only missing the wheels, which are waiting for chrome because the chrome was all original detonated, alas I decided to do it again with a chrome I bought, but it was not good. I used to exhaust welding wire of 2.4 mm after the damper to be able to do the curves. 'll Still get the tip of glove fishing, but only after mounted. New paint finally finished, just waiting to receive bare metal and lacquer to finish. It was much better now, and then I started using a sealer, nothing stripped. : D Black is polyester. I really liked the polyester dries too fast. Interior flocking. The engine until it was legal. I did the fuel hose leading from the fuel pump to the carburetor with nylon coated with varnish stained orange. I also did a hose coming out of the tank but only by firebreak wall. I made a hose coming out of the water reservoir of windshield cleaner that is not there. And I made a wiring that goes from the alternator to the voltage regulator on the wall firebreak. Ah, I managed with the help of Kleber Bitt and Dionísio Cavalcante who gave a strength to the pipes of the candles. I used the little tube of telephone wires, but had to give in a heated fire, but there was loose hoop done. hehehehe Edited September 9, 2012 by Agnaldo Quote Link to comment Share on other sites More sharing options...
Agnaldo Posted September 9, 2012 Author Share Posted September 9, 2012 (edited) Edited September 9, 2012 by Agnaldo Quote Link to comment Share on other sites More sharing options...
Agnaldo Posted September 9, 2012 Author Share Posted September 9, 2012 (edited) Inside the door handles made with bare metal. It was not legal, but it was my first experience with this material. Not much enjoyed not the result, but should be better than masking to paint right. I applied the powder as I had seen before, and of course, as I had problems starting node assembly, was a small gap close to the floor and the wall cuts focus, but I'll try to improve this tomorrow. Everything here was applied in semi gloss or satin varnish. Details of the start of fireproof wall. Edited September 9, 2012 by Agnaldo Quote Link to comment Share on other sites More sharing options...
Agnaldo Posted September 9, 2012 Author Share Posted September 9, 2012 Photos from the application of bare metal, because this step already finalized. I liked the result, despite flaws in the pictures are not very evident, but finalized and liked. The problem I believe is the knife I use, because I have no stylus, and even with a new blade just for that, it means chewing bare, instead of cutting just right. Very bare metal to apply, same too. Never make a car with so many beads. I made one more detail after these photos. The best so far. To better Ta near completion. Please tips, comments and suggestions as always, welcome and necessary. Hugs for all. Quote Link to comment Share on other sites More sharing options...
H.A.K Posted September 9, 2012 Share Posted September 9, 2012 Lookin good YO!!! Quote Link to comment Share on other sites More sharing options...
wesvh Posted September 9, 2012 Share Posted September 9, 2012 Looks great !!! I follow this ! Quote Link to comment Share on other sites More sharing options...
Gluhead Posted September 10, 2012 Share Posted September 10, 2012 Love it. Quote Link to comment Share on other sites More sharing options...
Dr. Cranky Posted September 10, 2012 Share Posted September 10, 2012 Looking real nice, and you've poured a lot of work into it. It's paying off. Quote Link to comment Share on other sites More sharing options...
scaleauto Posted September 10, 2012 Share Posted September 10, 2012 I love it, keep it goin' Quote Link to comment Share on other sites More sharing options...
MachinistMark Posted September 10, 2012 Share Posted September 10, 2012 Looks ace boss Quote Link to comment Share on other sites More sharing options...
Albie D Posted September 11, 2012 Share Posted September 11, 2012 I love low and I love this car! Keep it up! Quote Link to comment Share on other sites More sharing options...
Modlbldr Posted September 11, 2012 Share Posted September 11, 2012 Your work on the 53 is turning out fantastic. I like the stance and the engine looks great. I got a chance this last weekend to work on mine for a few hours. I'm finally getting the rear suspension scratch built. The ride height is getting ironed out. Keep up the great work on yours. Later- Quote Link to comment Share on other sites More sharing options...
Recommended Posts
Join the conversation
You can post now and register later. If you have an account, sign in now to post with your account.
Note: Your post will require moderator approval before it will be visible.