lghtngyello03
-
Posts
1,232 -
Joined
-
Last visited
4 Followers


Recent Profile Visitors
5,673 profile views


lghtngyello03's Achievements
MCM Ohana (6/6)
-
 Thanks man!
 -
Thank you Patrick!
-
Thanks Jim!
-
Thanks man! The little details like that really stand out!
-
Thank you very much. I’m really starting to get the hang of weathering convincingly. Thank you!!
-
Thank you! That is classic VW in my eyes. Thanks man!
-
'47 Chevy Delivery Sedan
lghtngyello03 replied to ATHU's topic in Model Trucks: Pickups, Vans, SUVs, Light Commercial
love the wood on the dash, how did you do this? -
Thank you Steve! Thanks Mike! I have to say, I really do enjoy the weathered builds now that I have done a few. You don't have to be as clean as you do with a nice shiny clear coated build, lol.
-
Thank you!! Thanks man! Not bad for my 2nd weathered build huh? Lol. These builds are so fun. Thank you sir!!
-
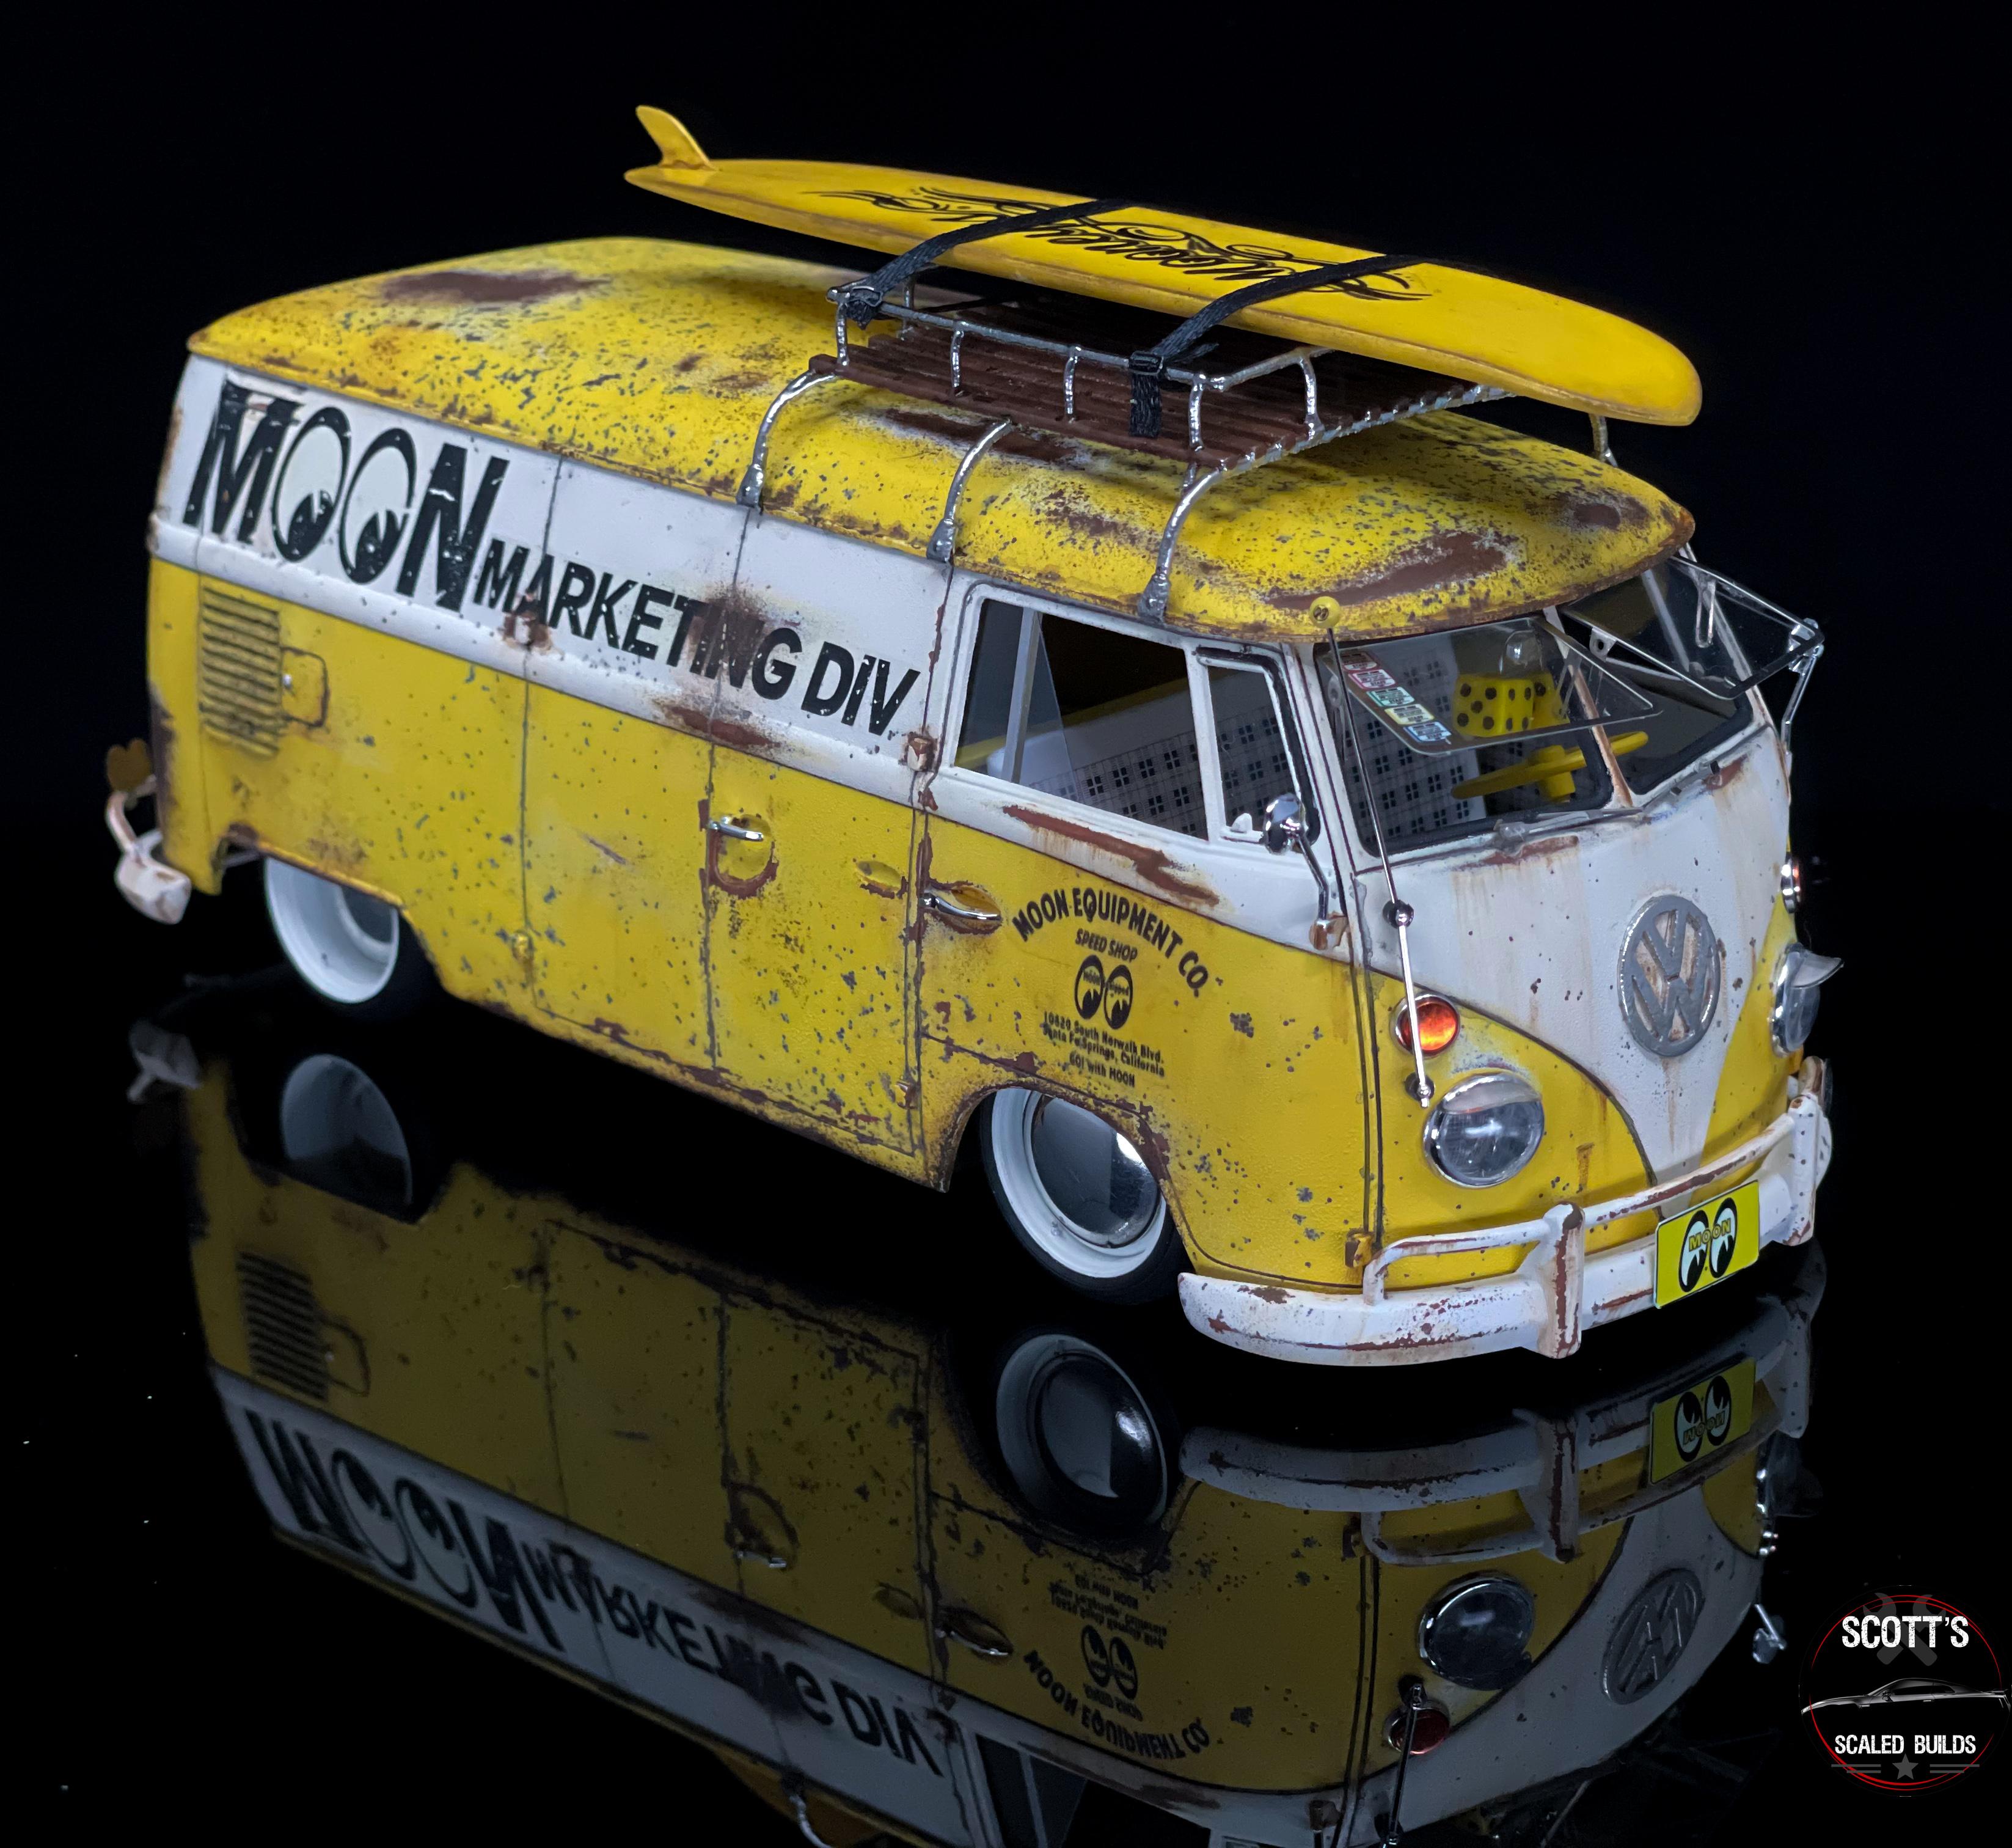
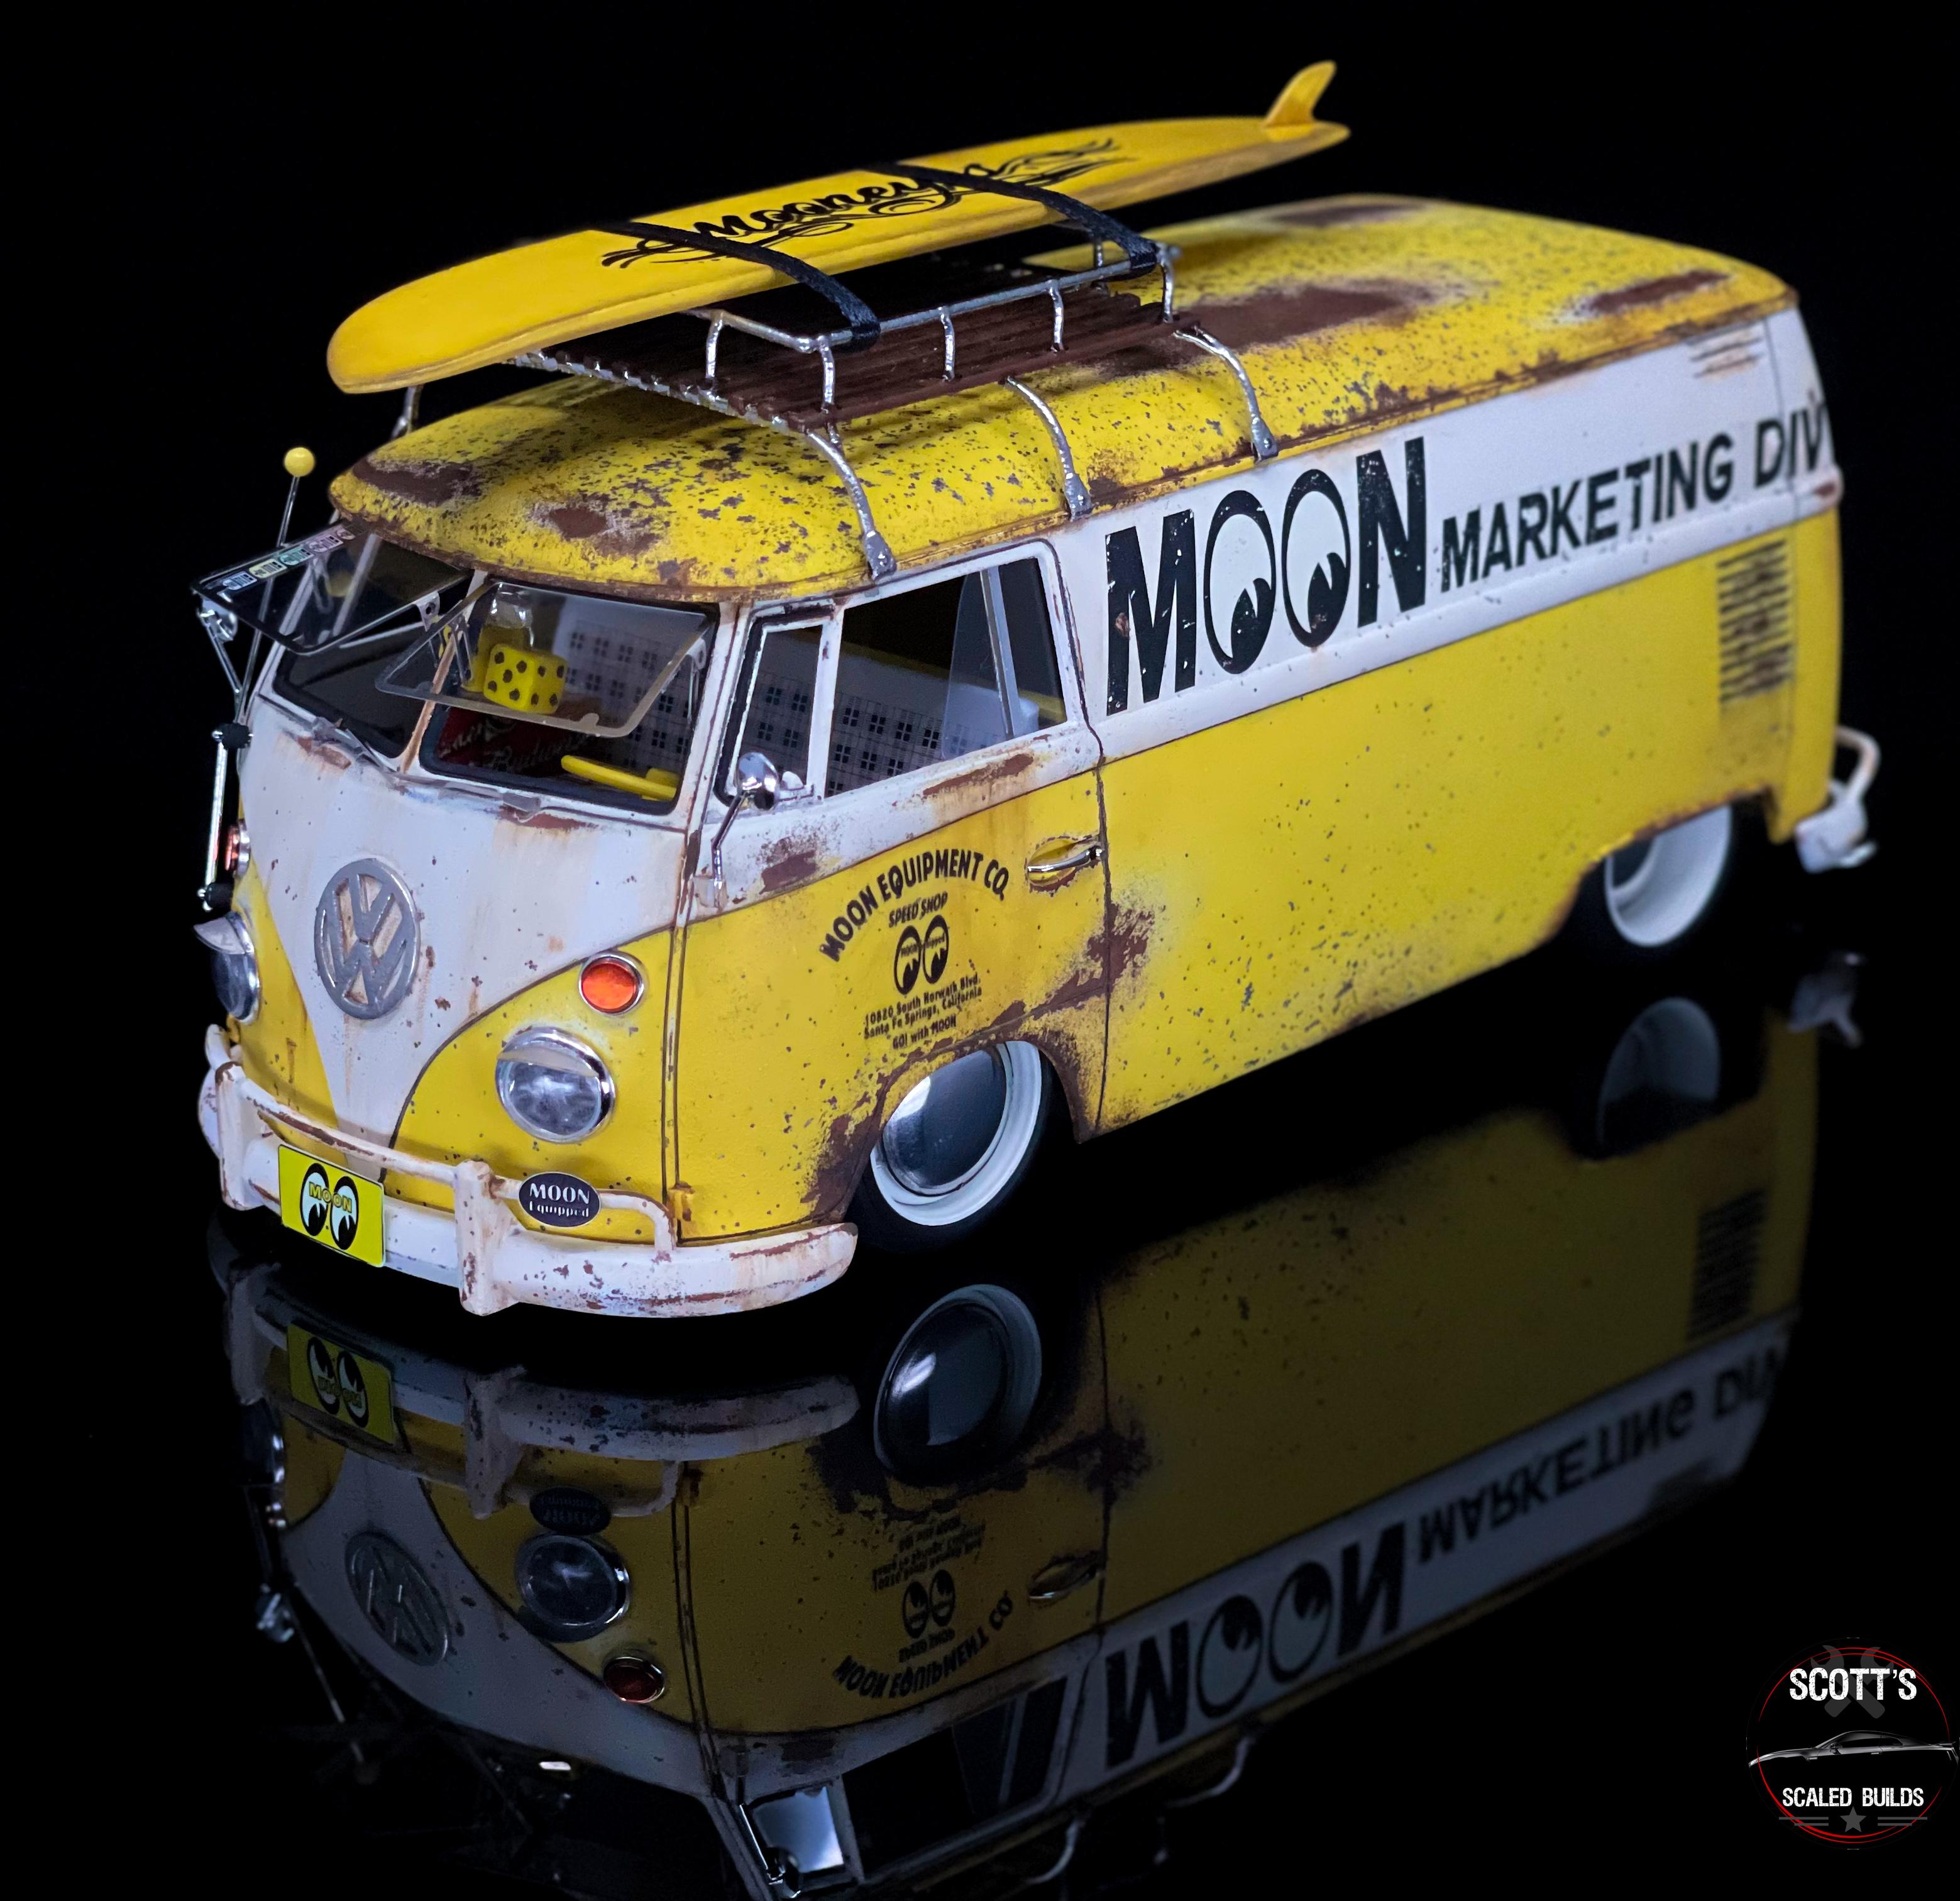
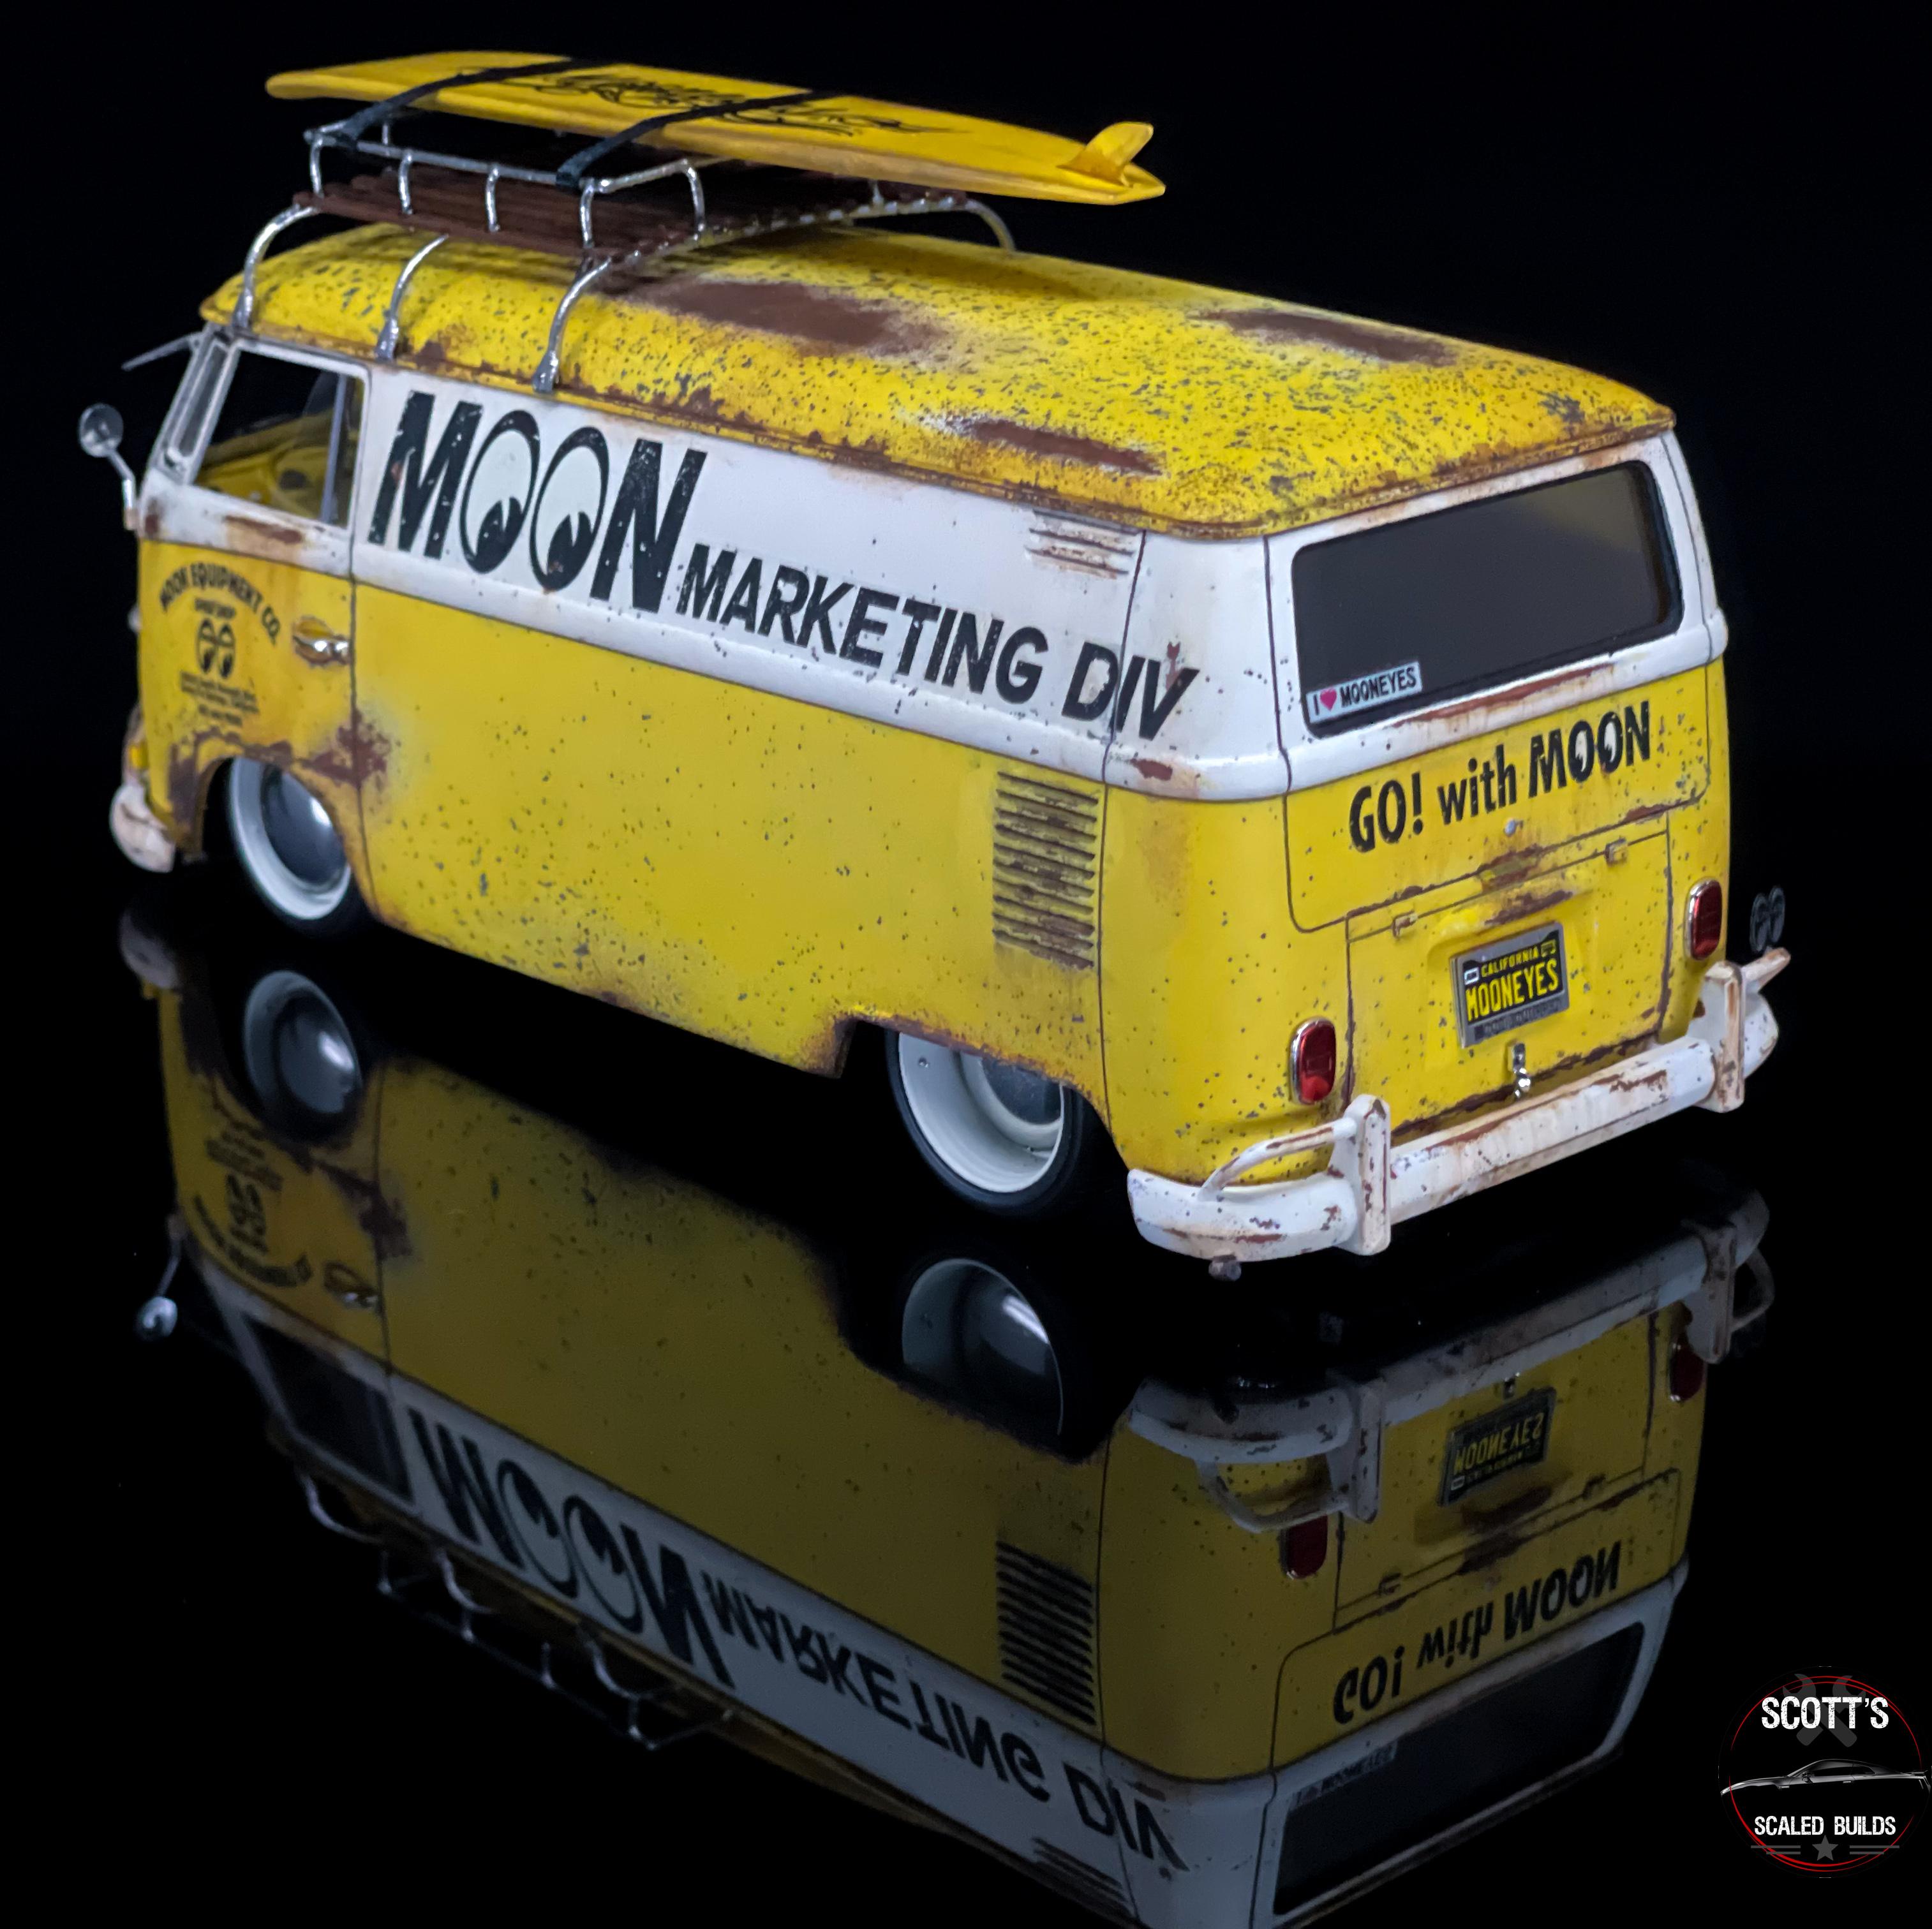
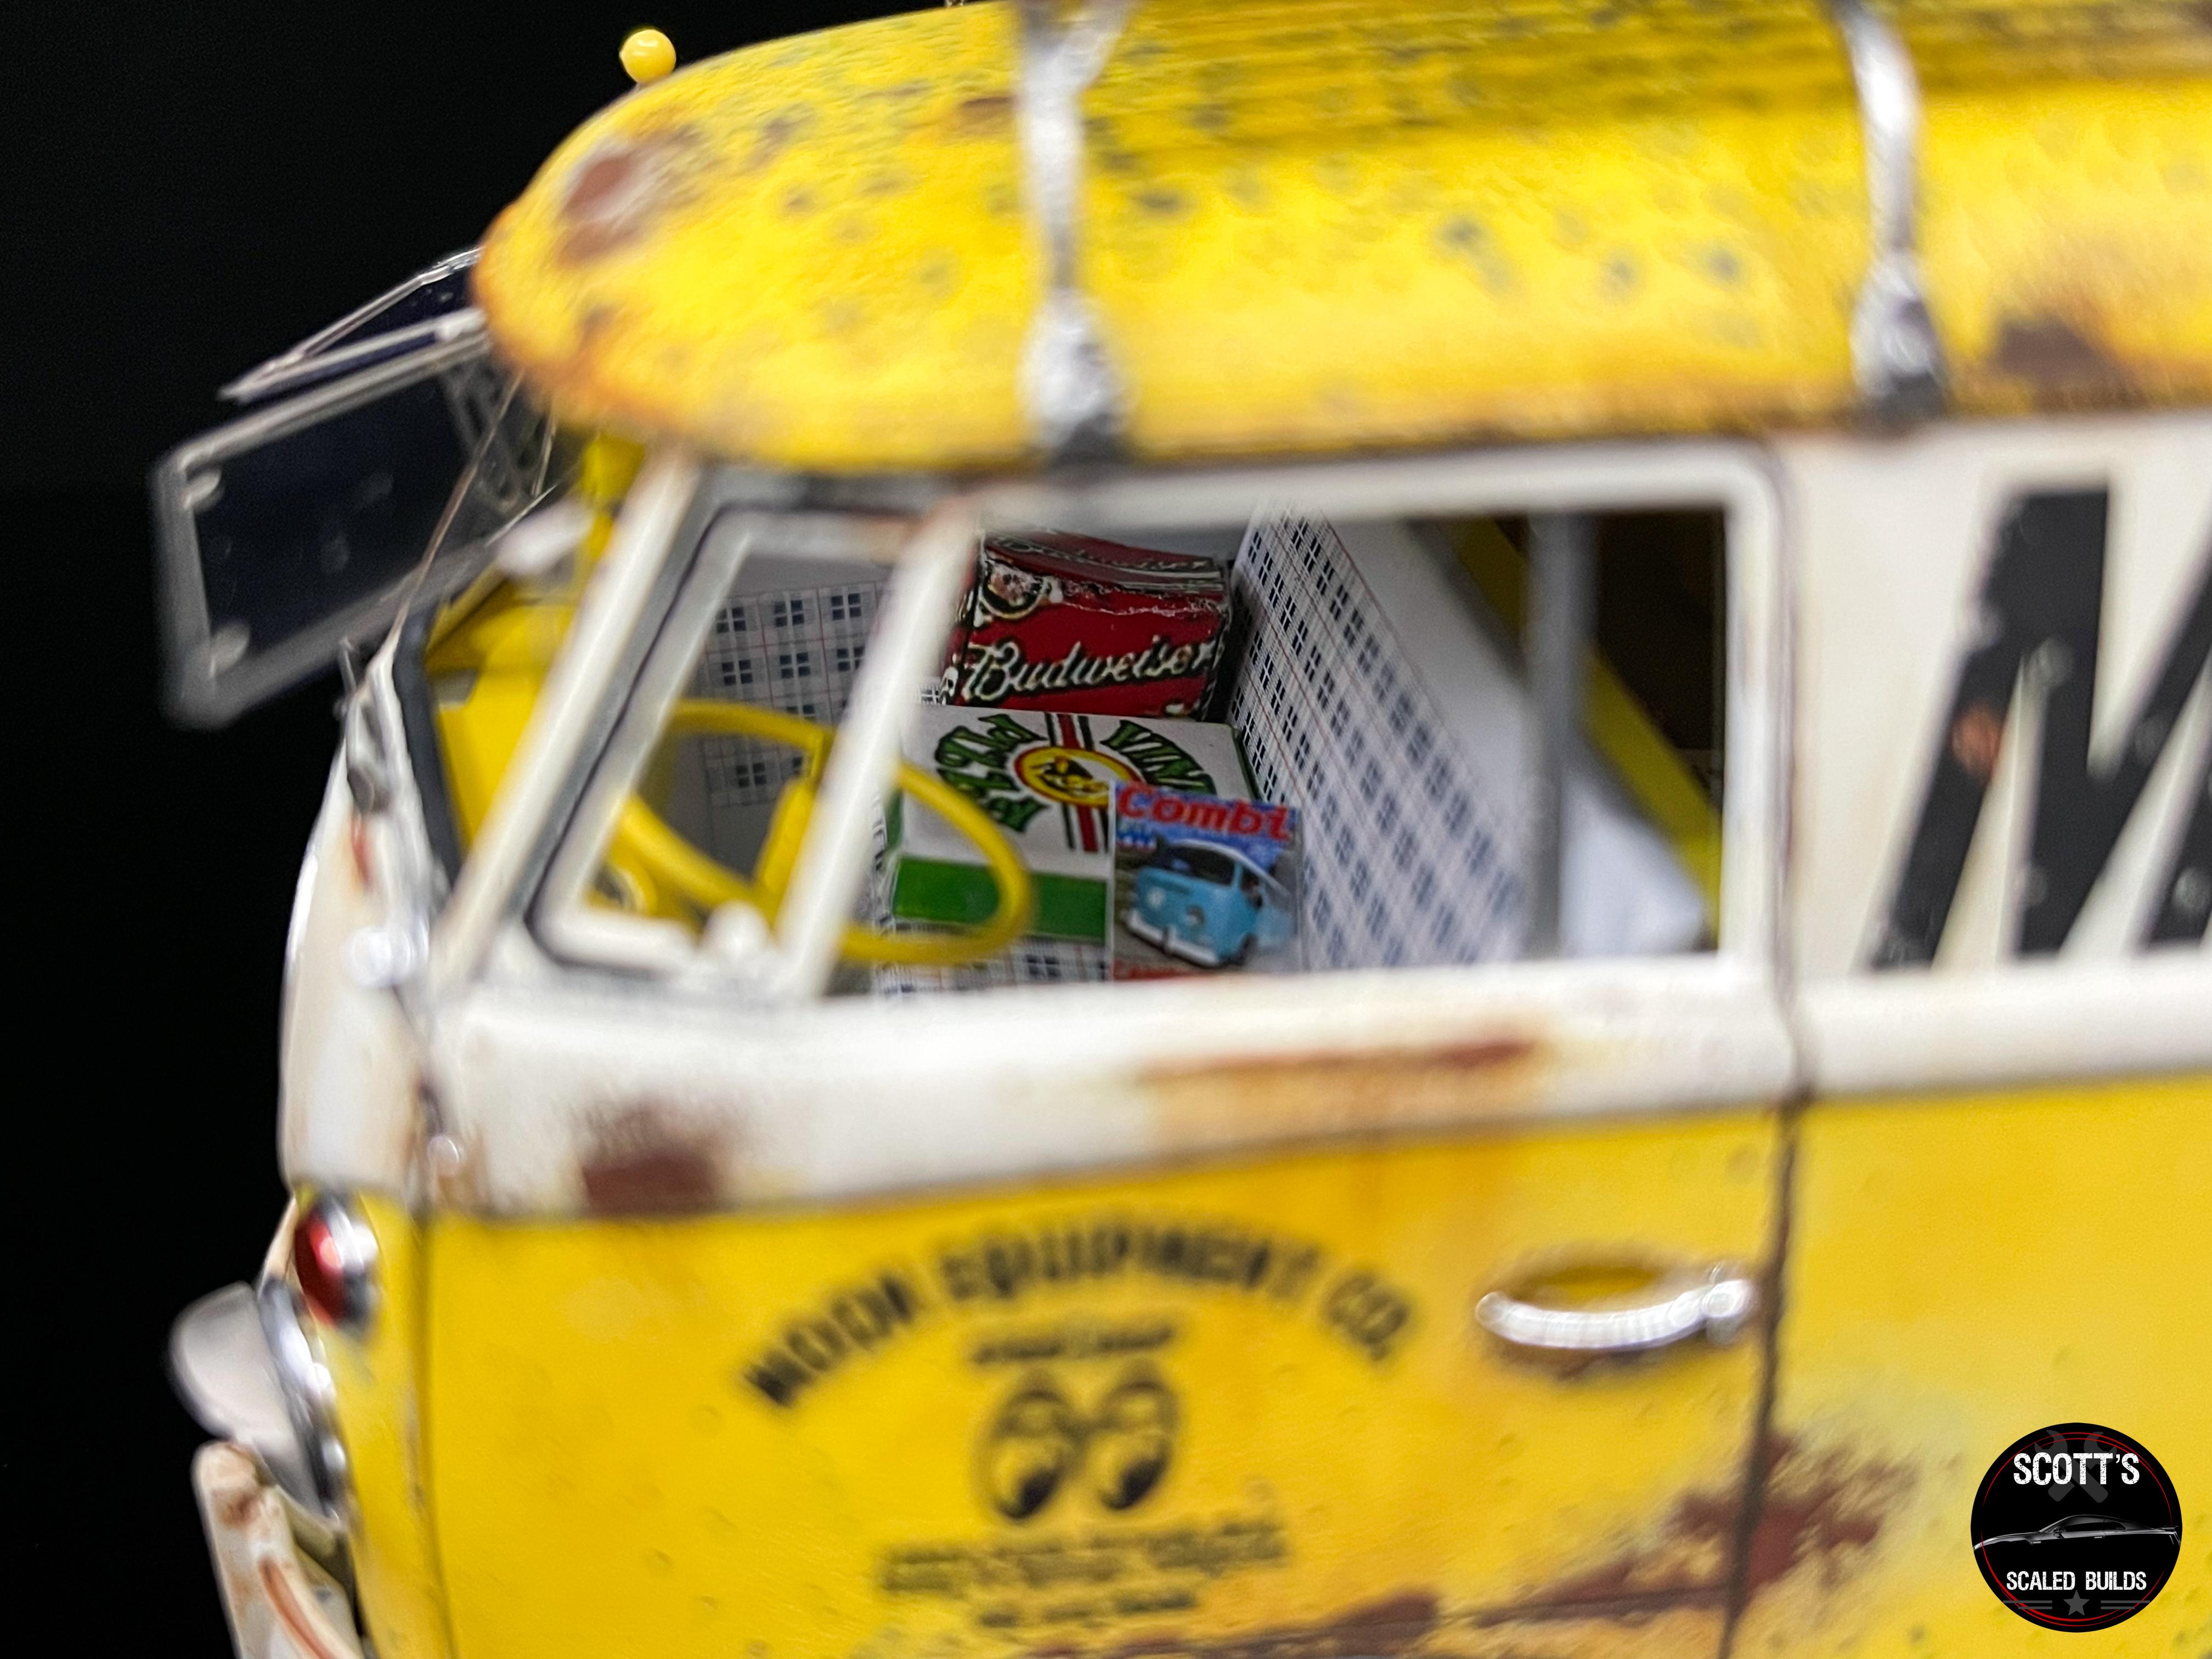
Again, many of you follow me on Instagram, so the work in progress wasn’t posted on here, it can be found on my Scott’s Scaled Builds page on IG. This started with a Hasegawa 67 VW Type 2 delivery van. The paint is Mitsubishi Lightning Yellow and a custom mix Pearl White from Splash Paints topped off with Vallejo Matte Clear Coat. The weathering was done using several different methods….Salt, sanding, sponge, brush, and streaking fluids. All of the rust was made using Splash Paints red oxide primer, various Vallejo acrylic rust colors, and AK rust streaking fluids. The interior was painted using Splash Paints Pure White. Highlight Model Studios door panels, Highlight Model Studios Mooneyes pedals, Scale Motorsport Euro Plaid decals, and various scale boxes were used throughout. A pair of dice was also a must hanging from the rear view mirror as well. The exterior received Highlight Model Studios Safari Windows, headlight visors, windshield wipers, tags/tag bracket, and Mooneyes bumper plaques. The antenna was made using a smaller colored ball sewing pin. I chose to use some of the kit decals, and I also ordered some custom Mooneyes shop logos for the doors to give it that shop truck look. To complete the 70’s Cali look that I was going for, I used a 3d printed roof rack sprayed in Splash Paints Hyper silver, and Tamiya Deck Brown. I then topped it off with a surf board from a random Aoshima kit, which is held on by straps made from 3mm ribbon, and some PE buckles from a racing harness kit. The wheels were 3D printed by myself, and designed by Slowlys Models. They are topped using the kit supplied metal Moon Disc caps. I wanted some pop to them, so I wet sanded and polished them. RB Motion valve stems are used as well. They are finished in Splash Paints rubber black, and the custom mix pearl white. Thanks for looking and enjoy!!

-
Great looking build! Hasegawa makes some great kits. This was my first dabble into them as well. Such a great little kit, that was put together just as well as any Tamiya kit that I've built. Here is a link to my finished build
-
Datsun 240/280Z & Nissan Fairlady Z/ZG multiple builds
lghtngyello03 replied to Spottedlaurel's topic in WIP: Model Cars
@Spottedlaurel If you ever decide to use the S20 from the Tamiya Hako kit in the Tamiya Z kit, just flip the engine mount around the opposite direction from what it would normally go on the Hako. You will have to chop the engine block to match the angle of the flipped mount due to this. This is literally all I had to do to make this engine fit the Tamiya 240 kit. Tamiya really should offer a Z432 kit with the S20 from the Skyline kit. My next build of this kit will be with a Hobby Design RB26 and a single turbo. Great info on all of the part mash ups -
Midnight Purple 3 Tamiya R34 Skyline Z-Tune
lghtngyello03 replied to lghtngyello03's topic in Model Cars
Thanks man!! -
Midnight Purple 3 Tamiya R34 Skyline Z-Tune
lghtngyello03 replied to lghtngyello03's topic in Model Cars
Thank you very much! It is indeed in a case with all of my others. Carney Display cases are the best! -
Millennium Jade Tamiya R34 Skyline Z-Tune
lghtngyello03 replied to lghtngyello03's topic in Model Cars
Thank you!! Thank you. One of my favorite colors on an r34! Thanks man!