Stuntman Mike
-
Posts
152 -
Joined
-
Last visited
Recent Profile Visitors
3,463 profile views


Stuntman Mike's Achievements
MCM Friend (4/6)
-
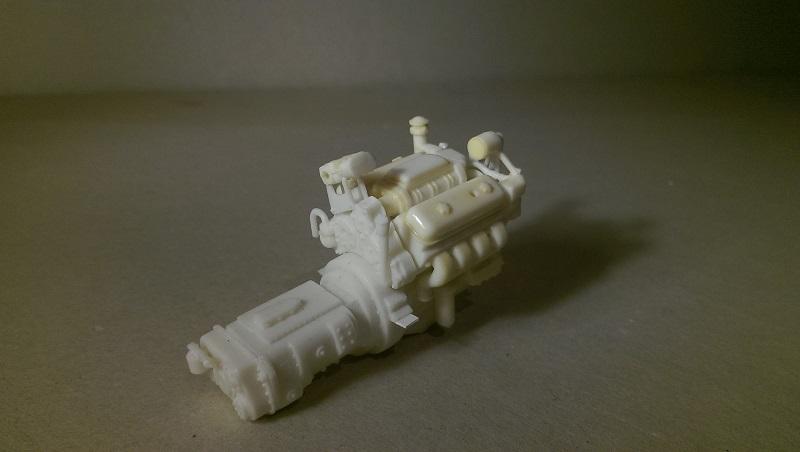
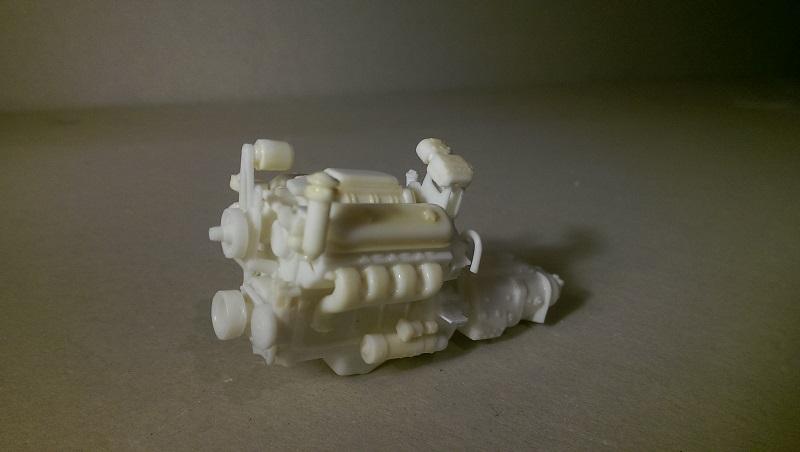
Really nice job so far and a cool subject. As the AMT Nascar Smallblock was mentioned, here´s a 358ci Pontiac engine from this kit: The following pic shows the intake manifold and carburator from the engine above. This is currently in progress of becoming the powerplant for my current ´70 Yenko Deuce Nova build. Not factory stock, but I think it´s a realistic upgrade for a 350 LT/1. The AMT Nascars are great as parts donors. A lot of crisp detailed parts and other useful stuff. The headers with the simulated heat wrap are pretty cool. However, hope this was useful for future projects. I´m looking forward to see this evolve. I really like Novas.

-
Triangle air cleaners
Stuntman Mike replied to IceMan Collections's topic in Model Building Questions and Answers
I think that the air cleaners you are looking for were included in AMT's '69 Plymouth GTX. It has an optional Hemi with a cross-ram intake manifold and I'm 87,3% sure that these triangular air cleaners came as chrome plated parts. -
Was a 250 Chevy six ever in a kit
Stuntman Mike replied to junkyardjeff's topic in Model Building Questions and Answers
AMT's '69 Firebird has a straight six included if I remember correctly. -
Any good painting tutorial?
Stuntman Mike replied to leon_s's topic in Model Building Questions and Answers
My procedure is pretty much the same. I currently use Tamiya spray exclusively. Primer, base color and clear coat. Careful wet sanding of every layer of the paintjob will improve your results significantly. For this step you may want to look for Micro Mesh abrasives. Great stuff. -
Yenko Deuce Engine & Exhaust Donor?
Stuntman Mike replied to Stuntman Mike's topic in Model Building Questions and Answers
Thanks for the information guys. I´ll modify the 302 engine that I have and will use the stock exhaust from the Nova kit. Decals from Keith Marks are on their way to me, too. @Casey I went for the AMT Nova on purpose as I´ve already had my hands on all three versions of the Revell Nova. I just don´t wanted another one. Another reason is the weird body lines of the Revell kit. The AMT Nova sure is a mess of an old kit, but it´s on spot with the proportions and it has tons of potential for detailing. The separate front fenders are a challenge to align and to blend into the body. But from there it´s just a fun kit to work on. Scratchbuilt side window trim, rocker panel trim removed and there is a detail upgrade on the suspension in progress. Paint is Tamiya rattle can TS-7 Racing White over Tamiya White Primer. I think it looks a little more classic than a in-your-face-yellow, especially when the wild black striping is done. Real Yenko Deuces were available in Gobi Beige and TS-7 is very close to the factory color.
-
My personal thumb rule is to start with the large decals and then place the small ones around the big ones. And I do the area where I grab the body while working on it at the end to avoid damaging the decals accidentally.
-
Hi I´m converting a ´72 Nova from AMT into a ´70 Yenko Deuce and need some input on the drive train. I have a ´69 Z/28 Camaro from Revell that has the exhaust with the unique mufflers. Was this exhaust style used on the Deuce aswell? I remember that I´ve read that this type of exhaust was needed to build something that has written Yenko on it. My fading memory has lead me to the conclusion that it probably wasn´t the Corvair Stinger... ...any ideas regarding the mentioned exhaust? And what about the 302 from the Z/28? Is that block with the heads and valve covers a good starting point to make a 350 LT1 out of it?
-
Thanks. Out of sheer curiosity, what is your next project?
-
It´s this kit There´s a different version available with a stock Tall T, but I wanted this because of the chopped body and because I just need the wheels, chassis, engine and radiator from the stock version for the vintage racer. The body will be built from scratch with the driver´s seat above the differential. Inspiration to build myself a neat vintage racer came from HERE
-
Best things come in threes.... I´m doing the side window trim for the third time. I realized the b-pillar was too narrow and while I´m at it I´ve also improved the top of the door panels. I have also started work on the c-pillars by sanding my way into it to bring it into shape. I think the correction of the rear window will be less work than anticipated. I´m also building with more reference now to avoid such no-brainer mistakes like the too narrow pillars. I´m actually starting to count rivets. I also think that the rear end of the body may be a little bit too long. Looks like it could be five millimeters shorter. What do you guys think? Does anyone of you actually own a 4-door Valiant? It would be awesome to get some measurements of different parts of the body. This is how the chassis plate of AMT´s ´71 Duster fits into the body. I just needed to do some minor trimming behind the rear inner fenders. It´s almost a drop-in. And this is the result on the trunk lid after a few minutes of sanding. That´s it for now. Next update will probably cover further work on the new pillar situation. Wish you all a great christmas and at least one new kit. Cheers Kevin
-
The Duel Project
Stuntman Mike replied to Stuntman Mike's topic in WIP: Model Trucks: Big Rigs and Heavy Equipment
Great job on your truck and trailer, Scott. I wish I was that far with my build I´ve stripped the chrome off of some parts and assembled the engine. This is where I run into the unknown. Is there any wiring and plumbing that should be done before painting the engine? Is diesel injected into the blower on these engines? I know it´s a two stroke, so there are probably no fuel lines to each cylinder. Is that correct? Pretty hard to find the reference I am looking for. Mainly because I don´t know what to look for. And what about that air compressor thing behind the blower? Is that for the brake system and looking forward to get connected to the air tanks? In case someone likes to share a link to a WIP that includes a superdetailed 8V71, I´d be a happy bloke Cheers
-
The Secret to Building a Better Model
Stuntman Mike replied to afx's topic in Tips, Tricks, and Tutorials
I started late to use the net and it took me a very long time to build halfway decent models. I remember that I was looking at pictures of built models on kit boxes and how impressed I was by them when I was a kid. There was no scale modeler around who could actually teach me how to put a kit together, how to clean up parts or how to paint properly. It was a long, dirty and expensive road until I was a "competitive" modeler. BMF and sheet styrene were discovered accidentaly in a shop a few years before my internet entry. I was glad to realize that I wasn´t the only freak on earth who did bodywork on scale models when I stumbled across a modeling forum for the first time. Today, when somebody is really interested to become a modeler, it´s very easy to gain knowledge. There are tutorials for everything on the Tube and the answer to any question is just a few minutes away. I´ve seen "first builds" that were way better than anything I could come up with after being ten years in the hobby. I´ve learned it the hard way and I´m proud my 28 years of experience. I´m happy with my results and I still use my prehistoric tools that have turned out to be useful and that´s it....I´m having fun. The secret to building a better model is easy to answer. It´s not about aftermarket stuff, tools from space or the amount of scratchbuilding. It´s about taste and craftmanship. One does not only need to apply a paintjob properly, one does also need to have a good hand at chosing a color that suits the subject and thus makes it stand out of the crowd. It´s about making the best with what you have and improve it where ever you can. Photography could be mentioned, but I doubt that a camera can improve the result of a build. -
Last week I´ve ordered a ´25 Model T 3in1 double kit primarily I´d like to turn the stock version into a single seat vintage style custom racer. So there will be plenty parts for me to turn the second kit into a rat rod. Count me in with a chopped ´25 Tall T. And if this CBP is renamed into "Race´n`Rad Rods", I´m in with the other one, too.
-
I´m in love with the Satellite
-
Vinegar And Water-Decal Setting Solution
Stuntman Mike replied to 69NovaYenko's topic in Model Building Questions and Answers
Haven't used this method yet, but I've heard about it, too. I read it either in a kit instruction or in an old Revell booklet that shows how to customize models. It's probably one of those early days techniques that have gotten lost in the ever growing universe of modeling supplies. It's most definately worth a try.