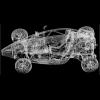
NormL Posted May 9, 2013 Author Share Posted May 9, 2013 Some screen shots of the model it was printed from for reference. Quote Link to comment Share on other sites More sharing options...
Chief Joseph Posted May 9, 2013 Share Posted May 9, 2013 Great work, Norm. Until Shapeways offers customers a way to specify print orientation, we'll be dealing with inconsistent quality on FUD parts. Other print services will orient the model to optimize surface quality. You'll pay for it, though. In addition to www.Moddler.com, you can look at www.Finelineprototyping.com and http://www.PCSEngineering.com. Quote Link to comment Share on other sites More sharing options...
NormL Posted May 9, 2013 Author Share Posted May 9, 2013 (edited) I would agree with you that it was orientation, ... well except, I cheated. I printed all three models in one stl and kept them just below 1 million faces. All had to be printed with the same orientation. Thanks for the links Edited May 9, 2013 by NormL Quote Link to comment Share on other sites More sharing options...
GTMust Posted May 9, 2013 Share Posted May 9, 2013 What a fascinating and incredible thread to follow!!!Unfortunately I don't understand a word of the technical side of it.......... but that's what happens when you turn 70 and technology leaves you in the dust!But keep it going...... I'm absolutely amazed at what can be done these days... and I'll try to follow along.Tony Quote Link to comment Share on other sites More sharing options...
NormL Posted May 9, 2013 Author Share Posted May 9, 2013 Joesph, I guess I am spoiled by the consistency of their sintered plastics. I have never had a consistency issue with them. A couple of weeks ago I thought that I wanted a phone case so I measured up my phone and sent it in. Since the sintered plastics are a hard shell I made the tolerances tight. Granted that FUD are tighter than the WSF products, but, the phone case was exactly what I expected. Quote Link to comment Share on other sites More sharing options...
NormL Posted May 9, 2013 Author Share Posted May 9, 2013 (edited) Got the motion up on YouTube. Sorry if this seems like I am beating it to death ... Both of these are in 1080 and the detail is much easier to see at that resolution Edited May 9, 2013 by NormL Quote Link to comment Share on other sites More sharing options...
Chief Joseph Posted May 11, 2013 Share Posted May 11, 2013 I would agree with you that it was orientation, ... well except, I cheated. I printed all three models in one stl and kept them just below 1 million faces. All had to be printed with the same orientation. Thanks for the links Did you connect them together on one axis? I have seen at least one of the scale train guys on Shapeways who connects three copies of a part on a sprue, each one oriented on a different axis. He claims this way he gets at least one consistent, usable part from each printing, no matter how the Shapeways operator orients his order within the larger job. Costs a little more, but cheaper than waiting on a part to be reprinted. If your three components were "free" within the STL file, i.e. not together on a sprue, Shapeways may have split them and oriented them differently from what you intended. This is just a theory; Shapeways seems to have no consistent procedures and there is apparently a wide variation between what their operators can achieve with the printers. Quote Link to comment Share on other sites More sharing options...
NormL Posted May 11, 2013 Author Share Posted May 11, 2013 Good point! They were not sprued, but, I had packed them all close together into one blob. Quote Link to comment Share on other sites More sharing options...
NormL Posted September 29, 2013 Author Share Posted September 29, 2013 OK, I am back and working towards a more traditional model. I was looking at my printing limitations and I still thinking that I can have working suspension, steering and rolling with clever design and not limit the authenticity. I did dye one of the frames black and it is very cool It is much darker in person. Most of the suspension is right at 1 mm in diameter, which happens to be my minimum sprue size. I am thinking the sprue size is going to have to be at least 1.5 mm to add some measure of rigidity to the print. Snap in ball joints for articulation and keeping the glue points as far as possible from the action. One of my big issues is going to be complexity, I do not want to make a manual, so, I want to sprue the parts for a part with it. Does anybody know of any 1/24th scale Recaro's Quote Link to comment Share on other sites More sharing options...
charlie8575 Posted September 30, 2013 Share Posted September 30, 2013 Check some of the Tamiya or other Japanese kits for seats. This whole thing is amazing. Thanks for sharing it with us. Charlie Larkin Quote Link to comment Share on other sites More sharing options...
my80malibu Posted September 30, 2013 Share Posted September 30, 2013 How artistic do need to be to use this technology? Are there companies/ individuals, that draw the product for you, then send it off to the printer? Is this difficult to use? Quote Link to comment Share on other sites More sharing options...
NormL Posted September 30, 2013 Author Share Posted September 30, 2013 (edited) Masochistic is closer ... Seriously, it is more engineering than artistic, although both are fair comments. Think of drawing something in CAD and then raising it into 3D, once you have it in 3D then you can do 3D stuff to it, but, most of what I do starts as 2D. Well unless I am working from a laser scan, .. and that is a whole new level of complicated. Yes, there are people that will draw products and make them print ready, but, I am guessing that would be cost prohibitive for anything complex. Once you have the hang of it, it is fun. From ground zero to fully functional would be a little while though (I am thinking a minimum of a year). I started with a full 3D laser scanning background and I learn something new every day. As I said, I enjoy the challenge of can I do this, "insert some pointless objective that is hard" and then I try to achieve it. I have been successful more than I have failed and have learned a lot on the journey. I use Inventor as my main program, but, I do like a freeware called Blender and it is fully capable This is a great example of a pointless objective ... I did some GPS at a local race track and had the crew GPS the edge with a truck mounted pole hung out at the edge of the track and set to sample every 25 feet. They drove both edges and recorded the track position. I then took public aerial lidar information for the ground around the track and supplemented the data. This gave me the track and the topography for the track area. I then had the brilliant idea to place the track in 3D on a cell phone case. Let's just say there were a lot of hurdles on that one. I got this ... Yes, that is silly!! The topography matched the lidar so well I had to cut ditches that don't actually exist to highlight the track I also got the bug to design and print my own gear shift knob for the Atom and printed the one in the middle The one on the left is my lit flameball knob and the one on the right is the stock one. I also printed a Seahawk's phone case for myself and can't wait for it to arrive. Until then, I did print one for Seattle's only Stanley Cup winner. I will look to Tamiya for seats, thanks Edited September 30, 2013 by NormL Quote Link to comment Share on other sites More sharing options...
charlie8575 Posted September 30, 2013 Share Posted September 30, 2013 Interesting...didn't even know that Seattle had a hockey team; I'm actually rather surprised they don't now. Charlie Larkin Quote Link to comment Share on other sites More sharing options...
NormL Posted September 30, 2013 Author Share Posted September 30, 2013 People in Seattle don't know that we had a Stanley Cup Champion, I would be surprised if anyone else knew. We keep hoping for a team! Quote Link to comment Share on other sites More sharing options...
gasser59 Posted October 4, 2013 Share Posted October 4, 2013 This is all so fascinating and amazing. Being an artist and designer, I get the finished piece but am completely blown away by the technology to get there. Thanks so much for this thread and keeping it going. As mentioned prior, seeing all of this develop and the thought processes and technolgy progress is truely inspirational. I might need to invest in a popcorn company. Quote Link to comment Share on other sites More sharing options...
NormL Posted October 6, 2013 Author Share Posted October 6, 2013 Thanks for the kind words I knew a compromise might be coming and it is here. This is the smallest I feel that I can get a ball joint for the suspension arms. This is way blown up and it is not as bad as the blown up picture makes it look. The ball on the end of the arm is 1.5 mm in diameter. I know that when it is printed that the points on the "cup" will melt back as they cannot exist that thin, so, I am making an educated guess on how much cup will be left to snap into. Another choice would be to model something that looks a little closer to the actual joint and make it a glue in peg. That is not going to look that good either as I will be compromised by the minimum printing width surrounding the mounting hole. I am leaning towards the ball joint as it is really only 1 mm total in width bigger and the same in the other two dimensions. There are limitations on how small I can go with non NASA printers. There is always printing everything in the right spot without gaps for movement, I guess. I could make the joints look great in that case. Printed "enblock" will make it very hard to paint, but, the most accurate. So that is the decision, suspension accurate and all at once or snap in and blob joints ... When I put it that way, I guess enblock is the answer. Quote Link to comment Share on other sites More sharing options...
Bigjeff Posted October 6, 2013 Share Posted October 6, 2013 I like that! Here,s another i've ssen on another forum, not functionnal but still pretty cool! http://www.scalemodeladdict.com/SMF/index.php/topic,9523.0.html Quote Link to comment Share on other sites More sharing options...
NormL Posted October 6, 2013 Author Share Posted October 6, 2013 WOW, that is big! Sooo cool Quote Link to comment Share on other sites More sharing options...
NormL Posted October 6, 2013 Author Share Posted October 6, 2013 If I wasn't convinced before I am now. The bracket cannot match stock as it would print too thin, so, this is a version of it that can print. The stock arm does have knobs on the end and the metal it bolts too is very thin. Quote Link to comment Share on other sites More sharing options...
NormL Posted October 11, 2013 Author Share Posted October 11, 2013 I received my 1/6th scale Christmas ornaments I am doing of some surveying instruments. As content they have no reflection on the Atom model, but, as an exercise in printing separate and functional they do. I am designing the Atom to be printed as sinter or deposit and using the combine design standards. I am doing this for two reasons, cost and detail. Sinter is way cheaper and does not have the detail of deposit. The laser sinter does not really lose that much detail. The cost difference will be quite large for something on the scale of an entire kit. They will still be separate models as the flexibility of the sinter lets you snap together parts that just are not possible with deposit. These are sinter versions of the models shown in deposit above. I made them snap together mini kits. I already snapped the bottom on the T3 before I remembered that I am dying these, but, it is almost all green anyway. The one side, visible in the photos, of the scope portion of the Geodimeter does have print stepping on it. That is caused by the orientation when printing. It is the only faces to show it as the other side is fine. These are the dyed versions and they are so awesome! I dyed them last night, which is right at the limit of my artistic abilities. I managed to smudge black dye on the eye piece of the Geodimeter, which means that I will probably re-boil the color off and do it again soon. One thing though, ... I created a green Christmas ornament. Yeah, a green Christmas ornament. What was I thinking? The bases and scopes turn as designed and the side knobs on the Geod work great. Very happy with them, I just need to place some advertising on them and give them out to clients. It occurs to me that I could very easily print these with open scopes and holes in the bottom for a Christmas bulb. Yeah, that is going too far ... It is not up to the painting standards I have seen on this site, but, neither am I Quote Link to comment Share on other sites More sharing options...
1930fordpickup Posted October 25, 2013 Share Posted October 25, 2013 These latest parts are fantastic. Much better than others I have held and looked at.you are doing a fine job on these. The texture is the only thing holding this back for mass production for most things. The cost will come down with more time . Quote Link to comment Share on other sites More sharing options...
NormL Posted November 8, 2013 Author Share Posted November 8, 2013 Thank you for your kind comments. You are 100% on the texture issue. I will release this as a combination detail and sinter plastic model because of this issue. I am planning on the hood, cowl and deck lids all being detail and the frame and suspension being sinter. It will be a while before I cut it into trees and make printable blobs. Since so many parts will look alike I feel I will have to place each corner on its own tree anyway. Model builders that actually build one can tell me if I was right on my choices. The design standards are so close for the two, I am doing a worst case design that way every item will be available in both plastics. My personal desk version will be 100% sinter as stuff will fall on it and customers will play with it, so, I just want strength. A desk is a very dangerous place for a model. I knew if I let this sit for a while I could think of a way out of my self made suspension issue. I think I have it and am going to dive back in. I have been asked for the model to do CFD analysis for some up coming after market wings. In order to use my model for this I need to finish the 1/24th scale to have all of the car parts. Cool stuff. I so want to do full scale side pods, more like Indy than F1, soon. I have now printed two metal objects to get my feet wet. I did a stainless steel key fob that is nothing more than a 3mm raise of a 2D logo with filleted edges. Regardless of the simple design the product is fantastic. The sharp edges are truly sharp and the round edges are truly round with no evidence of stepping. This is also true of the gold plated brass that I printed for my wife. It was also a simple design printed right to the minimums. Both came out great. The stainless print is heavily pitted as expected though Quote Link to comment Share on other sites More sharing options...
NormL Posted April 23, 2014 Author Share Posted April 23, 2014 I know I am very tardy with any updates on the Atom model, but, in the interim I want to share some pictures fro the SurveyorConnect website. Nate Drummond did an awesome job painting the laser sintered plastic (these are not the detail plastic ones) surveying instruments The large one is 1/4th scale and the small ones are 1/6th scale. http://surveyorconnect.com/index.php?mode=thread&id=256600 Quote Link to comment Share on other sites More sharing options...
NormL Posted September 29, 2014 Author Share Posted September 29, 2014 OK, I am getting back on track to finish this project, sorry it is taking so long. I have gone back in and added a lot of detail to the model enough so that I feel 1/43 and 1/87 are good to go, although neither of those scales as a kit. I have learned a lot by making snap together surveying models since I posted last. I decided that I wanted a stainless steel key fob for myself and a gold plated brass pendant for my wife. I got both of them today and they a fabulous!! Pictured with some miniature candy, my thumb is wider ... #D printed stainless and 3D printed gold plated brass The 1/24th scale kit is still a ways off as I want to add a lot of detail The gold one is gold plated brass that is first printed in wax and then through the lost wax process converted to brass (I have been meaning to look into what that means just haven't). The silver looking one is Shapeways Polished Nickel stainless steel, which is a two stage process of layer printing of stainless and glue that is later infused with bronze. Stainless is approximately 70% stainless and 30% bronze when done. The stainless prints that I have all have a slightly rough texture about them, but, the close ups make it look far worse than it is. Look at the one with the pen. The stainless one is very robust and I will be using it with no reservations as a key fob. The brass one is much more robust than I expected, but, I don't believe that a brass fob would work myself. The brass one is heavier than I expected and I was informed that it is a bit heavy for a pendant. The stainless one is just slightly heavier Better said, ... the silver one is from their stainless steel print (there are like 8 different options) and they are all going to be a little pitted looking up close, they are cheaper and stronger. The gold one is from their semi precious metal collection and because they are made like jewelery they do look better, the trade off will be strength. They have some silver options in their semi precious and their precious metals Quote Link to comment Share on other sites More sharing options...
chunkypeanutbutter Posted September 29, 2014 Share Posted September 29, 2014 You are amazing. I love this car. Quote Link to comment Share on other sites More sharing options...
Recommended Posts
Join the conversation
You can post now and register later. If you have an account, sign in now to post with your account.
Note: Your post will require moderator approval before it will be visible.