crazyrichard Posted January 11, 2013 Share Posted January 11, 2013 reading all of this makes me feel 3-d printing is awsome .. but for me i would say i like the idea more for making parts like wheels and suspension to ad to a kit maybe.. i love a printed finished model but it kind of lacks a soul .. its like when people build a bike (just an example) with all waterjet parts and clean as ...it looks great .. but then park a handbuild bike next to it .. whow what a difference .. not flaming 3-d printing at all , i think its a great thing with lots of potential ... but its not something i would like to get into i like cutting plastic and making stuff by hand and putting in time with your hands that said its def very cool to watch and see ... dont get me wrong Quote Link to comment Share on other sites More sharing options...
NormL Posted January 11, 2013 Author Share Posted January 11, 2013 (edited) Too much is being made of 3D printing, at the end of the day, it is just another tool in the tool shed. Will it replace injected plastic? I am not seeing it yet, as the cost will never be less. There will be those that use the tool now and others that wait to implement, regardless it is here to stay. Richard, I think you did hit the nail on the head as there is a substantial learning curve to get to the point where you can design and entire car and print it. The learning curve is much less for parts and that is undoubtedly where it will blossom. You mentioned wheels. I did the Team Dynamic Pro 1.2 wheels on the Atom in about an hour. I went to the scan cloud and took a cross section of one spoke of the twelve, just a jpg screen shot. I took that jpg and embedded it into a CAD program and traced the outline. I then went to the Pegasus tires that I could source and determined the dimensions the wheels had to be, this was with blatant disregard to scale as I was matching something. I then scaled my spoke cartoon to the radius of the Pegasus tire. The cartoon was then revolved 360° into a 3D solid that you would recognize as a wheel blank having the shape of the wheel without any cutouts. Back to the scan cloud and measure the cutouts and apply them to the wheel blank and now it is really starting to look like the wheel. However, ... more compromise time, ... the spokes have to be a minimum of 0.7mm to be printable in WSF and that can't go on for very long as that does not dissipate printing heat. I decided that since they were holding the weight of the entire model, I would be cautious here and made my minimum 0.9mm instead. So the net effect is the outer points of the wheels are compromises as are the proportions, but, they don't look that bad. I then just went to the car with a verier caliper and measured the depth and other attributes of the lug areas and did those cutouts too. Fillet the edges, done. OK, a person working out of their house is not going to have access to a scan cloud, so, you end up throwing a straight edge over the wheel and measure the out and downs, ... same effect. Maybe it would have taken an hour and a half without the scan cloud. This is all something that could have been done in the open source Blender for free. My point being the design of parts is here now. Car bodies, that is a different issue and requires that you have the scan cloud or you are willing to ultimately compromise on reality. As far as the porosity and other printing issues, let's go back to it is a tool in the tool shed, ... learn how to work with it. The printing manufacturers are not going to pander to you for a while as they have bigger more lucrative fish at the moment. Sealing it cannot be a deal breaker. Having to sand it smooth, again that cannot be a deal breaker. I am into the challenge of the design, so, I am going for something different. Edited January 11, 2013 by NormL Quote Link to comment Share on other sites More sharing options...
crazyrichard Posted January 11, 2013 Share Posted January 11, 2013 what i do like is that you can design parts and print parts that are not available , stuff with hard shapes .. so def has a lot of potential for the future Quote Link to comment Share on other sites More sharing options...
NormL Posted January 11, 2013 Author Share Posted January 11, 2013 I designed some cones to go around my model once I get the final print. This will annoy the people in the office more than usual, LOL. Next time I print I am going to order a set. So, I guess I am going to paint after all. http://www.shapeways.com/model/865938/cone.html?li=my-models&key=d690fcd865d08a4308707f72608c0ac3 Quote Link to comment Share on other sites More sharing options...
NormL Posted January 12, 2013 Author Share Posted January 12, 2013 Quote Link to comment Share on other sites More sharing options...
NormL Posted January 13, 2013 Author Share Posted January 13, 2013 (edited) OK, stupid question, ... does someone make things like pneumatic jacks and jack stands in 1/24th? My desk diorama needs more stuff. I was thinking I would print a working jack for the frame, but, my measurements tell me it would have to be 1/12th scale not to have a lot of concessions. Just a static thing at 1/24th. If not, I will go ahead and do the 1/12th and then scale it down, I kind of like the dual articulation point challenge to make the jack pad stay flat. Edited January 13, 2013 by NormL Quote Link to comment Share on other sites More sharing options...
NormL Posted January 13, 2013 Author Share Posted January 13, 2013 Well I decided that my diorama needs to be 100% printed. So I got started during the Seahawks game, ... sad right now. Anyway got the easy stuff the outer frame and wheels done. Quote Link to comment Share on other sites More sharing options...
NormL Posted January 14, 2013 Author Share Posted January 14, 2013 I am not setting any speed records as i am watching football mainly, LOL. I still need to make the two sides stable with each other, create the arm, the spring and the handle stops. The gaps on this 1/12th scale version are 0.5mm. I wish I had some of your metal skills as adding a few shims and this would work quite well. Quote Link to comment Share on other sites More sharing options...
NormL Posted January 14, 2013 Author Share Posted January 14, 2013 OK, finished. The same pic's work for the 1/12th and the 1/24th as they will use different materials. 1/12th scale in WSF and 1/24th in FUD I don't know where my tray is for my jack. I use the jack for the Atom and I can't get it under the car with it on. I must have placed it somewhere I could not forget. I am going to have to find it as my other cars do need it. Quote Link to comment Share on other sites More sharing options...
Lownslow Posted January 14, 2013 Share Posted January 14, 2013 nice i got something really cool in mind for my shop Quote Link to comment Share on other sites More sharing options...
NormL Posted January 14, 2013 Author Share Posted January 14, 2013 Thanks for the feedback, my wife has been shaking her head all day. I have my Craftsman 2 ton jack sitting on a shop towel on a coffee table in the living room. She drew the line at the kitchen counter .... I must say the cone was much easier to measure and make all the moving parts move. Quote Link to comment Share on other sites More sharing options...
Ace-Garageguy Posted January 14, 2013 Share Posted January 14, 2013 Fascinating project. The Atom always struck me as being the next evolutionary step (in the 4-wheeled-motorcycle species) after the Lotus 7 and its derivatives. Insanely fun car. Quote Link to comment Share on other sites More sharing options...
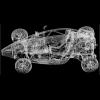
NormL Posted January 18, 2013 Author Share Posted January 18, 2013 (edited) Mule 2 is here: Yes, that is the broken remains of mule 1 in the back. The wife stepped on it. If you consider it was used as a shoe it did not come out that bad and I never heard a cry out at the time of the incident, so, WSF must be spongy and soft on bare feet. Issues: The suspension does work. It holds the car up and the springs compress when pressed. The Atom guys will tell me I have it set up way to stiff. Definitely the bias is off the front is much softer than the back. The steering does not work, oh it moves back and forth, but, there is way too much actual slop at the wheels to call it steering. It might be better called gentle nudge or hopefully guidance. I am going to have to think of a solution for this as if I make a solid attachment of steering shaft and wheel it will be too much articulation and be almost immediately a breakage point. The Team Dynamic 1.2 Pro's look great With the stiffening of the tray under the seats the frame is very robust now. No I still don't think it should be used for stepping on though. The revised articulation of the back wheels has made them very sturdy. The energy storing spring was a success. Too much success actually, it stores a ton of energy and is all stored up before it gets to my release mechanism. The entire drive mechanism has one big failing and one little one. Too much slop between the shafts, I need to either provide more support for the driving shaft or link the support between them or both. The energy storage system as designed does not work as the push shaft near the tire just pushes on the plate until the shaft moves the plate out of the way. The spring to force the drive shaft gear into the spring gear is too worthless and weak One of the rear shocks is having issues getting rid of the unused printing powder and the shaft only goes in partway. Edited January 18, 2013 by NormL Quote Link to comment Share on other sites More sharing options...
NormL Posted January 18, 2013 Author Share Posted January 18, 2013 A couple of more shots: Something that has not been brought up in the 3D printing discussions happened on this print. The wheel braces (the metal fingers that hold the rim) did not all print the same width. This is because a laser sintered print does react to gravity on the molten plastic. Kind of forgot about that. Quote Link to comment Share on other sites More sharing options...
NormL Posted January 18, 2013 Author Share Posted January 18, 2013 (edited) Edited January 18, 2013 by NormL Quote Link to comment Share on other sites More sharing options...
NormL Posted January 20, 2013 Author Share Posted January 20, 2013 I am not having difficulty on how to make the front wheels pivot and steer without so much slop that is is anything more than a direction suggestion system. The only workable solution that I know will work is that I use snap in components to make the steering actually functional. I really don't want to call the idea on the steering when I can make a storage spring work, but, I may have too. The suspension slop is livable now that the entire shock system is one piece with a pivot at the rocker. Basically replace all three wheel joints with ball and sockets. I still can't believe how much energy (power) can be stored in that spring. I have figured a way that might get the steering done as a static print. I can't help but notice that the two rear tires can deflect up to 15° of arc with pressure and they immediately snap back when the pressure is released. The rear tires are not designed to have deflection contained within the nylon. I am thinking that I can get the needed deflection within the flexibility of the nylon. I have the upper and lower hub joints designed in my head and I am still working on the linkage. Quote Link to comment Share on other sites More sharing options...
NormL Posted January 21, 2013 Author Share Posted January 21, 2013 i dipped my WSF parts in future to stop them from absorbing paint What is "Future"? Most of my prints have been sealed with bondo and I am unfamiliar with this product. Quote Link to comment Share on other sites More sharing options...
Lownslow Posted January 22, 2013 Share Posted January 22, 2013 What is "Future"? Most of my prints have been sealed with bondo and I am unfamiliar with this product. a lot of builders swear by it, i use it to give a seal to my FUD parts to make them castable Quote Link to comment Share on other sites More sharing options...
NormL Posted January 22, 2013 Author Share Posted January 22, 2013 (edited) We'll that certainly was not the expected answer! I never would have thought of going to Target. Thanks for the tip and it makes perfect sense now that I think about it. Have you used it on WSF? Edited January 22, 2013 by NormL Quote Link to comment Share on other sites More sharing options...
NormL Posted January 24, 2013 Author Share Posted January 24, 2013 I am resigning myself into having to add an idle shaft. I can't increase the size of the gear that resides on the drive shaft as I am as close as I can get to the frame. The gear ratio as it is now is too much for the spring and I thought I would end up here and here I am. I can drop another shaft in below the spring shaft and actually have a choice in gearing. I am also going to add at least two support webs between the now three shafts hard mounted to the frame I did start the steering redesign today and scraped and restarted two more times. I am thinking I have it now. I have several more hours before I can shoot a screen shot. Quote Link to comment Share on other sites More sharing options...
socalbuckeye Posted January 24, 2013 Share Posted January 24, 2013 OMG. Awesome. I looked into this a couple of years back as my brother has a MakerBot, but the resolution wasn't there and I shelved the idea. I will definately need to revisit it. Question, what/how did you laser scan your Atom to begin with? Seems like this would take out a lot of the upfront work and get the proportions dead-on. Quote Link to comment Share on other sites More sharing options...
NormL Posted January 24, 2013 Author Share Posted January 24, 2013 I have two scanners. One is a time of flight and one is phased based. The TOF is +/-1mm within 350 feet and the PB is +/-1.5mm within 75 feet. The difference is collection with the TOF being 50,000 nodal points per second and the phased being 508K pps. When you take the first sigma mean from a cylinder containing 150k points it is pretty accurate. The Atom's main tubes are splined in two directions at the same time and did take me a moment to figure out how to model correctly. Mine are BIM (building model) scanners and the short throw scanners are much more accurate Quote Link to comment Share on other sites More sharing options...
NormL Posted January 25, 2013 Author Share Posted January 25, 2013 (edited) I went ahead and spent a little time on the 1/24th jack and took the joint gaps way down and basically refined it. I never did find the cup that goes in the lift plate, so, I just made one. The gaps were from the 50% reduction of the 1/12th version and were 0.25 mm and I took them to 0.1 mm The jack should actually work, but, you never know until you print it and try. Since I am doing 3D models, I decided to place a 3D pdf's instead of a lot of pics. If Harry or another mod has an issue with this, just tell me and I will post pics instead. 1-24th Jack 2013-01-24.pdf Edited January 25, 2013 by NormL Quote Link to comment Share on other sites More sharing options...
Chas SCR Posted January 25, 2013 Share Posted January 25, 2013 Very nice work, Now I know what you are talking about on the Atom as it's a car not a printer machine lol You learn some thing knew every day and sitting here reading every page I see what more you are talking about. Thank you for sharing this stuff with us. Quote Link to comment Share on other sites More sharing options...
Bernard Kron Posted January 25, 2013 Share Posted January 25, 2013 Thanx for posting the 3D PDF. A little exploration around its various dusplay modes was very instructive. Quote Link to comment Share on other sites More sharing options...
Recommended Posts
Join the conversation
You can post now and register later. If you have an account, sign in now to post with your account.
Note: Your post will require moderator approval before it will be visible.