DynoMight Posted November 9, 2014 Share Posted November 9, 2014 (edited) Looks GREAT! As for the pupils. I read in a military magazine that had a feature about painting figures. The guy who did it didn't paint the whites and the pupil, but instead used a black wash to bring out the definition in the eyes. My dad used to paint the whites and the pupils and the guy always looked like he was about to do #2 in his pants. So I'd just use a black wash to bring out the detail instead of actually painting them. Edited November 9, 2014 by DynoMight Quote Link to comment Share on other sites More sharing options...
DrKerry Posted November 9, 2014 Share Posted November 9, 2014 Lookin good!!! Quote Link to comment Share on other sites More sharing options...
Chris D Posted November 9, 2014 Author Share Posted November 9, 2014 Glen, you made me laugh good with that comment, thank you! Kerry, thanks for the comments, I am giving it the best I can do! Hopefully today will be more productive, if not on the drag car, perhaps the other two. More updates tonight. Chris D Quote Link to comment Share on other sites More sharing options...
Chris D Posted November 9, 2014 Author Share Posted November 9, 2014 (edited) Another day of frustrations. Continued work on the rear suspension. Realized that I didn't order enough rod ends to complete the four link suspension. I got the upper links made and installed. Wasn't very easy to do with the limited room for everything - I swear the real car was much easier to work on! It was so frustrating working with the small rod ends and especially the jam nuts, I could barely see the darn things. Running into a road block due to a parts shortage I moved onto Mini-Me and made up the racing harness and strapped him to the seat. I know, in a real car you wouldn't attach the seat belts to the seat, instead they would be attached to the chassis and roll cage. Doing the correct way was too much work trying to figure our where I could attach things during assembly etc. so I cheated. Still didn't fix his spooky eyes though. I sprayed the interior tub with Model Master Chrome Silver as I thought it looked more like aluminum than the aluminum paint. That paint seems to take forever to dry, much longer than the Tamiya acrylics. I brush painted the roll cage. After all that was somewhat dry I moved onto installing the fuel cell (not correct to the real car but it fits) and added the battery box. The battery box is wired and the fuel cell is plumbed with a line running through the floor where the fuel pump will be. The battery box location and looks are pretty close to the original car with the exception of where the cables ran, I didn't wire them to the kill switch and I am not sure how I routed them to the front of the car. The fuel cell and battery box will not be too visible when the car is finished as the trunk will not open. I got some work done on the engine. Not too happy with it at present but I probably have time as I still have not received my parts from Reliable Resin nor have I received a response from them to my email request. That was it for the drag car progress today. I also worked on the factory original car by adding bare metal foil to it for the trim. My first time working with that and it wasn't too bad to work with, rather easy to be honest. The only area I really failed at was the wheel opening trim, after several attempts I gave up. I will try again on a day when I am not so frustrated. Yesterday, I realized the white vinyl top was so thin it would show the blue paint through the vinyl so I masked the street car off and painted a coat of white on the roof. This turned into a disaster. The blue paint was shot 2 weeks ago and it was Tamiya acrylic paint. When I removed the masking tape this is what I saw... I don't know what went wrong, I used tamiya masking tape and have not had a problem like this before. I didn't try to polish it off or anything yet as I want the white paint to cure a bit before working on it some more. If anyone has any idea how to fix it, please let me know. I will also post this in the Q/A section. Time to order more parts so I have something to do next weekend. Thanks for looking and feel free to comment. Chris D. Edited November 9, 2014 by Chris D Quote Link to comment Share on other sites More sharing options...
John Pol Posted November 10, 2014 Share Posted November 10, 2014 doing a great job so far good luck on that resin caster for your parts hoping you don`t plan to retire to soon lol Quote Link to comment Share on other sites More sharing options...
freakshow12 Posted November 10, 2014 Share Posted November 10, 2014 That should polish up. I have had that happen to me. These are turning out nice. May I ask why you only opened one door? I did a 70 mustang and asked how far to go and the overwhelming response was to do both or none. I did both Quote Link to comment Share on other sites More sharing options...
Chris D Posted November 10, 2014 Author Share Posted November 10, 2014 Hi guys, thanks for the comments. I sure hope it polishes up, I would have to start all over with the paint - again. Regarding the open door, that was a quick and stupid decision I made when I started the 4 models. I knew from the beginning i was going to do dioramas for all 4 cars and I was going to have the original photos next to each diorama (for proof I actually had the real car). The original photos show the car in two of its phases with the drivers door open. As I moved through the build, and put more thought into it, I decided to do the drag car diorama to match the photo of the car launching off the starting line. No need for an open door there. The showroom version also doesn't need the door open. A bit more thought in the beginning would have certainly changed how I would have handled the doors. Thanks again for the comments ! Chris Quote Link to comment Share on other sites More sharing options...
w451973 Posted November 10, 2014 Share Posted November 10, 2014 Looking good. I can relate to it being easier to build the real thing. Much more exspensive, but way more easier. Quote Link to comment Share on other sites More sharing options...
Mister Twister Posted November 10, 2014 Share Posted November 10, 2014 Good looking detail work......Keep it going! Quote Link to comment Share on other sites More sharing options...
Draggon Posted November 10, 2014 Share Posted November 10, 2014 Sorry about the masking tape fiasco. It happened to me too, and it appeared that a reaction between the Tamiya tape and the paint sprayed over it was the culprit. Mine actually ate into the cured finish under the tape so I had to wetsand and respray. Quote Link to comment Share on other sites More sharing options...
Scalper Posted November 10, 2014 Share Posted November 10, 2014 wow really like the green paint.. nice suspension too Quote Link to comment Share on other sites More sharing options...
Chris D Posted November 11, 2014 Author Share Posted November 11, 2014 Hi everyone, thanks much for all the kind comments. I got all the parts on order I need to complete the project, I sure hope they all show up. Chris D Quote Link to comment Share on other sites More sharing options...
Chris D Posted November 15, 2014 Author Share Posted November 15, 2014 Didn't get the parts needed that are holding me up on the drag car. Some came in so I moved onto those little tasks. I finished making the electrical panel and finished up the shifter and got those installed. Glue squeezed out the bottom of the electrical panel - made me made but didn't come up with a way to hide the problem yet - GRRR. I got some work done on the engine. Finally got some headers, painted and installed them. Then I was able to run the plug wires. I picked up some aluminum breathers and installed them. On the 1:1 car they had dump lines running to the headers - I felt it getting too busy in the model so I didn't want to add them. I also found some pulleys and belt so I installed them. That turned into a lot more work than I thought it would but I learned a number of things doing it so that was fun. Didn't turn out as good as I would like but I am okay with it. Here you can see some of the other engine details. For some stupid reason I decided to use A/N fittings on the carb, they are so small I question the effort to use them. Once I get them plumbed with braided line I might like them better. The 1:1 car had an electric fan, but a different style. The type on the 1:1 used an electric motor to spin a fan mounted to the water pump. I didn't want to scratch build one but in the end it would have been much easier than this thing. Putting together all those little etched parts was challenging for these old eyes and shaky hands. The end result is okay. I painted everything except the fan Titanium Silver and left the fan in stock nickle finish. The contrast isn't enough so it doesn't have the "cool" factor for all the work. I also finished up version #1 of this car which is the factory stock version. I posted that in the "under Glass" section if you want to take a look at that one. Thanks for looking and as always, comments are appreciated and welcomed. Chris D Quote Link to comment Share on other sites More sharing options...
1 bad55 stan Posted November 17, 2014 Share Posted November 17, 2014 Really nice work on both cars Chris! Quote Link to comment Share on other sites More sharing options...
Chris D Posted November 18, 2014 Author Share Posted November 18, 2014 Thanks for the comment Stan. Chris Quote Link to comment Share on other sites More sharing options...
DrKerry Posted November 18, 2014 Share Posted November 18, 2014 Coming along nicely!!!! Quote Link to comment Share on other sites More sharing options...
crowe-t Posted November 20, 2014 Share Posted November 20, 2014 Chris, Beautiful job so far! The chassis work is fantastic. I built a couple of models of a friend's bracket car(68 Camaro) back in the '80's that he raced at Raceway Park in New Jersey. I hope to build another model of his car one day soon but haven't gotten around to that yet. Mike. Quote Link to comment Share on other sites More sharing options...
Chris D Posted November 21, 2014 Author Share Posted November 21, 2014 Kerry and Mike, Thanks for taking a look and the kind words. I really appreciate you noticing the chassis work, that has been very challenging as it is the first time I have tried anything like that. Mike, get started on that bracket racer! Hopefully you still have access to it or at least photos of the car. I am finding it sort of fun trying to match the details from the 1:1 car. Even more fun is how many memories are starting to come back to me from my time with this car. Certain details that are not in the photos that I have of the 1:1 and were not in my memory while building are coming to surface. Chris D. Quote Link to comment Share on other sites More sharing options...
DrKerry Posted November 21, 2014 Share Posted November 21, 2014 Welcome Chris!!!!! Quote Link to comment Share on other sites More sharing options...
Chris D Posted November 23, 2014 Author Share Posted November 23, 2014 Hi everyone, Thanks for all the feedback and comments, I really appreciate it. I got some good bench time in this weekend and made some good progress on the car. I got the chassis primed and painted after finishing the mock up for the four link suspension. Test fit the engine again and all was well. Another test fit for the interior tub and that was fine. You will notice the wheel tubs are black rather than aluminum. On the 1:1 car the wheel wells were steel but I don't recall their original color so I just went with black. After some fitting around the wheel tubs, I was able to install the door panels and dashboard. I goofed up on the four link suspension a little bit. I thought I was going to get bolts from Scale Hardware to fasten everything together, but they don't make bolts small enough with enough thread length. As I was stuck, I went in the house for lunch and was watching my wife pin one of her quilts and those pins looked a lot like little bolts. Luck was with me, the pin diameter was a perfect fit for the heim joints and shocks. Simply insert them, apply a dab of super glue with the Looper tool and then cut off the excess pin. Learned a valuable lesson though, don't use your good, precision cutters to cut pins, the pins are harder than the cutting edges and I ruined my good side cutters. The four link turned out pretty good and I am pretty pleased with the end result. While not in focus very well, you can also see the electric fuel pump and plumbing to/from it. Also not very clear is the transmission blanket. In bracket racing, you had to have a blanket to contain explosions of the transmission. I remember mine was red on the 1:1 car with black straps. I also remember it was a pain to install/remove. To make this I used red duct tape for the blanket and then used left over seat belt material (Black tape from the kit) to create the straps. Here it is as of the end of the day. The master cylinder is installed and plumbed, the fuel distribution block is plumbed in the input side, and the coil is wired to the distributor. I am saving the braided fuel lines till the last as I suspect they will be very delicate when attached to those really tiny A/N fittings. With the chassis work in pretty good shape, I moved on to the new body. I had another body prepared all the way through primer stage, however, I cut the door open as my original plan was to display it with the door open like the 3 other cars. However, this one will end up in a diorama at the drag strip launching off the line, having the door open wouldn't have been very realistic (and I didn't want to learn hinged doors just yet). Like the previous body, I shaved the scripts and emblems, filled the vents behind the doors and primed it with Tamiya primer. I ordered another set of centerline wheels as I am not happy with the ones I have now. With those I will have a rolling chassis. Next weekend I should be able to get color on the car and then move on to detailing. With the long weekend I am hoping to wrap it up. I will probably pick up a food dehydrator to help with drying the paint so I don't have to wait another two weeks for the paint to set up before detailing. Thanks again for taking the time to look and I really do appreciate all the comments. Chris D. Quote Link to comment Share on other sites More sharing options...
1 bad55 stan Posted November 24, 2014 Share Posted November 24, 2014 This is a great build Chris.There is something special about building a replica especially when it is of your own 1.1 car.I'm doing a replica of my 65 impala wagon,which i need to get back into.Any way very cool work... Quote Link to comment Share on other sites More sharing options...
Chris D Posted November 25, 2014 Author Share Posted November 25, 2014 Thanks Stan, You are right, there is something special building a replica when it is one of your own. All those fond old memories coming back to life. Good luck on that Impala! Chris D. Quote Link to comment Share on other sites More sharing options...
Ira Posted November 25, 2014 Share Posted November 25, 2014 Looks Great Chris! Real Nice Detailing... Quote Link to comment Share on other sites More sharing options...
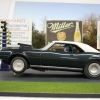
Chris D Posted December 13, 2014 Author Share Posted December 13, 2014 It appears my "I'm finished" went away with the latest server crash. Here is the car finished... I have the whole story of this car posted in the diorama section with 4 different models and 4 different dioramas. Thanks for looking and feel free to comment. Chris D. Quote Link to comment Share on other sites More sharing options...
1 bad55 stan Posted December 13, 2014 Share Posted December 13, 2014 Turned out great.that last shot is cool... Quote Link to comment Share on other sites More sharing options...
Recommended Posts
Join the conversation
You can post now and register later. If you have an account, sign in now to post with your account.
Note: Your post will require moderator approval before it will be visible.