Chris D Posted November 2, 2014 Share Posted November 2, 2014 Hello all, I know my skills are not up to snuff to post here but I thought I would share the build of a 1968 firebird drag car. This is 1 of 4 versions of the firebird I am building (See my post in the diorama section for version #2). This model is based on the 1:1 car I built into a drag car in the early 80's that I used to race at Great Lakes Dragaway in Union Grove WI. I have a couple of very bad photos of the car in different stages when it was a drag car. So, from those photos and my foggy memory I am trying to recreate the car. I am sure I will take some liberties along the way but want the end result to be a pretty close approximation of the real car. Some of the work on the model has already been completed so I am jumping in at the early stages. First a few photos of the original car... Showing the interior - sort of. Notice the roll cage, aluminum floor, street car version of the door panels. The engine was a big-block chevy (454 punched .060" over), transmission is a turbo-400, rear end is a GM 12 bolt I built a back half chassis and sistered that to the front stub. It had a 4 link suspension with coil overs. By today's standards, the car is slow, best it ran was 11.17 @ 117 MPH (numbers I have not forgotten). The car always ran good, launched good with about a 6" wheelstand and was a lot of fun at the time. More to come in the next post... Chris D Quote Link to comment Share on other sites More sharing options...
Chris D Posted November 2, 2014 Author Share Posted November 2, 2014 Moving onto the model building... This is the 4th model car I have built in the last 40 years or so, the other 3 were of this same car in different stages of the 1:1's life which are being built now too. The first thing I had to figure out was the chassis. Original car had a back half chassis. At first I could not figure out how I was going to do the chassis and marry that to the original front stub so I build a full chassis. That simply did not work out good so I abandoned that idea. After thinking about it for a while, I decided if I could do this on the real car, I should be able to do it on the model car following a similar process. I cut away the floor pan and trunk area of the chassis. I kept the side sections of the floor pan, rear fender wells and back perimeter "sheet metal". This gave me a "box" frame similar to the real car. I then took the scratch built chassis I made and abandoned, and cut it off at the correct length to fit. I joined that to the front stub in a similar fashion as I recall doing on the original car. The same was done at the back of the car. Here you can see the chassis and back half frame joined together. The 1:1 car had steel tubs. To make these tubs, I just glued .010" styrene to the inside and outside surfaces of the original wheel wells as well as the side of the frame rails. Using the original wheel well as a guide, I shaped them to fit the contour of the body. More in the next post... Chris D Quote Link to comment Share on other sites More sharing options...
Chris D Posted November 2, 2014 Author Share Posted November 2, 2014 Hello again, Now with the "easy" stuff done, I had to figure out how to work on the floor pan so I could still utilize the stock door panels and dash board supports. Again, I tried to scratch build it first and failed so back to working with the kit floor pan. The 1:1 car had an aluminum floor but I kept the stock door panels in place. So the model needed to incorporate all of this. After getting more styrene from the hobby store, I developed a plan on how I could cut away the majority of the model's floor pan but keep the perimeter for mounting the door panels etc. After some cutting with the dremel and a lot of shaping and filing, I had the starting point of the floor pan. I then fabricated the back section and "trunk" floor from styrene. By placing the items in the chassis, I was able to glue all the pieces together to get all the angles just right. I also used different thicknesses of styrene so that I could have flexibility in the unti to facilitate installation/removal. Here is the floor pan in its rough stage. I needed to get the floor smooth and flat like the 1:1 car so I added more styrene and did a bunch of sanding. To get the surface smooth on the top and bottom, I then veneered .005" thick styrene to the top and bottom of the floor pan. Now with smooth surfaces, I needed to refine the shape of the transmission/driveshaft tunnel. As I discovered later, I made it a bit too wide in the drive shaft section. Getting a worried things might not fit together I thought it would be a good idea for a test fit with the body. Things fit good except I ran into another problem. On the original model the height of the body in relationship to the chassis is controlled by the wheelwells. Without front wheel wells I have to come up with a way to hold the body up on the front end of the car - Suggestions are welcome!!! Next up was making the transmission/drive shaft tunnel. The 1:1 car had a square tunnel (I was a machinist at the time, not a sheet metal worker so a rounded tunnel wasn't in my plan). Working again with sheet styrene, I first fabricated the top panel which. This was easy as I just traced the hole in the floor pan onto the styrene then added more to the size to accommodate the wall thickness of the side panels. After measuring the length and height of the side panels, I cut strips of styrene and glued them onto the top piece. I scored the back side of the sides in the area where there needed to be a bend. Now I had to contour the bottom and back edges of the tunnel to fit the contour of the floor pan and the slanted section at the back. After about an hour of sanding and fitting, I got it close enough for a model. I then sanded up the rest of the tunnel cover to make the seams look like bends. The front of the tunnel has a fairly abrupt transition to the original area. I can't recall what I did in this area of the 1:1 car and as it can't be seen real well when assembled I am going to try and forget detailing that further - hopefully it won't bother me too much. At this stage, I have about 50 hours in the model including preparing the body and priming it. You may have noticed that the fake vents on the body (located behind the doors) are missing. On the 1:1 car, I used camaro quarter panels instead of the firebird quarter panels. That took a lot of work to fill in as I am finding body work on plastic models is not as easy as it would appear! Next up I have to start building the roll cage. This is going to require a lot of fitting and testing. With the transmission tunnel being a bit wide, I don't have much room for the seat and the side brace for the roll bar. I may have to make a smaller scale seat to fit which could be a problem if I put a driver in the car! Does anyone know how to shrink styrene? Chris D. Quote Link to comment Share on other sites More sharing options...
freakshow12 Posted November 2, 2014 Share Posted November 2, 2014 The firewall and rad support as well as the dash will all help in keeping the nose where it should be. Mock it up with all those parts in and you will see what I mean Quote Link to comment Share on other sites More sharing options...
slusher Posted November 2, 2014 Share Posted November 2, 2014 Great looking project.. Quote Link to comment Share on other sites More sharing options...
Chris D Posted November 2, 2014 Author Share Posted November 2, 2014 Hi Fred, Thanks for the input, I will see what happens on my next mock-up. I suspect your are right now that I think about it. Carl, thank you for the kind words, much appreciated. For today's efforts I got a few things done on this car and spent some time on the other two as well. Here is the car mocked up again with mini-me in the drivers seat and the beginnings of the roll cage. I also stuffed the tires under it to get a feel for the attitude of the car. This is the roll cage completed. On the 1:1 car, it was only a bracket racer so I didn't need a lot of roll cage protection like on pro-stock cars etc. The 1:1 car had a much more elaborate side brace by the driver. Luck worked for me and I could only fit the straight piece as shown. Mini-me, without arms fits and there appears to be enough room for his arms. Another cheat was that I used the roll bar section from the kit and only had to fabricate the other fore-aft supports. I started working through some of the suspension components. I had to shorten the rear axels to get the tires to fit within the wheelwells. I also put together the coil over shocks from RB (not shown). Now I need to order up the rest of the suspension parts for the 4 link suspension. While there isn't room on the model to place coil springs at the front in the proper place, there is a place to put them on the two posts that are mounts for the K frame. Wrapped wire around a 1/4-20 bolt, painted them clear red (1:1 didn't have red springs but I thought it would look better this way). The 1:1 car had a "moon" tank in the trunk and I bought one that didn't fit so I picked up a fuel cell and battery box. Those are shown painted and ready for plumbing and wiring. That is all for today, back to work tomorrow so I won't be able to work on this again till next weekend. Thanks for looking and by all means, comments are welcome! Chris D Quote Link to comment Share on other sites More sharing options...
vintagercr Posted November 3, 2014 Share Posted November 3, 2014 Awesome start! Quote Link to comment Share on other sites More sharing options...
mikemodeler Posted November 3, 2014 Share Posted November 3, 2014 Coming along nicely, great details and I am anxious to see this one done. Quote Link to comment Share on other sites More sharing options...
Chris D Posted November 3, 2014 Author Share Posted November 3, 2014 Stephan and Classified, thanks much for the kind words - very much appreciated. Chris D. Quote Link to comment Share on other sites More sharing options...
tyrone Posted November 3, 2014 Share Posted November 3, 2014 looking good... keep it up.... Quote Link to comment Share on other sites More sharing options...
johnbuzzed Posted November 3, 2014 Share Posted November 3, 2014 Cool build so far. I like the way you used the screw to wrap the coil springs. I have done that on past builds. Quote Link to comment Share on other sites More sharing options...
Chris D Posted November 4, 2014 Author Share Posted November 4, 2014 Tyrone and John, thanks for the feedback! Chris D Quote Link to comment Share on other sites More sharing options...
Outlaw_Pitbull_0411 Posted November 4, 2014 Share Posted November 4, 2014 Looks good Chris Quote Link to comment Share on other sites More sharing options...
Jantrix Posted November 4, 2014 Share Posted November 4, 2014 I know my skills are not up to snuff to post here Sorry Christopher. The photos tell a different story. I think your skills are doing just fine. Keep it going. I want to see this beast come to life. Quote Link to comment Share on other sites More sharing options...
Chris D Posted November 5, 2014 Author Share Posted November 5, 2014 Hi Brandon and Rob, Thanks for the kind words. Rob I have a special camera that hides my many mistakes ;-) Chris D Quote Link to comment Share on other sites More sharing options...
tubbs Posted November 5, 2014 Share Posted November 5, 2014 nice start so far Chris, love the stance, I am a big tire guy, but may reconsider after seeing this. great job on the chassis. Quote Link to comment Share on other sites More sharing options...
Chris D Posted November 6, 2014 Author Share Posted November 6, 2014 Hi Al, Thank for the kind words. I too am a big tire guy too but in this case I am trying to follow details from the 1:1 car. Regarding the stance, I just realized that it isn't going to matter in the end for this car. The model will be displayed as a diorama launching off the starting line as shown in the 1:1 photo above. The front wheels need to be about 6" off the ground as it did in real life. Chris Quote Link to comment Share on other sites More sharing options...
Dragfreak Posted November 7, 2014 Share Posted November 7, 2014 Excellent and very methodical approach, its looking very good! Quote Link to comment Share on other sites More sharing options...
Chris D Posted November 7, 2014 Author Share Posted November 7, 2014 Thanks for the comments Jason! It is Friday and that means bench time for the next 2 days! I got some of the 4 link components in the mail yesterday, I sure hope the rest show up because I really want to get that part of the build done. For some reason, building the 4 link has me worried a lot. I am also stuck on the engine. I ordered some headers from a company (reliable resin) about 6 weeks ago and have not seen any sign of them yet. Their website says it can take 4 to 6 weeks, well, time is running out :-( I really don't want to attempt the DIY header route just yet, looks like a very complicated process. Chris D. Quote Link to comment Share on other sites More sharing options...
matthijsgrit Posted November 7, 2014 Share Posted November 7, 2014 Uh oh.... Reliable Resin... Check the forum and you'll understand the "uh oh".... OK, back to the real subject: GREAT PROJECT!!! Quote Link to comment Share on other sites More sharing options...
w451973 Posted November 7, 2014 Share Posted November 7, 2014 Looking good Chris. Keep those updates coming. Quote Link to comment Share on other sites More sharing options...
DrKerry Posted November 8, 2014 Share Posted November 8, 2014 I'd say you have some good skills and are worthy of posting here. Keep it going, can't wait for more!! Quote Link to comment Share on other sites More sharing options...
Chris D Posted November 8, 2014 Author Share Posted November 8, 2014 It's Saturday morning and that means it time to start working on the model again!!!! Matthijs, thank you for the compliments and I guess the warning. I will do a search here for the Reliable Resins and see what kind of mess I got myself into. I did send them an email yesterday in hopes they will respond. Dennis, I hope to have some updates today on this car. I am sort of stuck on waiting for parts but hope to be able to find something to do on it. Kerry (from God's country), Thank you for the encouragement. However, as I mentioned before, the camera makes things look much better than they really are Well at this point I am assuming I won't see parts from R.R., so I am off to shop for some big block chevy headers. Chris D. Quote Link to comment Share on other sites More sharing options...
DrKerry Posted November 8, 2014 Share Posted November 8, 2014 No no, cameras usually don't show how NICE they are, have faith my friend and build on. It's looking good!!!! Quote Link to comment Share on other sites More sharing options...
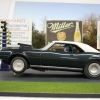
Chris D Posted November 9, 2014 Author Share Posted November 9, 2014 I did get some bench time today, but it sure didn't seem like I got anything done - Grrrr First up was Mini-Me, I painted that thing up this morning. Still have to figure out how to paint the pupils. Getting the white for the eyes took everything I had and the pupils are much smaller. I am gong to try a pin to see if I can get a dot of black there but will have to wait for a day of steady hands. I then was going to start detailing the bodies for 2 of the other firebirds. I tried to use that Line-O-Tape product. I bought a wide variety of widths and even used it on the interior. The first thing I used it on was the trim panel under the door - easy test as it was a straight piece of tape and easy to apply. Then I tried to do the wheel opening trim which isn't that tight of a curve. Even at just 1/64 wide I could not get that to lay flat so I gave up on that will will try to use Bare Metal Foil for the trim - never used that but hope it isn't too hard to work with. The Showroom New version of the car was Vedoro Green so I purchased that from Scale Finishes. That paint, along with their primer worked really good. For the street car and the drag car, the car was painted a dark metallic blue. I custom mixed some Tamiya paints and got really close to the original color (as I remember it). The car also had a white vinyl top and I purchased the white vinyl top kit from Model Garage. Turns out that it is a bit too thin and the dark blue would show through. I am going to have to mask off the car and paint the roof white before putting on the vinyl roof. This is the "Showroom New" car body (#1 car). This is the street car body which would be the restored version of the car (#3 car) Back to the drag car version, well, let me start by saying working on the real car was much easier, I am sure of it!!! I purchased from RB Motion coil over shocks and some rod ends and tubing to make up the four link suspension. I also purchased some brackets from Dirt Modeler. Laying out the components was difficult to say the least. Working with the incredibly small parts is enough to make a person go mad. They are so little!!! I spent hours just getting the brackets on the rear end. It took forever to come up with a way to hold parts in the mock up to make sure things would line up etc. Part of the problem was the hole in the brackets was about .010" larger in diameter than the axels. Finally, in a last attempt to save my sanity, I cut some .005" thick styrene and wrapped that around the axels to make up for the larger hole in the bracket. Gluing that on was a bear. Once I got everything glued, I sanded the axels down a bit to reduce their size until I got a snug fit with the brackets. Now that they didn't flop around, i was able to line up all 4 pieces and glue them to the axels. Needless to say, I was exhausted from all the tinkering with these tiny little parts. My goodness those little parts are just SOOOO LITTLE! Tomorrow I will attempt to make up the links and get the rest of the four link suspension completed. Chris D Quote Link to comment Share on other sites More sharing options...
Recommended Posts
Join the conversation
You can post now and register later. If you have an account, sign in now to post with your account.
Note: Your post will require moderator approval before it will be visible.