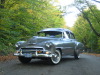
brewsterg6 Posted February 8, 2008 Share Posted February 8, 2008 (edited) My next project is going to be the AMT '57 hardtop. I am going with India Ivory over Surf Green, with a black interior. The closest I could find to Surf Green was a Colortool Spray in 'Prairie Grass' from Micheals. My first attempt to put it on resulted in it peeling off at the slightest touch or rub. I stripped it off and primed with Tamiya Primer. I hope clearing it will help keep it on. The green that I used on my '39 Seden Delivery was also a craft paint like this, but it stuck better. This build will have a ModelCarGarage Detail set, and Bare Metal Foil. I was going to make it a convertible, but I now understand how the roof won't fit. The Revell kits(1955's) roof is the right width at the window frame, but too narrow near the rear windows. I decided it would take too much to fix, and I only have one '55 kit to spare on parts to screw it up! Edited August 19, 2008 by brewsterg6 Quote Link to comment Share on other sites More sharing options...
rollinoldskoo Posted February 8, 2008 Share Posted February 8, 2008 check if a 65 impala convertable boot would fit.... also, i used "color tool" paints for the body and interior of this car too.... Quote Link to comment Share on other sites More sharing options...
brewsterg6 Posted February 8, 2008 Author Share Posted February 8, 2008 Nice Impala, Oldskool!! It is not the boot I am concerned about, because I could widen the '55 boot. I like the top up look in the cabinet, kind of makes it a two tone! The roof up would be too hard to cut. It would be a pie cut, wider at the back. Too much trouble. Also, black was not availible for this factory colour, only dark green and beige. So, I am going to stick with the hard top. Quote Link to comment Share on other sites More sharing options...
brewsterg6 Posted February 12, 2008 Author Share Posted February 12, 2008 (edited) Well, it was a day of spray painting today... into the garage for the flat black, then a trip to Canadian Tire for some Red Primer (after pulling some E-bay Photos of a 100 point Surf Green Convertible) for the floor. Motor is primed, but I will need to get some thinner for my Chevy Engine Red paint. Edited February 12, 2008 by brewsterg6 Quote Link to comment Share on other sites More sharing options...
Darrell Gwinn Posted February 12, 2008 Share Posted February 12, 2008 Sweet, I like your choice of colors. Quote Link to comment Share on other sites More sharing options...
rollinoldskoo Posted February 12, 2008 Share Posted February 12, 2008 lookin real cool man!!!!!!!!! Quote Link to comment Share on other sites More sharing options...
MrObsessive Posted February 12, 2008 Share Posted February 12, 2008 Lookin' Good Bruce! Good choice of color for the floor pan other than your basic black! Quote Link to comment Share on other sites More sharing options...
OLDERGUY Posted February 12, 2008 Share Posted February 12, 2008 Looks great. I really enjoy it when builders give details on their builds. Where you got your paint, wheels, etc. Since I come and go in models its hard to keep up with the new stuff. And by the way I just heard yesterday that the Micheals in this part of town has closed and I haven't looked in the "let your fingers do the walking pages" yet to see if theres one around here somewhere. Quote Link to comment Share on other sites More sharing options...
brewsterg6 Posted February 20, 2008 Author Share Posted February 20, 2008 Thanks for your comments, guys... not a hard subject to generate interest with... who wouldn't want a '57??!! Well, obviously Harley Earl never had to BMF one of these suckers...not quite in '58 Olds territory, but still crazy!! I didn't trim between the stainless trim on the rear fender because the ModelCar Garage PE set may not fit properly, so the BMF will fill out where it misses. Jeez I hate BMFing!! Quote Link to comment Share on other sites More sharing options...
rollinoldskoo Posted February 20, 2008 Share Posted February 20, 2008 Thanks for your comments, guys... not a hard subject to generate interest with... who wouldn't want a '57??!! Well, obviously Harley Earl never had to BMF one of these suckers...not quite in '58 Olds territory, but still crazy!! I didn't trim between the stainless trim on the rear fender because the ModelCar Garage PE set may not fit properly, so the BMF will fill out where it misses. Jeez I hate BMFing!! could be worse..... like a 59 cadillac.... Quote Link to comment Share on other sites More sharing options...
MrObsessive Posted February 20, 2008 Share Posted February 20, 2008 Or an AMT '58 Chevy around those rear fenders! Quote Link to comment Share on other sites More sharing options...
brewsterg6 Posted February 20, 2008 Author Share Posted February 20, 2008 Or an AMT '58 Chevy around those rear fenders! Absolutly right, Bill! My next project is going to be the new Revell '58, so I'm hoping it's not as hard with the chrome trim done already! Tell me now... is that a build that you wished you had waited on so that you could have built the Revell version?? Quote Link to comment Share on other sites More sharing options...
MrObsessive Posted February 20, 2008 Share Posted February 20, 2008 Tell me now... is that a build that you wished you had waited on so that you could have built the Revell version?? No........Not really. Both kits have their pluses and minuses..........The AMT one still holds up well IMO if time and patience are used to build it. The Revell one will appeal to a lot of guys due to ease of assembly-----and yes, that ready-done chrome trim will save many a builder a lot of headaches with BMF'ing. When I get around to building mine (probably as a rare fuelie coupe) I'll have my own way of dealing with the add on chrome as it has some setbacks I've noticed groking the kit. And I'll probably get crazy and open the doors on that one too, so it's consistent with my convertible! Quote Link to comment Share on other sites More sharing options...
brewsterg6 Posted February 27, 2008 Author Share Posted February 27, 2008 Started on the interior... more BMF!!! Photo etch handle knobs and ash trays. Also finished up the BMF on the drivers side, and fitted a a Photo etch side spear. Quote Link to comment Share on other sites More sharing options...
Darrell Gwinn Posted February 27, 2008 Share Posted February 27, 2008 Awesome, i love the interior. Quote Link to comment Share on other sites More sharing options...
geetee66 Posted March 3, 2008 Share Posted March 3, 2008 Wow! that's a really precise build...very clean and smooth... Lovely work Looking forward to the finished pics Quote Link to comment Share on other sites More sharing options...
Kenny Posted March 5, 2008 Share Posted March 5, 2008 Nice job with the foil and the PE. The color is perfect, too! Quote Link to comment Share on other sites More sharing options...
brewsterg6 Posted March 9, 2008 Author Share Posted March 9, 2008 Thanks for your comments, guys. Finished up the interior today... seat sides for the front are drying, so I will assemble the front seat later today. Here's a comparison of how I've improved the past 20 years...the red one I built when I was about 15! Quote Link to comment Share on other sites More sharing options...
Raul_Perez Posted March 9, 2008 Share Posted March 9, 2008 Nice work!! I wish that I still had some of my builds from when I was 15. The oldest one I have is from when I was about 30. Quote Link to comment Share on other sites More sharing options...
brewsterg6 Posted March 10, 2008 Author Share Posted March 10, 2008 Busy day today, besides finishing up the interior, the motor is done as well. A 283 with two 4 barrels and a batwing air cleaner. Quote Link to comment Share on other sites More sharing options...
Raul_Perez Posted March 10, 2008 Share Posted March 10, 2008 Looking good, Bruce!! I like the heat riser for the choke! Nice touch. Quote Link to comment Share on other sites More sharing options...
brewsterg6 Posted March 13, 2008 Author Share Posted March 13, 2008 Look what I did today!! I'm really disappointed that the ornament is the wrong size for the bar... apparently the etch set is for the old mold of the AMT kit... Quote Link to comment Share on other sites More sharing options...
Lyle Willits Posted March 13, 2008 Share Posted March 13, 2008 The MCG photoetch was done for the original AMT '57 Chevy, long before the "new" tool came out. This is also why the Revell '55 uptop won't fit your build. The "new" tool 57 Chevy is wider at the back than it is in the front. The Revell '55 uptop WILL fit the old tool AMT 57. Many people will argue that the original AMT '57 Chevy is the best and most acurate, although, when the "new" tool is built up properly, it is a very nice model. Quote Link to comment Share on other sites More sharing options...
brewsterg6 Posted March 28, 2008 Author Share Posted March 28, 2008 Well, I've been sick the last week, so the building kind of stopped where the sleeping took over. Back at it tonight... some hand painting of the hood and trunk under sides, and a bunch of photo etch trimmings. Also started assembling the suspension. Quote Link to comment Share on other sites More sharing options...
brewsterg6 Posted March 28, 2008 Author Share Posted March 28, 2008 I really need to finish this up, as the hard wood for the new hobby room has arrived, and I'm going to have to pack it up and move everything when we start redecorating! Here's the suspension work I got done today... I'm not a fan of the three piece exhaust, and I hate the rear motor mounts! I like the red oxide primer though... Makes me want to go back and re-do all my tri-fives!! I had the rear diff assembled and painted before I saw Plumbers model and realized the front half should also be red primer. It isn't coming apart now, so maybe my next build will be right... Quote Link to comment Share on other sites More sharing options...
Recommended Posts
Join the conversation
You can post now and register later. If you have an account, sign in now to post with your account.
Note: Your post will require moderator approval before it will be visible.