KJ790 Posted January 22, 2014 Share Posted January 22, 2014 Started a new project. This is my first real attempt at scratch building, so we will see how it goes. So far I have made the basic hood shape using styrene sheet. I am planning on modifying a snap kit W900 to update the cab and sleeper to a modern style one. I have the basic shape roughed out right now: Quote Link to comment Share on other sites More sharing options...
kilrathy10 Posted January 22, 2014 Share Posted January 22, 2014 This is awesome work, Man....You're definitely getting there.....This is an awesome first effort.... Quote Link to comment Share on other sites More sharing options...
Q tip Posted January 22, 2014 Share Posted January 22, 2014 your gonna get hooked on scratching or you'll never do it again, I hope the hook gets stuck in deep cause it lookin good. don't give up, have a stand-by project to go to when you get frustated Quote Link to comment Share on other sites More sharing options...
olsbooks Posted January 22, 2014 Share Posted January 22, 2014 Lookin good! Keep us updated. Quote Link to comment Share on other sites More sharing options...
TRaymo Posted January 22, 2014 Share Posted January 22, 2014 Looks good. Where did you get the sleeper from? Gonna have to make it a curved windshield too bein an aerocab. Possibly one piece glass too Quote Link to comment Share on other sites More sharing options...
KJ790 Posted January 26, 2014 Author Share Posted January 26, 2014 Got a little more work done. Here's a quick mock up: Quote Link to comment Share on other sites More sharing options...
Truck parts Posted January 26, 2014 Share Posted January 26, 2014 Very nice job, keep up the great job. Quote Link to comment Share on other sites More sharing options...
KJ790 Posted January 26, 2014 Author Share Posted January 26, 2014 Made some more progress today. I used hex stock styrene rod to make extended nut covers on the front wheel. Sprayed it with a little silver paint and it doesn't look too bad for being a snap-tite wheel: The rear wheels on the snap-tite models always seemed too shallow to me. I found that gluing the ring from an AMT white freightliner DD kit onto the outside of the snap-tite wheel it makes it a little deeper and more real looking. I still need to spay these silver to dull the look down a bit: I had this Detroit Diesel series 60 engine set aside for another project, but I think I'm going to use it in this build. It seems to fit into the frame alright: I also sprayed some primer on the whole cab so that it is easier to see where I need to sand. The primer really makes the defects pop. Quote Link to comment Share on other sites More sharing options...
KJ790 Posted January 26, 2014 Author Share Posted January 26, 2014 Looks good. Where did you get the sleeper from? Gonna have to make it a curved windshield too bein an aerocab. Possibly one piece glass too I forgot to answer your question. I got the sleeper from an AMT T600 kit and then modified the front corners of it. I'm going to keep the windsield as a two piece, and I am leaving the old style windows in the doors, as the truck I am using as a reference is like this. I should curve the windshield a little, but that may be a little difficult for my skill set at the moment. I should have used a cab from a T600 kit to get the curved windshield. I do have plans for a T800 in the future that will have the one piece curved windshield and "daylight" door windows. Quote Link to comment Share on other sites More sharing options...
olsbooks Posted January 26, 2014 Share Posted January 26, 2014 Looking REALLY good. Just a thought...not telling you what to do. If you want "newer" style glass, consider using the plastic from a 2 liter pop bottle and just a bit of heat from a candle or hair dryer. It may take a few tries but you can get the profile you want. Only after you have made the glass, then whack out the center post and vent window posts and fill/modify as you want. That stuff is thin enough that even if you dont get it "perfect", a little tape and white glue should hold it in place properly. I have made fighter plane pilot canopies out of it and been real pleased with it. It aint perfect under the magnifying glass but certainly passes the "two foot" rule. Just be willing to try half a dozen (or more) times and experiment with molding/shaping it before whacking out any "white" plastic. Good luck. Very nice! Quote Link to comment Share on other sites More sharing options...
Tony-442 Posted January 29, 2014 Share Posted January 29, 2014 Looks awesome! Great Job!! Could use a sun roof though... Mine had a sunroof. Quote Link to comment Share on other sites More sharing options...
Kostas Parchas Posted January 31, 2014 Share Posted January 31, 2014 So far so good. Kostas. Quote Link to comment Share on other sites More sharing options...
Trailking120 Posted February 1, 2014 Share Posted February 1, 2014 KJ Great job on this one. Quote Link to comment Share on other sites More sharing options...
KJ790 Posted February 5, 2014 Author Share Posted February 5, 2014 It's been slow progress, but I've gotten a little more done. I got some exhaust pipes made out of styrene tube: I made some battery boxes out of styrene sheet with some perforated brass as the steps: After painting: I modified the snap kit fuel tanks to look a little better. I sanded off the molded in straps, used bare metal foil as tank straps with black vinyl underneath, then added some fuel caps: Quote Link to comment Share on other sites More sharing options...
Old Buckaroo Posted February 5, 2014 Share Posted February 5, 2014 (edited) Looking really nice. Those fuel caps are great - did you make them ? Edited February 5, 2014 by Old Buckaroo Quote Link to comment Share on other sites More sharing options...
KJ790 Posted February 8, 2014 Author Share Posted February 8, 2014 Looking really nice. Those fuel caps are great - did you make them ? The fuel caps are resin pieces from Auslowe. I got some more progress yesterday, only to discover a huge oversight on my part. I never measured from the back of the cab to the drive axles on the snap-kit frame, and the frame is too short to pull most trailers. Here is the current mock-up: So this morning I pulled it all apart, cut the frame up and lengthened it 24 scale inches behind the back of the sleeper. Now I'm going to have to repaint it and redo the warning decals, but luckily I was able to salvage most of the other parts. Quote Link to comment Share on other sites More sharing options...
Old Buckaroo Posted February 8, 2014 Share Posted February 8, 2014 Man, that looks sharp. Glad to hear you were able to fix that minor glitch . What kit did you rob the Detroit 60 from or is it a resin casting ? If i had a dollar for every 60 series valve cover I shoehorned out from under a Columbia firewall.. Quote Link to comment Share on other sites More sharing options...
KJ790 Posted February 8, 2014 Author Share Posted February 8, 2014 The series 60 is also resin from Auslowe, but it is a replica of the one that comes with the Italeri peterbilts, so it is actually 1:24 scale. It doesn't look like the scale difference will me a problem with this build, I guess I will see. Quote Link to comment Share on other sites More sharing options...
KJ790 Posted February 9, 2014 Author Share Posted February 9, 2014 Scratch built air cleaner. I used styrene tube, some thin styrene strips for the straps, some photo-etched mesh from plano, and some bare metal foil. Quote Link to comment Share on other sites More sharing options...
blackbeard Posted February 9, 2014 Share Posted February 9, 2014 looking great Quote Link to comment Share on other sites More sharing options...
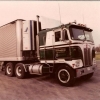
BigBad Posted February 10, 2014 Share Posted February 10, 2014 (edited) This is looking pretty good! Nice job on that hood. I've been looking at doing something like this for a while. Now I think I know where to start and what to use! Good job! I'm going to follow this closely. Here is some inspiration, just to keep you on track... Edited February 10, 2014 by BigBad Quote Link to comment Share on other sites More sharing options...
KJ790 Posted February 11, 2014 Author Share Posted February 11, 2014 I scratchbuilt some mudflaps and hangers from some scrap styrene I had laying around. I also completed the frame stretch. I think this wheelbase looks a little more natural. Quote Link to comment Share on other sites More sharing options...
scale trucker Posted February 11, 2014 Share Posted February 11, 2014 looks great so far Quote Link to comment Share on other sites More sharing options...
olsbooks Posted February 11, 2014 Share Posted February 11, 2014 NICE! Quote Link to comment Share on other sites More sharing options...
goodwin3224 Posted February 11, 2014 Share Posted February 11, 2014 great progress Quote Link to comment Share on other sites More sharing options...
Recommended Posts
Join the conversation
You can post now and register later. If you have an account, sign in now to post with your account.
Note: Your post will require moderator approval before it will be visible.