retroguy Posted November 30, 2012 Share Posted November 30, 2012 great job so far,looking forward to see the end product... wonder how the new olds would look with these mods... Quote Link to comment Share on other sites More sharing options...
JasonFL Posted November 30, 2012 Share Posted November 30, 2012 Really cool project. Can't wait to see this thing finished up, nice work. Keep it going Quote Link to comment Share on other sites More sharing options...
BKcustoms Posted December 2, 2012 Author Share Posted December 2, 2012 Thanks for the comments guys, I appreciate it. I started work on the rear suspension and chassis. This was my first attempt at making an airride setup, it's not perfect but I think it'll look fine once it's painted and detailed. the bars are brass tube I had laying around with dirtmodeler rod ends and suspension brackets and the bags are "machined" from scrap plastic on my dremel. I still need to add the link from the top of the axle to the frame that keeps the axle centered but the floor needs to be notched before it'll fit so I'm waiting to do that. I also started to cut down a set of GTO seats. Let me know what you think! Billy Quote Link to comment Share on other sites More sharing options...
crazyrichard Posted December 2, 2012 Share Posted December 2, 2012 whow awsome build and that section really got it even better .. Quote Link to comment Share on other sites More sharing options...
hjracing Posted December 2, 2012 Share Posted December 2, 2012 I really like your take on this build! I'll keep an eye on this one.. Quote Link to comment Share on other sites More sharing options...
TooOld Posted December 2, 2012 Share Posted December 2, 2012 You've got a good eye for what looks good ! Moving the wheel openings back was definetly the way to go ! This is really cool ! Quote Link to comment Share on other sites More sharing options...
Tom Setzer Posted December 2, 2012 Share Posted December 2, 2012 I Think The Custom Body Modifications Are Really Outstanding! Great Work! Quote Link to comment Share on other sites More sharing options...
Trans Am Erik Posted December 2, 2012 Share Posted December 2, 2012 Heck yeah man!!!! Bagging it is the way to go with this one, Laying frame Quote Link to comment Share on other sites More sharing options...
BKcustoms Posted December 15, 2012 Author Share Posted December 15, 2012 Thanks guys! It'll be as low as it'll go with these wheels After some messing around with the front suspension and almost breaking it I decided to make it functional so I could set the ride height exactly where I want it during final assembly. Basically all I had to do was cut the kit suspension apart and drill holes where bolts go on a 1:1 and add brass tubing where the "bolts" go through the frame. since I don't trust the plastic to hold up very well. Fully lowered.. Fully raised... And a pic of where it sits as of now. It'll be a little lower in the end though. Thanks for looking in! Let me know what you think and feel free to ask any questions you may have. Billy Quote Link to comment Share on other sites More sharing options...
Draggon Posted December 15, 2012 Share Posted December 15, 2012 Not a fan of big wheels by any means, but they really fit your build. This might be the first time that I love these wheels on anything. Keep it coming! Quote Link to comment Share on other sites More sharing options...
GerN Posted December 15, 2012 Share Posted December 15, 2012 Great design work (and comments). Have you tried less extreme wheels and tires? I'm curious to see how that would look. Quote Link to comment Share on other sites More sharing options...
cwobeaman Posted December 15, 2012 Share Posted December 15, 2012 I some how had missed this.... Wow you've got my attention now. Quote Link to comment Share on other sites More sharing options...
BKcustoms Posted December 16, 2012 Author Share Posted December 16, 2012 Thanks for the comments guys! I'm not usually a fan of big wheels either on cars this old but I think they give it a modern look and I'm enjoying the challenge of getting them to fit the way they should in a way that would work on a 1:1. Quote Link to comment Share on other sites More sharing options...
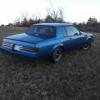
BKcustoms Posted January 21, 2013 Author Share Posted January 21, 2013 Well since I'm still waiting on some engine parts I decided to paint the frame. Color is Testors one coat Icy Blue lacquer. This might also end up as the body color but I'm also considering silver. Let me know what you think. Billy Quote Link to comment Share on other sites More sharing options...
clavender17 Posted January 21, 2013 Share Posted January 21, 2013 Lookin good man lookin good Quote Link to comment Share on other sites More sharing options...
BKcustoms Posted January 22, 2013 Author Share Posted January 22, 2013 Thanks Chris! Quote Link to comment Share on other sites More sharing options...
BKcustoms Posted March 15, 2013 Author Share Posted March 15, 2013 Well i dug this one out and managed to finish the floor, hinge the trunk, make an engine bay and firewall, and make a speaker box for the trunk. and here's the reason i haven't had much modeling time lately Thanks for looking, sorry for the crappy hone pics. Quote Link to comment Share on other sites More sharing options...
CrazyGirl Posted March 15, 2013 Share Posted March 15, 2013 here i go again , WOW amazed again ,,, you guys are artists ,, to bad one of you guys dont video one of these builds start to finish , it sure would be mega cool to watch and really learn something ,,, i am blown away again Quote Link to comment Share on other sites More sharing options...
BKcustoms Posted March 16, 2013 Author Share Posted March 16, 2013 Thanks Anne! Making videos is a pretty good idea, I might try to make one when I do the paint on this. Quote Link to comment Share on other sites More sharing options...
Dominik Posted March 16, 2013 Share Posted March 16, 2013 Your bodyworks are awesome! looks realy, realy cool! Quote Link to comment Share on other sites More sharing options...
Dr. Cranky Posted March 16, 2013 Share Posted March 16, 2013 Oh yeah, looking forward to seeing this one in paint. Great added details. Quote Link to comment Share on other sites More sharing options...
BKcustoms Posted March 20, 2013 Author Share Posted March 20, 2013 Thanks Do nminik and Doc Cranky! Paint time is going to be real soon. I finally got ahold of an appropriate engine for this build froom Chris L. (Clavender17) it's from the AMT 32 ford phantom vickie and I added a scratchbuilt blower and detail master wiring.i still need to make an engine cover for it to tie it in to the engine bay. Thanks for looking, next step is paint! Quote Link to comment Share on other sites More sharing options...
CrazyGirl Posted March 20, 2013 Share Posted March 20, 2013 man this is crazy cool Quote Link to comment Share on other sites More sharing options...
BKcustoms Posted March 21, 2013 Author Share Posted March 21, 2013 The air filter is out of the phantom vickie kit, i'm not sure if it'll be staying though. I'm thinking about making some kind of dual cold air intake. Quote Link to comment Share on other sites More sharing options...
JasonFL Posted March 23, 2013 Share Posted March 23, 2013 Man I love what you did with that motor compartment, so clean and smooth looking. That's the look I want to achieve when I finally get to doing mine. Looks like you just cut the old ones out and used the other optional hood to cut the rounded edges off and put them in place. However it was done, looks great. Looking forward to seeing it all painted with those colors. Btw, the 1:1 project is looking good too. Quote Link to comment Share on other sites More sharing options...
Recommended Posts
Join the conversation
You can post now and register later. If you have an account, sign in now to post with your account.
Note: Your post will require moderator approval before it will be visible.