mario lucchini Posted February 23, 2010 Share Posted February 23, 2010 (edited) I registered in this Forum a long time ago, but haven't posted anything in a long time... Thanks to my good friend Don Garret, AKA Grandpamcgurk, I'll be posting here a series of builds I call "Making the most of Pocher Kits" I bought my first Pocher kit about 3 years ago and got addicted inmediately seeing the enormous potential these kits have for superdetailing.... Nowadays, I'm working on the Alfa 8C Monza, The Rolls Royce Sedanca, the Rolls Royce Star of India, the Mercedes True roadster and the Bugatti T50.... One of the things I've managed to achieve is that I assemble this kits using no glue at all, but only scale hardware, scratchbuilding a lot of parts and superdetailing at a psichopatic level.... As a sample, the pics shows some engine images of the Alfa Monza, which is almost ready...the first 3 pics shows the engine on its stand, and the last3 pics shows the engine in its craddle, the unpainted frame... Thanks Mario Edited February 23, 2010 by mario lucchini Quote Link to comment Share on other sites More sharing options...
arick Posted February 23, 2010 Share Posted February 23, 2010 Hey Mario, welcome to the MCM forum! Guys, if you want to see what can be done without glue, then wait till you see how Mario builds using fasteners and detail accessories. What he's posted above, well, I won't say "it ain't nothing", but I will say this........"you ain't seen nothing yet". Give us more Mario! Quote Link to comment Share on other sites More sharing options...
Harry P. Posted February 23, 2010 Share Posted February 23, 2010 Wow! What a surprise to see you here! I can say with utmost confidence that the members here are in for a real treat once you start posting here! Quote Link to comment Share on other sites More sharing options...
Dragline Posted February 23, 2010 Share Posted February 23, 2010 Crickey, this is modeling on a whole other level! Building without glue is tantamount to actually being a coachbuilder in many respects. You have my admiration on what are universally known as tough to build kits. Muy Caliente' Bob Quote Link to comment Share on other sites More sharing options...
mario lucchini Posted February 24, 2010 Author Share Posted February 24, 2010 Thanks for your welcome Harry and Rick!...Hope I can make a little contribution here... Speaking of scratchbuilding parts for the Pochers, her's one example....homemade spring suspensions... The Pocher Alfa's kit suspension is made from hard rubber...ugly, non scale and unable to support the finished kit's weight...so, I scratchbuilt them from brass strips 1/4" wide... I first took precise measures using the kit's parts, and then draw them in 1/8 scale in Autocad, mighty useful when you print the drawings and use them as templates...I stick the drawings to the brass sheet using 3M's spray contact cement...this is especially useful to locate precise hole templates for drilling holes... Once the part is drilled and cut, you simply soak it in Zippo's lighter fluid and everything is spic & span... Then the fun begins when you spend hours filing, sanding, rectifying, beveling and polishing every part you made...but as a superdetailing freak I am, I enjoy it....besides, a self made part which ends beutifully made is most gratifying!! The first pics shows the parts on top of the Autocad plans and the last ones, the finished product... You can see the kits hardware used on the finished leaf springs which are OK.... These suspensions were later blued, using a cold gun blue used in firearms made by Outers, which gave the parts a beautiful aged patina but always showing the "metal look", which make these parts stand out when installed on the model... Thanks for viewing... Mario Quote Link to comment Share on other sites More sharing options...
GrandpaMcGurk Posted February 24, 2010 Share Posted February 24, 2010 Well hello there Mario. Looks like Rick and Harry beat me to the welcome, that's cool. Yeah buddy, strut your stuff. Quote Link to comment Share on other sites More sharing options...
mario lucchini Posted February 24, 2010 Author Share Posted February 24, 2010 (edited) Here's a sequence of pictures showing the Alfa's mainframe and the central body after sanding and fitting (Many hours but worth the effort... ) The subassembly shown has the complete mainframe,the central body & tail, the naked engine block, the floorboard, the firewall and the seat, already upholstered in Capretta leather....I'll go into the seat's detail later... You can see the scale hardware joining every part, for which holes were drilled and tapped and studied against the prototypes pics to maintain scale accuracy... The big advantage of this, is that you can dissasemble everything any time you want too...for correcting things, painting or simply add more details, hee, hee... Also note the new position of the engine's mounting bolts, which in this particular kit MUST be moved backwards 10 mm, this is the only way everything will fit OK later... Besides from the scale hardware, bought or homemde, I used some 2 mm Allen bolts to eliminate completely the use of the Pocher screws which are weak, ugly and non-scale... Thanks for looking... Mario Edited February 24, 2010 by mario lucchini Quote Link to comment Share on other sites More sharing options...
GrandpaMcGurk Posted February 24, 2010 Share Posted February 24, 2010 You're cracking me up Mario. Guys when Mario says "bought or homemade" understand that he's an accomplished machinist as well. If can't find a particular bolt or fastener he'll make his own. He even makes his own tools from time to time if he has to. I learned long ago that this guy has no problems....just solutions. He gives a whole new meaning to the term "detail freak". Way to go Mario. Quote Link to comment Share on other sites More sharing options...
Harry P. Posted February 24, 2010 Share Posted February 24, 2010 ok, you're not building a "model car" here... You're building a real car, it just happens to be 8 times smaller than the original. I don't think there's anything I could say about your work... the photos speak for themselves. This is model making at a level far above and beyond what us regular humans can ever hope to achieve. Move over, Gerald Wingrove! Quote Link to comment Share on other sites More sharing options...
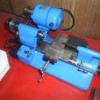
mario lucchini Posted February 24, 2010 Author Share Posted February 24, 2010 Harry and Don greatly exaggerate...anything I can do, anyone can also do with lots of perseverence, careful planning and a little bit of luck... Taking Don words about making your own scale fasteners, I'm showing a pictorial sequence of making yourselves a scale bolt, hex head, 2 mm AF in brass.... First a 2 mm AF hexagon brass bar is grabbed in the 3 jaw chuck of the lathe, drilled with a 1.6 mm drill held in the tailstock...notice the slight chamfer in the bar made with a jewellers file (that's for looks!...) http:// Second step, using the 2 mm tap held in the taistock, headstock rotated by hand, carefully doing the thread on the bolt's head... http:// A 2 mm brass rod is held in the collet chuck to ensure concentricity and being tapped using a clockmakers die...(The one shown can make threads from 0.3mm to 2.5 mm diameter threads in steps of 0.5 mm) http:// The threaded stud thus made is cut to the needed length, and is held on the tailstock and fed by hand slowly rotating the headstock to ensure absolute concentricity between the bolt's head and the foot thread...I first dabbed some Loctite in the stud... http:// The threaded stud is held in the headstock and rotating rapidly, is given a touch with a Dremel sanding drum to round its point... http:// The brass bar is held in the headstock once more, and a "V" tool is used to turn the bolt's head...you can also preform the bolt's head as needed at this stage... http:// Here, the parting tool is definitely separating the bolt's preformed head from the bar... http:// The complete bolt is now reversed, held in the headstock and given its final form and then polished.. http:// The finished product, with the added satisfaction of telling friends "I made it!".... http:// http:// WHOA!! Mario Quote Link to comment Share on other sites More sharing options...
Dragline Posted February 24, 2010 Share Posted February 24, 2010 Gerald Wingrove indeed! You are the Heir Apparent Mario. I'm enjoying this very much. Bob Quote Link to comment Share on other sites More sharing options...
mario lucchini Posted February 25, 2010 Author Share Posted February 25, 2010 (edited) How about making some useful tools for our hobby? Sometimes the market doesn't have what you want or need, so my personal feeling about this, is DIY! I needed a third hand to grab very tiny parts for filing, drilling, etc... I looked arround the Web for ideas, and came up with the following "Minivise" I designed and made with some scrap brass and some chunks of black acrylic.... The greatest advantage of this vice is that it rotates 360º both in the horizontal & vertical planes....besides, I mounted it in a bigger swiveling vise to have the best of both worlds... The Minivise The parts and bits... The minivise mounted on the bigger vise... The holes seen in the jaws upper edge, are for inserting short 3 mm diameter steel pins to grab ackward formed parts... This apparatus tends to be very user friendly, hee, hee.............. More DIY tools coming next... Thanks Mario P.S. If anyone wants to try his hands in toolmaking, PM me for the plans... Edited February 25, 2010 by mario lucchini Quote Link to comment Share on other sites More sharing options...
Foxer Posted February 25, 2010 Share Posted February 25, 2010 I have to say Welcome ..and .. can you make a tool to lift my jaw off the floor? I'm very much enjoying your posts and seeing your fantastic work! Glad to have you here! Quote Link to comment Share on other sites More sharing options...
mario lucchini Posted February 26, 2010 Author Share Posted February 26, 2010 Let's go back to the beggining of the Alfa build, which I started with the engine... I assembled the 2 block halves using rectified 2 mm Allen bolts, after a long session of sanding & rectifying the plastic parts (By the way, Pocher plastics are VERY hard, which is an advantage when drilling for tapping threads, but not when sanding! ) As in all my subassemblies, this are joined with scale hardware so I can dissasemble everything anytime....sometimes special reinforcements have to be made in order to drill holes for threading purposes...this is studied beforehand using the reference photographs... This is the block front receiving the engine's front cover which is a metal casting, the appropiate holes were drilled and tapped...the casting was rectified and polished... The front cover in place...of course, nothing is painted yet, just sanded & rectified...later, everything is taken apart and every bit and piece are primed & painted...as you can see in the pics, there's a lot of sanding pending!! Here you can see some special scale hardware holding everything tight and in place!...you can also see the metal cylinder liners held in place by the 2 block halves...good Pocher engineering! http:// A plan view of the block with the front cover, cylinder liners, and oil pan in place... One of the most useful accesories one can make to ease the pocher kit assembly, is to make a good engine stand...I did a little Web search and found some pics of the original stand used in the Alfa factory, so back to Autocad and made some scale drawings, which printed and used as templates were put to work...I used 0.8 mm thick styrene sheet to do the whole stand... Some stages of the styrene formers... The curved parts were formed over a wooden template, using a heat gun, everything was glued using Medium CA... The finished stand, bolted to a wooden base...the engine block in place...this is a very practical "third hand" for working on the engine from now on...... Thanks.... Mario Quote Link to comment Share on other sites More sharing options...
mario lucchini Posted February 26, 2010 Author Share Posted February 26, 2010 I ran out of pics space, so I continue here the engine's stand affair... More of the finished stand... The finished stand painted and scale bolted to the wooden base which was oiled with Tung, polished after 48 hours... For all the Pocher kits parts, I use automotive acrylic lacquer applied with airbrush, after a lot of primer coats sanded in between...in this case, the color used was the factory Alfa red, which was not easy to achieve, lots of trial and error samples!!! Once achieved, this is the definitive color to be used on the model... Cheers...............Mario Quote Link to comment Share on other sites More sharing options...
arick Posted February 27, 2010 Share Posted February 27, 2010 Guys, Mario lives near this mornings earthquake in Chile. Lets keep him in our thoughts and hopefully we'll hear from him soon. Quote Link to comment Share on other sites More sharing options...
sjordan2 Posted February 27, 2010 Share Posted February 27, 2010 Boy, you're not kidding about correct Alfa red. I've had two '60s-era 1:1 versions, and when I needed a paint match, it was hard to achieve. There's just a dash of maroon or an eyedropper of blue in it. And restored multizillion-dollar 1:1 examples of your model are all over the place in color. What combination are you using? PS - hope you're OK after the quake. Quote Link to comment Share on other sites More sharing options...
Harry P. Posted February 27, 2010 Share Posted February 27, 2010 Is he in Santiago? I read that they got hit pretty hard in that area. Quote Link to comment Share on other sites More sharing options...
GrandpaMcGurk Posted February 27, 2010 Share Posted February 27, 2010 Is he in Santiago? I read that they got hit pretty hard in that area. Yes, he lives in Santiago....I'm trying to contact him now to see if he & his family are okay. I don't know if he'll be able to get back to me, but if I hear anything I will certainly let you know. We're very good friends and honestly, I'm a bit concerned. Quote Link to comment Share on other sites More sharing options...
crazyjim Posted February 27, 2010 Share Posted February 27, 2010 Yeah Grandpa. Keep us posted. And there's concern for Gregg in Hawaii too. Quote Link to comment Share on other sites More sharing options...
Harry P. Posted February 28, 2010 Share Posted February 28, 2010 Has anyone heard from Mario? Quote Link to comment Share on other sites More sharing options...
arick Posted February 28, 2010 Share Posted February 28, 2010 Nothing yet here or at SMC Harry. I think Don has a personal msg out to him also. Quote Link to comment Share on other sites More sharing options...
GrandpaMcGurk Posted February 28, 2010 Share Posted February 28, 2010 Nothing yet here or at SMC Harry. I think Don has a personal msg out to him also. Yes I do, I haven't heard back yet. If I don't hear from him by tomorrow, I'll see if I can get through by phone. Quote Link to comment Share on other sites More sharing options...
GrandpaMcGurk Posted March 1, 2010 Share Posted March 1, 2010 (edited) Hey gang, I know this is a bit off topic but I just heard from Mario, I hope you don't mind but I'll post a piece of my correspondence with him just to let everyone know he's okay, he can delete this post later when the dust settles..... _____________________________________________________________________________________________________________________________________________ My dear friend....I just got back the internet a few moments ago....electricity, running water and telephones were back only last night....this has been a nightmare you just can't begin to imagine.... This one has been the strongest earthquake here in Chile for the past 100 years by far.... Though the epicenter was about 600 Km. South of Santiago where I'm standing, damage here is second to none.....never in my 64 years of life I had seen so many structural failures in houses and buildings.... Luckily my house here in Santigo didn't suffer anything serious, and the house on the beach either.... We are all well, no injuries, just the scary moments.... By the way, when this movement came I was absolutely alone here in Santiago, my whole family was in the beach house at Santo Domingo....luckily I could contact them some moments after via telephone, one hour later I had no water, electricity and phones (Mobile & fixed)....never been so scared in my life, not knowing about the family.... Thanks so much for your concern, buddy.......I'll be mailing you with more details later, describing my hairising experience.....got a lot of mails to answer, mainly from relatives who doesn't live in Chile.... Edited March 2, 2010 by GrandpaMcGurk Quote Link to comment Share on other sites More sharing options...
Guest 85Biarittz Posted March 2, 2010 Share Posted March 2, 2010 I'm glad he and afmily are doing okay. Quote Link to comment Share on other sites More sharing options...
Recommended Posts
Join the conversation
You can post now and register later. If you have an account, sign in now to post with your account.
Note: Your post will require moderator approval before it will be visible.