robiwon Posted September 7, 2012 Share Posted September 7, 2012 (edited) O.K. I moved this thread from "On the Bench" to here since this is a scifi subject. I'm shortening the originl text and will mainly show pics and videos of my progress. Pics are clickable. The Spinner, by Fujimi, will be lit with over thirty 1.8mm and SMT LEDs. Short video of some of the LEDs going into this build. Working on modifying light housings to accept the new LEDs. Stock on left and modified on the right. Short video testing 1.8mm LED in one of the bubble domes for the roof. Working on making the doors operable as well. Scribing along the window frames to seperate the side glass using my pinvise and sewing needle. And seperated. Set back in place to check fit. Looks good. Edited September 8, 2012 by robiwon Quote Link to comment Share on other sites More sharing options...
Yahshu Posted September 8, 2012 Share Posted September 8, 2012 This is gonna be so cool when it's finished. One of my all time fav Sci-Fi flicks. Quote Link to comment Share on other sites More sharing options...
robiwon Posted September 13, 2012 Author Share Posted September 13, 2012 (edited) Update time- I seperated the doors. I painted the panel lines black so I could see them better from underneath. I used a ball cutter in my Dremel to remove material beneath the panel liine. This allowed me to finish the cut with a few swipes of my Xacto blade. The doors taped together to check for fit. A small filler plate was added to extend the front of the door to make it more "substantial". Also, a bit of photo etched detail added for visual interest. I'll work on making the actual hinges today. More to come.... Edited September 13, 2012 by robiwon Quote Link to comment Share on other sites More sharing options...
Edward Gore Posted September 14, 2012 Share Posted September 14, 2012 Awesome project. I'm checkin this out Quote Link to comment Share on other sites More sharing options...
robiwon Posted September 14, 2012 Author Share Posted September 14, 2012 Thanks Ed! I knew there had to be more than a few scifi fans here, LOL. The hardest and most nerve wracking was cutting those long clear side windows away from the main windshield. Clear plastic as we all know does not like to be cut very much! It took about 20 minutes of careful, slow scoring to seperate the glass on each side. Build is moving aong and I will have more updates soon! Quote Link to comment Share on other sites More sharing options...
kruleworld Posted October 5, 2012 Share Posted October 5, 2012 (edited) Are you correcting the rear cockpit wall and under dash area? The rear wall bends at waist level to include the rear windows. this is the movie prop being built.... the under dash area isn't wrong, just cludgey. Oh, and that's an amazing amount of lights. will look impressive in the dark. Edited October 5, 2012 by kruleworld Quote Link to comment Share on other sites More sharing options...
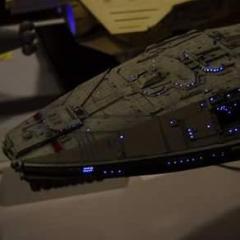
robiwon Posted October 7, 2012 Author Share Posted October 7, 2012 Thanks kruleworld. Yes, there will be extensive mods to the entrior. I will be adding a photoetched set that replaces the rear wall and all the console faces. The entiors floor has already been removed and new seat brackets are being fabbed up at the moment. The lighting has been changed as well. The 1.8mm LEDs have been dumped in favor of all SMT LEDs and a custom board to power them. It was (the cicruit board) actually made for the Jupiter 2 as the Fusion Core. The maker of this board reprogrammed the board to flash all the light randomly for me. At no charge! Here are some updates. I will post a short video today of a test of the new lights. Details added to the inner door panles, including pull handles. Hinges complete. Doors are held open by small Rare Eart magnets. Doors in action! Main insturment pod moddified. Clear sections added that will be lit from underneath with a yellow LED. This is the circuit board that will power all the flashing lights. Fits nicely in the rear. Quote Link to comment Share on other sites More sharing options...
robiwon Posted October 30, 2012 Author Share Posted October 30, 2012 (edited) More mods. Getting close to actually building this kit! Front wheel pods and side stripes on the body modded for lights. Light test of a bubble dome and the center "headlight". Edited October 30, 2012 by robiwon Quote Link to comment Share on other sites More sharing options...
Ace-Garageguy Posted October 30, 2012 Share Posted October 30, 2012 Really really cool. Gotta get one. Does anyone make a 1:1 Rachel model? I'd like to have one of those too. Quote Link to comment Share on other sites More sharing options...
Chuck Most Posted October 30, 2012 Share Posted October 30, 2012 I think you should have left it in On The Workbench... it's still technically a car, right? A lot more people would see this cool model project! I've wanted to tackle this kit for a while- I won't go into so much detail with mine, though. Quote Link to comment Share on other sites More sharing options...
robiwon Posted October 31, 2012 Author Share Posted October 31, 2012 Thanks for the comments guys. It is a great kit and one of my all time favorite scifi cars and movies. It is expensive but I got mine at Wonderfest for $60. It was better than paying $80+ elsewhere. Would a Moderator be able to move the whole thread back for me? Michigan Madman, are you in Michigan? I lived in the Pontiac/Waterford area for most of my life before moving to KY 7 years ago. I'll actually be in Mich this weekend moving a friend to up there. Futurbat, I agree with the lights. When I heard about this kit that was my first thought, lighting it! Then a saw a Japanese blogger build one with hinged doors. I knew I had to do the same to mine. Quote Link to comment Share on other sites More sharing options...
zz383mero Posted November 2, 2012 Share Posted November 2, 2012 Really really cool. Gotta get one. Does anyone make a 1:1 Rachel model? I'd like to have one of those too. I know right! Quote Link to comment Share on other sites More sharing options...
jeffb Posted November 2, 2012 Share Posted November 2, 2012 well, she was a model kit after all.... Quote Link to comment Share on other sites More sharing options...
Recommended Posts
Join the conversation
You can post now and register later. If you have an account, sign in now to post with your account.
Note: Your post will require moderator approval before it will be visible.