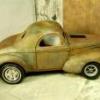
RyanSilva Posted November 14, 2008 Share Posted November 14, 2008 (edited) So Im sitting here eating birthday cake.. <img src="http://www.modelcarsmag.com/forums/public/style_emoticons/<#EMO_DIR#>/tongue.gif" style="vertical-align:middle" emoid="" border="0" alt="tongue.gif" /> and on my desk is a AMT 1953 F100, this thing has been painted so many times i lost count! Its been "completed" about 3 times in the past 13 years, needless to say This should be it's final version. With no plan in mind aside from a hobby saw, a file and a dull pencil, i marked where i wanted the cuts, eyeballed reference points and cut away. I used the stock cowl vent as a point of reference on how much to eliminate width wise. When that was done..it was to tall, so i sectioned out the bottom of the cab, rounded the edges a bit, and there ya have it! Still needs PLENTY of cleanup but the look overall is there. I picked up parts off the mockup bench to see what it will look like, i dig it! I will power it by a flathead with goodies (i save my flatheads for open wheeled cars only) Wheels and tires.. will be steelies (not shown but similar! <a href="http://public.fotki.com/73OldsOmega/models/1953-ford-f100-modified/sany0083.html" target="_blank"><img src="http://images46.fotki.com/v1392/photos/9/979739/6924154/SANY84-vi.jpg" border="0" class="linked-image" /></a><a href="http://www.fotki.com" target="_blank">Hosted on Fotki</a> <a href="http://public.fotki.com/73OldsOmega/models/1953-ford-f100-modified/sany0085.html" target="_blank"><img src="http://images46.fotki.com/v1393/photos/9/979739/6924154/SANY0085-vi.jpg" border="0" class="linked-image" /></a><a href="http://www.fotki.com" target="_blank">Hosted on Fotki</a> <a href="http://public.fotki.com/73OldsOmega/models/1953-ford-f100-modified/sany0087.html" target="_blank"><img src="http://images43.fotki.com/v1388/photos/9/979739/6924154/SANY0087-vi.jpg" border="0" class="linked-image" /></a><a href="http://www.fotki.com" target="_blank">Hosted on Fotki</a> <a href="http://public.fotki.com/73OldsOmega/models/1953-ford-f100-modified/sany0091.html" target="_blank"><img src="http://images46.fotki.com/v1393/photos/9/979739/6924154/SANY0091-vi.jpg" border="0" class="linked-image" /></a><a href="http://www.fotki.com" target="_blank">Hosted on Fotki</a> <a href="http://public.fotki.com/73OldsOmega/models/1953-ford-f100-modified/sany0094.html" target="_blank"><img src="http://images43.fotki.com/v1381/photos/9/979739/6924154/SANY0094-vi.jpg" border="0" class="linked-image" /></a><a href="http://www.fotki.com" target="_blank">Hosted on Fotki</a> <a href="http://public.fotki.com/73OldsOmega/models/1953-ford-f100-modified/" target="_blank">http://public.fotki.com/73OldsOmega/models...-f100-modified/</a> few more pics here... now back to the bench to sand away the seams! Plenty of plastic to add thats for sure, I got my sheet stock ready! Edited November 24, 2010 by RyanSilva Quote Link to comment Share on other sites More sharing options...
GOTH KUSTOMS Posted November 14, 2008 Share Posted November 14, 2008 Heck of a way to start a build but I like It, a Razer saw and file, nice start, keep posting those shot's... Quote Link to comment Share on other sites More sharing options...
RyanSilva Posted November 14, 2008 Author Share Posted November 14, 2008 I added some plastic to fill in where the fenders were removed, now to make a firewall!. I cut notches to channel it over the frame. The frame I will be using is from the 41 chevy, I wanted to make a frame for that truck, so Now will be the opportunity to steal the chassis! I stole the flatty from the 50 pickup to see if it fits, and it does...good! Now to make some mounts for the chassis and crossmembers. (I have a built flatty going on..tripple deuce, fenton headers and motorcity flathead heads) Hosted on Fotki Hosted on Fotki Hosted on Fotki Hosted on Fotki Quote Link to comment Share on other sites More sharing options...
RyanSilva Posted November 14, 2008 Author Share Posted November 14, 2008 Hey you snuck in there, thanks! Next up sanding her smooth. Quote Link to comment Share on other sites More sharing options...
RyanSilva Posted November 14, 2008 Author Share Posted November 14, 2008 Thanks guys! What I started to do, was mount the 1948 Ford dash, this takes some trimming thats for sure! But i can't resist the seperate chrome on the dash..which makes decaling easier. Plus there are 8 decals for the dash, that should make it stand out easier. I sanded the cab a little bit more than the door, just to give a little detail of slightly bigger parts. Next comes dents, not over done..just some baseballs and a gun shot wound here and there! ideas on colors? Im thinking baby blue or red flat head, just so it stands out..of coarse it will be fitted with grease stains. Hosted on Fotki Hosted on Fotki Hosted on Fotki Hosted on Fotki Seats... ratty looking one or, tuck and roll? Hosted on Fotki Hosted on Fotki Quote Link to comment Share on other sites More sharing options...
Clay Posted November 14, 2008 Share Posted November 14, 2008 That looks pretty good, I got a few spares of those, so I might try that. Quote Link to comment Share on other sites More sharing options...
Geezerman Posted November 14, 2008 Share Posted November 14, 2008 Do it , Ryan "Down n' dirty makes it purty !!!!!!!" Quote Link to comment Share on other sites More sharing options...
RyanSilva Posted November 15, 2008 Author Share Posted November 15, 2008 Down and dirty it is! ------ I went and bought some munchies over at CVS today and at the counter was a balsa glider plan for 1.29..so i said what the heck and bought one, and well it hit me..im buying this cheap balsa plane with no intention of using it other than impulse buying...but what hit me was to cut the wing up for the floor of the truck! it worked, some light sanding is needed still, but i can make about 5 more floors, so im good to go. If i do use the seats they will need to be trimmed for a trans tunnel, I thought i could make it, but i will need a tunnel to set the engine back some. No biggie, just need to mod the bench seat. The dash was a pain, why? Well the decals from revell are never perfect. I had some trouble with these, they disintegrated in the water, so i had to make use of the the 4 decals rather than the 8... the other 4 were supposed to be the vent and heat on the drivers side. I added some Future floor acrylic to the tach and speed-o to give it some gloss. Thos shows why i need a tunnel. Hosted on Fotki Hosted on Fotki Hosted on Fotki Hosted on Fotki Hosted on Fotki Hosted on Fotki Quote Link to comment Share on other sites More sharing options...
RyanSilva Posted November 16, 2008 Author Share Posted November 16, 2008 The engine is based on a 1948 Flathead from the Revell 1948 Convertible. So far what you see is what comes with the kit. I did remove the coil that is molded into the passenger side head. These heads replicate the motorcity flathead company. I added some acylic transparent red from createx, i shoulda used the opaque but so be it. They need a little more clean up but im being to picky.. I painted them silver with a sharpie! The engine was painted up just like my tutorial, two browns were used, then baby blue. soaked it with india ink and alcohol (AI), and let it dry. I then broke out this 3 color makeup set i like to use for weathering grime. It has 2 browns and one tan, i coated the engine with the grime brown, and washed it off when it was dry with alcohol, i followed up with a bit of tan, which ended up looking like aluminum/metal wearing through. I need to continue this onto the transmission, i waited due to sizing up the dimensions for the floor. Hosted on Fotki Hosted on Fotki Hosted on Fotki Hosted on Fotki Hosted on Fotki Hosted on Fotki Quote Link to comment Share on other sites More sharing options...
RyanSilva Posted November 16, 2008 Author Share Posted November 16, 2008 I dont have any silicone mold material (need to order some) So i used clay, they made some simple one time molds to pour some resin into cylindrical shapes big enough to chuck into my dremel. Using xacto blades to cut away and shape. (yes i wear safety shield, your stupid if you dont!) anyways..im replacing the dash knobs with one, and il have a stem on the other side as the "missing knob" Hosted on Fotki Hosted on Fotki Quote Link to comment Share on other sites More sharing options...
Dennis Lacy Posted November 16, 2008 Share Posted November 16, 2008 Wow, what a cool project! Ordinarilly, I'm not into these "truckster" and "kulture with a K" kind of rods (I won't use the "R" word) cause they're usually a hodge-podge of parts and suck proportions, but this really has a neat look to it. The new shape and proportions of the cab work great, wheelbase is perfect and the use of mostly early Ford parts (so far) is a major plus. Also really dig the use of a wood pallet out back - never, ever seen that done before. Press on! Quote Link to comment Share on other sites More sharing options...
Guest JamesDE Posted November 16, 2008 Share Posted November 16, 2008 Ryan, you have got some skills!! I have an AMT '55 Cameo truck that needs a makeover. I might end up doing something like this with it. Great work bro! Quote Link to comment Share on other sites More sharing options...
RyanSilva Posted November 18, 2008 Author Share Posted November 18, 2008 Thanks guys! I would never build one like this in the real world, but in scale, there perfect for creativity! Ok what i got done has been not much, but progress is progress! I cut the pallet down a plank and a half, it looks so much better now! I cut the leaf spring off the 48 ford rearend and glued it to a 41 chevy rearend. I need to make the correct spring perch though. You can see how high the rearend sits, so the cab will need to be trimmed to fit the driveshaft, along with the seats! Ive yet to make the front portion of the dash and firewall, the engine will move back almost a 1/4th inch! so this will shorten the front end up a bit. I will be using cheater slicks and the chrome steelies in the back. Up front, no clue yet. What you see is just mockup. I will be using the 32 ford grill, with the 1948 radiator. I weathered half of the dash, gotta do the drivers side of it now. then add some stickers and powders! Hosted on Fotki Hosted on Fotki Hosted on Fotki Hosted on Fotki Hosted on Fotki Hosted on Fotki Quote Link to comment Share on other sites More sharing options...
Raul_Perez Posted November 18, 2008 Share Posted November 18, 2008 Oh yeah...I really like the way this one is coming together!! It's a pretty stark contrast to the '53 F100 that I'm building! Keep up the GREAT work and keep posting pics!! Later, Quote Link to comment Share on other sites More sharing options...
Clay Posted November 19, 2008 Share Posted November 19, 2008 That is turning out really good. Quote Link to comment Share on other sites More sharing options...
Rudy Posted November 19, 2008 Share Posted November 19, 2008 This looks like a weathered version of a truck I saw recently in RebelRods magazine. Except the one in the mag had a roof. They said they did the same kind of thing, no measuring, they cut the truck cab in 24 pieces and welded it back to gether ALOT smaller..... Looks very similar! I like it! I absolutely love the pallet! Where did you find it> Or did you just make it yourself? Keep up the good work, Rudy Quote Link to comment Share on other sites More sharing options...
evilone Posted November 19, 2008 Share Posted November 19, 2008 wow looks like me when i was a little kid LOL that thing is tight bro dang i have to get back into rat rods havent done one for ages Quote Link to comment Share on other sites More sharing options...
RyanSilva Posted November 19, 2008 Author Share Posted November 19, 2008 Thanks guys! Ok ..i wanted to make the ugliest most uncomfortable seat possible.. did i pass? Hosted on Fotki Hosted on Fotki Hosted on Fotki Hosted on Fotki Its basically a cut up pallet, and part of the end from the bed thats on the back. Its pretty much epoxy glued together, since superglue is so brittle. Its very ugly built, you cant see it because I will be hiding it Next is the floor and seeing how high the driveshaft will be. Quote Link to comment Share on other sites More sharing options...
RyanSilva Posted November 21, 2008 Author Share Posted November 21, 2008 anyways.. I opened the door! Just need to adjust the hinge. I will be only having one door open, the other side will be welded closed., like my sign? Hosted on Fotki Hosted on Fotki Hosted on Fotki Hosted on Fotki Hosted on Fotki Hosted on Fotki I will be adding another high just above this. Quote Link to comment Share on other sites More sharing options...
RyanSilva Posted November 22, 2008 Author Share Posted November 22, 2008 Ok what i did today..(not much) but, i painted the drivers door and sealed it with dullcoat. It has 4 layers of browns. redoxide is my basecoat always, primer or sponged on acrylic..this case its sponged on. I made about 8 hinged, could not get any of them to fit properly, so i took the right side of a Revell Model A RPU cab and cut off the hinges, and glued them on with MEK. I have the bottom one obviously but i left it off so i can remove the door till final assembly. The door will be Yellow. The body....not sure, but maybe baby blue. Oh and i need to clean my desk..see how cluttered it gets at the start of a project? WOW! Hosted on Fotki Hosted on Fotki Hosted on Fotki Hosted on Fotki Hosted on Fotki Hosted on Fotki Quote Link to comment Share on other sites More sharing options...
jbwelda Posted November 22, 2008 Share Posted November 22, 2008 thats totally wicked! Quote Link to comment Share on other sites More sharing options...
RyanSilva Posted November 22, 2008 Author Share Posted November 22, 2008 Thanks JB! --------------------- Ok i got the dash template made and MEK glued to the dash, just gotta add filler and cover up the spaces to make it nice and pretty. It fits the curvature of the body. Quote Link to comment Share on other sites More sharing options...
RyanSilva Posted November 29, 2008 Author Share Posted November 29, 2008 I got the firewall in place..just need to trim it away and putty it up. Its getting closer to paint..Whats next is the bellhousing tunnel will need to be made in the firewall, so i can mock up the flathead. I have a problem though, the seats will not work, so I will use simple padded cushions on the floor.Because its channeled so much, and the angle of the steering wheel and the pedals, you would need to be a midget to drive it! Its ok..i can fine adjust the floor pan with spacers to gain more clearance. Plus cowl steering! Hosted on Fotki The grill was made by chopping off the forward portion of the stock fenders of the f100 and mocked at an angle then glued. The radiator is made from the 48 ford kit..I my as well use up most ofthe kit seeing i abortioned it. Hosted on Fotki Hosted on Fotki Hosted on Fotki Hosted on Fotki Quote Link to comment Share on other sites More sharing options...
Clay Posted November 29, 2008 Share Posted November 29, 2008 Thats looking more atty as you go! Good job!!! Quote Link to comment Share on other sites More sharing options...
walt francis Posted November 29, 2008 Share Posted November 29, 2008 Wow ! I just caught up with this project and I will have to keep an eye on this for further use in weathering, Keep up the great progress Quote Link to comment Share on other sites More sharing options...
Recommended Posts
Join the conversation
You can post now and register later. If you have an account, sign in now to post with your account.
Note: Your post will require moderator approval before it will be visible.