Wagoneer81 Posted July 30, 2013 Share Posted July 30, 2013 Just watch those pesky intake and exhaust lines crossing themselves!!And that, my friend, is why I'm using your pics as reference... ;^) Quote Link to comment Share on other sites More sharing options...
BigBad Posted July 31, 2013 Author Share Posted July 31, 2013 Well Alclad II claer coat doesn't mix well with Tamiya paint or the Modeltruckin' decals... I'm at the first coat, and the decals cracked and the paint turned blotchy. I had second thoughts on spraying a clear coat over this before doing it. Stay tuned for the second coat... Quote Link to comment Share on other sites More sharing options...
Wagoneer81 Posted August 1, 2013 Share Posted August 1, 2013 That's no good... I hope you can get it sorted out. Quote Link to comment Share on other sites More sharing options...
BigBad Posted August 1, 2013 Author Share Posted August 1, 2013 (edited) So, like I said, the cab is painted, decaled and cleared. The first coat was looking disastrous, I still went on with a second wet coat, left it to dry overnight. So the paint came back to be decent looking but the colors of the decals aren't much to look at anymore because of the cracking. The cracks won't show much in the pictures but they are very apparent up close. The cab looks ok, but it won't be doing any competition in shows. I'm considering buying another cab, paint it all white and apply some other blue and gold decals from Jbots. Then compare both and install the better one on this frame. Too bad, I really like the paint scheme on this version. Anyway, have a look, I think you'll still enjoy the pictures. If you can blow up the pictures you will be able to see the cracks in the black stripes. The angle I like best Rear flaps are printed paper from a computer file, then clear coated and painted on the other side to give them some protection and some thickness for realism. I probably should have painted the black and then white so light wouldn't go through them... Maybe next time. Looks pretty decent in this view: The diamond plate is there for mock-up, the hose support is not installed yet and I'm also planning a spare tire carrier right behind the exhaust brackets. Uploaded with ImageShack.us Edited August 1, 2013 by BigBad Quote Link to comment Share on other sites More sharing options...
Brinx Posted August 1, 2013 Share Posted August 1, 2013 That is one nice looking K! Quote Link to comment Share on other sites More sharing options...
jacobus Posted August 2, 2013 Share Posted August 2, 2013 robert its not possible to remove the striping whit out damage color is very nice its sad for this nice work jacobus Quote Link to comment Share on other sites More sharing options...
Wonderbread Kustomz Posted August 2, 2013 Share Posted August 2, 2013 I love it! Reminds me of the one my Dad use to drive when i was a kid Quote Link to comment Share on other sites More sharing options...
truckabilly Posted August 2, 2013 Share Posted August 2, 2013 It is very nice build indeed. I like the job you have done so far. The painting looks top class and no problem with the cracked decals in those pics. I like the scheme too. It is a good idea to paint the mud flaps black first. Make sure to do that next time. Keep on the good work. Quote Link to comment Share on other sites More sharing options...
charlie8575 Posted August 2, 2013 Share Posted August 2, 2013 Very nice-looking truck. The white with blue stripes is a beautiful combination. Charlie Larkin Quote Link to comment Share on other sites More sharing options...
Q tip Posted August 2, 2013 Share Posted August 2, 2013 sweet ride, are you going to use grab handle and steps from the aerodyne kit? cant wait to see it finished! Quote Link to comment Share on other sites More sharing options...
Jim B Posted August 3, 2013 Share Posted August 3, 2013 Looks really nice. Quote Link to comment Share on other sites More sharing options...
Truck parts Posted August 3, 2013 Share Posted August 3, 2013 That's a cool looking build. I use to drive one many years ago. Quote Link to comment Share on other sites More sharing options...
BigBad Posted August 3, 2013 Author Share Posted August 3, 2013 sweet ride, are you going to use grab handle and steps from the aerodyne kit? cant wait to see it finished! Actually I'll be using the parts from the Revell Aerodyne for patterns to make grab handles from aluminum rod, stay tuned for that... Quote Link to comment Share on other sites More sharing options...
BigBad Posted August 6, 2013 Author Share Posted August 6, 2013 (edited) A little more stuff has been done to this machine. I got my fuel tanks and they look great! They're installed on the truck on the kit's brackets. Had I decided on these tanks before starting the kit, I would have used the white metal brackets supplied with the tanks as they are vastly better... I'll use them with a 4 strap tank later on an other project... I stole 1/2 fenders from a revell Peterbilt "353" kit. and installed them too. the back-up light and tail lights are on the back of the frame as well. I added a spare Wheel carrier as the the real truck had one at the time. It's a little out of scale as the material I used was a little thick, I didn't have enough scrap photo etch material to buils a thinner rack... I think it's still ok as is. I am presently fiddling with the interior... I had to grind the bottom of the dog house in front to clear the radiator tank that I also ground down a bit for the same reason. The glass and the interior bucket are now installed in the cab and fitting ok. Next time, the cab will be installed and detailing will have started. Now some pics... Here are the the new added parts: great looking aluminum fuel tanks, half fenders, spare wheel carrier... Also the "hose tenna" not complete I need to put the hoses on. A better view of the spare carrier. I used a spare Italeri tire along with two rim backings glued together to make the... Well, rim... A nice view of one of those tanks... These come from MCA truck parts. They are polished and come complete with cast white metal brackets, black and chrome tape for the straps and a machined aluminum filler cap. As you have probably noticed, the finish at the ends is as machined and is flawless. I used CA glue to stick these on the brackets. Yes it did fog up the metal surface, but to my surprise, wiped off pretty easily, maybe because of the high polish. A view to show the machined end and the filler cap. A nice touch. MCA specializes in aluminum and metal parts for 1:24 and 1:25 scales and also the Tamiya 1:14 radio controlled trucks. Michael makes exhaust stands, fuel tanks, disc and spoke wheels, curved exhaust stack end stands, air horns... Lots of excellent stuff. Edited August 6, 2013 by BigBad Quote Link to comment Share on other sites More sharing options...
marcay Posted August 6, 2013 Share Posted August 6, 2013 it's look superbe RobertI restart My Revell W900 and I shall inspire on your WorkI'll try to make a classic daycab based on the Revell dumptruck whitout dump but a little tuning like personal exhaustThierry Quote Link to comment Share on other sites More sharing options...
truckabilly Posted August 6, 2013 Share Posted August 6, 2013 The chassis looks really great in the sun. Really nice to look at. Quote Link to comment Share on other sites More sharing options...
ap40rocktruck Posted August 6, 2013 Share Posted August 6, 2013 Fantastic classic ! looking forward to seeing this one completed. Ap40 Quote Link to comment Share on other sites More sharing options...
flat-top Posted August 6, 2013 Share Posted August 6, 2013 Very nice. great job on the K W . Quote Link to comment Share on other sites More sharing options...
ap40rocktruck Posted August 6, 2013 Share Posted August 6, 2013 (edited) See below.... Edited August 6, 2013 by ap40rocktruck Quote Link to comment Share on other sites More sharing options...
ap40rocktruck Posted August 6, 2013 Share Posted August 6, 2013 Attached is a photo of a resin cast pair of cab mounts for this kit, but these mount to the underside of the interior bucket so that the cab will tilt correctly & the end result is much stronger than the kits tiny originals which we all know are horrible to work with. Ap40 Quote Link to comment Share on other sites More sharing options...
BigBad Posted August 6, 2013 Author Share Posted August 6, 2013 Attached is a photo of a resin cast pair of cab mounts for this kit, but these mount to the underside of the interior bucket so that the cab will tilt correctly & the end result is much stronger than the kits tiny originals which we all know are horrible to work with. Ap40 Soooo right! The Revell K100 has a similar arrangement to what you're showing. I agree that it would look a lot better and be sturdier at the same time. I have got a lot of aftermarket stuff on this one and honestly, I think it's enough already for this one. AMT did a decent job with this truck, but they could have engineered some more locator pins and holes here and there, especially with the cab components... Man is this dashboard a pain to get aligned properly with the windshield. They could have put a more positive way to locate this on the interior tub. But then again, this one went pretty well for the majority of the build. Quote Link to comment Share on other sites More sharing options...
ap40rocktruck Posted August 6, 2013 Share Posted August 6, 2013 Soooo right! The Revell K100 has a similar arrangement to what you're showing. I agree that it would look a lot better and be sturdier at the same time. I have got a lot of aftermarket stuff on this one and honestly, I think it's enough already for this one. AMT did a decent job with this truck, but they could have engineered some more locator pins and holes here and there, especially with the cab components... Man is this dashboard a pain to get aligned properly with the windshield. They could have put a more positive way to locate this on the interior tub. But then again, this one went pretty well for the majority of the build. I cast these as I have more of the AMT Aerodyne kits than the RoG. LOL As for the rest of the old K-100 kit, it was a fantastic kit when it was new on the shelves, and now with a little bit of work it can be a great kit of today, just as you have done here. Great look all around. Ap40 Quote Link to comment Share on other sites More sharing options...
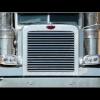
BigBad Posted August 7, 2013 Author Share Posted August 7, 2013 (edited) Alright! The cab is installed, door surrounds sleeper vent and wiper arms BMF'ed, front bumper, front cab handles, rear view mirrors, clearance lights, door handles MCA aluminum air horns, photo etch Kenworth nametags, sun visor... Still have some other details to add though, the grab handles are mostly complete except for the mounting brackets. I was aiming at making a 1976 truck, so I got rid of the upper door handles and changed the grab handles for long dual ones with integrated steps. I used door handles from a generic photo etch tree. I they look wrong, not the right shape and they're too wide. but that's the closest I could get with what I had. The trailer connections are not on yet. I'll add some license and other detail decals. I'm on the last stretch. Here are some pictures to show: Here is a view showing the very nice MCA horns, one peice plus the stands, no parting lines! Available with bug covers or open : In this build I used a lot of custom parts made of metal, resin and photo etch. I'm very happy with them, they are of very high quality and set off the model nicely. It's my first experience with photo etch and I will be using custom parts for all my next builds. In this view you can clearly see the cracks in the decal stripes that happened with the clearcoat application... You can also see I used the gullwing bumper from the Revell snap Aerodyne Kenworth W900. In this view, you can clearly see that the door handle is wrong... The Kenworth name tag is very nice though. Overall still looking pretty good in spite of the little defects here and there. Not show material in my opinion, but I like it and it will fit nicely in my collection. Edited August 7, 2013 by BigBad Quote Link to comment Share on other sites More sharing options...
BigBad Posted August 7, 2013 Author Share Posted August 7, 2013 I cast these as I have more of the AMT Aerodyne kits than the RoG. LOL As for the rest of the old K-100 kit, it was a fantastic kit when it was new on the shelves, and now with a little bit of work it can be a great kit of today, just as you have done here. Great look all around. Ap40 Thanks for the tips and also for the compliments Richard and all my forum friends, it's appreciated! Quote Link to comment Share on other sites More sharing options...
KJ790 Posted August 7, 2013 Share Posted August 7, 2013 That looks great! how did you get the red in the KW logo on the grille? Quote Link to comment Share on other sites More sharing options...
Recommended Posts
Join the conversation
You can post now and register later. If you have an account, sign in now to post with your account.
Note: Your post will require moderator approval before it will be visible.