Lownslow Posted December 10, 2010 Share Posted December 10, 2010 its my first 2 part mold Quote Link to comment Share on other sites More sharing options...
Longbox55 Posted December 10, 2010 Share Posted December 10, 2010 Looks right to me, but I freely admit to not being an expert on moldmaking. Quote Link to comment Share on other sites More sharing options...
Lownslow Posted December 10, 2010 Author Share Posted December 10, 2010 Looks right to me, but I freely admit to not being an expert on moldmaking. me neither but the wheel behind the spokes is pretty well sealed with glue and tape Quote Link to comment Share on other sites More sharing options...
Danno Posted December 10, 2010 Share Posted December 10, 2010 Looks right, but the proof is in the pudding ... or, more accurately, the proof will show up when you pour resin the first time. Just make sure you have sufficient depth above the part to provide for a thick enough mold that it won't collapse or get distorted by the poured resin. Good luck! Quote Link to comment Share on other sites More sharing options...
shucky Posted December 10, 2010 Share Posted December 10, 2010 If you dont mind a lil advice ... I would put another "key" (locating hole) in the upper right of the mold and move the blue tubes you have there for venting/pouring closer together towards the top of the wheel. You could remove the blue tubes all together and carve your pour/vent channels after the mold is complete with a sharp Xacto. Also, thats a very intricate wheel design with very many thin area's. I hope you have the area behind the spokes completely sealed against clay or something, otherwise you wont get the wheel back out w/out cutting behind every spoke. Quote Link to comment Share on other sites More sharing options...
RyanSilva Posted December 10, 2010 Share Posted December 10, 2010 Add more key holes, you can never really have enough, even if there the size of a pencil eraser, just make a few more, the better the mold locks into place the better. And like shucky said, move that vent closer to the fill port. Usually if your vent hole is lower than the fill port, the mold itself has a tough time filling up to the top. Quote Link to comment Share on other sites More sharing options...
Lownslow Posted December 10, 2010 Author Share Posted December 10, 2010 If you dont mind a lil advice ... I would put another "key" (locating hole) in the upper right of the mold and move the blue tubes you have there for venting/pouring closer together towards the top of the wheel. You could remove the blue tubes all together and carve your pour/vent channels after the mold is complete with a sharp Xacto. Also, thats a very intricate wheel design with very many thin area's. I hope you have the area behind the spokes completely sealed against clay or something, otherwise you wont get the wheel back out w/out cutting behind every spoke. i added another key in the upper right but the vents stayed someone in another forum said something about a bottom fill mold with the vent up top but the thing looked like it took up a lot of space with little room for keys Add more key holes, you can never really have enough, even if there the size of a pencil eraser, just make a few more, the better the mold locks into place the better. And like shucky said, move that vent closer to the fill port. Usually if your vent hole is lower than the fill port, the mold itself has a tough time filling up to the top. too late, Quote Link to comment Share on other sites More sharing options...
shucky Posted December 10, 2010 Share Posted December 10, 2010 Just as Ryan mentioned, you may have trouble filling the mold with the vent lower than the pour hole. If it fills, in between these 2 tubes is where you'll most likely wind up with a bubble. I try to keep my pour/vent holes (on the inner part of the mold, where the void that your trying to fill up with resin) within 1/32 of an inch of each other. Quote Link to comment Share on other sites More sharing options...
Lownslow Posted December 10, 2010 Author Share Posted December 10, 2010 Just as Ryan mentioned, you may have trouble filling the mold with the vent lower than the pour hole. If it fills, in between these 2 tubes is where you'll most likely wind up with a bubble. I try to keep my pour/vent holes (on the inner part of the mold, where the void that your trying to fill up with resin) within 1/32 of an inch of each other. i thought the top was supposed to be the vent? its cool its not at the face of the wheel i can always remold without the vents and add them later. nobody here post pictures of molds so im still confused about the vent and filler stuff. Quote Link to comment Share on other sites More sharing options...
shucky Posted December 11, 2010 Share Posted December 11, 2010 i thought the top was supposed to be the vent? its cool its not at the face of the wheel i can always remold without the vents and add them later. nobody here post pictures of molds so im still confused about the vent and filler stuff. Sometimes where you think the pour/vent holes are supposed to go doesn't always wind up that way. Sometimes it is trial and error (plus some good old fashioned experience) lol. I will snap a couple pics tomorrow for you of a couple two piece molds. It's hard for me at least to say one way or another where exactly the pour and vent holes should go. It's not exact science and can vary by specific part/mold your working with. It's just been my experience thus far that these holes / channels need to be VERY close to each other to avoid filling problems and giant bubbles. Perhaps it's just because of the items I've been working with, I don't know, but that's been my experience so far. Quote Link to comment Share on other sites More sharing options...
old-hermit Posted December 11, 2010 Share Posted December 11, 2010 I don't want to burst your bubble but ... (you knew it was coming) ... by the looks of it, rubber will fill the void between the front & rear spokes and you'll never get the master out without destroying the mold and the master. I'm not saying it can't be done but it's next to impossible to resin cast a one piece wire wheel. I've tried. Quote Link to comment Share on other sites More sharing options...
dannyi Posted December 11, 2010 Share Posted December 11, 2010 ..this may help with the fill and vent holes. Everybody does this their own way I suppose but this is what I try to do. I try to thing of resin as water going through plumbing. You what to direct the flow. When you design your mold, imagine the resin going in and the air going out. You have to set it up so all the air can escape. Gravity is at work here too. Here's a couple of simple 2 piece molds. Notice in the second pic I put an extra vent tube in the 'Y' pipe. Quote Link to comment Share on other sites More sharing options...
ian ashton Posted December 11, 2010 Share Posted December 11, 2010 ..this may help with the fill and vent holes. Everybody does this their own way I suppose but this is what I try to do. I try to thing of resin as water going through plumbing. You what to direct the flow. When you design your mold, imagine the resin going in and the air going out. You have to set it up so all the air can escape. Gravity is at work here too. Here's a couple of simple 2 piece molds. Notice in the second pic I put an extra vent tube in the 'Y' pipe. http://i292.photobucket.com/albums/mm3/dioman54/MISCPICS/085.jpg http://i292.photobucket.com/albums/mm3/dioman54/MISCPICS/084.jpg I LIKE THIS A LOT! Quote Link to comment Share on other sites More sharing options...
jeffb Posted December 11, 2010 Share Posted December 11, 2010 fill low, vent high.. Quote Link to comment Share on other sites More sharing options...
Lownslow Posted December 12, 2010 Author Share Posted December 12, 2010 ..this may help with the fill and vent holes. Everybody does this their own way I suppose but this is what I try to do. I try to thing of resin as water going through plumbing. You what to direct the flow. When you design your mold, imagine the resin going in and the air going out. You have to set it up so all the air can escape. Gravity is at work here too. Here's a couple of simple 2 piece molds. Notice in the second pic I put an extra vent tube in the 'Y' pipe. thanks this helped whats a good size fill "tunnel" i used old styrene tree rods what ive seen someone else posted their mold that his fills from one end of the mold via tunnel from the bottom then vents out the top would this work. btw those skeptical about the spokes the wheel is and flat glue sealed Quote Link to comment Share on other sites More sharing options...
Mike Kucaba Posted December 12, 2010 Share Posted December 12, 2010 thanks this helped whats a good size fill "tunnel" i used old styrene tree rods what ive seen someone else posted their mold that his fills from one end of the mold via tunnel from the bottom then vents out the top would this work. btw those skeptical about the spokes the wheel is and flat glue sealed Golf tees(get them in a bag at any sports counter) make great pour/vent tunnels. Quote Link to comment Share on other sites More sharing options...
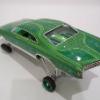
Lownslow Posted December 12, 2010 Author Share Posted December 12, 2010 they came out good Quote Link to comment Share on other sites More sharing options...
mikemodeler Posted December 12, 2010 Share Posted December 12, 2010 Nice job on that first resin cast project! Looks like a little clean up and some Alcad and you will have a set of wire wheels! Quote Link to comment Share on other sites More sharing options...
Recommended Posts
Join the conversation
You can post now and register later. If you have an account, sign in now to post with your account.
Note: Your post will require moderator approval before it will be visible.