Mopar - D Posted March 26, 2014 Share Posted March 26, 2014 Keep it coming John it keeps getting better. Quote Link to comment Share on other sites More sharing options...
FASTBACK340 Posted April 6, 2014 Author Share Posted April 6, 2014 OK…. I've been as busy as a one-armed wallpaper hanger. Work has become late nights on a daily basis. Fun late nights, but my spare time has been totally shot. I went in today for 9 hours…… but that's just not reason enough for slacking off on this build. I'm doing exactly what I hate seeing on forums: Projects dropping dead in mid-build. I apologize ….. Tonight I spent the night in the recliner, but I was scribing all the panels and trim on the body. A few more details and we block it out and drop on some primer. I'm not leaving the house tomorrow and will get some progress. NNL East is weeks away…… BTW: Trumpeter sells a VERY nice panel scriber for about $8. Money well-spent. I was able to scribe bare-metal channels next to the trunk trim on the `Cuda's deck lid. The actual piece on my 1:1 car is about 5/8". In scale it's SMALL and this tool made the scribing a breeze. I highly recommend it! Quote Link to comment Share on other sites More sharing options...
Custom Mike Posted April 6, 2014 Share Posted April 6, 2014 John, I've been using that same Trumpeter scriber for a few years now, and I have to agree, it is the best tool I've ever bought! I used it on my Barracuda to deepen the panel lines, window trim, and add the missing trim under the tail light housing. It makes fixing trim issues a breeze, doesn't it? And the best part is, it won't bend under pressure like the old Micro-Mark scriber, I ruined a bunch of those babies over the last ten years! Quote Link to comment Share on other sites More sharing options...
FASTBACK340 Posted April 6, 2014 Author Share Posted April 6, 2014 The ergonomics of the handle and curved THIN blade is a pleasure to use. That's why I'm re-scribing all the trim so I can bare metal and have a crisp line. It's very accurate. Quote Link to comment Share on other sites More sharing options...
Dogfish_7 Posted April 6, 2014 Share Posted April 6, 2014 Really fun to watch! Learning allot here. Quote Link to comment Share on other sites More sharing options...
Jeremy Jon Posted April 6, 2014 Share Posted April 6, 2014 Really fantastic workmanship John, nicely done!! That Ross resin engine is unreal !! Quote Link to comment Share on other sites More sharing options...
FASTBACK340 Posted April 6, 2014 Author Share Posted April 6, 2014 Bruce & Jeremy, thank you. I was fully immersed with this project and I changed jobs, which unknowingly ate into my spare time. Some nights we're finishing dinner at 8:30, by the time you get cleaned up and prepare for the next morning, the night is shot….. I'm hoping to get some noteworthy progress done today. I want to wrap this up soon, as NNL East was to be it's debut. Quote Link to comment Share on other sites More sharing options...
72 Charger Posted April 6, 2014 Share Posted April 6, 2014 John keep going its great . Do you know of anyone selling those scribers in the UK ? Quote Link to comment Share on other sites More sharing options...
FASTBACK340 Posted April 6, 2014 Author Share Posted April 6, 2014 John keep going its great . Do you know of anyone selling those scribers in the UK ? I bought mine from Omni Models off of e-Bay. It was $8.29 + $1.99 shipping in the US. Here's a current auction you can contact about shipping. http://www.ebay.com/itm/NEW-Trumpeter-Panel-Engraver-Tool-Blister-Carded-09912-NIB-/331146099451?pt=US_Hand_Tools&hash=item4d19d87afb Quote Link to comment Share on other sites More sharing options...
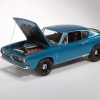
FASTBACK340 Posted April 11, 2014 Author Share Posted April 11, 2014 I had strained my neck and I've been a bit uncomfortable recently. I have been seeing a Chiropractor and it's been helping. I've had 2 visits in the last 2 weeks and the difference is amazing….. so much so, I spent the evening at the bench last night. I finished up all the scribing and panel mods and figured I'd share what I did. A pet peeve of mine is seeing a car with a mile-deep paint job with no panel definition or trim crispness. I've seen cover-cars that were door-slammers with no door lines!!!!! C`mon…. we can do better. I start by re-scribing every panel on the body, including adding the ones omitted in the initial mastering of the production molds. If the panel opens, I cut through the edge, as if I was cutting the panel free. I use the very base of the Xacto blade itself near the handle. It's incredibly sharp, yet broad enough to leave a delicate slice. Here's a view of the trunk lid opening and the trim & tail light bezels. This will all be foiled later, so by gently scribing now two things happen: I back-wash the seems for definition before paint, and it gives a nice, crisp channel to slide a blade when trimming bare metal foil. And if you roach-it, it's easier to fix BEFORE paint. Don't forget those front fenders bold on…. cut a gap, but leave the trim as it bridges the rocker panel and fender on the 1:1. Obviously I know first hand every intimate detail of this particular car, but it's these little details that bring it to the next level, but are just a little more work in the prep. If your going to foil, why not cut a groove now, before paint… that will make it easier once it IS painted. Plus the back-wash will give just a hint of a shadow in that narrow space. Those rocker panel trim pieces will look like separate pieces when it's done. And don't forget the window trim. On this particular application, there is a thick rubber gasket on either side of the window trim. If you scribe a deep, but slightly wider channel and apply the backwash after paint, it will look like the rubber seal. Take a black Sharpie to the inside edge of the window opening and you now have in-scale windshield trim with proper gasket shadowing on both sides. One last thing. Look at this wheel opening, the thickness of the fender itself. In real-world dimensions that's about 3". I take the back edge of an Xacto and gently scrape the edge off and roll it around. Don't go too far or you'll ruin the opening. Hit it with a Sharpie so it's easier to see what your scraping off. This is what you'd want it to look like. I've also decided to drill out the marker lights and use aluminum tubing and plastic lenses. It'll look more realistic. It should be in paint by Sunday. To be continued….. Quote Link to comment Share on other sites More sharing options...
Ramfins59 Posted April 11, 2014 Share Posted April 11, 2014 That is looking soooo sharp John. I can't wait to see it in person at the NNL. See you there buddy. Quote Link to comment Share on other sites More sharing options...
Mopar - D Posted April 11, 2014 Share Posted April 11, 2014 John nice progress and thanks for your tips on the panel lines Quote Link to comment Share on other sites More sharing options...
1 bad55 stan Posted April 11, 2014 Share Posted April 11, 2014 Very cool John,U r da Man ... Quote Link to comment Share on other sites More sharing options...
charlie8575 Posted April 11, 2014 Share Posted April 11, 2014 John, I'm very impressed with the chassis detail you've done. The rest of the build is looking good, too. I'm hoping to see this at NNL, even if it's on the WIP table. Charlie Larkin Quote Link to comment Share on other sites More sharing options...
72 Charger Posted April 11, 2014 Share Posted April 11, 2014 John thanks for the link for the scriber . I like the idea about the marker lights too ,we will be needing lots of pics of that prosess Quote Link to comment Share on other sites More sharing options...
blunc Posted April 11, 2014 Share Posted April 11, 2014 great tips on scribing. I like your standard for details. Quote Link to comment Share on other sites More sharing options...
10thumbs Posted April 11, 2014 Share Posted April 11, 2014 Hi John, good info about the panel lines. You're doing thorough prep work. Hey, about the thickness of the fenders. Maybe you misunderstand. 3 inches of steel....that's just Ma Mopars idea about being bulletproof. 3 inches of steel....Obama and his ride won't even come close. Michael Quote Link to comment Share on other sites More sharing options...
Tom Geiger Posted April 11, 2014 Share Posted April 11, 2014 Interesting work and thoughts John! A lot of modelers don't realize that there are panel lines omitted from kits, mainly the fender edges at the rocker and panel between the hood and windshield (I forget the name of that right now, no doubt I'll remember as soon as I post). I always wondered why they didn't do these lines, then I recently was looking at a Chevette brochure for details on the one I'm building and it seems that Chevy airbrushed those lines away! Probably for a cleaner look in the brochure. And automakers probably told the model companies not to put them on the promos. The Chevette photos also deleted the antenna. So you can't go by the brochures for details. John is lucky enough to have a 1:1 in his driveway, but at least find some pictures of the real cars on the Internet for reference. John, you also mentioned the detail around the front and rear glass on Mopars of that era. I had many of them in my Valiants and Barracudas. Basically it's a thin mylar chrome strip that sits in the black gasket to hold it in place. Many of mine had aged and lost the chrome covering. On my first '66 Valiant, I actually painted the then beige and crummy mylar flat black. Later I noticed that someone discovered it was the same (or close enuf!) as that on later Chevy pickups. And I'm sure the aftermarket has figured that out today. So it is a challenge to model that detail. Keep going on this project and I'll see you and Amy in a few weeks! Quote Link to comment Share on other sites More sharing options...
Skypower Posted April 11, 2014 Share Posted April 11, 2014 Looks great John thanks again for showing us how to do things, I learn so much from your builds. Quote Link to comment Share on other sites More sharing options...
om617 Posted April 11, 2014 Share Posted April 11, 2014 Looks great John thanks again for showing us how to do things, I learn so much from your builds. X2 Will be getting this scriber. Quote Link to comment Share on other sites More sharing options...
Ron Hamilton Posted April 12, 2014 Share Posted April 12, 2014 You do nice work John. Quote Link to comment Share on other sites More sharing options...
FASTBACK340 Posted April 12, 2014 Author Share Posted April 12, 2014 Thank you everyone, I appreciate the encouraging replies. Back in `06 when the actual car was being reassembled after the bodywork was completed I chronicled the build on-line. Back then I was a Moderator over at For A Body's Only, obviously an A body specific Mopar site. I had a running thread called `Cuda Capers that went on for over 2 years…… Everything I did to that car was posted on-line and documented in my Fotki album: http://public.fotki.com/FASTBACK340/barracuda_stuff/ Now the pressure is on…. and I thrive on a challenge. I had some down time due to not feeling well and long hours at the new job (which absolutely rocks!) and I backed-off on the build. Now we get cracking on this puppy. Quote Link to comment Share on other sites More sharing options...
Mopar - D Posted April 12, 2014 Share Posted April 12, 2014 John thanks for sharing your link to your restoration on your Cuda. Looking for ward to your updates this week end. Quote Link to comment Share on other sites More sharing options...
FASTBACK340 Posted April 12, 2014 Author Share Posted April 12, 2014 John thanks for sharing your link to your restoration on your Cuda. I was scrolling through the album and what really struck me as amusing was seeing how ratty my yard was before we renovated the house & property. Quote Link to comment Share on other sites More sharing options...
Mopar - D Posted April 12, 2014 Share Posted April 12, 2014 Great before and after pictures. Quote Link to comment Share on other sites More sharing options...
Recommended Posts
Join the conversation
You can post now and register later. If you have an account, sign in now to post with your account.
Note: Your post will require moderator approval before it will be visible.