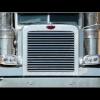
BigBad Posted July 27, 2013 Share Posted July 27, 2013 (edited) Well this is my anual truck build. I chose to build a truck from the memories of my youthful days... I used to hang out with my friends at a BP garage of one of my friend's dad. A broker used to park his K100 on the lot behind that garage. It had the "Salem" (BJ and the Bear...) paint scheme in blue and white. I remember it had a Cummins, 6 spoke wheels in the back, aluminum discs in front, dual exhaust, half rear fenders, the gullwing front bumper had "Mich Inc" in a half-round on the doors. A rather common sight in the day, since I want to reproduce what I usually see on the road, I thought this one was a natural. So here goes for the description: I'm using the steering metal front axle, the resin front disc wheels and mufflers from KFS. The rear wheels are from Auslowe with pressure buttons for the baby moons and A&N Michelin XDY traction tires. I'll be using the rear fenders from the RoG Peterbilt kit, I patterned grab handles from the RoG Kenworth K100 (still need work... but coming along.) I added some wiring and tubing to the Cummins and also for the brakes. I'm using automotive Ford metallic blue for the main color and will be using tamiya "pure white" for trim. I have some stripe decals from Scale truckin and photoetch door handles from KFS to complete the cab. I'm waiting for polished aluminum fuel tanks to come in from MCA trucks to complete the model. Now the pictures: I installed the grill with the cab pivots at this point because the pivot pins are really tight and i didn't want to fight this with the full cab weight on the pivots at the end of the build. We'll see if this plan works properly later... Here, you can see the front Wheel flaps that I made from printer paper and kenworth logos from the internet. I painted the rear of the flap with flat white tamiya spray paint and flat clear coated the front for some more thickness and protection. The thread on the A&N tires look really good, there is some flash to remove from the inner diameter and from the outside as well but it cleans up nicely. i find the sidewall a little too slab sided but they look ok once installed on the rim... Go figure. A nice view of the Auslowe spoke wheels, These are two piece, the spider and the rim. I ground off the center détails of the spider in order to stick the baby moon properly on the hub. I painted the nuts silver to add more pizzazz. These wheels are very well detailed to start with fit together nicely with minimal fuss. I also have a set of similar spoke wheels from KFS and are very similar. I'd say the KFS units are slightly better quality for finish. But these are excellent still. Since I like my models to roll, all the wheels on this model rotate. I installed aluminum tubing inserts in the hubs to match the AMT metal axles. The front Wheel setup is exactly the same as the italeri kits. One thing that is unfortunate is that nobody sells the Italeri type hub covers to lock the front wheel on the hub... Too bad! i had to steal some from my other kits. A view of the photo etch exhaust shield, I'm not too familiar with this material yet, these are pretty stiff to roll. I have the tool to shape them, but it still take some work to get them to roll small enough. This exhaust kit has the aluminum tubing for the stack, the P-E shields and the P-E brackets, 2 resin mufflers and summary injstruction. The shields look really good once installed and you can order these with logos or plain. They all have round cooling holes though. Ok for Kenworth, but probably not for all trucks. Ah yes, the KFS front disc wheels... These are very well detailed, so much so, that there is thread detail on the studs. No kidding! I put some bare metal foil on the intake tubing. I'll have to fill in the kink at the joint here, these are pretty difficult to line-up if you're not careful... I had a little more success with the exhaust and intake on the left side though. Watch this when you're building an AMT Kenworth. So this is where I'm at right now, I am working on the painting the cab at the moment. More pics to come soon. Uploaded with ImageShack.us Edited July 27, 2013 by BigBad Quote Link to comment Share on other sites More sharing options...
Mack_Mechanic Posted July 27, 2013 Share Posted July 27, 2013 Looks like your off to a great start!I have a soft spot for the old cabovers,I'm a truck mechanic and started my wrenching career on Freightliner cabovers with big cam 400s. Quote Link to comment Share on other sites More sharing options...
mackinac359 Posted July 27, 2013 Share Posted July 27, 2013 Looking good with those spokes! Tim Quote Link to comment Share on other sites More sharing options...
marcay Posted July 27, 2013 Share Posted July 27, 2013 super boulot Robertwhat a job!!! Quote Link to comment Share on other sites More sharing options...
Q tip Posted July 27, 2013 Share Posted July 27, 2013 my dad worked on trucks back in the 70's before driving so I grew up in what was then a white freightliner dealer. used to play in those old cabovers , yours "fit the bill" of what I remember. cant wait to see the cab. great work !!!!!!! Q Quote Link to comment Share on other sites More sharing options...
Jim B Posted July 28, 2013 Share Posted July 28, 2013 (edited) Your frame looks really nice. I like the rear spokes with the front disks. Very East Coast 1970s. Heck, very East Coast now! Edited July 28, 2013 by Jim B Quote Link to comment Share on other sites More sharing options...
Swamp Dog Posted July 28, 2013 Share Posted July 28, 2013 that's really looking good.. Quote Link to comment Share on other sites More sharing options...
mackd Posted July 28, 2013 Share Posted July 28, 2013 Very beautiful assembly,I like the look.Or do you have to buy the tires backs?I find them super.Alain Quote Link to comment Share on other sites More sharing options...
BigBad Posted July 28, 2013 Author Share Posted July 28, 2013 Very beautiful assembly,I like the look.Or do you have to buy the tires backs?I find them super. Alain Salut Alain, yes I bought the rear tires from A&N trucks in Russia of all places! They sell all kinds of aftermarket parts and also some trans-kits based on italeri kits. They are molded in rubberized resin. Also, they are molded for bigger 1:24 rims like the ones from Italeri, not the AMT or most other Revell rims, unless they're 1:24th scale! Thanks for the comment! Quote Link to comment Share on other sites More sharing options...
baloney Posted July 28, 2013 Share Posted July 28, 2013 Your frame looks really nice. I like the rear spokes with the front disks. Very East Coast 1970s. Heck, very East Coast now! +1 Quote Link to comment Share on other sites More sharing options...
redneckrodder Posted July 29, 2013 Share Posted July 29, 2013 I have the soft spot for these old cabovers too but I wasn't around to see em on the roads Quote Link to comment Share on other sites More sharing options...
redneckrodder Posted July 29, 2013 Share Posted July 29, 2013 is it an aerodyne truck or flattop Quote Link to comment Share on other sites More sharing options...
BigBad Posted July 29, 2013 Author Share Posted July 29, 2013 is it an aerodyne truck or flattop It's an AMT short sleeper cab 86" with the flat top. I see a couple running up and down the roads around here once in a while, I get to see the latest Freightliner Argosy more, but I also see a bright yellow customized Kenny K100 Aerodyne with square headlights so it probably is a K100E and also an older Freightliner FLB. There is one guy who owns a GMC Astro around here but it looks like it's his toy more than a work truck, he uses it to go to shows and truck drag races. It still is in pretty decent shape. Quote Link to comment Share on other sites More sharing options...
BigBad Posted July 29, 2013 Author Share Posted July 29, 2013 Thanks for the kind words guys! So, I'm trying to figure out how to make the Salem (BJ and the Bear type) stripes on this thing without making a mistake. The white paint is applied already, I haven't wet sanded it or polished it yet. Now I need to mask the cab so I can apply the blue paint I'm looking at the decal stripes that I got to trim and separate the colors. I'm shooting the cab with Tamiya spray paint that I got out of the cans into my airbrush to have better control on the paint thickness and how much is going on the surfaces. I'm thinking of using a paper copy of the decals scanned on the computer to act as a template to get an idea of where to apply the masking tape. I have done this before so I shouldn't worry too much but I know it might not be foolproof. I'll be using the Tamiya narrow masking tape for the edges and mask the rest with regular painter's tape. I'm thinking by applying really thin coats the paint might not bleed onto the white paint, but then again I could be wrong. Your comment are welcome for this too!!! Quote Link to comment Share on other sites More sharing options...
Wagoneer81 Posted July 29, 2013 Share Posted July 29, 2013 (edited) BigBad! I'm working on a box-stock build of this same kit, as we speak. I love the changes and the aftermarket parts you're using. I look forward to seeing this one completed!Two-Tone painting TIP: To keep the red from bleeding under the tape onto the white: Once you get the second color masked, seal the edges of the tape by spraying the first color again, in this case white. Once that has flashed, go ahead and spray the red. The reason is this; If there is bleed-under, it'll be that coat of white that does it. No worries since that's the color you're trying to protect. The white seals the edge of the tape and keeps the red from bleeding under the tape. I use this technique on all my two-tone jobs and it hasn't failed me yet. Edited July 29, 2013 by Wagoneer81 Quote Link to comment Share on other sites More sharing options...
BigBad Posted July 29, 2013 Author Share Posted July 29, 2013 (edited) Thanks for the tip Chris! I went ahead with my old ways, but next time I'll try your technique. The cab is out of the paint booth... And everything went better than planned! 2 coats of Alclad II white primer, followed by 3 coats of Tamiya pure white then masked with Tamiya masking tape (excellent stuff!!!) to apply the metallic blue, again Tamiya from a spray can into the airbrush with 3 light coats and a nice wet 4th coat. (I cheated with the blue as I used automotive spray paint for the frame) and I was not too sure of how this paint would react with the Tamiya paint under it... So I matched the Tamiya metallic blue to the frame color. I was a little concerned with the second color seeping onto the white, as you can see, I have some, but it's really minor! The defects will be hidden with the decals anyway. It's nice to work with quality products. I'm almost ready to apply the stripe decals... These pics show a mock-up of the cab on the frame so it will look a little crooked... The interior is not quite ready for install yet. The visor will need another coat of blue... These are the stripes I got from Modeltruckin, not the color I wanted but still nice, so I order another set with gold pinstripes... I got these with the gold pinstripes, but notice the offset of the black and the gold. So, I guess I'll use the silver ones... This is the second time this happened to me with their decals. So watch for this defect if you get some. Uploaded with [url=http://imageshack.us] Edited July 29, 2013 by BigBad Quote Link to comment Share on other sites More sharing options...
redneckrodder Posted July 29, 2013 Share Posted July 29, 2013 ohhhh man need to go pick me up an amazon gift card so I can order this one just sweet what are the front tires from what trailer is going behind it or is there not going to be one behind it Quote Link to comment Share on other sites More sharing options...
BigBad Posted July 30, 2013 Author Share Posted July 30, 2013 ohhhh man need to go pick me up an amazon gift card so I can order this one just sweet what are the front tires from what trailer is going behind it or is there not going to be one behind it Thanks Jim! All the rims are made to go on a 1:24 th scale Italeri truck kit. The front tires are from Italeri, they are really nice as they are the closest thing to rubber tires as I've seen yet except for some from Revell. The truck I'm basing myself on used to pull a flatbed full of 2x4's. So I have a Fruehauf 40' flatbed lined-up for it. It will be pretty much box-stock except for some brake lines I'm not too sure I'm going to load it up though. Trailer is going to be assorted to the tractor, with a blue platform and blue and white wheels with white mud flaps. Quote Link to comment Share on other sites More sharing options...
mackd Posted July 30, 2013 Share Posted July 30, 2013 Hi Robert,the painting is very successful.J've noticed a small detail on cab.The wippers are molded to the cab of the kit,it removes realistic according me.J know it's too late for modify.Me remove them and made in styrenne.I like what I see. Alain Quote Link to comment Share on other sites More sharing options...
Wagoneer81 Posted July 30, 2013 Share Posted July 30, 2013 Looking great! I've got the BJ and The Bear set... I'll be using just the stripes out of it for mine... I went with Testors Sapphire Blue in the little 1/4 oz. bottle and Testors Steel with a dark insignia blue frame... I started it last week. Great minds DO think alike, Robert! If our trucks don't look like brothers, they'll definitely be cousins... ;^) Quote Link to comment Share on other sites More sharing options...
BigBad Posted July 30, 2013 Author Share Posted July 30, 2013 Hi Robert,the painting is very successful.J've noticed a small detail on cab.The wippers are molded to the cab of the kit,it removes realistic according me.J know it's too late for modify.Me remove them and made in styrenne.I like what I see. Alain Thanks for pointing this out Alain. Unfortunately you're right, it is a bit late to fix this. But rest assured, next build is going to be even better than this one... I have a whole lot of photo etch parts in my bin, just not for this one... Quote Link to comment Share on other sites More sharing options...
BigBad Posted July 30, 2013 Author Share Posted July 30, 2013 Looking great! I've got the BJ and The Bear set... I'll be using just the stripes out of it for mine... I went with Testors Sapphire Blue in the little 1/4 oz. bottle and Testors Steel with a dark insignia blue frame... I started it last week. Great minds DO think alike, Robert! If our trucks don't look like brothers, they'll definitely be cousins... ;^) Really! That's pretty cool! Actually I can,t wait to see mine finished, so I can't wait to also see yours too! have fun building it! Just watch those pesky intake and exhaust lines crossing themselves!! Quote Link to comment Share on other sites More sharing options...
kilrathy10 Posted July 30, 2013 Share Posted July 30, 2013 Looks pretty awesome, Man....Pretty awesome.... Quote Link to comment Share on other sites More sharing options...
jacobus Posted July 30, 2013 Share Posted July 30, 2013 its looks very very nice i like the the colors and the wheels tyres i have seen from a&n and yes , the are very nice and the pe work you have need very little fingers [ tweezer work ] follow this clean build jacobus Quote Link to comment Share on other sites More sharing options...
ewaskew Posted July 30, 2013 Share Posted July 30, 2013 Very good looking KW Did you spray some clear on after you taped it off before you sprayed your paint for the two tone? If not on the next one you can do that before painting the second color and it helps prevent bleeding on to the other color. Quote Link to comment Share on other sites More sharing options...
Recommended Posts
Join the conversation
You can post now and register later. If you have an account, sign in now to post with your account.
Note: Your post will require moderator approval before it will be visible.