dmk
-
Posts
184 -
Joined
-
Last visited
Content Type
Profiles
Forums
Events
Gallery
Everything posted by dmk
-
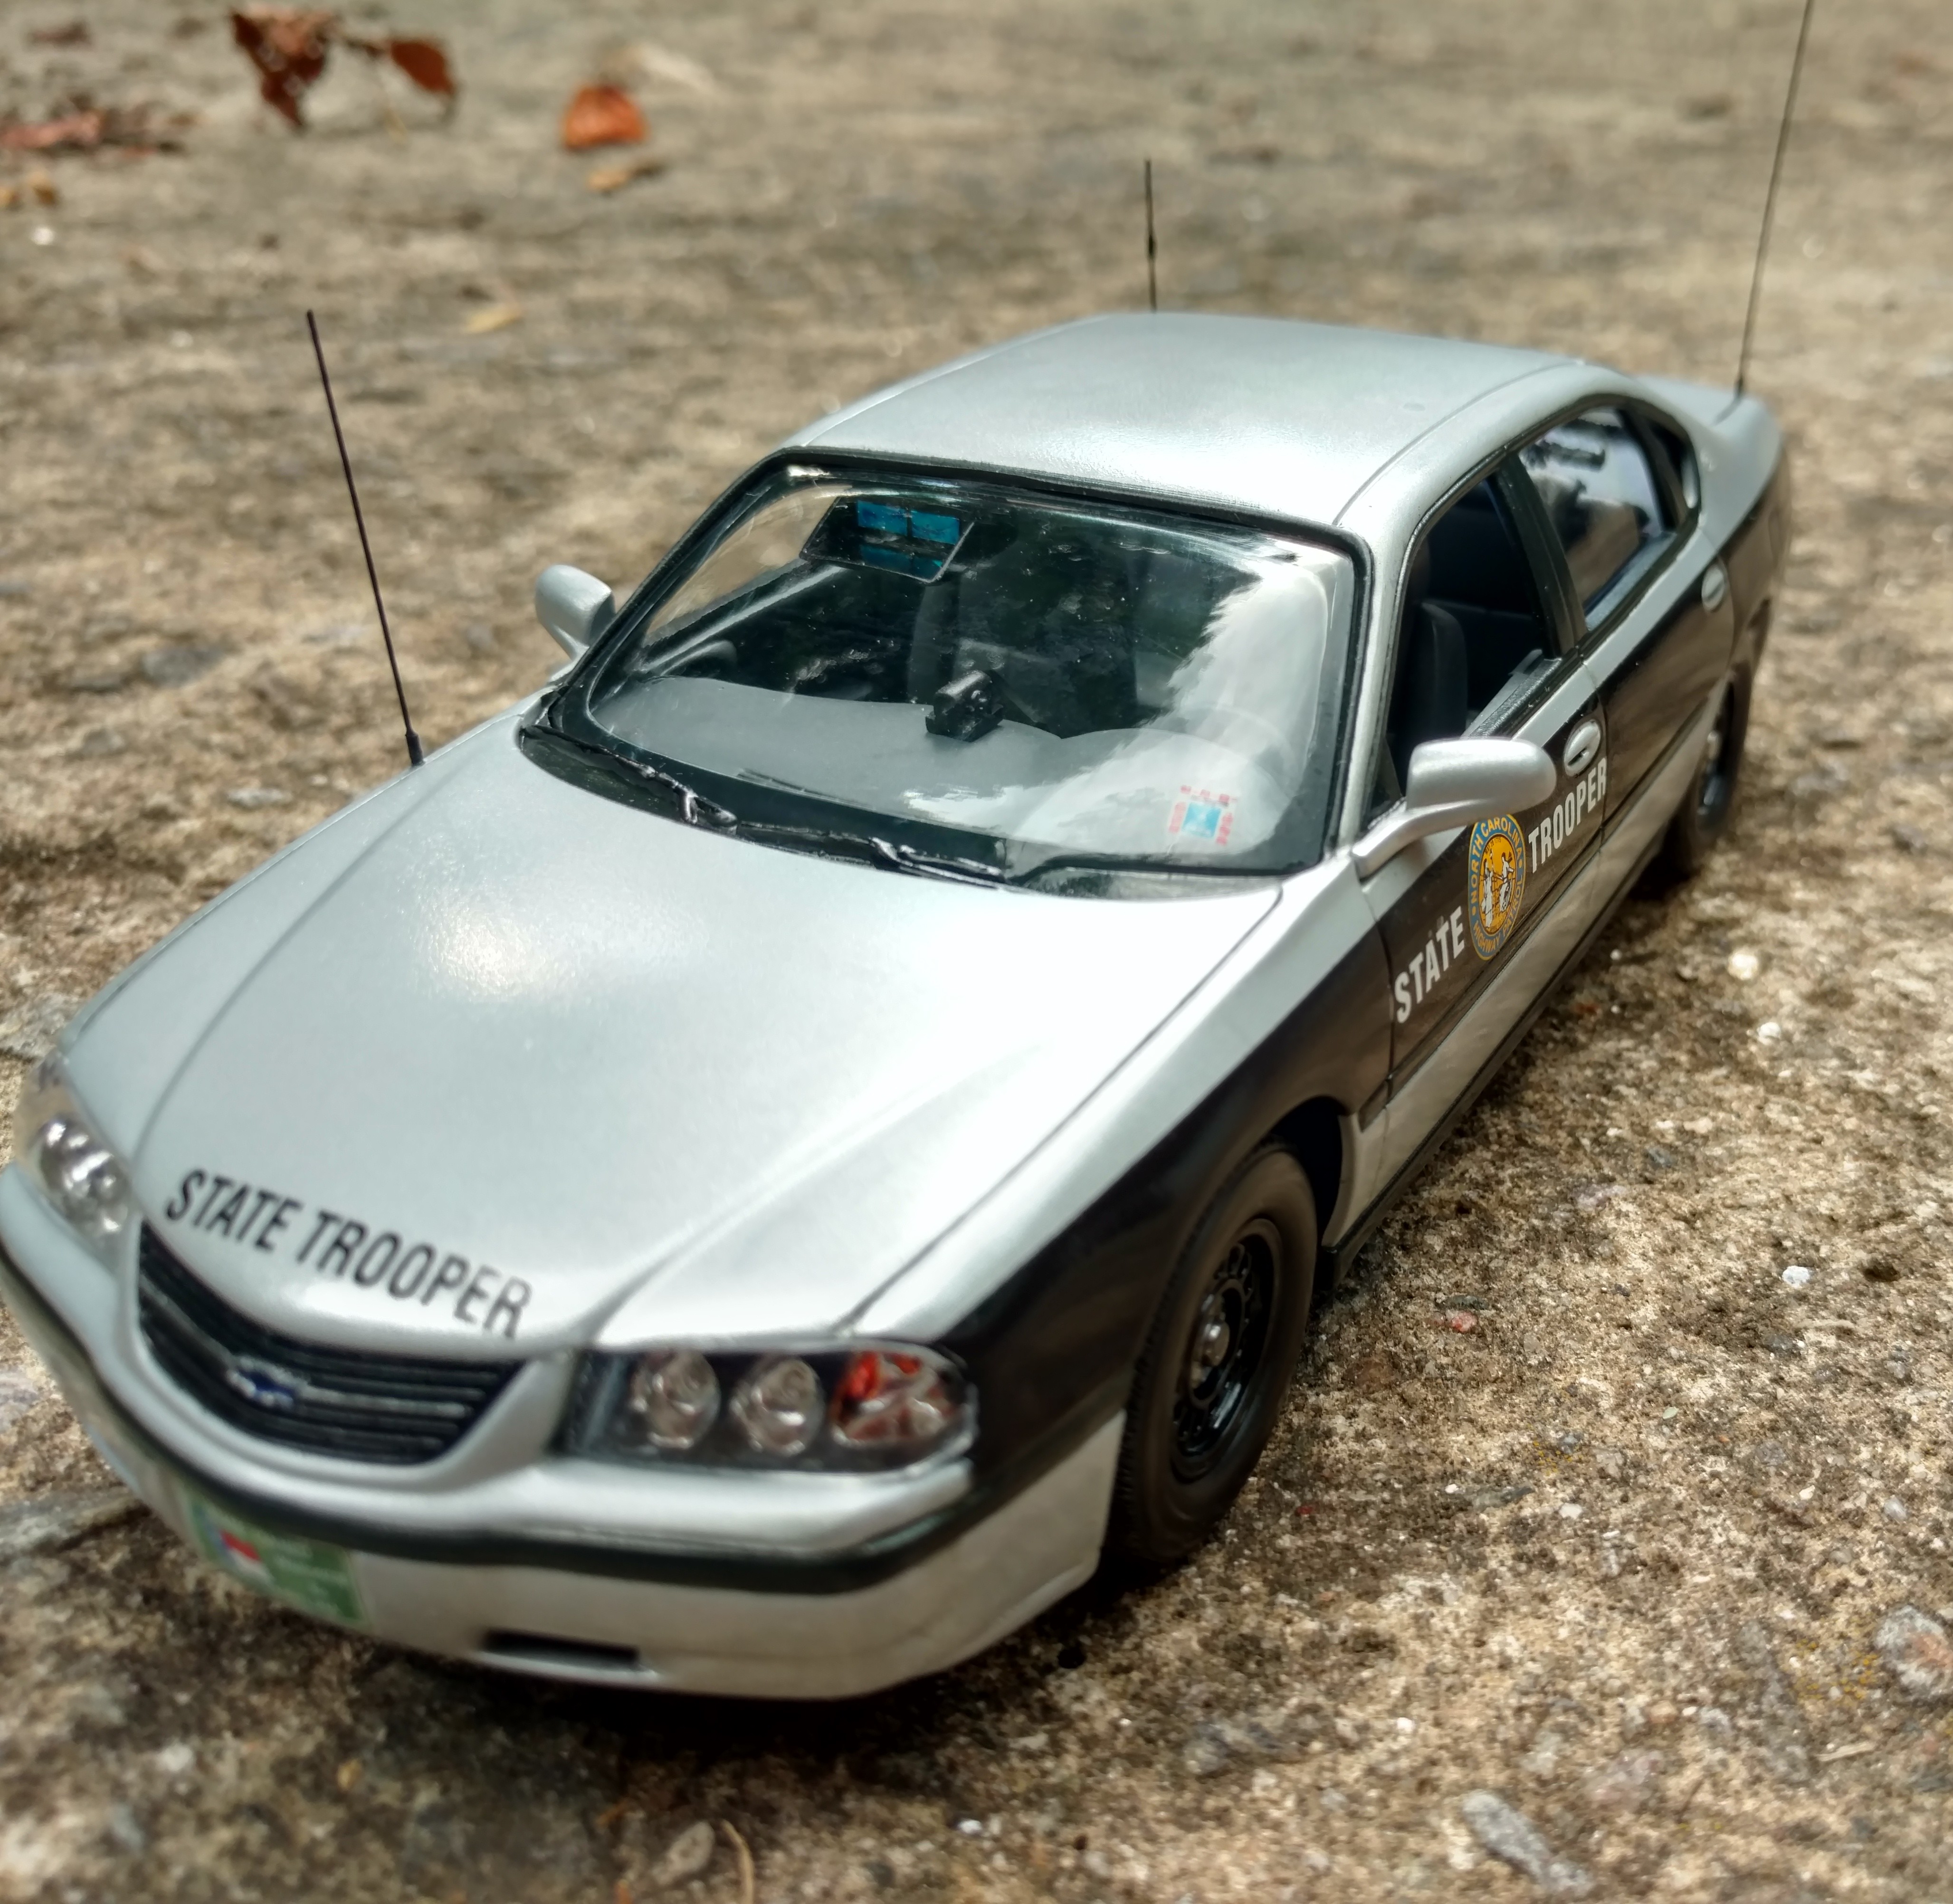
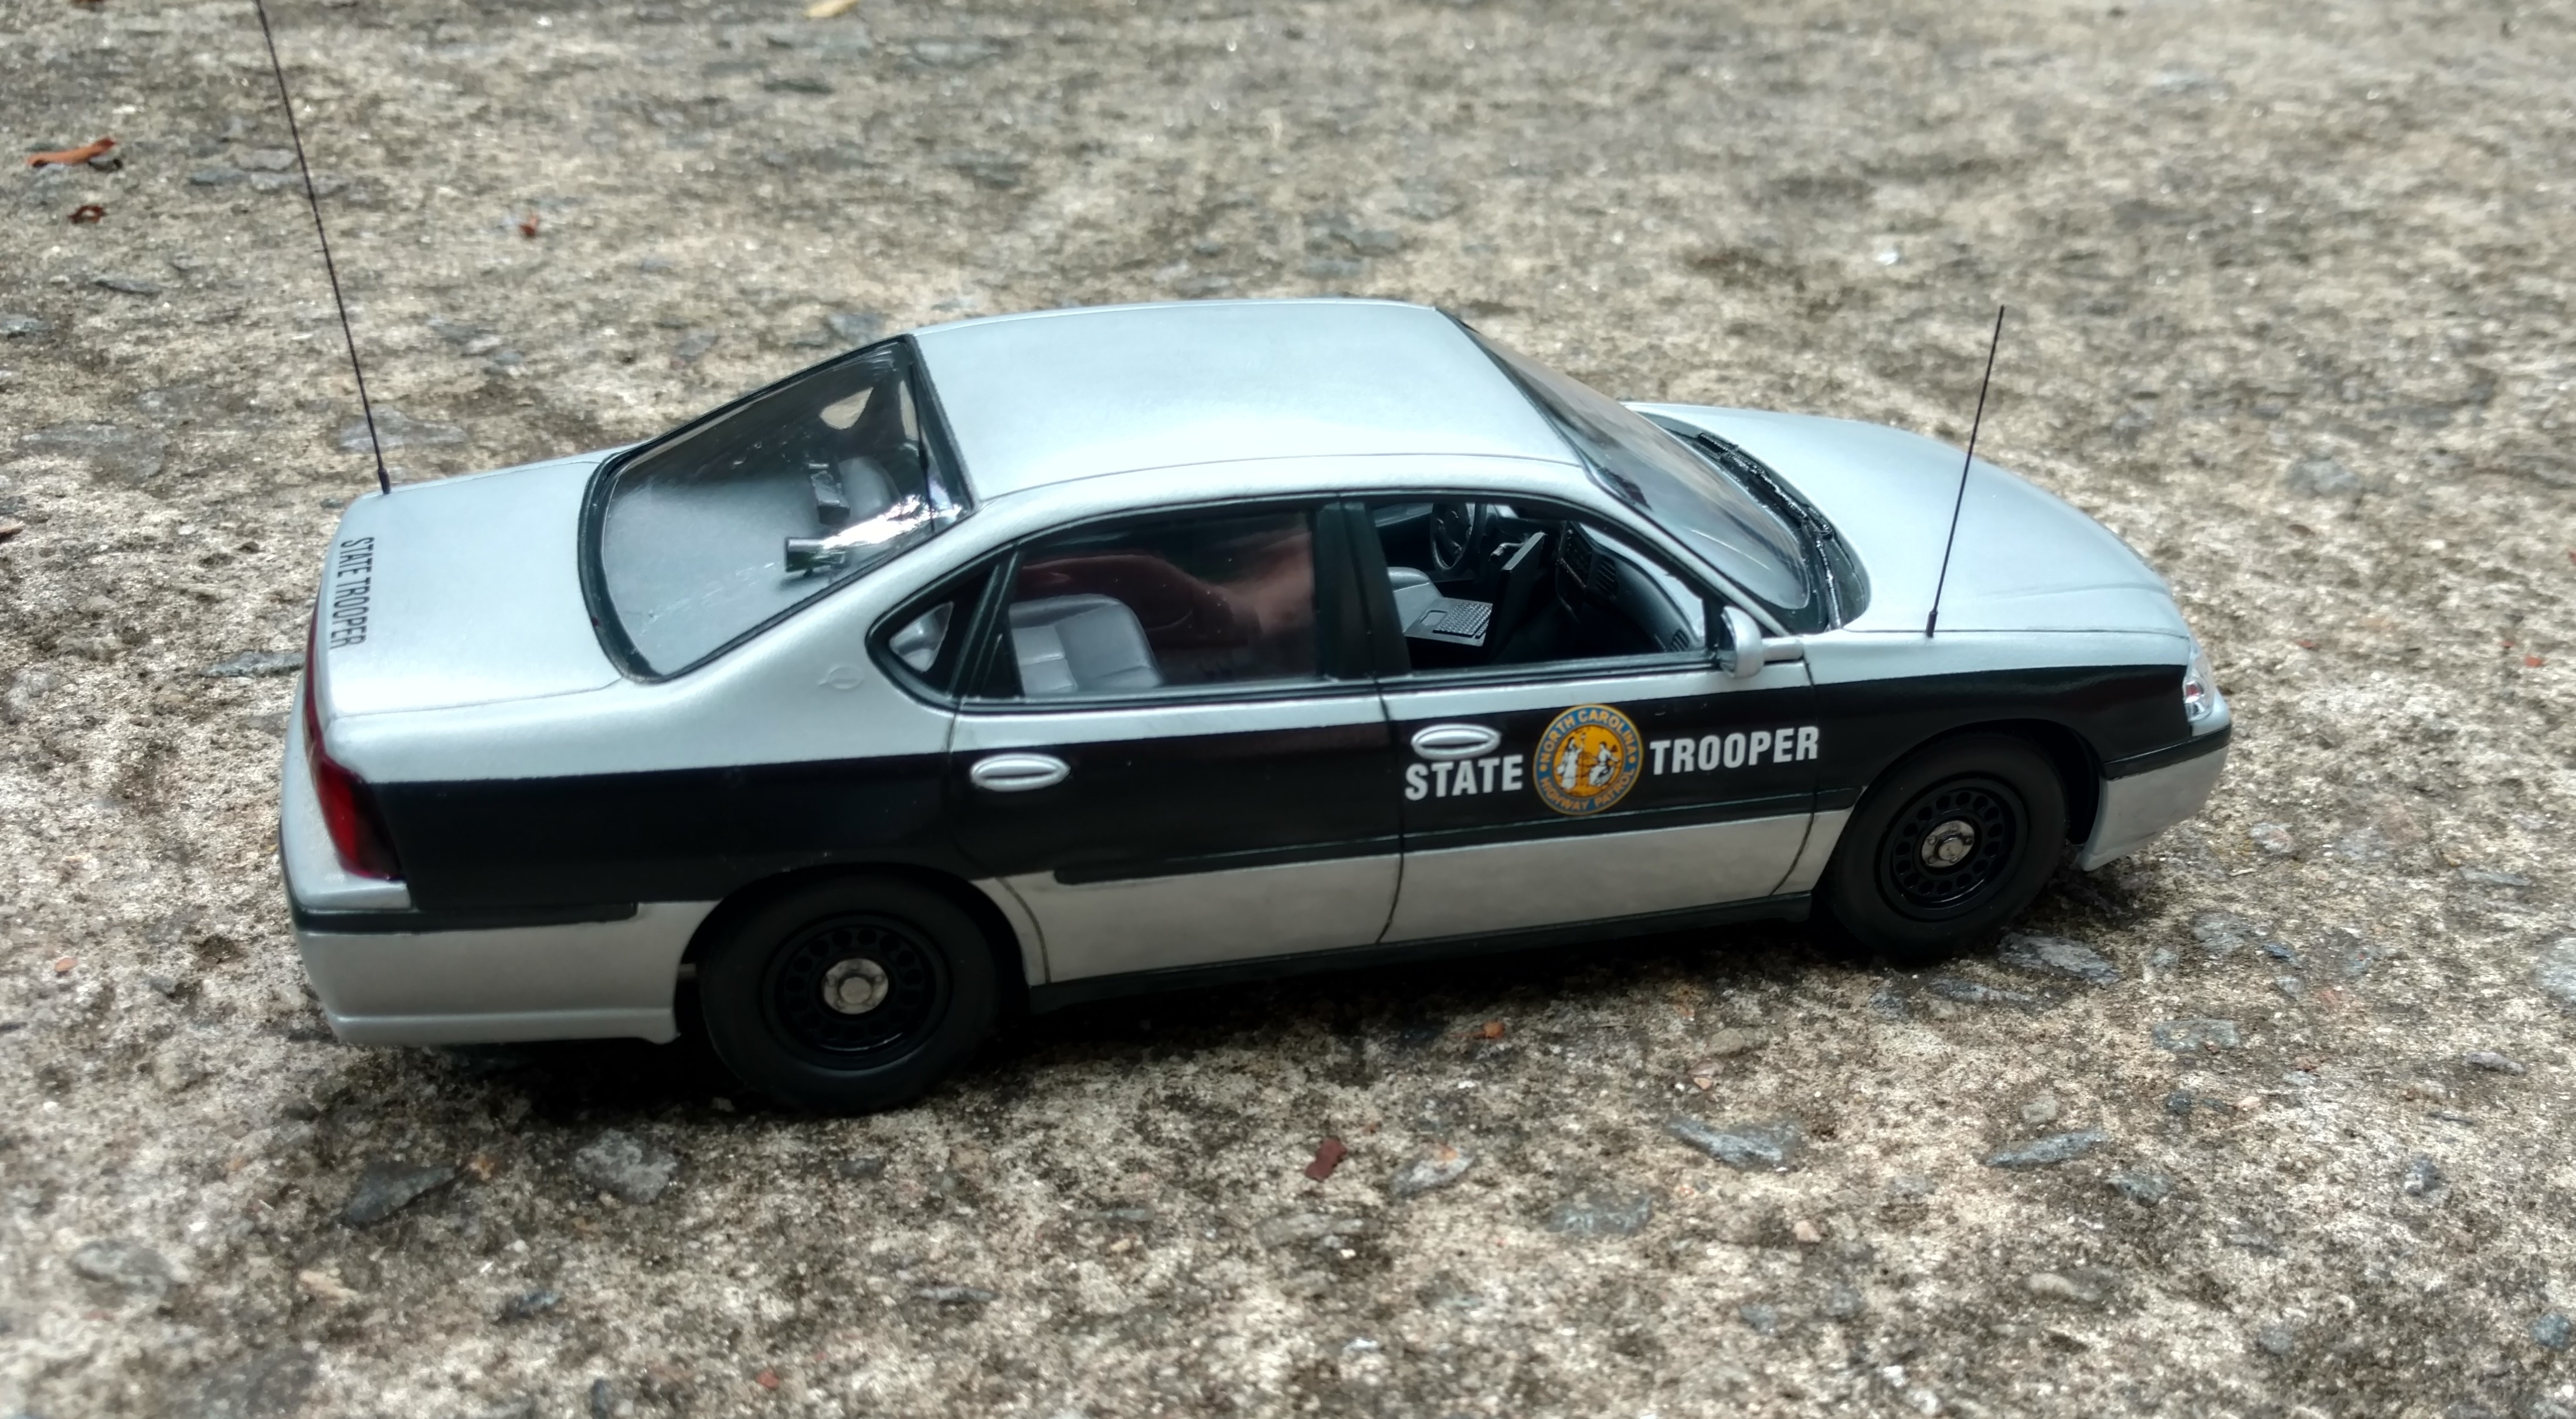
Thanks! That was a fun kit to build. The NC Troopers only used those cars for a few years but I always thought they looked sleek in that scheme.
-
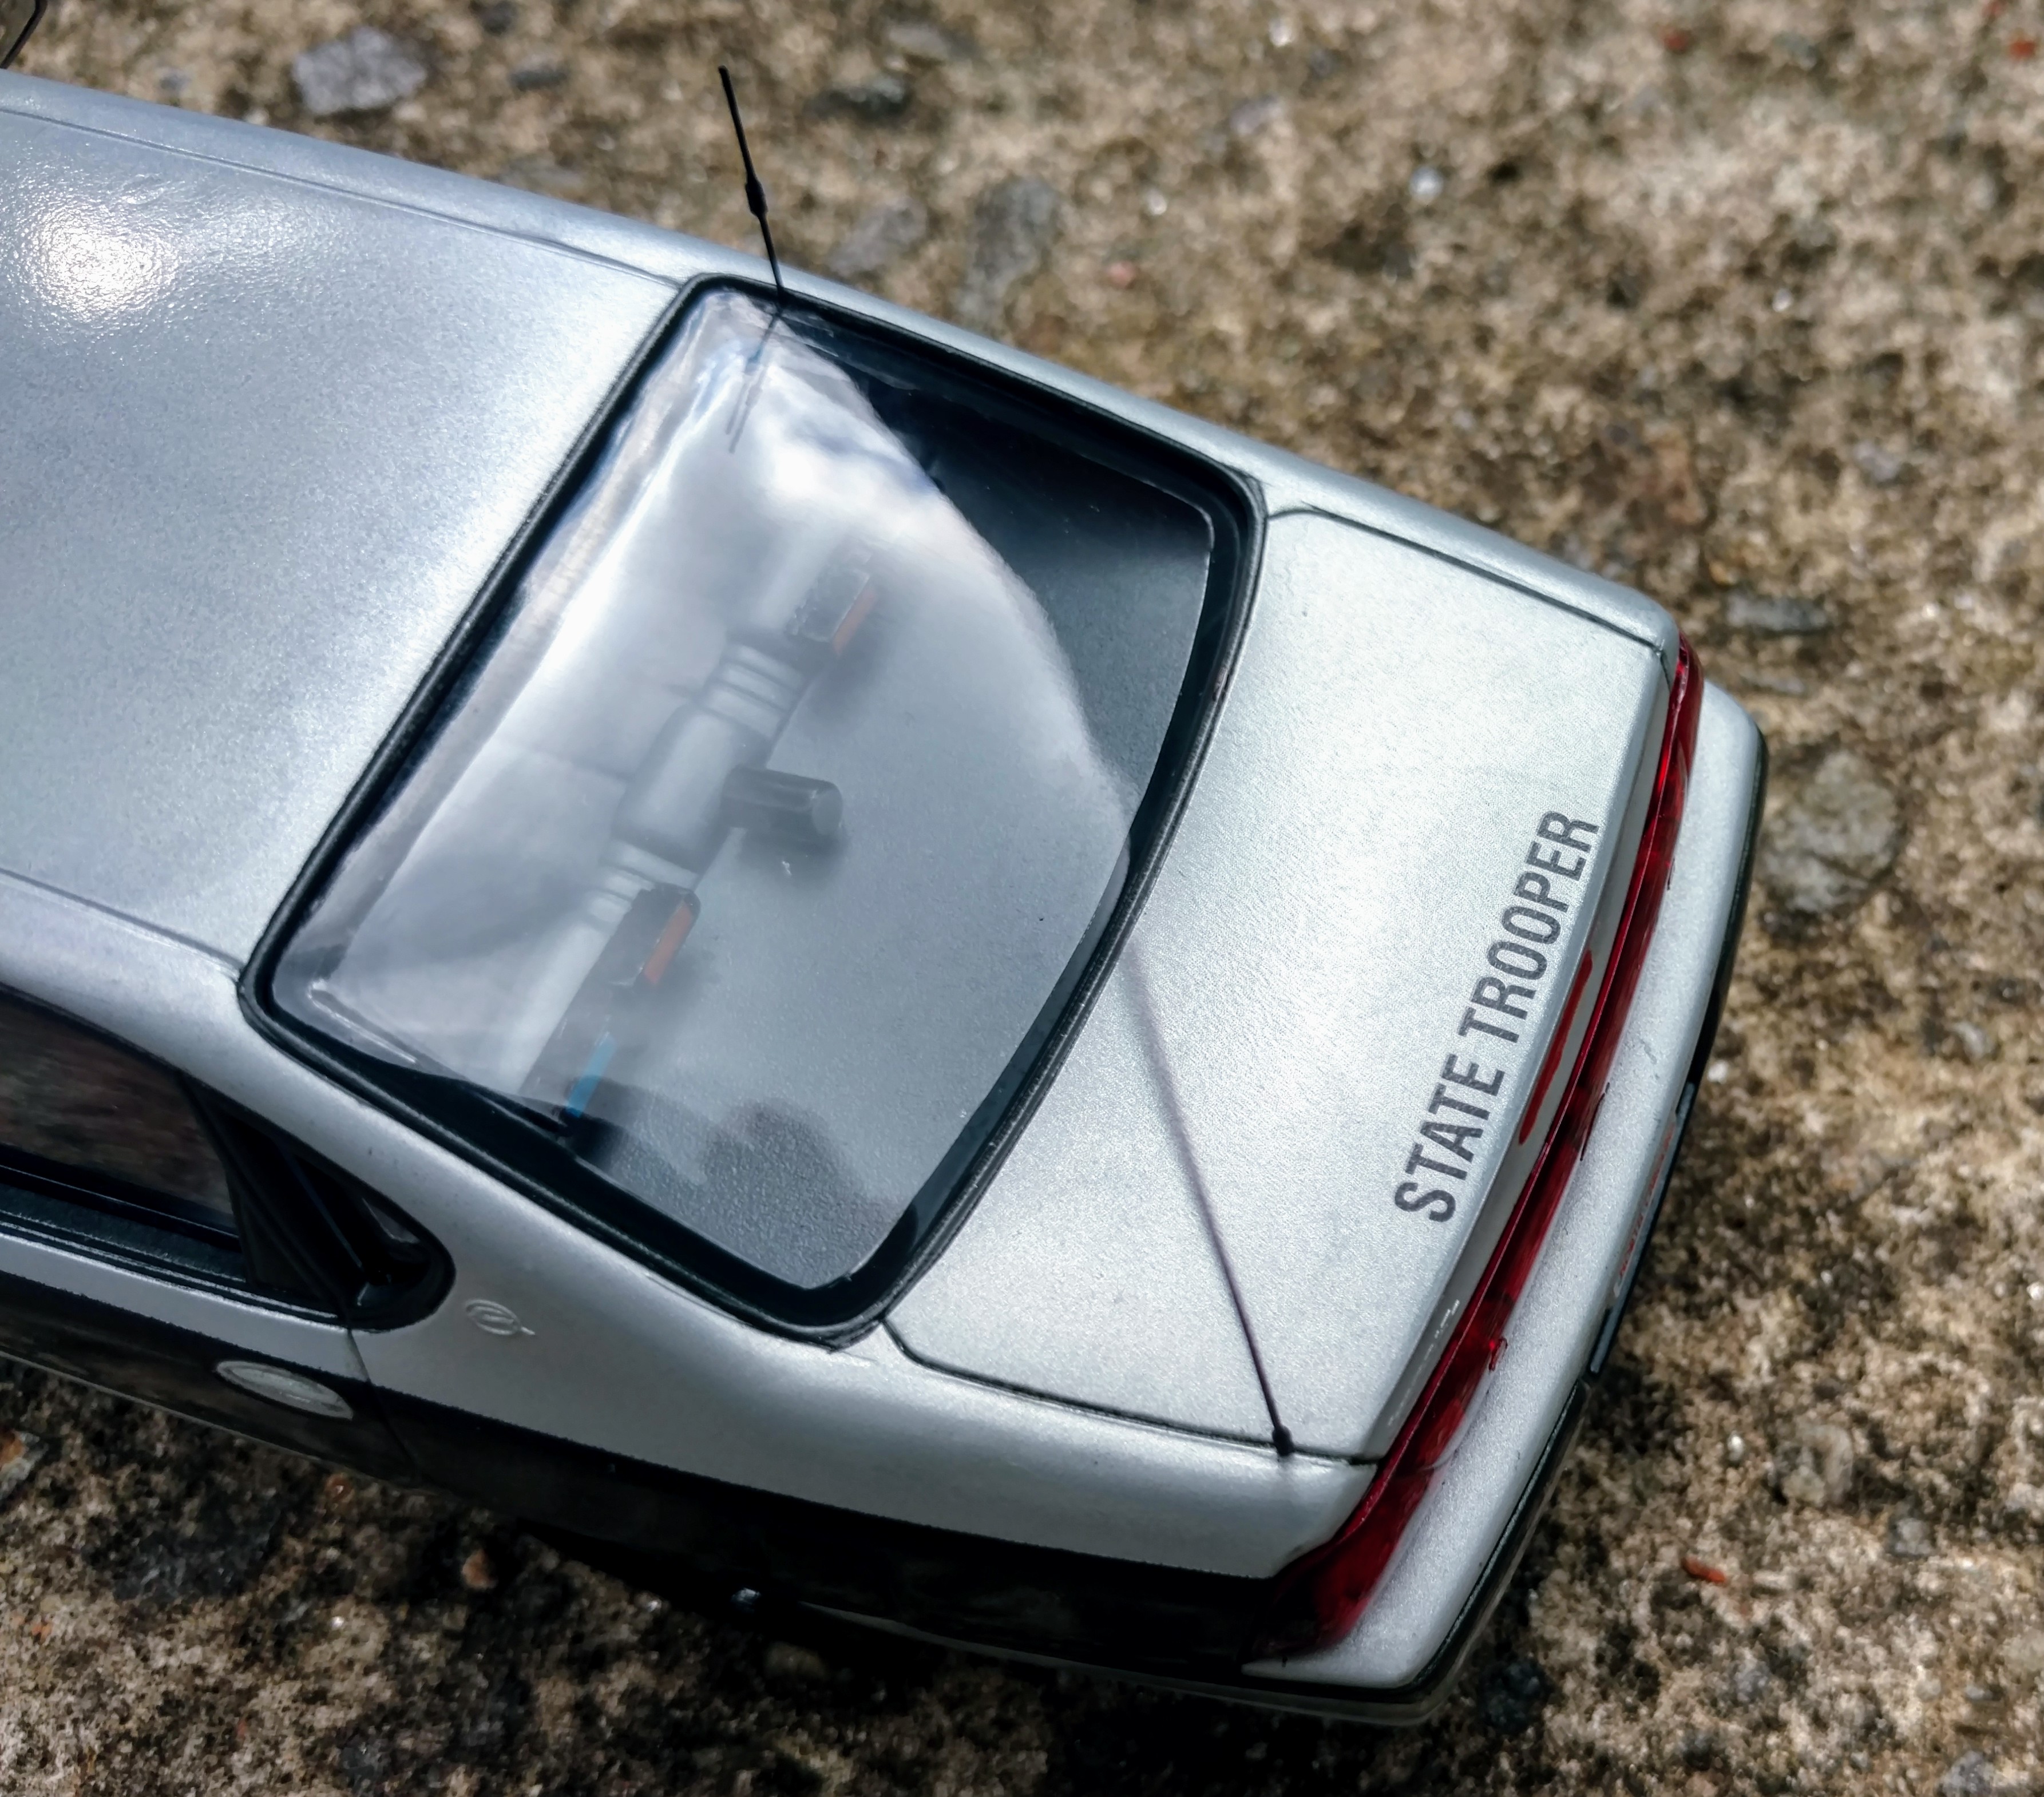
Nice patrol cars guys! Here's my only cop car: NC State Highway Patrol Impala flat top using the Revell SnapTite kit. Decals were for a Crown Vic. The antennas, hidden lights and the radar were scratch built. The laptop computer came in the kit. Most of these in NC SHP service had aluminum wheels, but I finally found a reference pic of a flat top with steelies and hub caps, so that allowed me to use the kit wheels..

-
That is cool. I see Daisy getting away in the background. Poor old Rosco. Boss Hog isn't going to be happy.
-
 Nice! I love that Cobra carrier.
 -
I just built one. It didn't go together bad at all. You have to be careful and test fit, but I didn't have to modify anything. The instructions are a little vague though.
-
Wow, the new site is horrible! It's arguably prettier, but pretty useless as a resource. I can't believe they took all the instruction sheets offline. I just sent Round2 an email expressing my disappointment and telling them that I'd probably buy more Revell kits now since they have the instructions online for my review before purchase.
-
Revell customer service vs. Round 2's
dmk replied to unclescott58's topic in General Automotive Talk (Trucks and Cars)
Revell's awesome. Round 2 is good. Both are better than Academy. I had a 747/shuttle kit where the fuselage was short shot and a huge chunk of it was missing. I sent them the UPC off the box, the form with a description of the part, the number on the sprue and the kit#. After like a month, I got a box from them that was way too small. They sent the wrong part. -
I notice that the instructions have a section showing how to cut the body, attach some alternate parts and fit it to a truck chassis/cab for a standard "straight job" dump truck. However, at the top it says that this section is for "nostalgia purposes only". Does anyone have any idea why they say that? It seems to me that all the parts are in the box to do this. I was thinking that it might make a cool dump truck on the MPC Mack DM 600.
-
If I could find a '72 GMC stepside, I'd just build that out of the box. I like the grill of the GMCs better than the Chevys.
-
What do you seal it with?
-
Are we talking about the Revell 30/31 coupe? The blower is easy. There are a ton of kits with nice blower that you can rob from. The real trick is period correct (1950s/1960s era) suspension parts, manual transmission, rear end and brake parts.
-
Thanks guys! Sorry for posting in the wrong forum. Not sure how that happened.
-
I have the AMT Chevy 1972 fleetside and I'd like to make it a stepside. Would the bed from the Revell Chevy 1965 Stepside be correct or did GM changes the beds by then?
-
What's "Traditional" ?
dmk replied to Greg Myers's topic in General Automotive Talk (Trucks and Cars)
I like this term better than 'traditional'. Here's why. If you look at the kits that are available, they reflect the periods from which the kits were designed. (Revell Dueces with 1980/1990s Airbag suspension and Ford 302 for example, vs the earlier period AMT 1925 'T' twin kit) . What if you want to build a car as it might have been put together in the 40's, 50's, 60's or 70's? Those would be four fairly different cars with different techniques and parts. So you need to be able to have a discussion about what kit to start with and what kits to rob parts from. 'Traditional' is too broad a term, means different things to different people, and covers too wide a period to be useful. If you want to represent a car built today, it's all moot. You can use any parts or techniques that strike your fancy. -
What if Monogram had done 1/25?
dmk replied to Southern Fried's topic in General Automotive Talk (Trucks and Cars)
I always loved that kit. I actually have the white one in my stash right now. I don't care about 1/24 vs 1/25 if it's a good kit and right subject. -
Thanks guys! I'm glad you are enjoying the build. I'm having a lot of fun with it too.
-
I think it did also. It wasn't hard to do on this kit either. Just took a course sanding stick and sanded down the back of the grill. I held it up to a light and checked periodically to see how thin it was getting. Once I broke through, I trimmed the flash with an exacto knife.
-
Wow, I can't believe it's been more than a month since I last worked on this kit. Well, at least I think I've made some good progress in the last few days. Did some detailing on the grill. Added a parts box winch and some tow hooks (made from wire). I mounted the engine and exhaust on the completed chassis, and decided it is finally time to start some weathering. First, I mixed up some cheap craft paint. I used about five shades of browns and tans. To thin it, I poured some Liquitex Airbrush medium into a small cup about 60% full. I then took a craft stick and added a small amount of craft paint to the mix until I got it about the consistency of 2% milk. I fine tuned the mixture with Testors Acryl universal thinner until it was thin enough to airbrush. I wouldn't want to use this as a primary paint, but for weathering I think it works very nicely. One of the common complaints about craft paint is that it isn't very durable on plastic. For weathering I think that is actually a benefit. Mud and dirt are not durable either. They are easily wiped or washed off, so the the weathering will get rubbed off on some of the high spots from handling, it actually makes it look more realistic. You can make it more durable by mixing in some Future and Tamiya X-21 flattening agent (to balance out the glossiness the Future will add) . This mixture will keep pretty well too. I used some that I mixed a month ago. With the paint ready, I broke out some salt. I'm using both course and find salt mixed together in a small cup. I used a small pump spray bottle (I found you can also use your airbrush) to liberally spray water over the parts and generously sprinkled some salt around randomly. Set this aside to dry overnight (or at least a few hours if it is a dry day). Once the water dried, I airbrushed some dark brown randomly around (check some reference pictures of real vehicles). You only need to let the paint dry about 30min to an hour and then you can wet it and put on another layer of salt. The next day hit it with your next color. Each time I went to the next lighter shade, until after five times, I was at a light tan. About the third coat, I wiped off most of the salt because it was building up quite a bit. then I wet it again and added a fresh layer of salt on. Maybe this gave me a more random pattern and gave the lighter tans more coverage. Finally, after the last coat of tan dried, I took a stiff toothbrush, and scrubbed off the salt. I rinsed the assemblies under warm water in the sink and scrubbed some more to get the stubborn salt off. You will wipe off some of the paint, but I think it adds to the effect.
-
Doh! Thanks for the heads up! I'm glad you caught that. I should have checked my references more carefully before making that assumption. Luckily It's not too late to fix it. (It's ironic because I actually use RainX orange washer fluid in my car, and almost went with that, but then thought blue looked more normal) Thanks for the offer of reference photos. I actually found a lot of good photos of these trucks on the web, so I don't want to put you through the trouble. If I get stuck on something I'll shoot you a PM though.
-
Actually yes. I have quite a few builds planned for cars in this genre. These were the cars that my older brothers and friends had when I was a kid. I've always liked these styles. (most not all). Thanks for that link! I love this Nova picture on that site. Reminds me of me as a kid. I always loved cars.
-
slight rant about differences
dmk replied to wagonmaster's topic in General Automotive Talk (Trucks and Cars)
When I got back into modeling a few years back, it was aircraft that got my interest first, then after a few years of that I got back into automotive as well. I actually found it quite liberating that car models are generally cheaper and that there are less aftermarket upgrades being used by the community. I like that I can follow builds of various kits on the forums and see builders using ingenuity, common materials, and tricks with paint or texture to improve the details or shortcomings of a kit. It's a lot of fun to use these techniques in your next build. Most aircraft modelers just buy some expensive resin or PE to improve things and then fight with them to fit them in. It seems every kit build in the forums gets a resin cockpit or landing gear bay. I just don't find that fun at all. Does anyone actually enjoy trying to fit a resin part into a kit? Does anyone actually enjoy trying to bend, shape and attach PE? It's just more expense and frustration. Scratch building and using ingenuity is fun, creative and gives you a sense of building something. I'm not a good scratch builder, but I learn something from others in the community and that helps me do small things on every build. I'd hate to see the automotive community lose that and move to merely buying and fitting detail. -
1937 Bugatti Atlantic 57 S - Mother of all Sports Cars?
dmk replied to Plastheniker's topic in Model Cars
Very impressive work! The scratch building is amazing. Regarding the real 1:1 cars, didn't these have magnesium body panels? I just noticed the ridges on the body and fenders. I suppose where the panels were riveted or screwed together? -
Great looking Chevelle! The wheels were a nice idea. They look kind of familiar on there actually. I think I may have seen that done on a 1:1 Chevelle.
-
The Penultimate Painting Area Thread
dmk replied to LokisTyro's topic in General Automotive Talk (Trucks and Cars)
Thanks Alyn. It was a fun project actually. The air flow pulls the paint down. Think about how you paint. I tend to hold my airbrush in front of and above the object. If you had the blower on top, it would be pulling the paint up, away from my parts. An inlet at the rear would probably work OK too, but it could still pull some paint up and away when you had the parts resting at the bottom while painting. Plus for me it was easier to package my blower and filter at the bottom of the cabinet. Under the rack (re-purposed baking racks actually) I have cheap furnace filter and under that a 6" deep plenum with the blower at the bottom. -
The Penultimate Painting Area Thread
dmk replied to LokisTyro's topic in General Automotive Talk (Trucks and Cars)
A vented paint booth was the best thing I ever did to make my hobby more enjoyable. I can even use a spray can in this thing (but it does dirty up the filter faster). Flip a switch for lights and blower, spray some paint, turn everything off, close the door and done. No mask, no respirator, no fumes, no smell. It's nice to walk over, spray a few parts and then go back to assembly.