Plastheniker
-
Posts
832 -
Joined
-
Last visited
Content Type
Profiles
Forums
Events
Gallery
Everything posted by Plastheniker
-
Thanks for the response! There were conspicuous gaps between soft top and the top and the rear of the side windows, the windshield frame and the rear body. The remedy was cautious bending, adding styrene strips, putty and a ot lof sanding ...
-
Colour chice, paintwork, detailing, craftmanship - simply perfect! IMO the model of the month!
-
Excellent idea, funny, very different and beautifully executed!
-

1968 Dodge Charger R/T (in Medium Turquoise Poly)
Plastheniker replied to Tommy124's topic in Model Cars
Super clean work, can't be done better! -
Between WWI and WWII the Adam Opel AG (owned by GM since 1929) was Germany's largest car manufacturer. After WWII Opel remained no. 2 behind Volkswagen until the seventies and enjoyed a reputation of supplying modern and reliable cars at moderate prices. The decline of Opel came when GM imposed a drastic policy of cutbacks which resulted in a general quality disaster from which Opel sales never recovered despite later quality improvements. While VW, Mercedes, Audi and BMW flourished Opel existed at the verge of bankruptcy for years, only kept alive by the German government. Recently Peugeot bought Opel's remains. Between the wars Opel's biggest cars belonged to the lower upper class. In 1938 Opel entered the lower luxury class introducing the 3.5 litre Admiral. The Admiral was offered at the same price that Mercedes demanded for a 2.3 litre car. The beginning of WWII stopped production after less than 7000 finished Admirals. ICM's kit (currently reboxed by RoG) shows bright light and deep shadows. Fit and parts quality are excellent , the kit is well-detailed and with some extra work the finished model looks great. On the other hand one has to cope with several issues: The fit of the closed soft top is disastrous and took me more than one day to make the top fit snugly The multi-piece body consists of 8 parts, IMO rather anachronistic Panel lines are too shallow and must be rescribed (neurasthenics should refrain) The kit dashboard is rather simple without usable dial decals My decal sheet looked good but most decals fell apart when becoming wet Chroming is partially very poor or even missing, so praise Mr. Molotow!
-
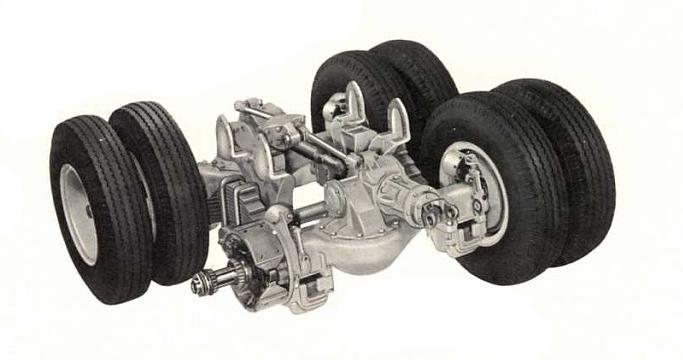
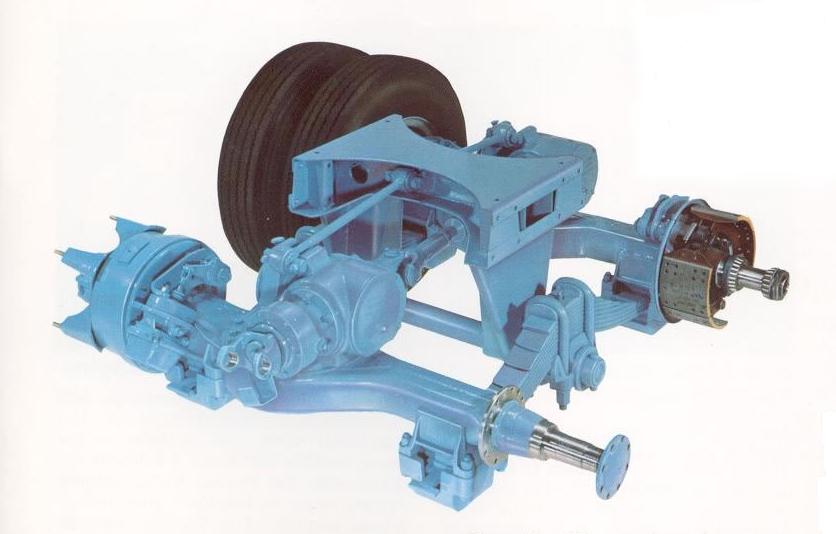
Thanks for the latest replies! Helmut, actually the mpc/Ertl DM 600/800 as well as the Amt R685 can be used, but these kits replicate two different types of bogies. The bogie of the DM 600/800 kit resembles this one: The bogie of the R685 resembles this one: All my pictures of 1:1 H-67s showed bogies similar to the latter one of the R685. Nevertheless I used the DM 600/800 kit because its fit is much better, but the necessary modifications were rather time-consuming. Therefore today I would certainly use the R685 kit despite its poorer fit.

-
Thanks for all comments! Bill, Clifford , you really make me blush Hans-Jürgen, in 2013 I explained how I made a similar grille for a GMC 9500 here http://www.modelcarsmag.com/forums/topic/74735-gmc-9500-short-hood-aitm-with-tube-trailer-scratch-built/ in posts on pages 3&4. Unfortunately Photobucket deleted the attached pictures. I am going to restore them or make new pictures if necessary. If it is not possible to edit the a. m. post I will add a post in that GMC topic with the pictures only. Making the grille of the H-67 was a bit different because here the grille was an integral part of the cab and space between the horizontal grille bars was (as far as I remember) less than 1 mm. Here mostly handwork was necessary I will explain how I made the H-67 gille here in this topic referring to the GMC grille. Probably drawings or photos will be necessary so please give me a few days time.
-
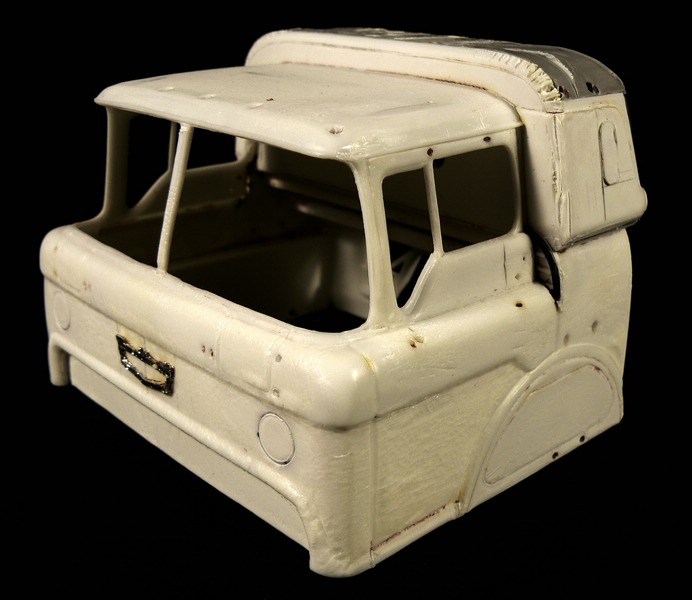
My fourth AITM cab showed similar issues as my precedent three cabs: The two grilles are an integral part of the cab casting. Though actually nicely done their bars have ( presumably for casting reasons) roundish surfaces. This makes giving them an even and realistic appearance impossible. Usually the result looks like this or even this IMO cutting out both grilles and making them new is indispensible. Also the very faintly ribbed headlight carriers with their four moulded headlights should be replaced. Any and all supplied parts except the naked cab and two door handles were not usable. The material thickness of my cab was extreme. After reducing the excessive thickness the cab had lost (I guess) at least half of its weight. My cab showed numerous (mostly minor) casting flaws. The only really difficult issue were the recessed areas around the lateral windows.Their depth and width varied conspicuously. All in all as expected this AITM cab was laborious but very rewarding because of the really unique design of the H-67. Even if most AITM cabs look very tempting they should, as already mentioned in my earlier topics, be tackled only by most advanced modelers. Otherwise the result will be more or less disappointing. The H-67 is no exception. The well-known AMT tanker doesn't look very typical for the fifties and the Lindberg tanker looks too simple IMO. Scratch building an oval tank trailer with a convex front and a convex/oblique rear was challenging and rather time-consuming but it was an unusual project and really fun.
-
BRBO 2020 Paystar and lowboy
Plastheniker replied to Sam I Am's topic in Model Trucks: Big Rigs and Heavy Equipment
Good colour choice, simple and monochromatic paintworks look often best. -
Good combination, attractive colour combination (Blue/white will seldom fail).
-
Super clean work, V E R Y attractive paint scheme!
-
48' Great Dane Reefer
Plastheniker replied to KJ790's topic in Model Trucks: Big Rigs and Heavy Equipment
Excellent work, very attractive result! -
Very interesting combination!
-
Mack Superliner Wrecker
Plastheniker replied to PierreR89's topic in Model Trucks: Big Rigs and Heavy Equipment
Unusual and attractive paint scheme! -
Thanks for the latest replies, nice to see that there is still some interest in my older topics.
-
As expected another unusual top notch work from your workbench!
-
1955 IH RDTC Highbinder
Plastheniker replied to DRIPTROIT 71's topic in Model Trucks: Big Rigs and Heavy Equipment
Really impressive model (unfortunately not mine!). I really love those often bizarre trucks of the fifties. -
International 4300 Eagle
Plastheniker replied to landman's topic in Model Trucks: Big Rigs and Heavy Equipment
Nice work, very realistic workhorse! -
ERTL Volvo
Plastheniker replied to gatorincebu's topic in Model Trucks: Big Rigs and Heavy Equipment
Nice work! IMO the Volvo was one of Ertl's most attractive kits. Sad that there was never a re-release. -
Thanks for the recent comments! As mentioned I don't have any work in progress pictures but I have one work in regress picture, so to speak. When my red paintwork on the upper cab had dried I spotted some tiny sunken spots on a filled area on top of the sleeper. I thought it would be best to strip the fresh red paintwork completely. For some years methoxypropanol is my favourite paint stripper so I used it here, too. Not a good decision! For some unknown reason this time the plastic was attacked almost immediately. Since I had used various sorts of plastic and lots of micro balloons and super glue there was possibly any unforeseen chemical reaction. Anyway my upper cab was irretrievably lost. After my hands had stopped trembling I started again. Always look on the bright side of life ...♪.♪.♪
-
BRBO Western Star 4964
Plastheniker replied to tbill's topic in Model Trucks: Big Rigs and Heavy Equipment
Beautiful model, another proof that white can be a very good choice! -
Thanks for the replies, thanks for the pictures! I agree, this is a fantasic model. Sad that there are no better pictures, and even sadder that there are almost no Japanese modelers in western forums since many of them do outstanding work.
-
Spectacular paint scheme! I never saw one done before.
-
BRBO 2019 Mack R
Plastheniker replied to gotnitro?'s topic in Model Trucks: Big Rigs and Heavy Equipment
Can't be done better! -
Peterbilt revell of Germany
Plastheniker replied to Ken Gilkeson's topic in Model Trucks: Big Rigs and Heavy Equipment
As always a perfect colour choice and a beautiful paint scheme!