John Goschke
-
Posts
1,919 -
Joined
-
Last visited
Content Type
Profiles
Forums
Events
Gallery
Everything posted by John Goschke
-
Lindburgh 1/12th fiat
John Goschke replied to willieman's topic in General Automotive Talk (Trucks and Cars)
I built when I was a kid and thought it was really cool and my buddy's were impressed. As an accurate model of a '60 Fiat drag altered it's a waste. Cool parts kit if you build in that scale though if only for the tires and Halibrand wheels. -
'40 Ford Tudor – Late '50s Style! In Paint At Last!
John Goschke replied to John Goschke's topic in WIP: Model Cars
Thanks, Larry! Thanks, Tyler! Thanks, Bob! -
'40 Ford Tudor – Late '50s Style! In Paint At Last!
John Goschke replied to John Goschke's topic in WIP: Model Cars
Thanks, Ray! Thanks, James! Yes, Tamiya over Duplicolor. The Duplicolor was a rattle can from the '80s, leftover from when I had a 1/1 '79 Malibu in the same color. I sprayed the Duplicolor over Plasticote sandable grey primer. -
'40 Ford Tudor – Late '50s Style! In Paint At Last!
John Goschke replied to John Goschke's topic in WIP: Model Cars
Thanks, Michael! -
'40 Ford Tudor – Late '50s Style! In Paint At Last!
John Goschke replied to John Goschke's topic in WIP: Model Cars
Here are some shots of the various parts of the Tudor in paint at last! Vintage '79 Duplicolor Chevy Camel metallic and Tamiya Gold under Tamiya Clear. Looking for ward to rub-out in a few days. -
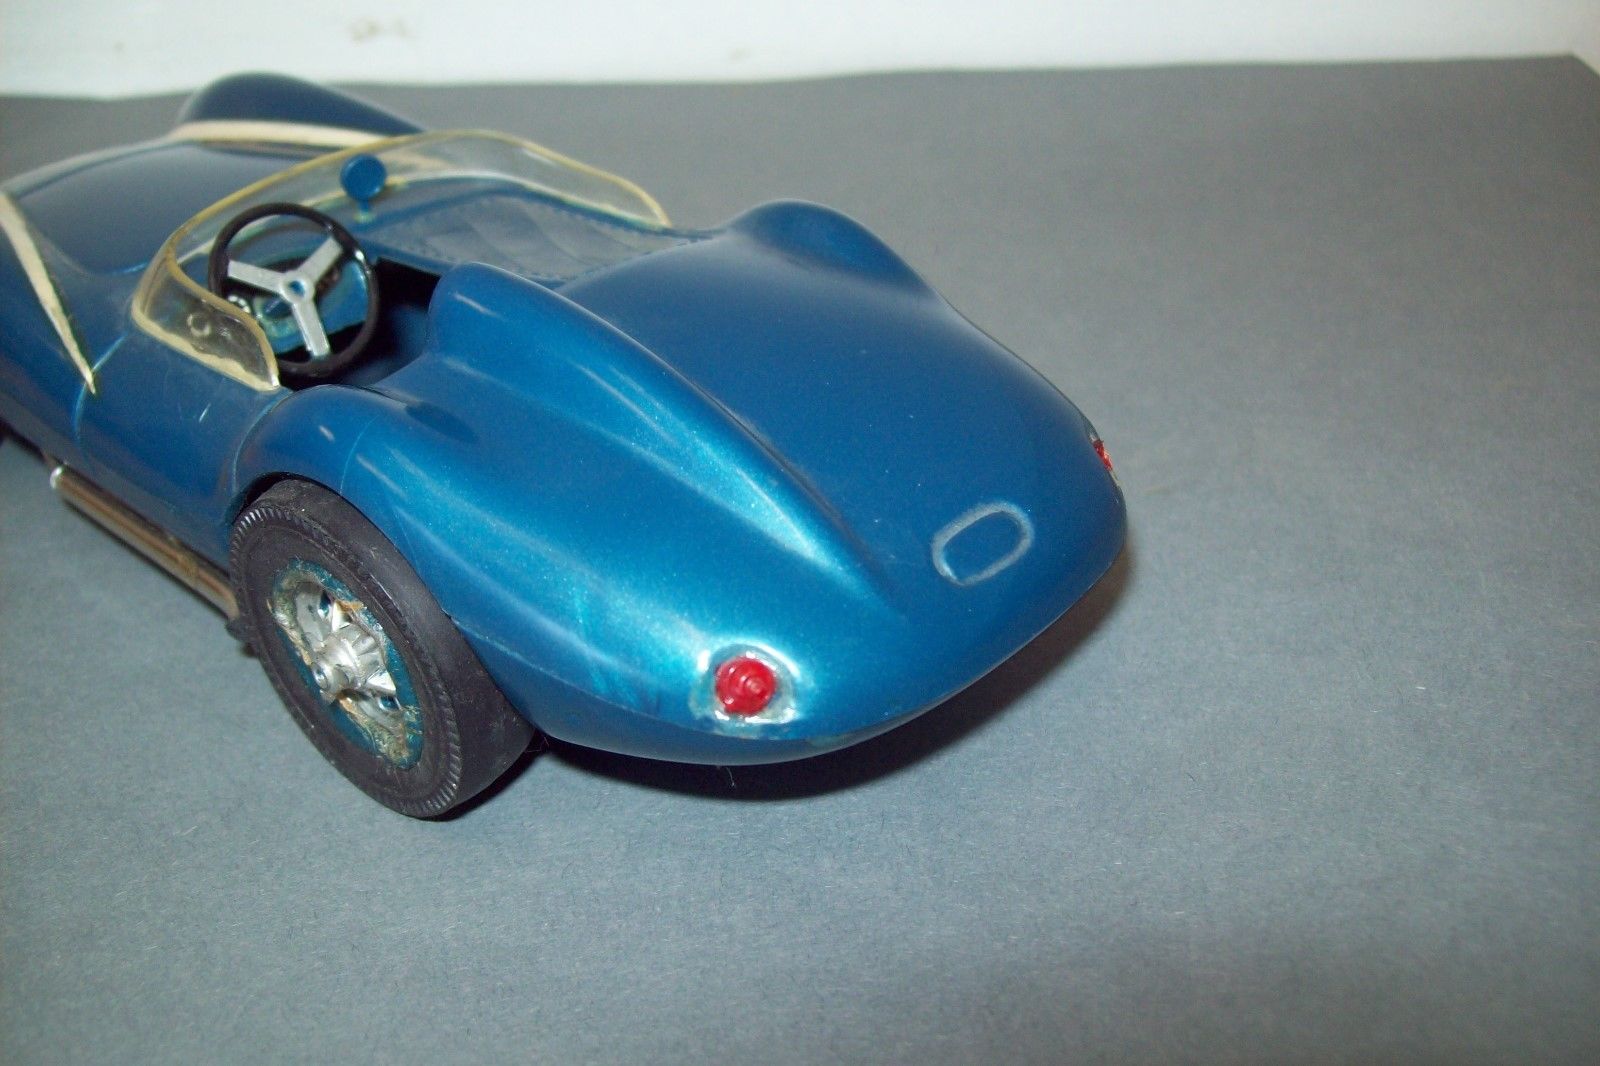
Strombecker 1/25 Reventlow Scarab. Came to me as restorable builtup, so it will get rebuilt. If I could afford a MIB one, I'd build that, too!

-
Fantastic build, Marcos! Especially that engine! Just for the record, it's a Crestline Victoria. No Crown Victorias till 1955.
-
Fully detailed Airfix James Bond Aston Martin DB-5
John Goschke replied to Dann Tier's topic in WIP: Model Cars
Looking forward to your build! This kit has tons of potential and is definitely the only game in town for accuracy of overall shape. The Doyusha and Aurora kits are worthless by comparison. -
'40 Ford Tudor – Late '50s Style! In Paint At Last!
John Goschke replied to John Goschke's topic in WIP: Model Cars
Modified the interior with scribed in pleats on the upper seat backs and some styrene rod piping. The interior was painted overall Tamiya Racing White, then the seating areas and upper side panels were brush-painted Humbrol black acrylic with a random pattern in Testors copper bottle enamel with a touch of flat black to resemble the type of pattern fabric used in the '59 Edsel. The steering wheel and accessory gauge panel are from the AMT '50 Ford. -
'40 Ford Tudor – Late '50s Style! In Paint At Last!
John Goschke replied to John Goschke's topic in WIP: Model Cars
Added some detail to the kit's Olds engine. Most importantly adding brackets to the generator, which I lowered and replaced with a scratched piece with a more accurate shape. Also added a fan, nuts to hold the air cleaners on, a better distributor, and an upper radiator hose. -
Been working off and on this Tudor for a long time, but now it's on again for September Showdown. Louvers are from the '40 coupe kit, cut apart and applied individually. Spent a lot of time getting the hood and grill to fit properly on this one.
-
Very impressive detailing on this build! Looks like a great kit of a great car.
-
Revell red/white/blue 53 Chevy Panel
John Goschke replied to dragmodels44's topic in WIP: Model Cars
Really sharp paint work! -
Great project! I think Mr. Garner would approve.
-
AMT 1956 Ford Stravaganza (picture HEAVY)
John Goschke replied to Lovefordgalaxie's topic in Model Cars
Outstanding quartet of Victorias, Tulio! I especially like the turquoise one. -
Beautiful job restoring this space age dream car!
-
Huge improvement!
-
58 Impala custom-the way it was done in the 60's
John Goschke replied to pack rat's topic in Model Cars
I like that a lot! Very cool! Period perfect, right down to the wheels and tires. -
Beautiful color combo, nice detailing!
-
'58 Bonneville Hardtop Back on the Bench! 3/20/18
John Goschke replied to John Goschke's topic in WIP: Model Cars
Ken, I covered the kit windshield with a piece of masking tape before installing it in the body. Then I used a pencil to trace the shape of the windshield opening onto the masking tape. Next I peeled the tape off the windshield and applied it to a piece of manila file folder to create a pattern by cutting it out approximately 1/16" larger than the pencil outline. Then I cemented pieces of styrene strip inside the windshield posts and the bottom corner of the windshield about 1/16" inside the opening. The strips act as brackets to hold the windshield in place. After peeling the tape off my new folder stock pattern I fit it inside the body and trimmed as needed to refine the fit until the pattern popped into place in the brackets and fit nicely around the opening. Then I used the pattern to cut the new "glass" out of the sheet of PVC. Before cutting I protected both sides of the PVC with masking tape. Once the new windshield was cut out and tape peeled off it was test fitted inside the body. Luckily this one popped into place without any adjustments to the fit. It sounds like a lot of work but this one only took about 1 1/2 hours and the results are sure worth it! Thanks to Steve Boutte for persuading me to give it a try. Here are some photos from when I did the windows in the '58 Ford... -
'58 Bonneville Hardtop Back on the Bench! 3/20/18
John Goschke replied to John Goschke's topic in WIP: Model Cars
Thanks for the responses, gentlemen! The Bonneville continues to move along! -
'58 Bonneville Hardtop Back on the Bench! 3/20/18
John Goschke replied to John Goschke's topic in WIP: Model Cars
Now that the '58 Ford is finished I can get back on another neglected project, this '58 Bonneville. Worked on fixing some nagging issues. Weak cowl vent detail resolved a with piece notched in from an AMT '58 Impala. Shaved the front fender ornament "jets" off and replaced the fender top raised crease detail with filed-down .030 triangle strip. Made a clear PVC windshield and replaced some damaged moldings at the rear of the roof with styrene strip. Good to have this one moving again! -
Thanks so much for all the comments, guys! Wish I had time for a personal reply to each of you but deadlines are limiting my forum time!
-
The Fairlane is finally finished! Details in brief... • Johan ‘57 Chrysler front bumper • Taillights from 1960s Aurora Custom Grill & Trim set & red plastic piggy bank • Emblems and door handles removed • Rechromed bumpers • ‘59 Ford chassis lowered • Handpainted whitewalls • Wheels from Ertl ‘50 Olds diecast • Roof and window openings reshaped for greater accuracy • Cowl vent detail added from ‘58 Edsel • Photoetch mesh added to molded-in and opened hood scoop • AMT ‘57 Ford custom headlight lenses added with “googly eye” reflectors • Kit windows replaced with clear PVC • ‘57 Ford interior with scratch sidepanels, ‘58 T-bird console, ‘62 T-bird bucket seats and rear seat insterts added to ‘57 Ford seat, ‘56 Ford custom steering wheel, scratch rear view mirror • Decanted, mixed, and airbrushed Tamiya lacquers Build thread ad nauseum, here,
-
'58 Fairlane 500 Semi-Custom! Finished at Last!
John Goschke replied to John Goschke's topic in WIP: Model Cars
Thanks, Lee! The masking went well until I ran out of the black tape and had to order more online then wait five days for delivery. Sure looked like there was enough on the roll! Thanks, Craig! I can't wait either! Wish I could click my heels and say "There's no model like a done one!," and poof, it'd be finished and ready for photos!