
fun9c1
-
Posts
114 -
Joined
-
Last visited
Content Type
Profiles
Forums
Events
Gallery
Everything posted by fun9c1
-
Man, you guys are GOOD! Yup, mystery solved. I thought those "valve covers" looked kinda puny! Glad to know what it is. Now to find some real valve covers....
-
Can anybody ID this motor? It came out of another car I bought built on ebay and I want to put it into this rat rod project. The motor was not part of the same kit as the car it was in. The only clues I can give you other than the picture is the entire motor was chromed over yellow plastic and the valve covers are gold. I've stripped the chrome and would like to paint it whatever the factory color would have been for it, assuming it's a decent color. Thanks for any help.
-
53 ford victoria 1:1 question
fun9c1 replied to fun9c1's topic in General Automotive Talk (Trucks and Cars)
Got it! Thanks. I did not think to look on the clear tree. -
53 ford victoria 1:1 question
fun9c1 replied to fun9c1's topic in General Automotive Talk (Trucks and Cars)
Still working on this! Just started "modeling season" again. Not a whole lot left. Can somebody explain why I seem to not have the #305 storage bottle? I have two of these kits and cannot find this part in either one. Am I missing something or am I missing something? Thanks, Rob -
53 ford victoria 1:1 question
fun9c1 replied to fun9c1's topic in General Automotive Talk (Trucks and Cars)
Thanks all. I would love to post pics of it in progress and when finished but haven't figured out how yet.... I tried actually when I started this post but no luck. -
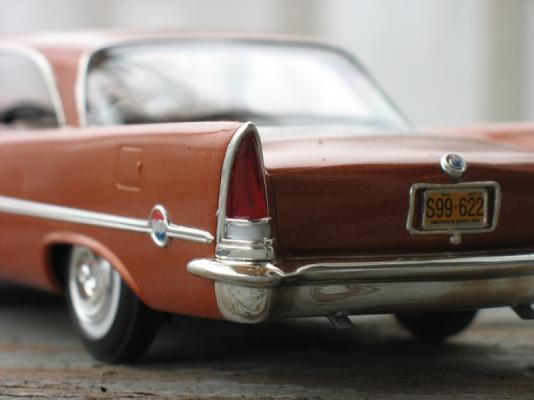
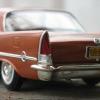
I'm on the home stretch on building a Lindberg '53 Victoria. This will be a surprise gift to my dad. A '53 Victoria was his first car and I'm doing this as close to his as I can with what limited info I can get without him getting suspicious. I do know it was in good shape (this would have been ~1960) and it was Sheridan Blue over Sungate Ivory. So the question is- does anybody know what color the headliner would have been in that? Would it have had chrome strips at the seams or no? Thanks for any help.
-
Alot of time has been spent with not alot of visual progress... but I've sanded off the door trim and drilled out for the fastener holes, used some grey, black, and red primer, and a combination thereof with some thinner, now drying in preparation for some "nose art". The hood is in the ol' purple pond and I'm thinking some flat black to match the rear, and some type of rat-rod-in-your-face type of CI or HP callout.
-
-
-
I hadn't planned on getting involved in this enough to do a WIP, but it started to consume me. I need some paint for the interior and a teeny drill for the plug wiring before I can go much further, so all I can do now is type about it! I got this on ebay for $8, shipping included. It was a textbook gluebomb. Tons of glue and no paint except for the engine which was red (that went into the purple pond after dissassembly and is now the correct orange). A complete car except for the front bumper, steering wheel, and radiator hoses. The first 3 pics shows how it was when I got it. I decided on a rat rod look since it was missing these parts and had so much glue (and racing seats and faux air scoops on the side... with tons of glue holding them on...). I saw a pic online of a '53 Ford Victoria, lowered with nice paint all around except for the hood and the tops of the front fenders which were rusty due to sanding down with a Makita grinder. It had steelies and wide whites. I loved the look and that's what I headed for with this (also going for the "roof and wheels are the only decent paint" look). I won't narrate every step of the way, but right now what's left off the top of my head is some engine detailing, addition of some scratchbuilt fenderskirts that are in the works (one done, one to go), and the interior. I had to scratchbuild the kingpins since the originals broke, and were the wrong ride height anyway. It now has poseable steering, which I discovered makes a huge difference in realism. It also has aftermarket resin Dodge steelies on front that I bought for my "SuperBee ElCamino", but the originals broke around the rim, so I stole 'em for this. Oh yeah, I decided that the "original color" is Anniversary Gold Metallic, which is now evident in the engine bay and door jambs which is the first time I've tried that particular detail. I've done my share of painting my 1:1 cars quick and dirty back in the day without regard to painting anything that required opening any hinged stuff. That's what the 1:24 owner of this one did. Planning on some "nose art" on the doors and maybe the trunk. Hope you enjoy the look. Comments and criticism are welcome.
-
need some sungate ivory for '53 Ford
fun9c1 replied to fun9c1's topic in Model Building Questions and Answers
Thanks for all the replies. One of those ought to work! Mike, I had seen that site before and emailed him about ordering paint but never heard back. Had you ordered anything from him? -
I'm starting to build the Lindberg '53 Ford Victoria for my Dad, which I plan to surprise him with. This was his first car which he bought in 1960 in good shape from his favorite uncle. It was Sheridon Blue over Sungate Ivory. The blue seems to be available, but I am having a heck of a time finding any Sungate Ivory, which is weird because they must have laid down zillions of gallons of that back in the day. Anyone know of a source? TIA, Rob
-
Figured I'd post some better pics of the underside, interior and the battery. These pics show me a couple things I need to address. And the carpet needs to be messed up a little.
-
Thanks for the comments, guys, I appreciate it! Bob- yes I do need to do something with the headlights, I forgot to mention that. Any suggestions? Is there a way to make them look reasonably realistic without drilling them out and adding clear lenses? Tom- my thoughts exactly on the battery. If this were a 1:1, it would have a cheapo newer battery in it. The first good image I came across was an EverStart so I printed it. I figured if it wrinkles up a little, all the better since some 1:1 labels end up doing that or half-peeling off anyway. The hood insulation is just black felt with some dry-brushing with brown, white, and gray oil paint. I really like the way it came out. First time trying that. More soon I hope. Won't be long till it's under glass.
-
Well this thing is getting pretty close to being done. Some things left to do still include painting/foiling the steering wheel and some chrome in the interior, adding a mesh behind the grill, license plate, maybe plug wires. Since the last post, I've got the interior mostly painted and foiled (and grimed up), added the battery and radiator, weathered the headlight bezels and got those glued on, and got the front wheels spaced apart a little more realistically than JoHan would have you do it. For the battery, I printed out an image of a battery in 1/25 and stuck it on the battery while the black paint was wet. Then grimed up the image a litte by drybrushing.
-
Thanks for the comments, guys. Dave, that sounds like a great idea and a good challenge for one that's sitting, but this is a daily driver, circa '83ish.
-
OK, I tried the same thing on the windshield that I did to the wheels and I'm very happy with it. What I did was commandeered my daughter's Crayola sidewalk chalk (she's 12- she doesn't need it anymore! ) and scraped up some white and gray into some water, mixed it up, and basically "drybrushed" that onto the windshield and back window until it had the look I wanted. Then I took a .080 or so styrene strip, cut it same length as the wipers from the pivot point to the inside end of the wiper, wrapped a little paper towel where the wiper would be, and made the wiper motion with that against the windshield. I love the way it looks. It's not permanant which could be good or bad- good if you change your mind, but bad if someone touches it. But it can always be done over again. I also did the front wheels with the chalk so now all four are done. I'm hoping to get some more done this weekend as another foot of snow is coming down on top of the 3 or 4 feet already on the ground...
-
'32 ford 5-window coupe , top chopped rebuild
fun9c1 replied to crazyrichard's topic in WIP: Model Cars
Thanks for the explanation on the rust, Richard. That thing looks awesome. And i'm jealous of your garage! -
Paint Strippers - What to Use?
fun9c1 replied to pbj59's topic in Model Building Questions and Answers
Anybody ever tried Purple Power on tires? I'd like to remove a botched white letter job (testors) but want to make sure it won't wreck the tires. I found that it does eat through ziploc (different brand but like ziploc) bags after a day or two. These tires are from the Revell/Monogram '55 Chevy Street Machine. -
Thank you guys for the compliments! This is alot of fun straying from my usual builds where I try to make it like it just rolled out of the factory. Wayne- I agree it wouldn't hurt to make the glass look "older". I don't want to do any permanent damage though. So far there is nothing on any part of this that can't be fixed with Purple Power. I would probably never redo this as a "shiny" car, but I like to know I can if I want. Especially since this particular kit is getting pricey. Believe me, it was very difficult to mess up that nice new blue paint job (first time I ever did THAT on purpose!) but I'm glad I did now. Tom + Steven + Wayne- I like the simulating a dirty windshield idea. I will probably do that. Tom- You're "new wipers on an old truck" reminded me of Christine- "He's got new wipers on a busted windshield... Good hands, bad taste in cars..."
-
OK, I tried something on the back wheels less permanant than paint. I scraped some white and dark gray chalk up, put a bunch of it in 2 or 3 tbsp of water, mixed it up good and dunked the wheels in, took 'em out and let them dry and it doesn't look half bad! It doesn't show up in the pix that much but it takes the shine off, and makes a couple of "crusty" spots. You can see the diff between the front and back wheel: I also couldn't wait to put my scratchbuilt wipers on even though that should probably be one of the last things I do... I put one a little higher than the other like it probably would be on a 1:1.
-
That is one gorgeous engine bay! Yup, that's how my frame came too. I glued it, put the car upside down and put alot of weight on it and so far after a year or so it's still together. But I hear you on the being able to take it apart someday. I do that alot, too. In fact most of my models do not have the chassis glued to the body. NIce work!
-
Thanks guys. I had forgotten that those were aluminum!
-
It just dawned on me today that I have an old, half-started 20 years ago with a lousy paint job Revell/Monogram '55 Chevy Street Machine that has the exact wheels I wanted so I did this mock-up and I really like it. I'm thinking I'll add a little rust to the wheels, and I'd like to remove the paint on the raised letters and either leave it off or re-do it. Will brake fluid work on tires or will it wreck them? I also need to space the front wheels a little farther apart.
-
'32 ford 5-window coupe , top chopped rebuild
fun9c1 replied to crazyrichard's topic in WIP: Model Cars
I love it! Can't wait to see the rest. What method did you use for the rusty surface?