pcm1977
-
Posts
146 -
Joined
-
Last visited
Content Type
Profiles
Forums
Events
Gallery
Everything posted by pcm1977
-
Thank You
-
Alan, Thanks for the advice, but I don't know if raising the engine is an option right now. The overhang on the upper part of the firewall is pretty close right now. I do not want to really add another bit into the frame and push the body back, that was a pain in the A!!.
-
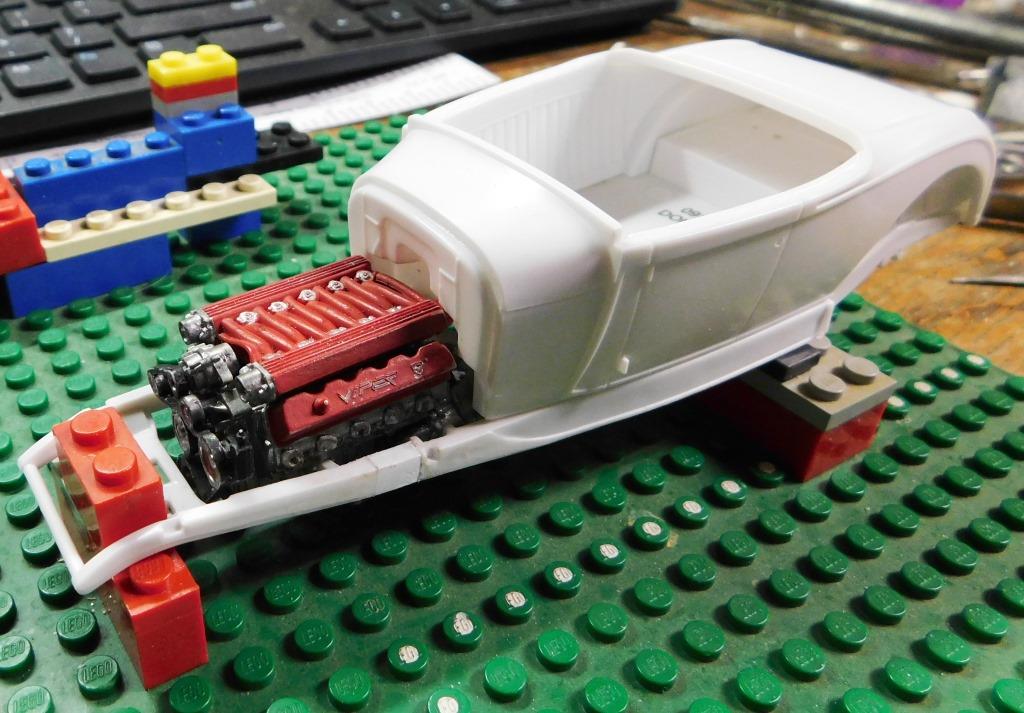
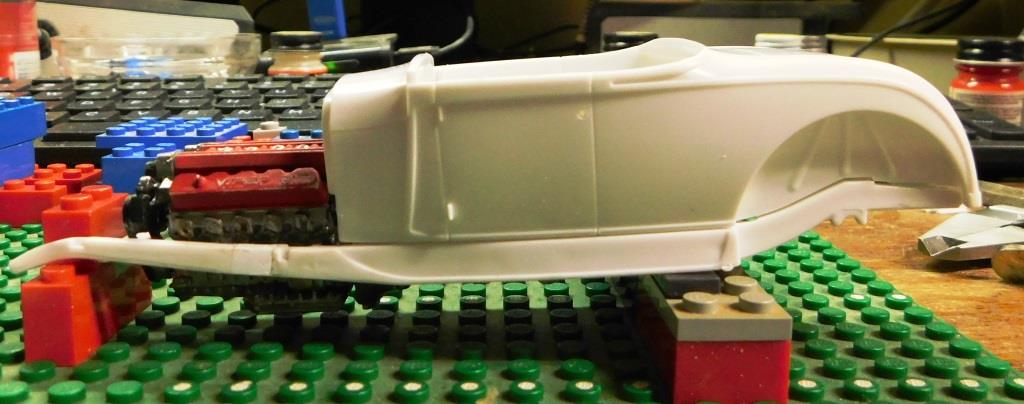
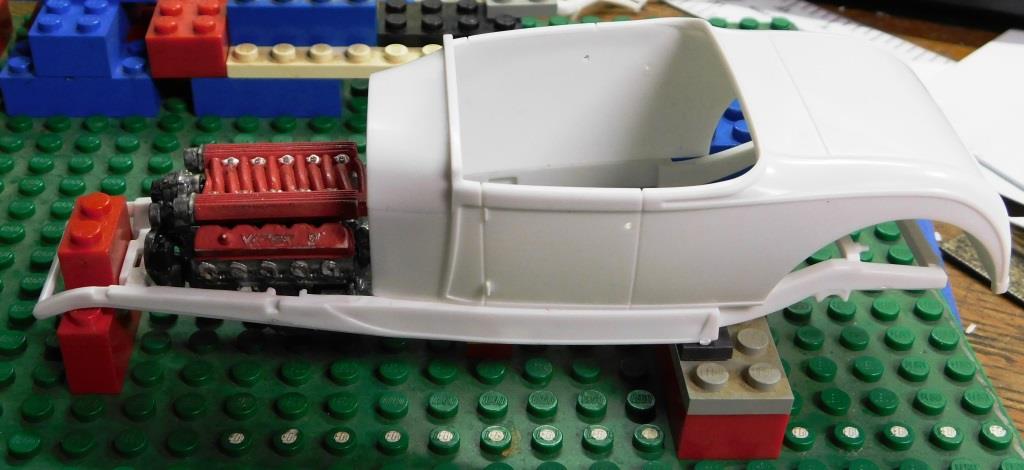
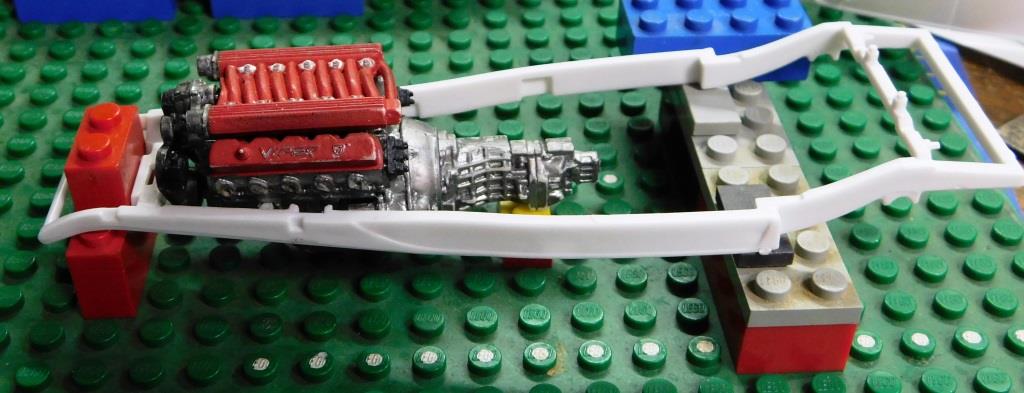
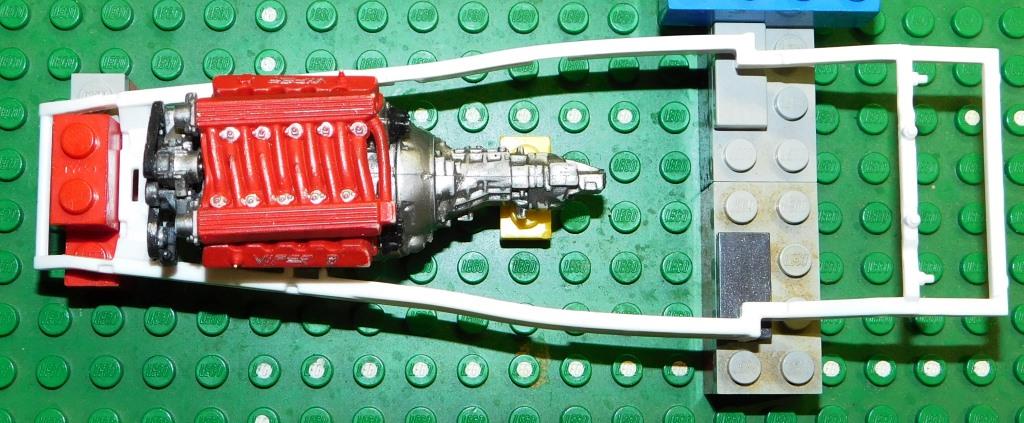
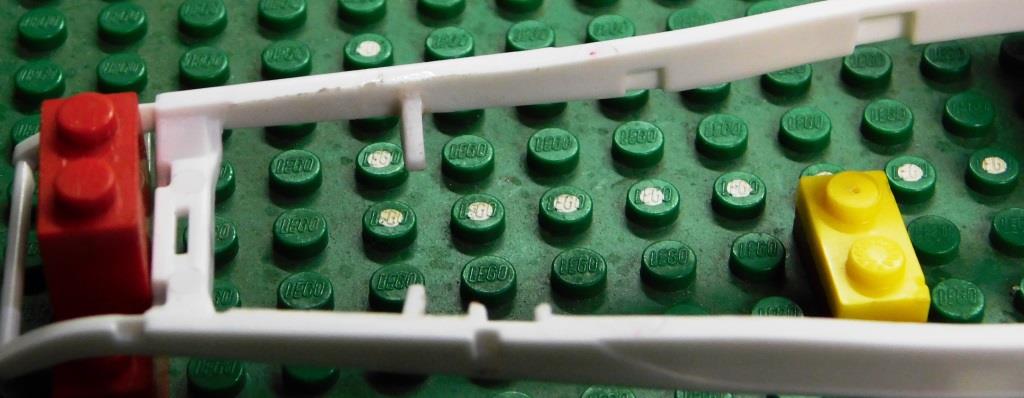
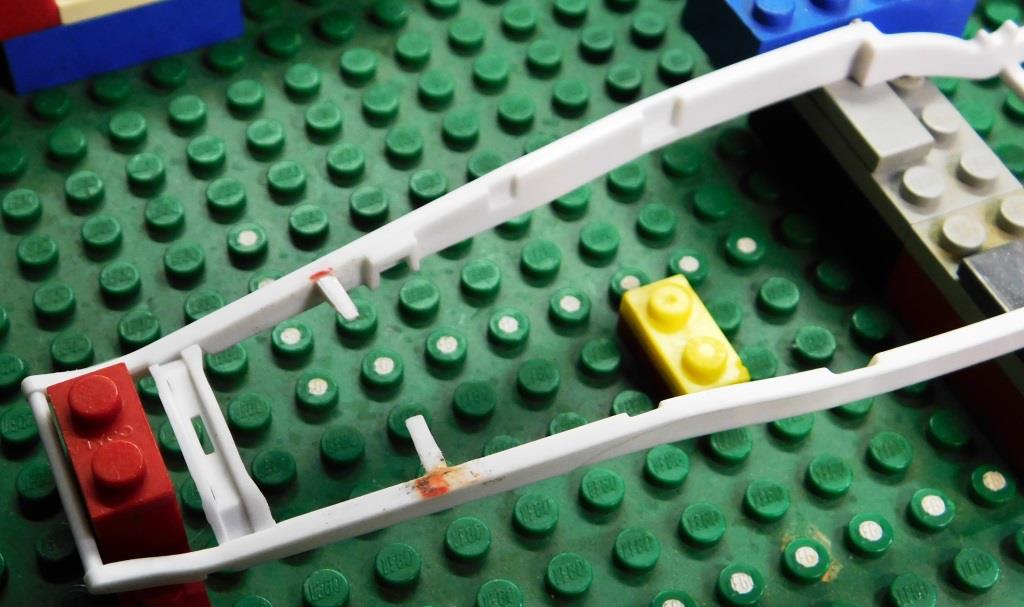
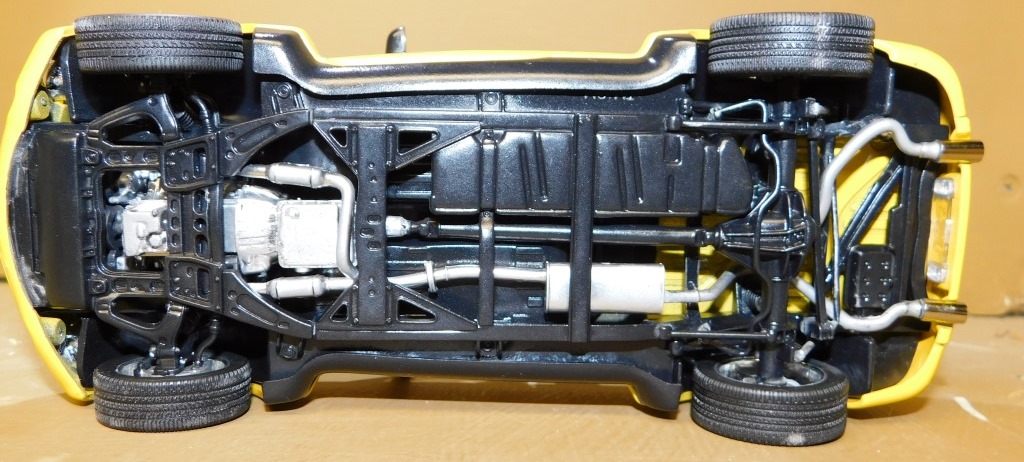
Did a bit of work on the frame this evening. I accidentally broke the frame apart on the one side when washing it before painting. I glued it back together last night and added some thin pieces of styrene to the inside of the frame for reinforcement. Tonight I modified the cross brace/transmission support. I simply cut out the middle and added a curved piece of round styrene. Her are some pictures of what it should look like with the engine and the body. Talk about building a car around the engine As I looked over what I had done tonight it came to me. Once I get the axles and wheels I was planning on using on the car the oil pan and transmission bell are too low in the frame and actually looks as if they will keep the wheels off the ground. Initially I think all I have to do is boost the back end of the transmission up and put some blocks on the rear axle to drop it some. I hope this "boost" does not make the car look too tall over all, since my original idea was to keep this as low as possible.

-
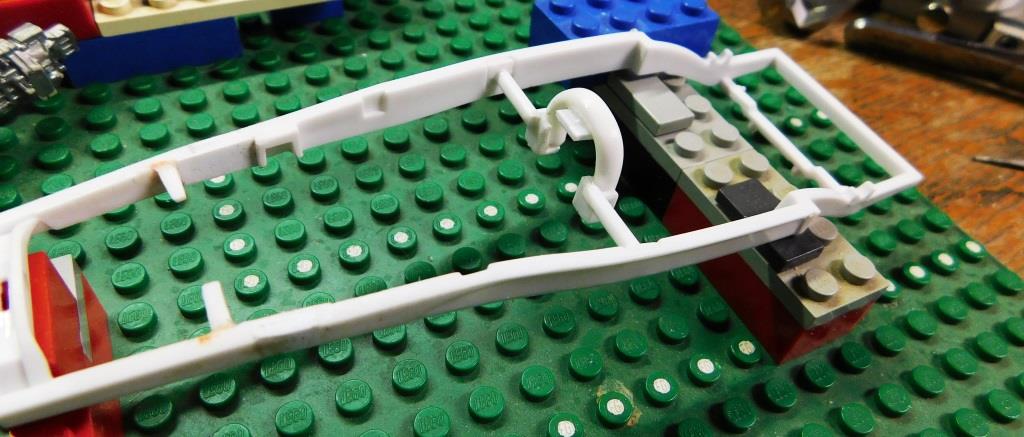
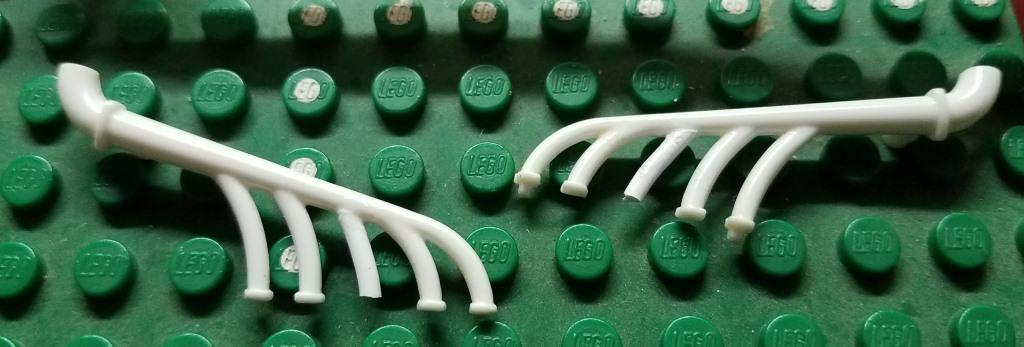
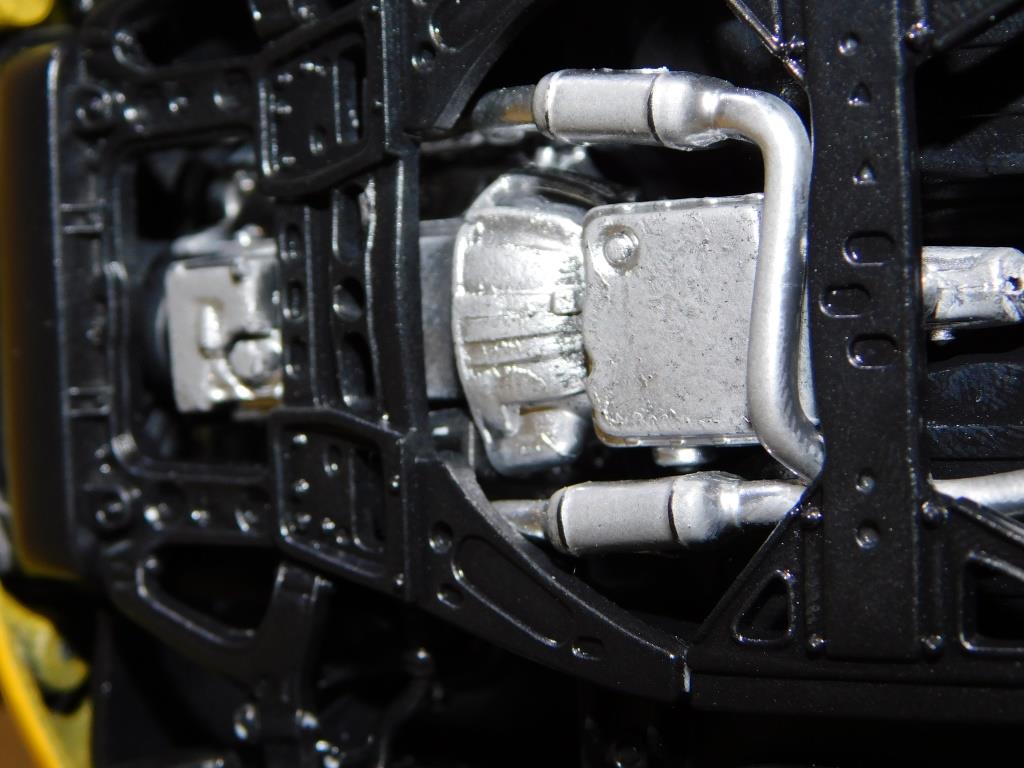
Worked a bit more on the frame this afternoon and this evening. I cut the frame and put a piece of styrene 0.025" long on each side just behind the engine mounts. Since I did not have the right size of rectangular styrene I sandwiched three pieces of flat sheets together. A bit of sanding and some putty and you should not even be able to tell I put them in. I also added the extra pipe to each header this evening. Just waiting for the glue to dry, then I will put the flange on it and a bit of sanding. The next issue I came across this evening was the brace for the back end of the transmission. The original brace that came with the kit holds the end of the larger transmission too high, which interferes with the bottom of the body. While not a big deal I just did not want to make a new one from scratch...o'well. Thanks for looking I also mocked up the engine and body to see how they looked against the stretched frame.
-
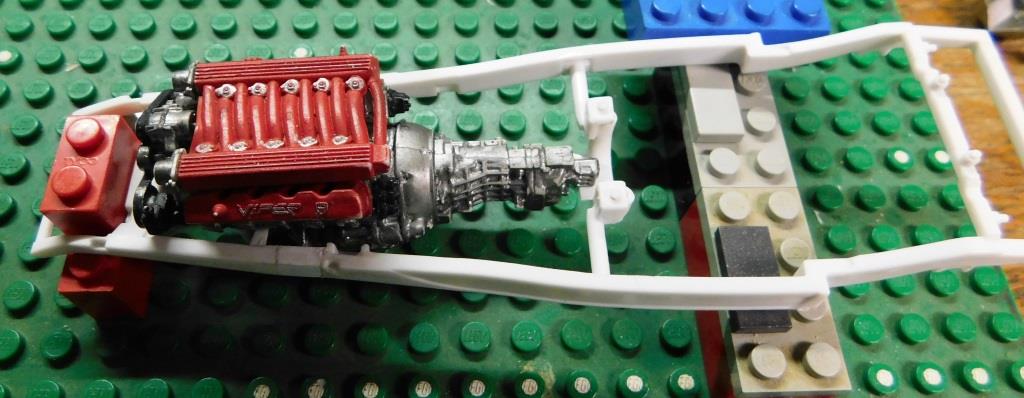
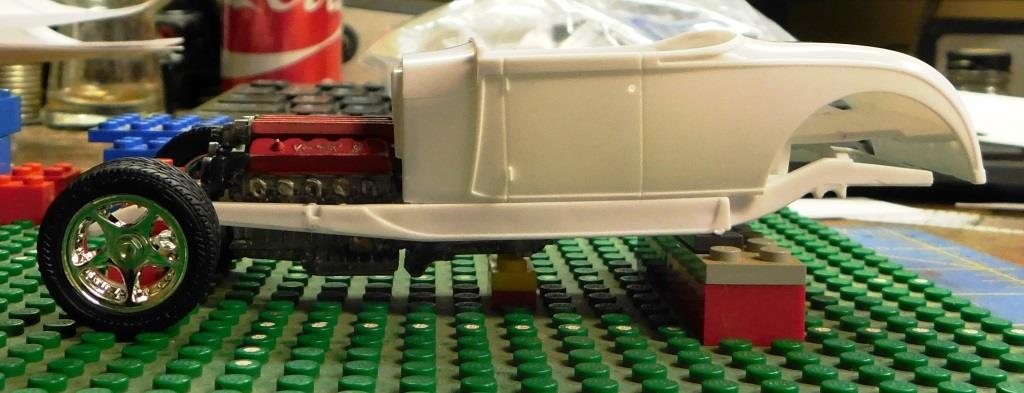
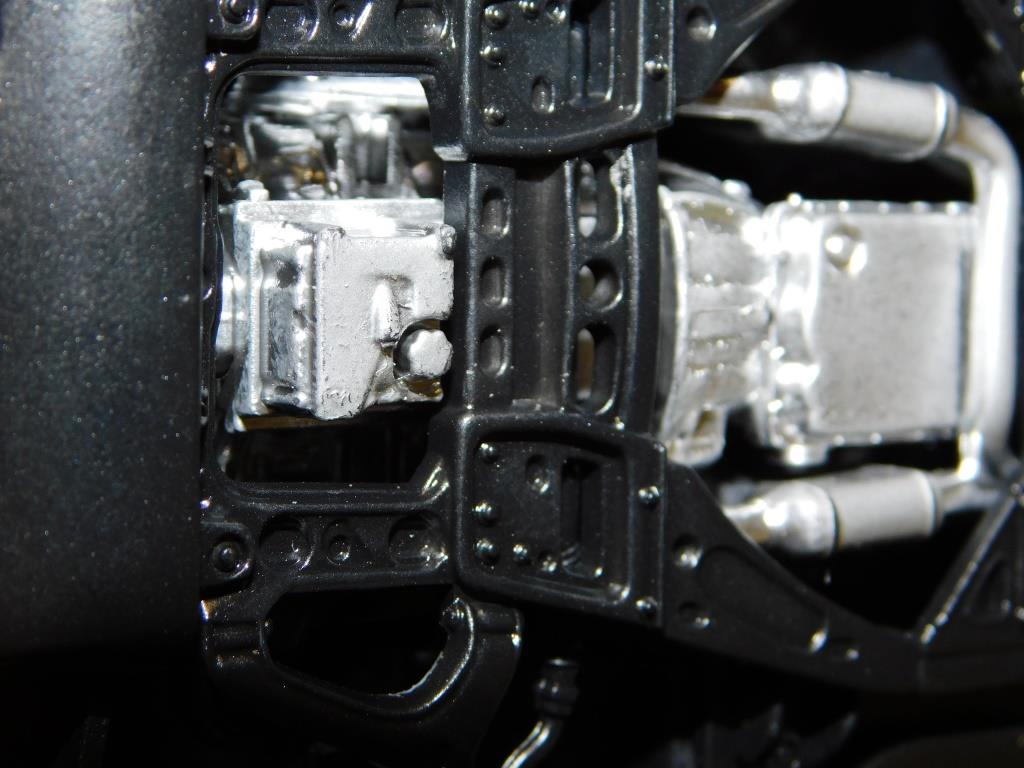
So I worked some more on this one tonight. I took into account the firewall just as espo suggested. The good thing is that the firewall is almost vertical so it did not appear to be an issue. However the transmission hump was. I took some measurements and began to try and figure out how much I would have to cut out of the hump to fit it all in once I extend the frame. I did not want to extend the frame too much and put a large gap between the firewall and the back of the engine and was ready to give up till I decided to work on moving the engine mounts. I realized that the mounts sat on the top side of the frame and angled upward. I was going to cut them off and move them back approximately 0.080". As I looked over them and the angle on the side of the engine block, I realized that if I simple cut them off, moved them back the 0.080" and then flipped them over and placed the lower angle of them up. When I glued them back on I lined them up with the bottom of the frame. This lowered the engine considerable in the frame and will allow the transmission hump to fit over the transmission with not modification once the frame is stretched 0.025" just behind the engine mounts. I mocked up the body and engine along with the low profile tires I plan on using. The new engine mounts from the top. and from the bottom With the tires.
-
Thanks espo, I have been worrying so much about getting it in the frame that i totally forgot about body fit. The V10 does sit higher in the frame that the Nailhead and I had not worried too much about that since I had no intentions of putting a hood on it.
-
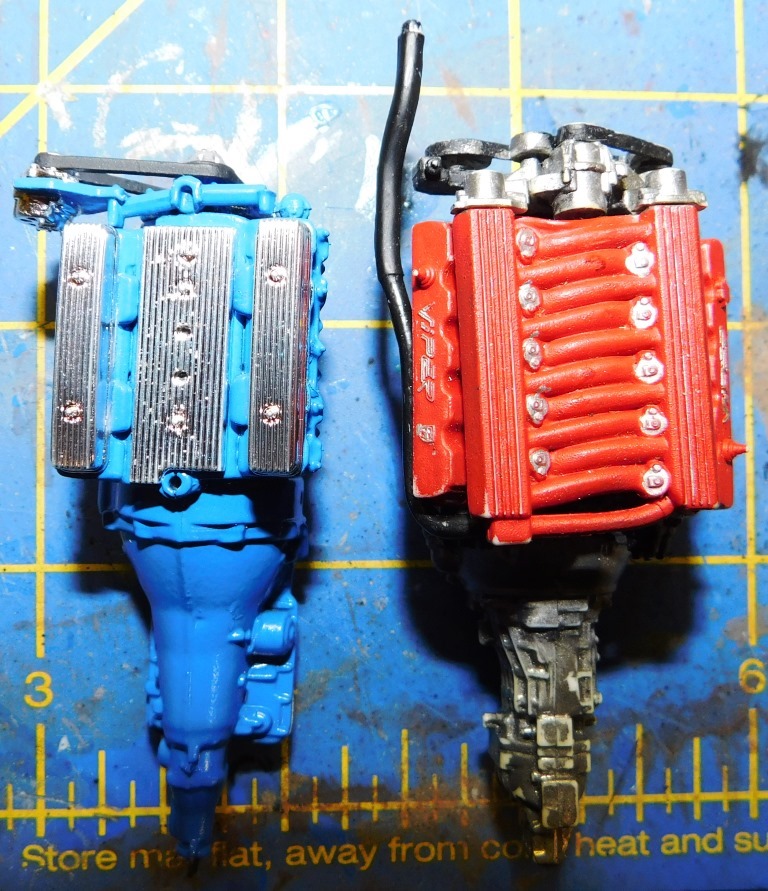
Tonight I started the planning phase of what i need to do to fit the V10 into the frame of the '29. I took some general measurements of each engine and compared them to come up with how much I need to adjust the frame. After looking over everything I came to the conclusion that I need to extend the frame about .025 of an inch. I also need to move the engine mounts back about 0.080 of an inch. Those two adjustments and I think the larger V10 will fit in the frame.
-
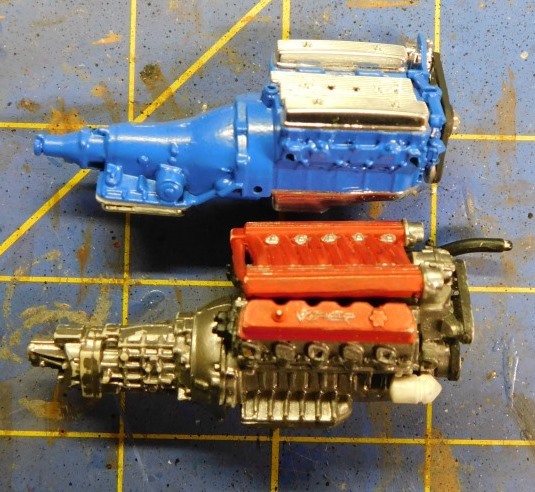
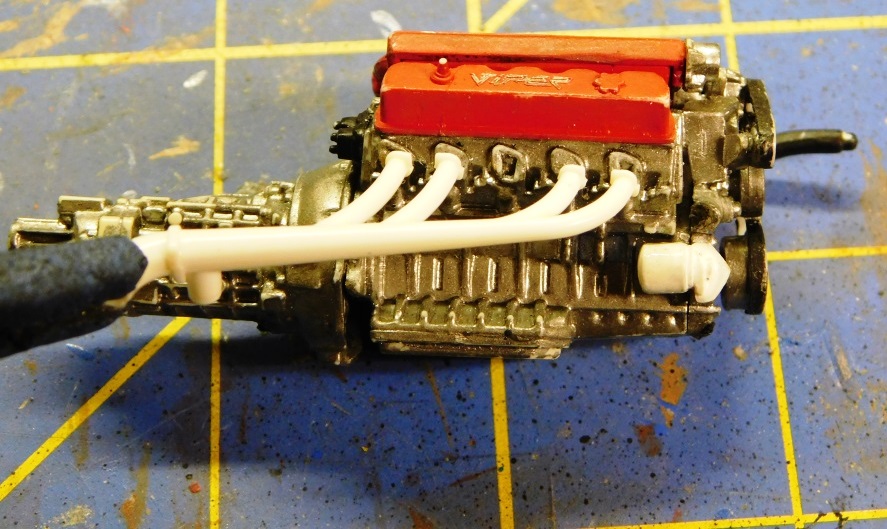
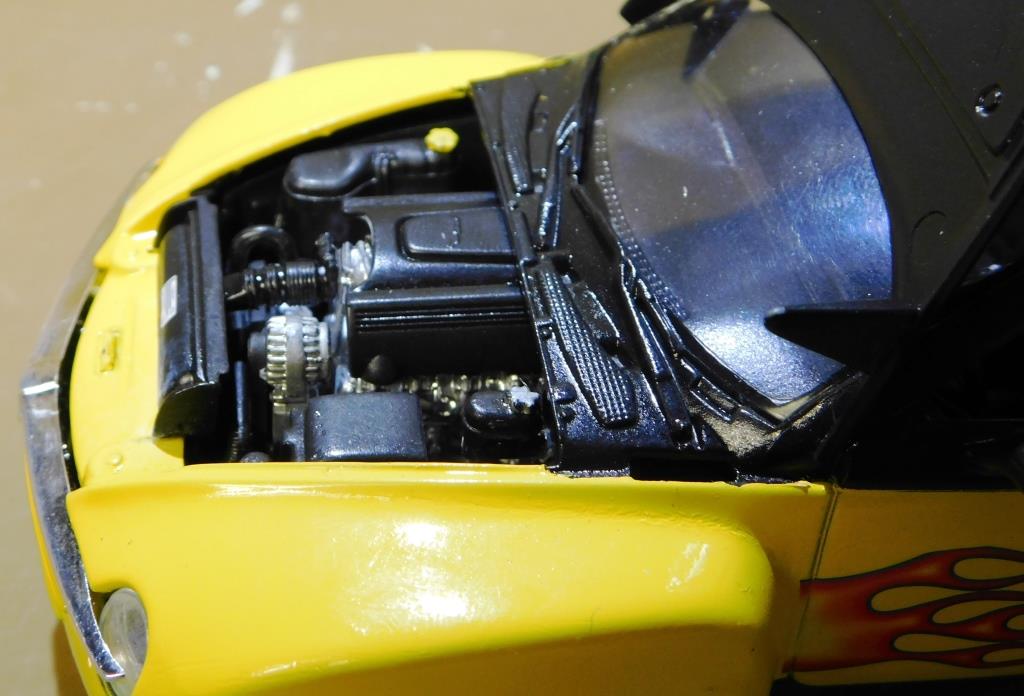
So It has been a little over a year since I floated this idea and I am finally getting around to this one. First I have to figure out how much I need to stretch the frame and make modifications to the body if necessary. I decided to build up the engine that comes with the Revell '29 and measure it against the Viper's V10 and increase the size of the frame to make up the difference. Much to my surprise the overall engine and transmission of each engine is relatively the same. and the width is about the same on the bottom side (the part between the frame rails) of the engines. Another pleasant surprise was the exhaust. I took the manifold off the V10 and placed it next to the manifolds of the '29. They matched up with the exception of the lack of a 5th pipe. However as you notice below a properly placed piece of styrene and some scratch building and I have a sweet exhaust for the V10. The bonus is that the way the '29 manifold sits it appears that I do not need to modify the frame width to fit the exhaust inside it. One last thing. I am considering finishing the '29 engine and either using it for another build or a diorama. However I do not know what type of engine it is, so I can make sure I get it done up correctly. Thanks.
-
Thanks kelson, I just have not had the chance to take better pictures of the diorama.
-
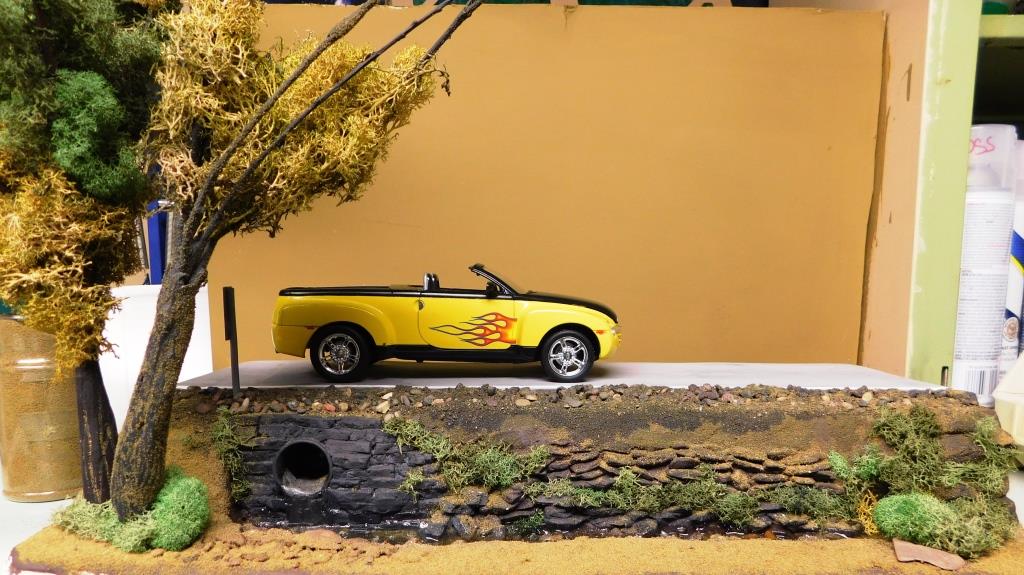
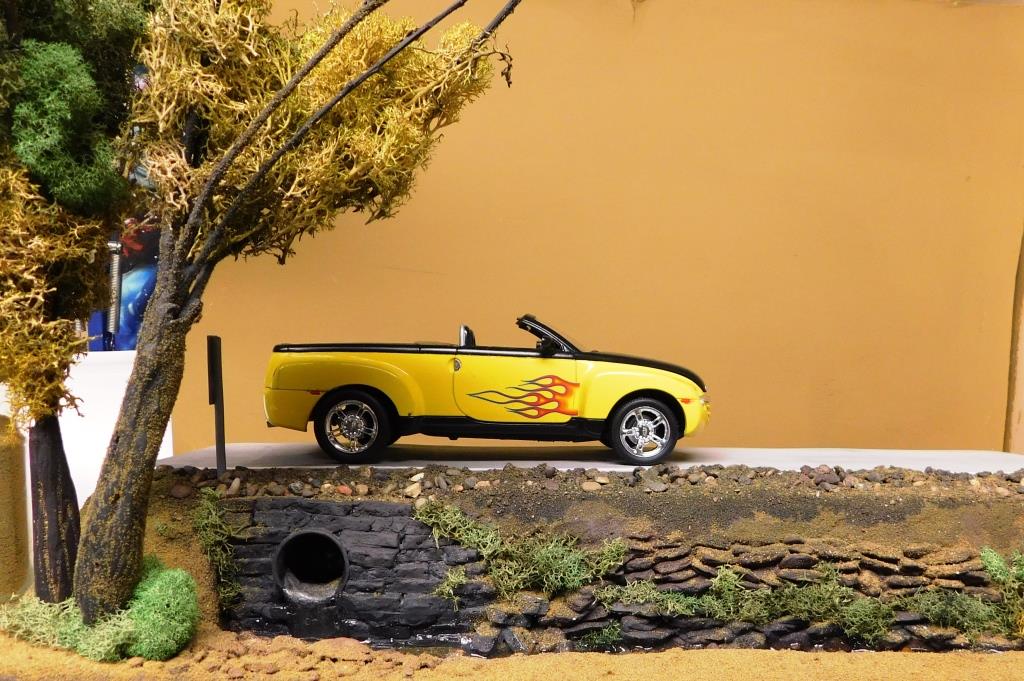
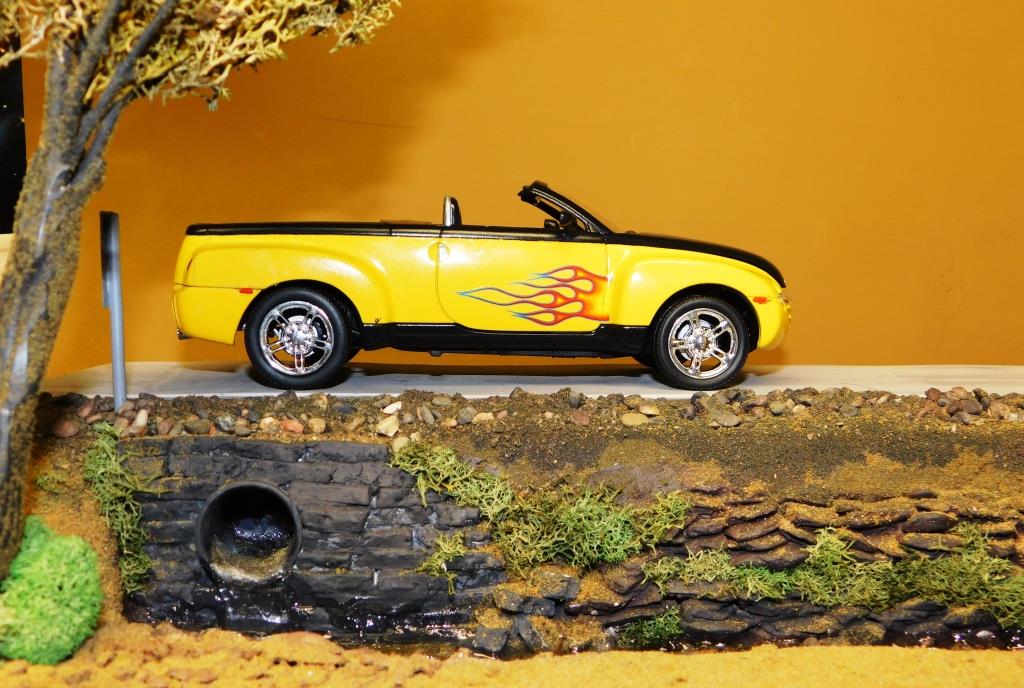
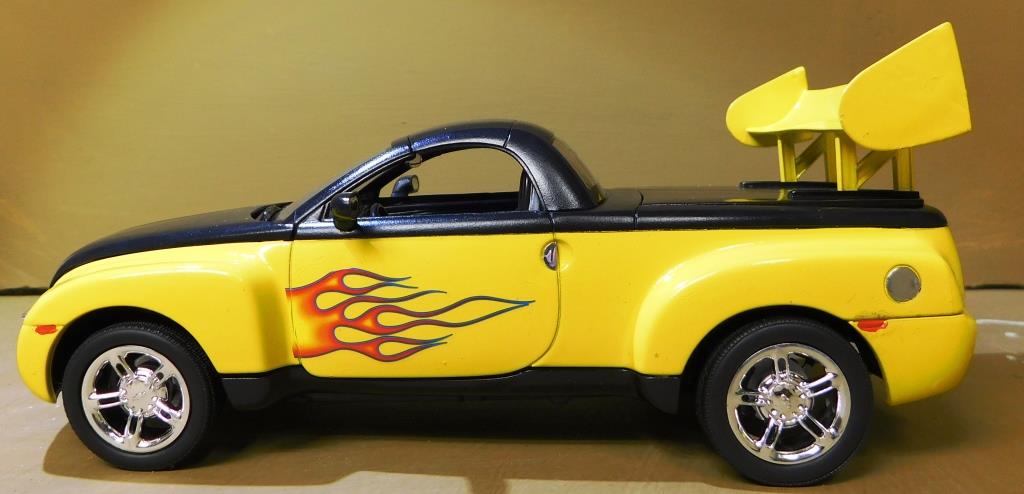
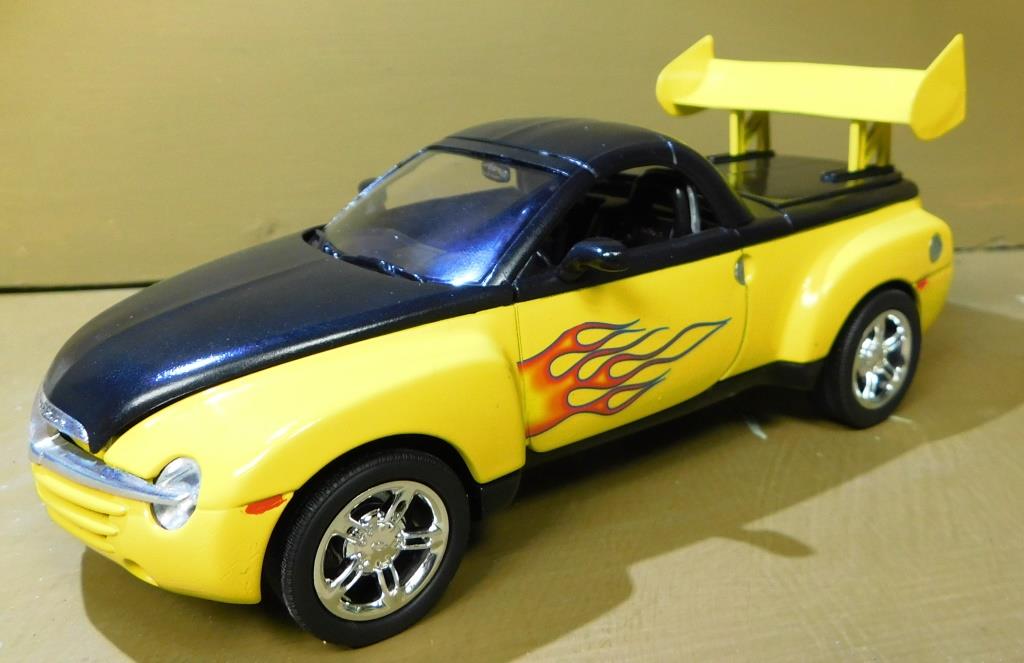
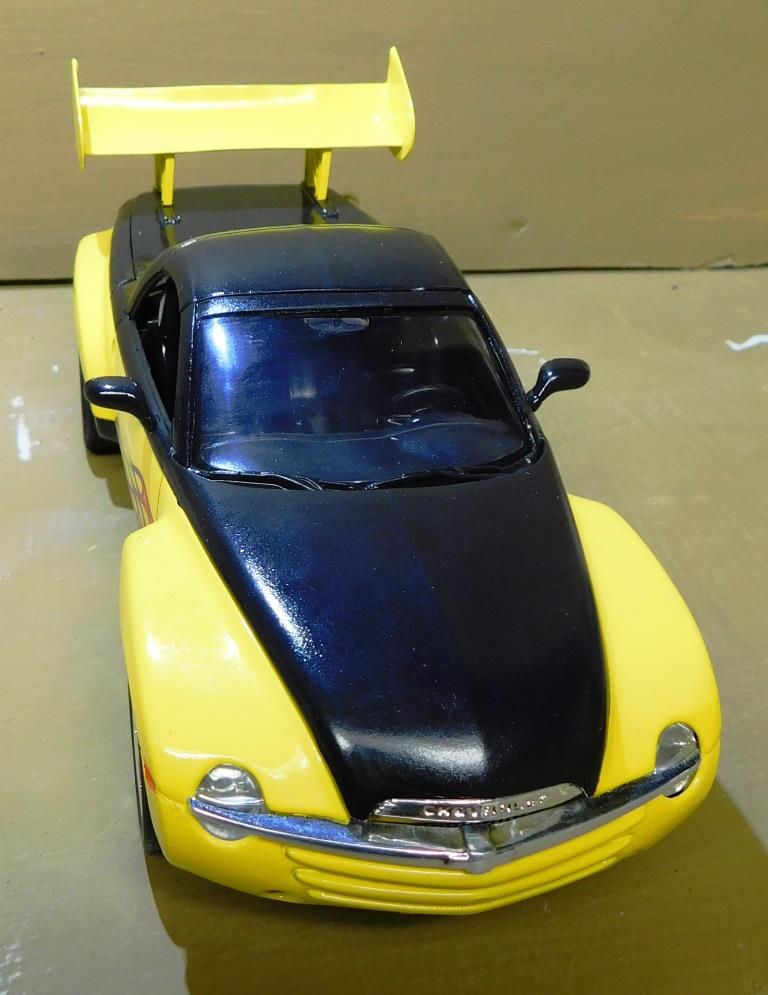
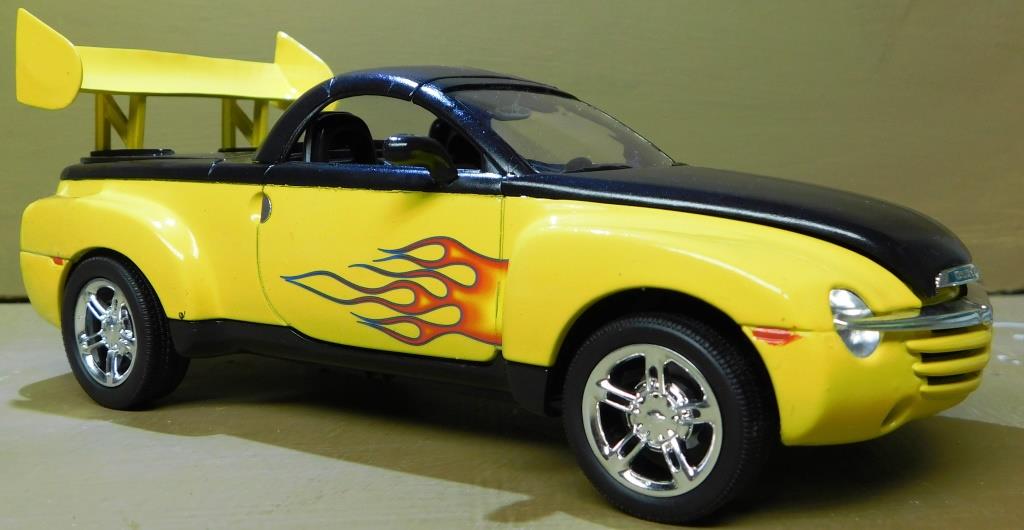
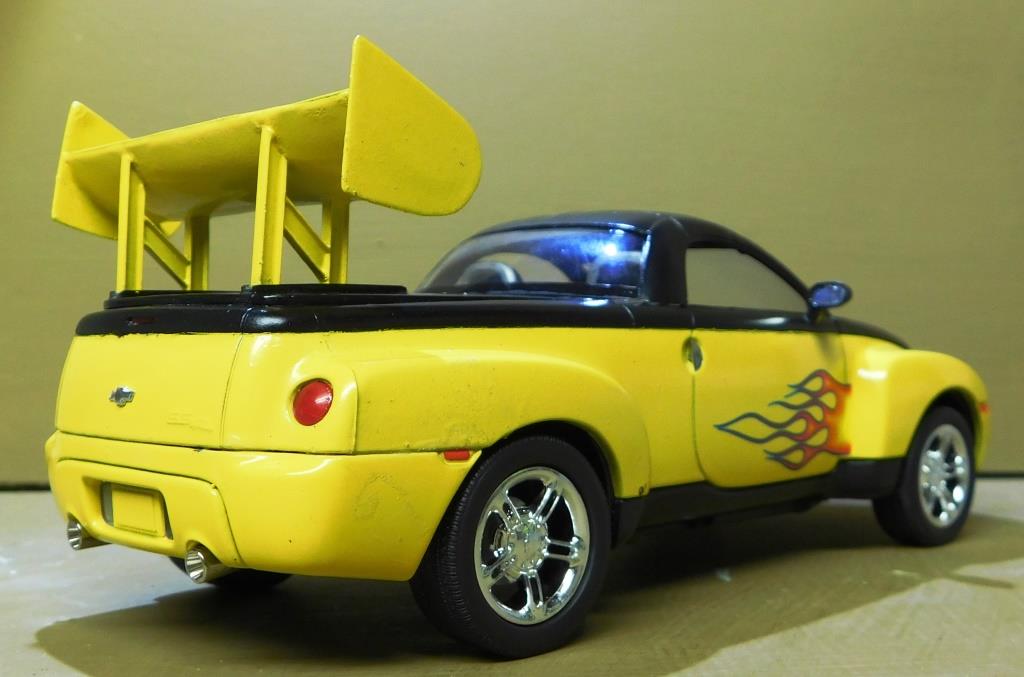
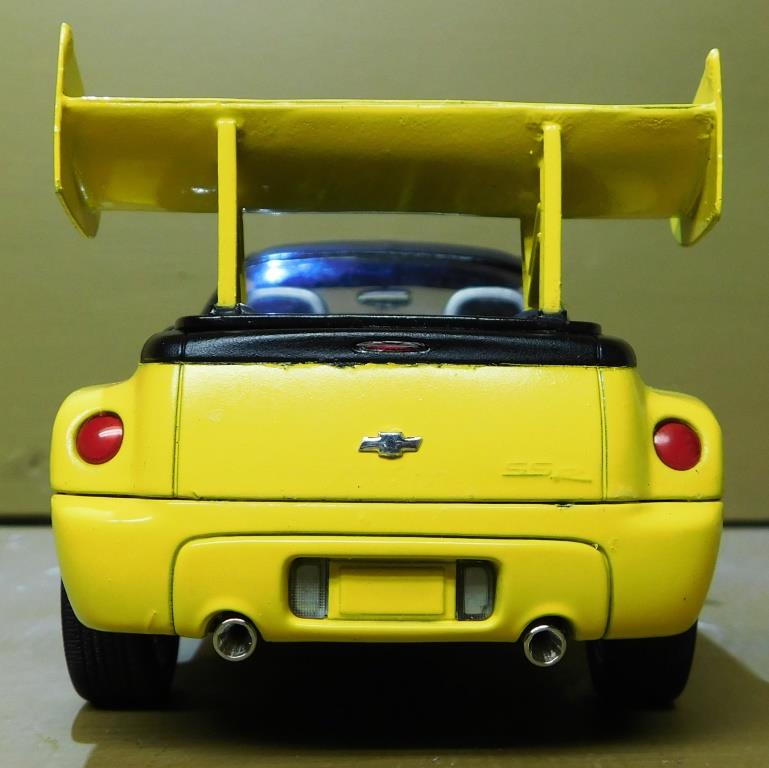
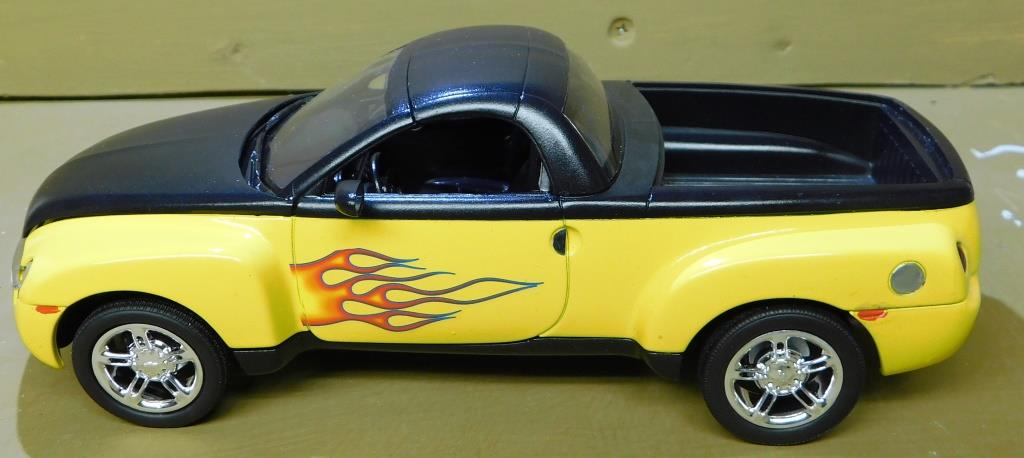
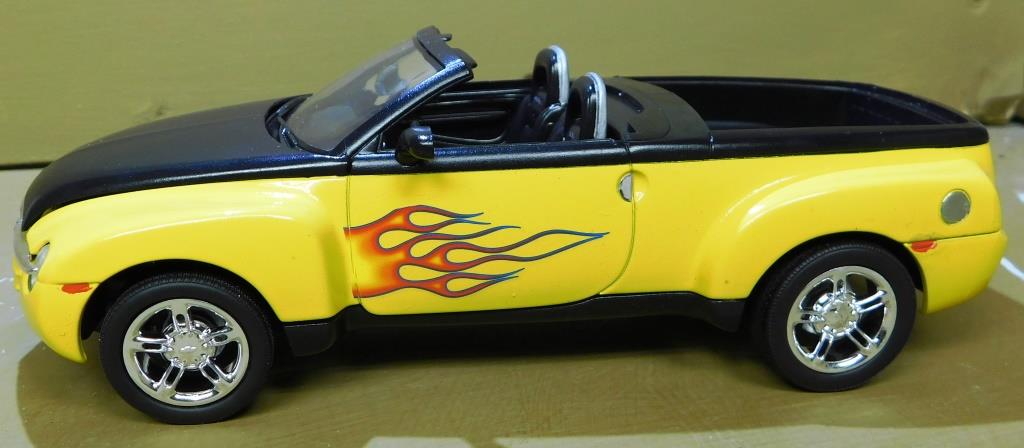
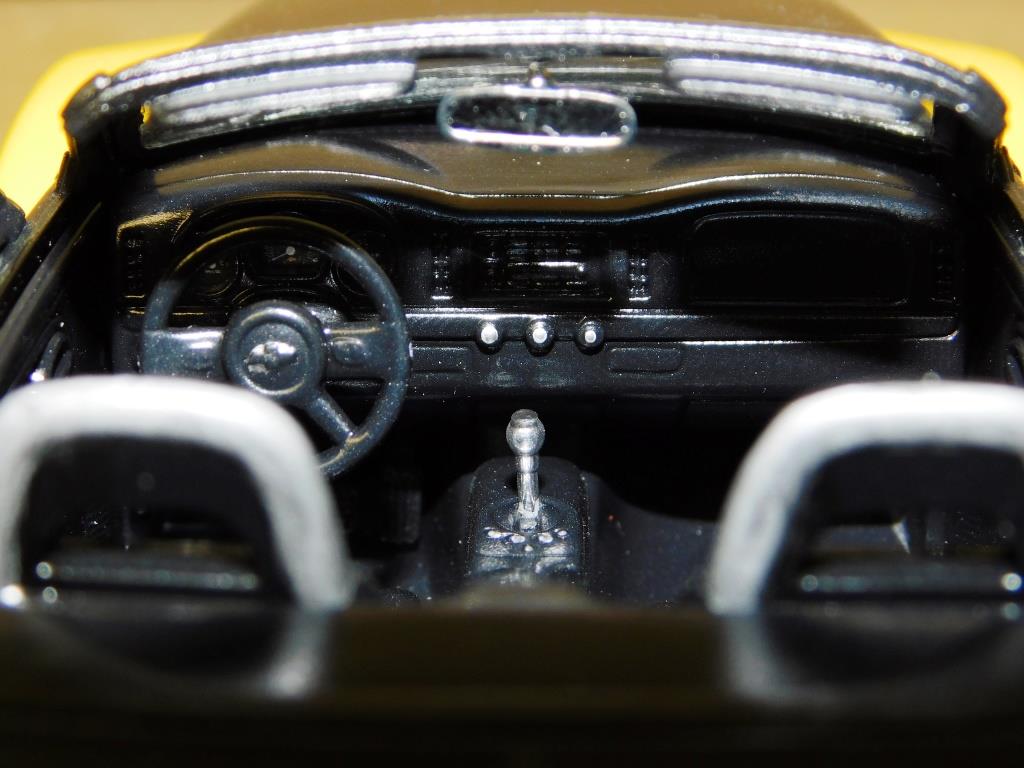
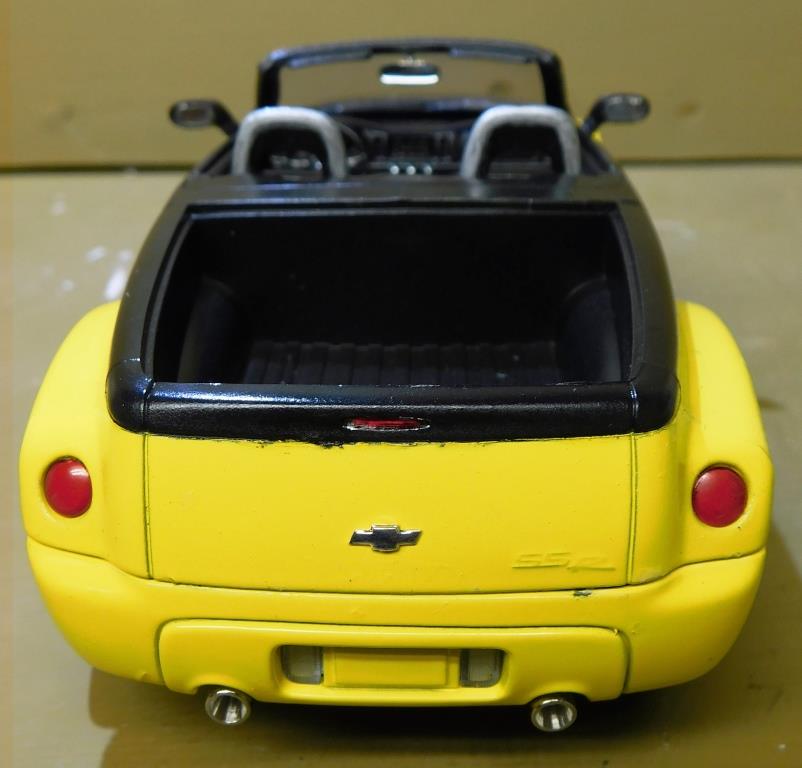
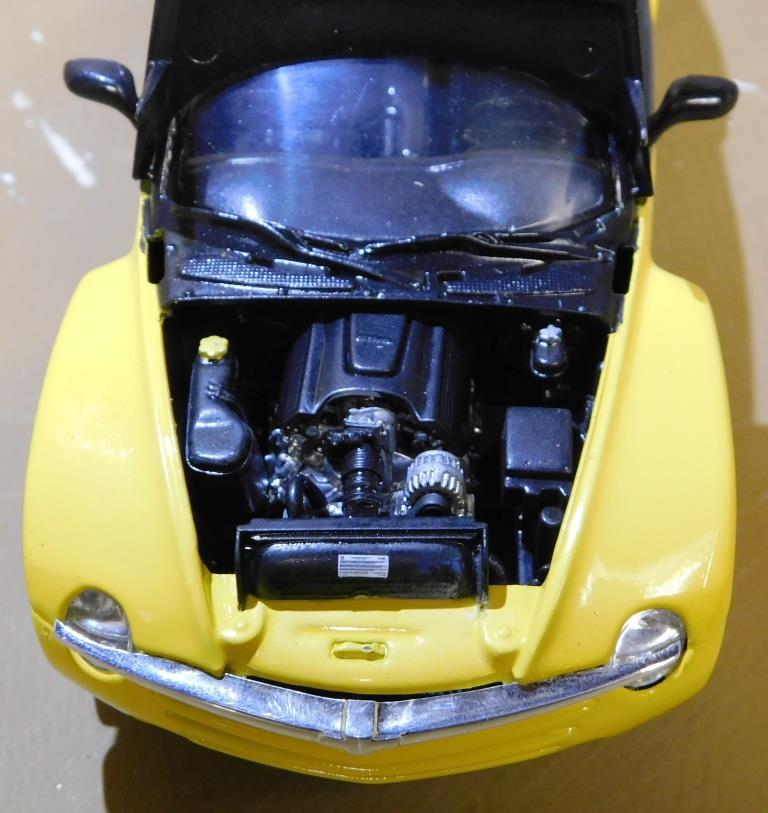
Found this kit at my local Olies store for cheap. I picked it up a while back and put it on the shelf. I spent some time thinking about how could I make it better. I painted it two-toned and took some flame decals I had laying around and put on the sides. My son suggested that maybe I put a GT Wing on the back. So I got started with the most ridicules wing I have ever seen. I did some research and scaled the measurements down, but it still seems a bit large, maybe next time I'll make it a bit smaller. Overall the kit went together nicely with the exception of the glue bomb on the back bumper, because it was warped slightly. The wing is 100% custom from sheets of styrene and small I-beams. I chromed the entire engine. I had recently made a new diorama and decided to take some pictures of the SSR on it. Out for a Sunday drive with the top down and the wing at home.
-
Supercharged '65 Chevy Stepside
pcm1977 replied to pcm1977's topic in Model Trucks: Pickups, Vans, SUVs, Light Commercial
Thanks, it was a fun build. -
Thanks Ace, Now that you mention it, I did clean the hood and the rest of the car just how I always do, with dish soap and hot water. Then I let it dry for a day or two. However I did NOT clean the spoon, just pulled it out of the box and painted it. What gets me is that the black primer went down really well on both with no issues.
-
I went to my local hobby shop a couple weeks back looking to try and match a paint color. A couple of years ago I painted a semi truck a blue color. For Christmas I got a trailer for the truck and wanted to paint it the same color. I took the truck with me and never really matched the paint color, but bought a can of Testors clear blue anyway. So when i got home I gave the blue a shot on the back of a plastic spoon. Laid down 2 coats of black primer and then two coats of the blue. I compared it to the color of my truck and determined that it is way too purple. No big deal, I set the can aside and moved on with my life. This past week I was looking at that spoon and thought that would be an awesome color for the '71 corvette I had sitting on my shelf waiting to be assembled. I followed the same paint method as I did the spoon (2 coats black, 2 coats clear blue) with a light sanding between each. My first shot of the blue on the hood produced this awful finish. I figured the tip was clogged so I cleaned it up and tried again, same thing. So after two coats with sanding in between the finish looks like the picture below. Both the hood and spoon are smooth to the touch, but the hood looks like S*&$#. Did I do something wrong? This is only the second time I have used Testors paints and i remember not really liking the first time I used them. I could understand maybe this is just how this paint is, but the spoon came out so wonderful.
-
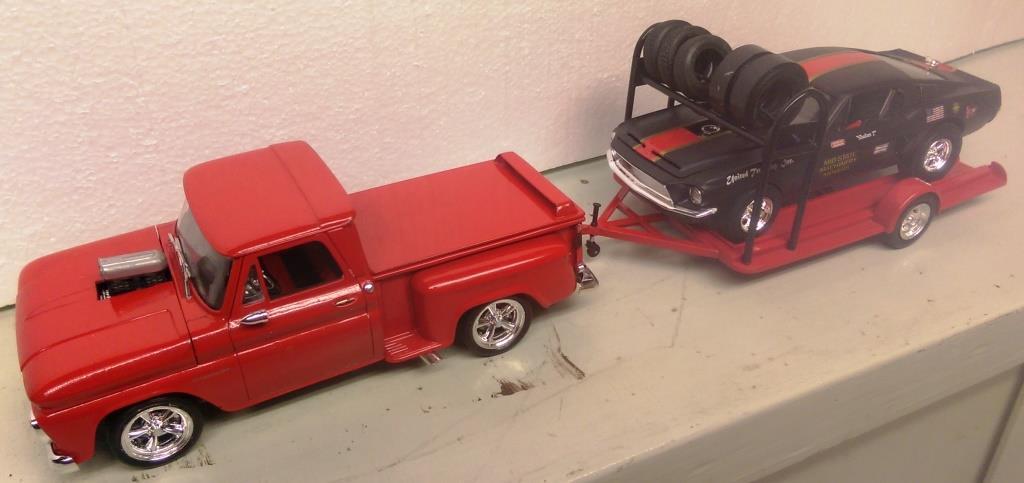
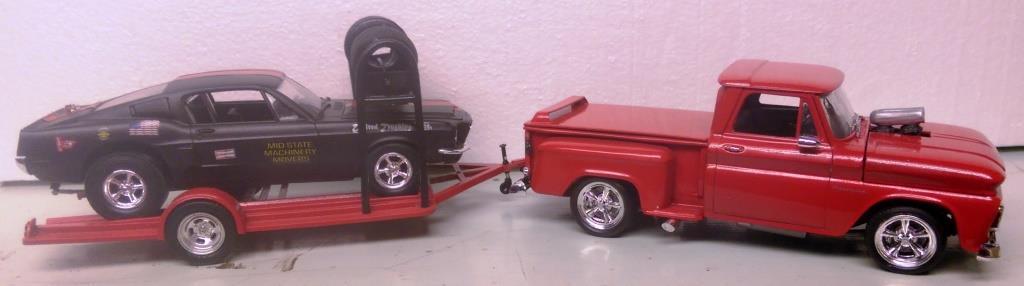
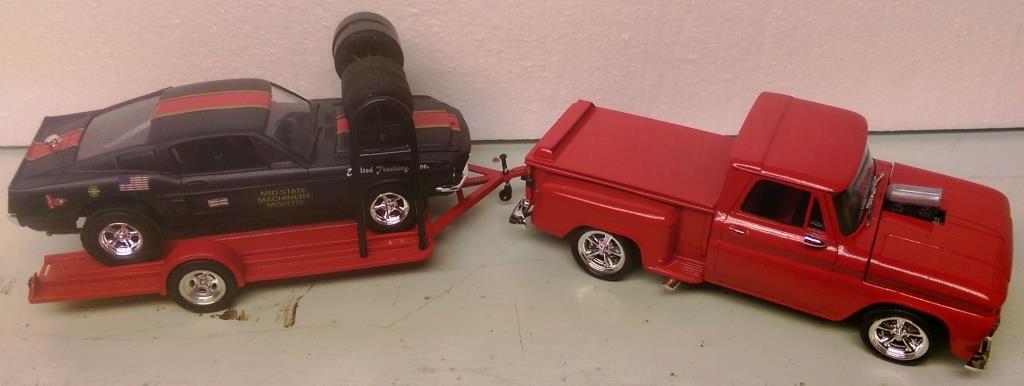
Thanks for the comments afx: My 12 year old said the same thing when he saw the finished product. I told him you could look at it two ways. 1 - The Chevy is a slave to the better Mustang and puling it around on a trailer similar to a king and his carriage...or 2 - The Mustang is inferior to the supercharged Chevy and the Chevy is demonstrating its dominance by pulling the Mustang around. I guess it all depends on if your a Ford or Chevy guy whether the glass is half full or half empty.
-
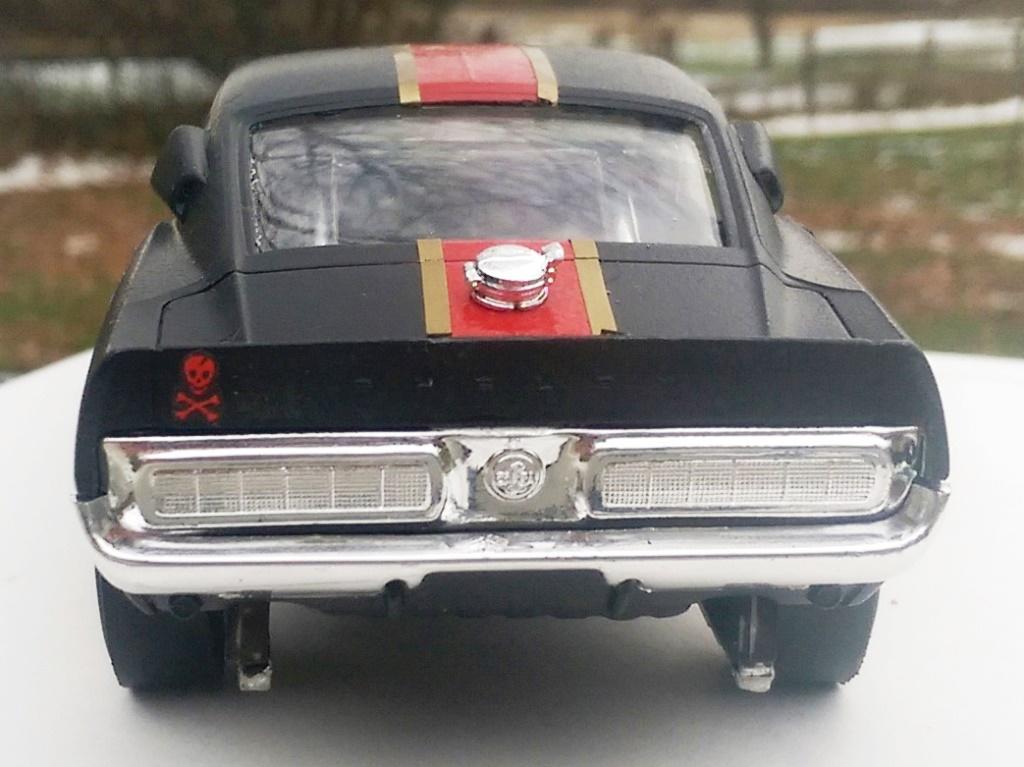
I finally finished my 1965 Chevy Stepside, trailer and 1968 Mustang Drag. I got the trailer from a junk yard I got off ebay. Put some nice rims on the trailer and added the scratch buit tire rack on the front. Thank you for looking Original '68 Mustang Drag thread - Link Original '65 Chevy Stepside thread - Link
-
Supercharged '65 Chevy Stepside
pcm1977 replied to pcm1977's topic in Model Trucks: Pickups, Vans, SUVs, Light Commercial
Thank you everyone for the positive feedback. crazyjim - I was looking at that when I was editing the pictures and agree that the grill needs a little bit more. I have never given a chrome part a black wash, this might just be my first I will try. -
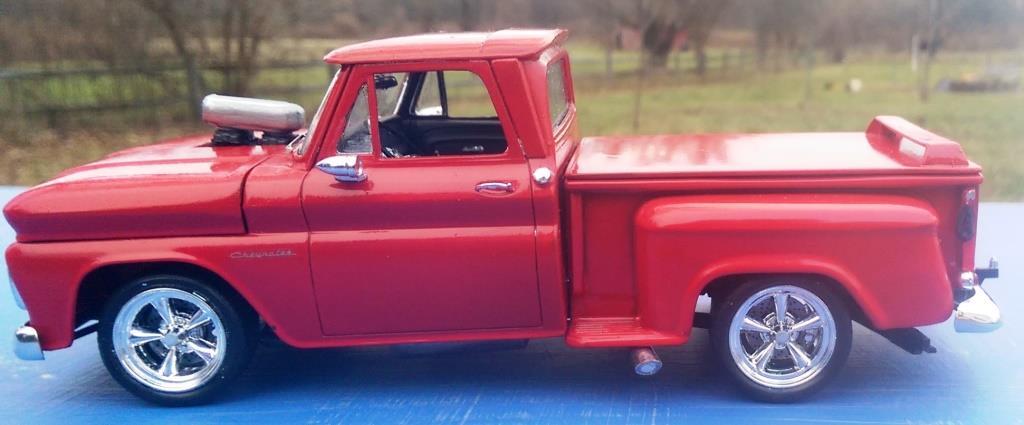
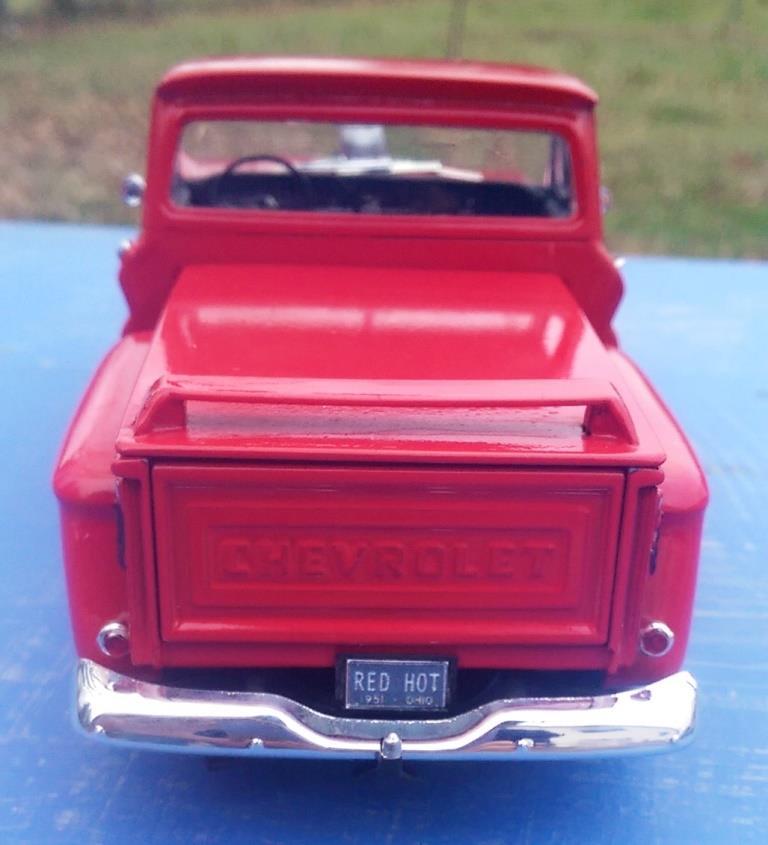
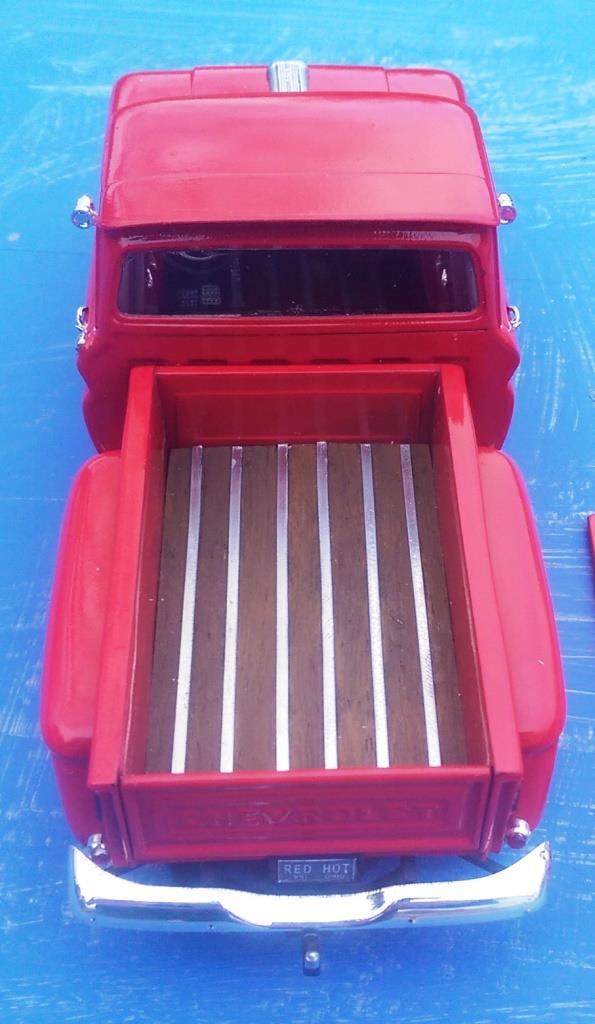
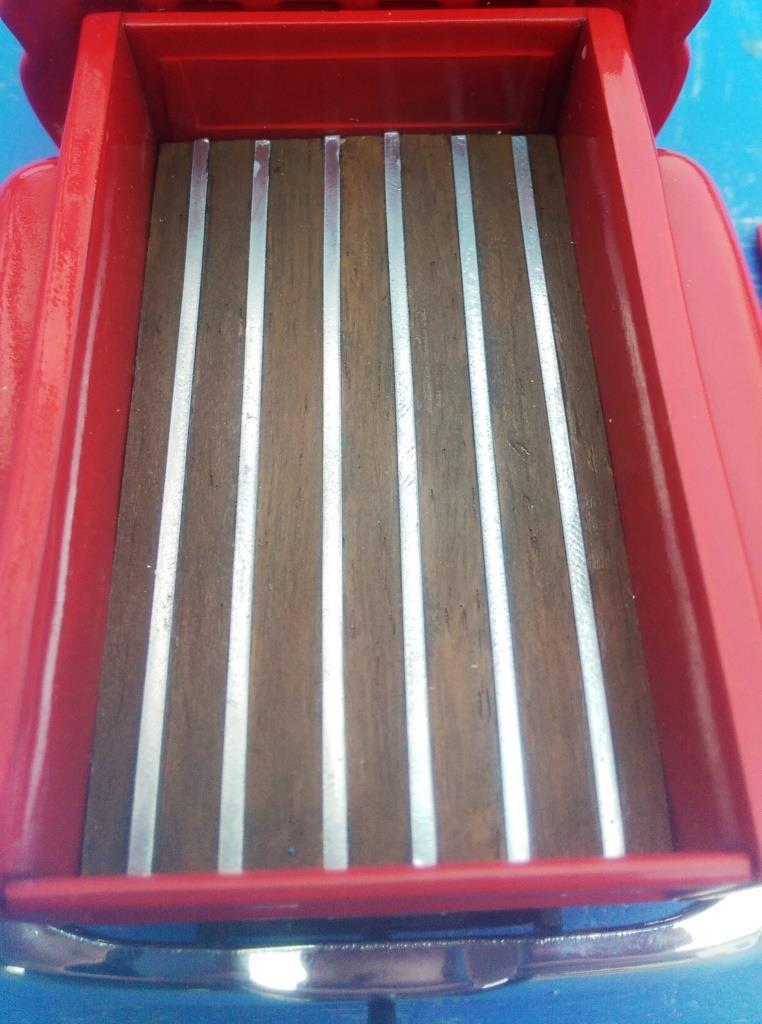
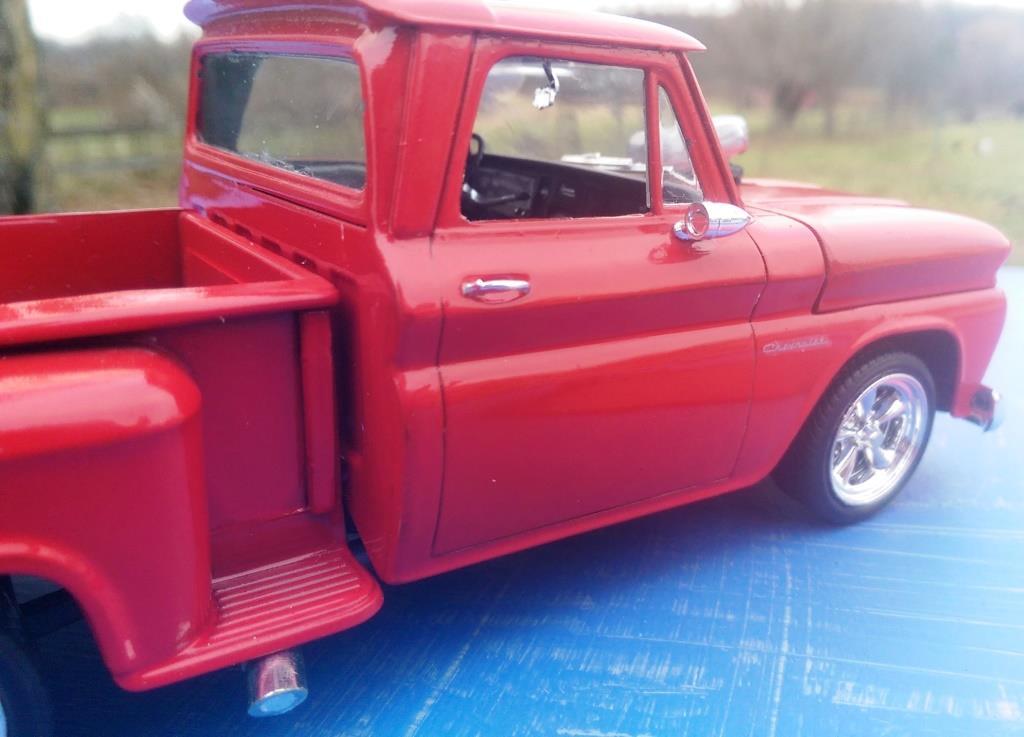
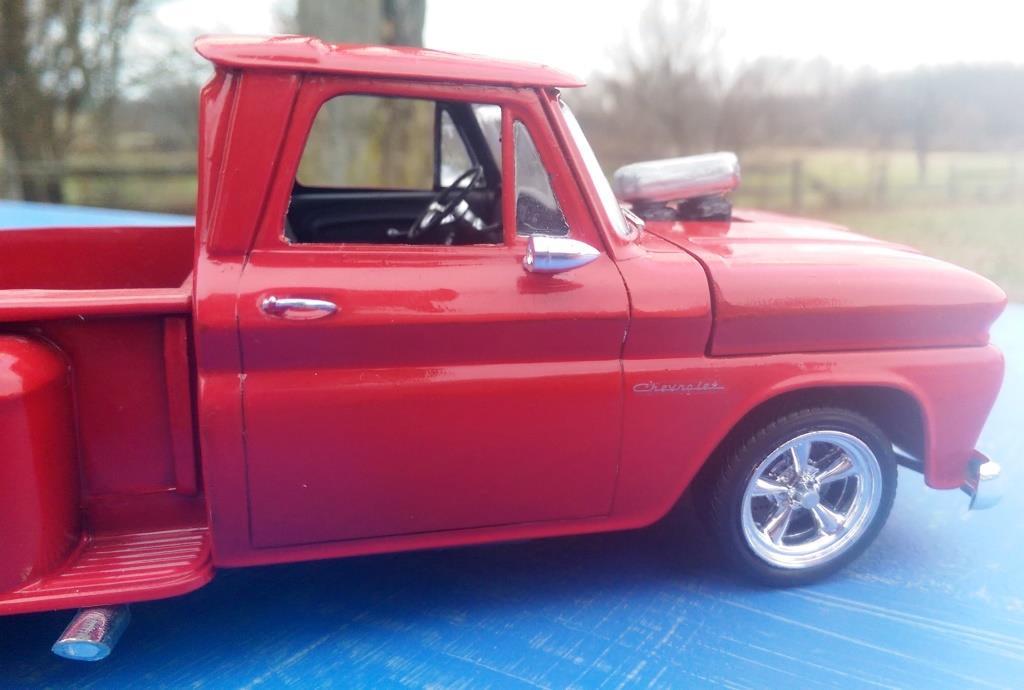
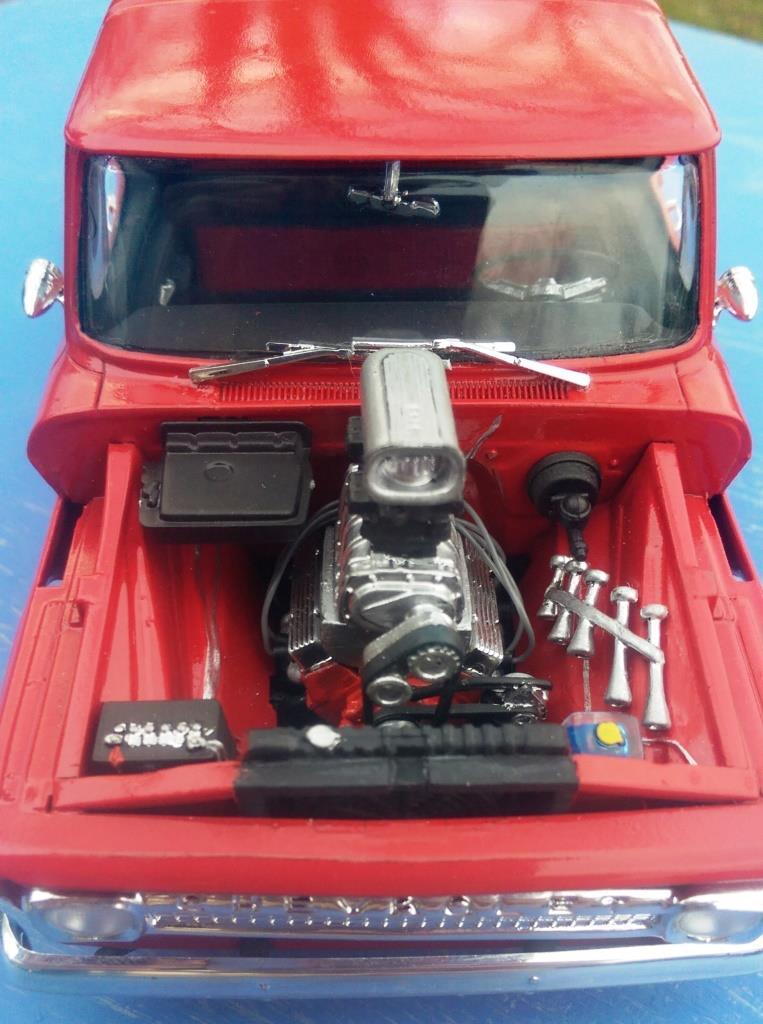
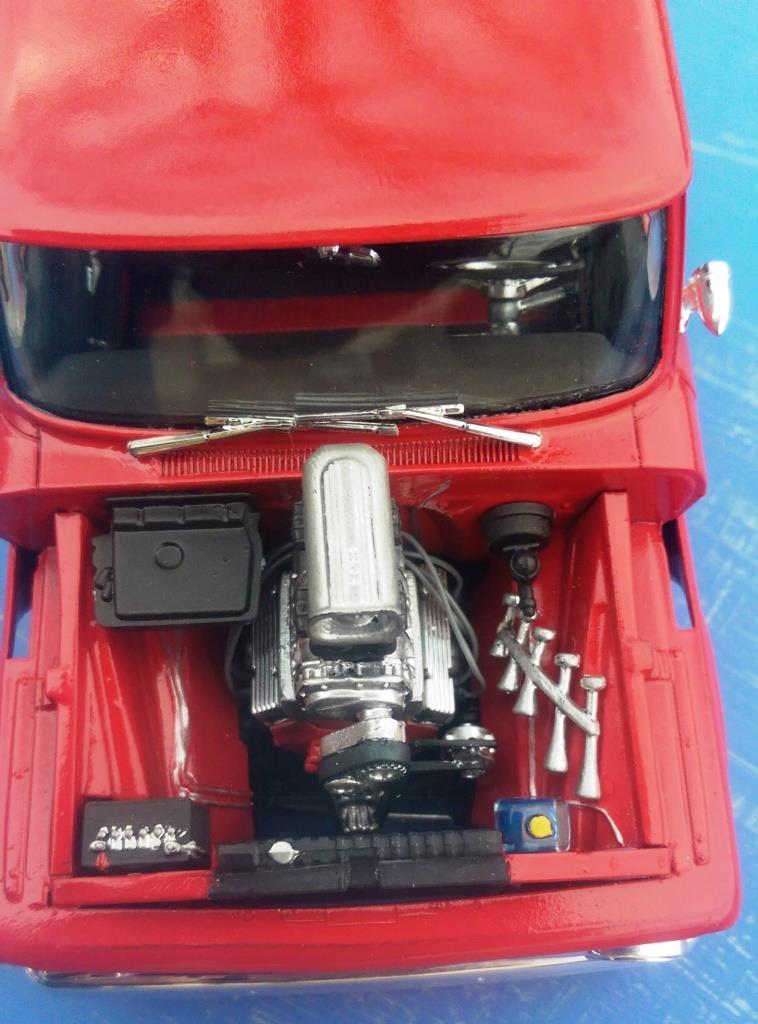
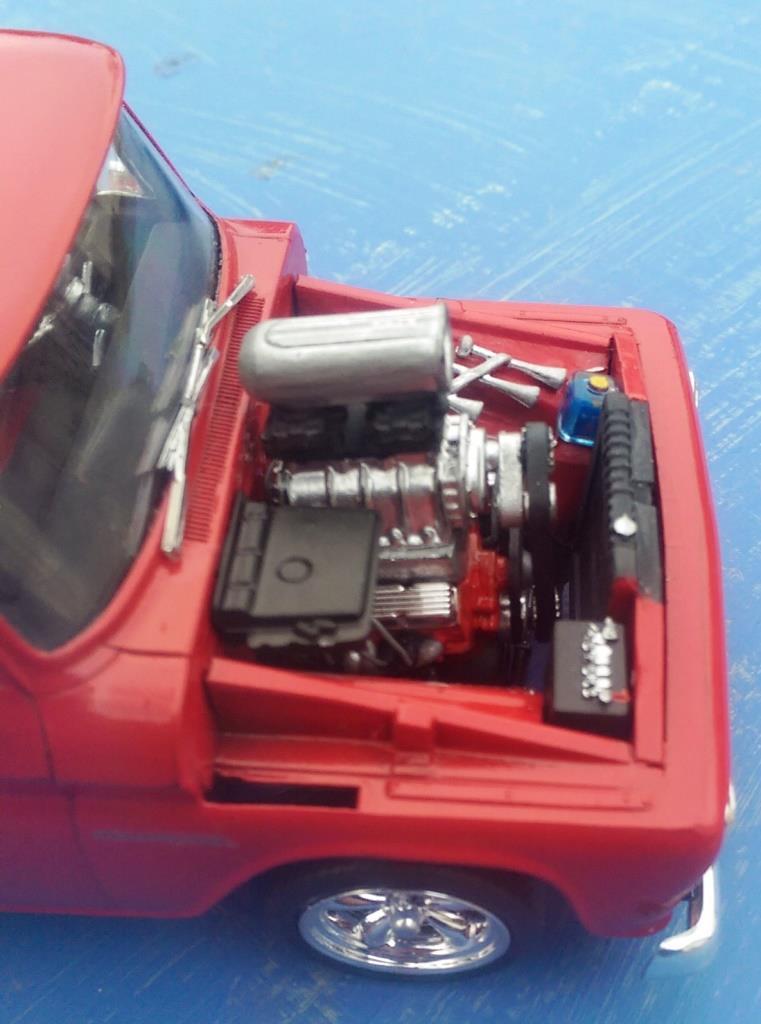
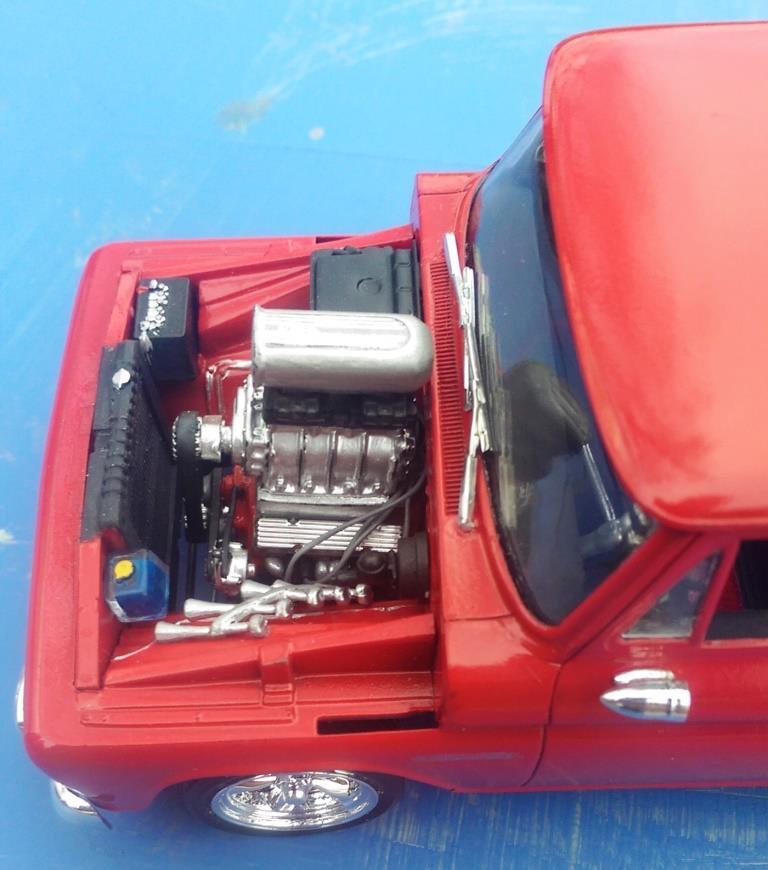
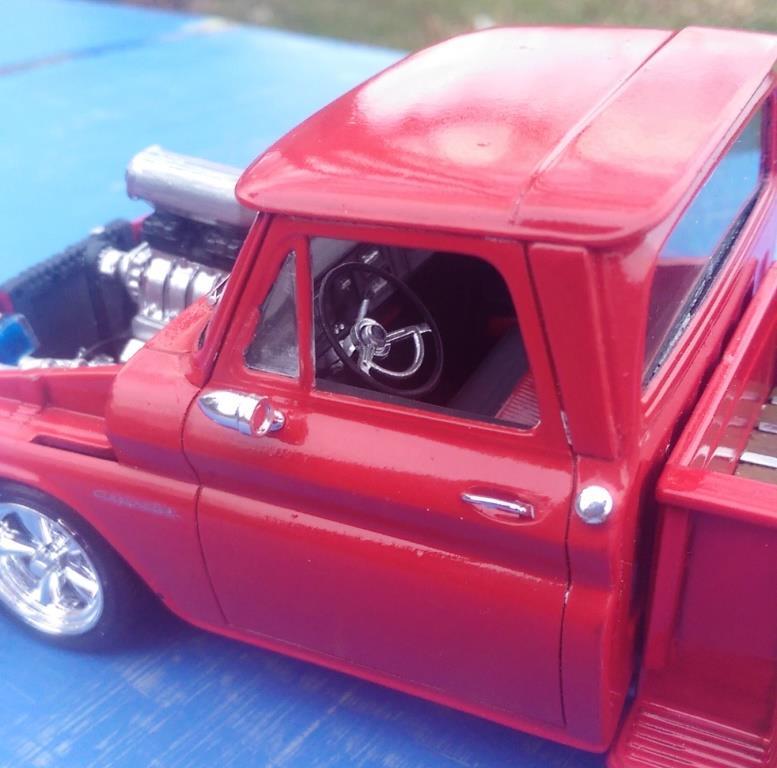
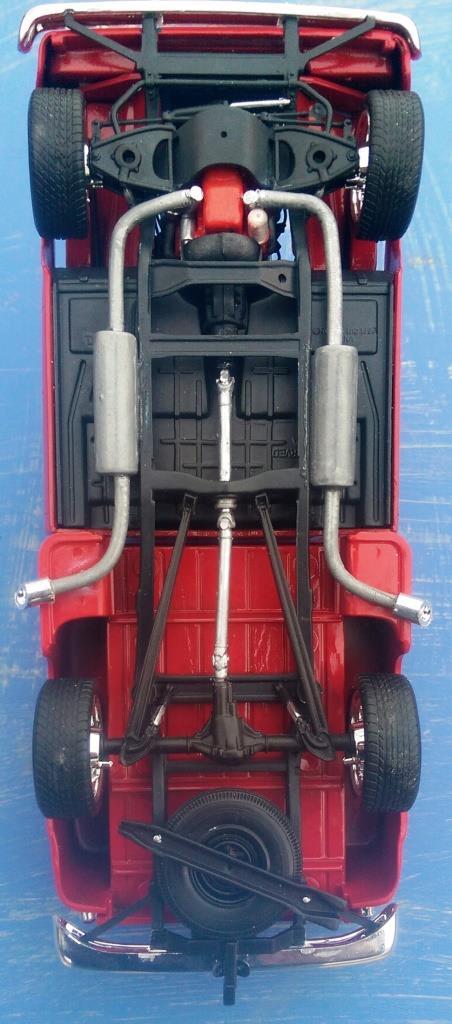
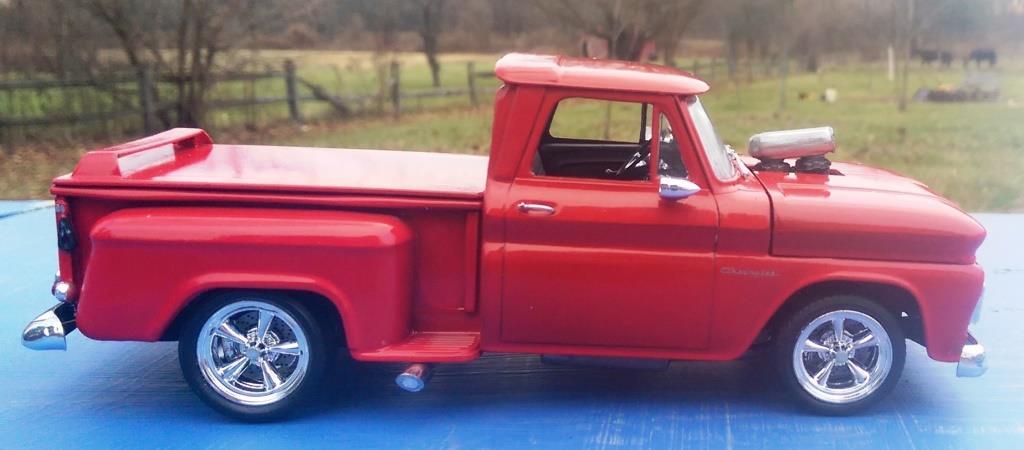
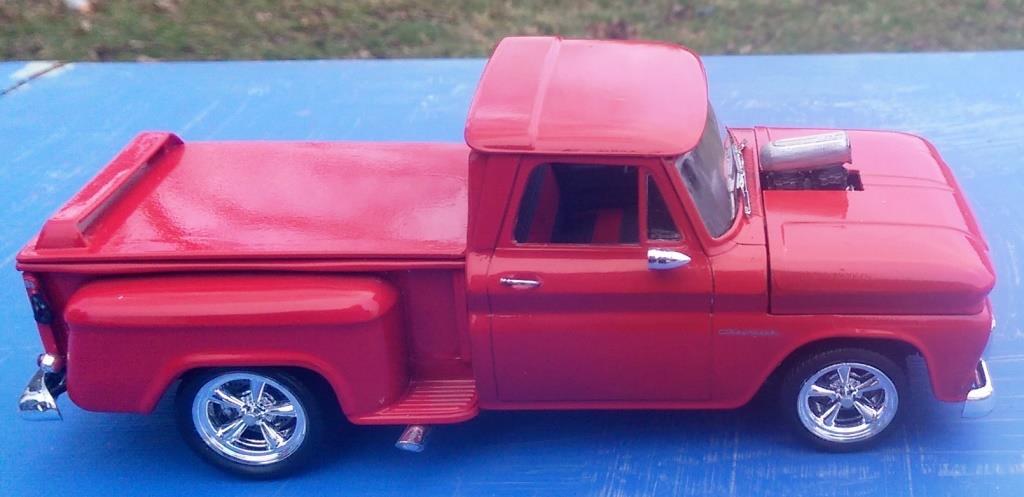
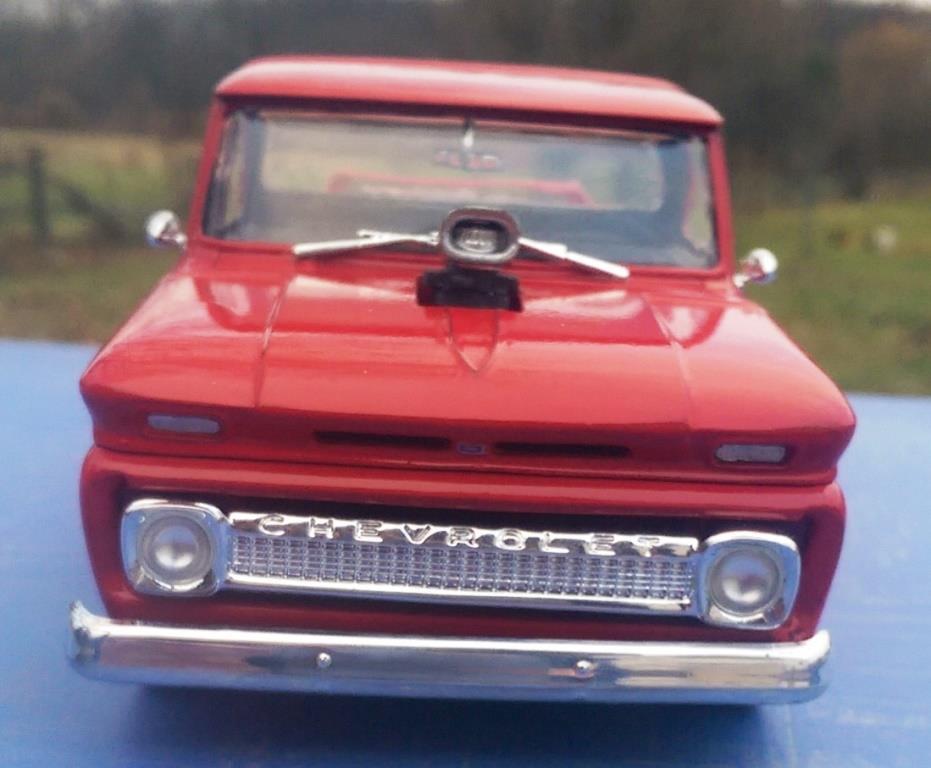
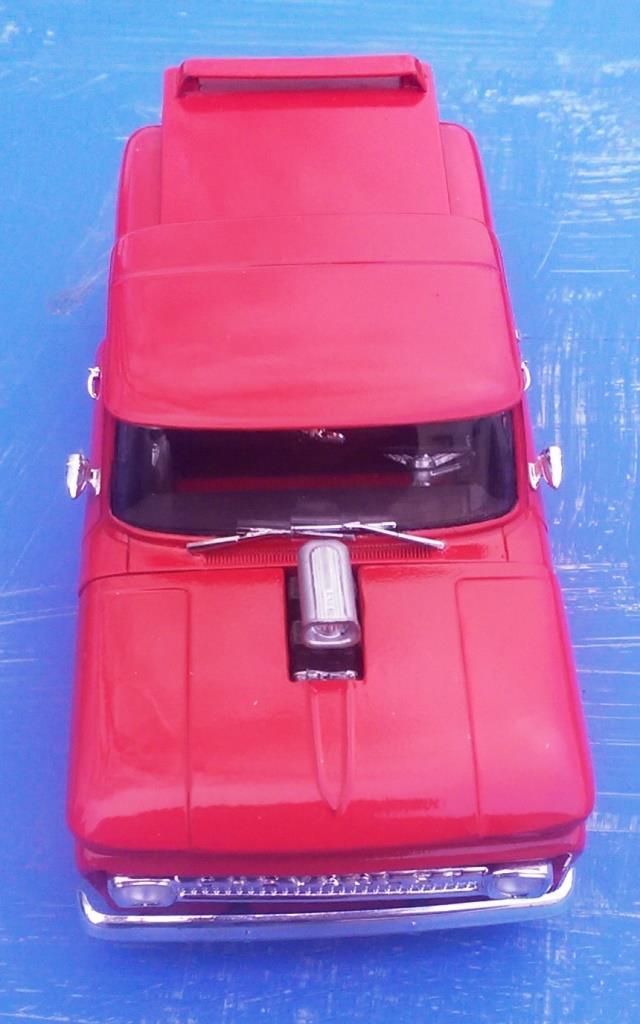
This truck was supposed to be a quick build, something to tow the trailer with my 68 Mustang Drag (Link) on it. I quickly purchased the Revell '65 Chevy Stepside Pickup 2 'n 1 to take the place of an AMT 1953 Ford Pickup Street Machine that I simply failed at when building. I was going to make the custom version of the truck straight out of the box and paint it with the same rattle can red as what I painted the trailer it is going to be towing. However if you look at the pictures you will soon discover that I got a bit carried away with some customizing of my own. I went through my parts box and managed to find the stuff to put a supercharger and such on top of the engine. As you notice I also found am air horn...so I put it in the extra space in the engine compartment. I then looked over and saw a piece of styrene laying on the desk and decided that a truck like this needed a fiberglass tonneau cover over the bed. I made a custom spoiler for the cover also. I could not leave the bed alone and had to put some wood and strips of styrene painted chrome. The mirrors are from the 68 Mustang (who needs mirrors on a drag car anyway??). (the truck is straight, the board it is on is not) The last thing I did to finish the custom job on this truck was to put a custom exhaust on the bottom. I used some solder to make the pipes and added to round styrene for the mufflers. Once again I stole something from the 68 Mustang, the exhaust tips finish it out, don't you think? Thanks for looking
-
Thanks Buff, that is the best idea I have heard so far...now off or the hall closet for a coat hanger.
-
I have one of these. The back does not fit quit right and it only appeared after I had the body on the frame. The screens that cover the front intakes came off while slipping the body over the frame. I finally got the body on after almost breaking it, then one of the wheels (suspension and all) broke off. Maybe this kit is a bit over my skill set or just poorly made, but I put it back in the box and back on the shelf before I tossed almost 6 months of working on this model in the trash can. My advice is take your time and put it back in the box and away for a bit when it really gets to you. I had to at least twice.
-
Those are awesome comp, how did you make those with such details?
-
Thanks Metaldrumm, but I was really trying to not purchase one, rather make one from the stuff I have laying around.
-
I have looked and cannot find if anyone has custom built Nitrous Oxide (N2O) bottles. Has anyone ever tried to scratch build bottles? If so could you please point me in the right direction. Thank you
-
Revell Kenworth W900 - Lightning Express
pcm1977 replied to pcm1977's topic in Model Trucks: Big Rigs and Heavy Equipment
Please help me out, if any one can. Earlier on (January 25, 2015) I mentioned that I was going to get a trailer and paint it up to match the truck and use some lighting decals also. I acquired the lighting bolts and was going to order the Moebius 53' smoothside trailer soon. My idea is to paint the trailer the same color blue as I did the truck, however that is where my problem lies. You see I forgot what color blue it was. I know it was a Testors Model Master spray paint and it was metallic. The issue I am having is that I don't remember the exact color of blue. I also painted it over a black primer and put a semi-gloss clear coat on top of it if that helps. Any help that anyone could give me would be greatly appreciated, thank you. -
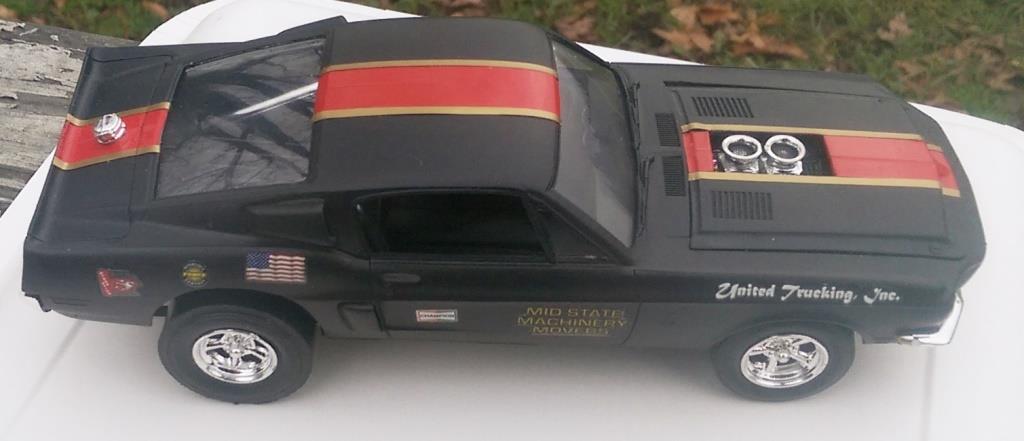
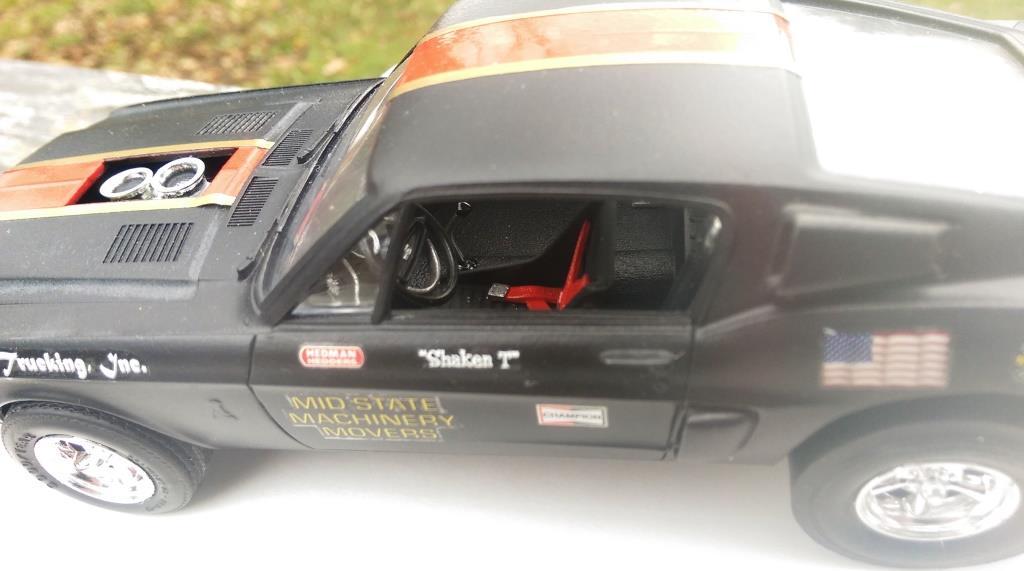
My latest is a black 1968 Mustang GT-500 Drag car. It’s an older AMT kit and I found it to be a bit challenging. It took me about 2 months to finish this one as I put it down many times because it frustrated me. I made the drag version of the car and put the larger engine in it. I could never get the drag exhaust to fit properly and since I had worked on the car for so long and was so far along I simply did not put an exhaust on it in favor of tossing the entire model in the trash. The sponsor stickers on the side came from other kits, such as the AMT Lowboy and the Revell Peterbilt 359 Conventional. I found the gold strips in an old model kit of the Titanic that my father gave me a long time ago. I have a trailer that I have customized that the car will go on and be towed around by a modified ’65 Chevy I am currently working on. Hopefully I will have that done soon and you guys can get a look at the entire package.
-
I have have been looking at it and thought Tue same thing. Thank you for your feedback.