
Daxman
-
Posts
214 -
Joined
-
Last visited
Content Type
Profiles
Forums
Events
Gallery
Everything posted by Daxman
-
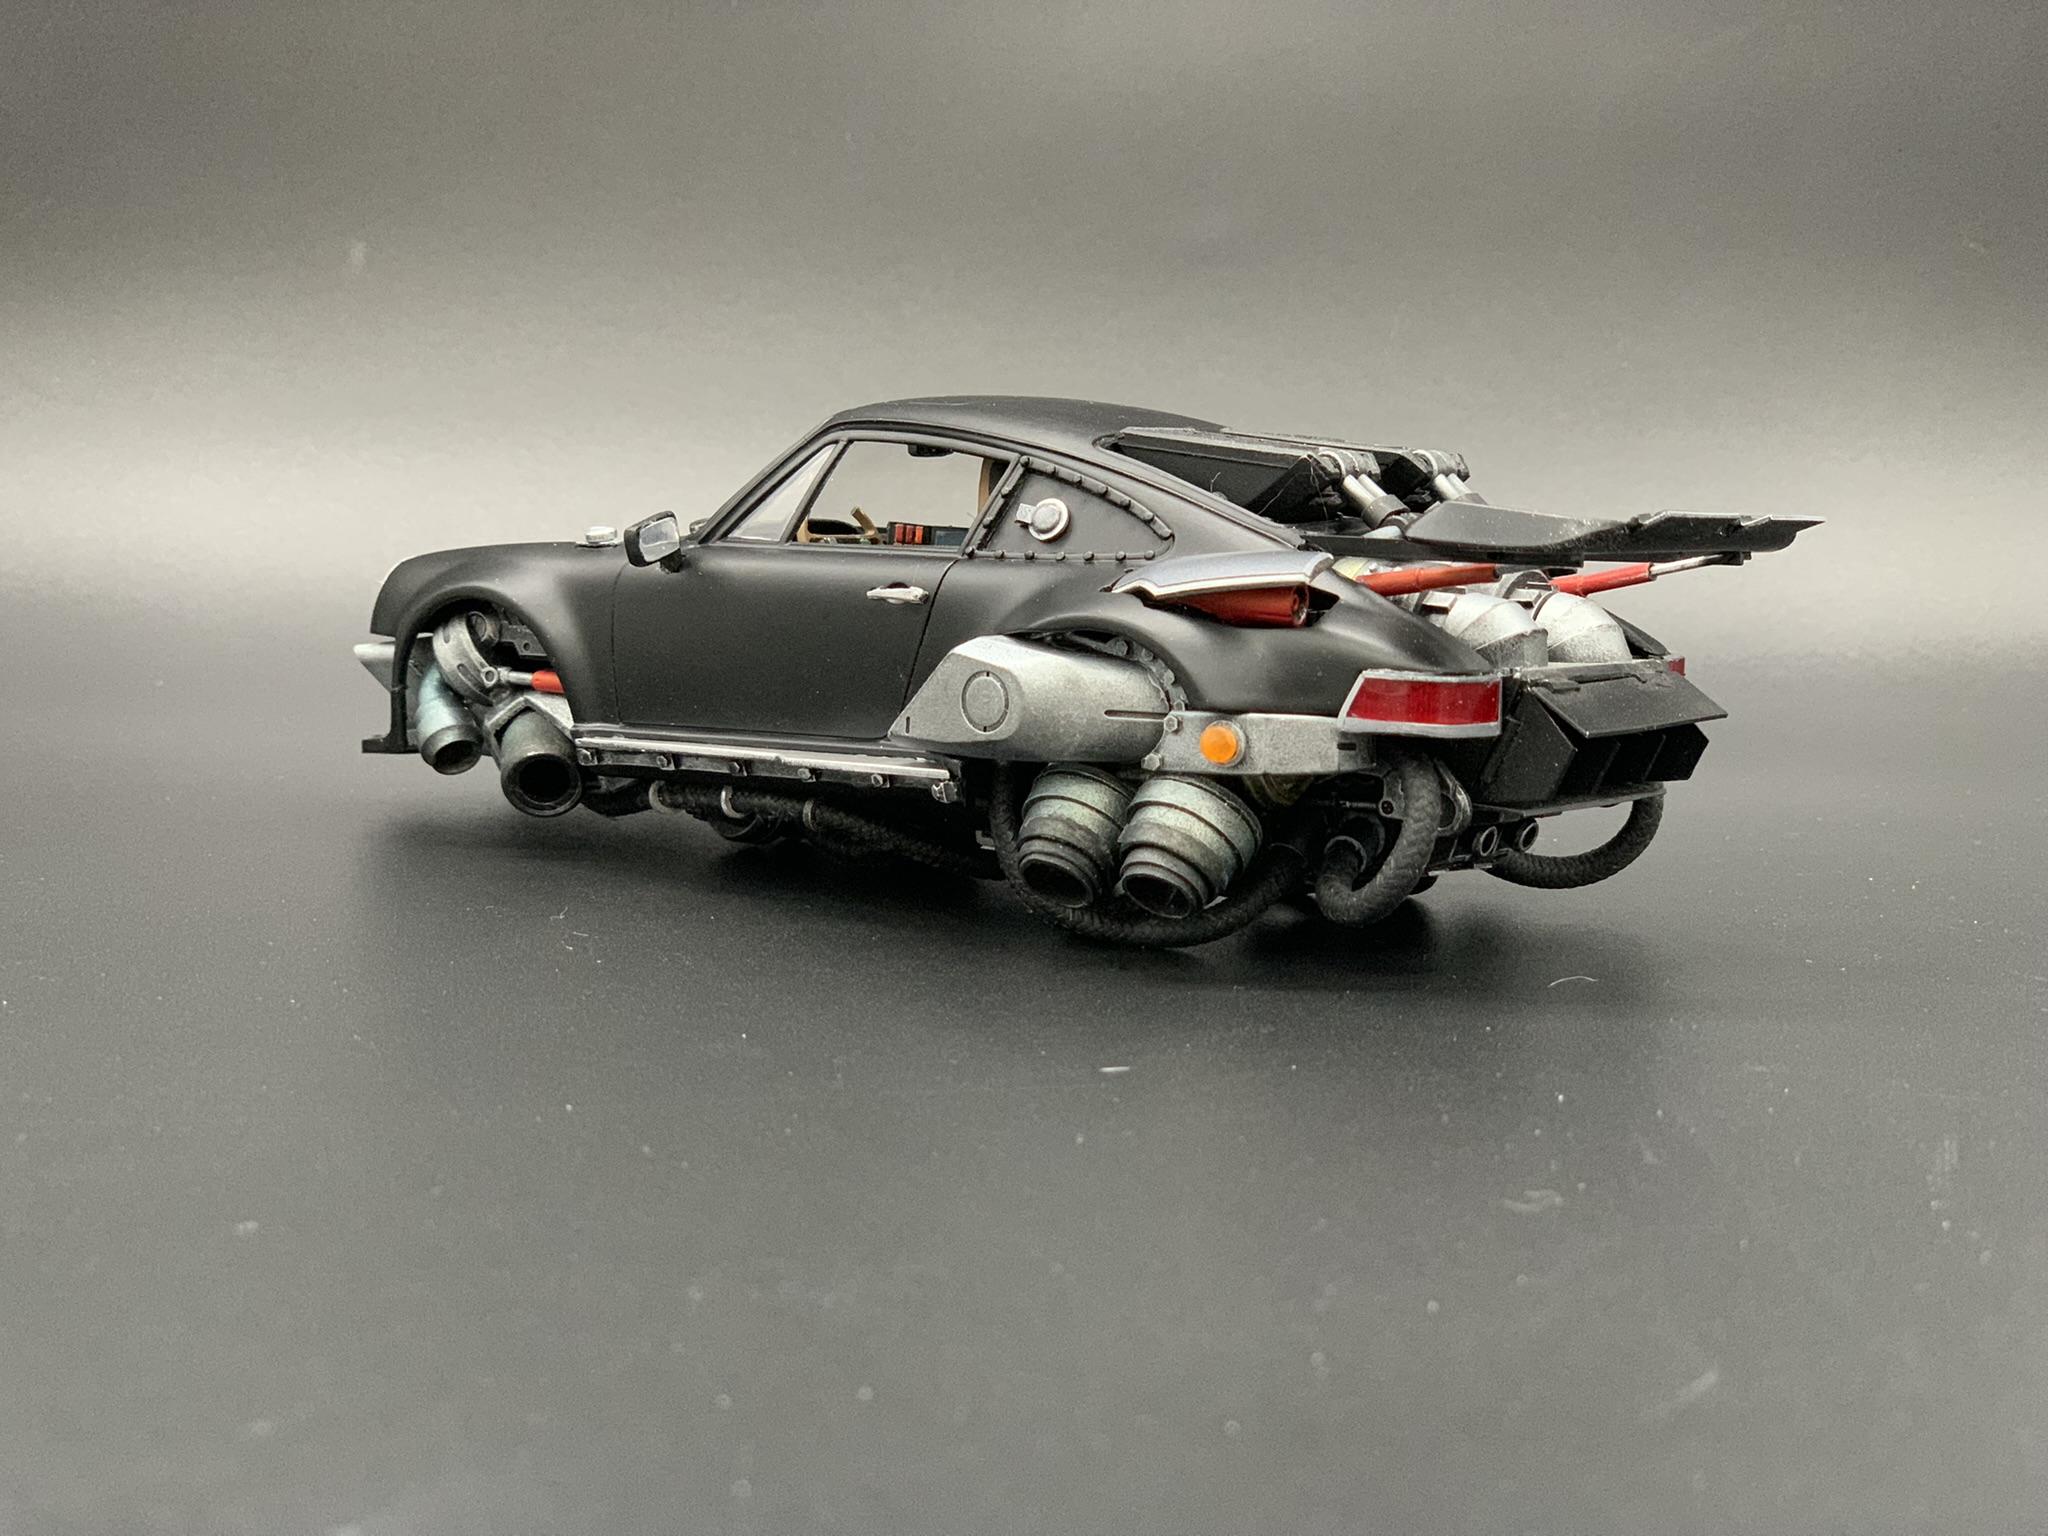
Thanks Rob! I always appreciate the kind comments. Thank you David. I used Tamaya's matt black from a spray can. It always goes on with the best finish. It's often what I use as my primer. The view that never gets seen. I used a braided Iphone charging cable for the plumbing lines. Smaller lens inside the original headlamp bezel. Added a tiny turn signal. I love the turn signals in the intakes. Grotesque use of Gundam parts. Although the front chin splitter was handmade and I think it's one of the best parts on the car. My attempt at flight buttons and a touchscreen display.

-
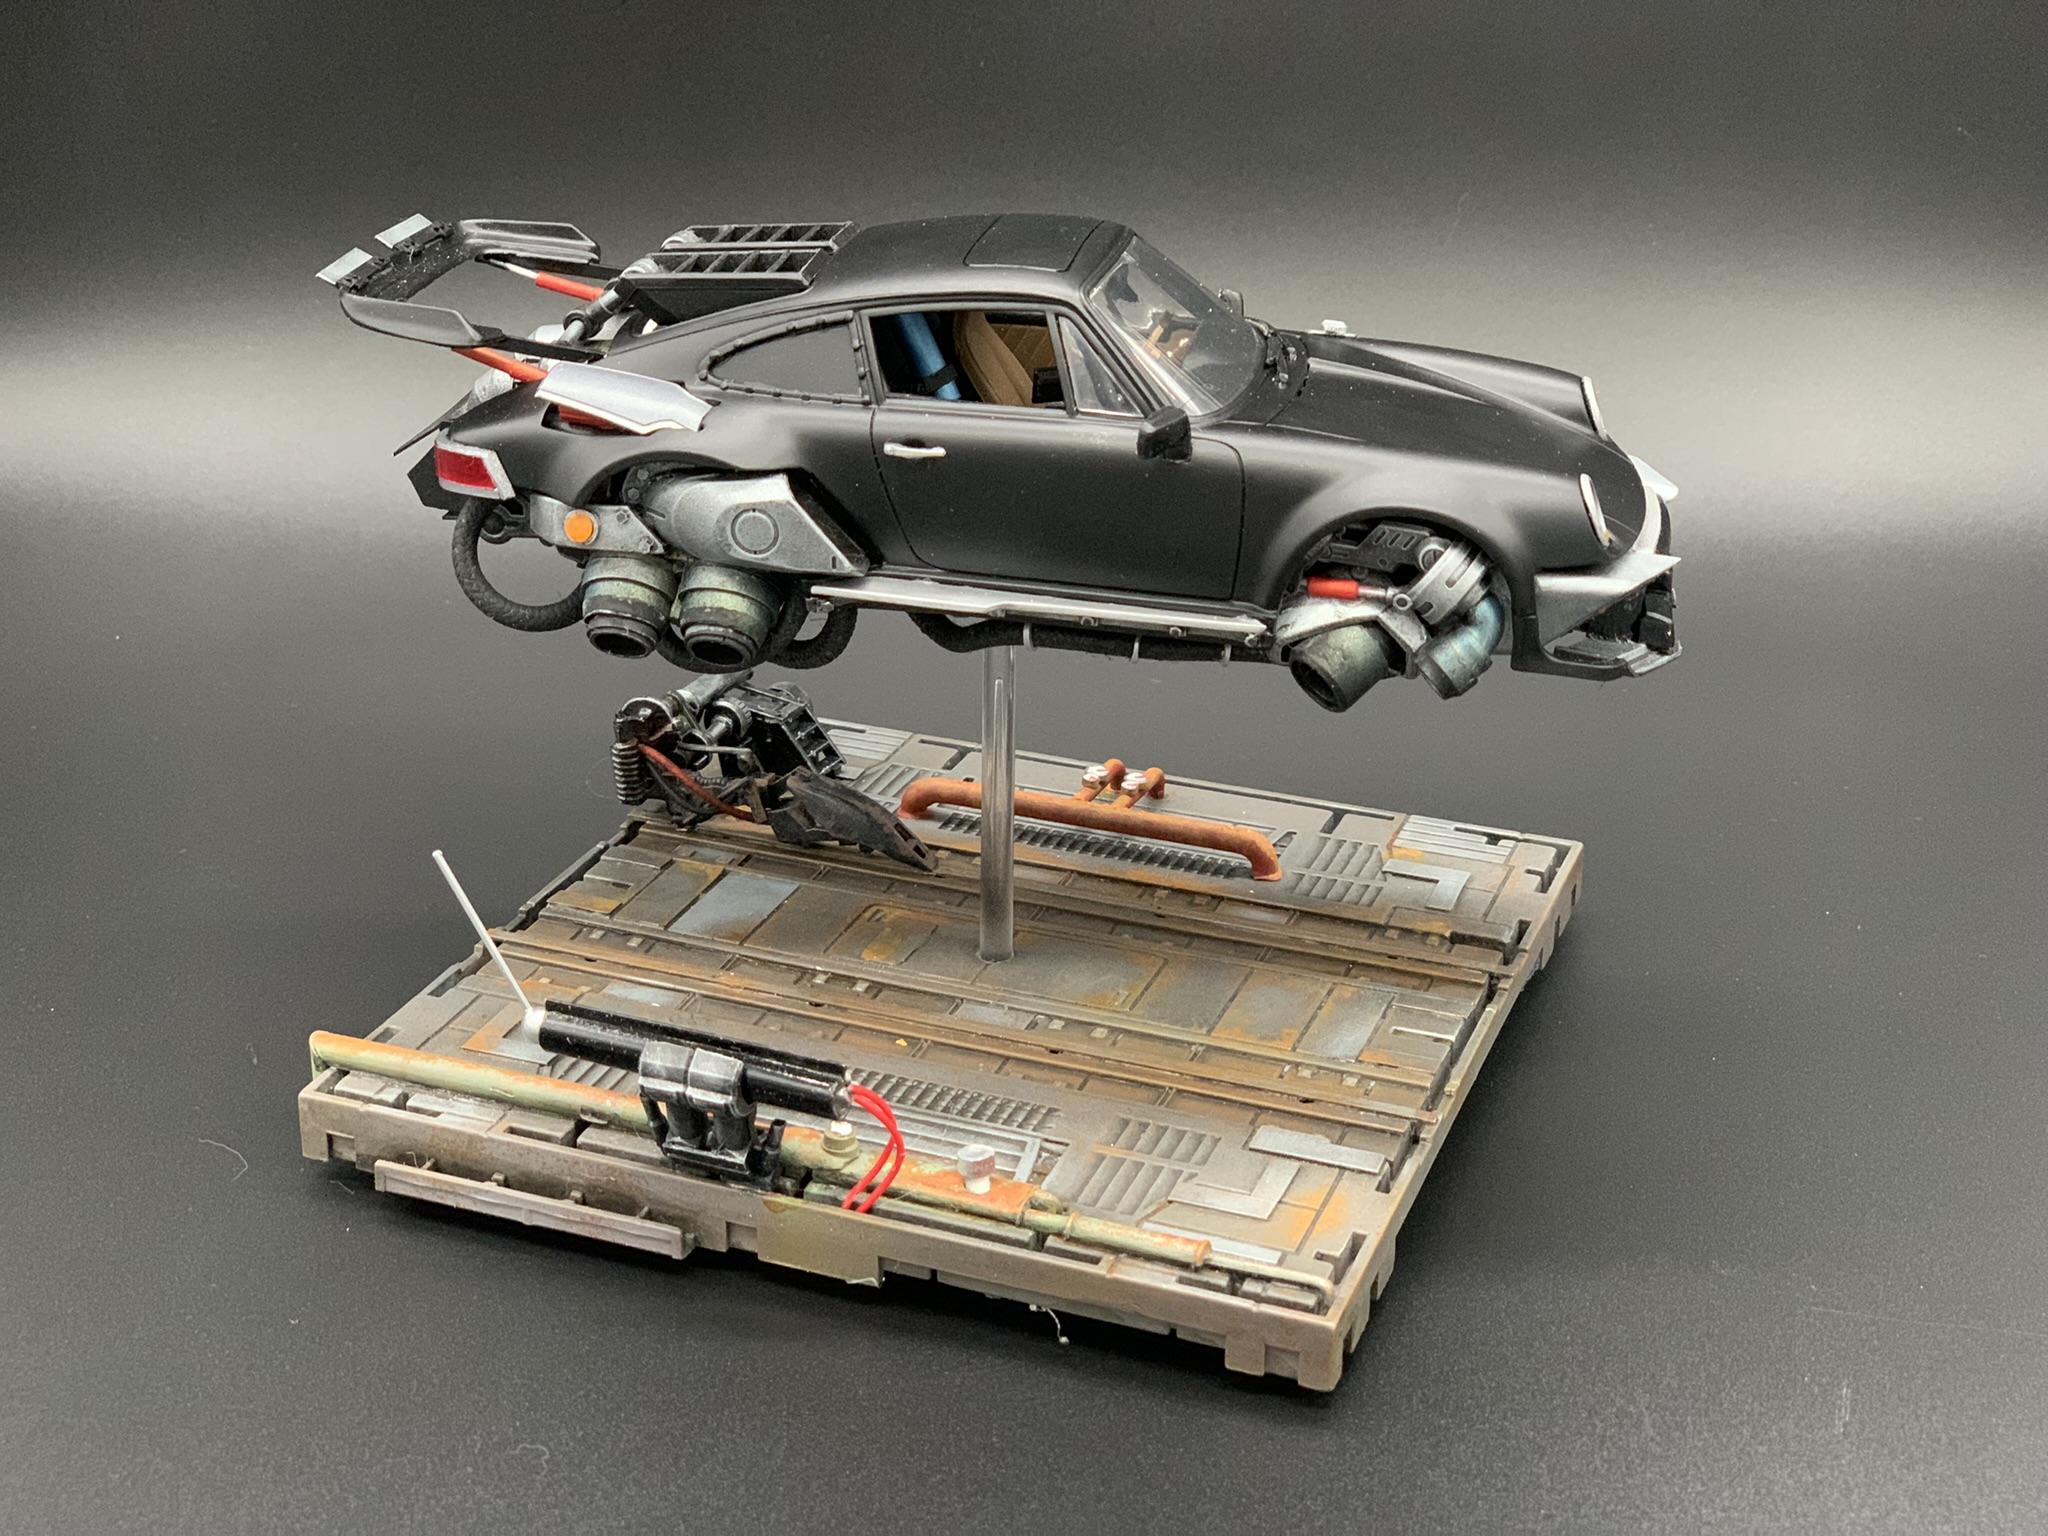
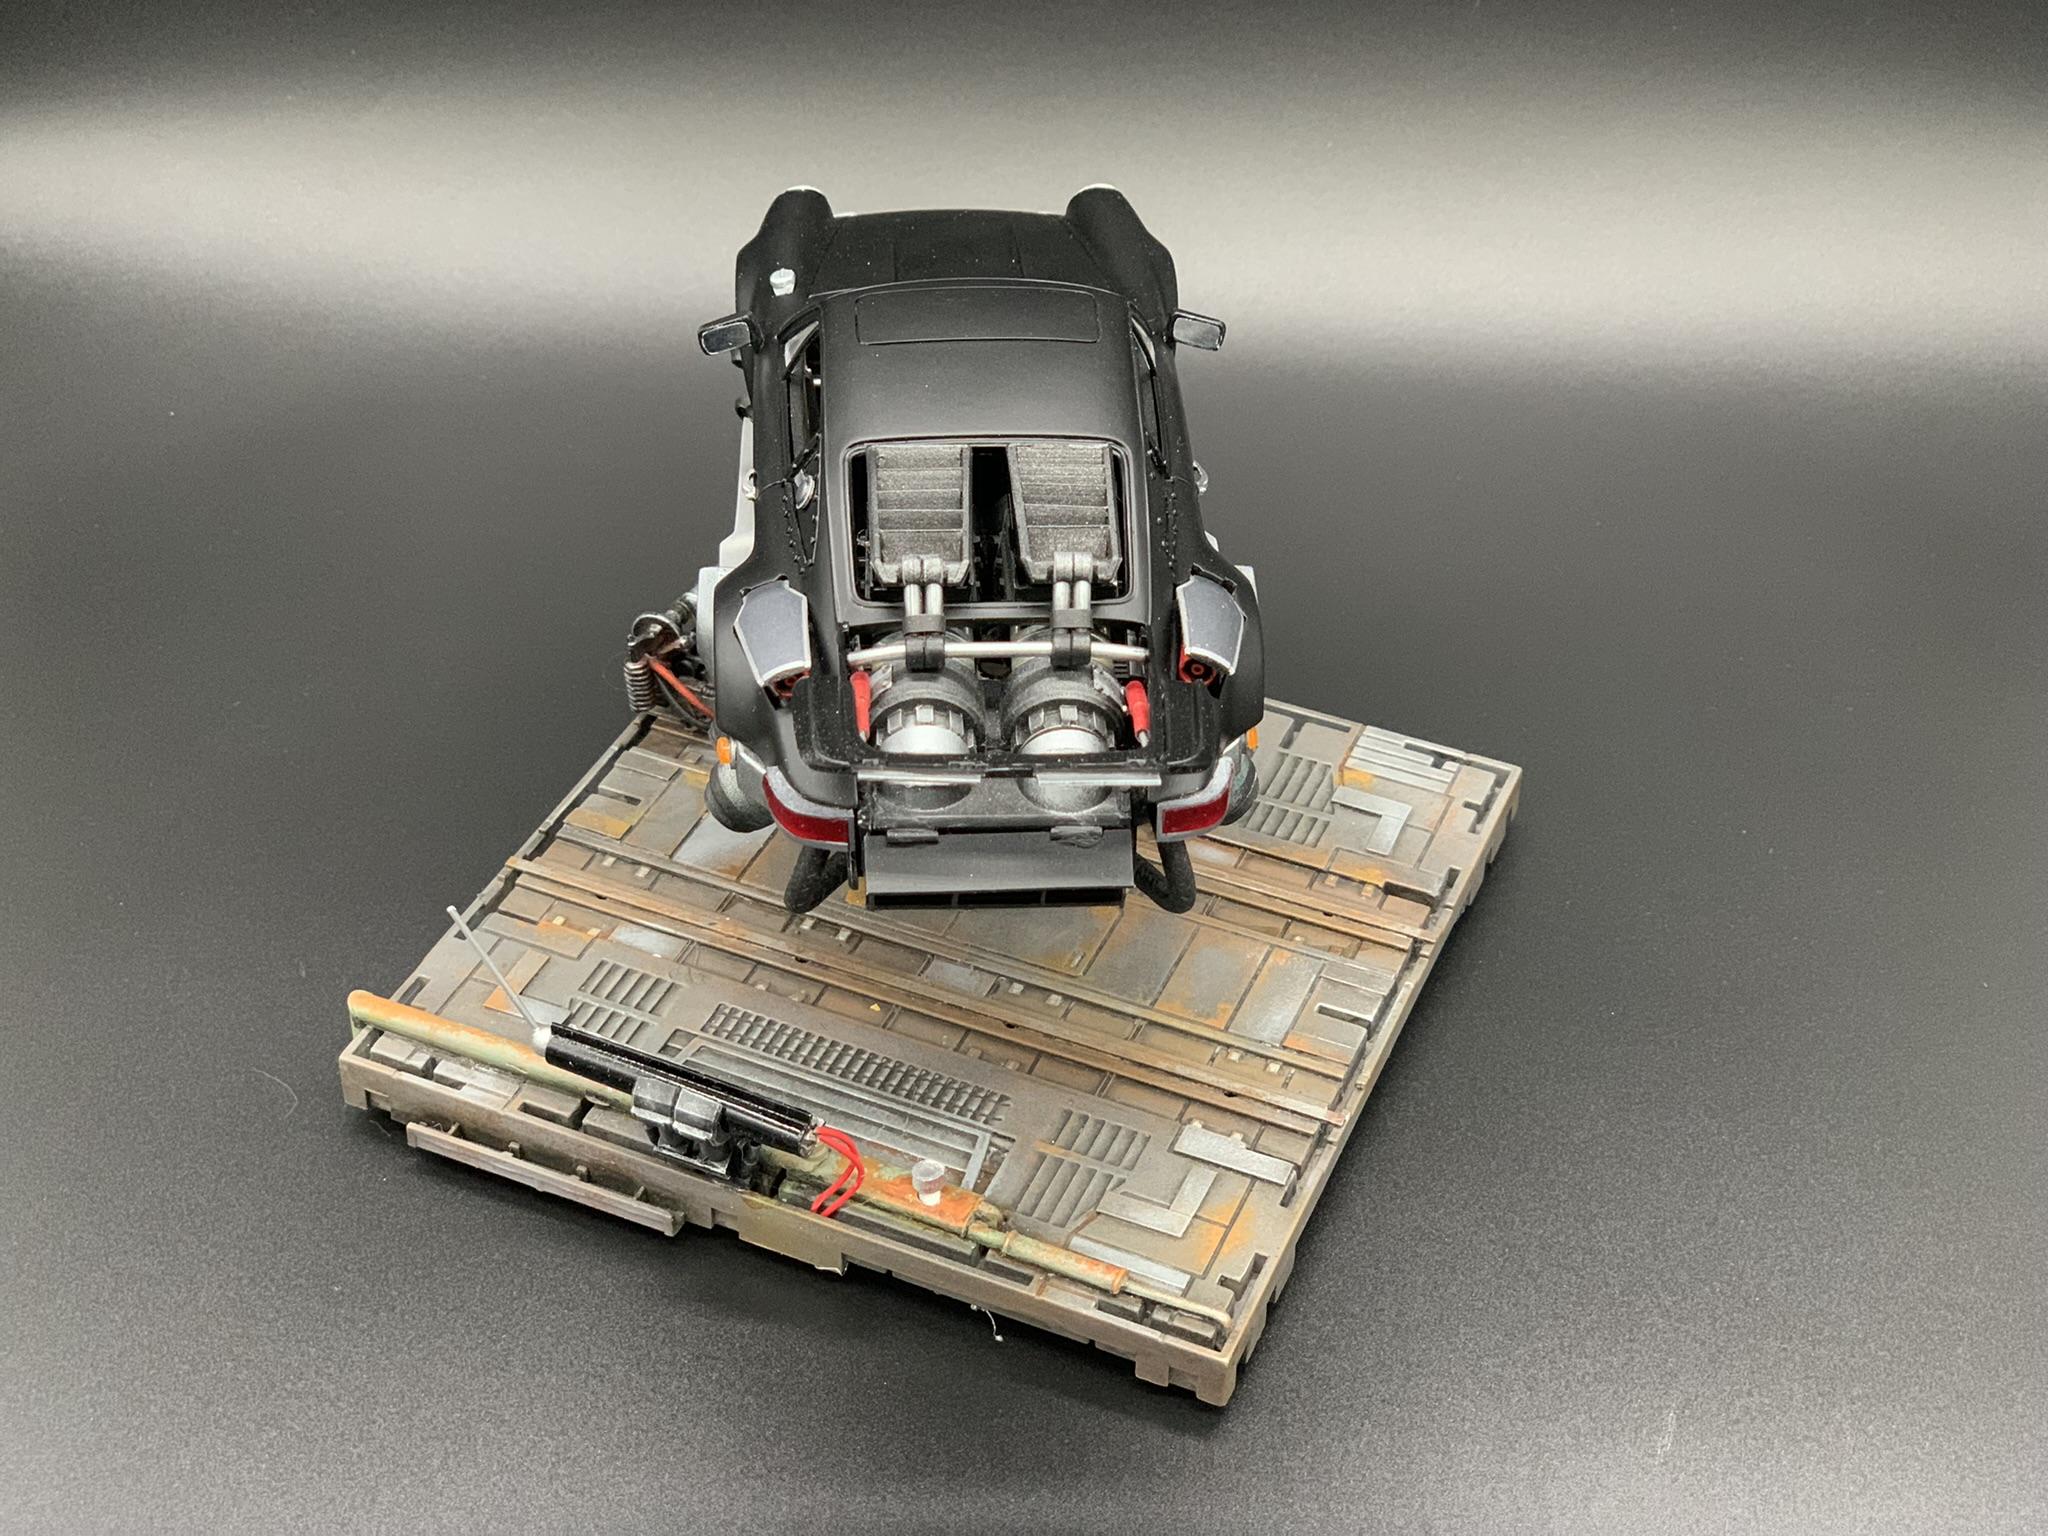
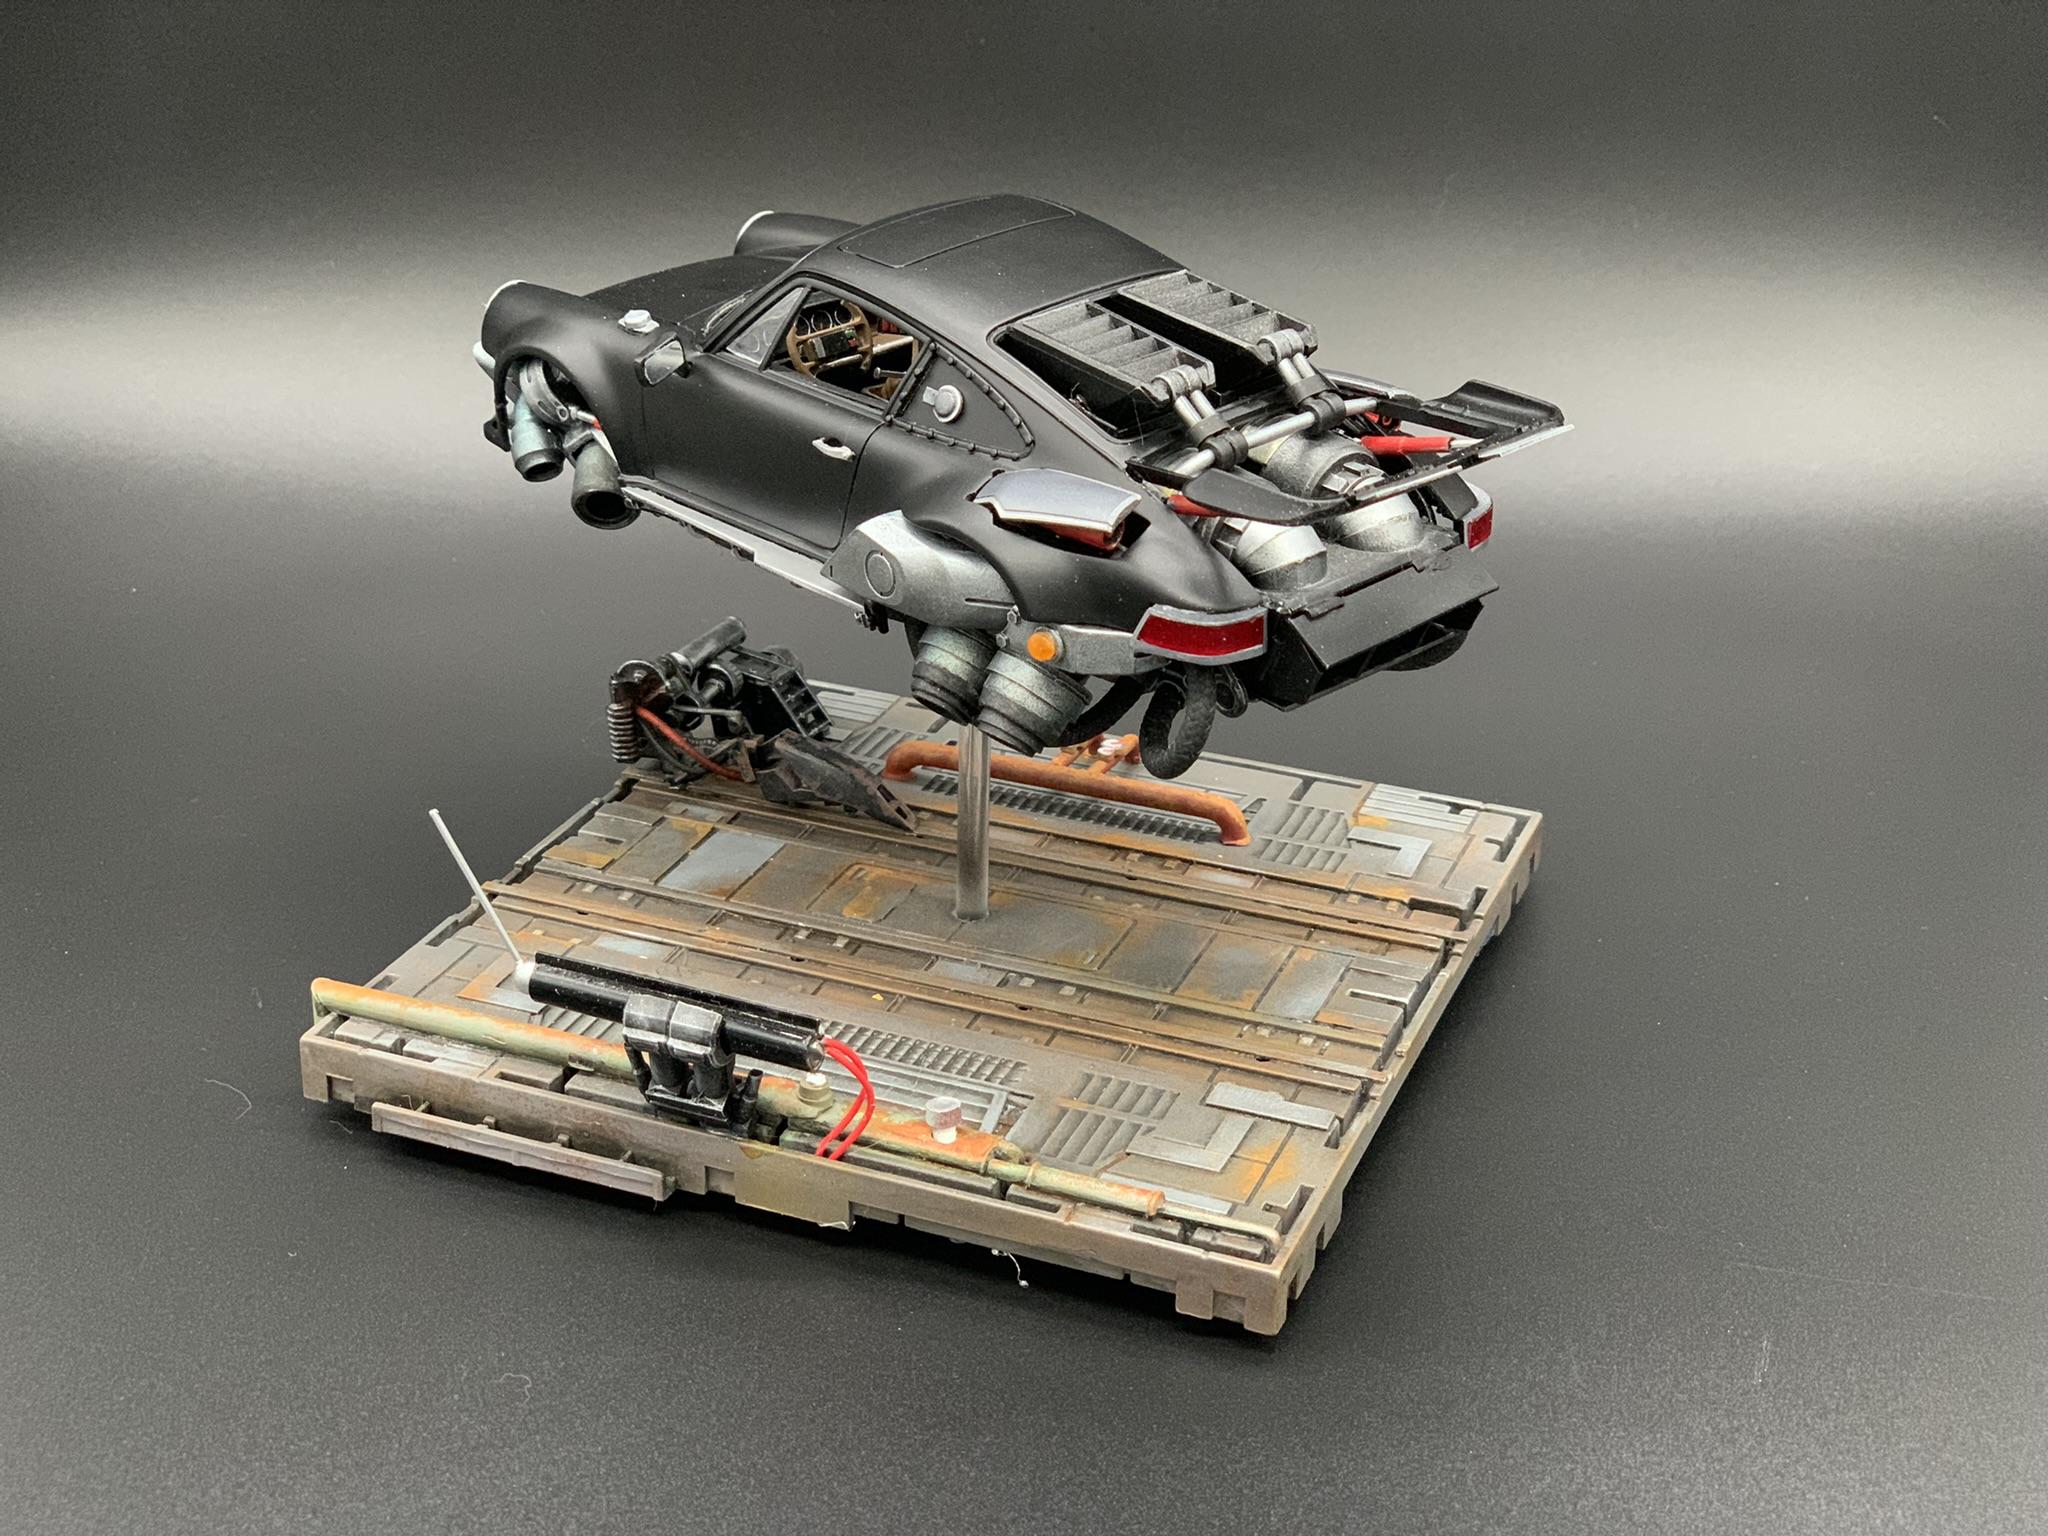
I have an account on Instagram. I show off all my builds there as well. I was contacted and asked if I would do a commission build. I was given total artistic freedom. The only stipulation was that it had to be a Porsche 911 turbo 964. And it had to be black. We agreed on a price. Doug sent me two Porsche 911 model kits. Doug has a "real-life" Porsche that he's modifying into a rally/baja monster. It's in the shop right now. He's filming it and making a YouTube series about the progress. It's named Winston after his beloved dog. Here's the hover version of Winston I painted it twice with a gloss black. Both times the paint had serious imperfections. I did a total paint strip both times. What a pain.....I was about to do the third glass paint job when I decided that it looked 100x better in matte black primer. The matt black allows you to focus on the details. I went a little crazy on the interior flight controls. There's a ton of buttons and levers. Let me know what you think! Very fun build. I'll get some more pics up soon.
-
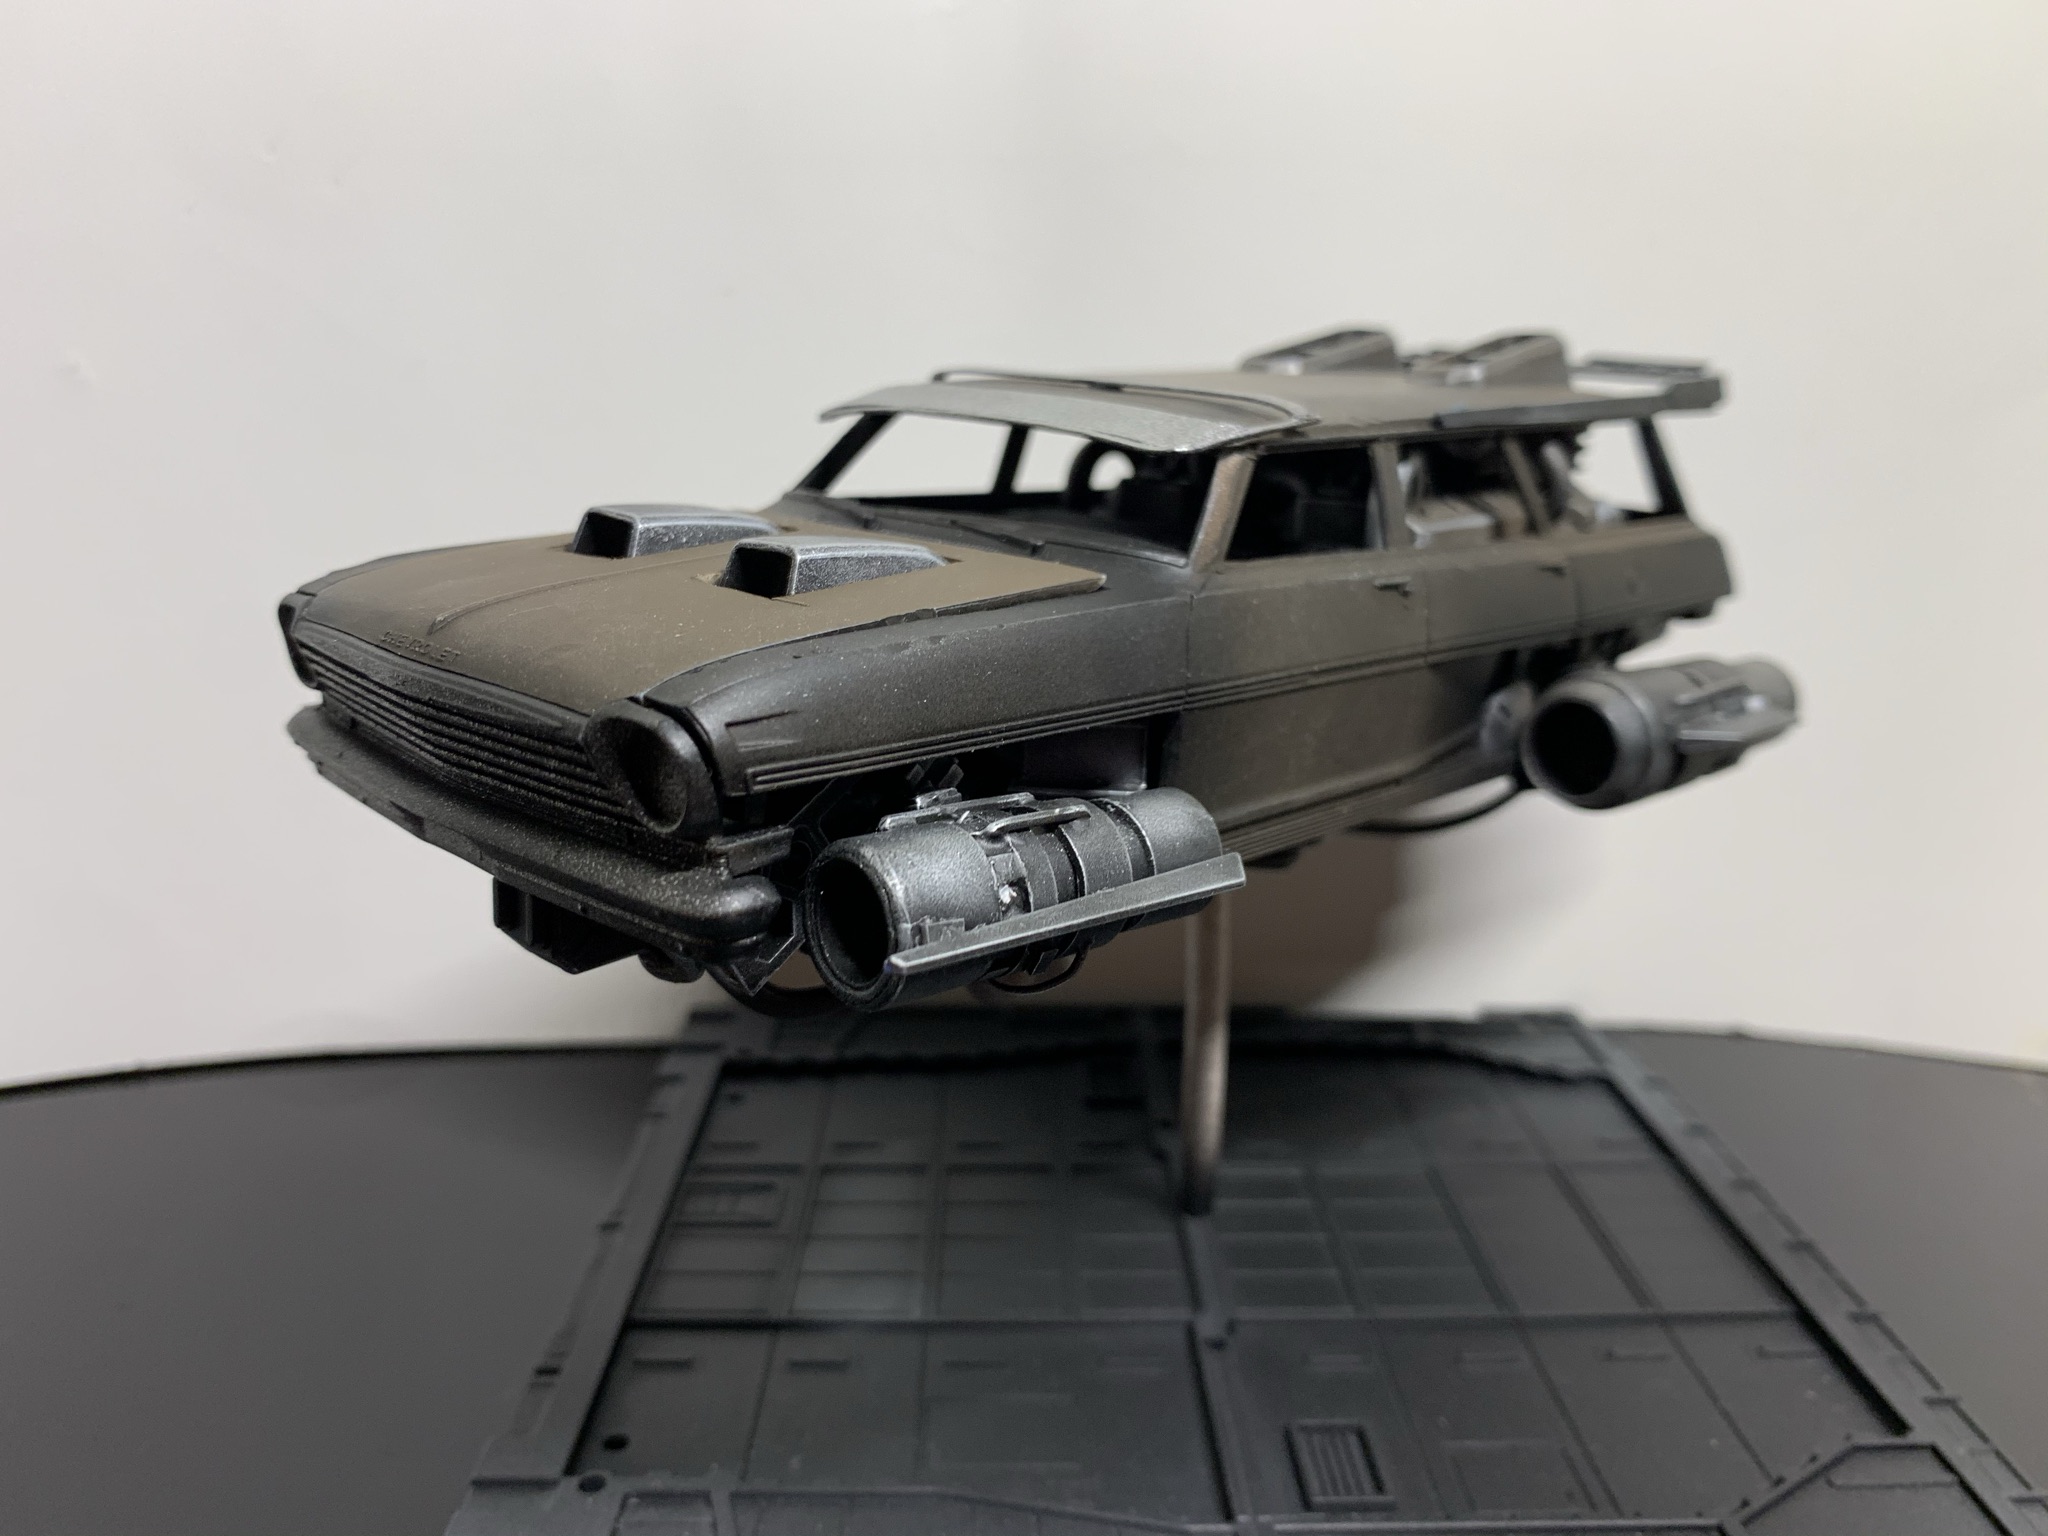
Here's my latest jet car. 63 SuperNova. I really wanted to get some pictures up. It's late, so I'm not going to type much. Gotta get to bed. I'll post more photos soon of the earlier stages, but here's where I am currently. This thing is a beast! Thanks for looking!!!!!
- 1 reply
-
- 1
-

-
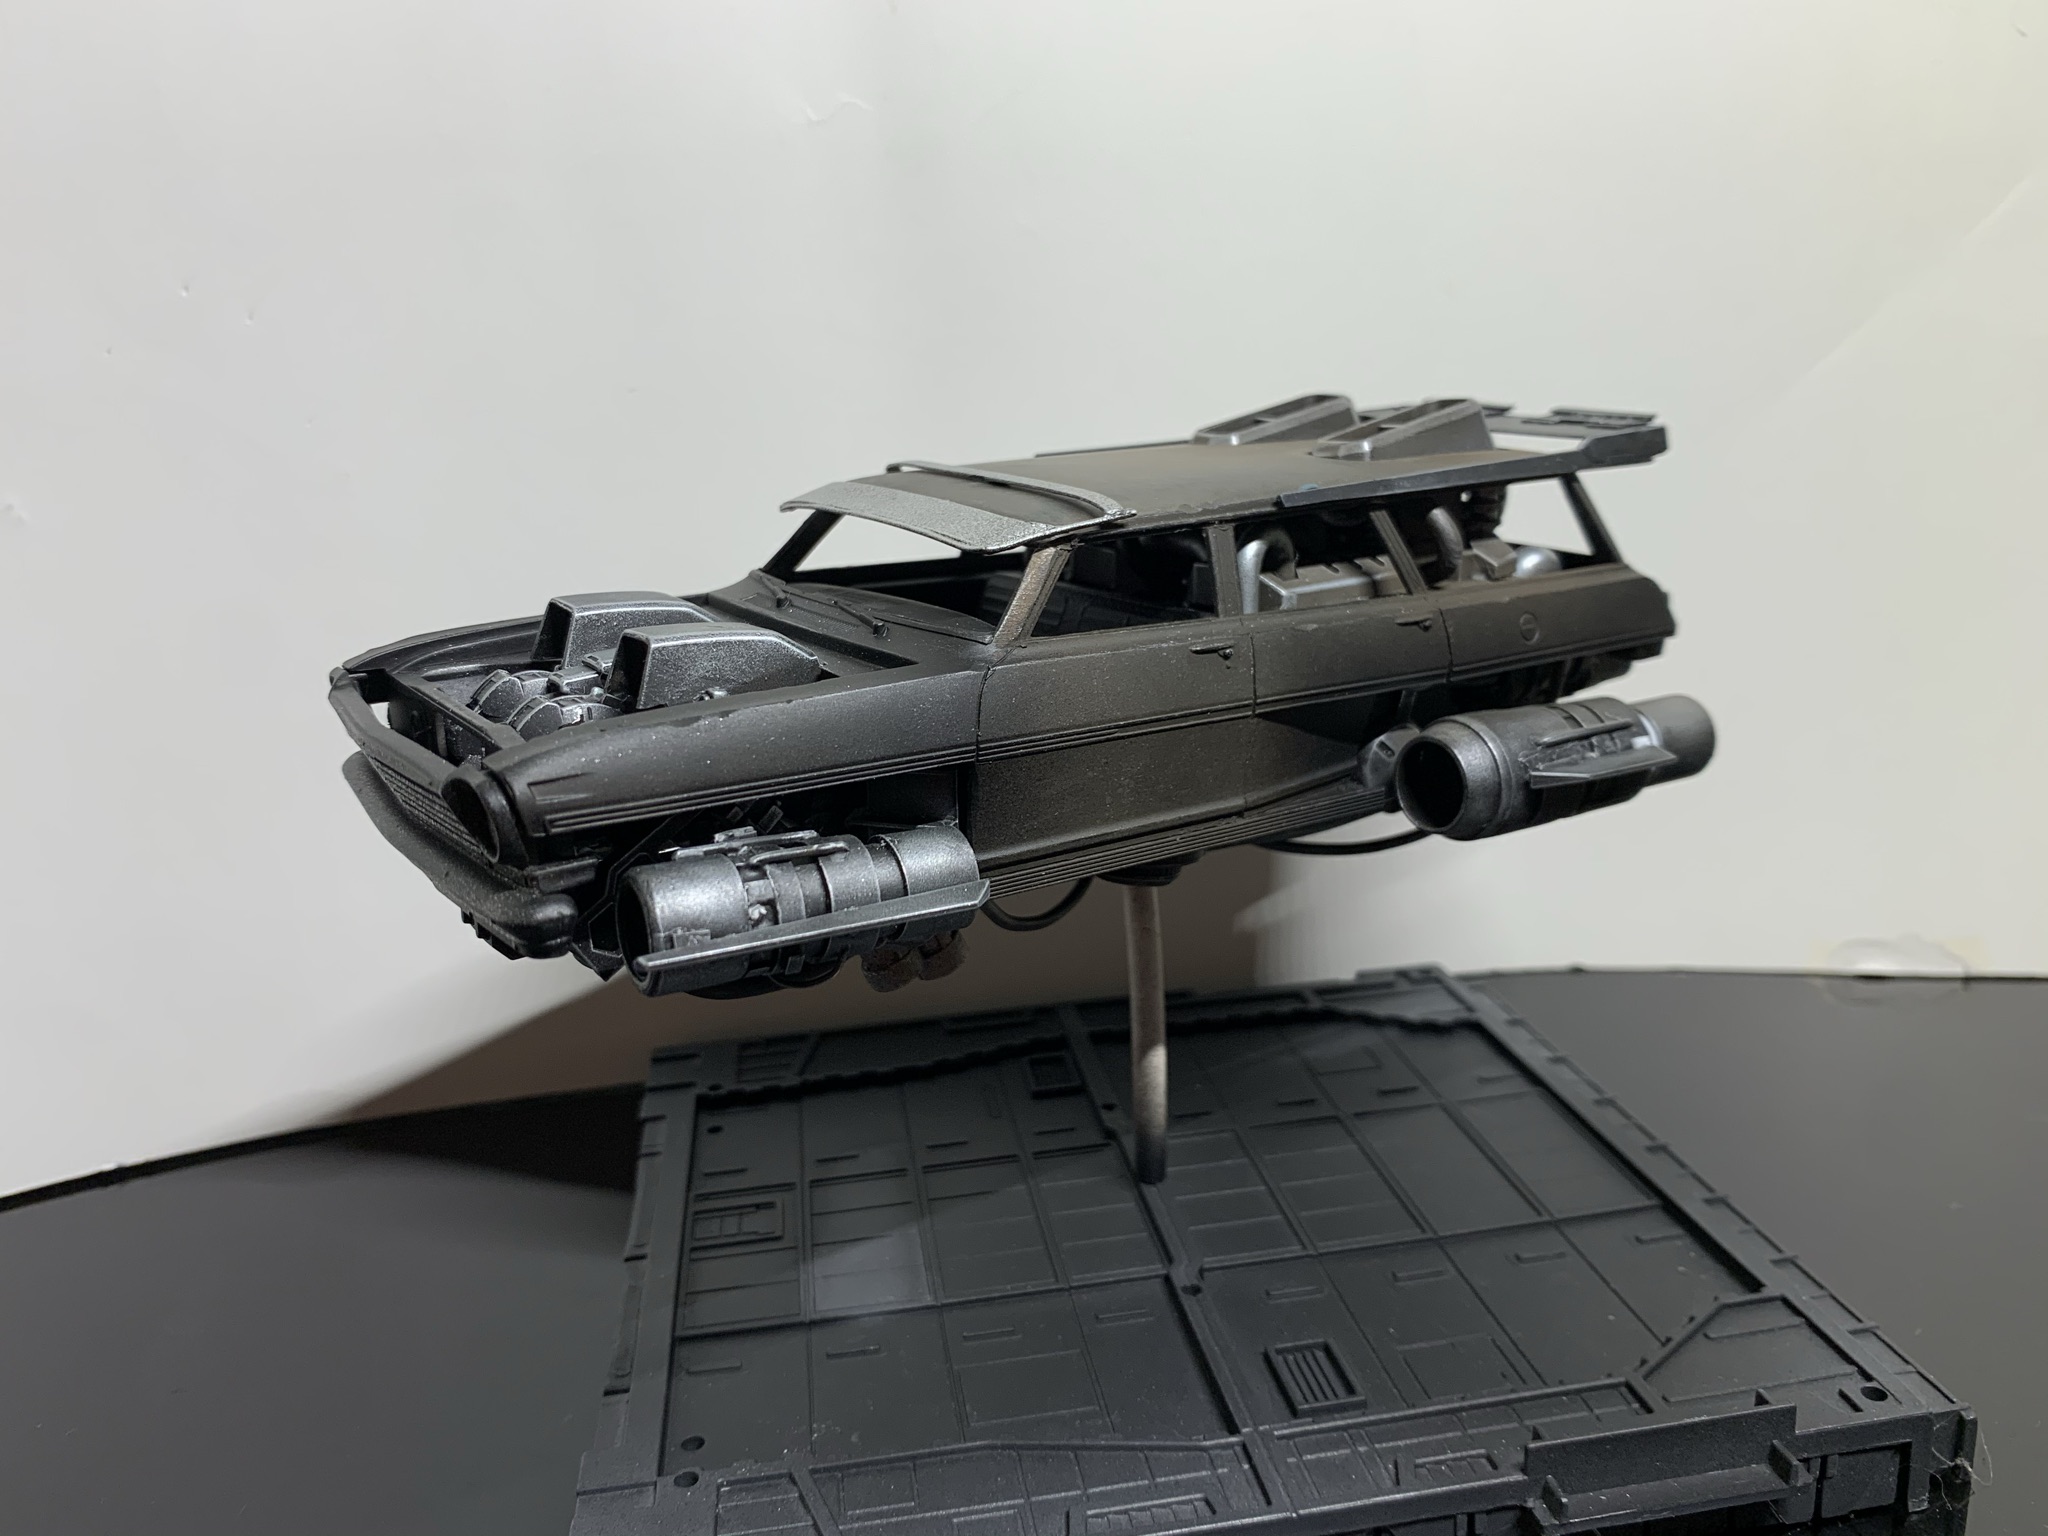
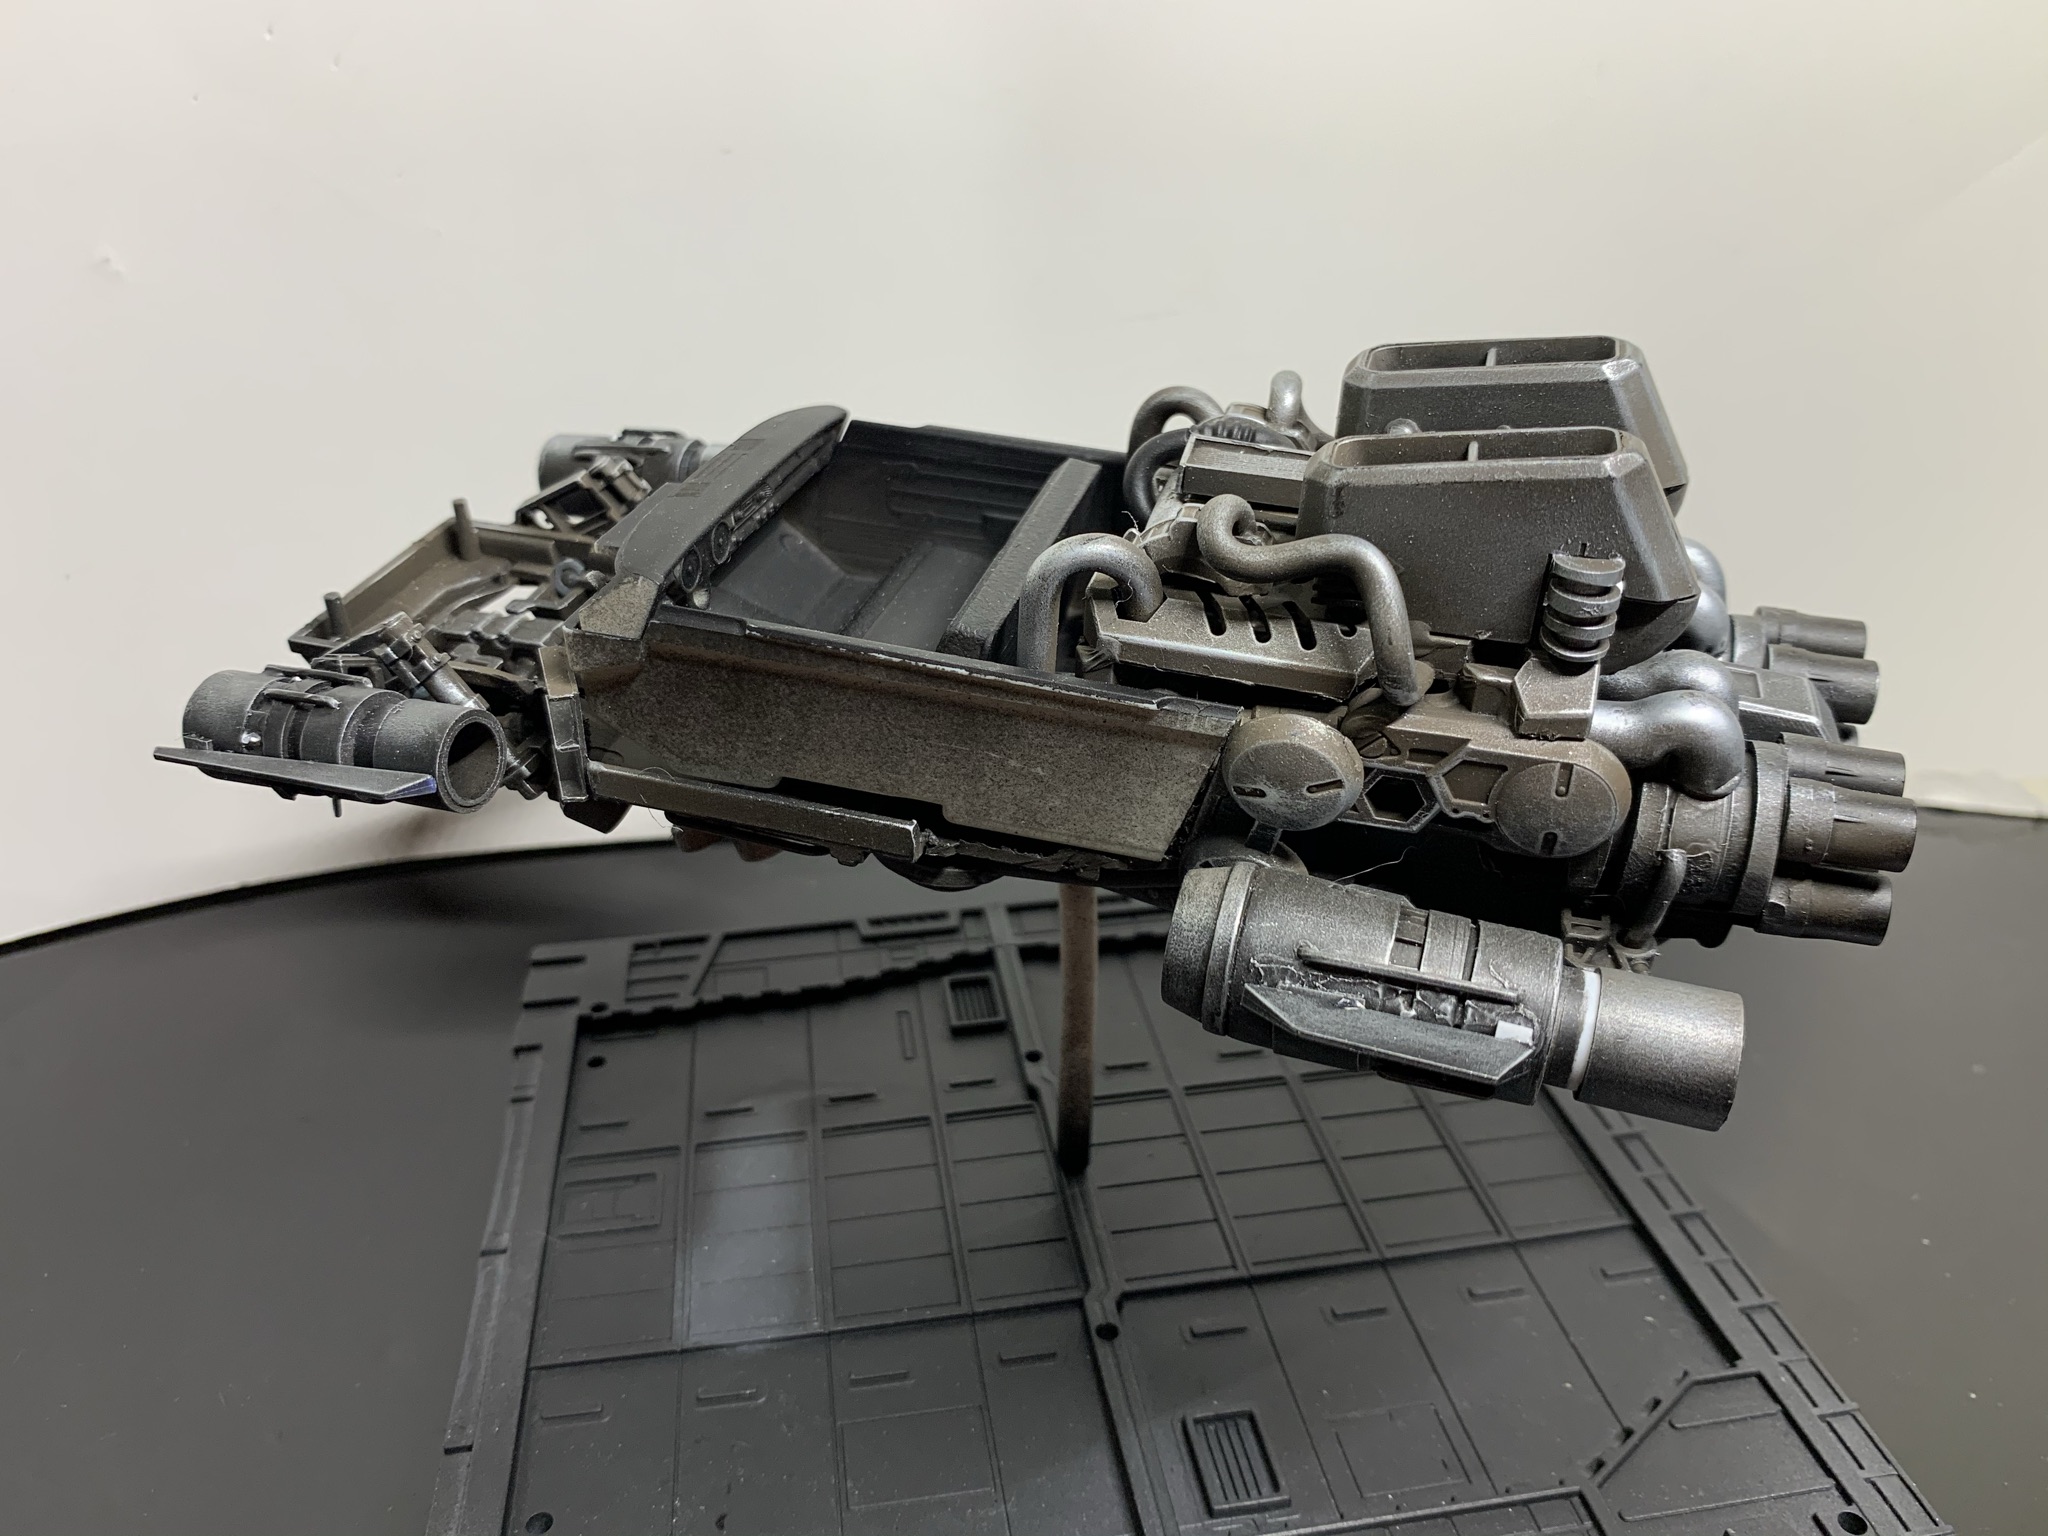
Hi John. I'd say 70% of the extra details are from Gundam kits. 20% Styrene tube/rod or sheet, and 10% spare car parts. I often try to use the existing suspension to mount the wheel turbines to. Recently I've tried using parts from Kotobukia model kits. They have a few model kits that are space military. Lots of usable parts. If you want to see those parts, look at my 63 Nova station wagon. The big intakes on the roof and most of the rear power plant are from the Kotobukia kits.
-
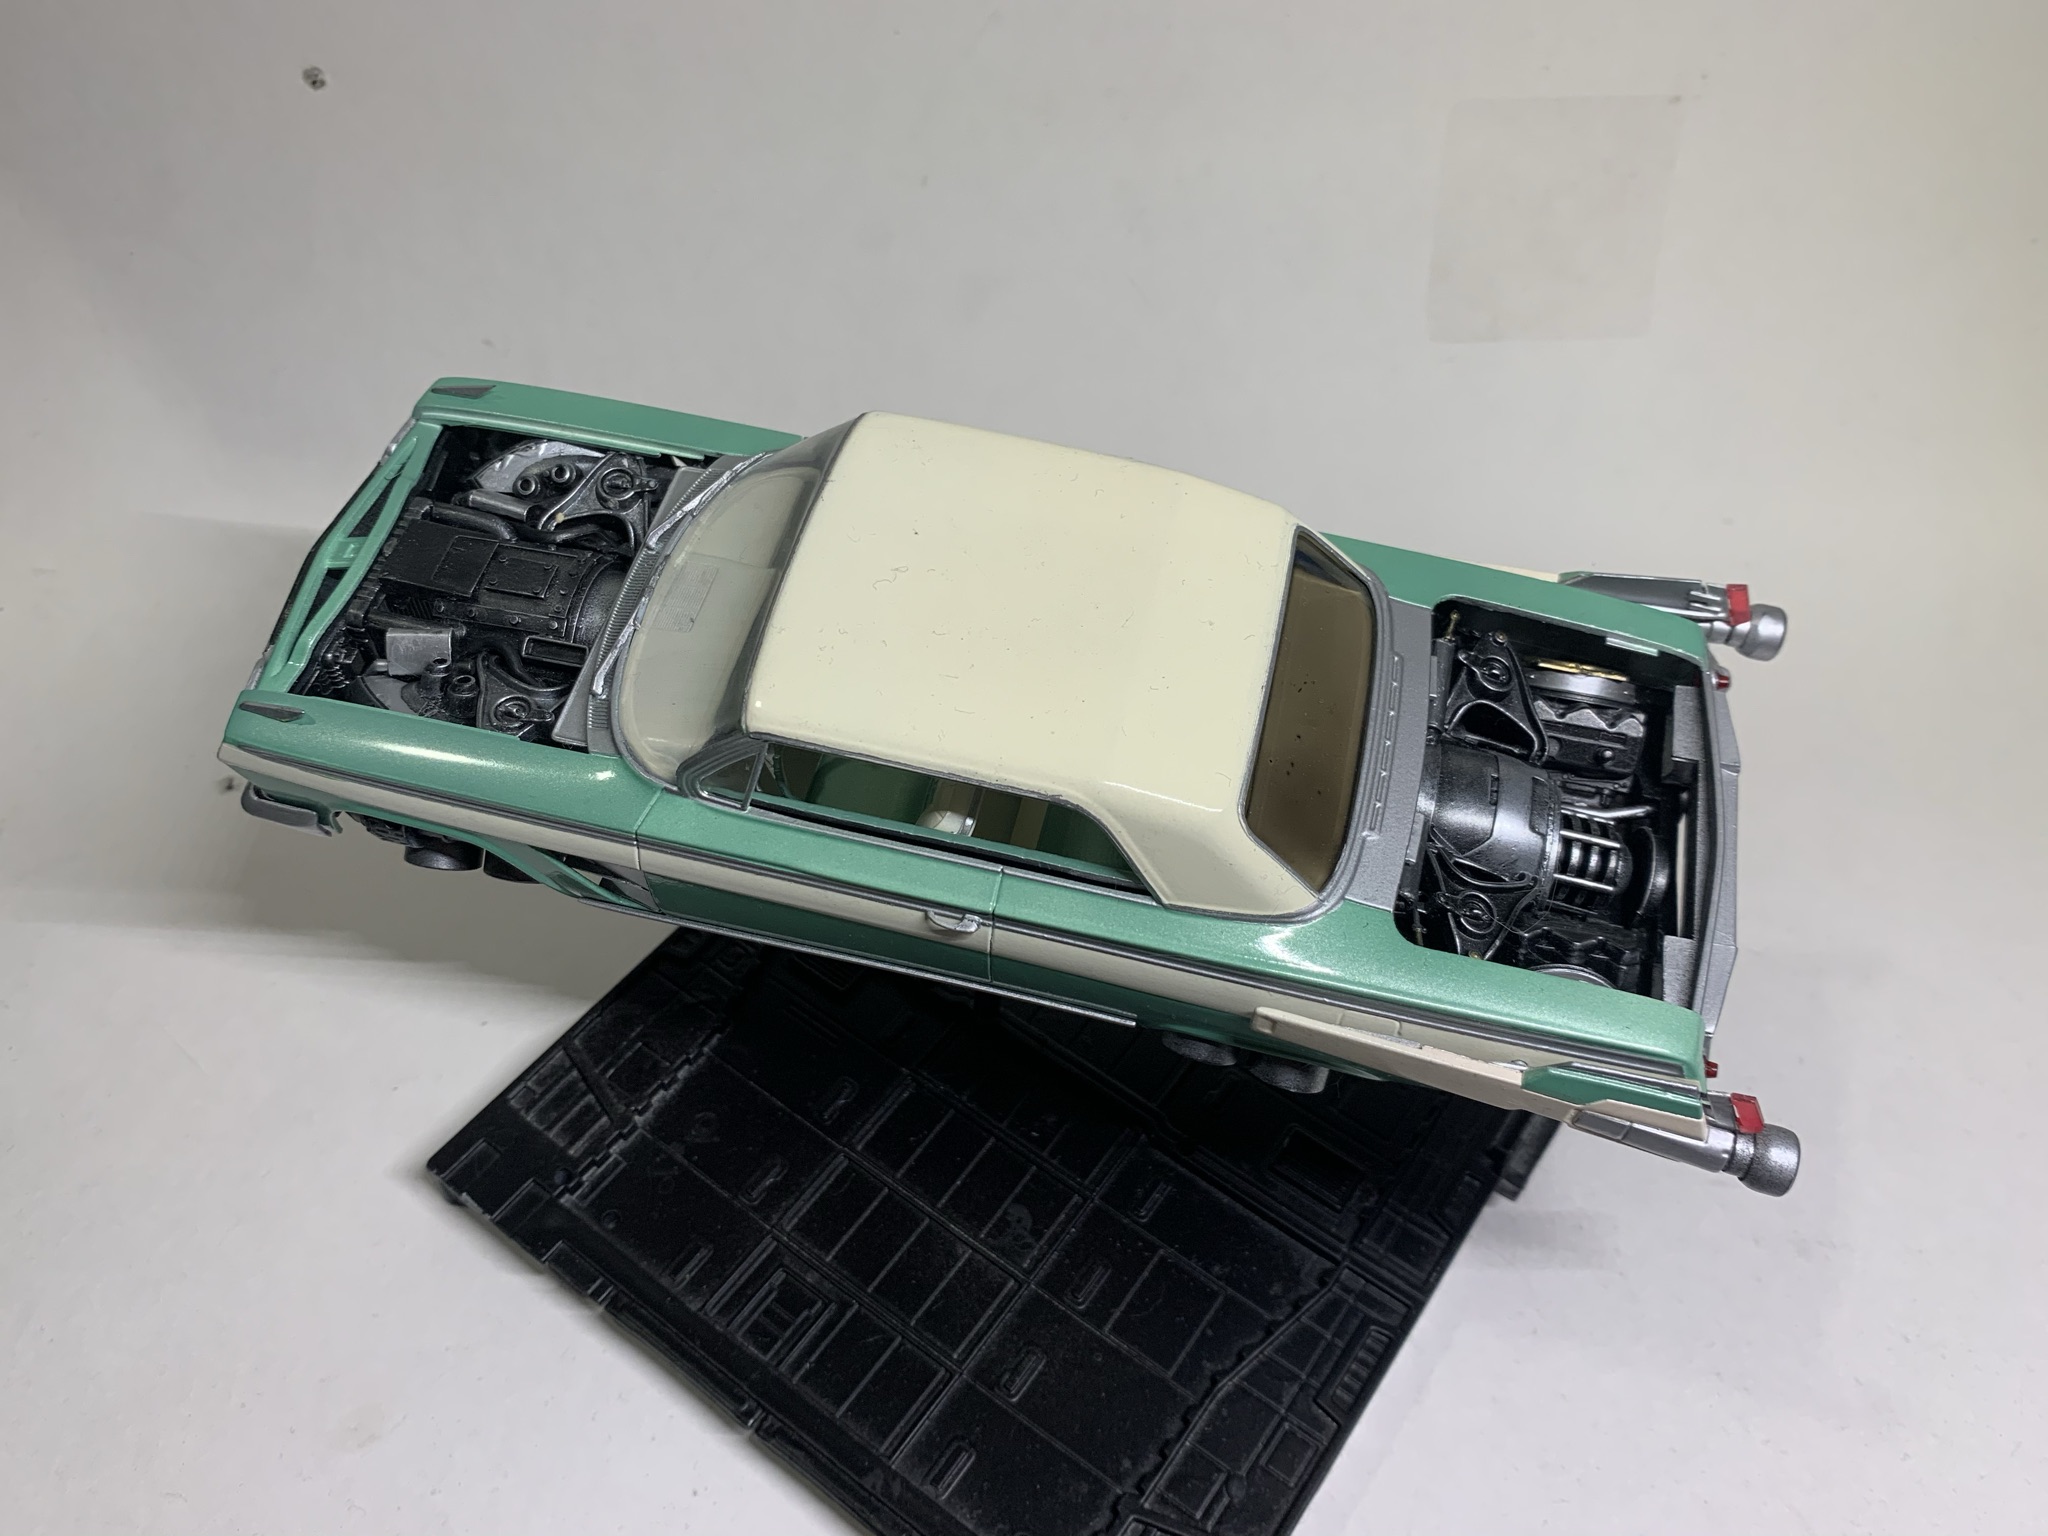
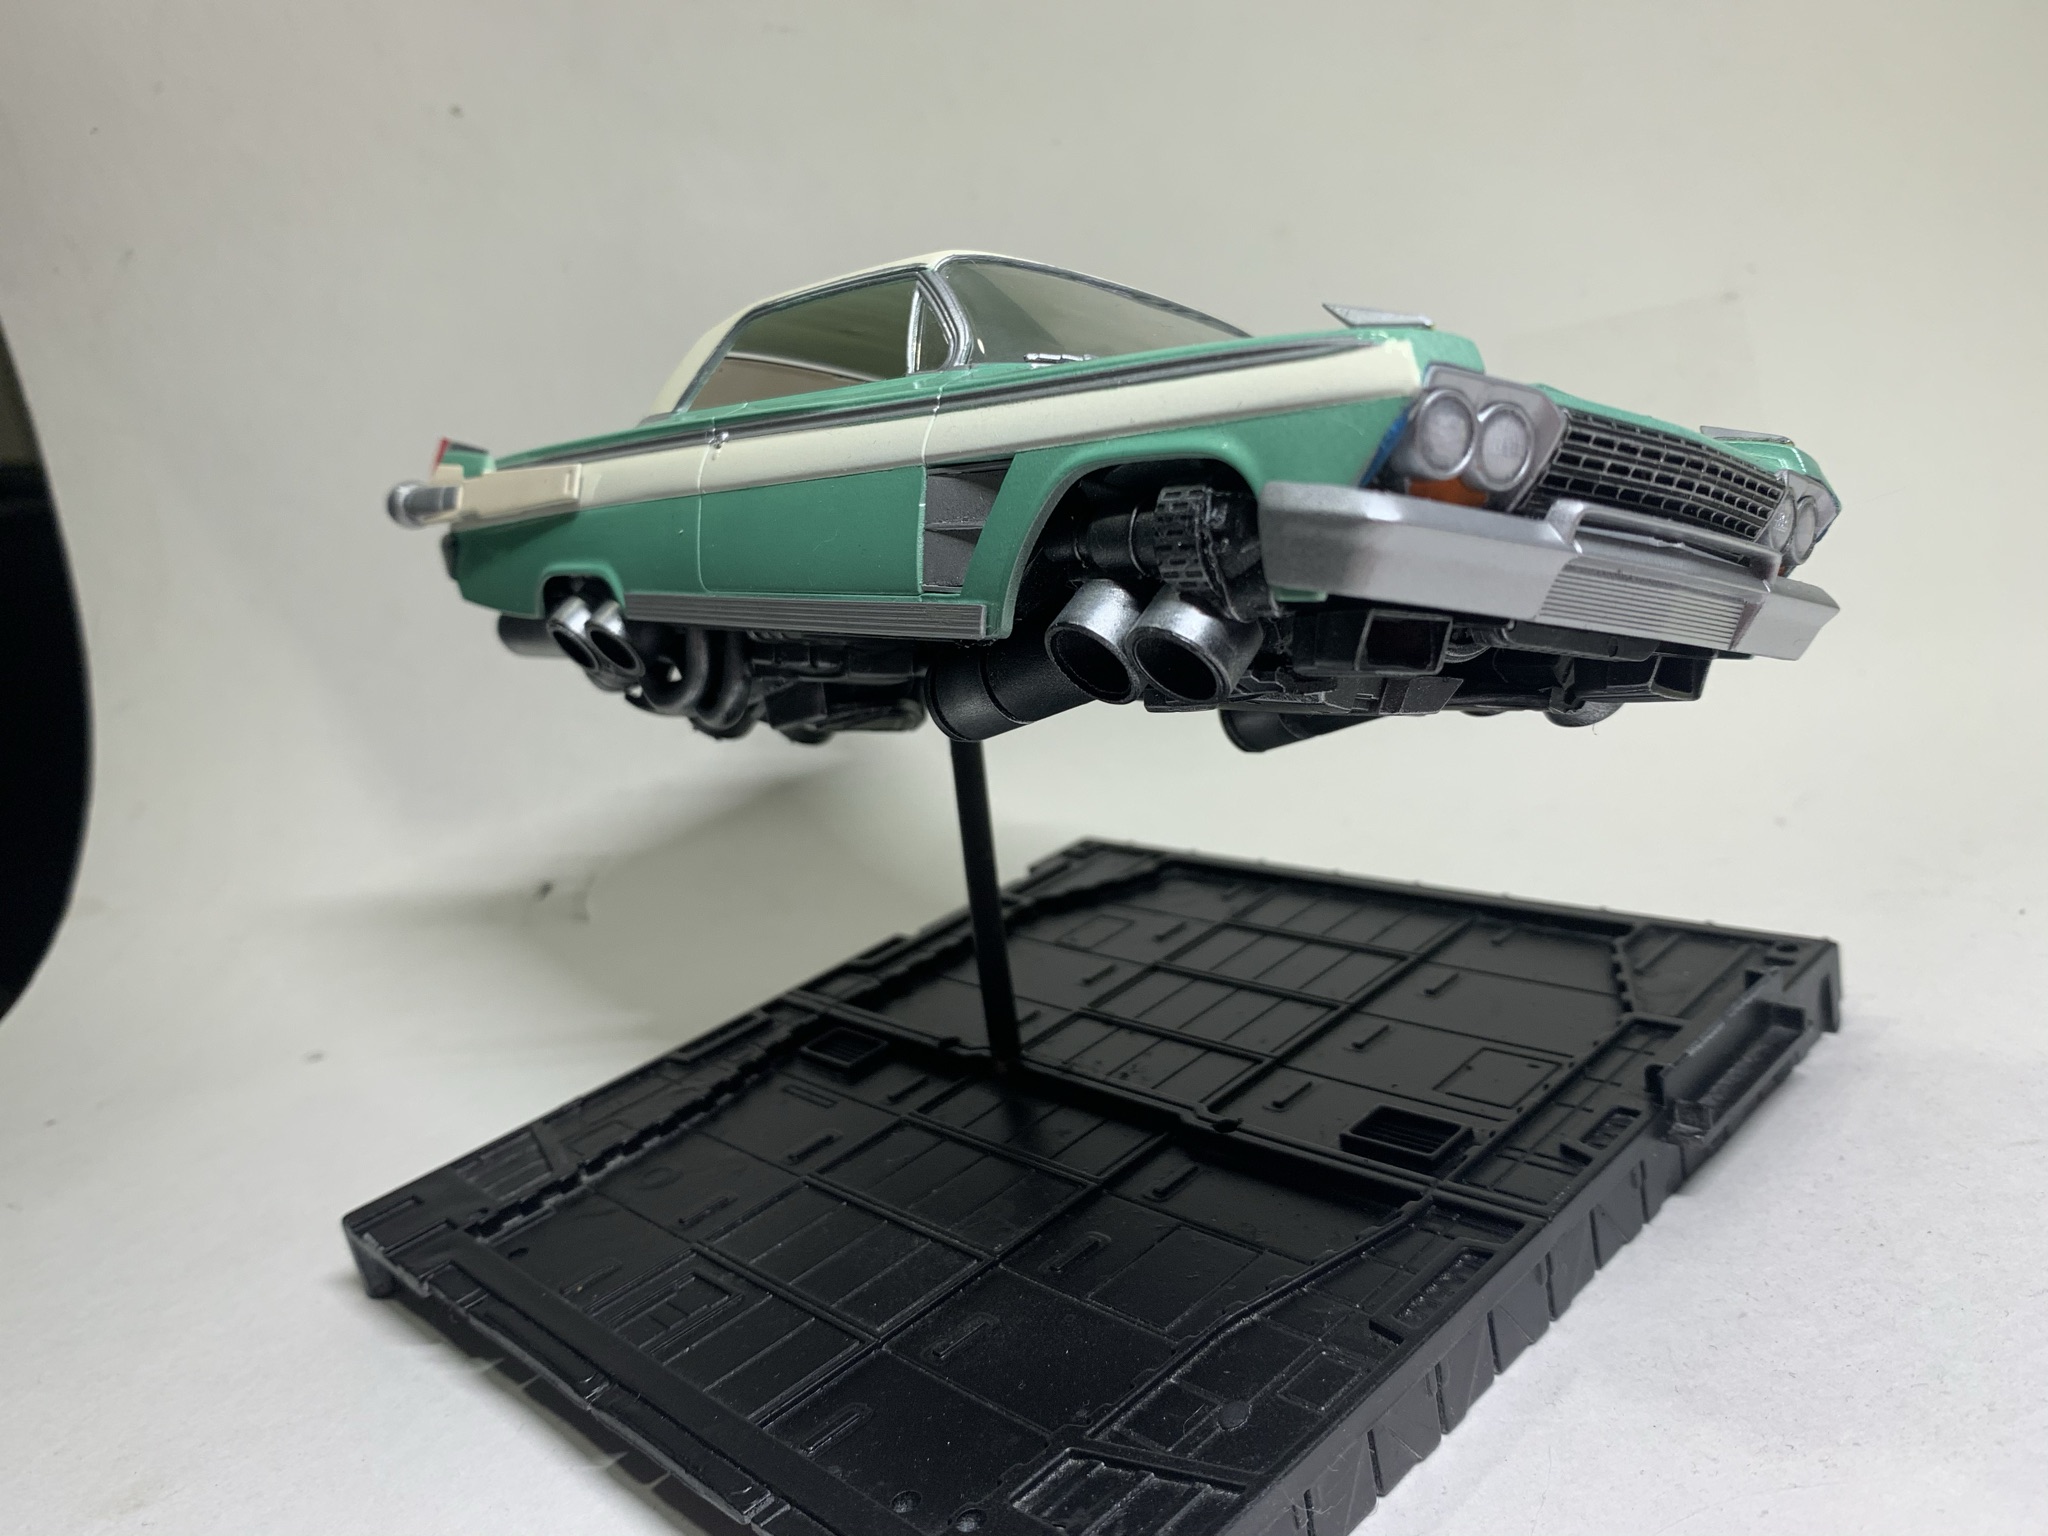
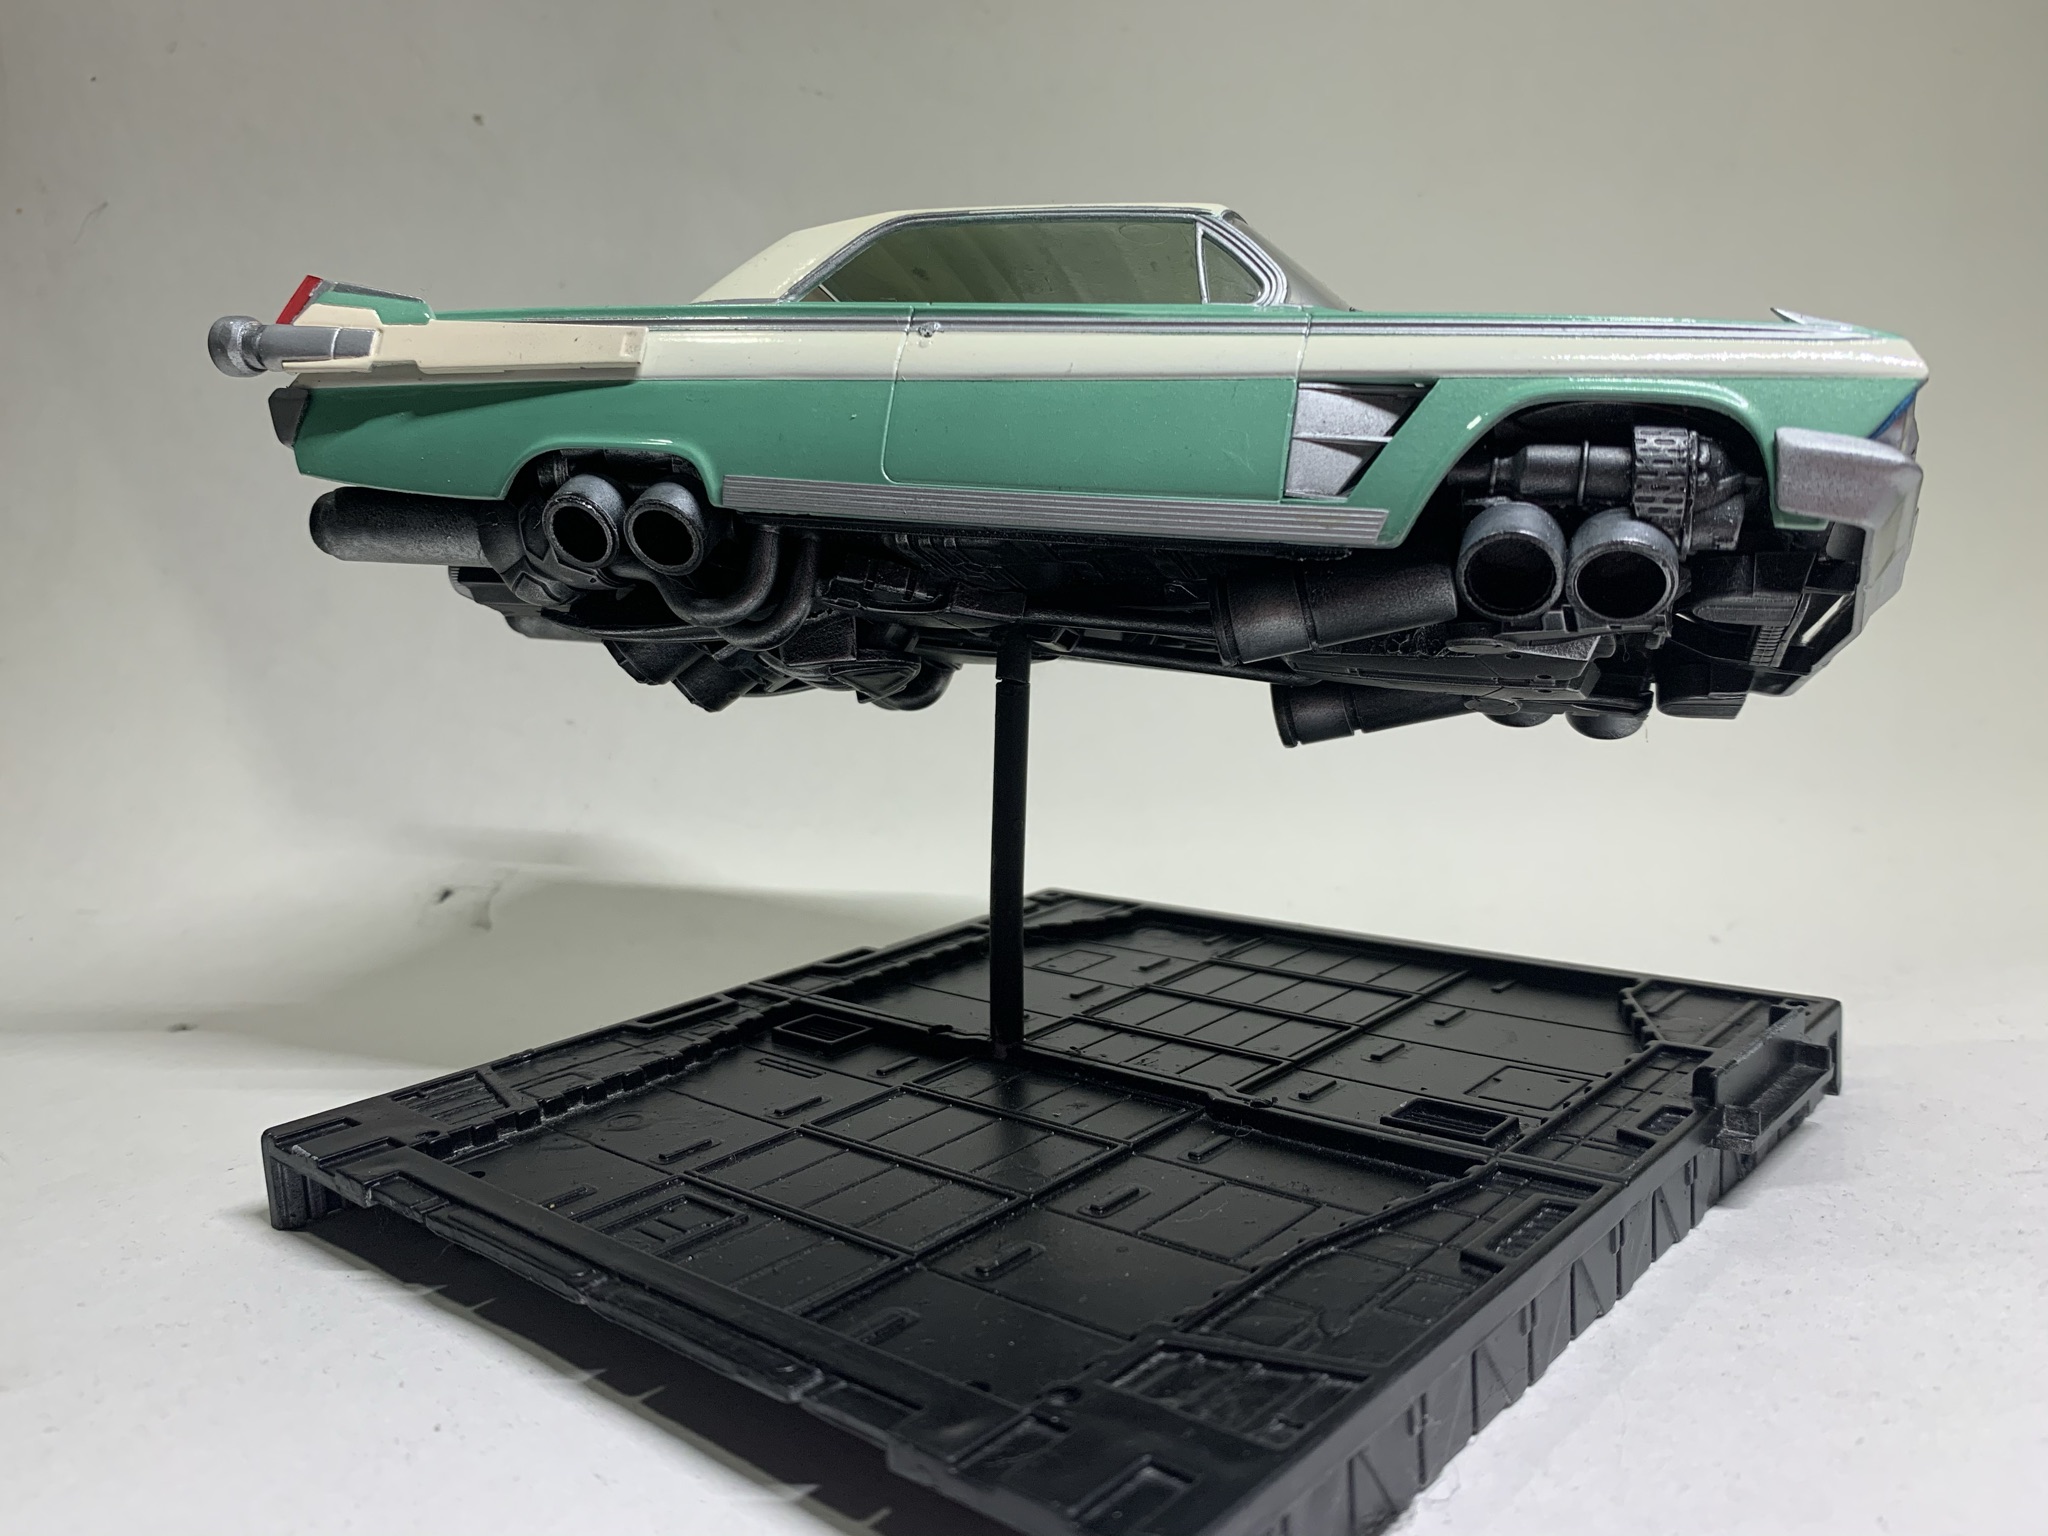
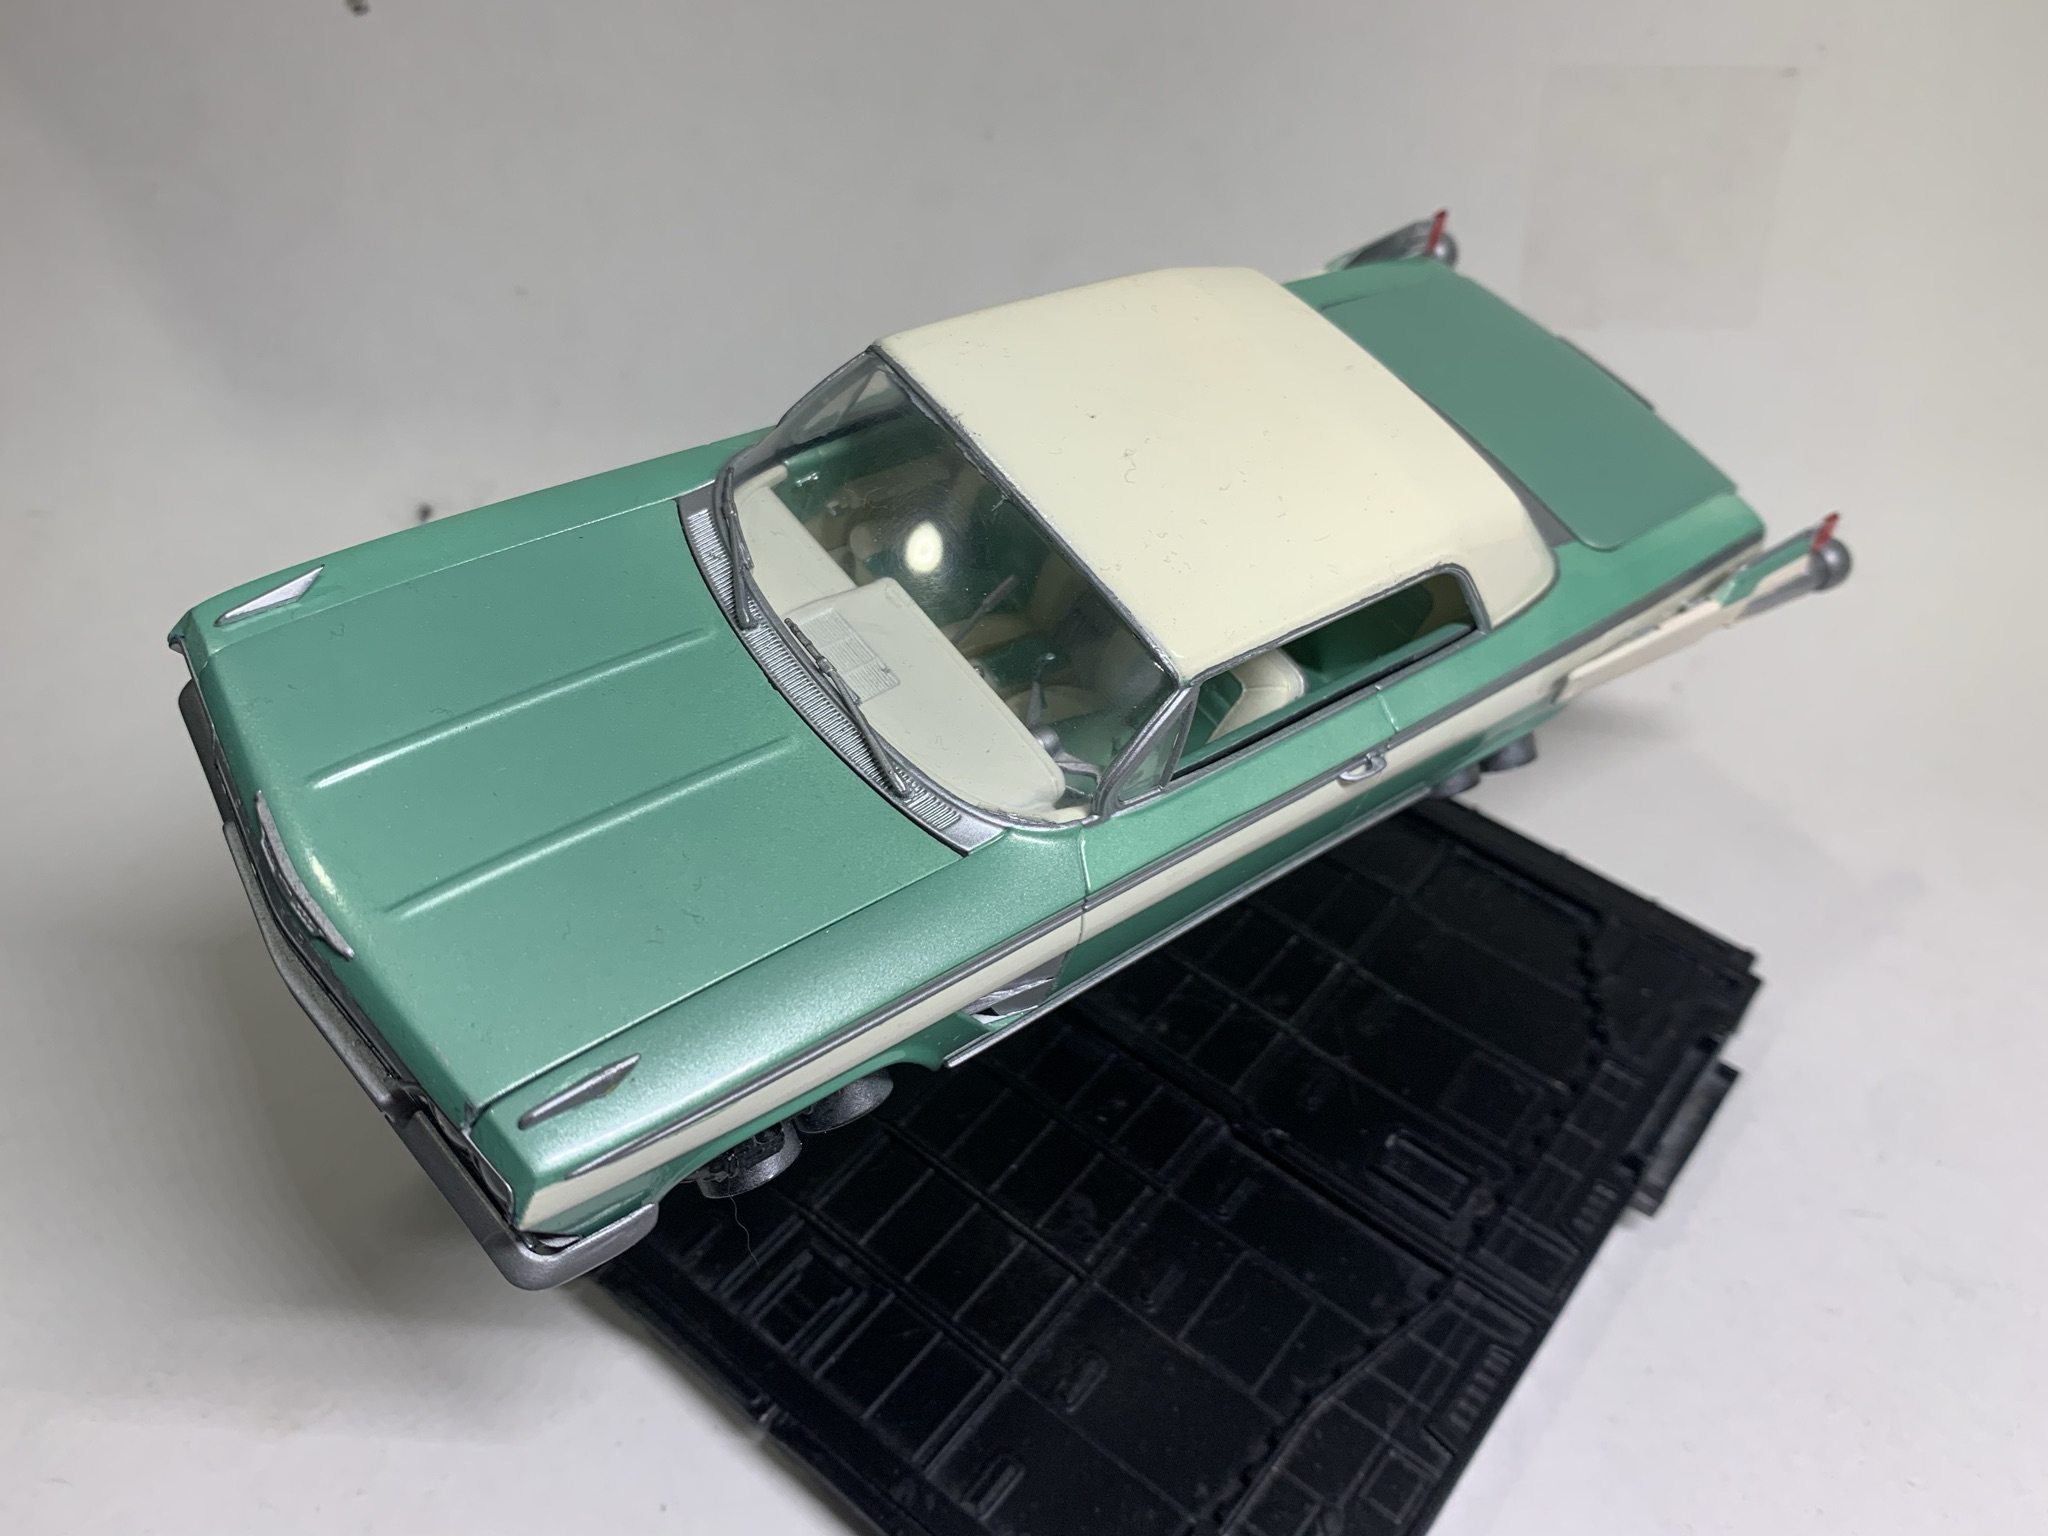
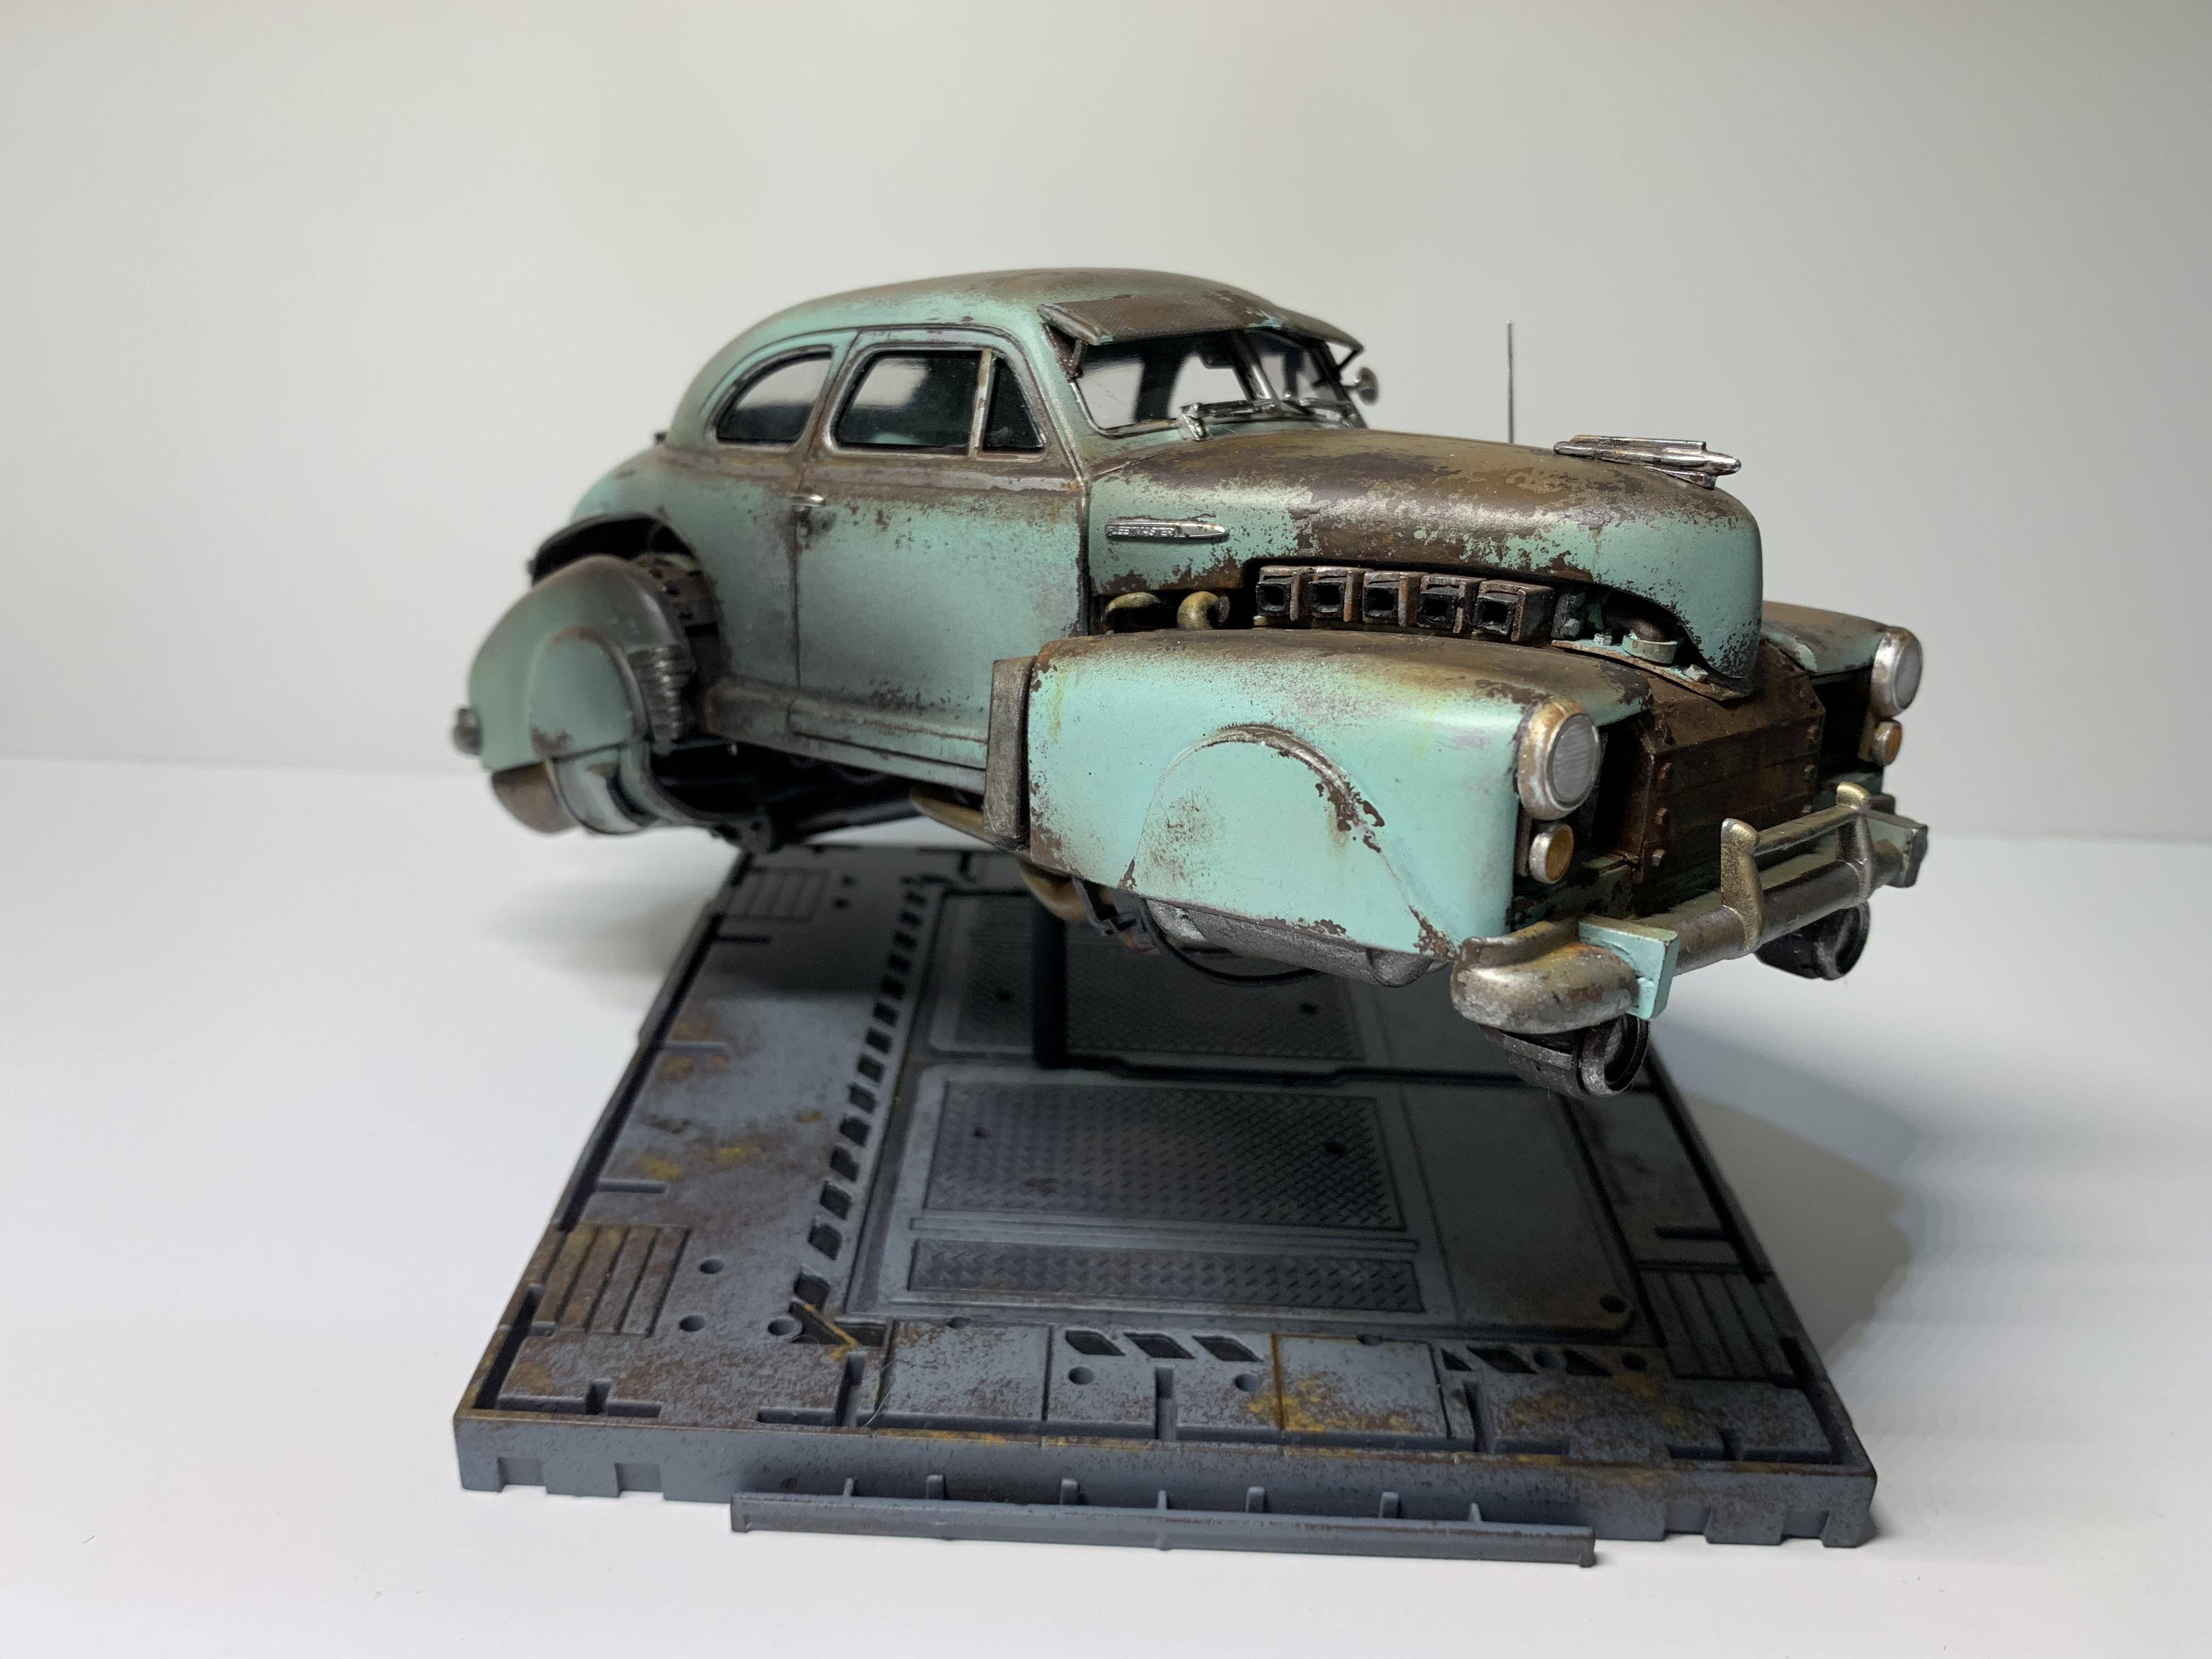
Thank you Dave! Thanks for bringing this post back John! Now I can add my 62 Impala. 62 Impala - Lowrider/Highflyer - Build 11 From the start of this build, I wanted it to have the lowrider style. Not too flashy. Simple and clean. I'm very happy with the color combo. Tamaya TS-60 Pearl Green and TS-7 Racing White. I used Aluminum spray over anything that was supposed to be chrome. I added about 3/16" Styrene strip to the lower rear quarter panel below the white side stripe. It helped bring the rear wheel arches down and also give the car a more rectangular look from the side. I also cut out reliefs in the front fenders. You know I love my vents and large intakes! I used the same VTOL type thrusters under each of the wheel wells as I did on the 41 pickup, and the 32 Ford Vickie. It's probably the most simple type thruster to make. Take half of a V8 engine. Cut off the transmission housing from the bell backwards. Glue two Styrene tubes where the heads mount. Then glue it to the undercarriage so the thrusters angle out at 45 degrees. Then cover it in pipes or whatever will disguise the engine block. Fill the wheel wells with parts that look like they belong.
-
I appreciate the wonderful comments! Thank you all for taking the time to say something nice. I truly enjoy building these vehicles. Thanks Jonathan! I agree 100%. I have the Kansas City model show coming up in just a few days. I had intentionally left off the side mirrors and 1 antenna. I figured they wouldn't stay glued on. I'll be attaching them right before the show. As you can see in the photos I have already lost one of the door handles. And since I took these photos, I have since lost the hood emblem. Both lost to the abyss that is known as the floor.....a place where things seem to just vanish without a trace. Here's some more photos. This is the first build that I didn't put in the Work in Progress part of the forums. I had computer issues and was not able to upload photos. All fixed now. The rear wheel arches came up a little high showing off too much of the mechanical parts. I was going fora lowrider look, so I did some cutting of the rear panels. I scored the line right at the detail that runs down the side of the car. I added about a 1/4 inch of Styrene to the top of the panels that I removed, then reinstalled in the new position.
-
62 Impala jet car. It's been a while since I had to worry about a clean paint job. All of my builds nowadays are weathered. I really enjoyed this. I didn't go to crazy with gadgets. I wanted a clean simple build. I love this color combo!! I'm not a fan of the chrome out of the box. I find that it wears off easily and looks fake. I went with aluminum over the chrome bits. I had painted the trunk lid and got a large dog hair right in the middle. I attempted to sand the imperfection away. Sanded too far through and ended up having to strip and repaint the trunk. It doesn't quite match. This is why I don't do clean paint jobs. 😢 I have the Kansas City model show coming up next week. I've waited to add the side mirrors until the show. I know they'll fall off like the door handle. I lost the passenger door handle. That's nice to know as I post these photos.............. As usual. Plenty of Gundam parts and styrene tube used in making the mechanical details. I suggest if you want to try to build one of these....get a few cheap Gundam kits. That's where I get 80% of my detail pieces from. Most of the exhaust tubes are 3/8 - 7/16 Styrene tube. Thanks for looking!!!!!
-
The bases were given to me by my son. They're bases for standing Gundam figures on. If you look up MSG Chain Base, you should be able to find it. When you combine the price plus shipping, they get fairly expensive.
-
56 Ford FD-100 Hover Truck
Daxman replied to Daxman's topic in Model Trucks: Pickups, Vans, SUVs, Light Commercial
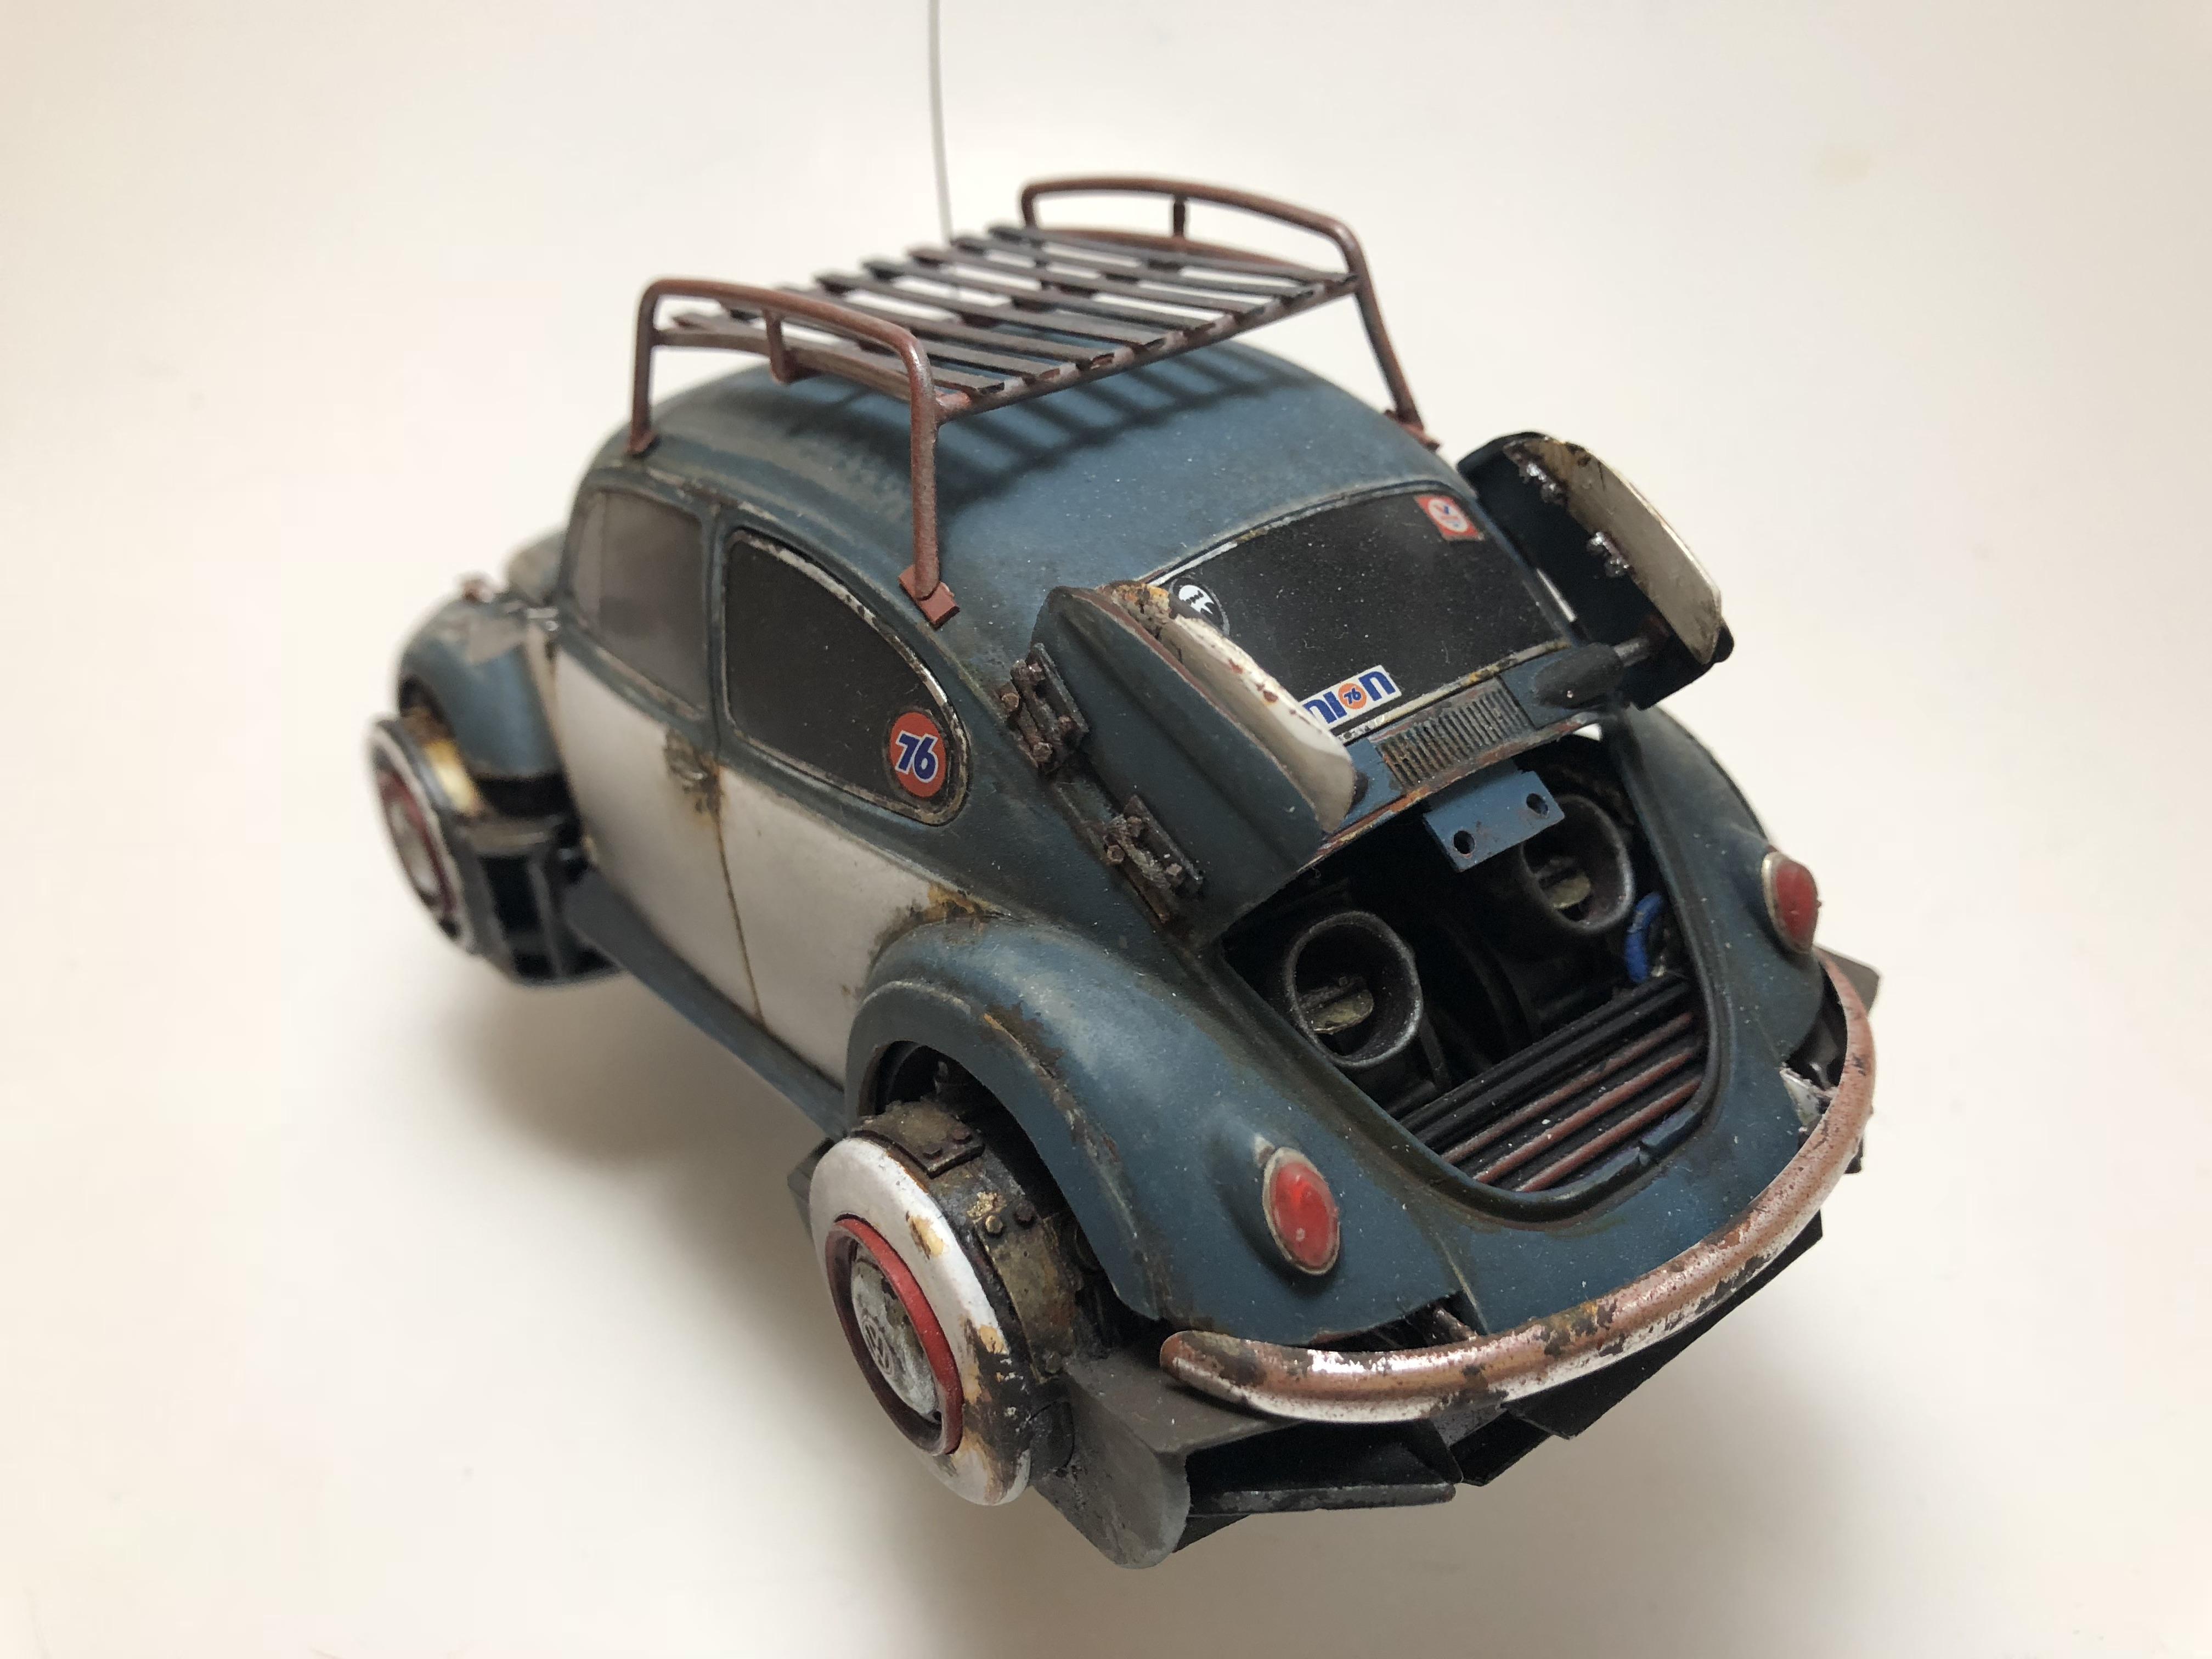
Sorry Chuck! And sorry to anyone who started looking at the side mirrors. I thought they were the tail lights from a 71 Cuda. I was mistaken. I don't actually know what they're from. After I posted that question, I looked up photos and the shape is slightly different. Here's some before and after early photos Before it was narrowed. After. I get asked a lot about the parts that I use. My first answer is Gundam kits. I will usually modify the parts further to fit the car. I also build in sub-assemblies. I like to pin the parts with Styrene tube. Makes for easy mock ups.
-
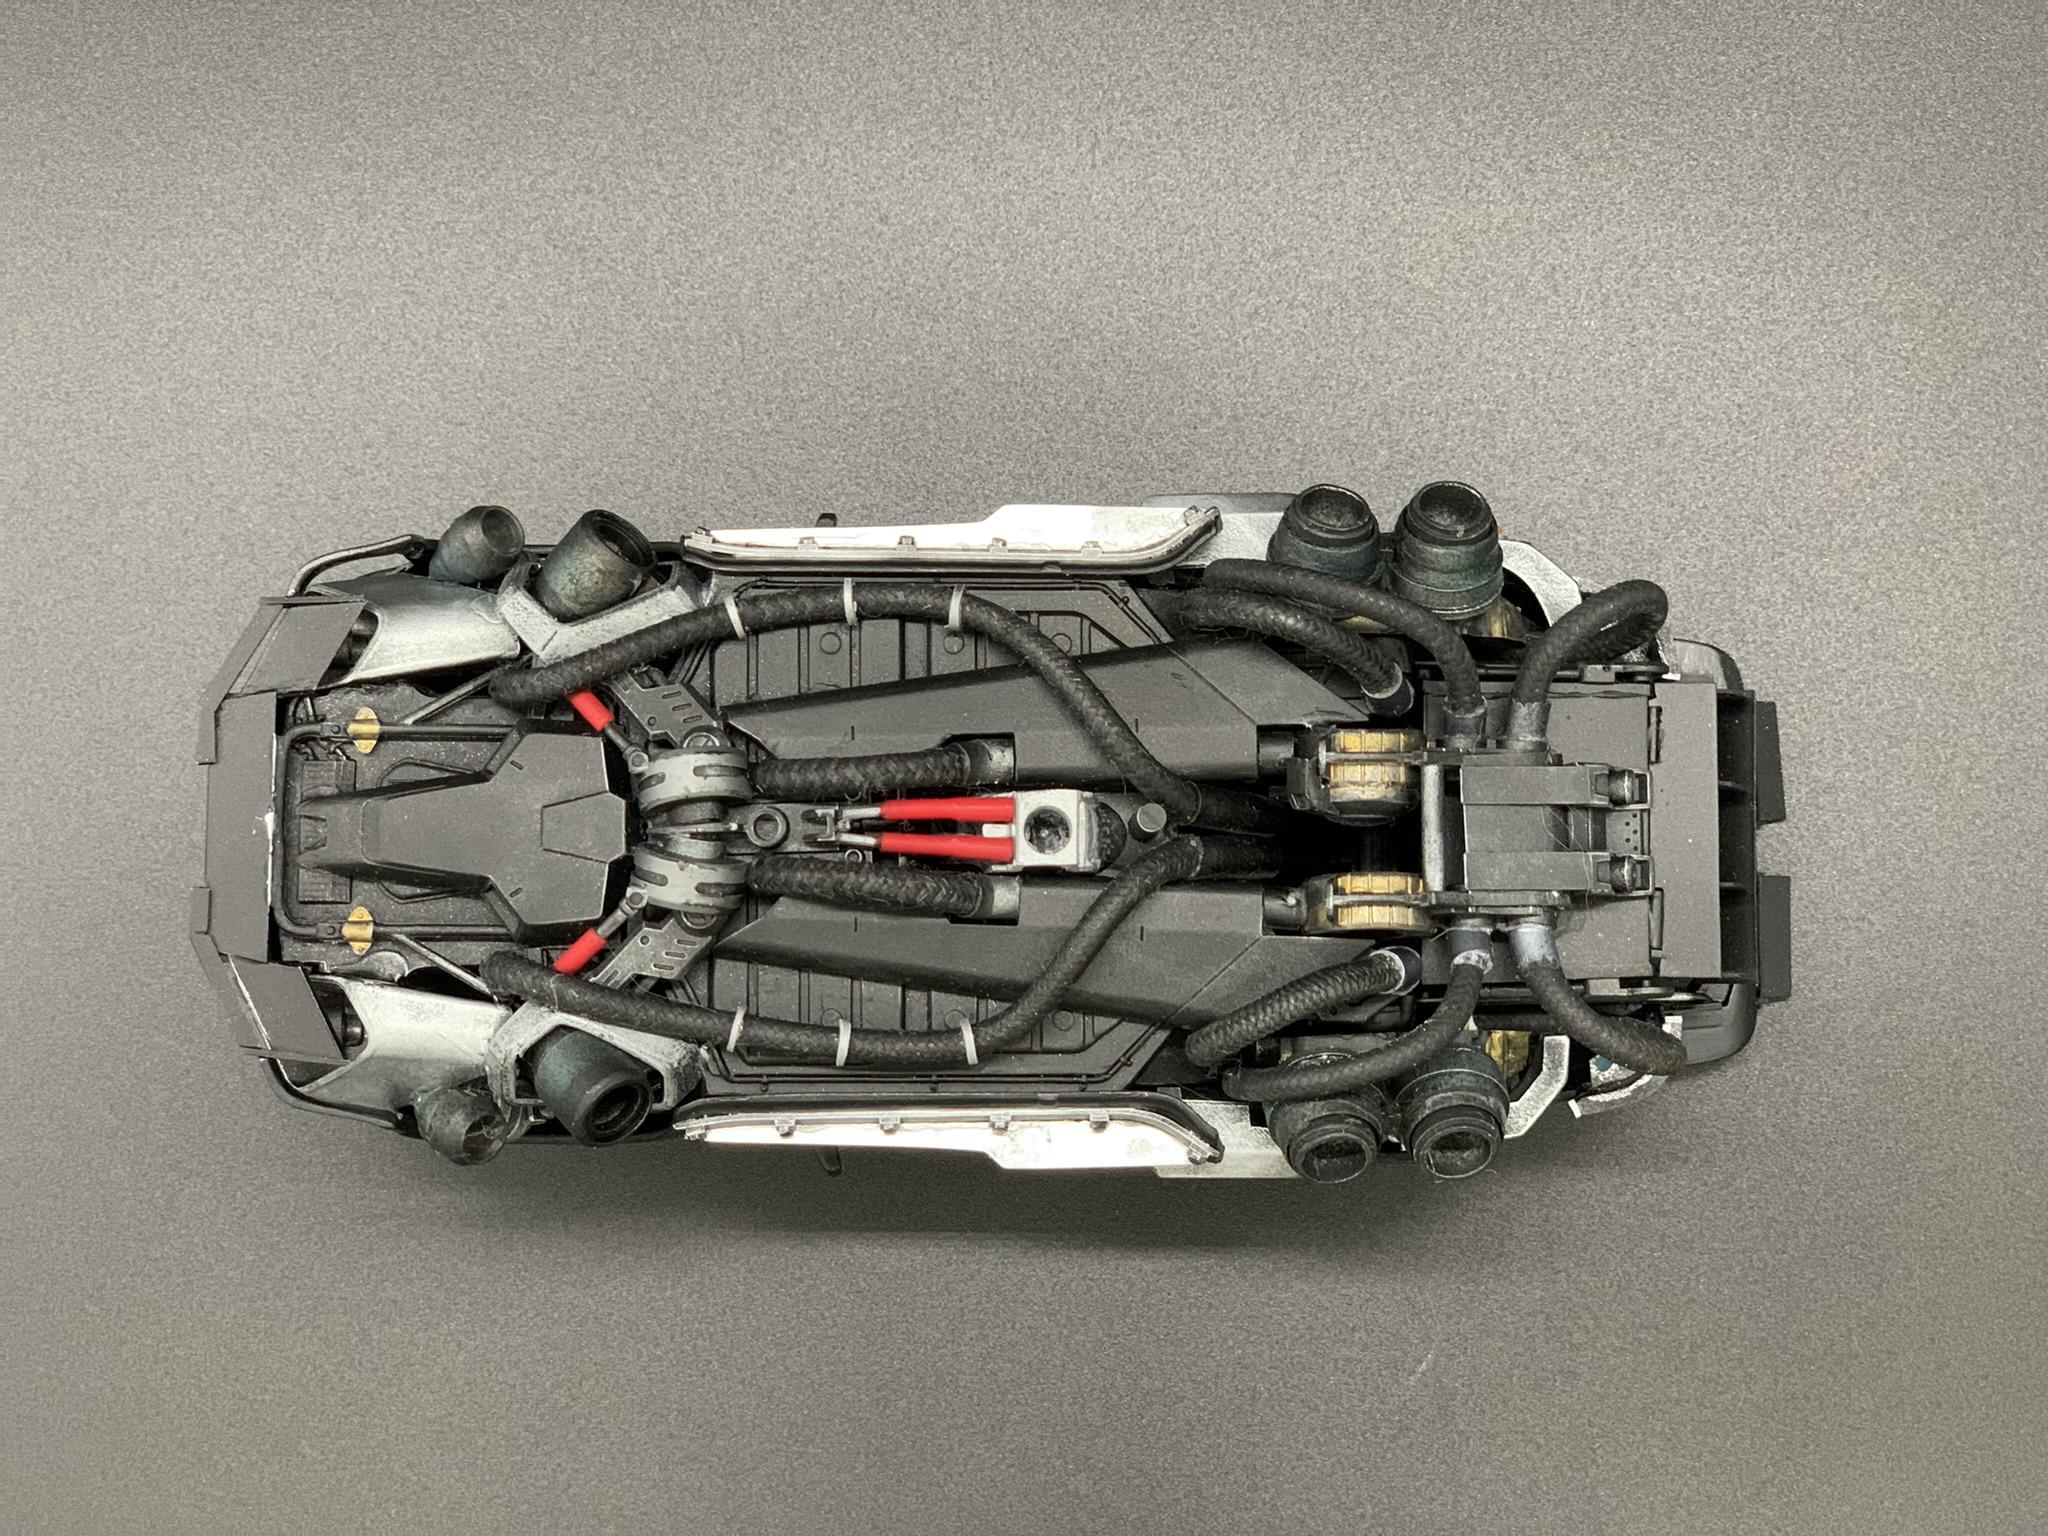
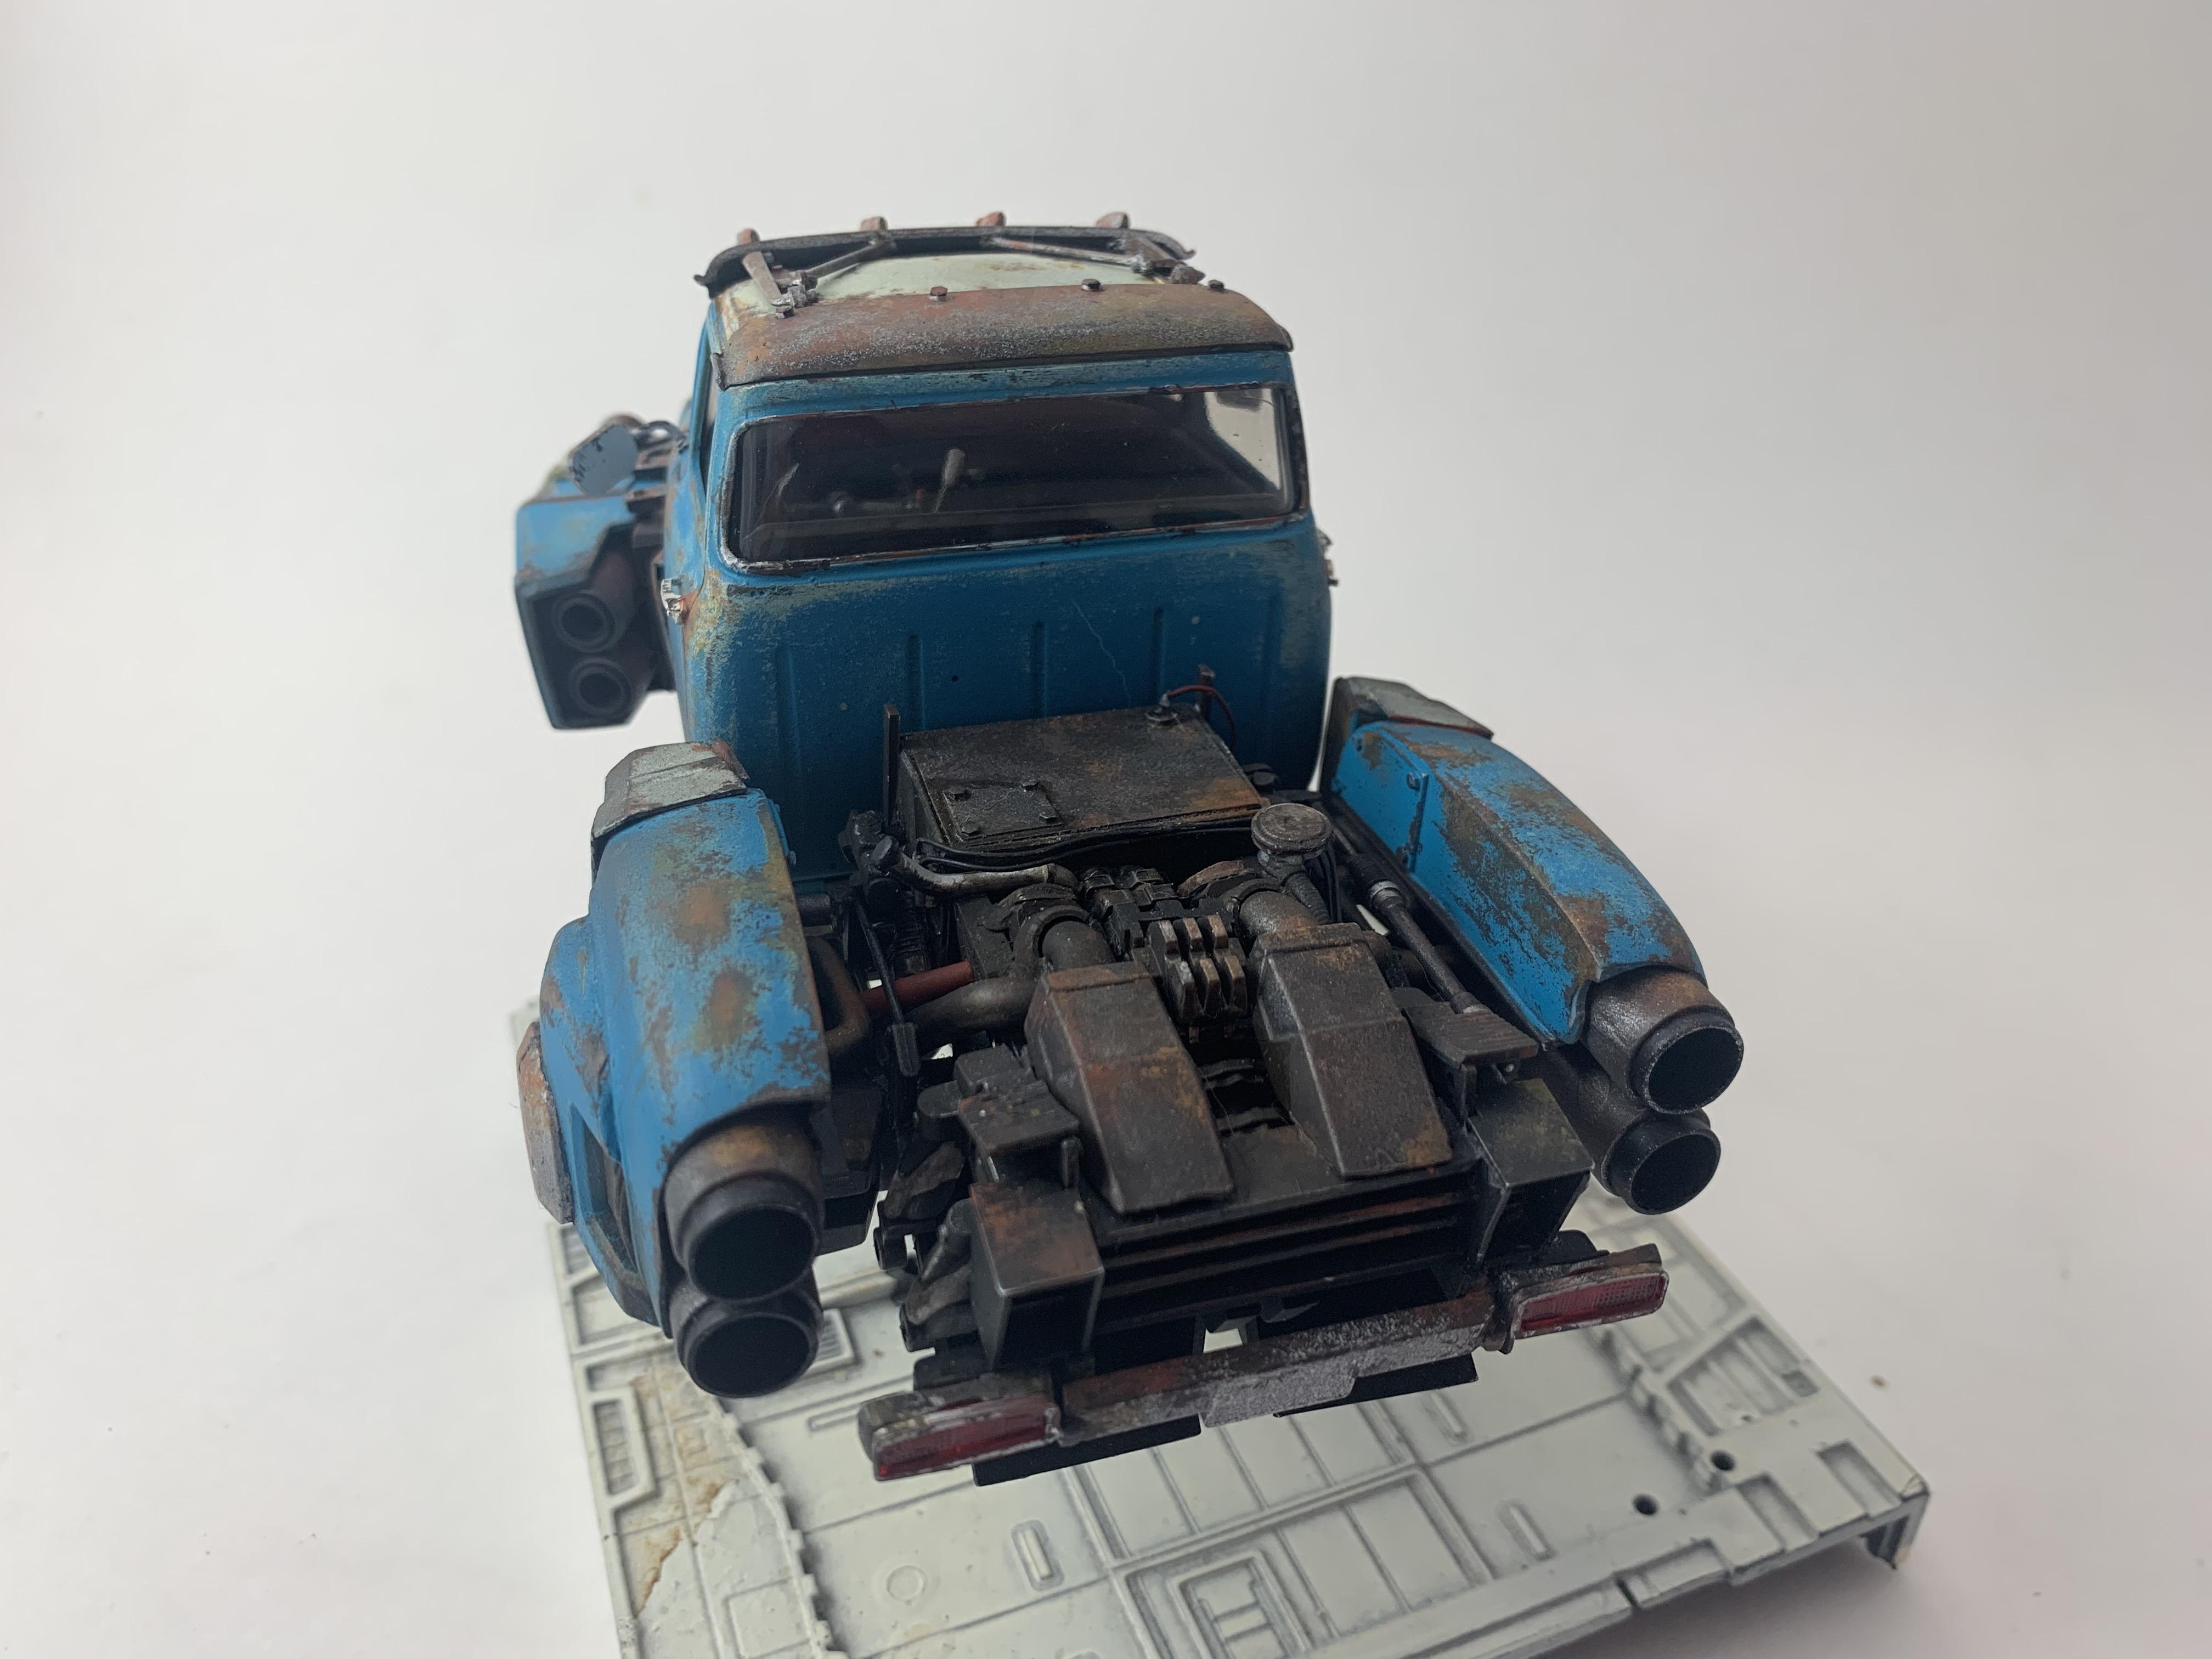
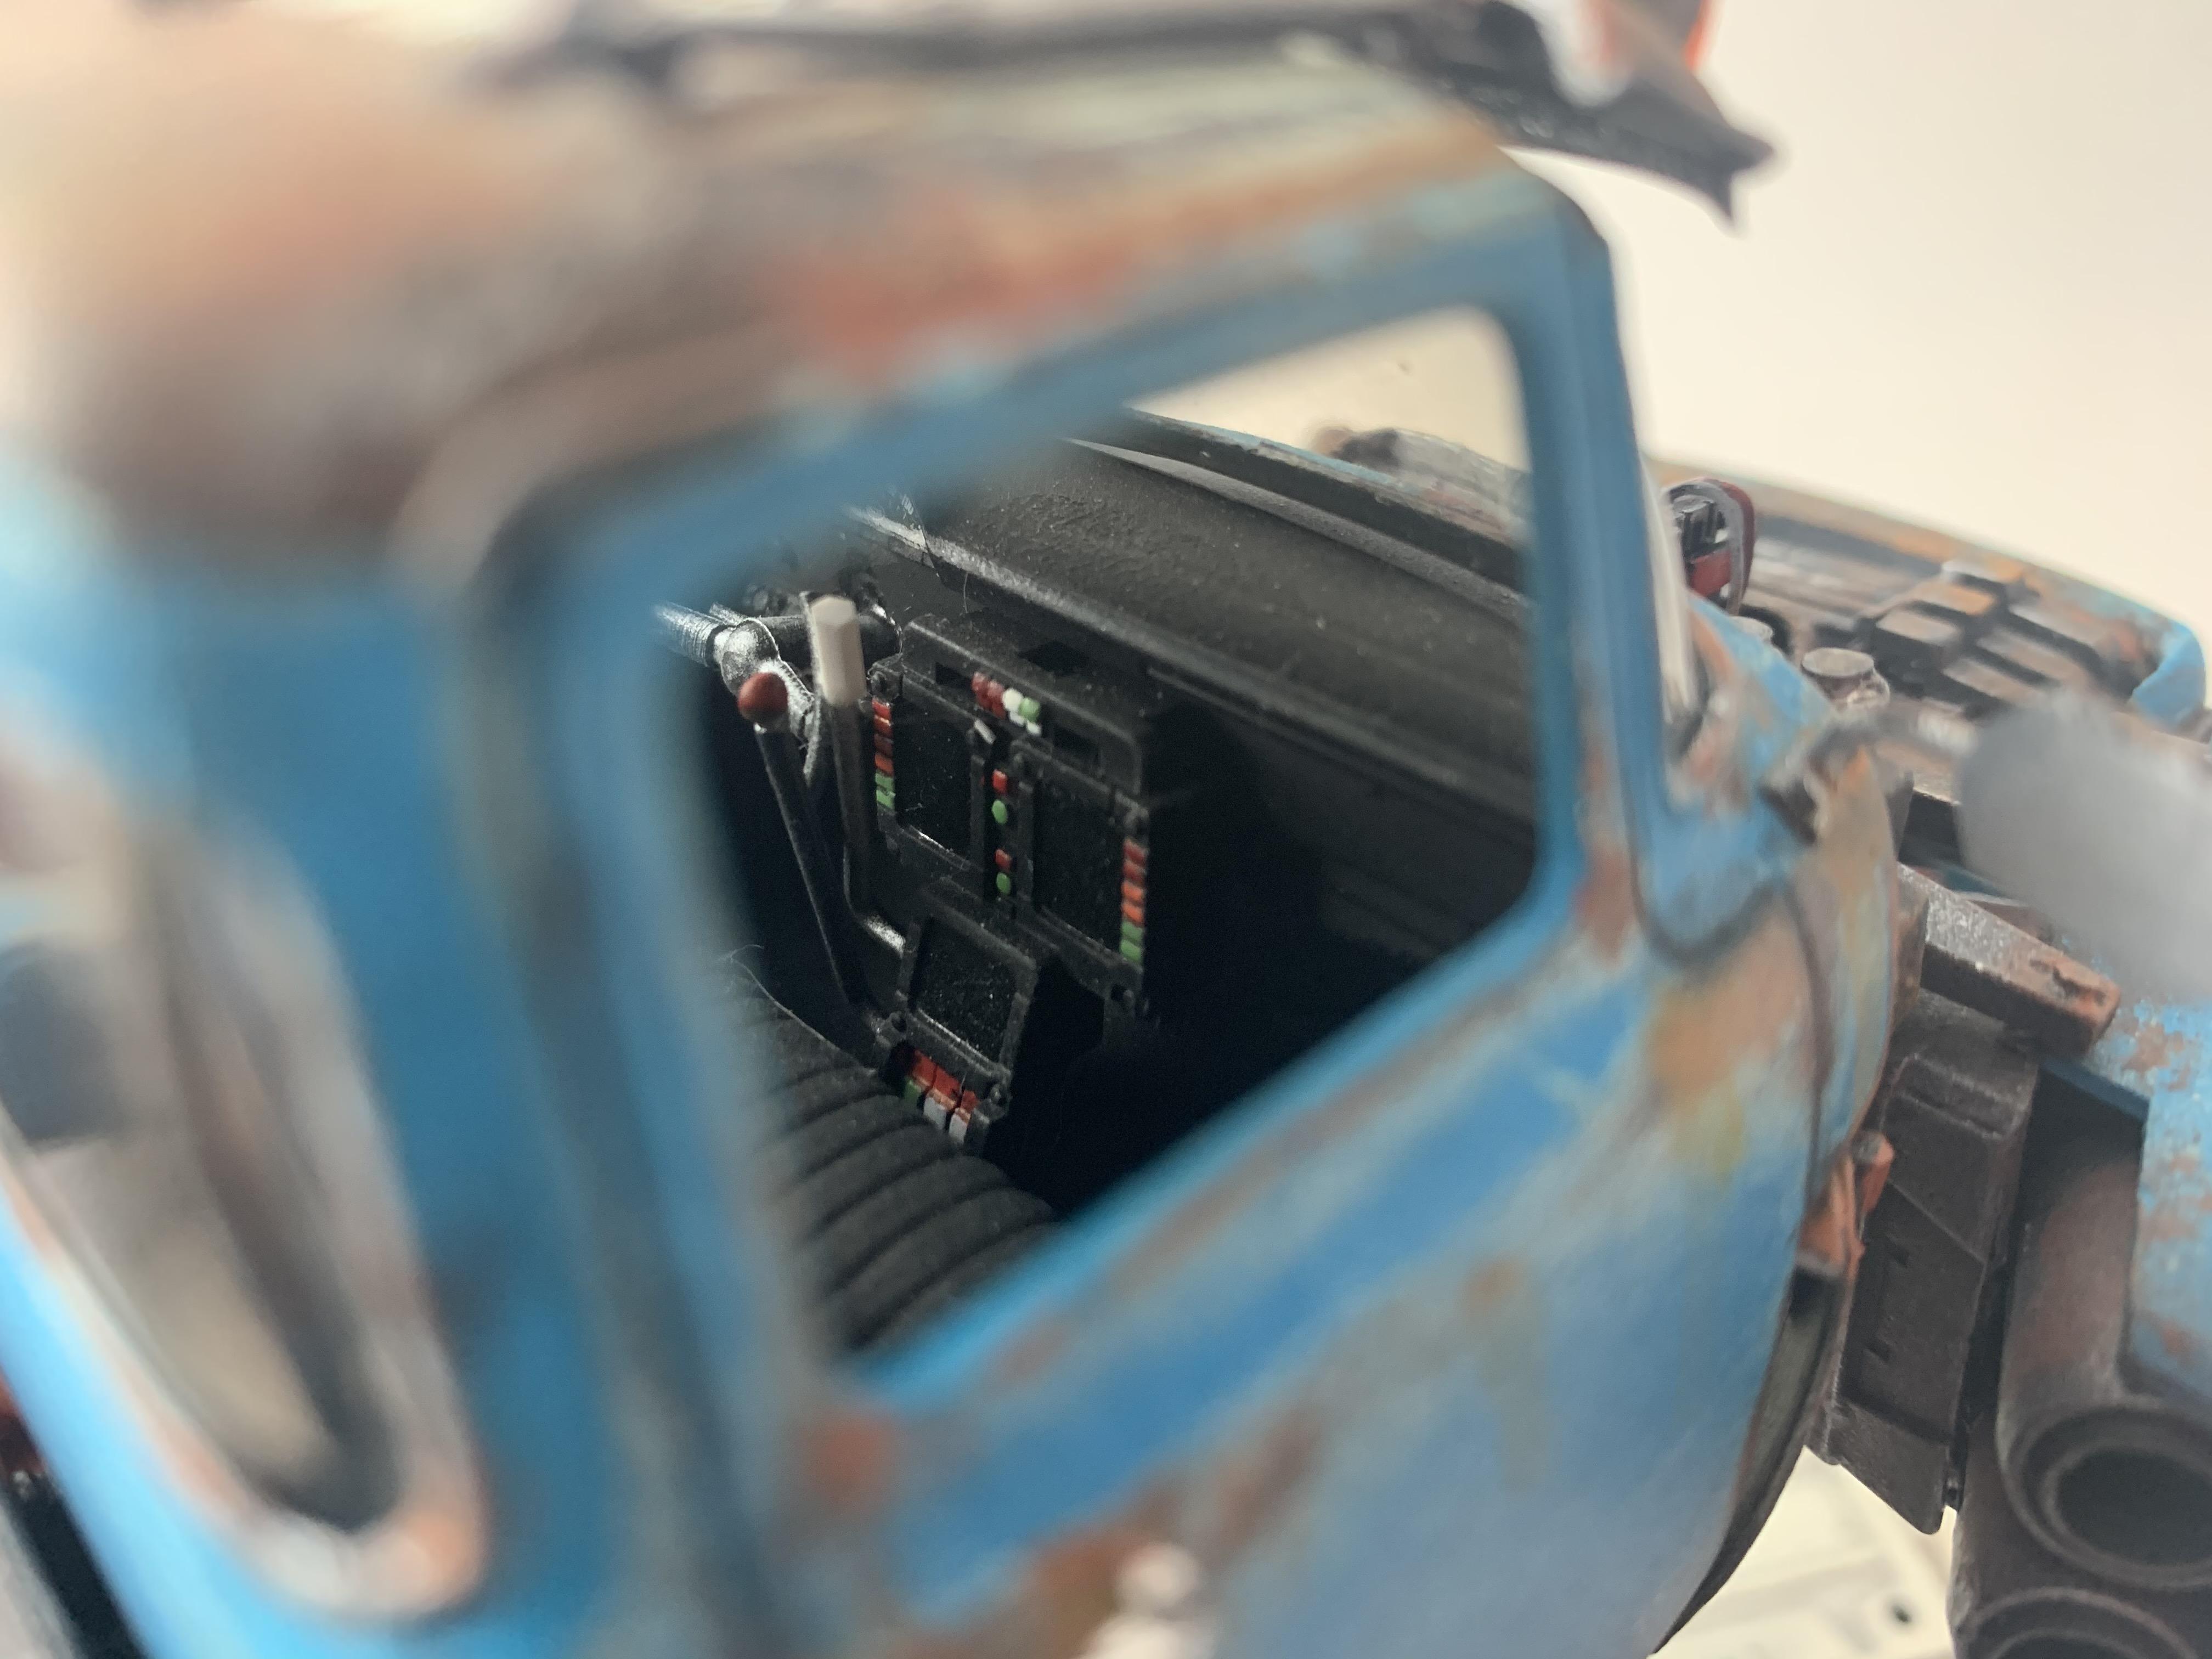
Thank you all!!! Thank you Rob. i start with a base coat of rust colored primer. Then two coats of Dullcoat. Third is a few layers of Acrylic latex in the body color. Lightly sand until it wears thru the latex and the rust primer shows thru. I'll go back with Acrylic rust colors and give it random highlights. I use 4-5 different rust colors for the highlights. Dry brush or with a sponge. Here's some more photos. Close ups of some of the small details. I love putting in tiny details. Most of which isn't seen unless you're really looking. My 1st attempt at the fins on the afterburners. A cool undercarriage view showing the Gundam parts, styrene rod and the kitchen sink. Before paint and weathering. Flight controls. All of them have the steering wheel designed like a flight yolk. Plenty of levers and a few have computer screens. Another undercarriage view. I'm still working on the Jetvette. Procrastinating on the livery decals. It's almost complete at this stage. I just need to do a little weathering. It wont be as weathered as the rest. Just a little grime.
-
I enjoy the comments. This is what motivates us all to be creative and show off our work.Thank you all so much! ? Thanks Tom. The first four builds include more scratch built items. It wasn't until the Fleetmaster that I started relying on Gundam kits as my go to source for parts. The Gundam parts are mainly used as filler for the undercarriage and engine bay. The large turbines that stick out the back of most of my vehicles, those are scratch built. I use large 1/2, 7/16 and 3/8 Styrene tube placed one inside the next. Thank you Paul. I'm procrastinating. I haven't used digital art in ages. I have a free program called Gimp that is very similar to Photoshop. I just need to get the basics down. If anyone knows an alternative program, or a place where I can get 1/25 scale futuristic decals. Please let me know. I always think as I'm building these vehicles "these would never get off the ground". I just gotta make them look as if they could. Here's some close ups of the smaller details.
-
My son gave me around 6 Gundam kits that were brand new. Plus a few more that had been built. I've used the majority of the usable parts, but still keeping the extras just in case. At my local hobby shop they carry Gundam kits that are under $20. I'm getting to the point where I'm going to have to start buying new kits. I'll be posting more photos soon. I'll try to get a few pictures of the type of parts that I look for when kitbashing. I just posted all my jet cars in one post. In the finished models section. 10 jet cars including this one. I'm trying my first race livery. I need to start making my own futuristic sponsor decals. I'm procrastinating......
-
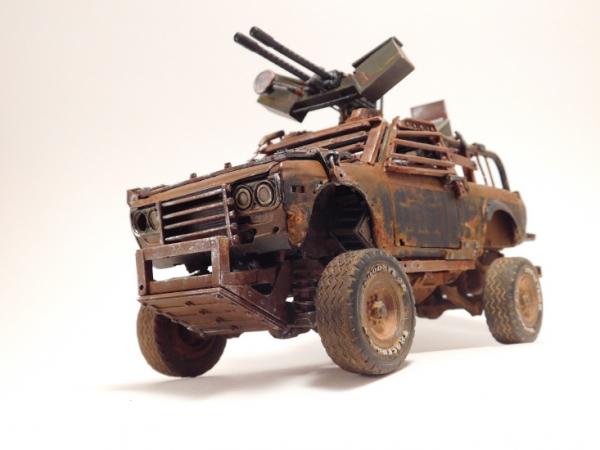
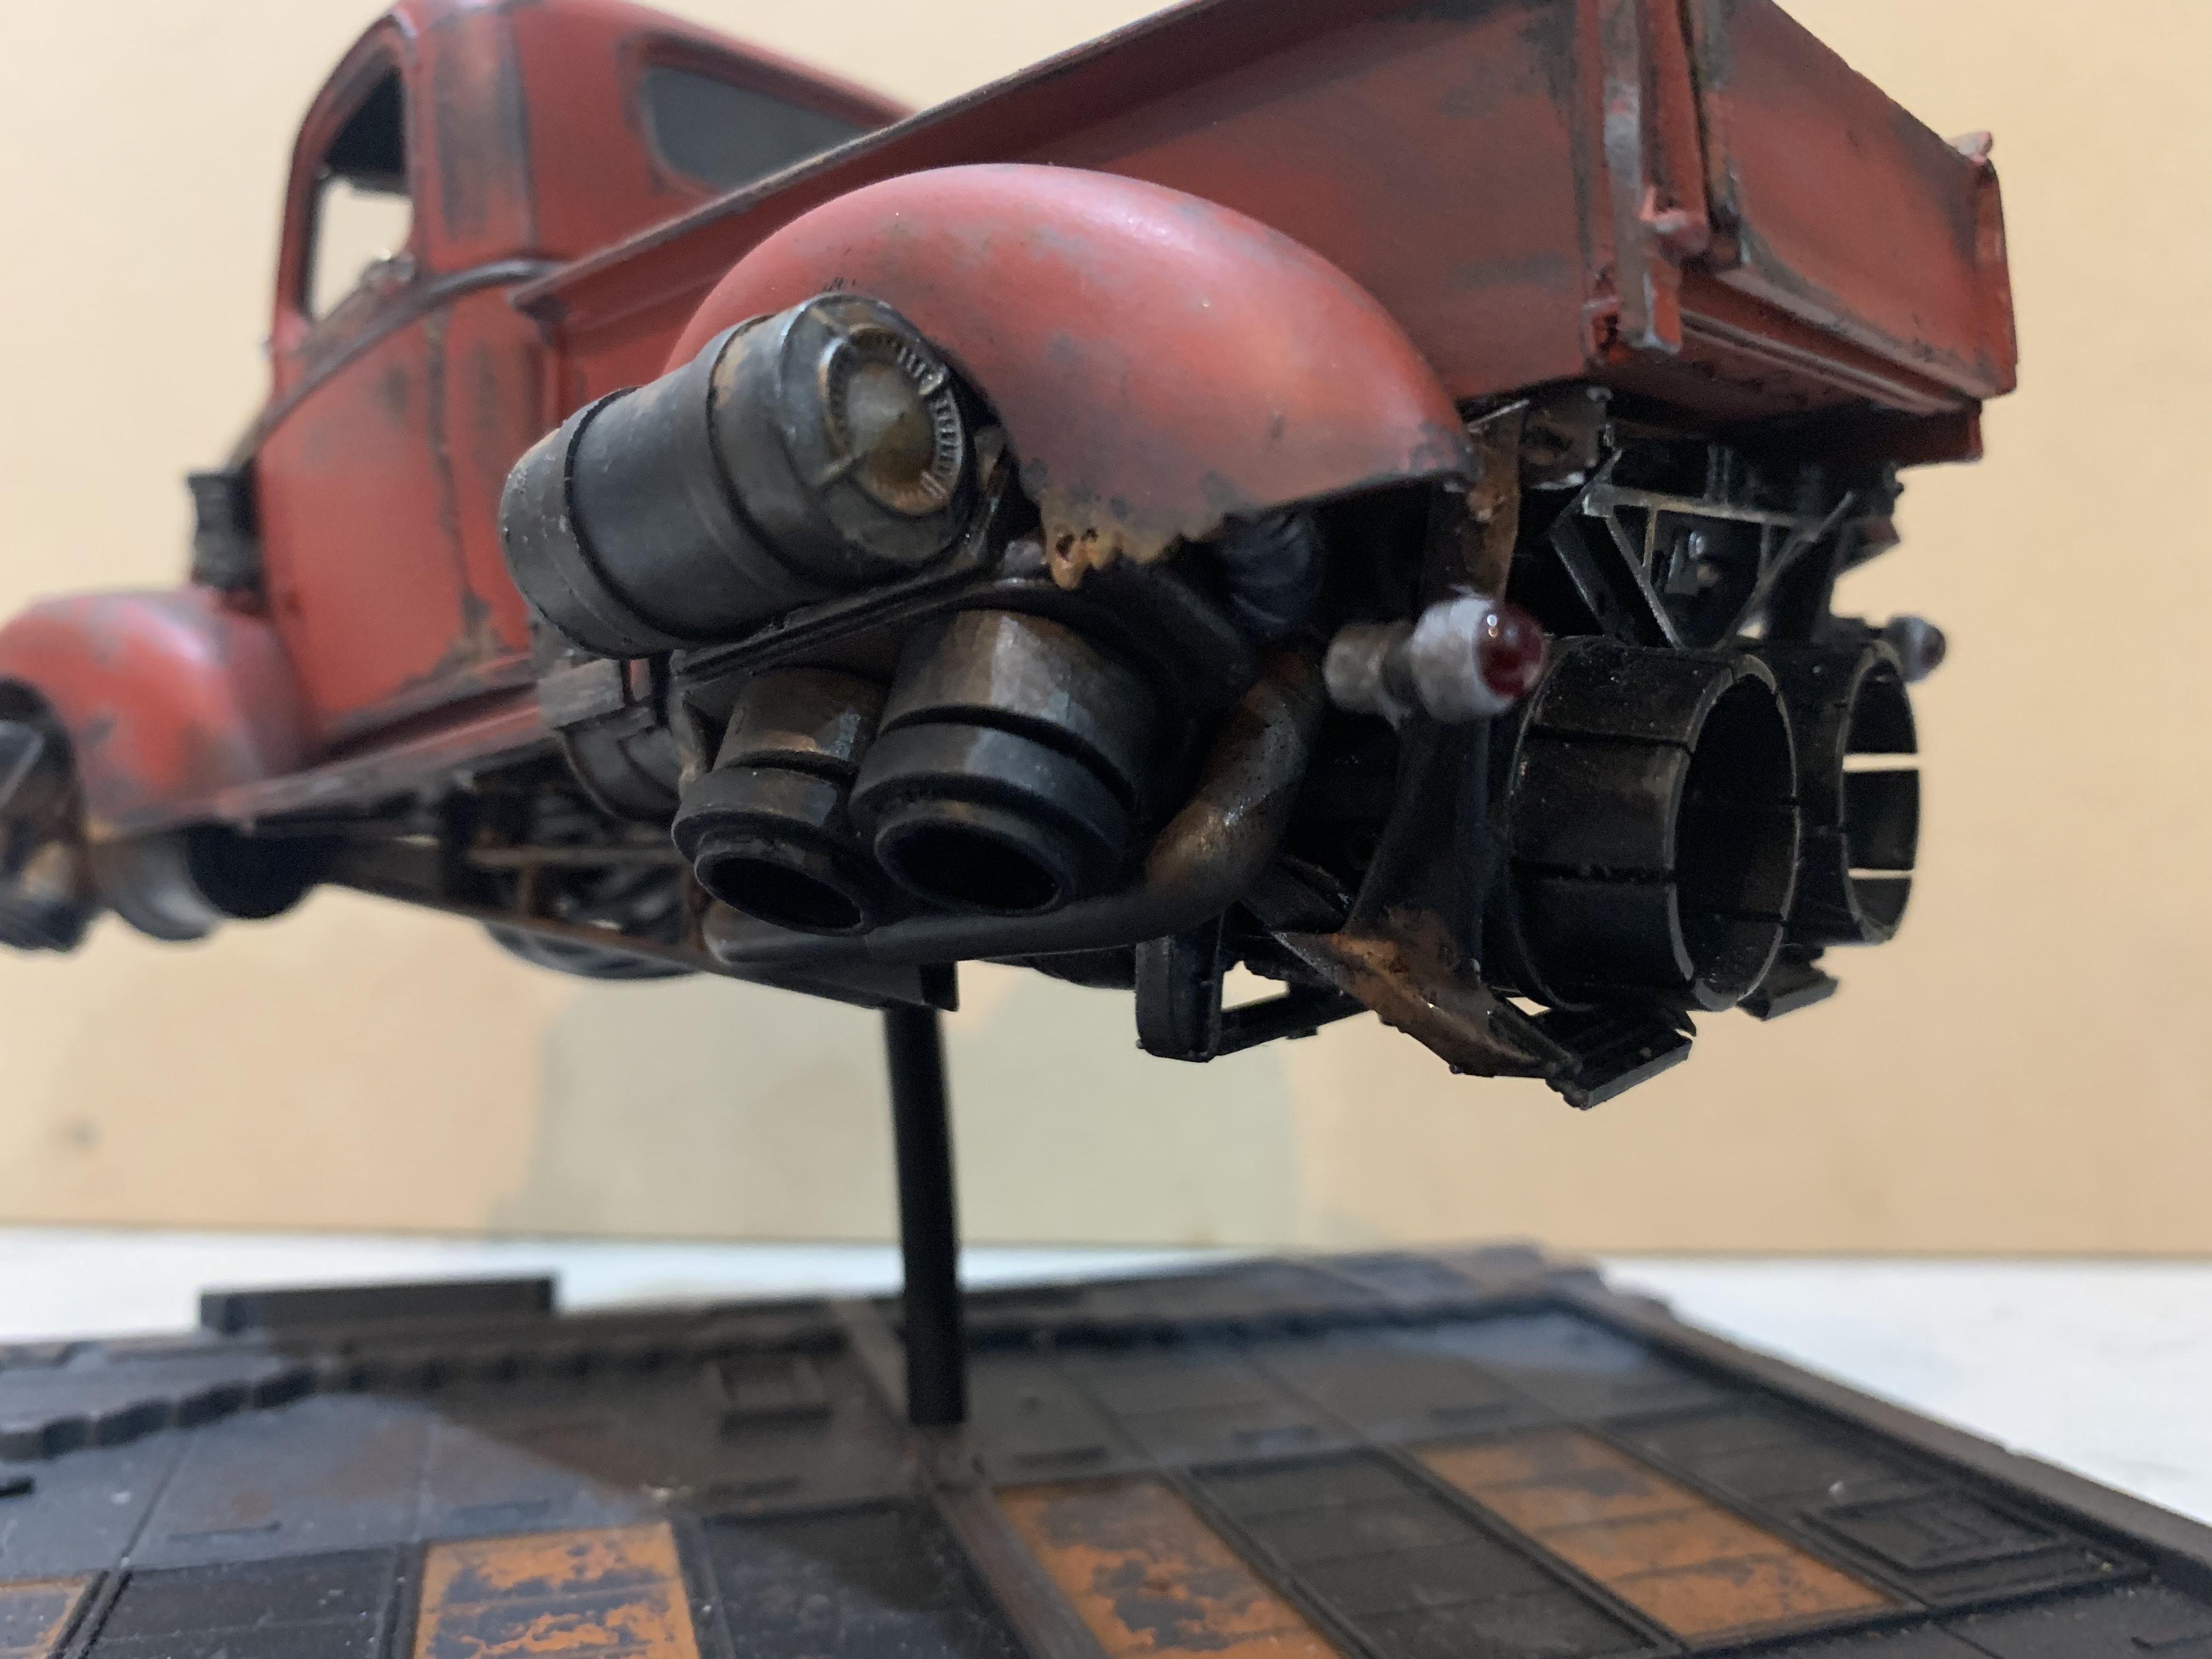
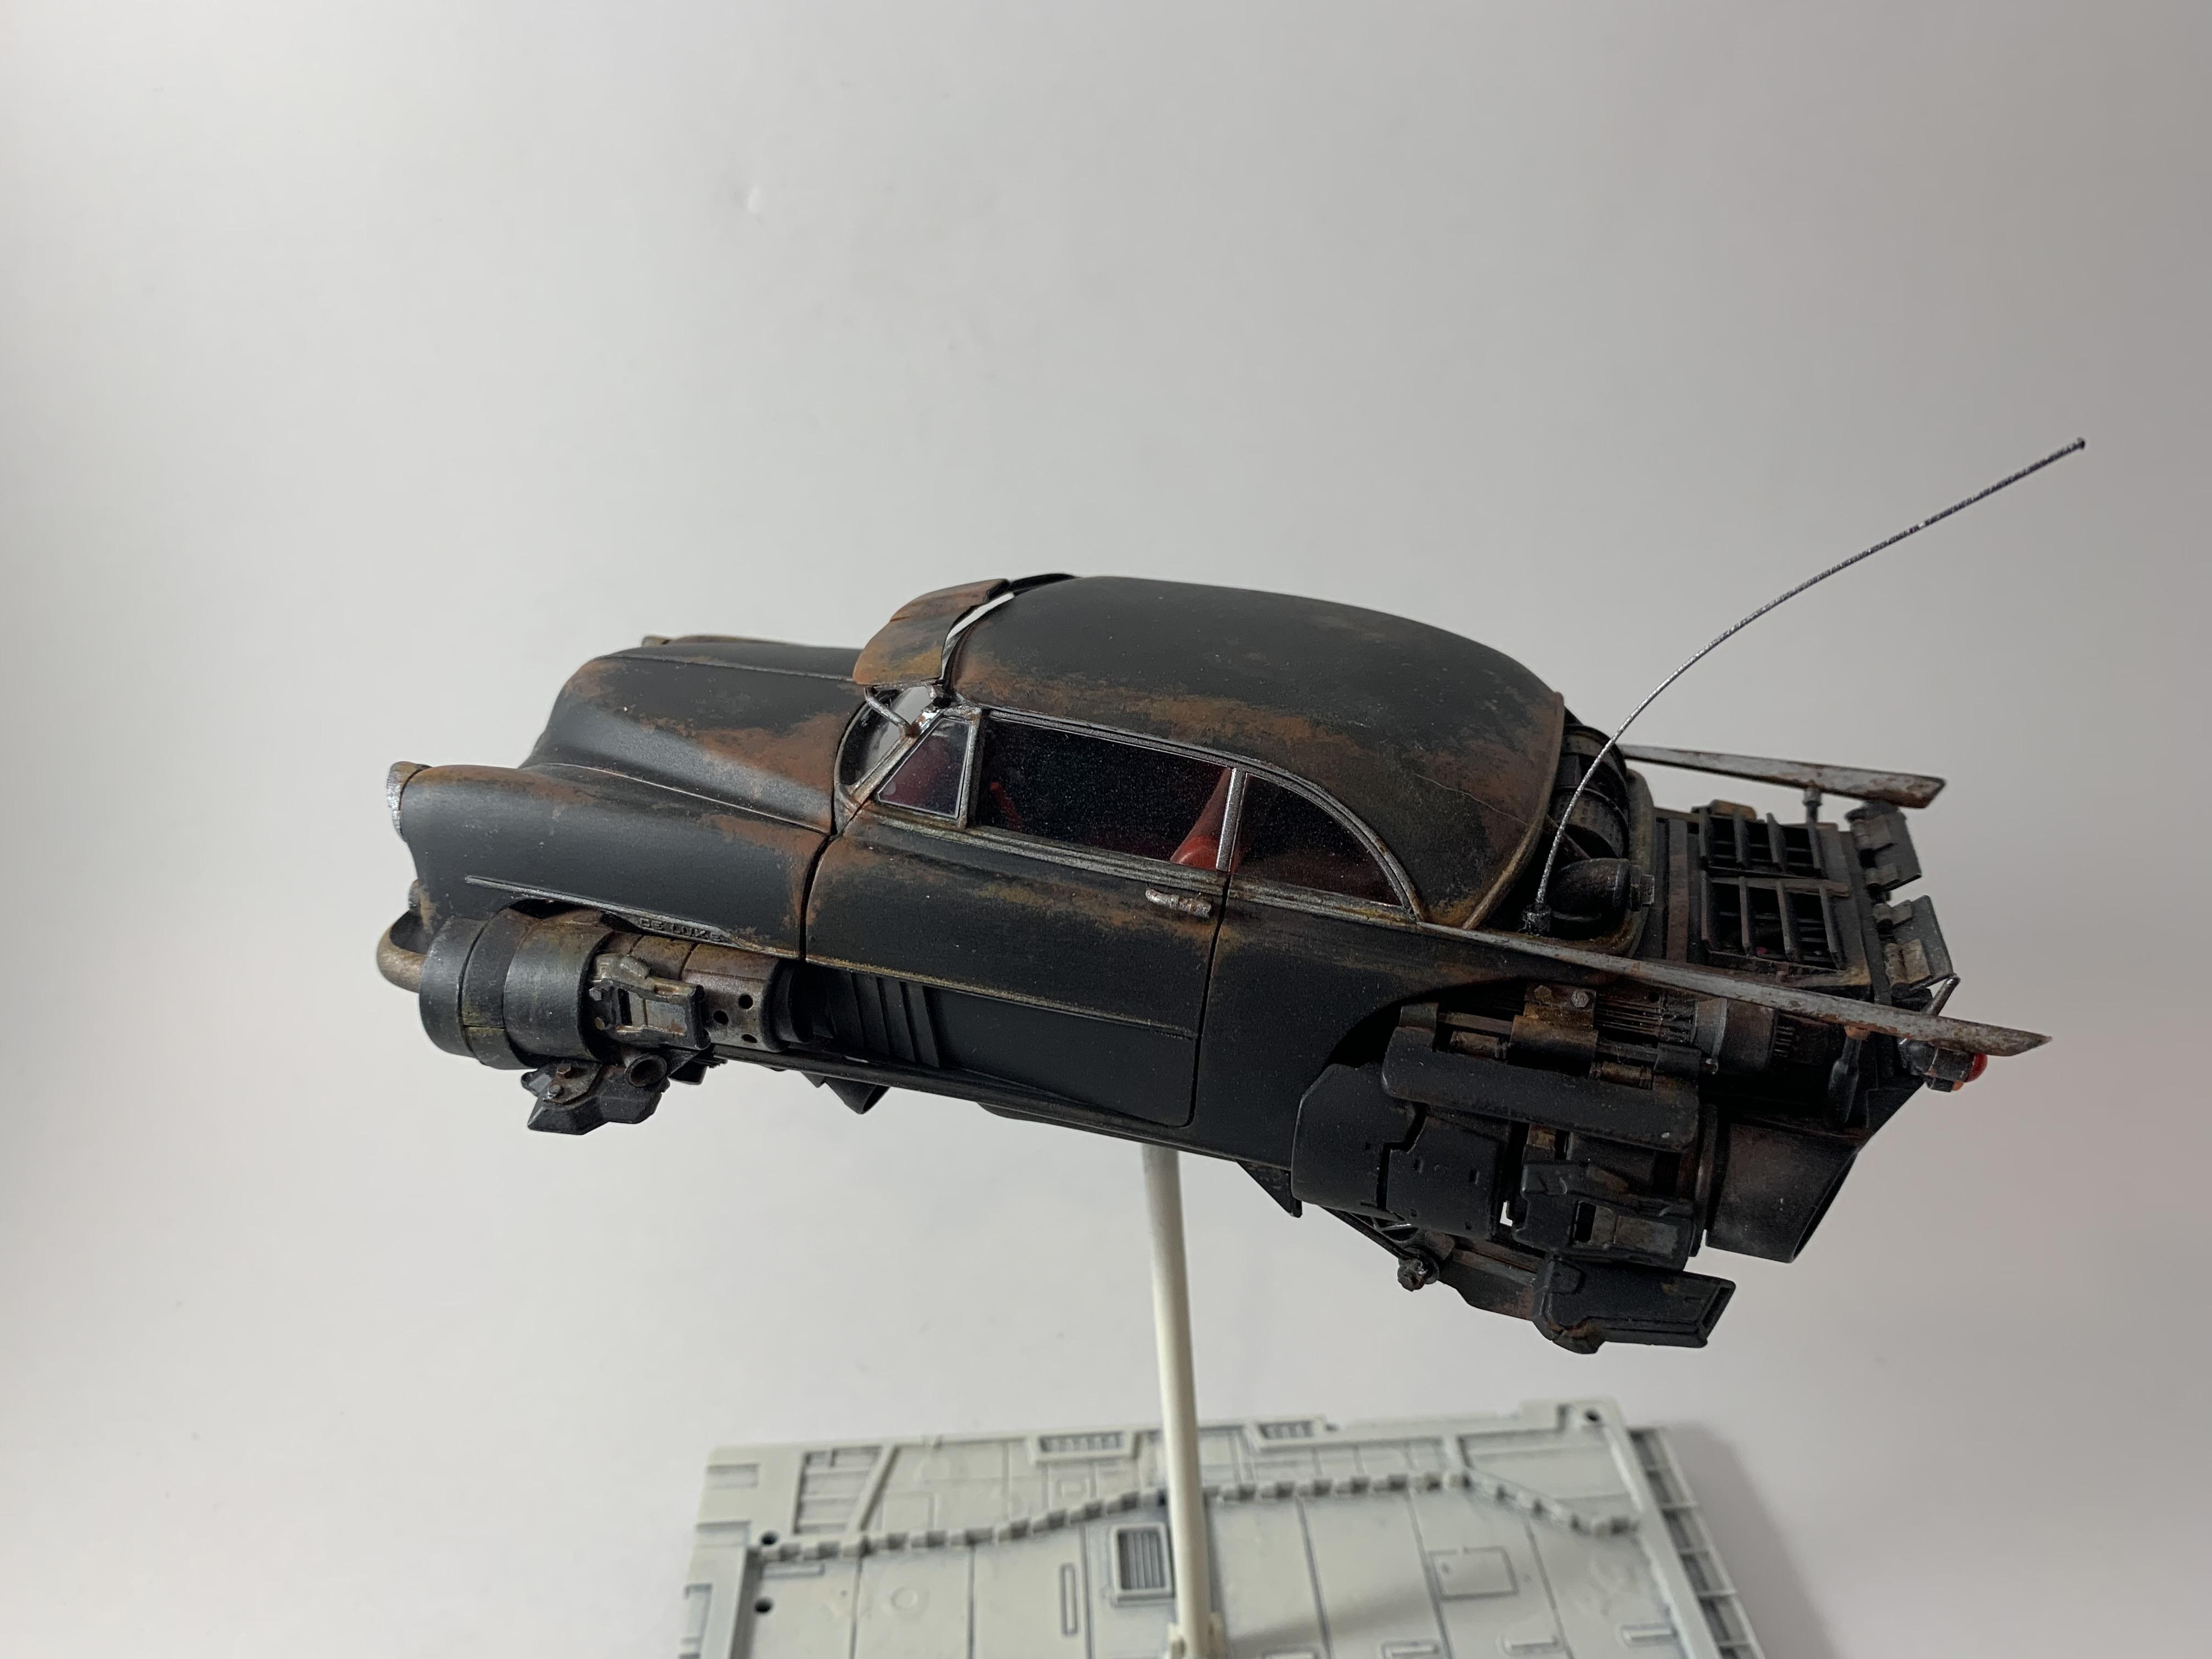
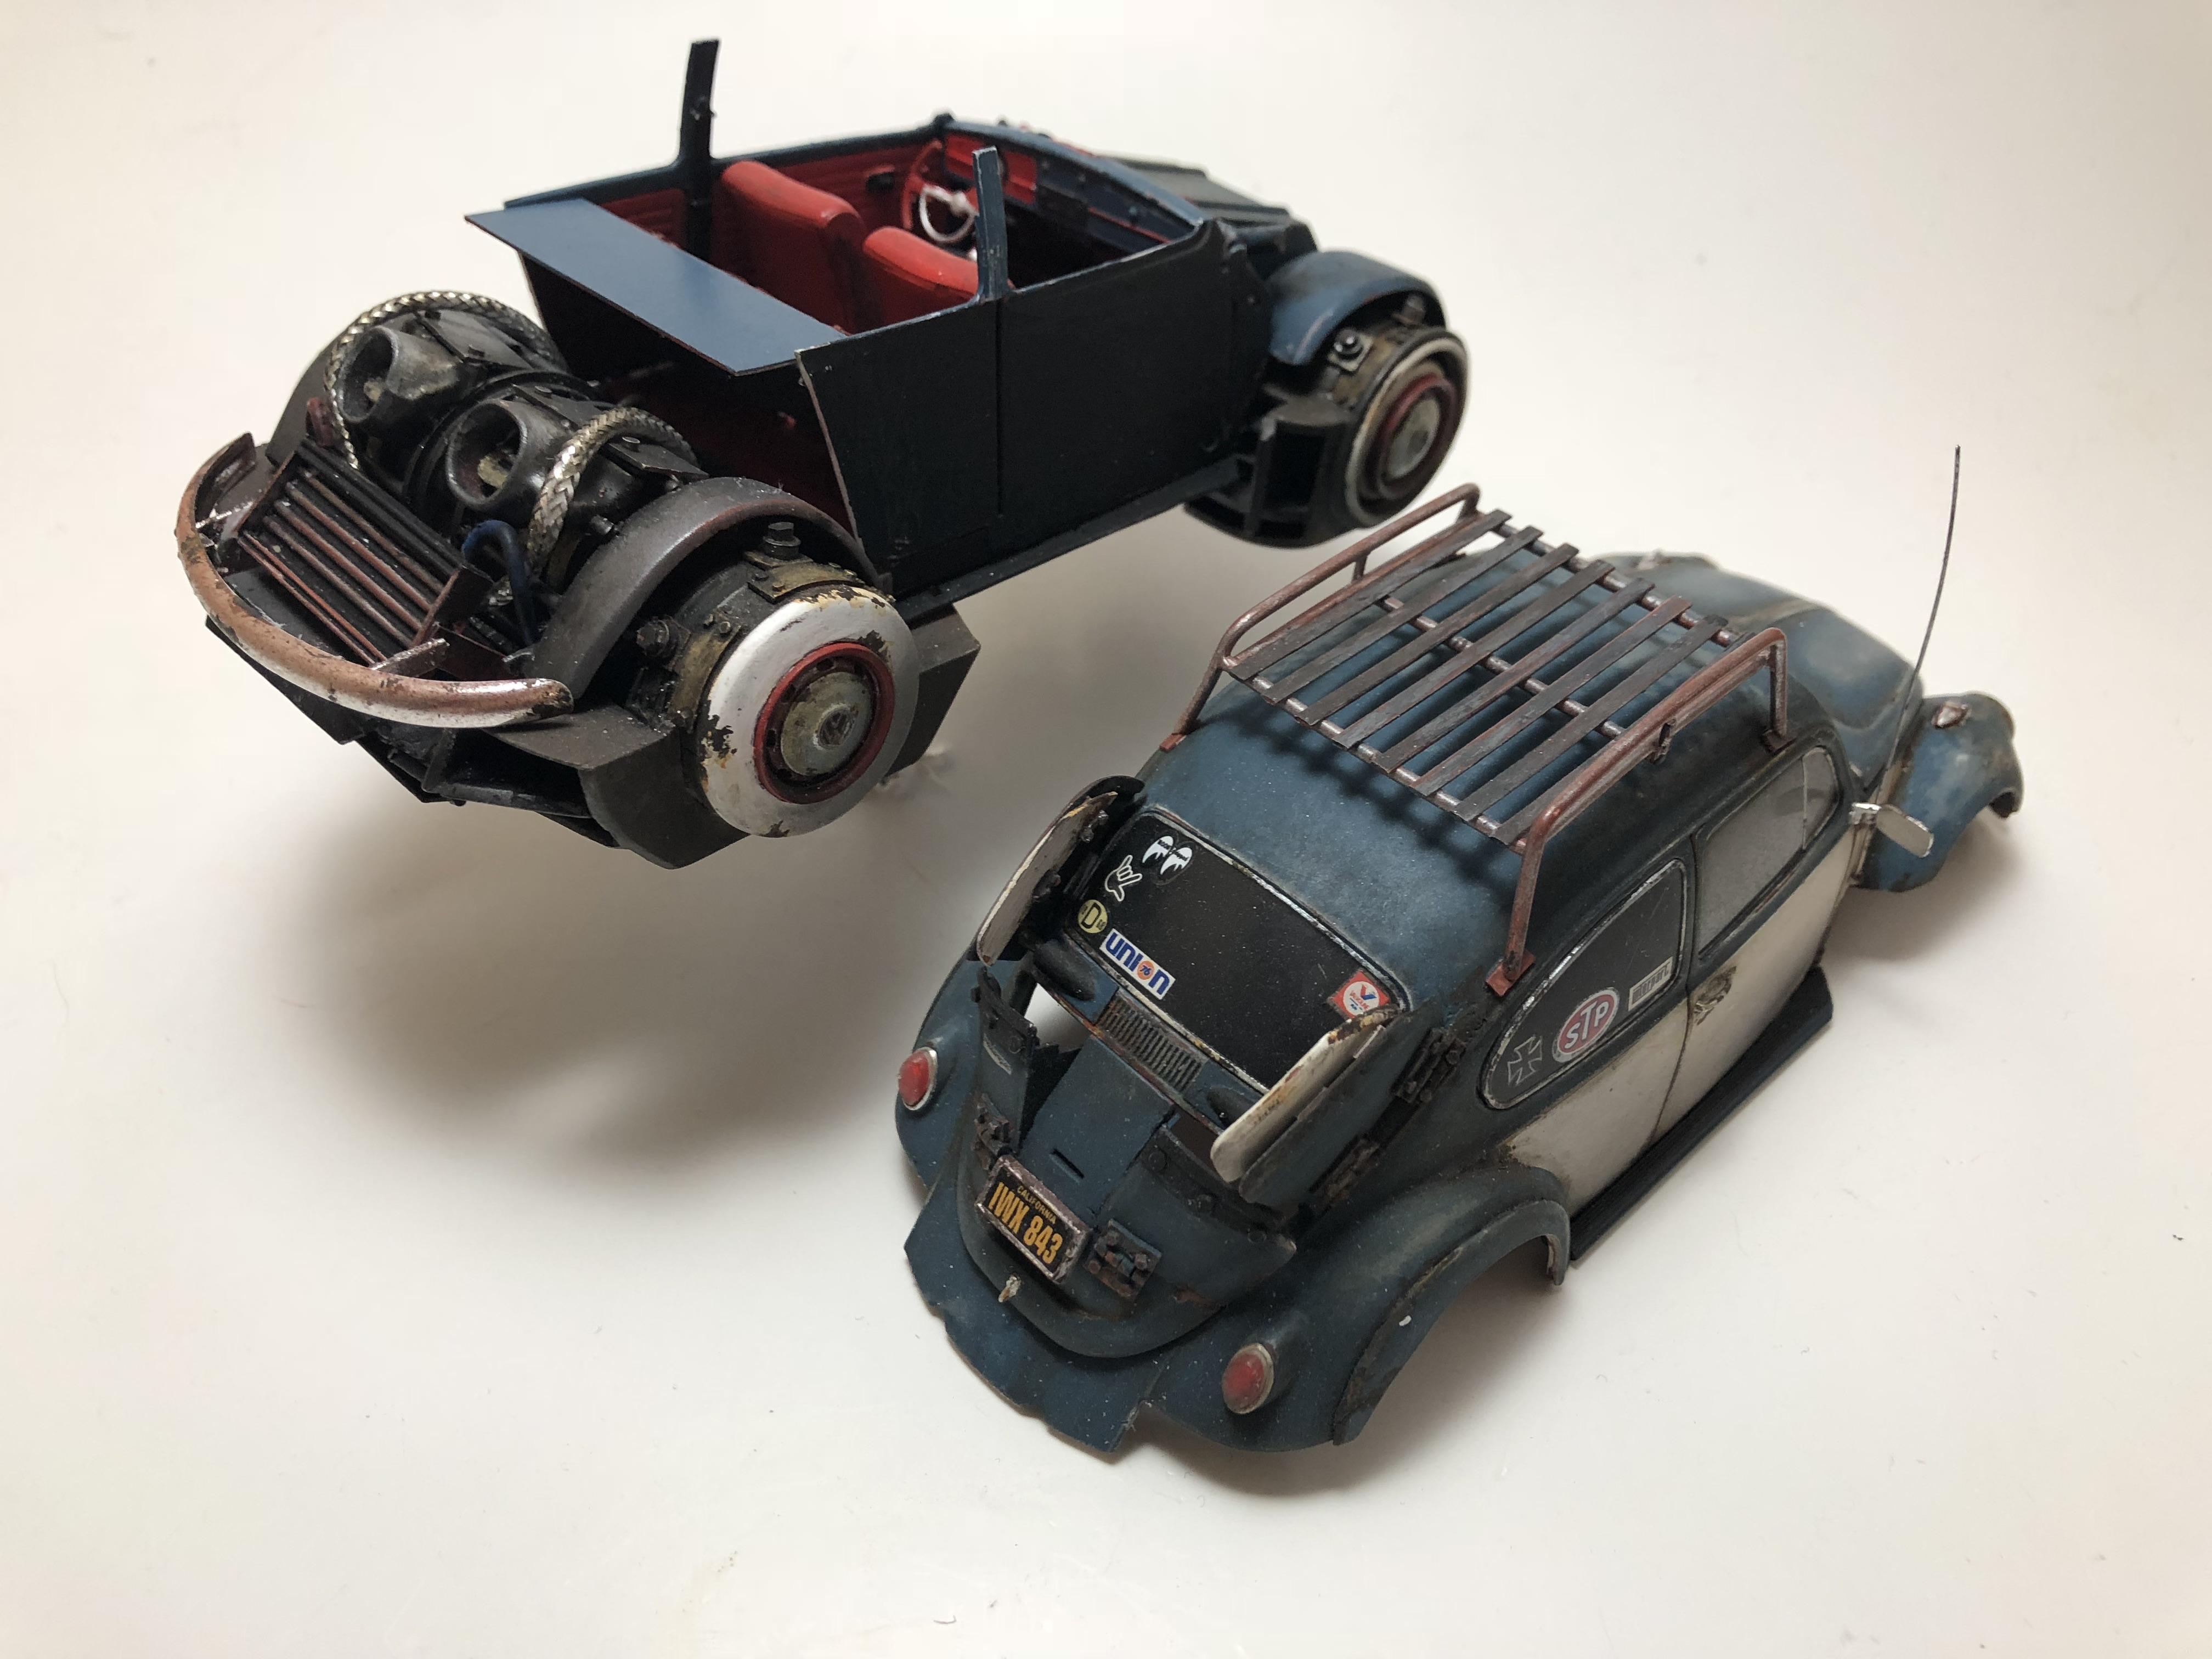
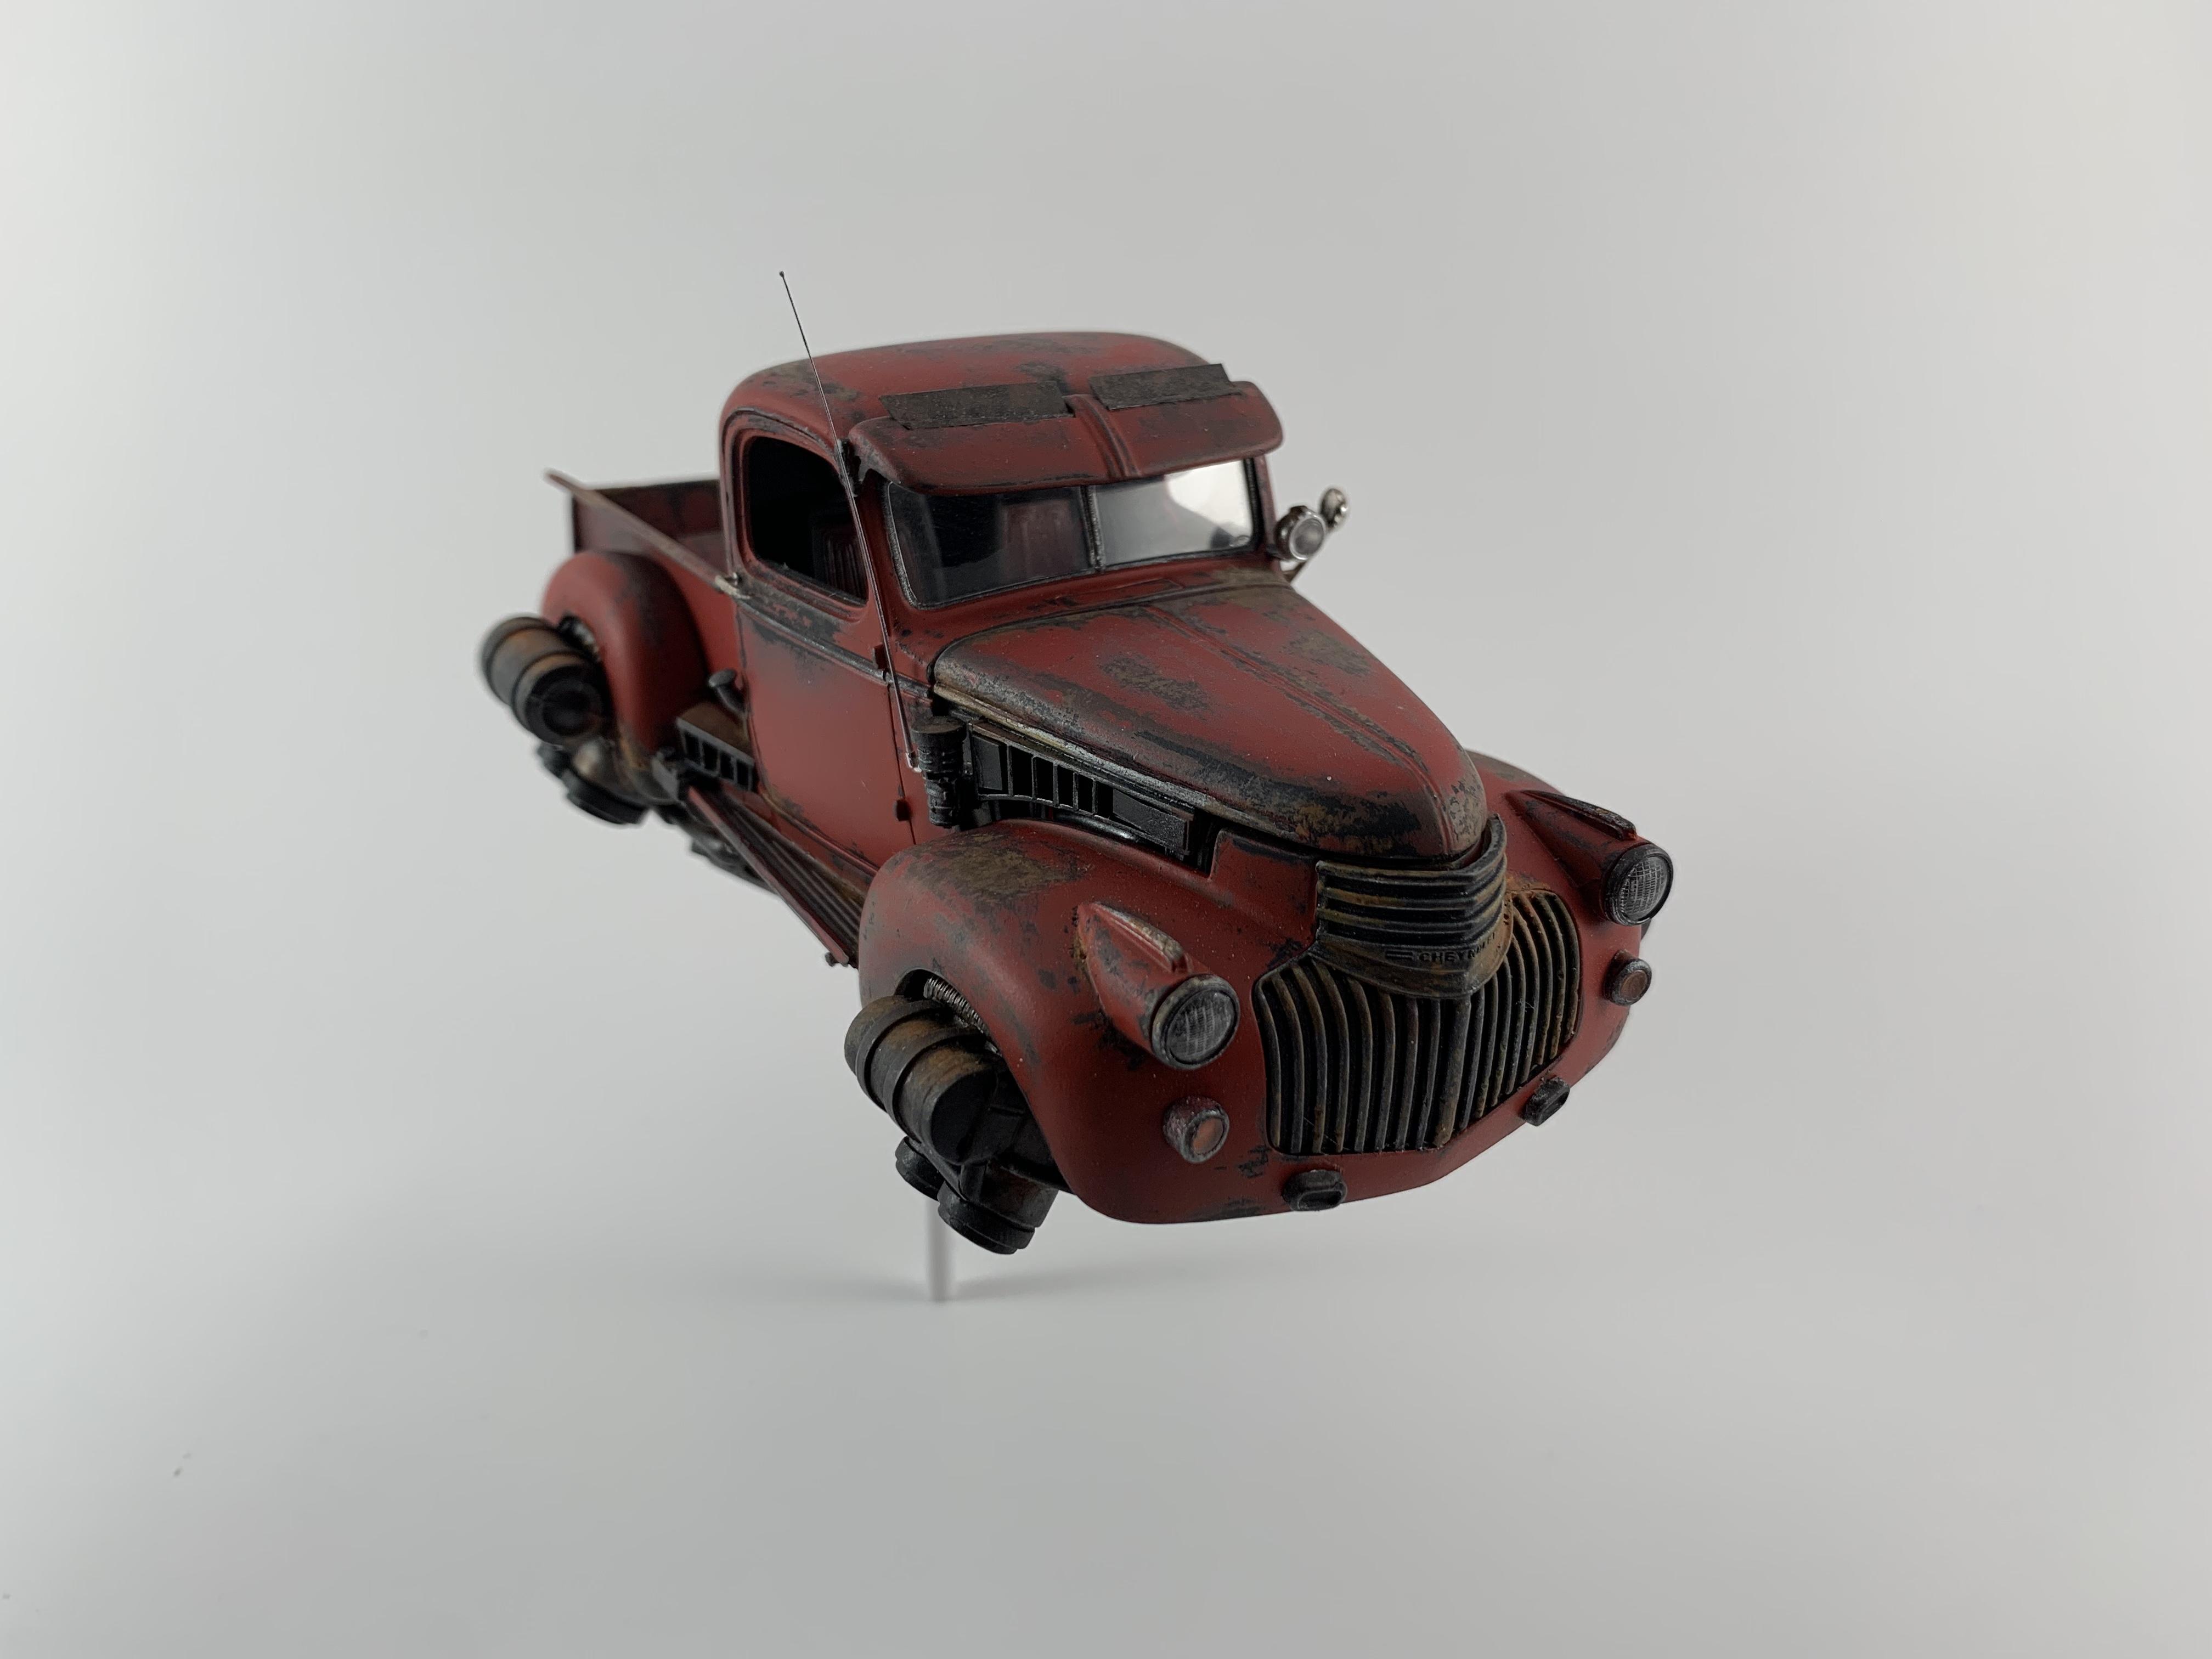
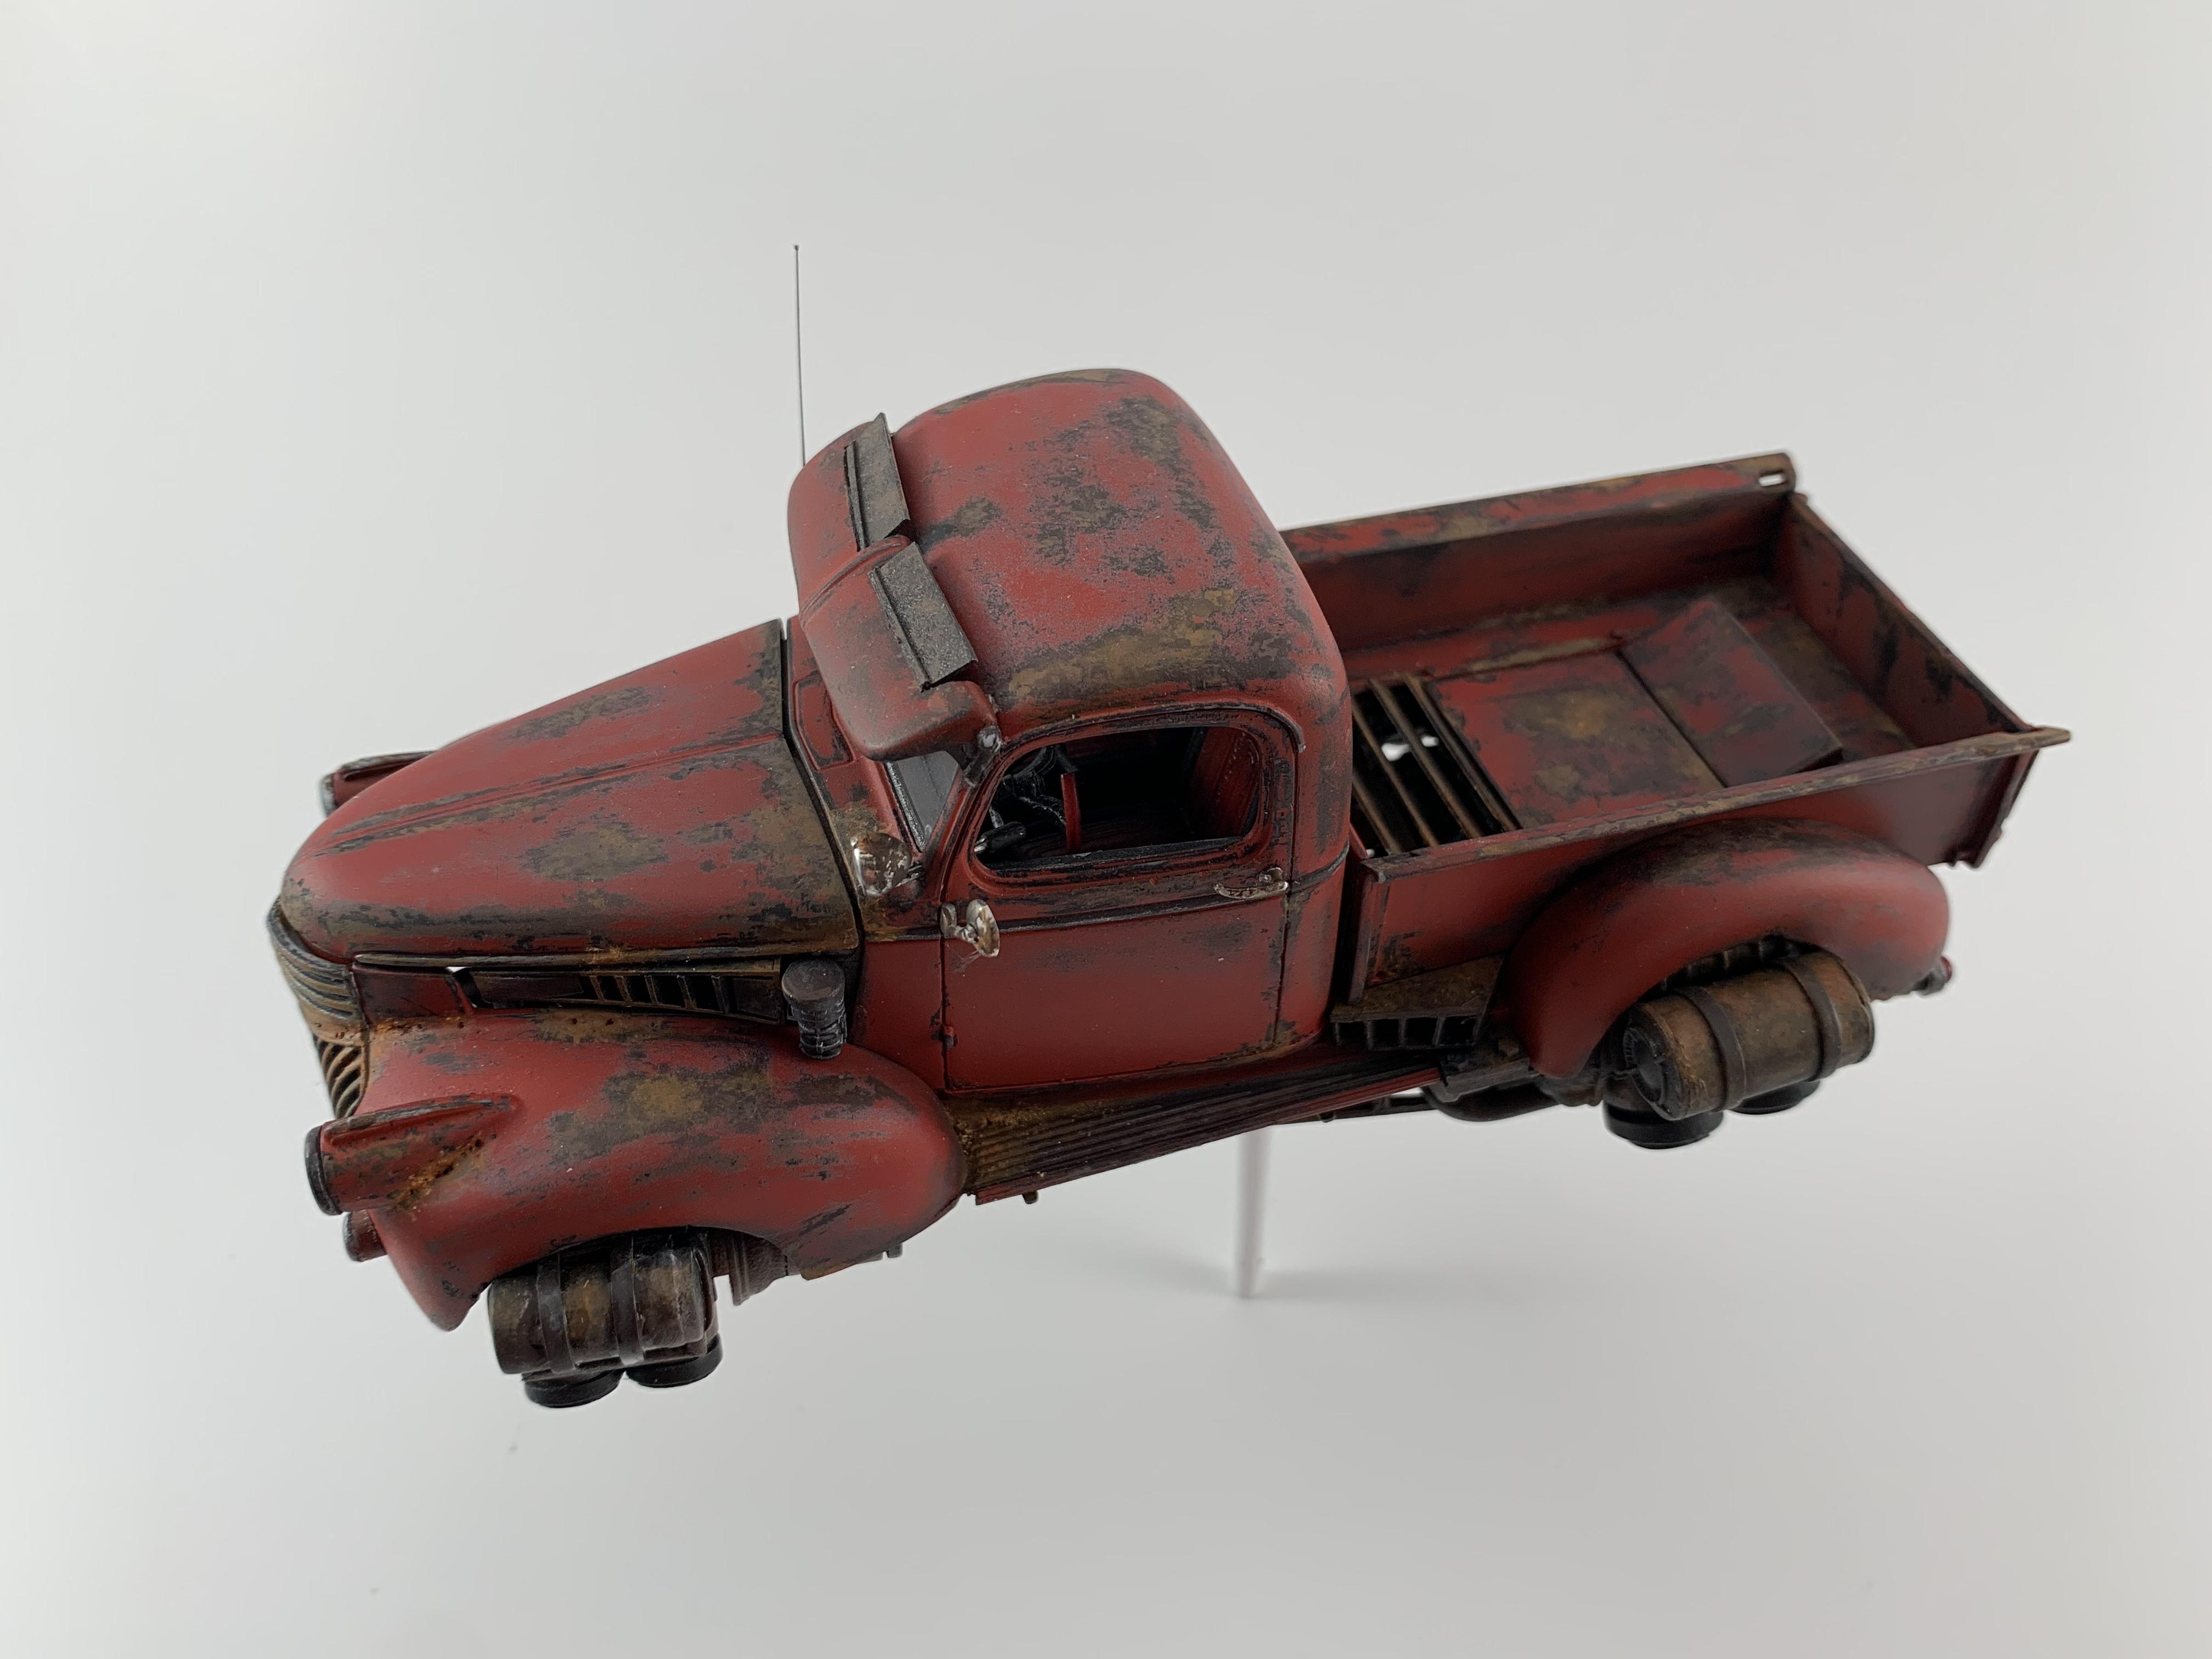
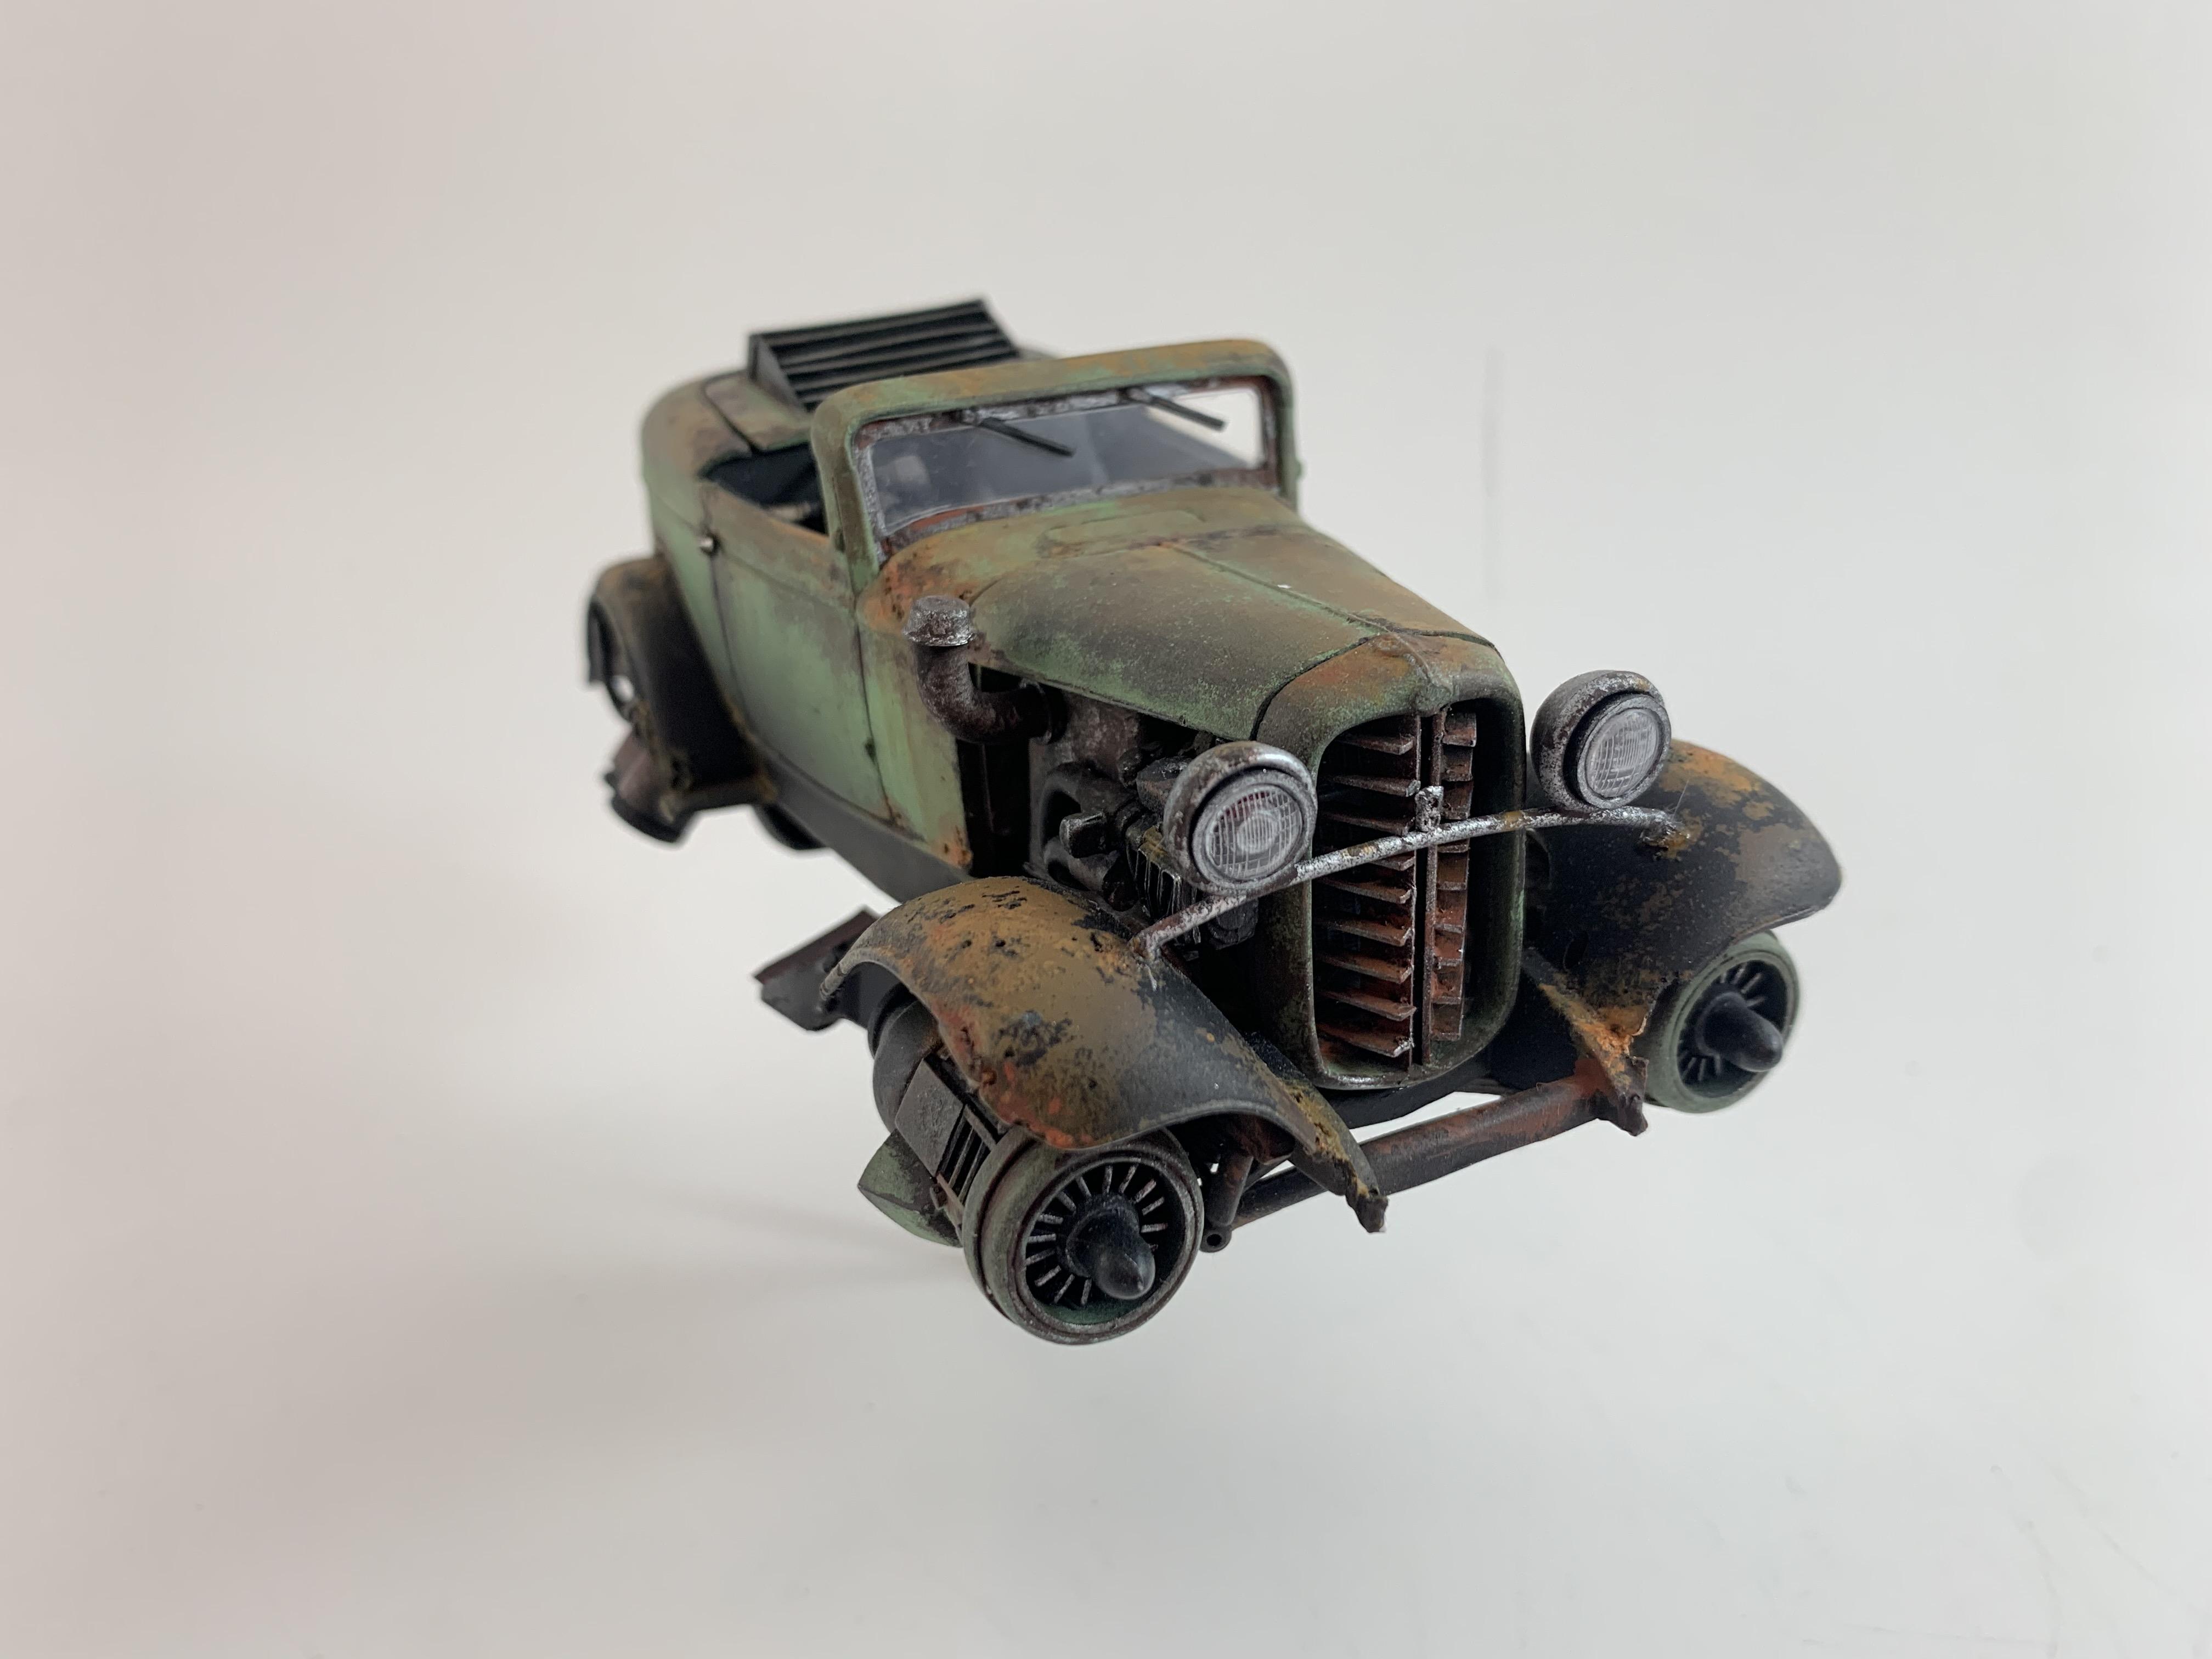
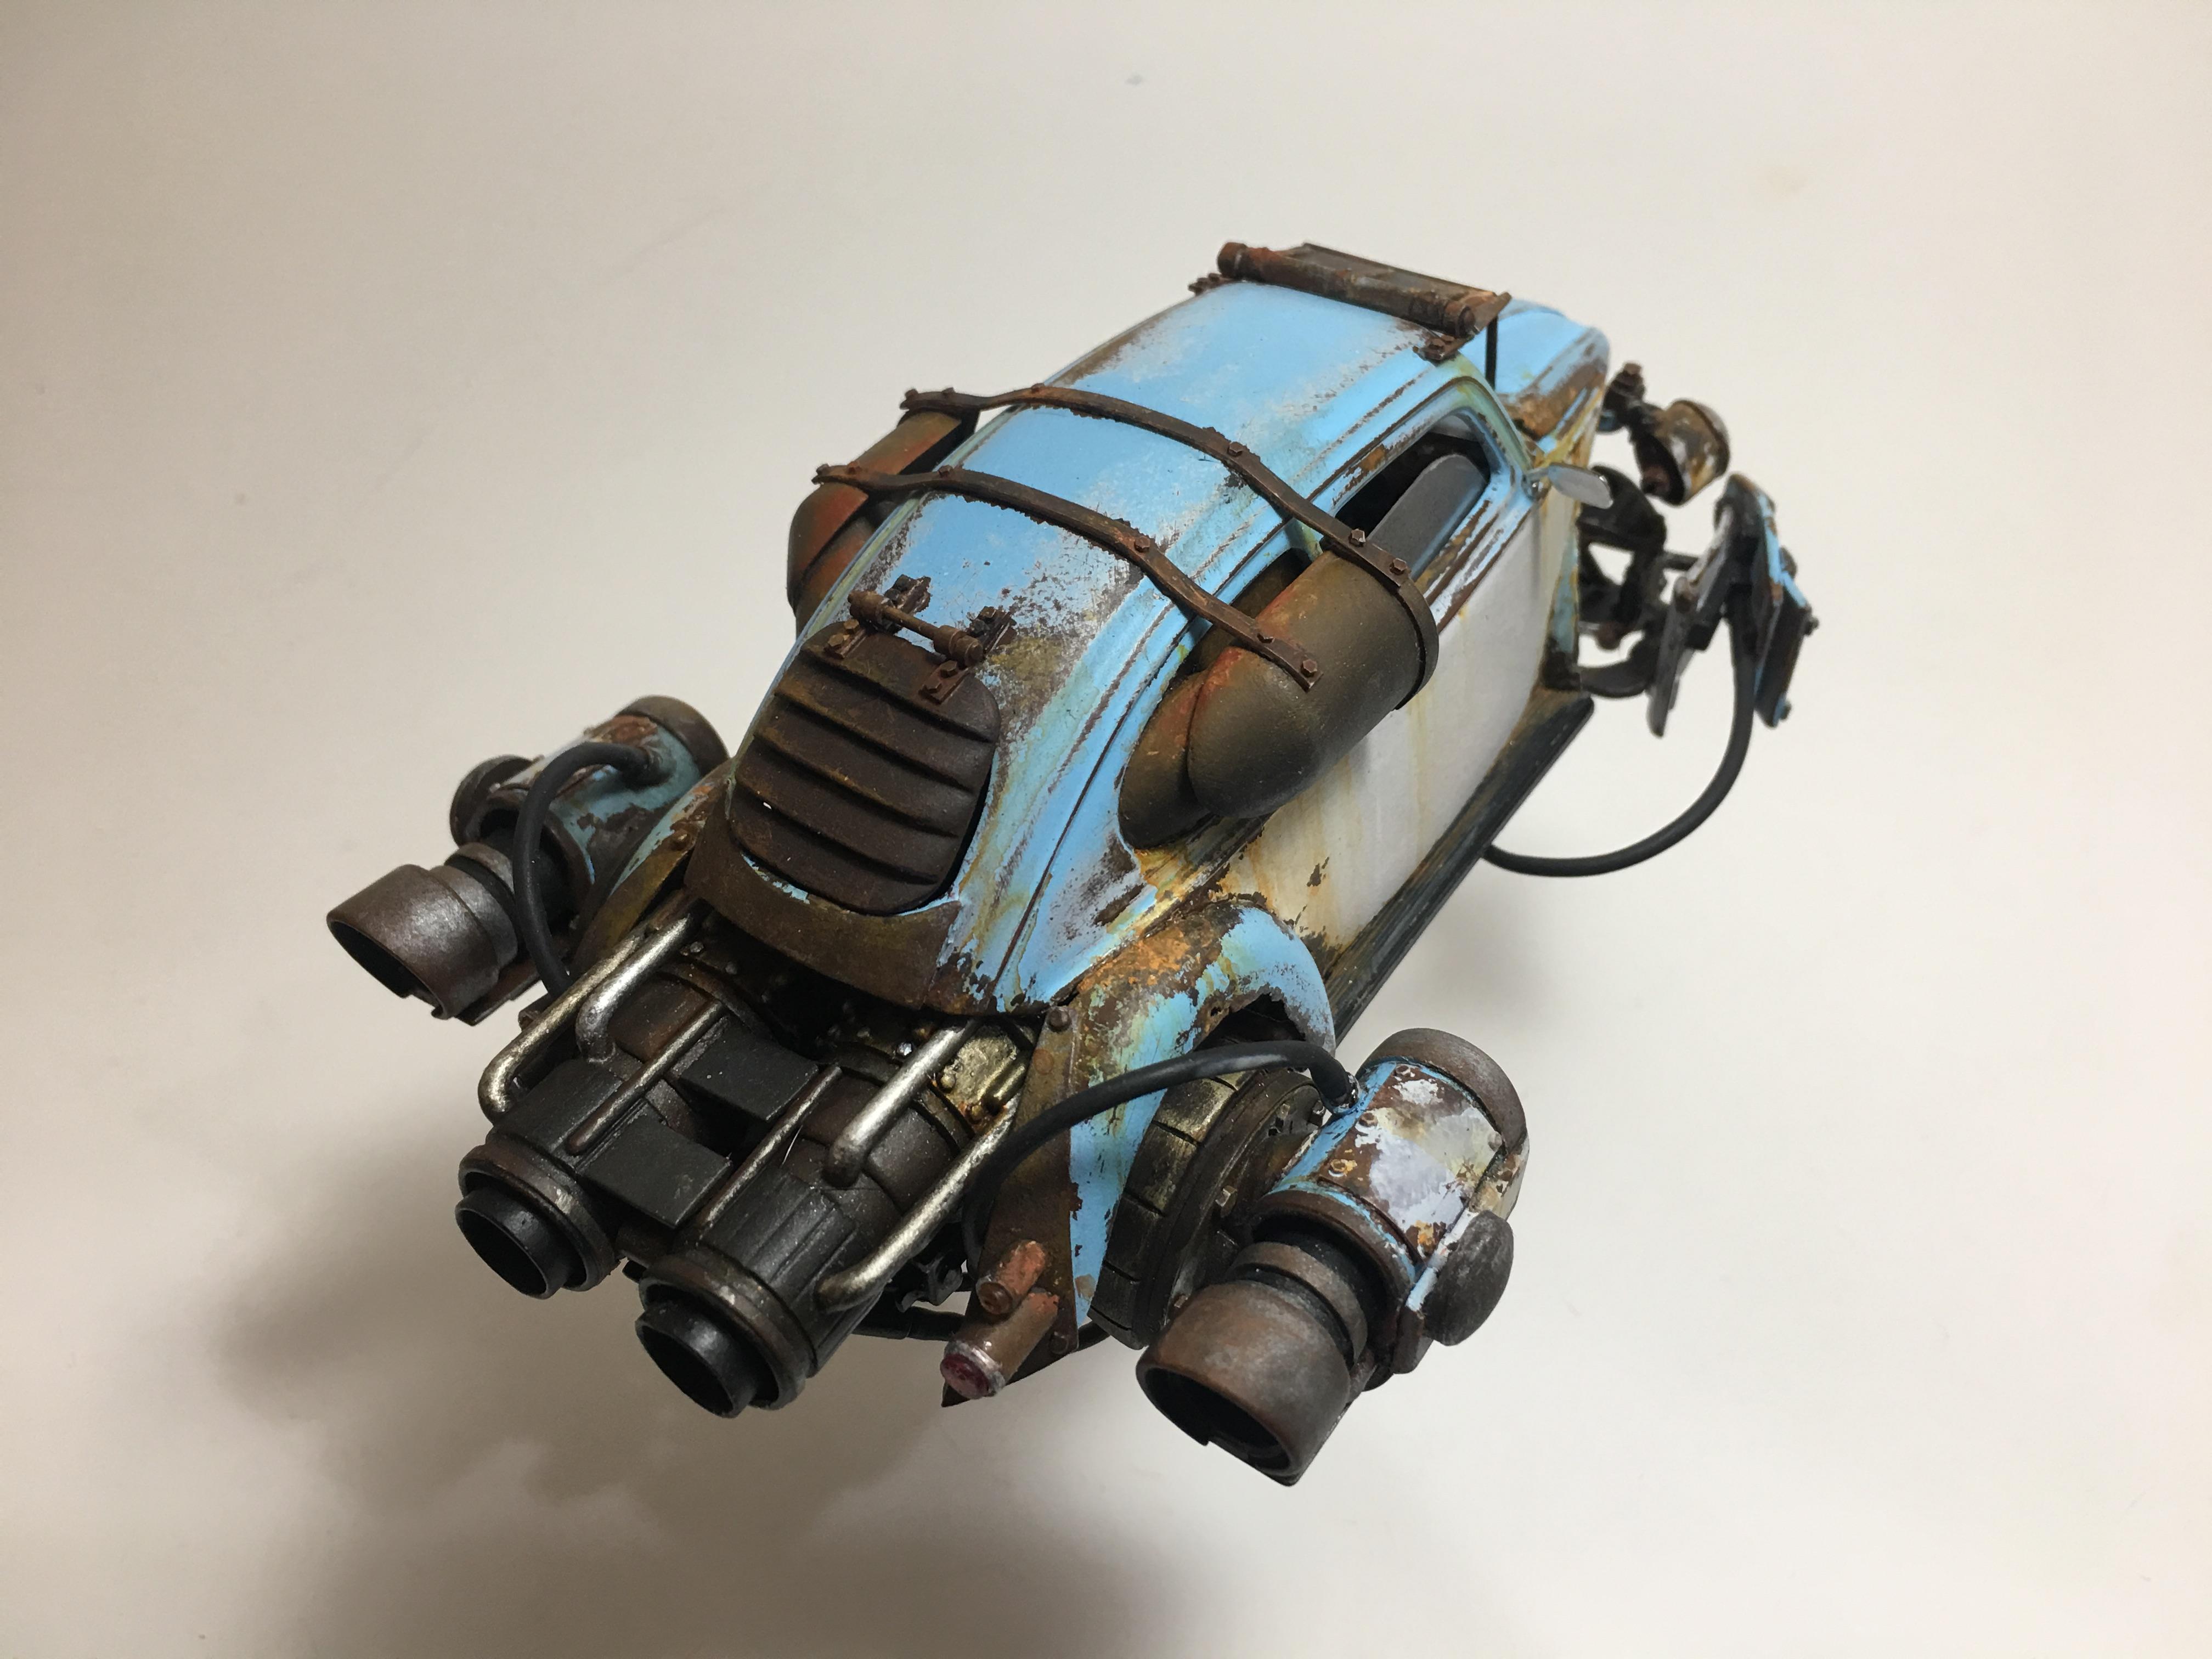
I've been wanting to make a post that contained all of my jet cars. Finally got around to it. I want to thank all of you who have been following me through the years. It's been a fun ride! You always have such wonderful comments. I appreciate them all. I have posted all of these in the Work in Process forums as well as the finished model forums over the past four+ years. 37 Chevy Coupe - JetRod - Build 1 This is where it all started. The front turbines were from a 1/44 scale A-10 Warthog. I cut the front fenders off and attached the turbines directly to the front suspension. I cut the rear fenders off preparing to mount 2 more Warthog turbines, but I didn't like the look upon mock up. I came up with this idea to hinge the back fenders as a unit. I was really surprised that I was able to pull this off. This was also my first serious attempt at weathering. I used the hairspray technique. It's supposed to be two tone green and white, but I took too much of the white off in my opinion. I could have also used more variations of rust colors. I display the model with the orange windows. It looks more sci-fi. Most of the extra parts on this build were either scratch built or spare parts from other 1/25 scale cars. This was before I started using Gundam kits to borrow from. Number of windshield visors spotted: 1 68 Volkswagen Beetle - RocketWagen - Build 2 What inspired me to remove 1/3 the center out of a VW bug? I was thinking about sticking large turbines out of the rear. Where the old engine resided. Taking up most of the back seat area as well. I figured this thing was built for pure speed. A single seat rocket. This was back when I scratch built most of my detailed parts. All the turbines, the grilled radiators under the front fenders, the rear window intakes. It's funny to see your early work compared to the new stuff. This is my only jet car that doesn't have turbines on the front suspension. It has front wings similar to a Star Wars speeder bike. Those blue wings are the original seat backs for the driver and passenger. The white inner wings are the seat backs from the next jet car on my list. Number of visors spotted: 2 68 VW Beetle - Vintage style - Build 3 The plan was to make a Jetboard that would be carried on the roof rack. Scratch built the roof rack for that one purpose only. The Jetboard remains in my scrap pile 90% complete. Someday.......... Was going for the Cali style. I accidentally over-tinted the windows. First time using a spray tint. It actually has a cool red interior that I wish you could see. The air flaps in the back direct the airflow to the large intakes. Gotta have big intakes. Number of visors spotted: 2 32 Ford speedster - Build 4 I was really proud of this one once it was complete. I felt like my weathering had really improved. I really like the color combo as well. This one has a grimy, dirty look. I love it. These front turbines were also from a A-10 Warthog, but a smaller scale than used on the 37 Chevy. This is my only jet car that has landing gear. Two skid plates at the rear and two skis at the front. There are linkages to the front flaps. Two bottles of Nitrous in the passenger well. A large fuel tank and flight computer under the hood. Lots of little details. Visors spotted: 3 47 Fleetmaster - The Flightmaster - Build 5 I used a similar hinged rear as my first build. This car had the perfect @$$ for it. I used a lot of Gundam parts on the undercarriage here. A lot of Styrene rod as well for pipes. I wanted it to have a heavy look. I moved the front and rear fenders outward making the car wider. This gave me spaces to add little mechanical details. Not 100% happy with the front view of this car. I do like the side and rear view. Instead of placing visible turbines at the front fenders, I went with a more concealed look only showing the exhaust port. Visors spotted: 4 41 Chevy Pick Up - Build 6 I had scratch built two large turbines for a 71 Hemi Cuda jet car I was working on. I placed them under this pick up just to see how they looked. I instantly switched over to this jet truck. The propulsion under the wheel wells make this more of a VTOL type craft. The four wheel jet engines are made from halves of V-8 engines with Styrene tube (2) glued where the heads mount. You can see the transmission housings facing each other under the truck. This was one of the most fun jet cars I've built. It came together so easily. I like the side details on the hood. This one has a ton of detail under the truck bed that can be accessed from the middle panel. I'll post more of the detail shots of each car soon. One of the few that has the stock grill intact. I attempted to make my own, but none of them looked better than the original. I love this truck. One of my favorites. Visors spotted: 5 32 Ford Vickie - The Junkyard Dog - Build 7 This started out as a Vickie. I cut the top off because I wanted to make a cool interior that could be seen. I went a little crazy on the flight controls. the front turbines are scratch built. The rear are made similar to the 41 pick up. The mechanical details that stick out from under the hood are asymmetrical. The driver's side is covered, the passenger side is open. Another custom grill. The turbine fins are scratch built. Probably my least favorite jet car Visors spotted: 6 51 Bel Air - Build 8 This would be the villain's car in some post apocalyptic movie. I originally thought about making it a police pursuit car. This car relies heavily on Gundam parts for all the little details, it has the most by far. The tail fins make it look somewhat like a 57 Chevy. I made cut outs on the doors to protect from the heat of the front turbines. The undercarriage on this one is my favorite. As well as the four wheel well turbines. They show so much detail and fit the look that I wanted. Visors spotted: 7 56 Ford FD-100 - Foose Flyer - Build 9 I found the perfect shaped shoulder thrusters from Gundam Virtue. They fit where the front fenders were. I did have to modify the thrusters to get them to fit. I went without the truck bed, to show off all the mechanical bits. I matched the grills from the front of the truck to the side intakes. Then matched the rear intakes to the front. The visor was a good addition. lots of linkages and steel. A little detail under the hood. I really like the A arms that attach to the front turbines. Visors spotted: 8 63 Corvette - Jetvette - Build 10 This is still a work in progress at this time. I have it up in the WIP section. I went a little different direction with the paint here. I want this to be a race livery. I need to get motivated to make my own futuristic sponsor decals and a race number for the door.. After I install the race decals, I plan to do a slight weathering. As if it has been in a few races. Some grease, soot and maybe some wear spots on the heavily used areas. This one has plenty of Gundam parts as well. Probably the 2nd most. It's the only vehicle with identical turbines at all four corners. I like the look from directly above. Visors spotted 8 of 10 cars. It helps with aerodynamics, trust me. Which is your favorite?
-
56 Ford FD-100 Hover Truck
Daxman replied to Daxman's topic in Model Trucks: Pickups, Vans, SUVs, Light Commercial
Thank you all. I love the comments. I must apologize! I hope you didn't spend too long looking at those side mirrors. I thought they were from a 71 Cuda....I was wrong. I have no clue where they originally came from. Please forgive me! Here's a few pics with the bed of the truck on. These were earlier photos before the build was complete.
-
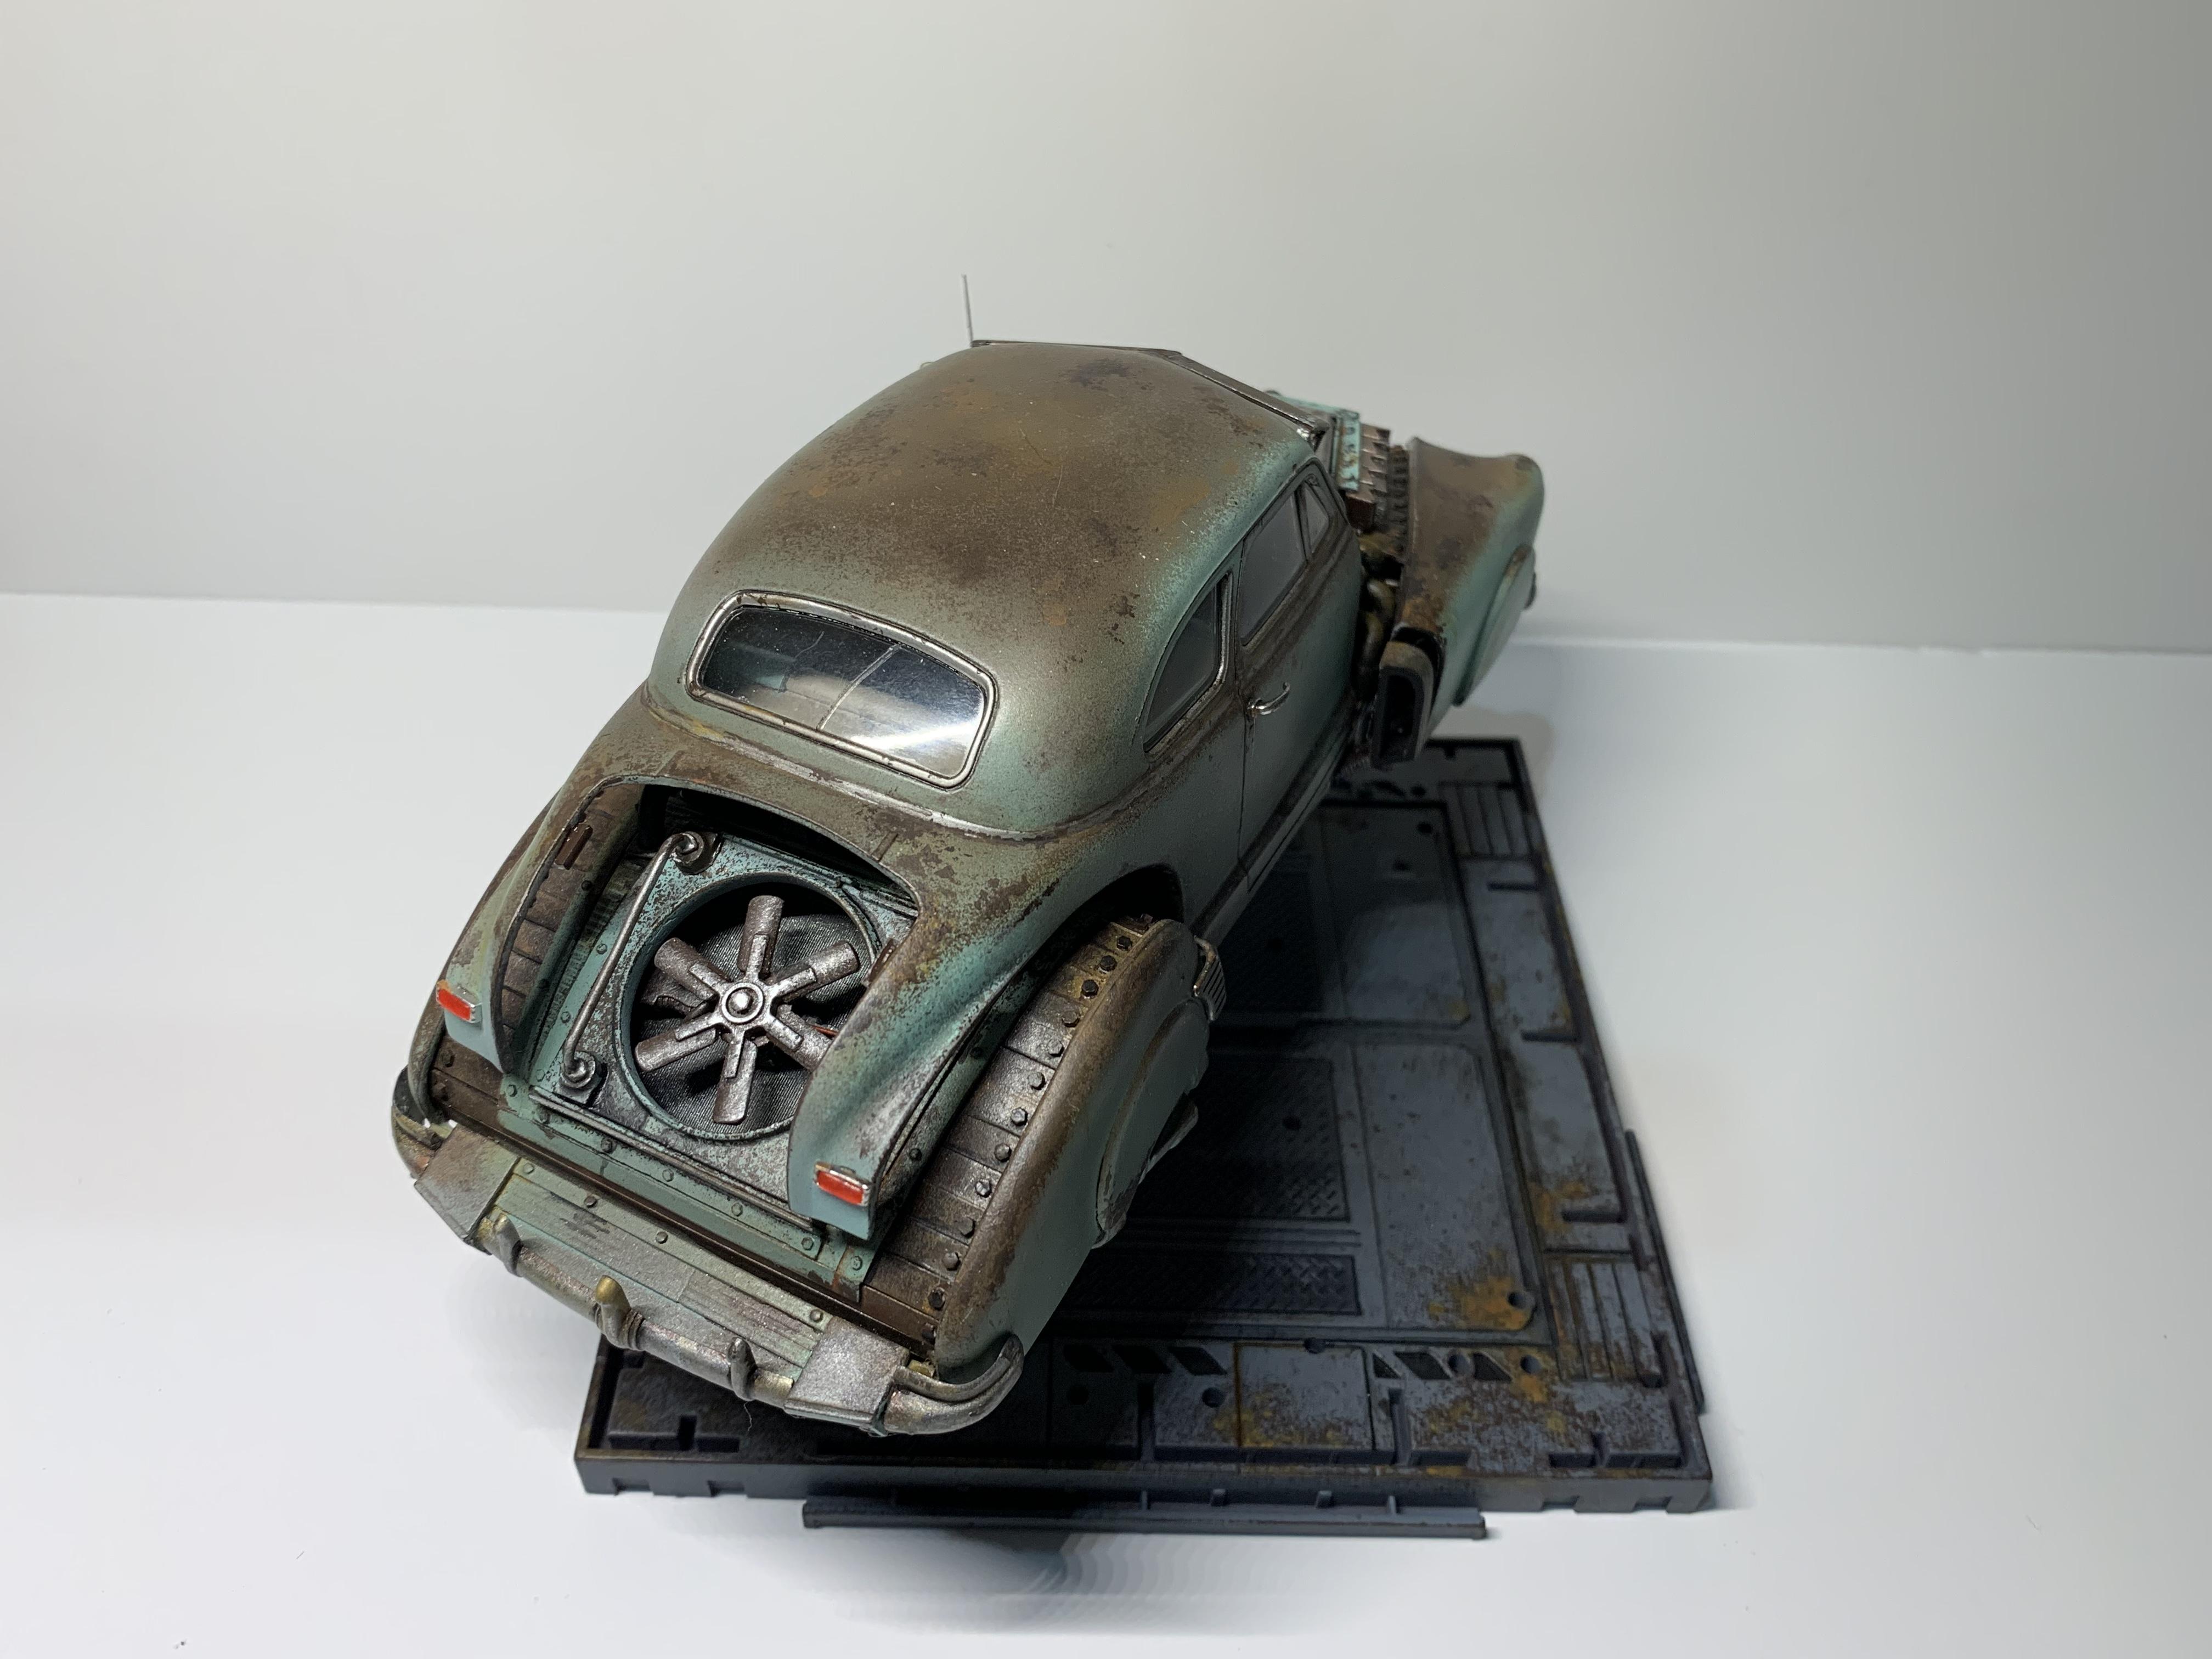
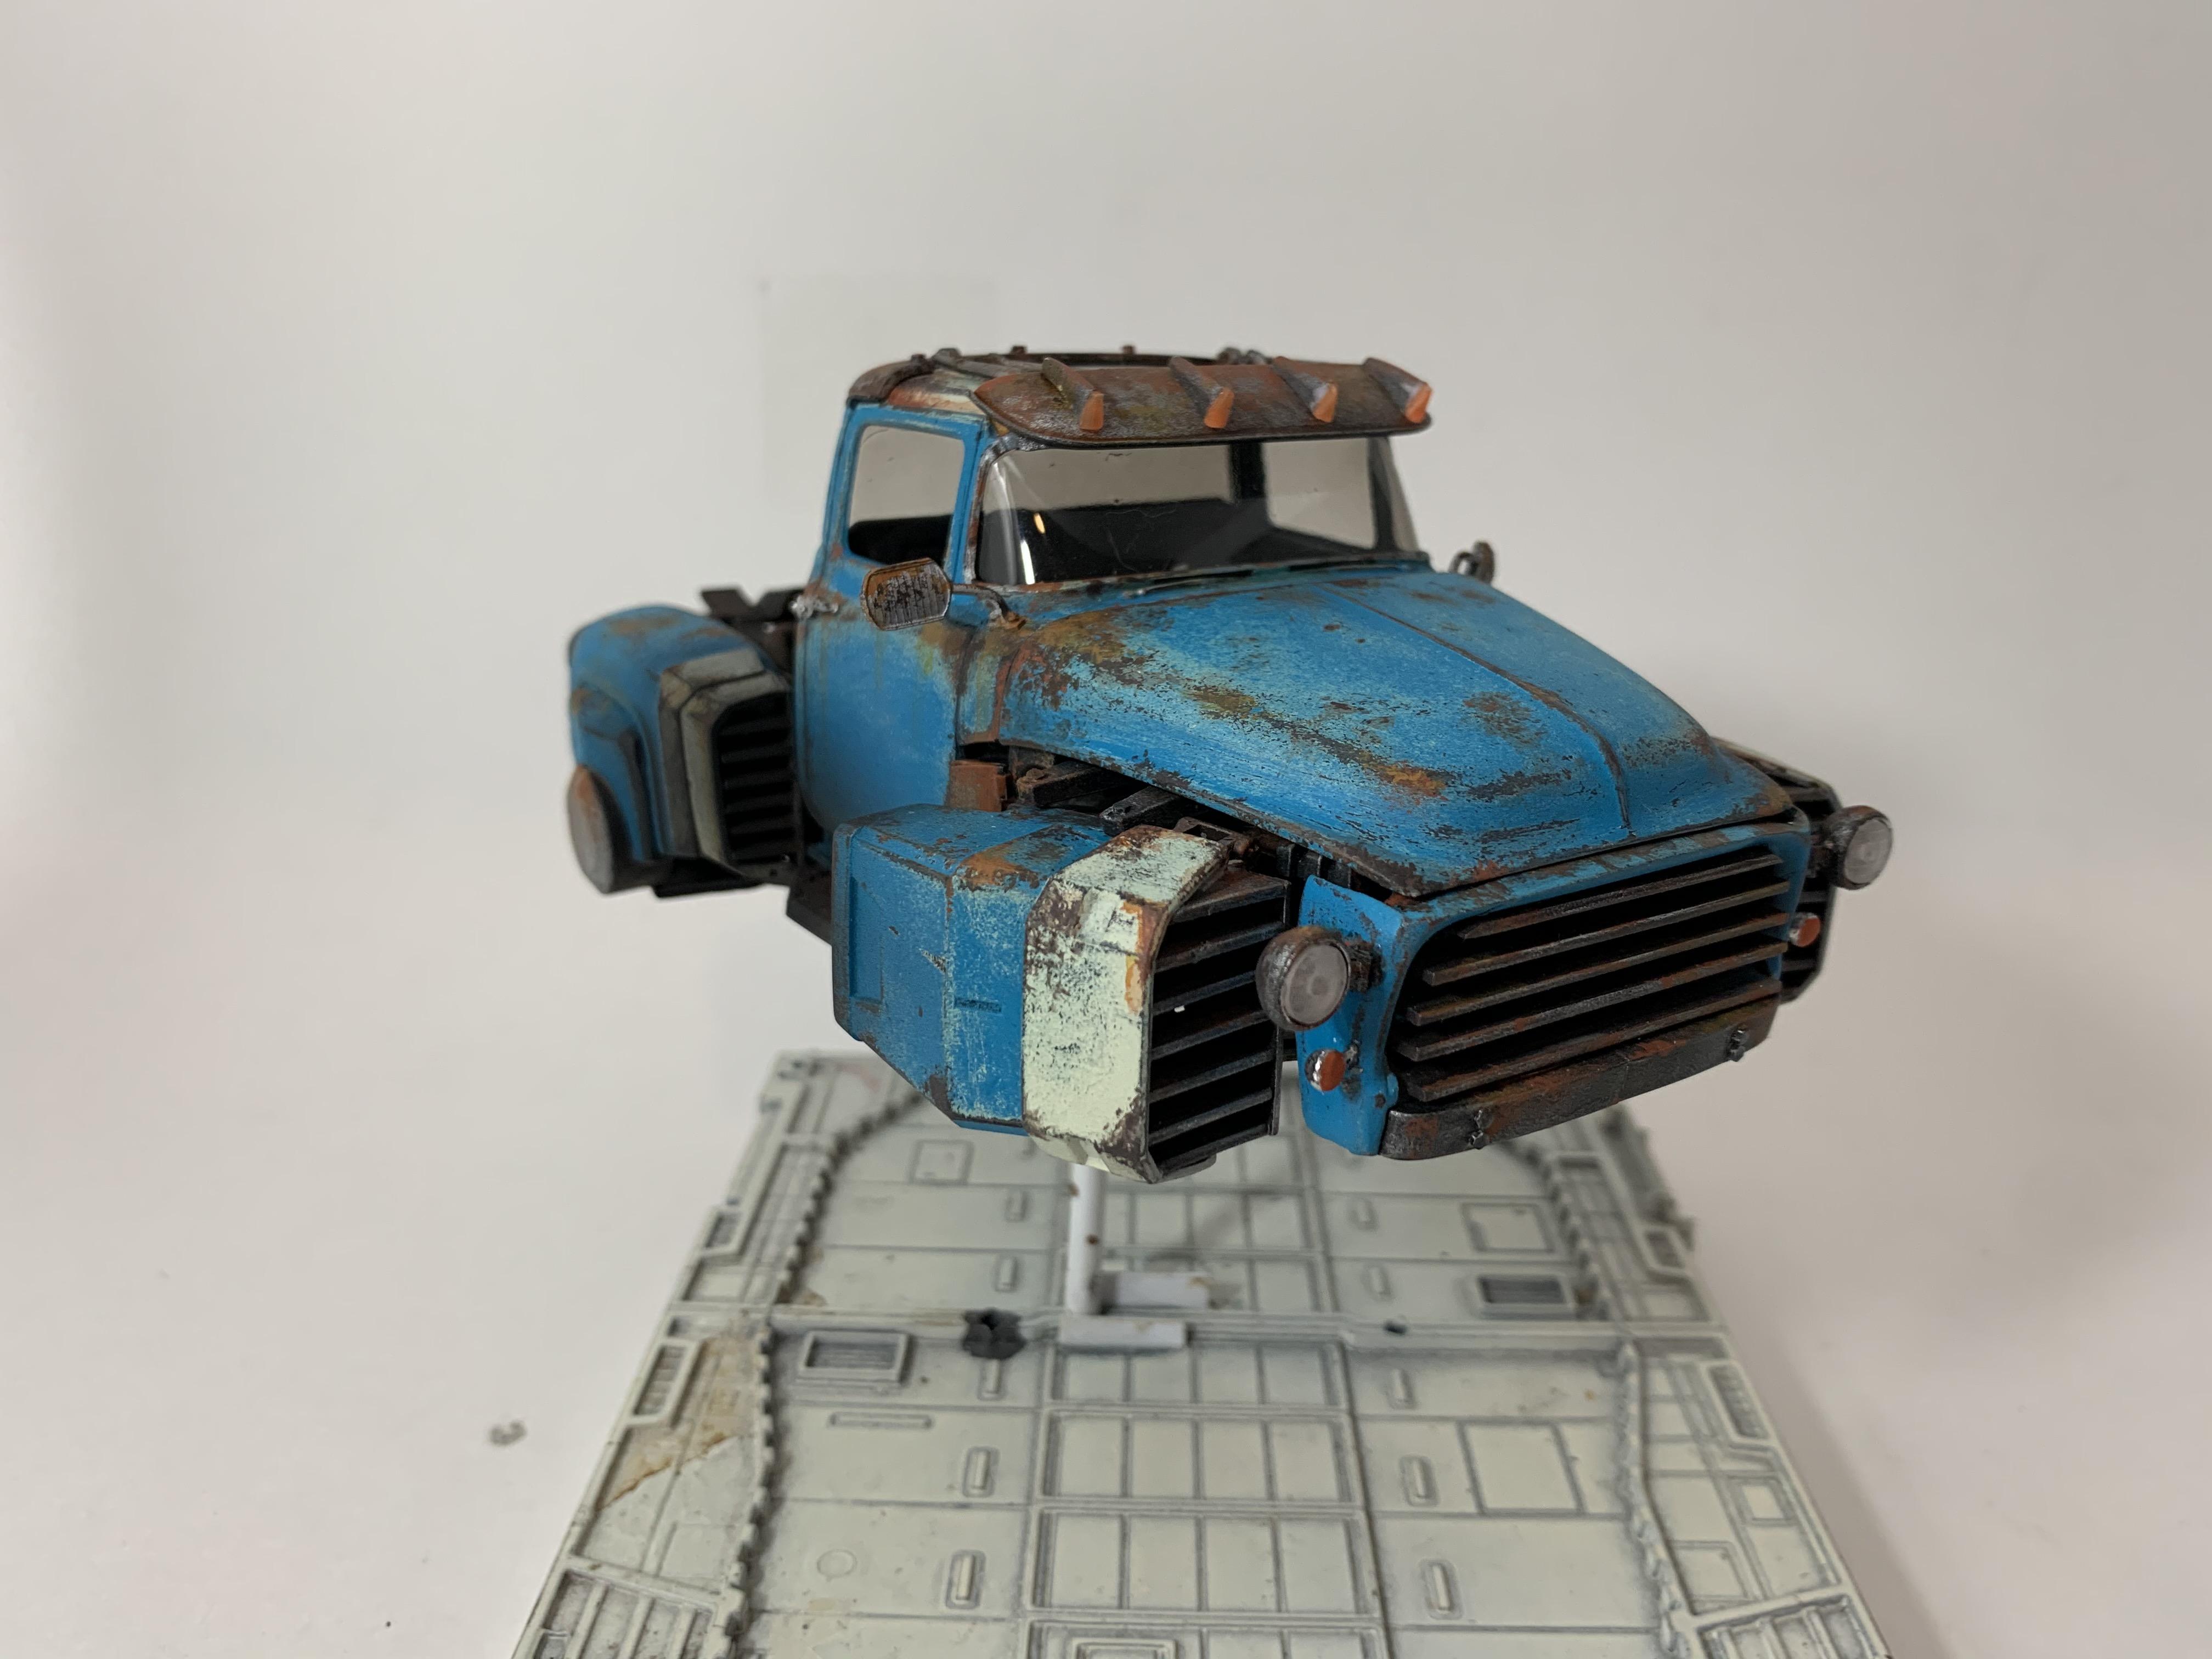
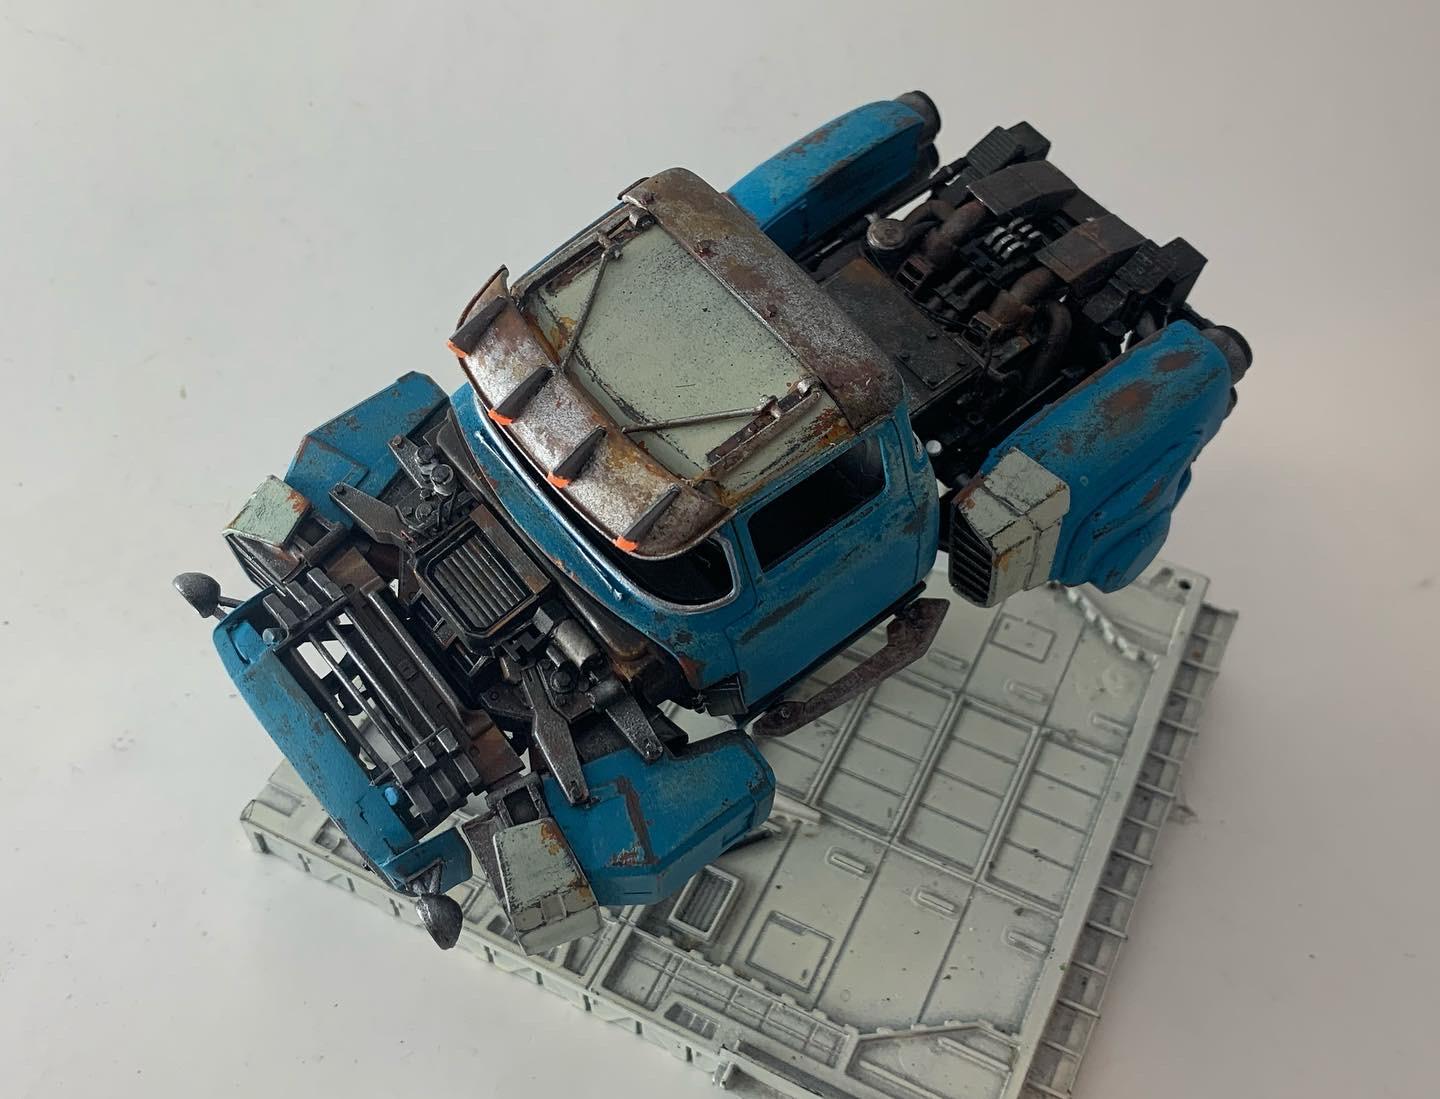
You all really know how to make a guy feel special. Thank you so much for the comments. ? Tom I'm glad you asked about my inspiration. If you go to the link below, you'll see my work in progress of my very first hover car. In that post, I mention my inspiration for that build (check that link as well). A very talented builder indeed. His weathering and kitbashing skills are excellent. I've since found him on Instagram and we follow each other on that platform. I did use Pinterest a lot for my early hover car research. I'm now mostly on Instagram. Andre Tkachenko is a Russian artist that I follow. He has a style that I admire. Although not hover cars, but car design. It sounds ridiculous, but I also try to stick to this alternate reality timeline when I build these. In my mind these vehicles are from a post apocalyptic world of some sort. Think Mad Max but a little more civilized. Maybe 15-20 years after the event, the population starts to rebuild. These cars are taken from junkyards and reassembled as jet cars. Maybe they race for competition or for credits. The people have pride in their jet cars, so they do try to make them look cool. Much like we do to our cars today. I try to make the cars reflect that world in my head. The two grey parts above are used on the undercarriage below. Each had to be modified. I do modify most of the Gundam parts that I use. I'd prefer that they weren't recognizable. Lots of parts covering up other parts. The undercarriage is one of my favorite areas to scratchbuild. The four identical turbines under each wheel well are unique to this model. All of my other builds have different turbines from the front to the back. Vents, vents and more vents. It's gotta breathe. Thank you all for looking. I'll update soon.
-
Same here. This is truly an amazing build. I will be watching. Thanks for posting every little detail.
-
Slap some turbines on this baby and let it soar! It looks like it was made to fly. Wedge shaped like the cross section of an airplane wing. What are you planning on for the windshield, if not a bubble top? Not to add pressure, but you've got lots of us interested. Don't let this go to the closet.
-
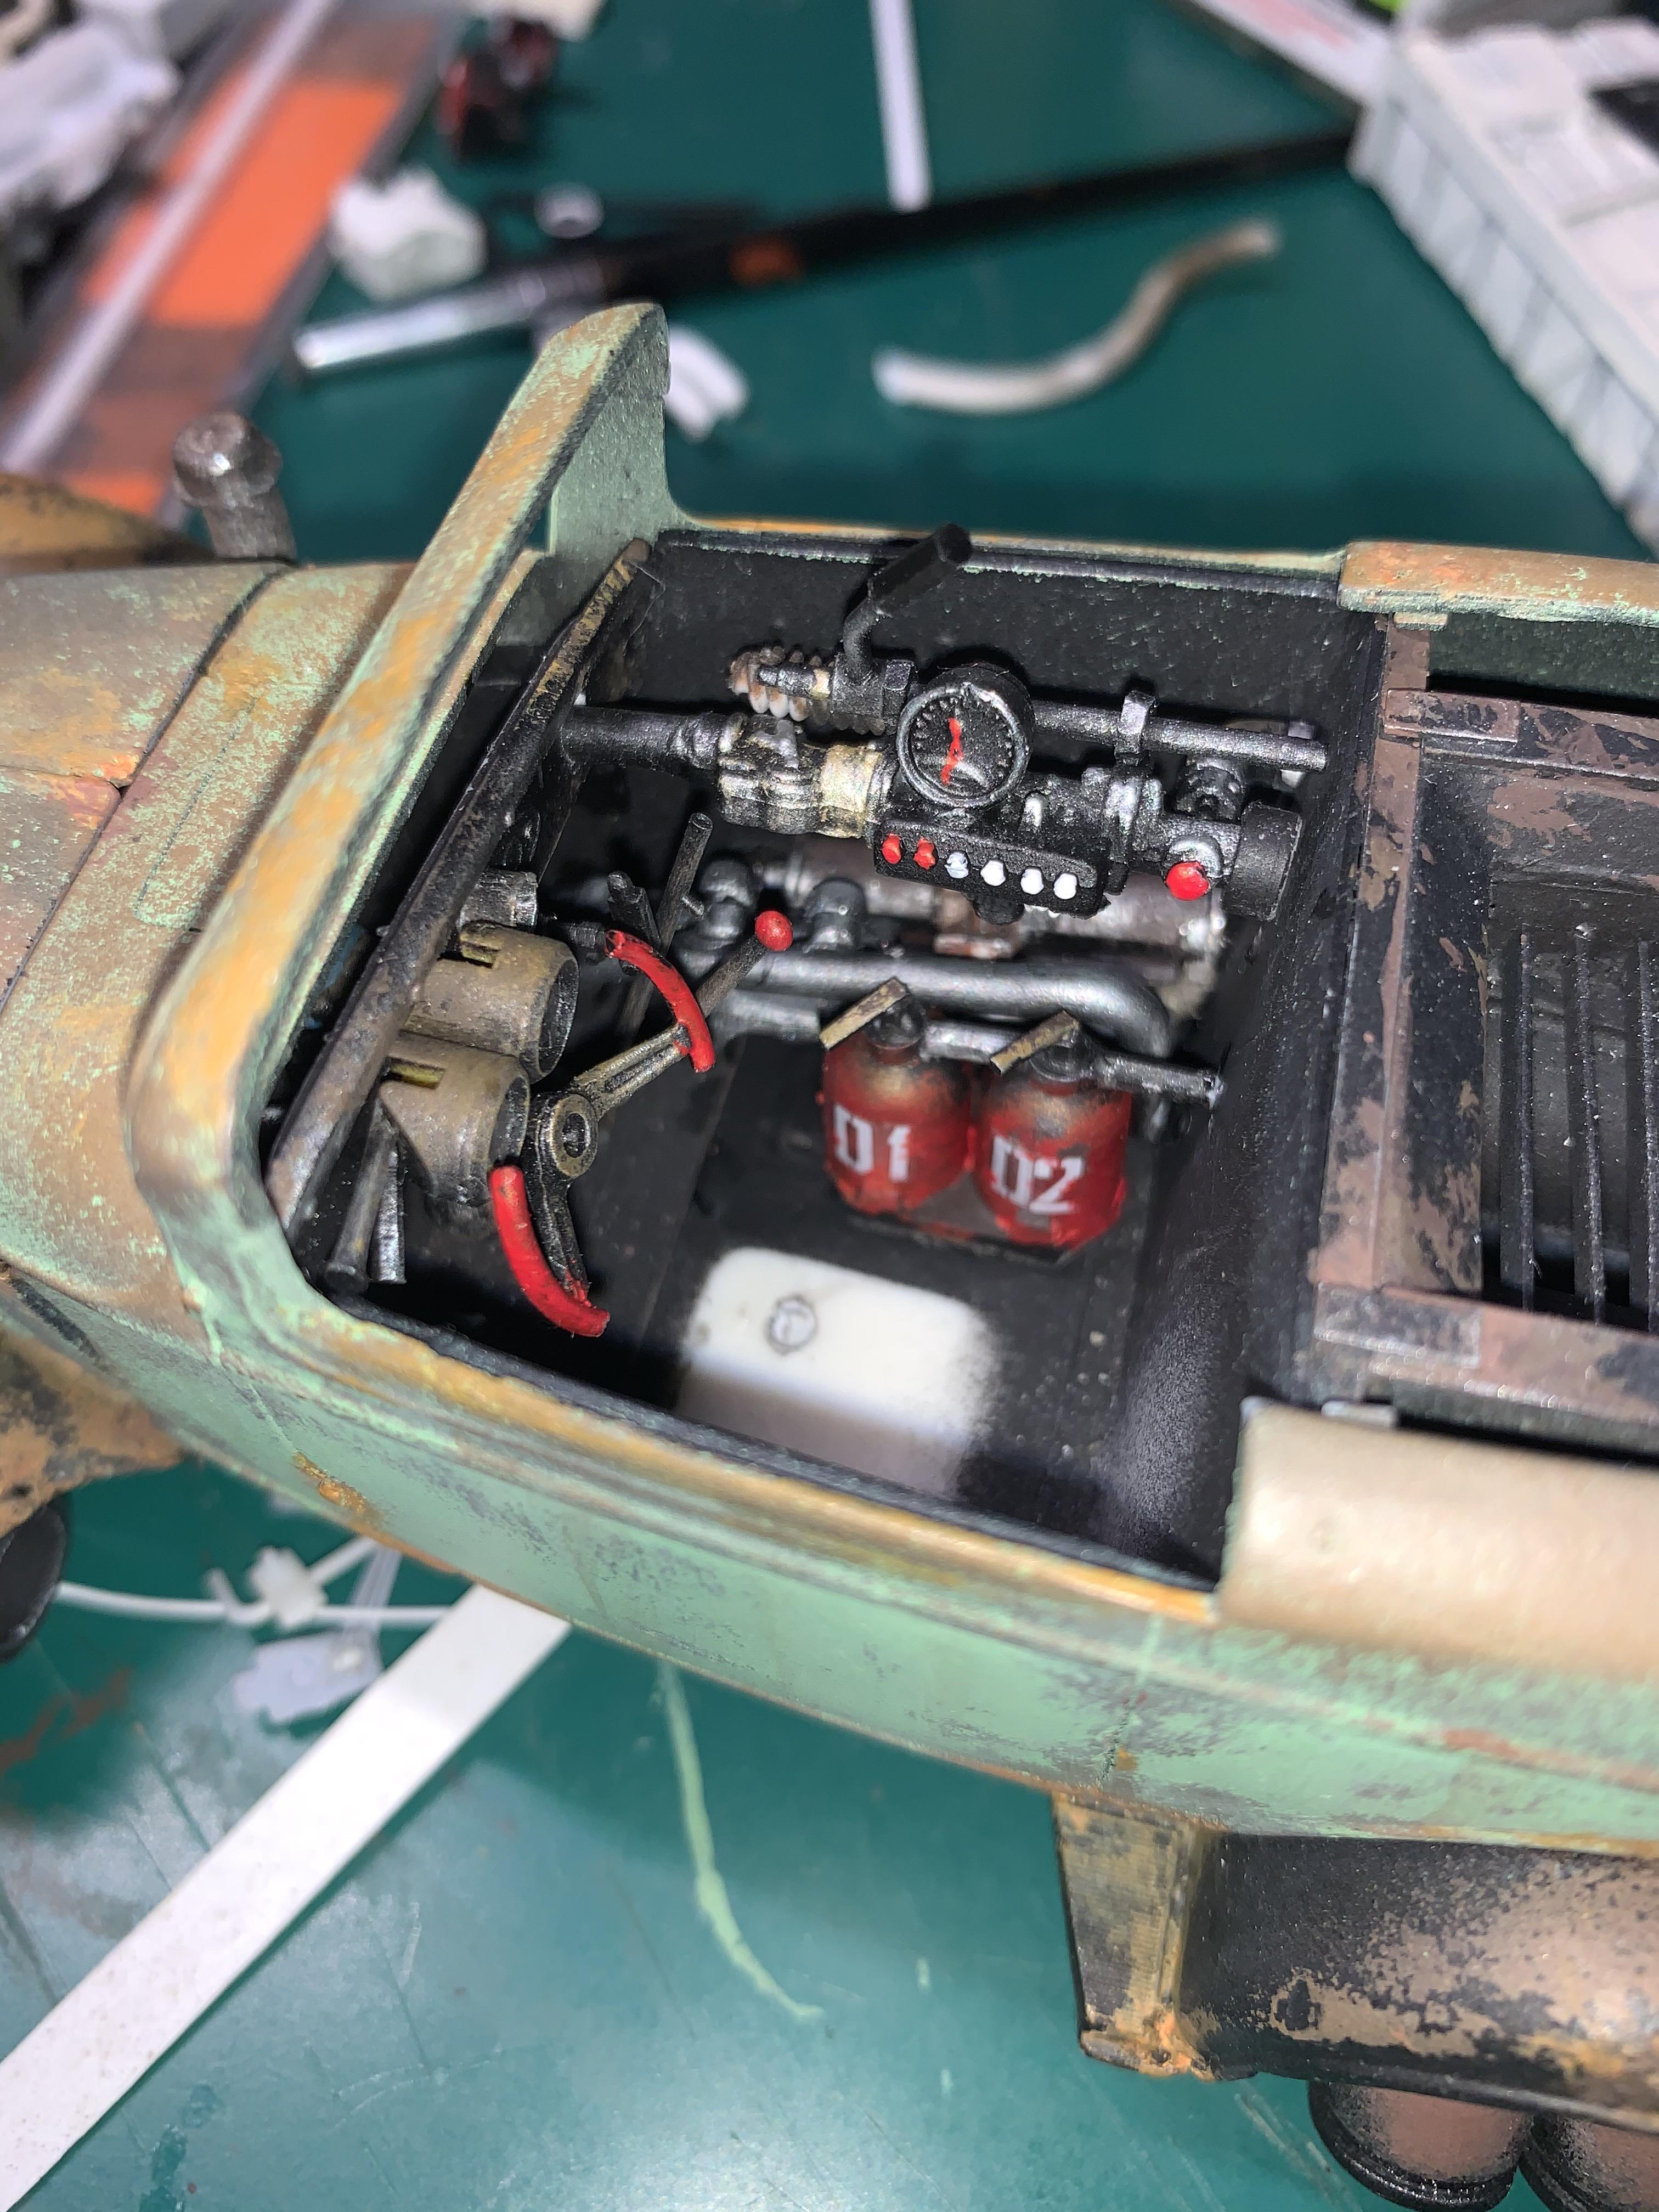
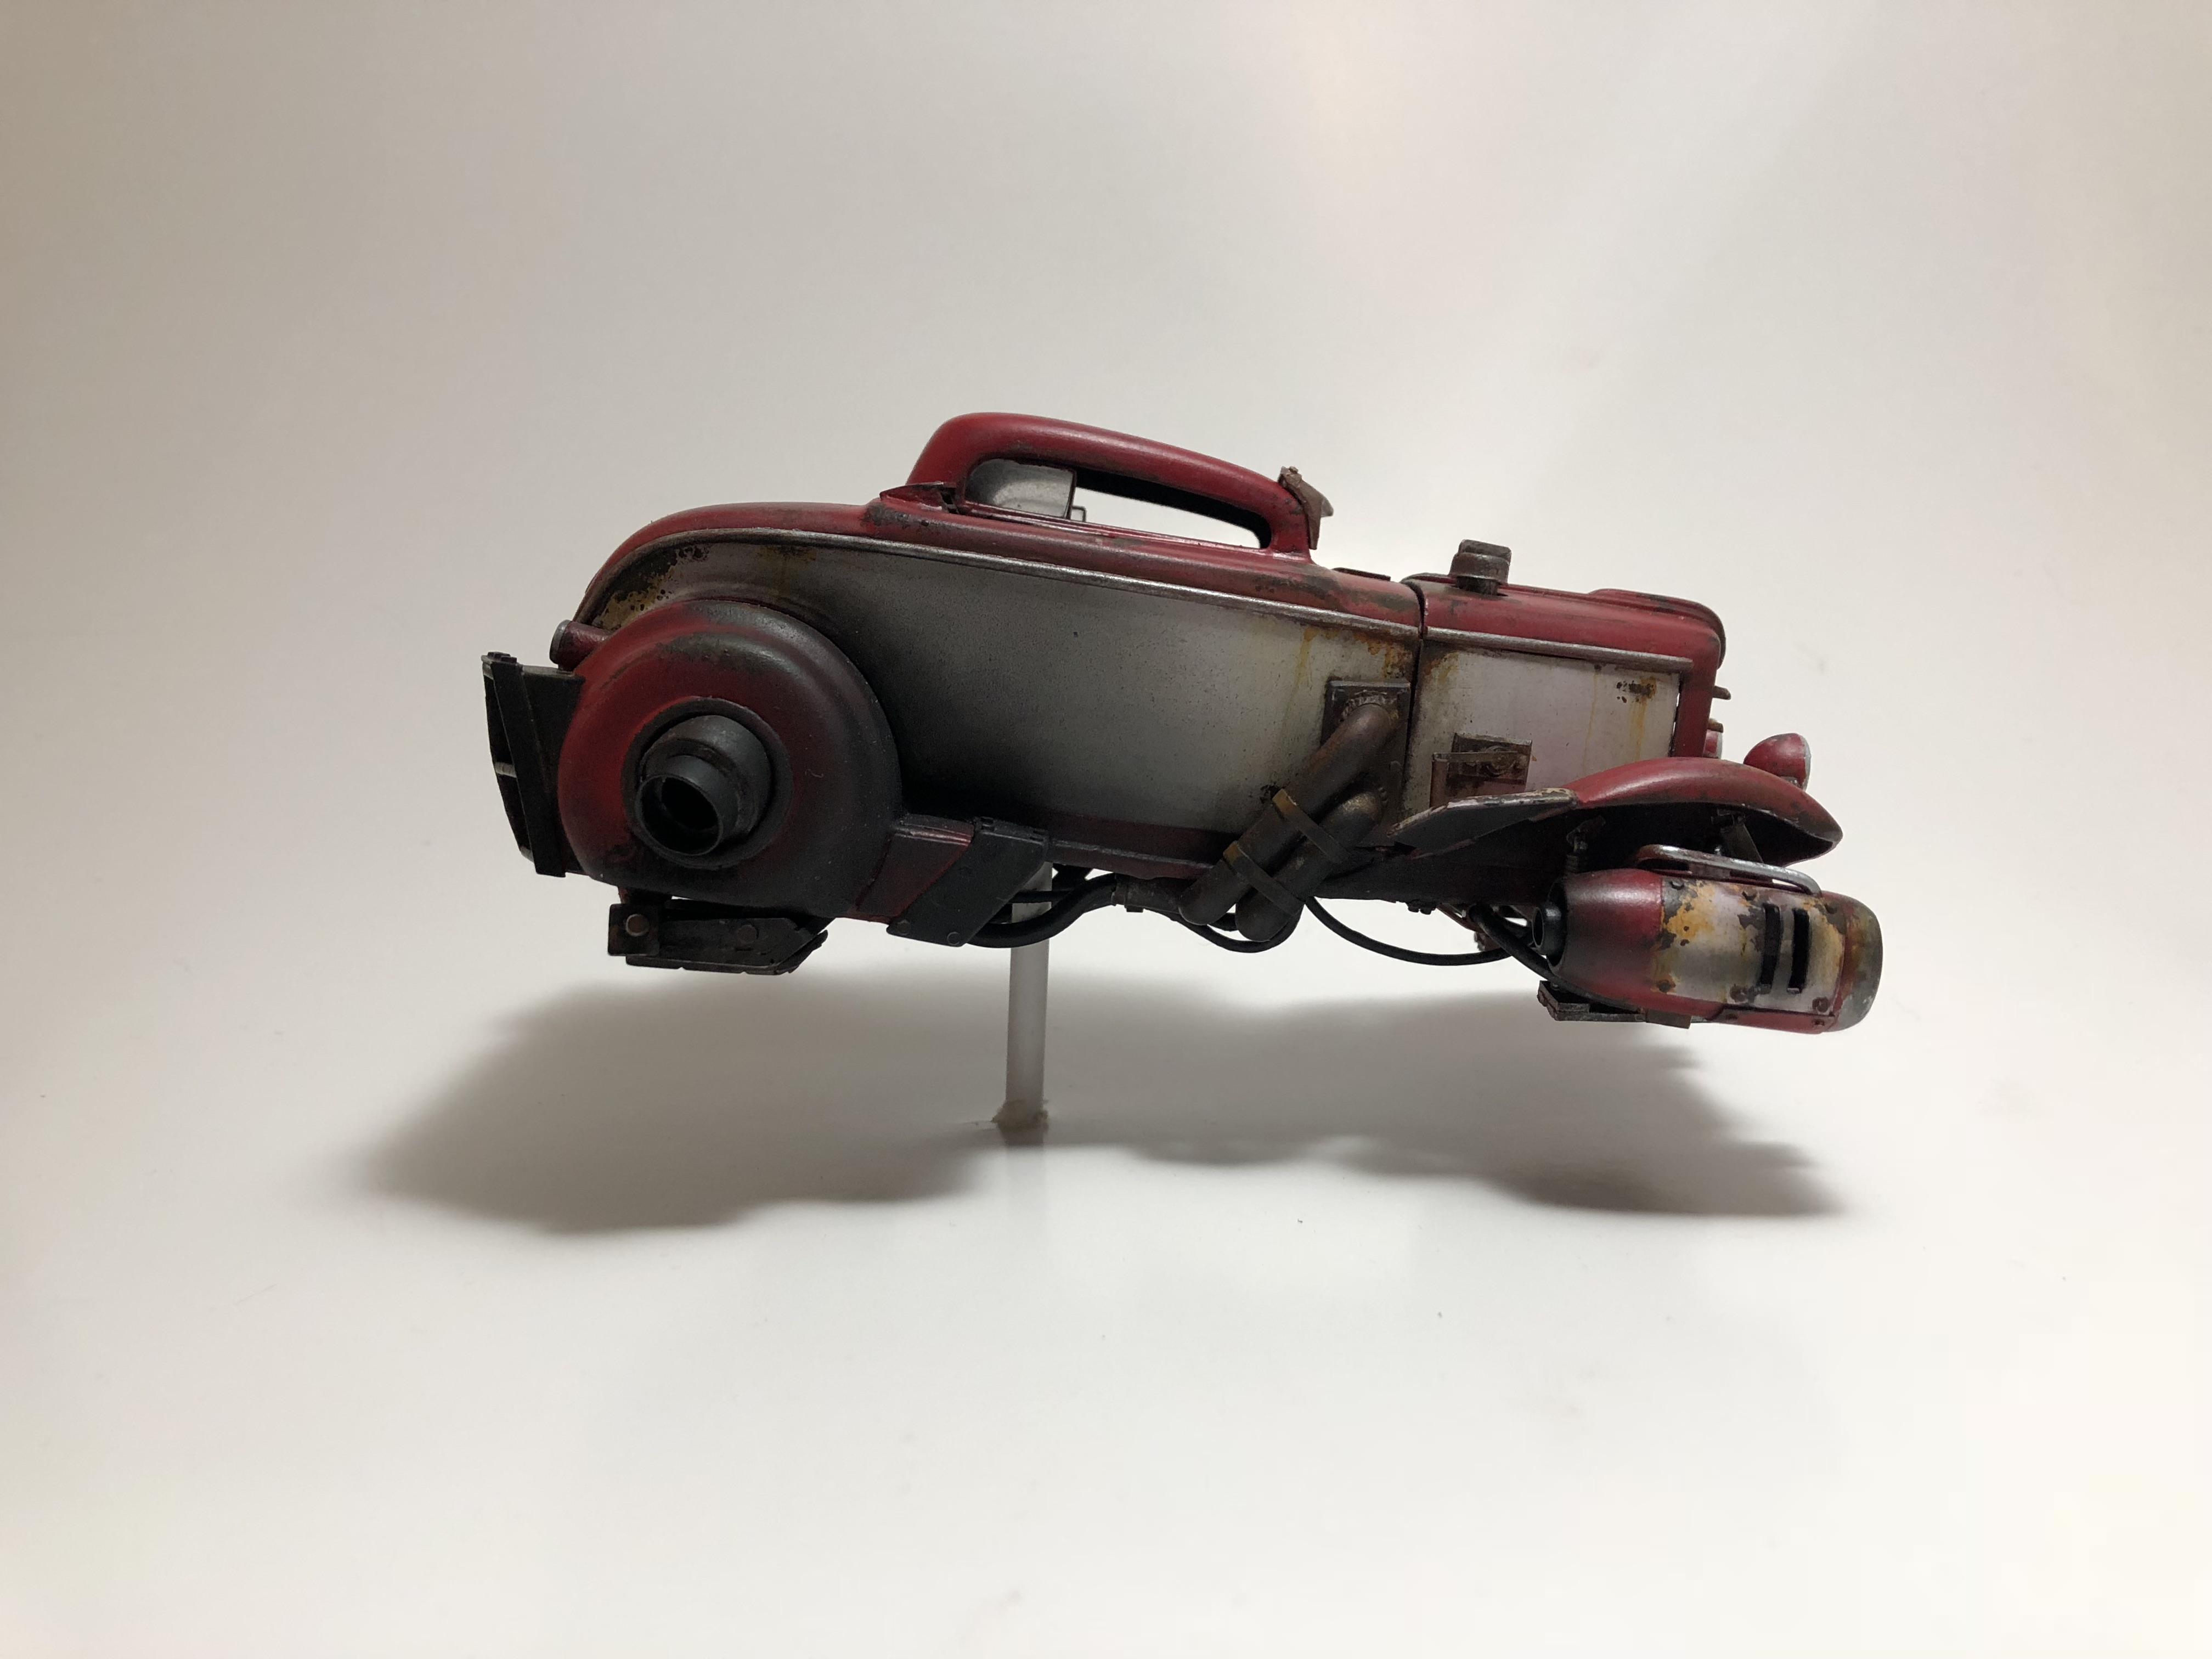
Thank you both! I couldn't do these without the excessive use of Gundam kits and Styrene. The amount of Gundam parts that I used on the Foose truck was ridiculous. The undercarriage, the front power plant, the front and rear turbines are mostly Gundam. I wish that I could give you the names of each of the kits that I used, but I don't have the original boxes or instructions anymore. Just a bin full of parts. I do know that the front turbines on the Foose truck were from Gundam Virtue. A few parts from Gundam Denial as well. I always try to build in sub-assemblies. The four corner turbines are removable even on the completed model. Using Styrene tube to hold pegs on it's adjacent part. There's some Mustang tail lights in there as well. The fuel tanks are blood test strip containers. I'm a type 1 Diabetic. I have plenty of these. As for the large turbines that are sticking out back of the Jetvette, I've made similar on my last 5 or 6 jet cars. Just use different diameter Styrene tube overlapping each other. I cut the center of a rim out for the front of the intake. Split some Styrene tube lengthwise to fit over the first. I'll use the strip of Styrene as a flat gluing surface to mount it to the vehicle.. Split more Styrene tube and fit over the second. I cut some of the tube into small strips. Glued them with even separation between. The split some more of the tube to hide the seams. Happy to answer any questions. Thanks guys!!!
-
56 Ford FD-100 Hover Truck
Daxman replied to Daxman's topic in Model Trucks: Pickups, Vans, SUVs, Light Commercial
Thank you Steve! I appreciate the kind words!! -
56 Ford FD-100 Hover Truck
Daxman replied to Daxman's topic in Model Trucks: Pickups, Vans, SUVs, Light Commercial
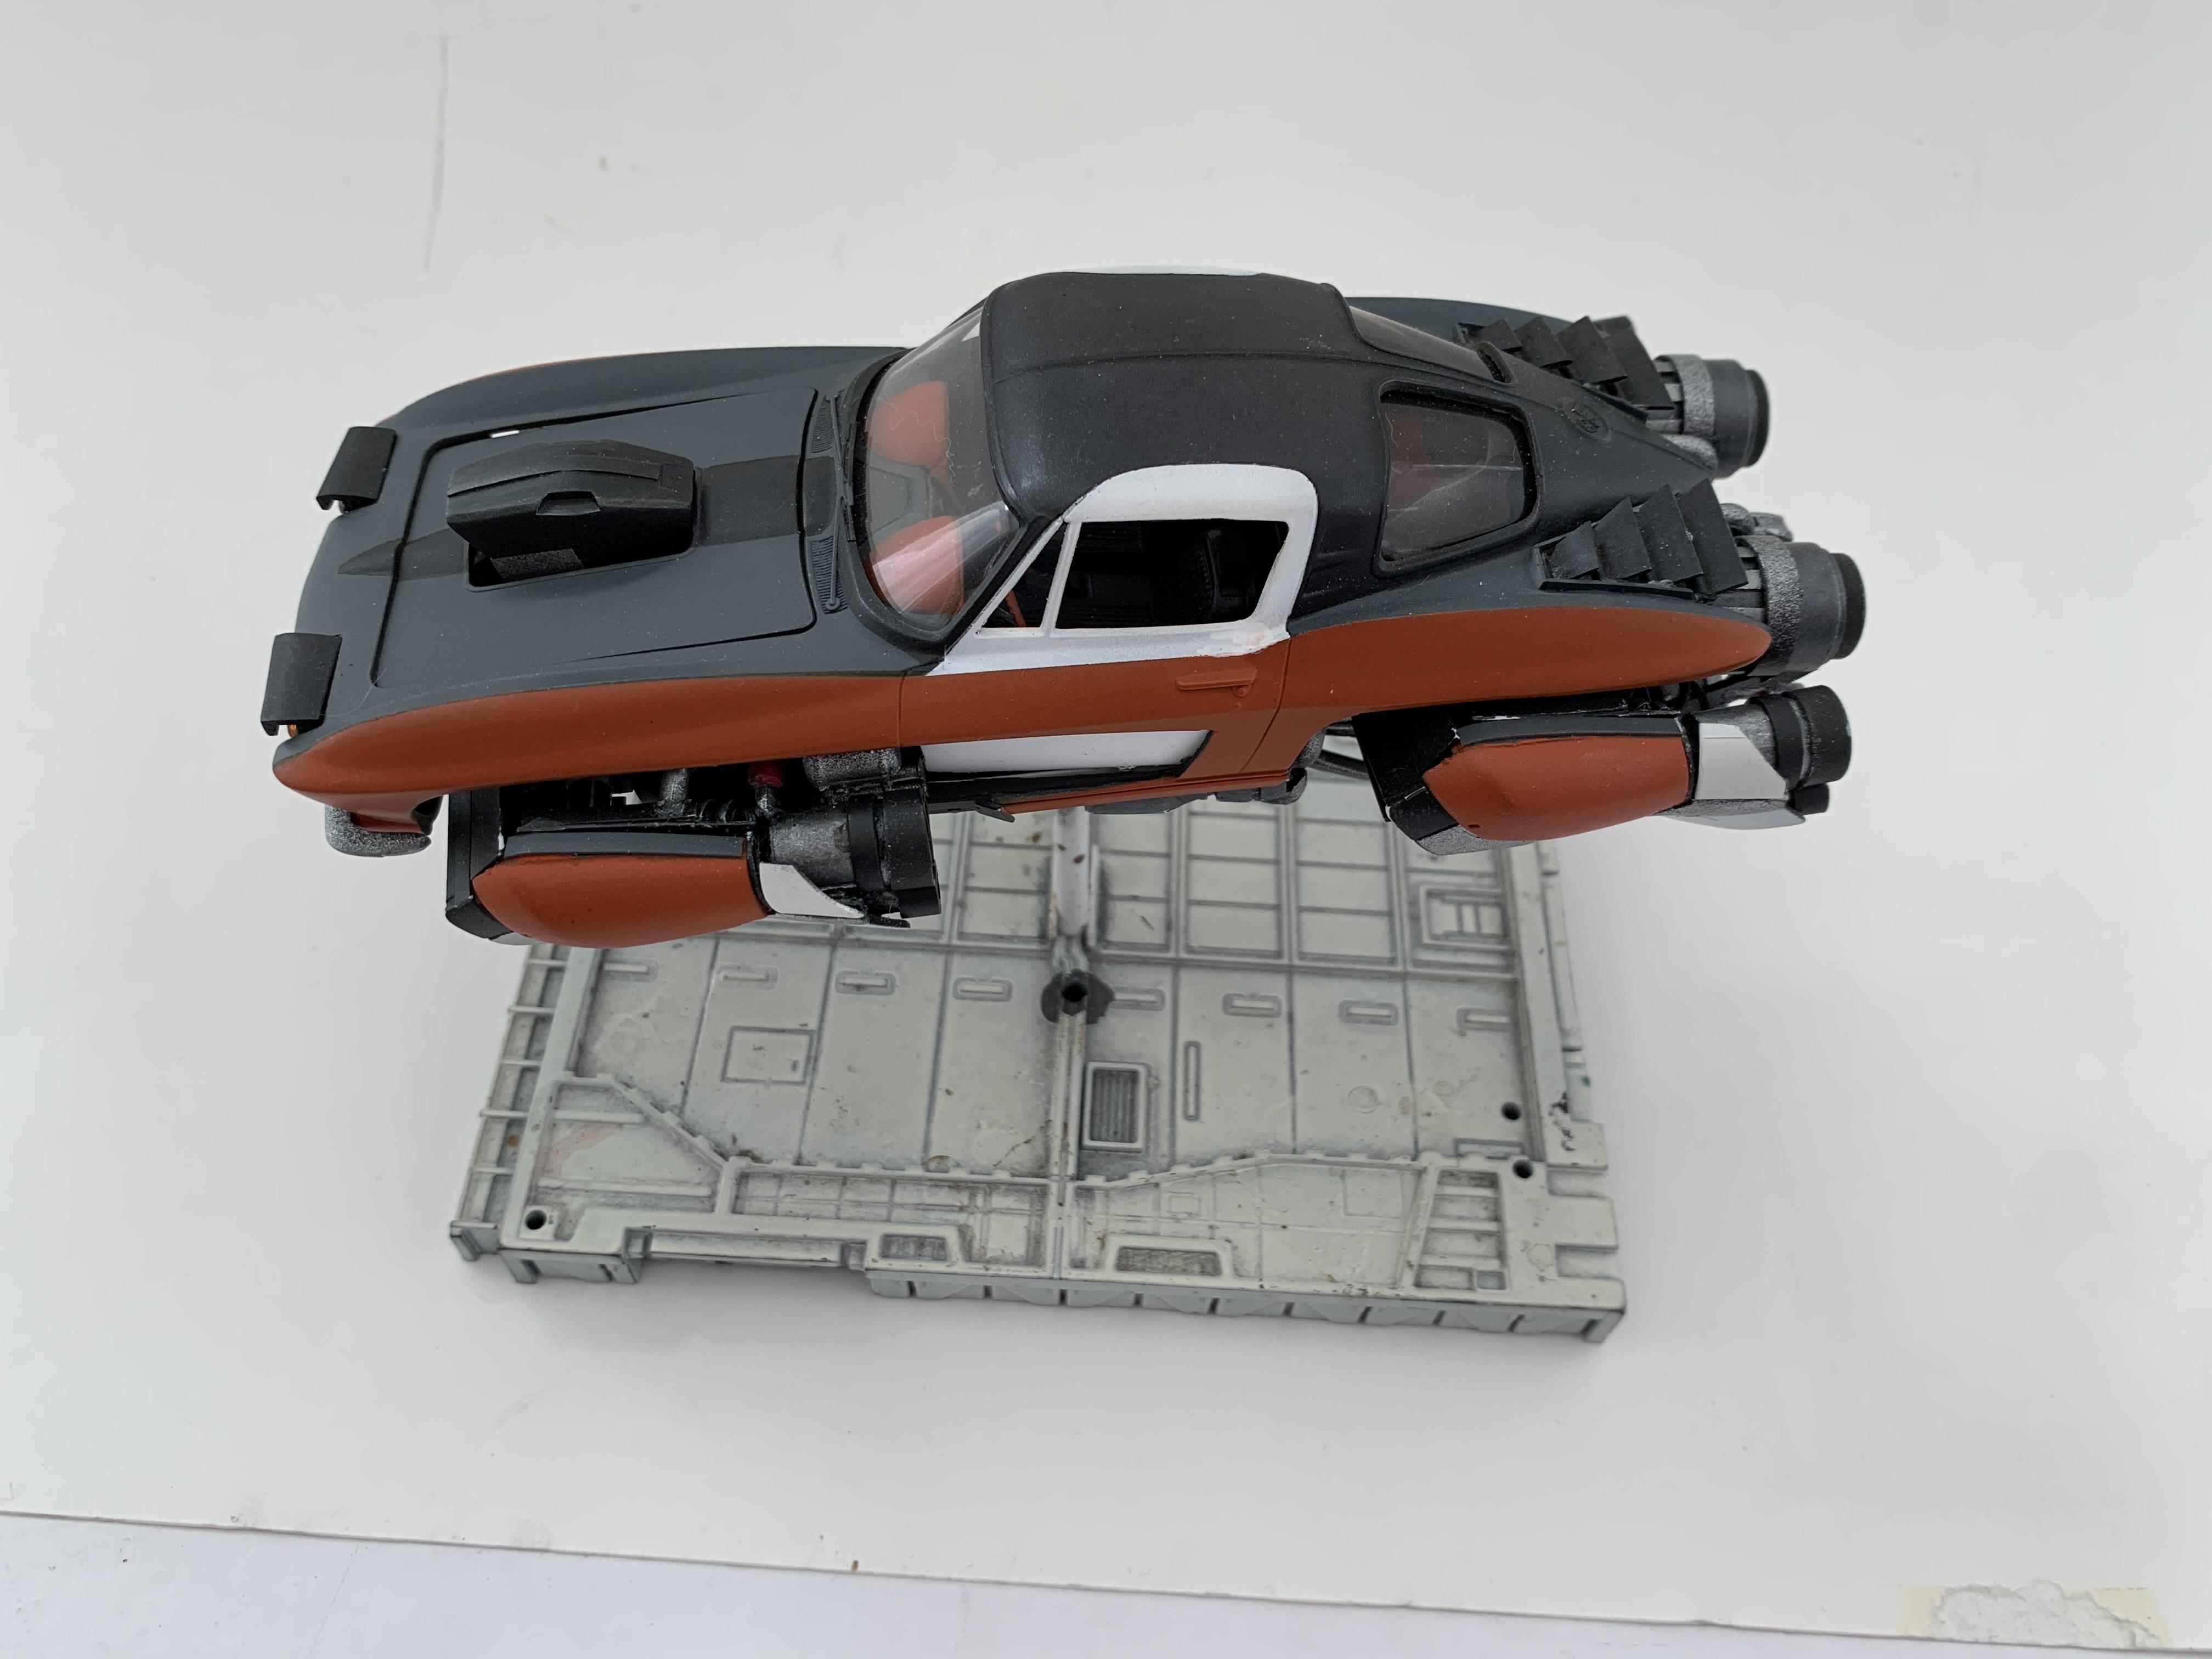
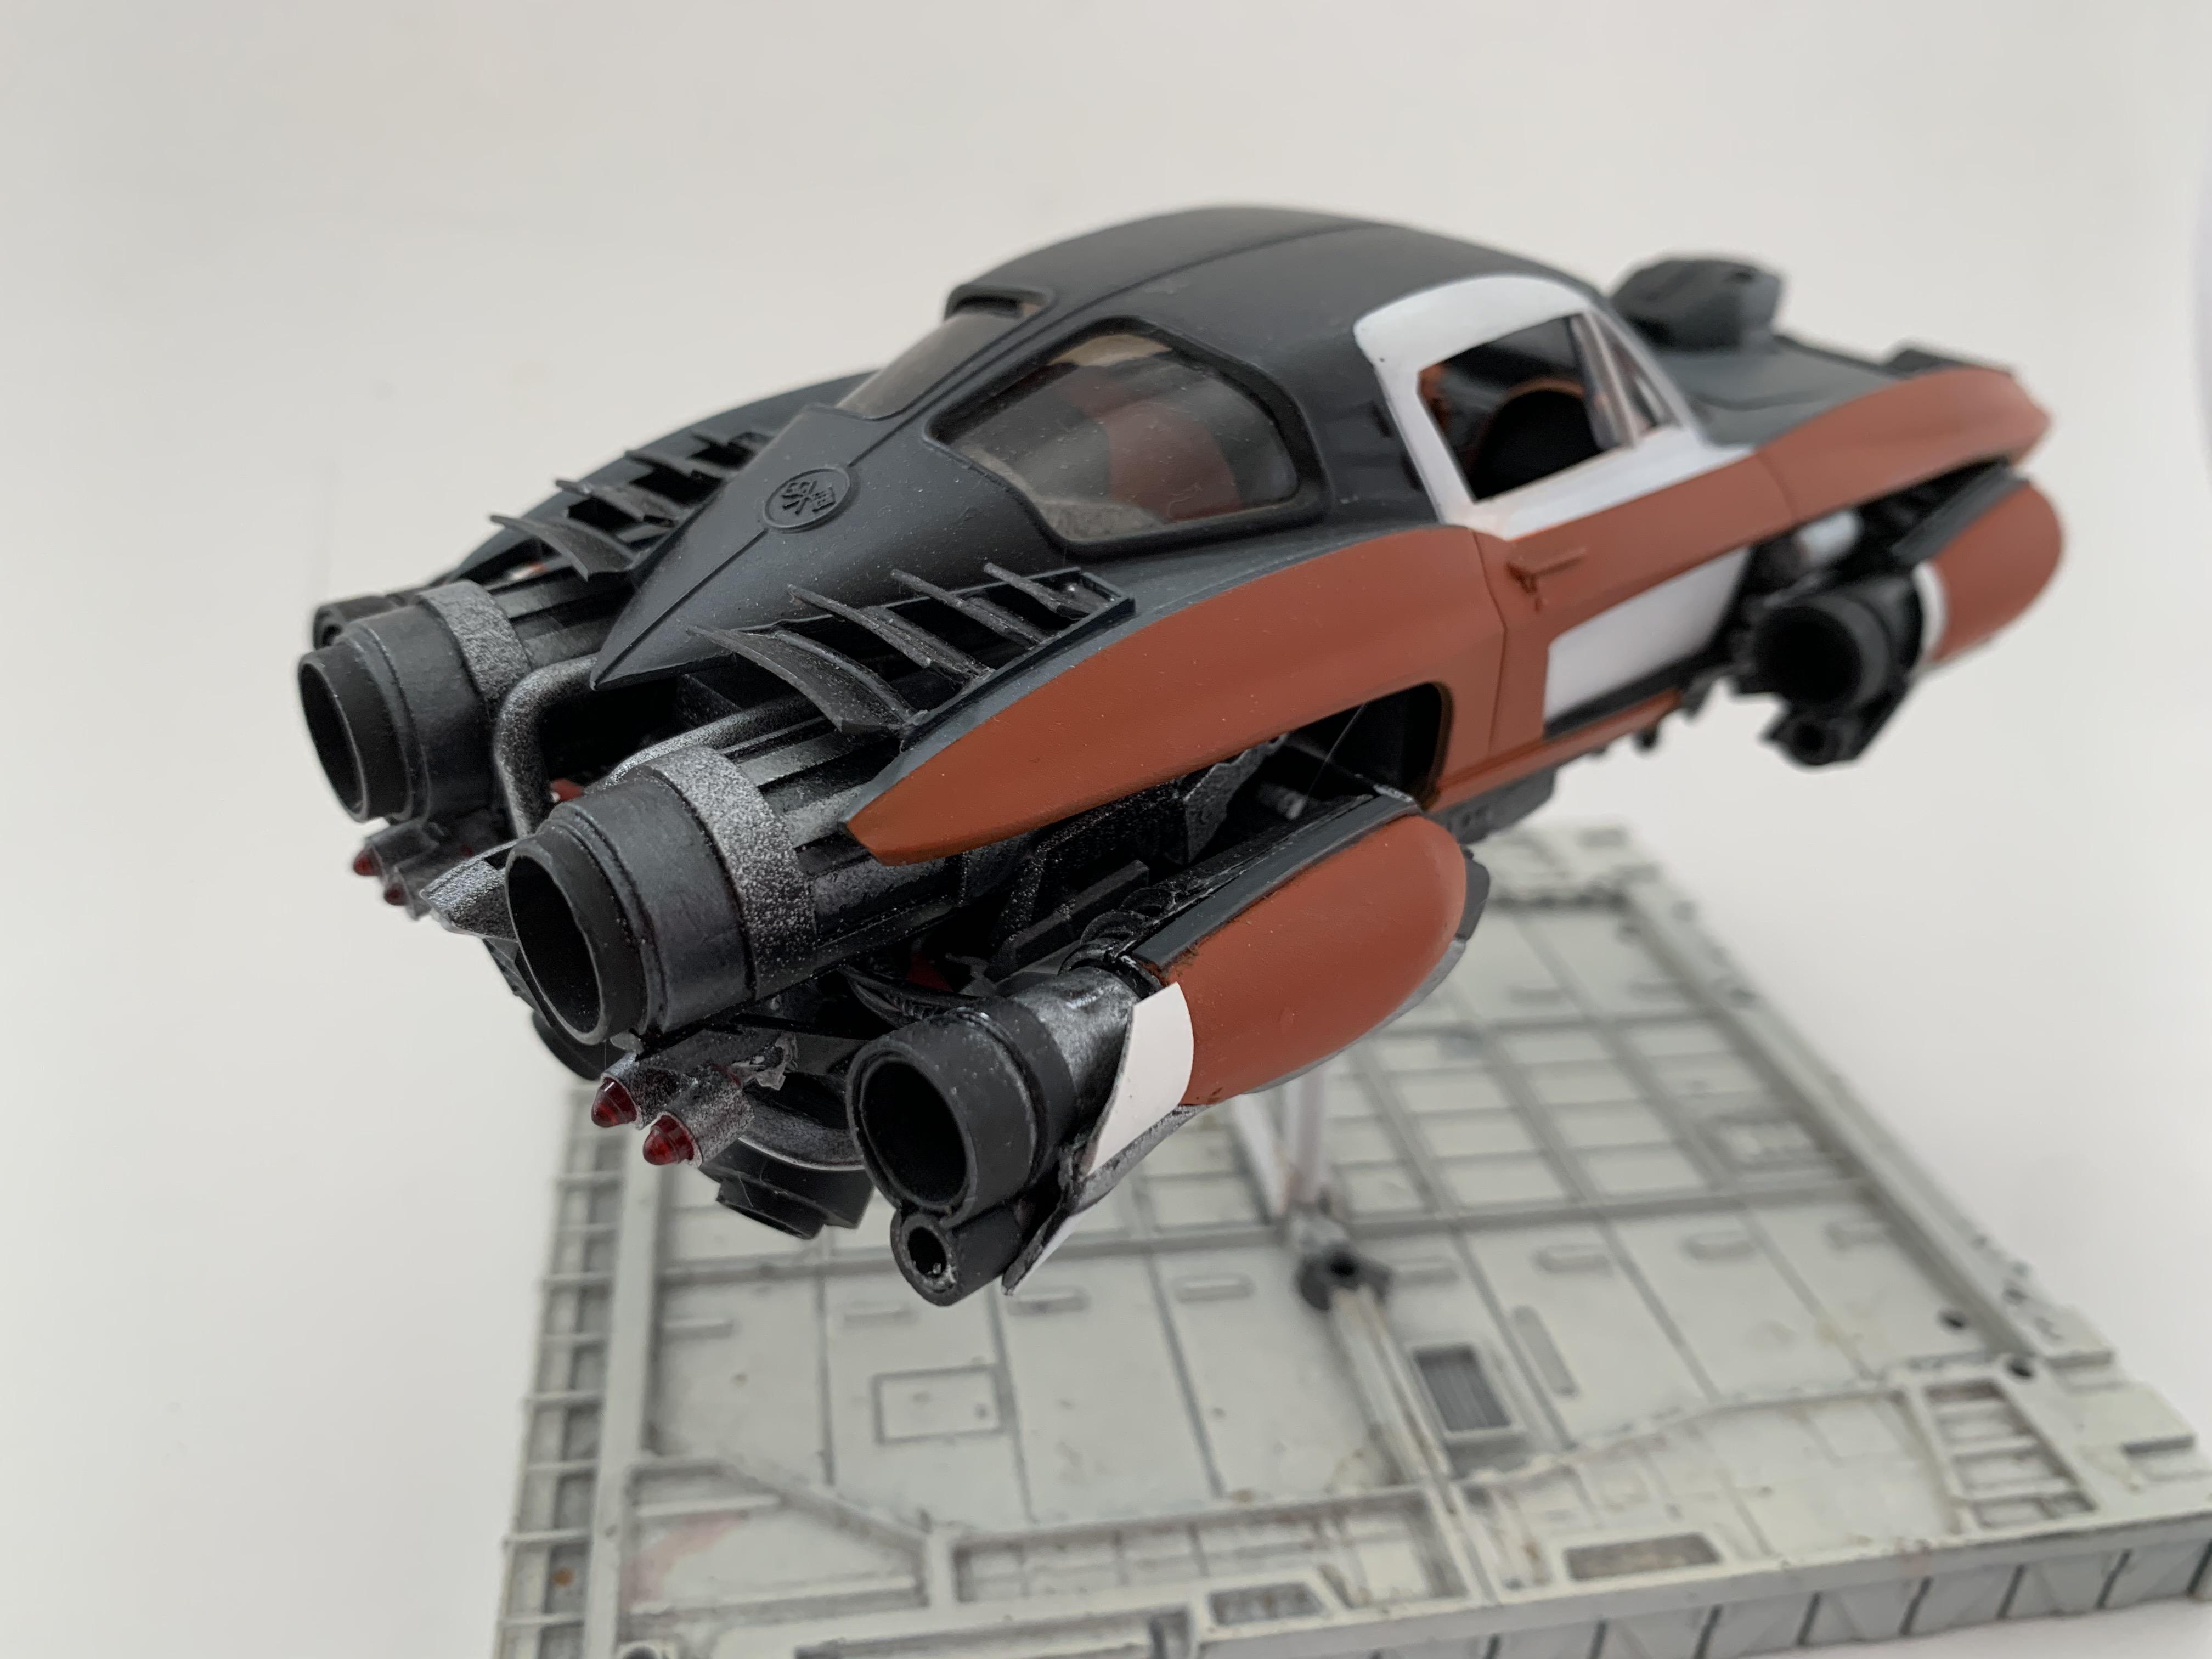
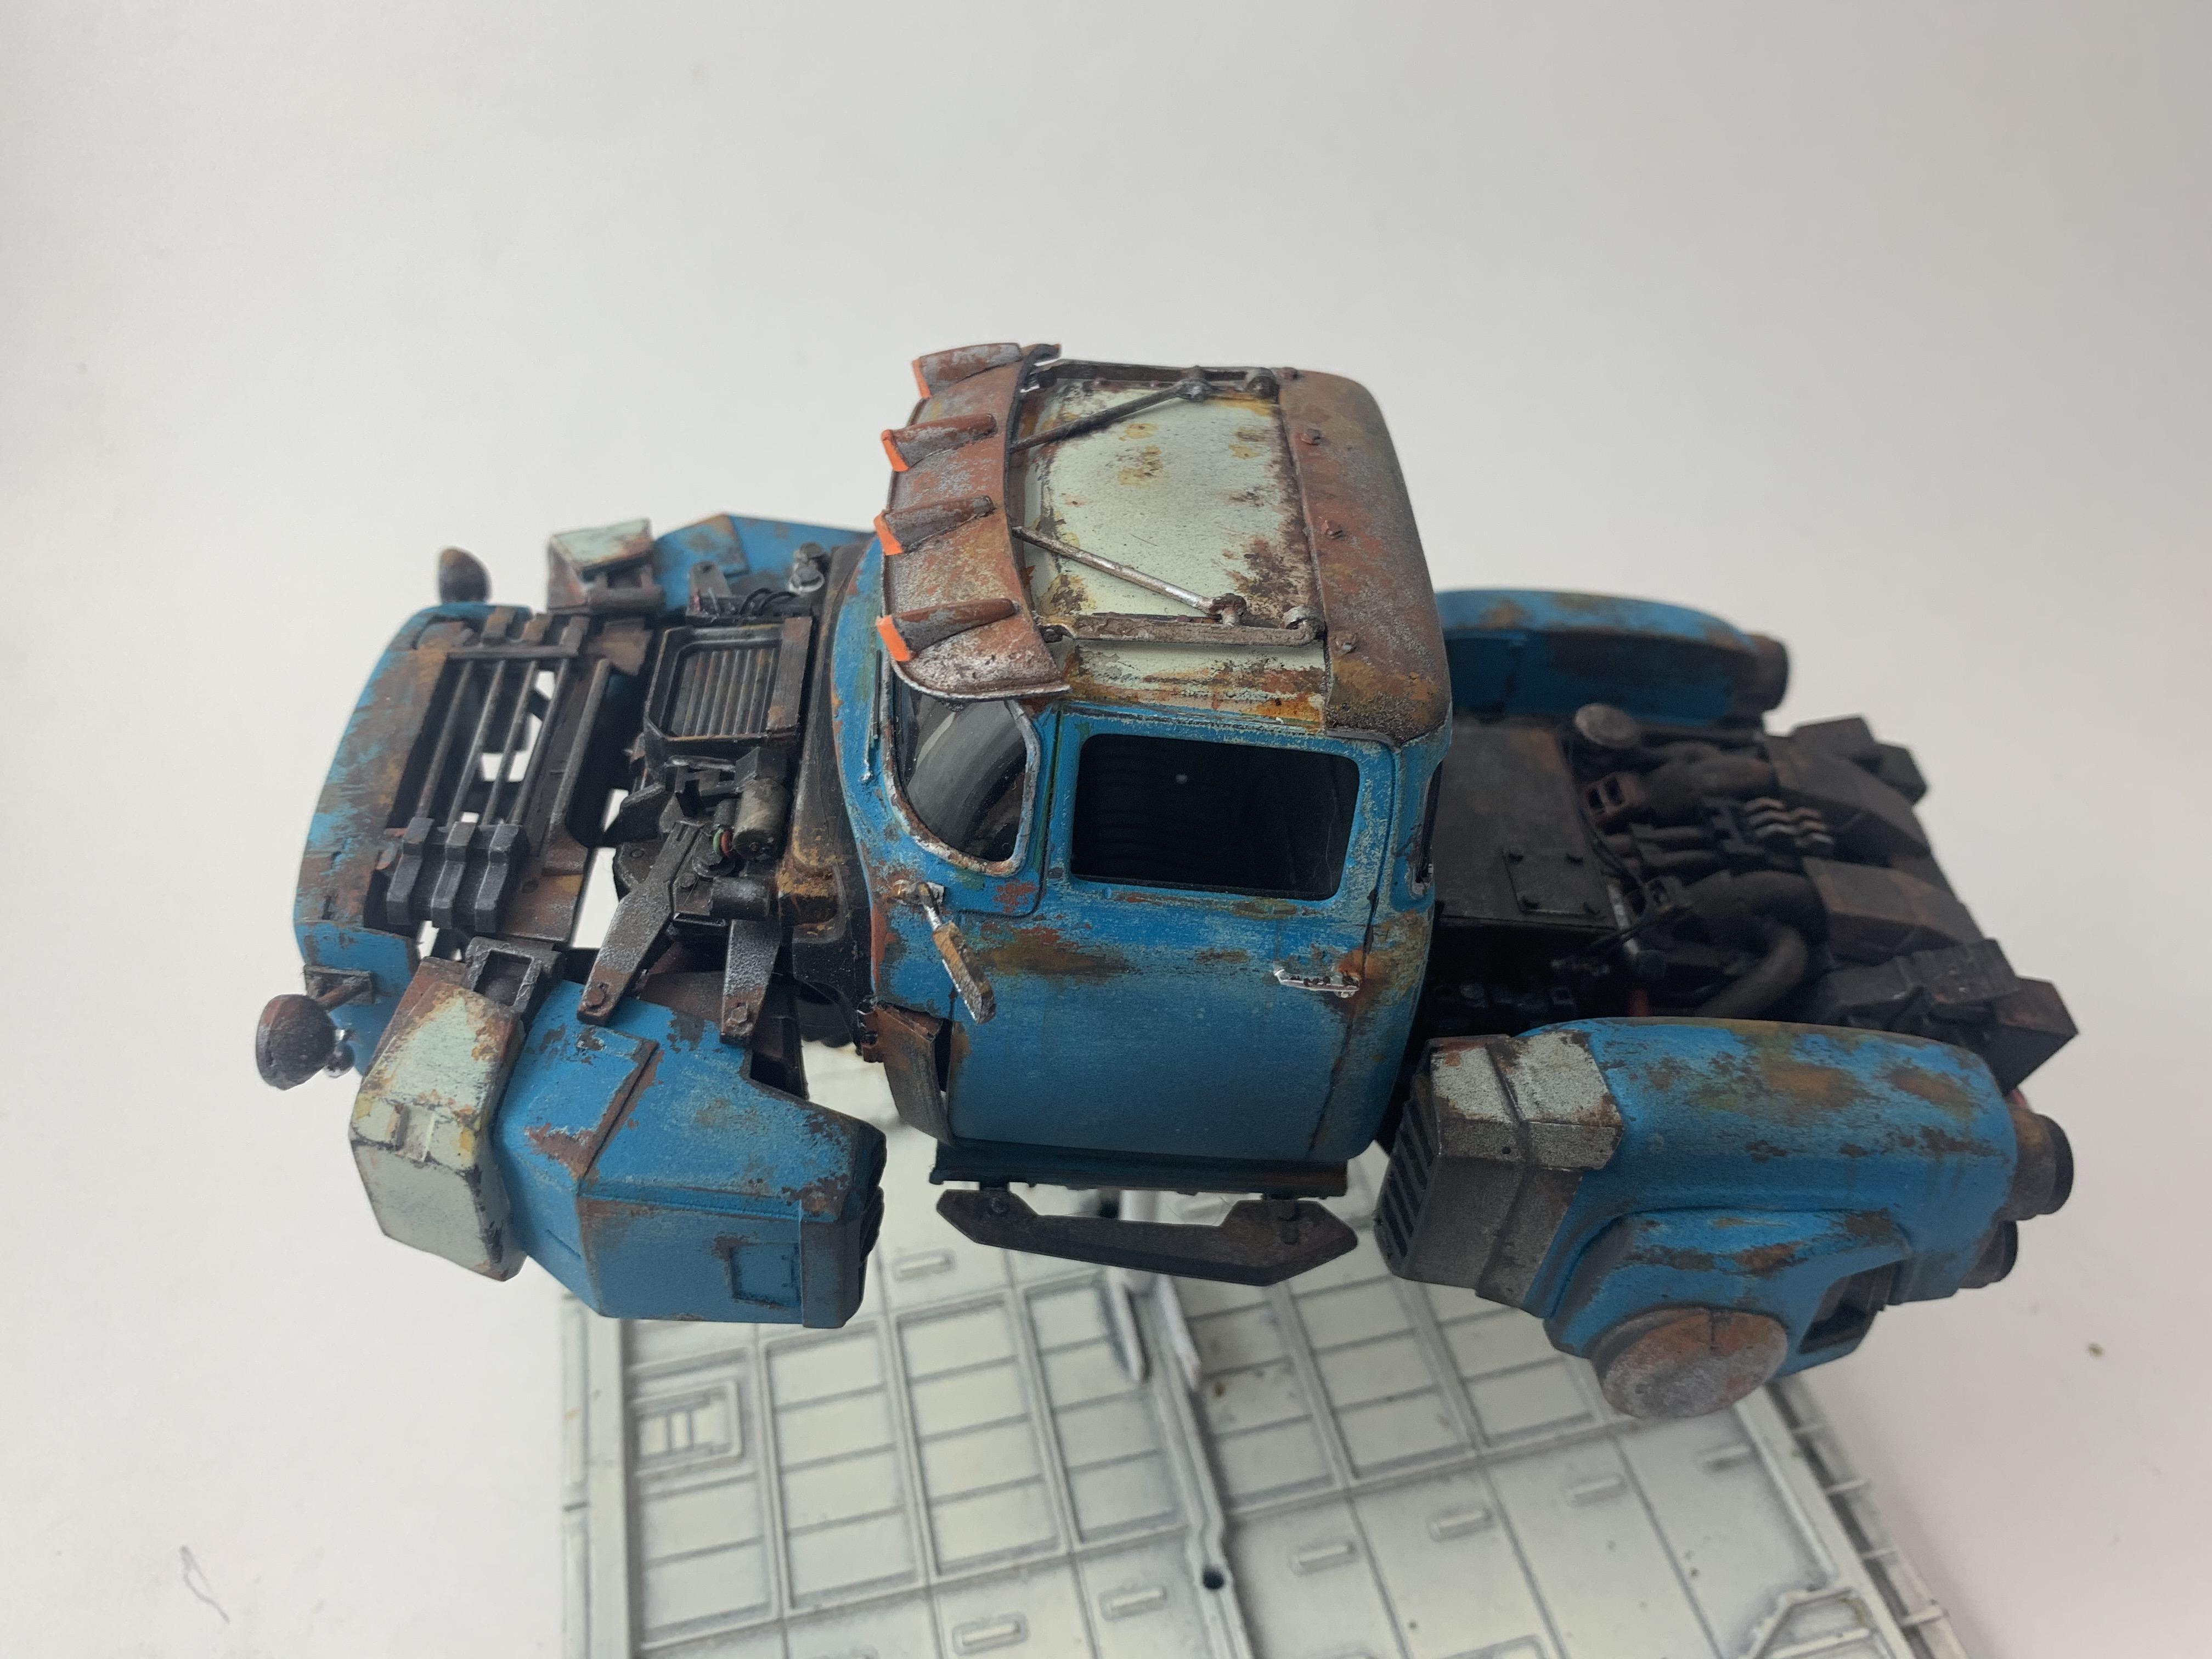
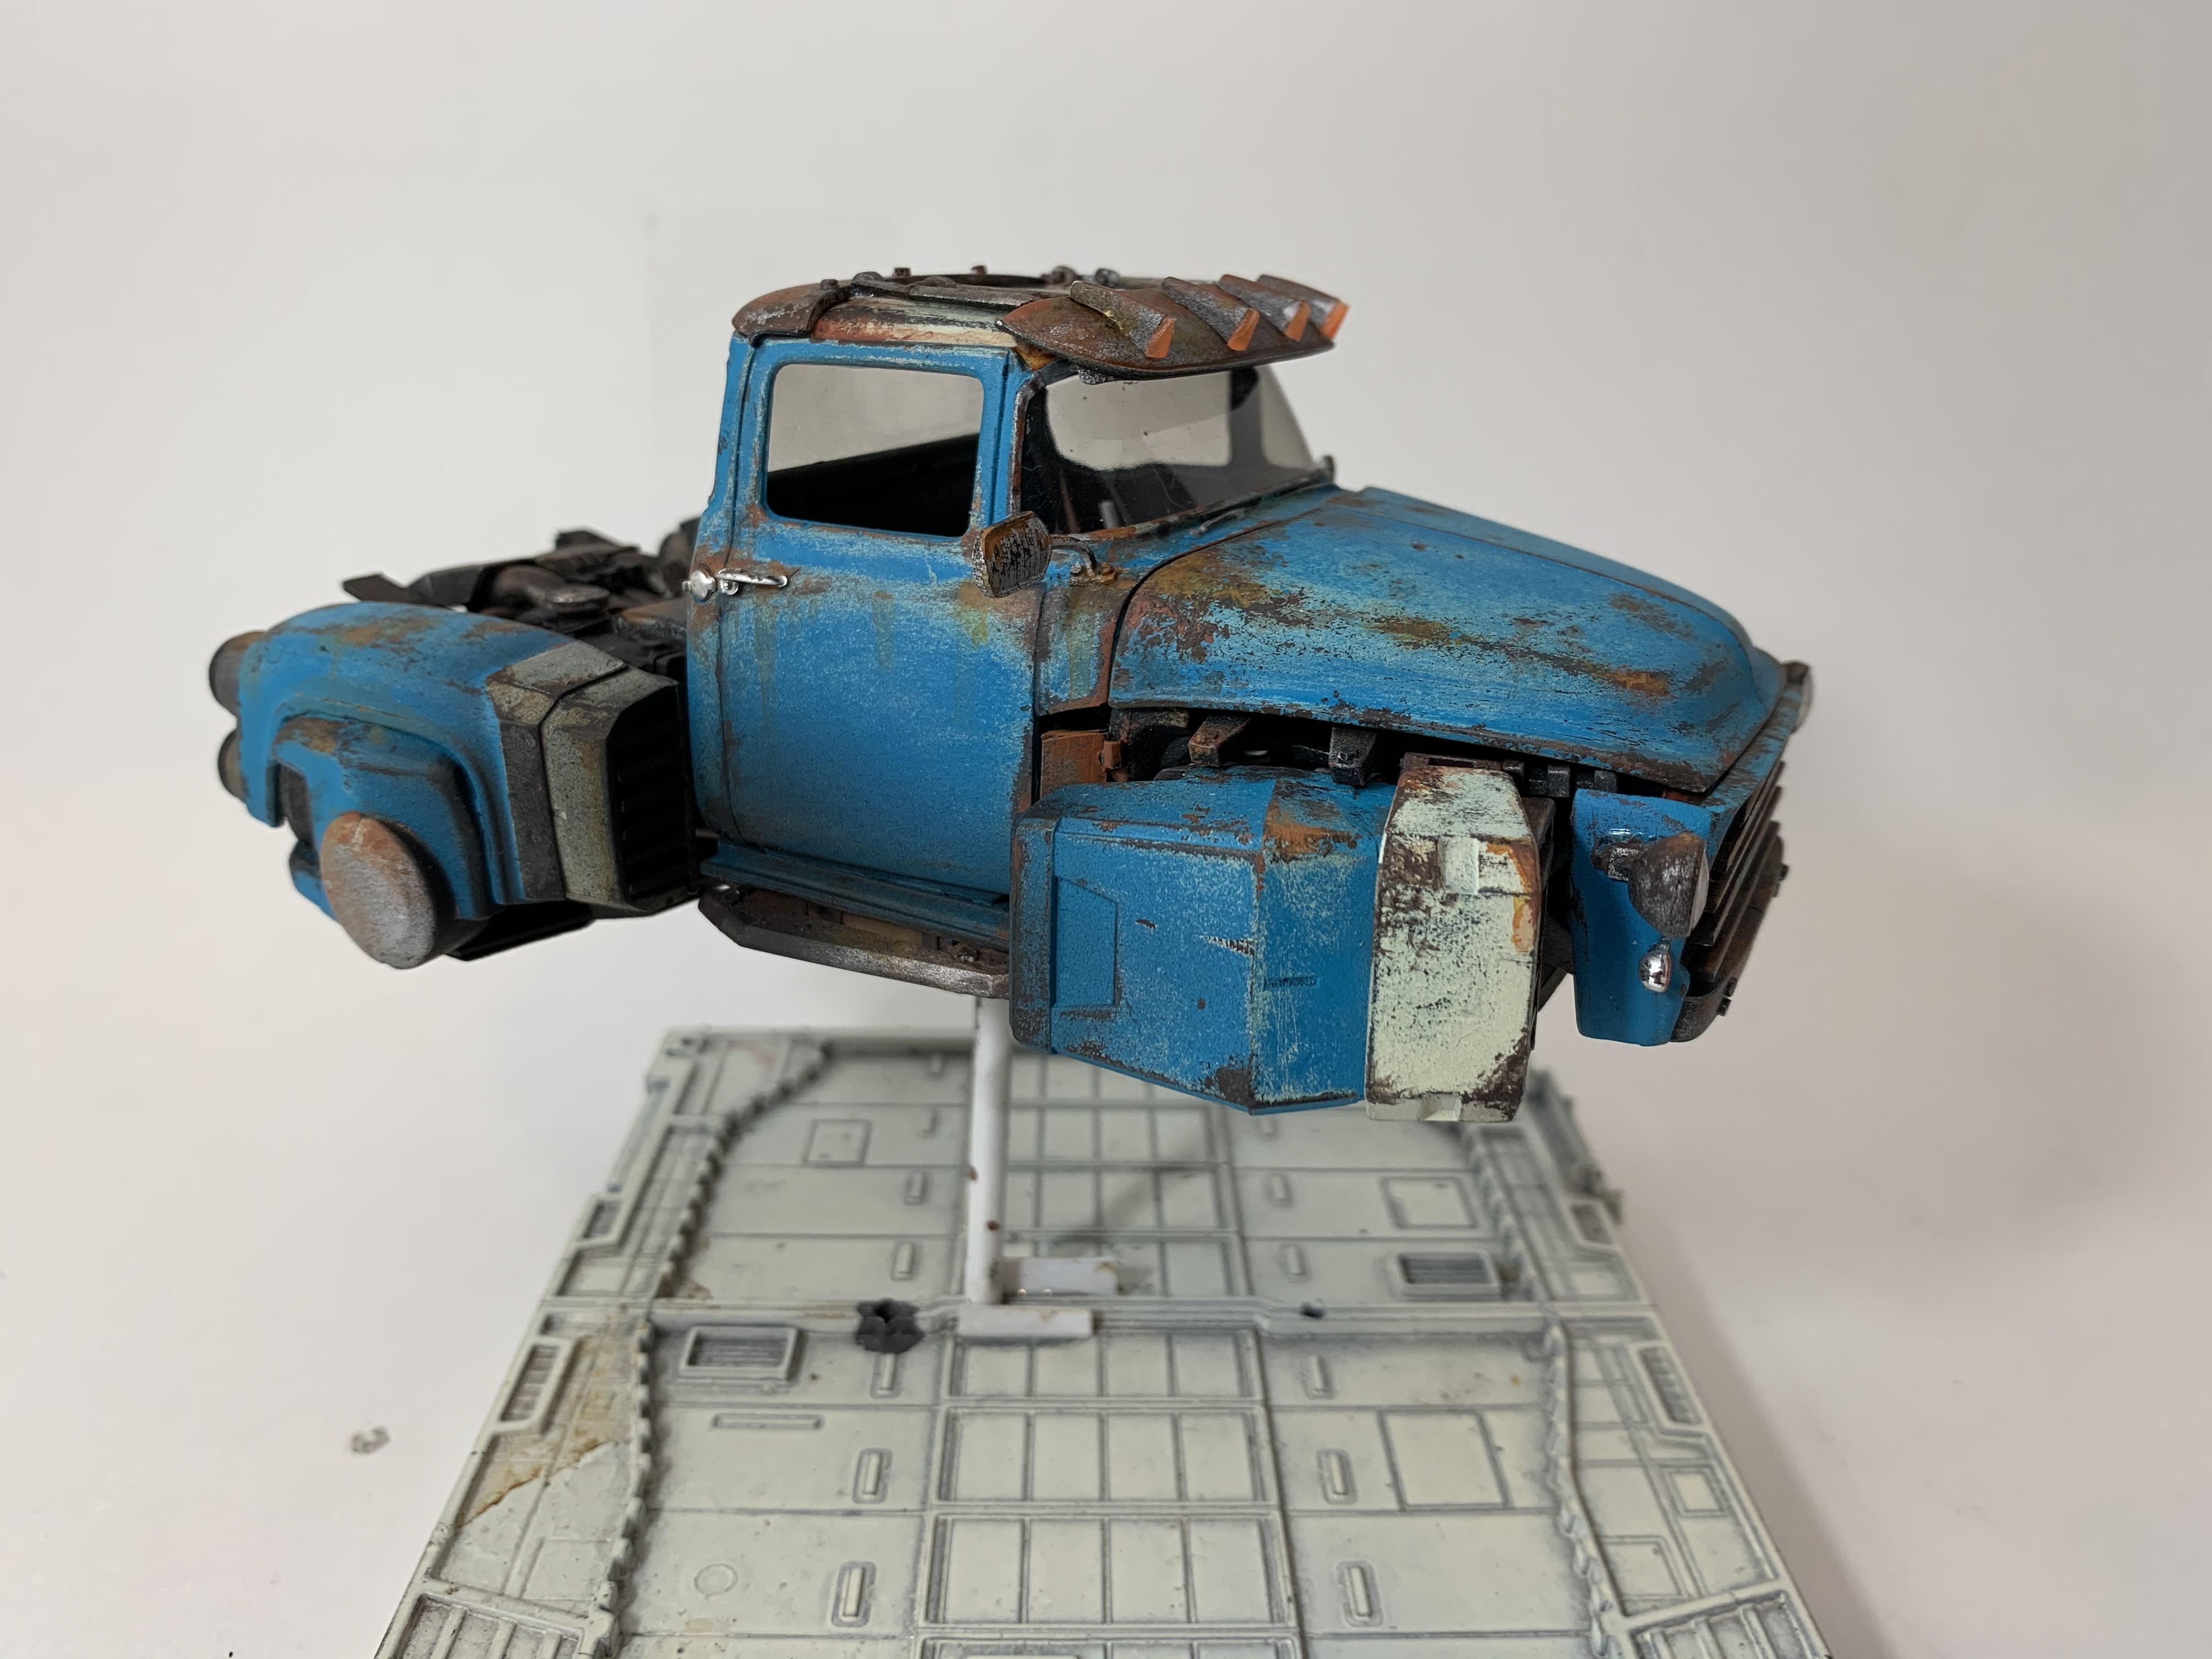
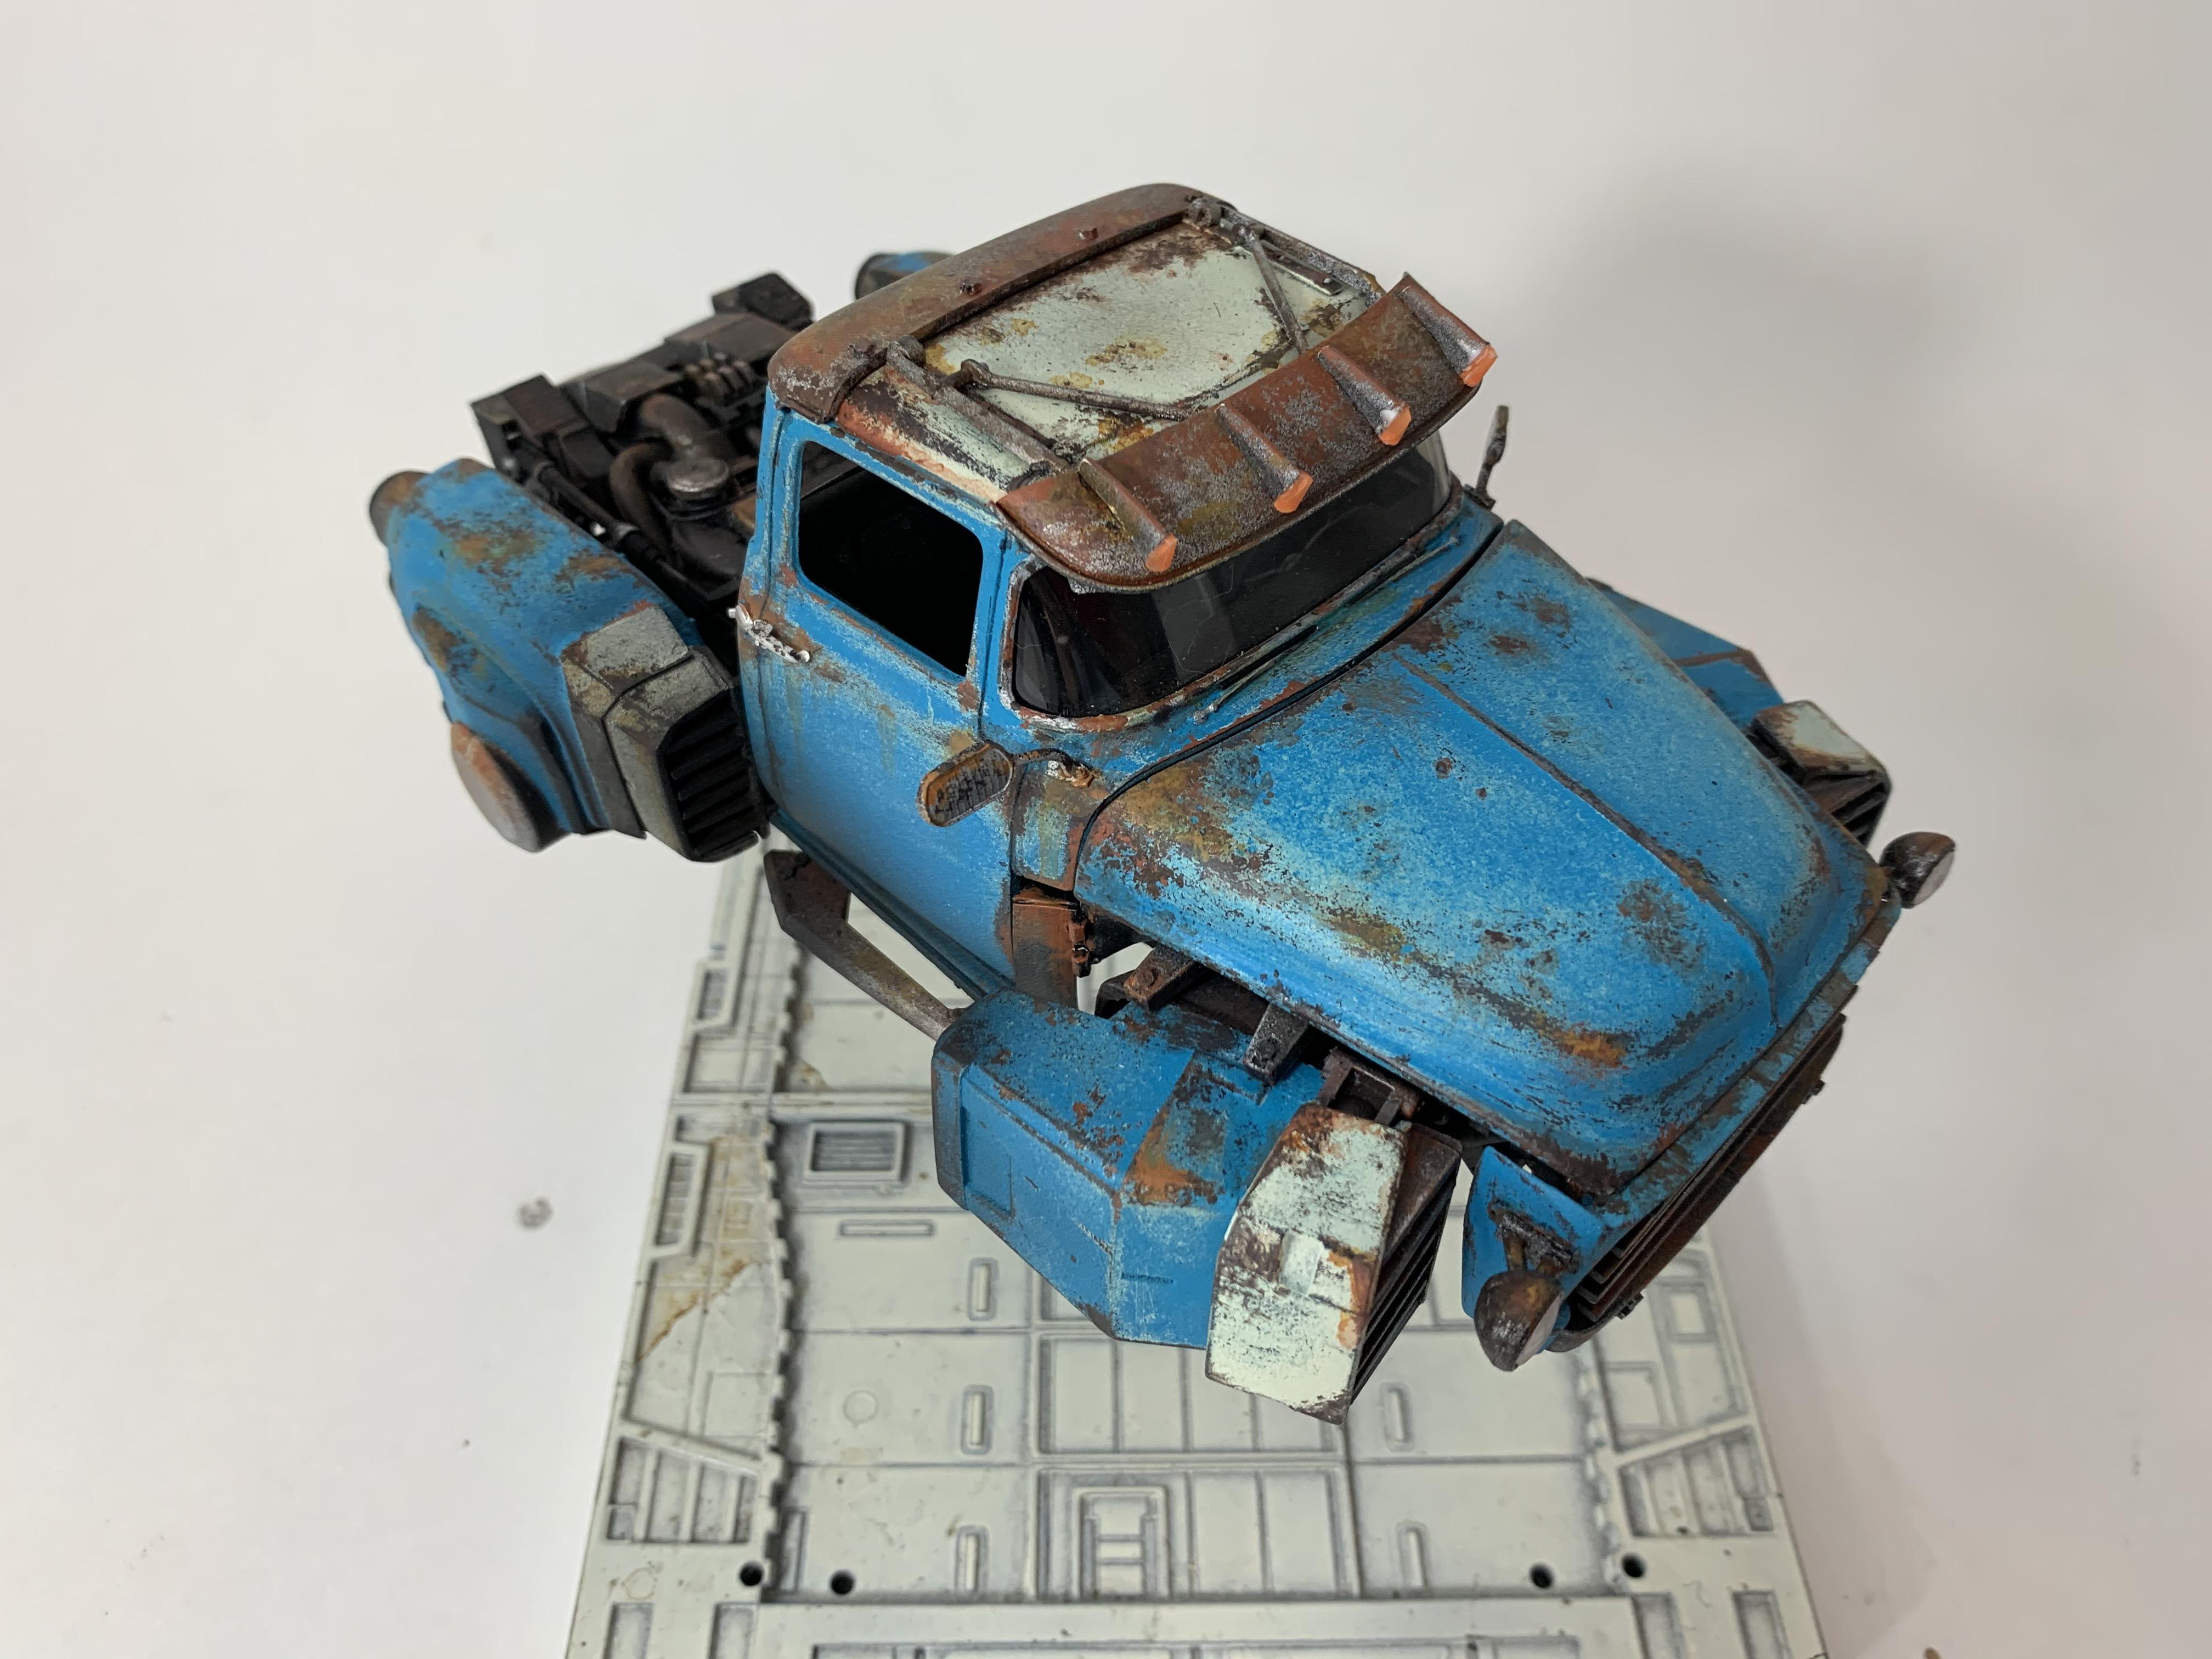
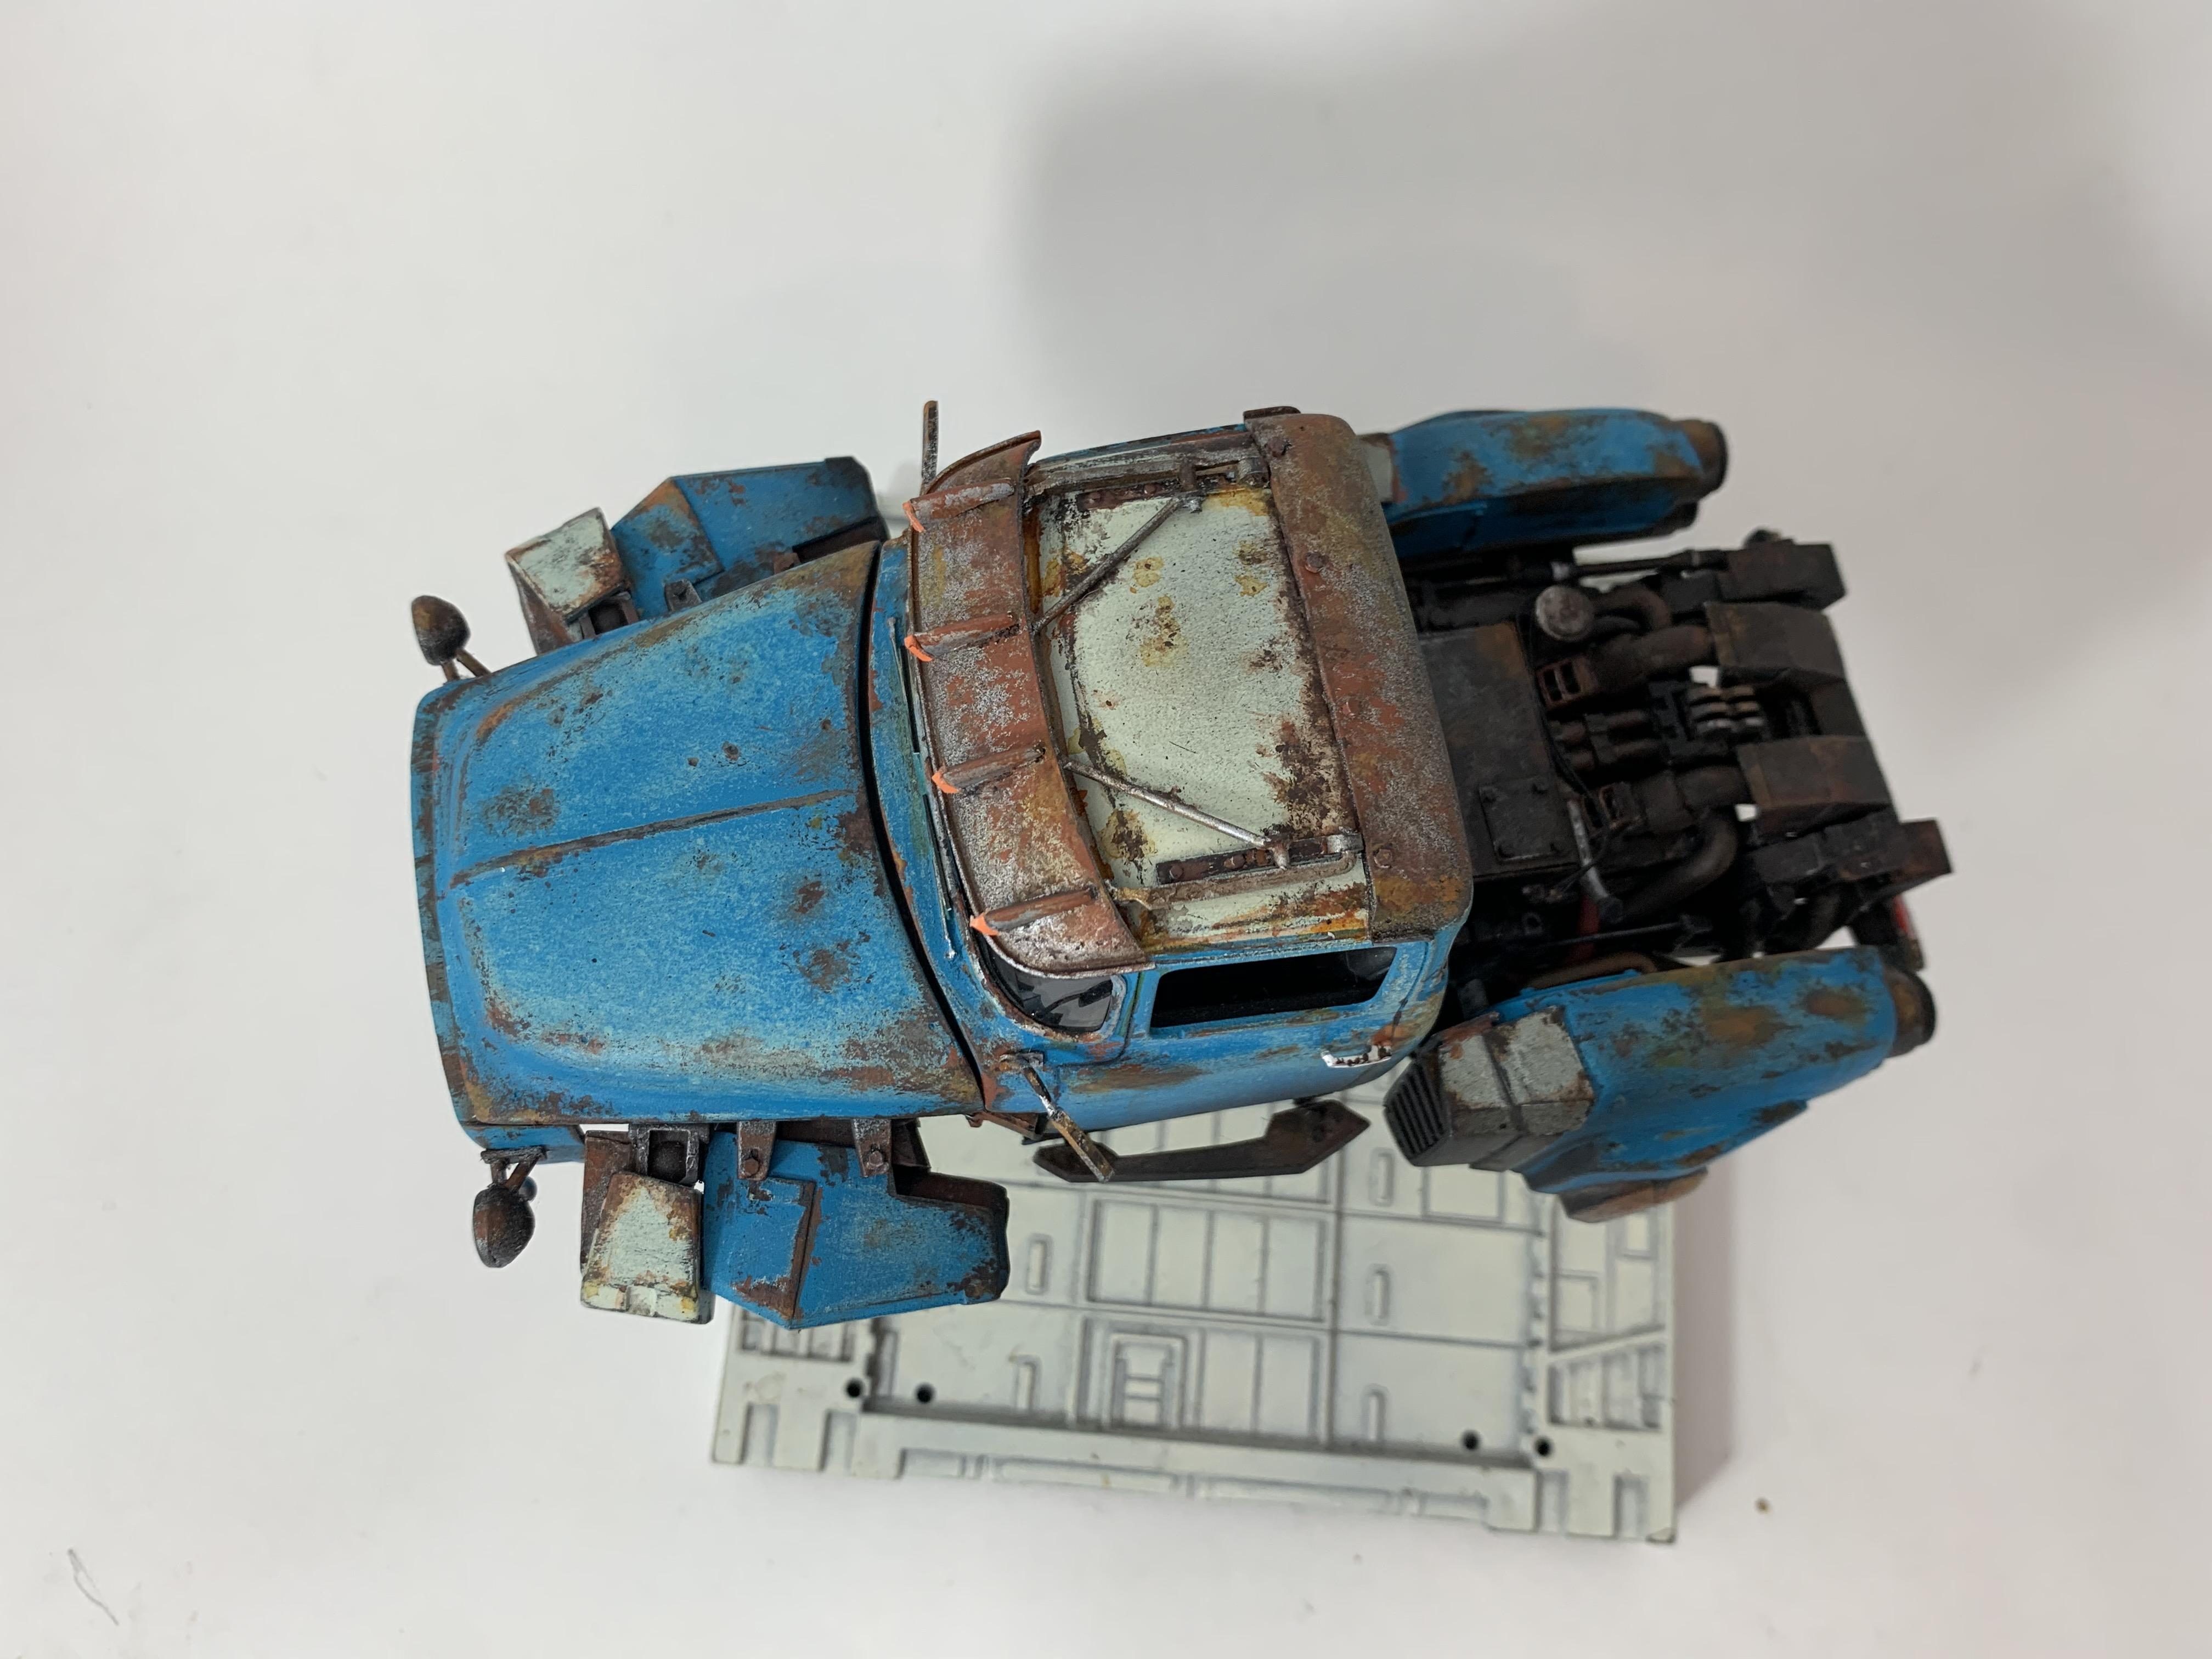
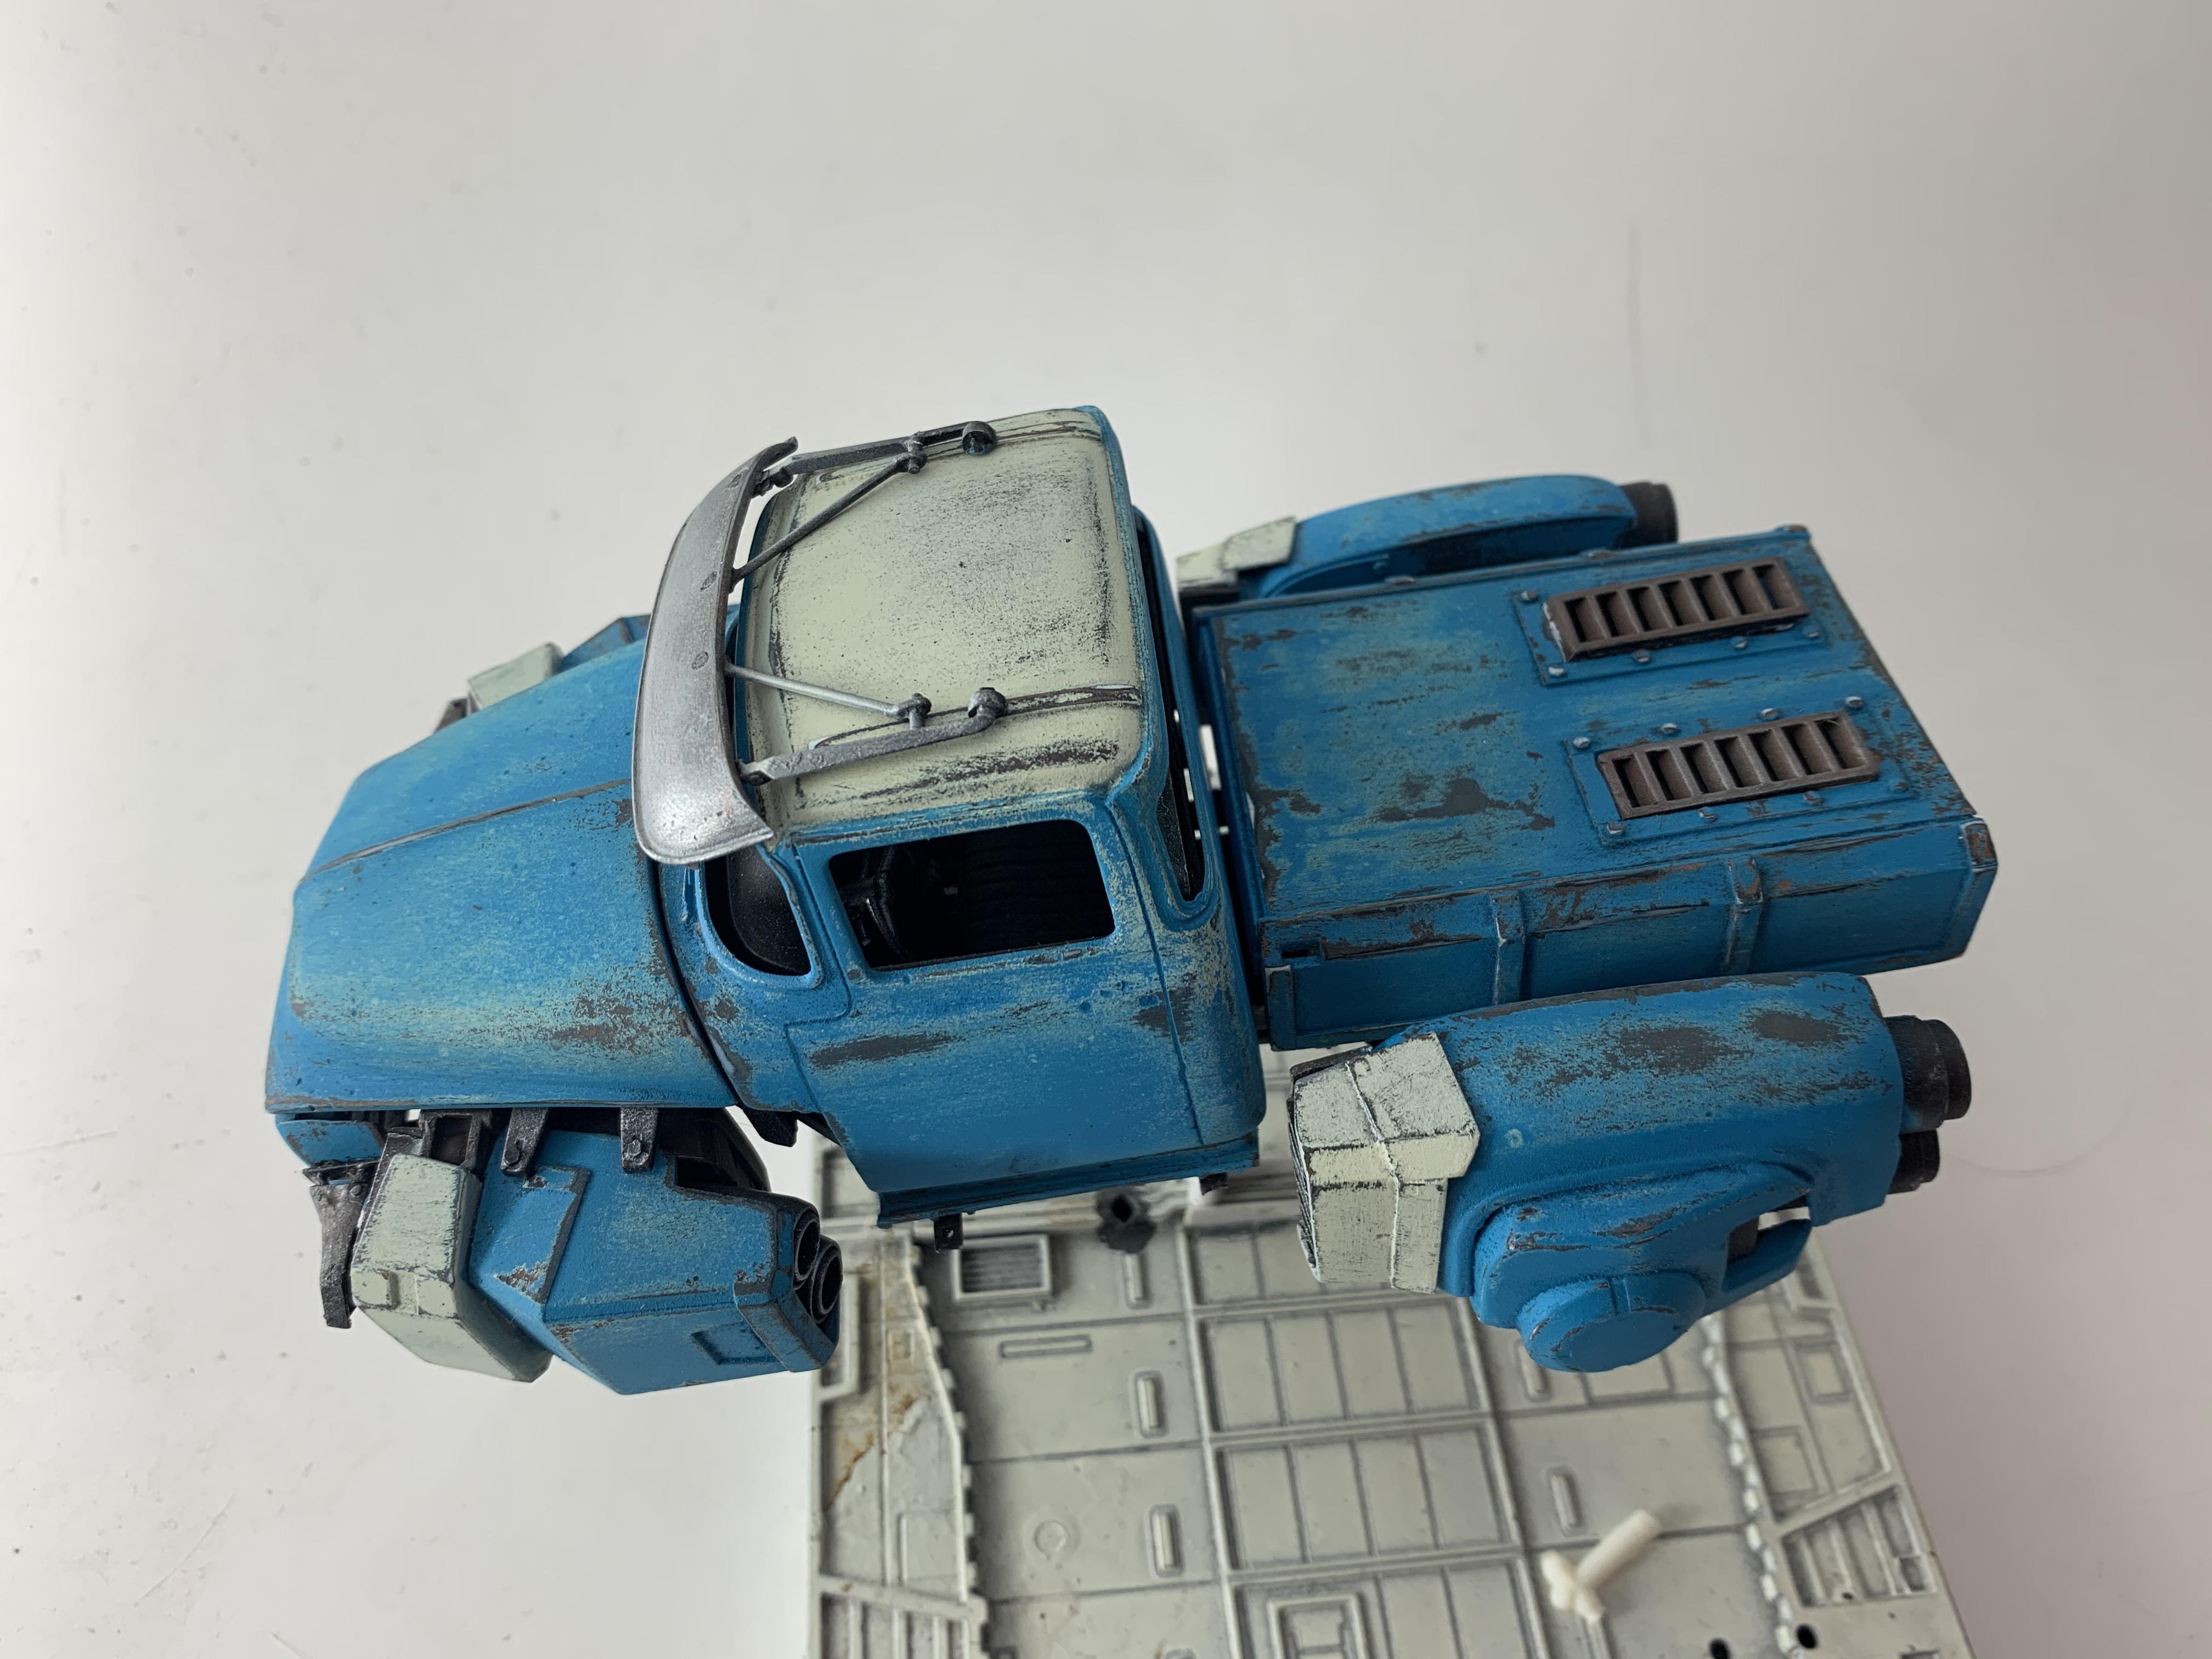
Thank you guys!!! Glad you all like it. That's a dream job right there! The next Mad Max? Here's some more pictures. A few close ups as well. I use the hexagon Styrene rod to make the bolt heads. I feel it adds weight to the parts. I don't remember where I got the monitor display from. It's been in my spare parts bin forever. It fits the truck, big and bulky. The two A-arms that are mounted to the top of the front turbines is my favorite part. I also really like the way the visor turned out. Can anyone guess what vehicle are the side mirrors from? Hint: They're not side mirrors on the vehicle I took them from. Here's the undercarriage before it was finished and painted. Unfortunately I don't have a pic of it weathered with all the plumbing hooked up..
-
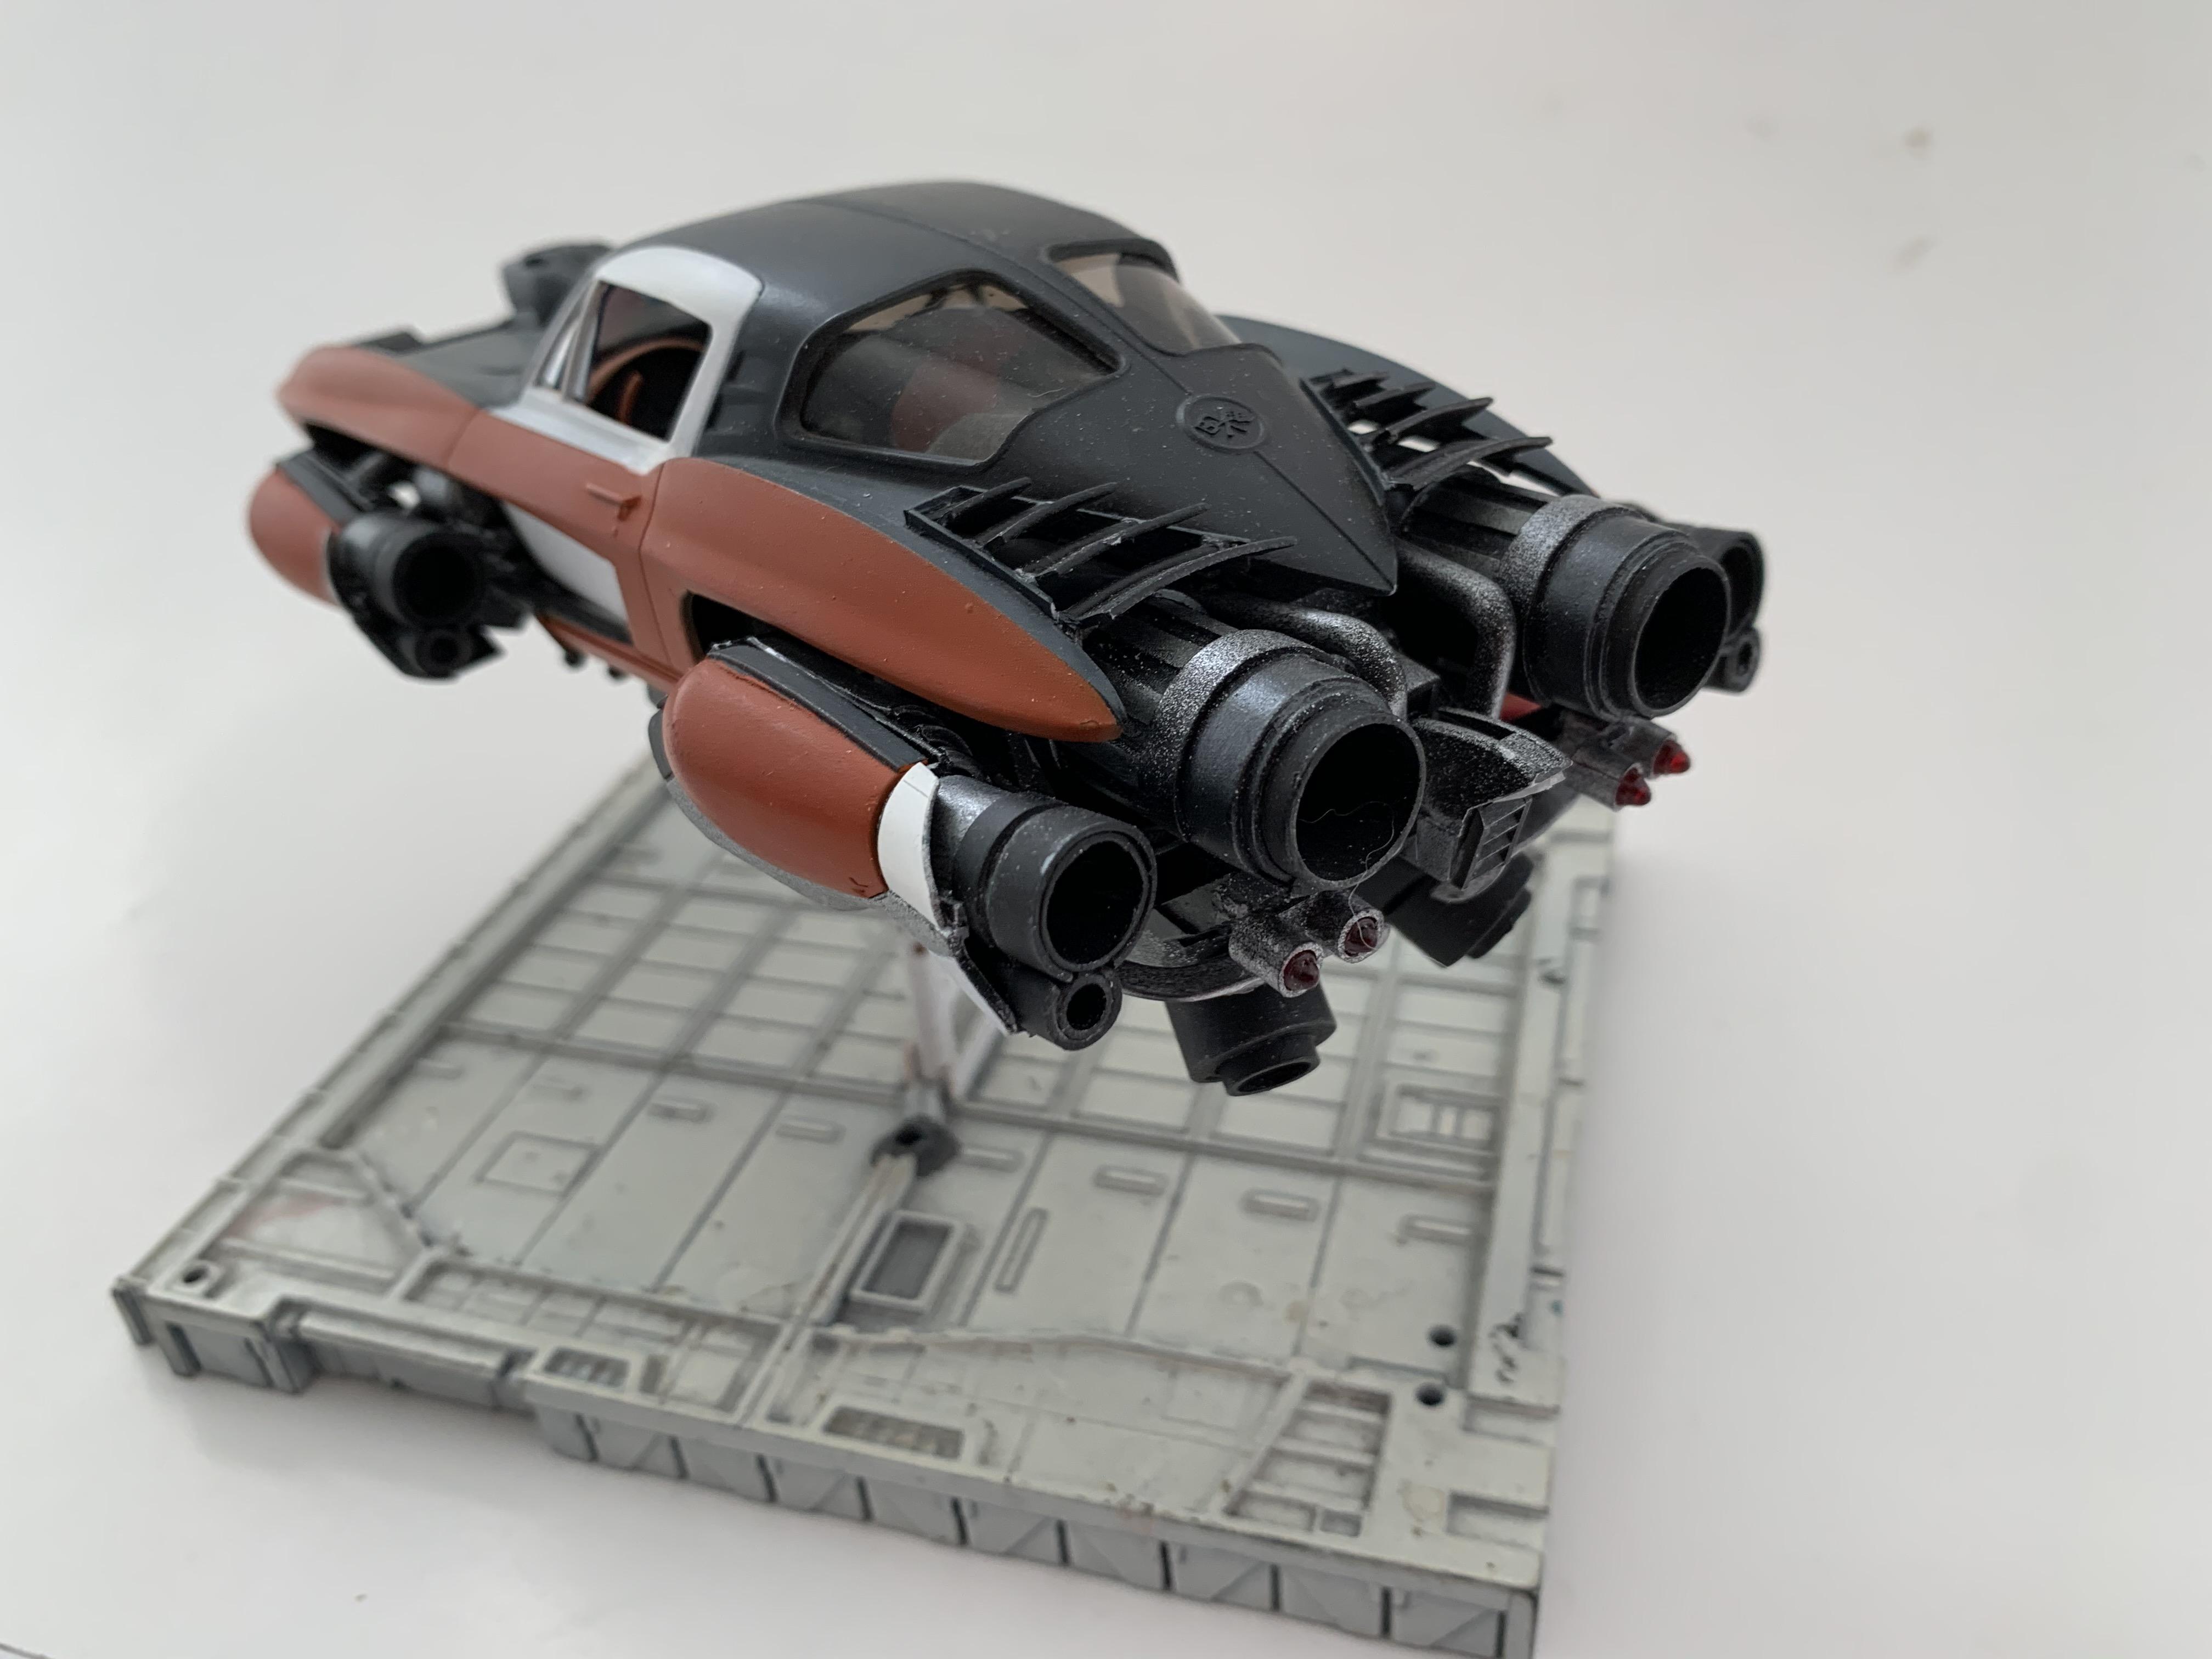
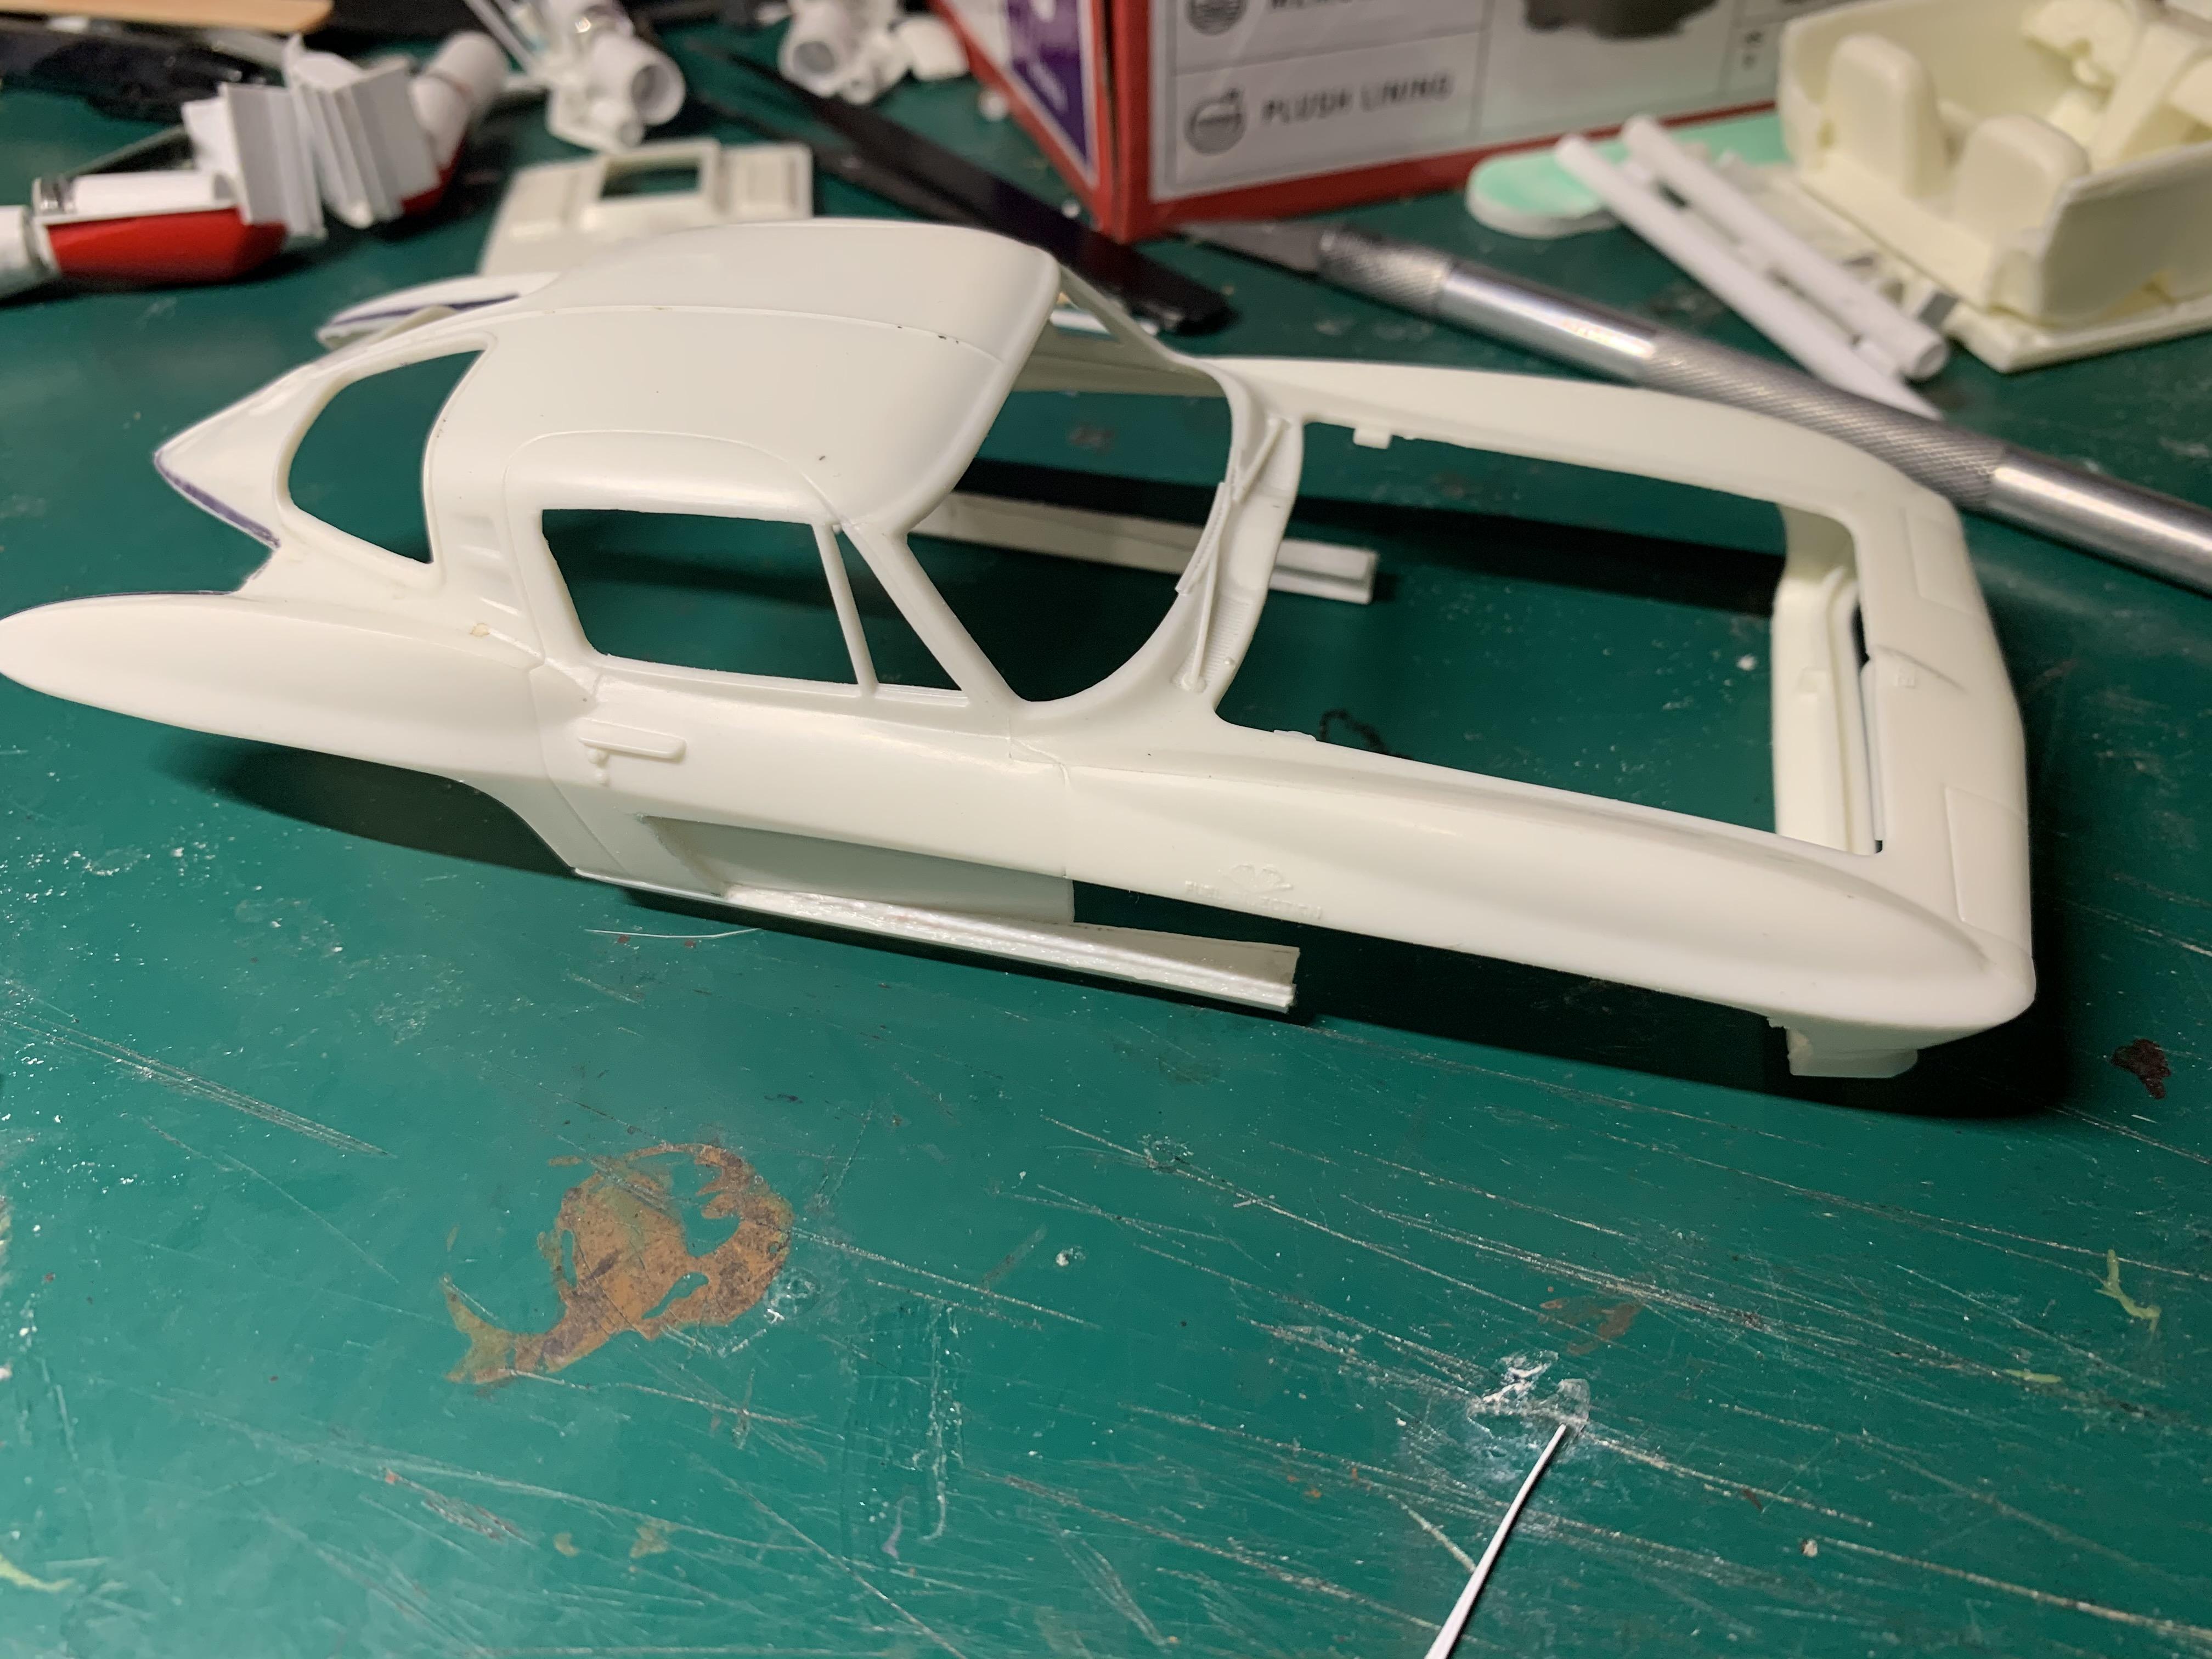
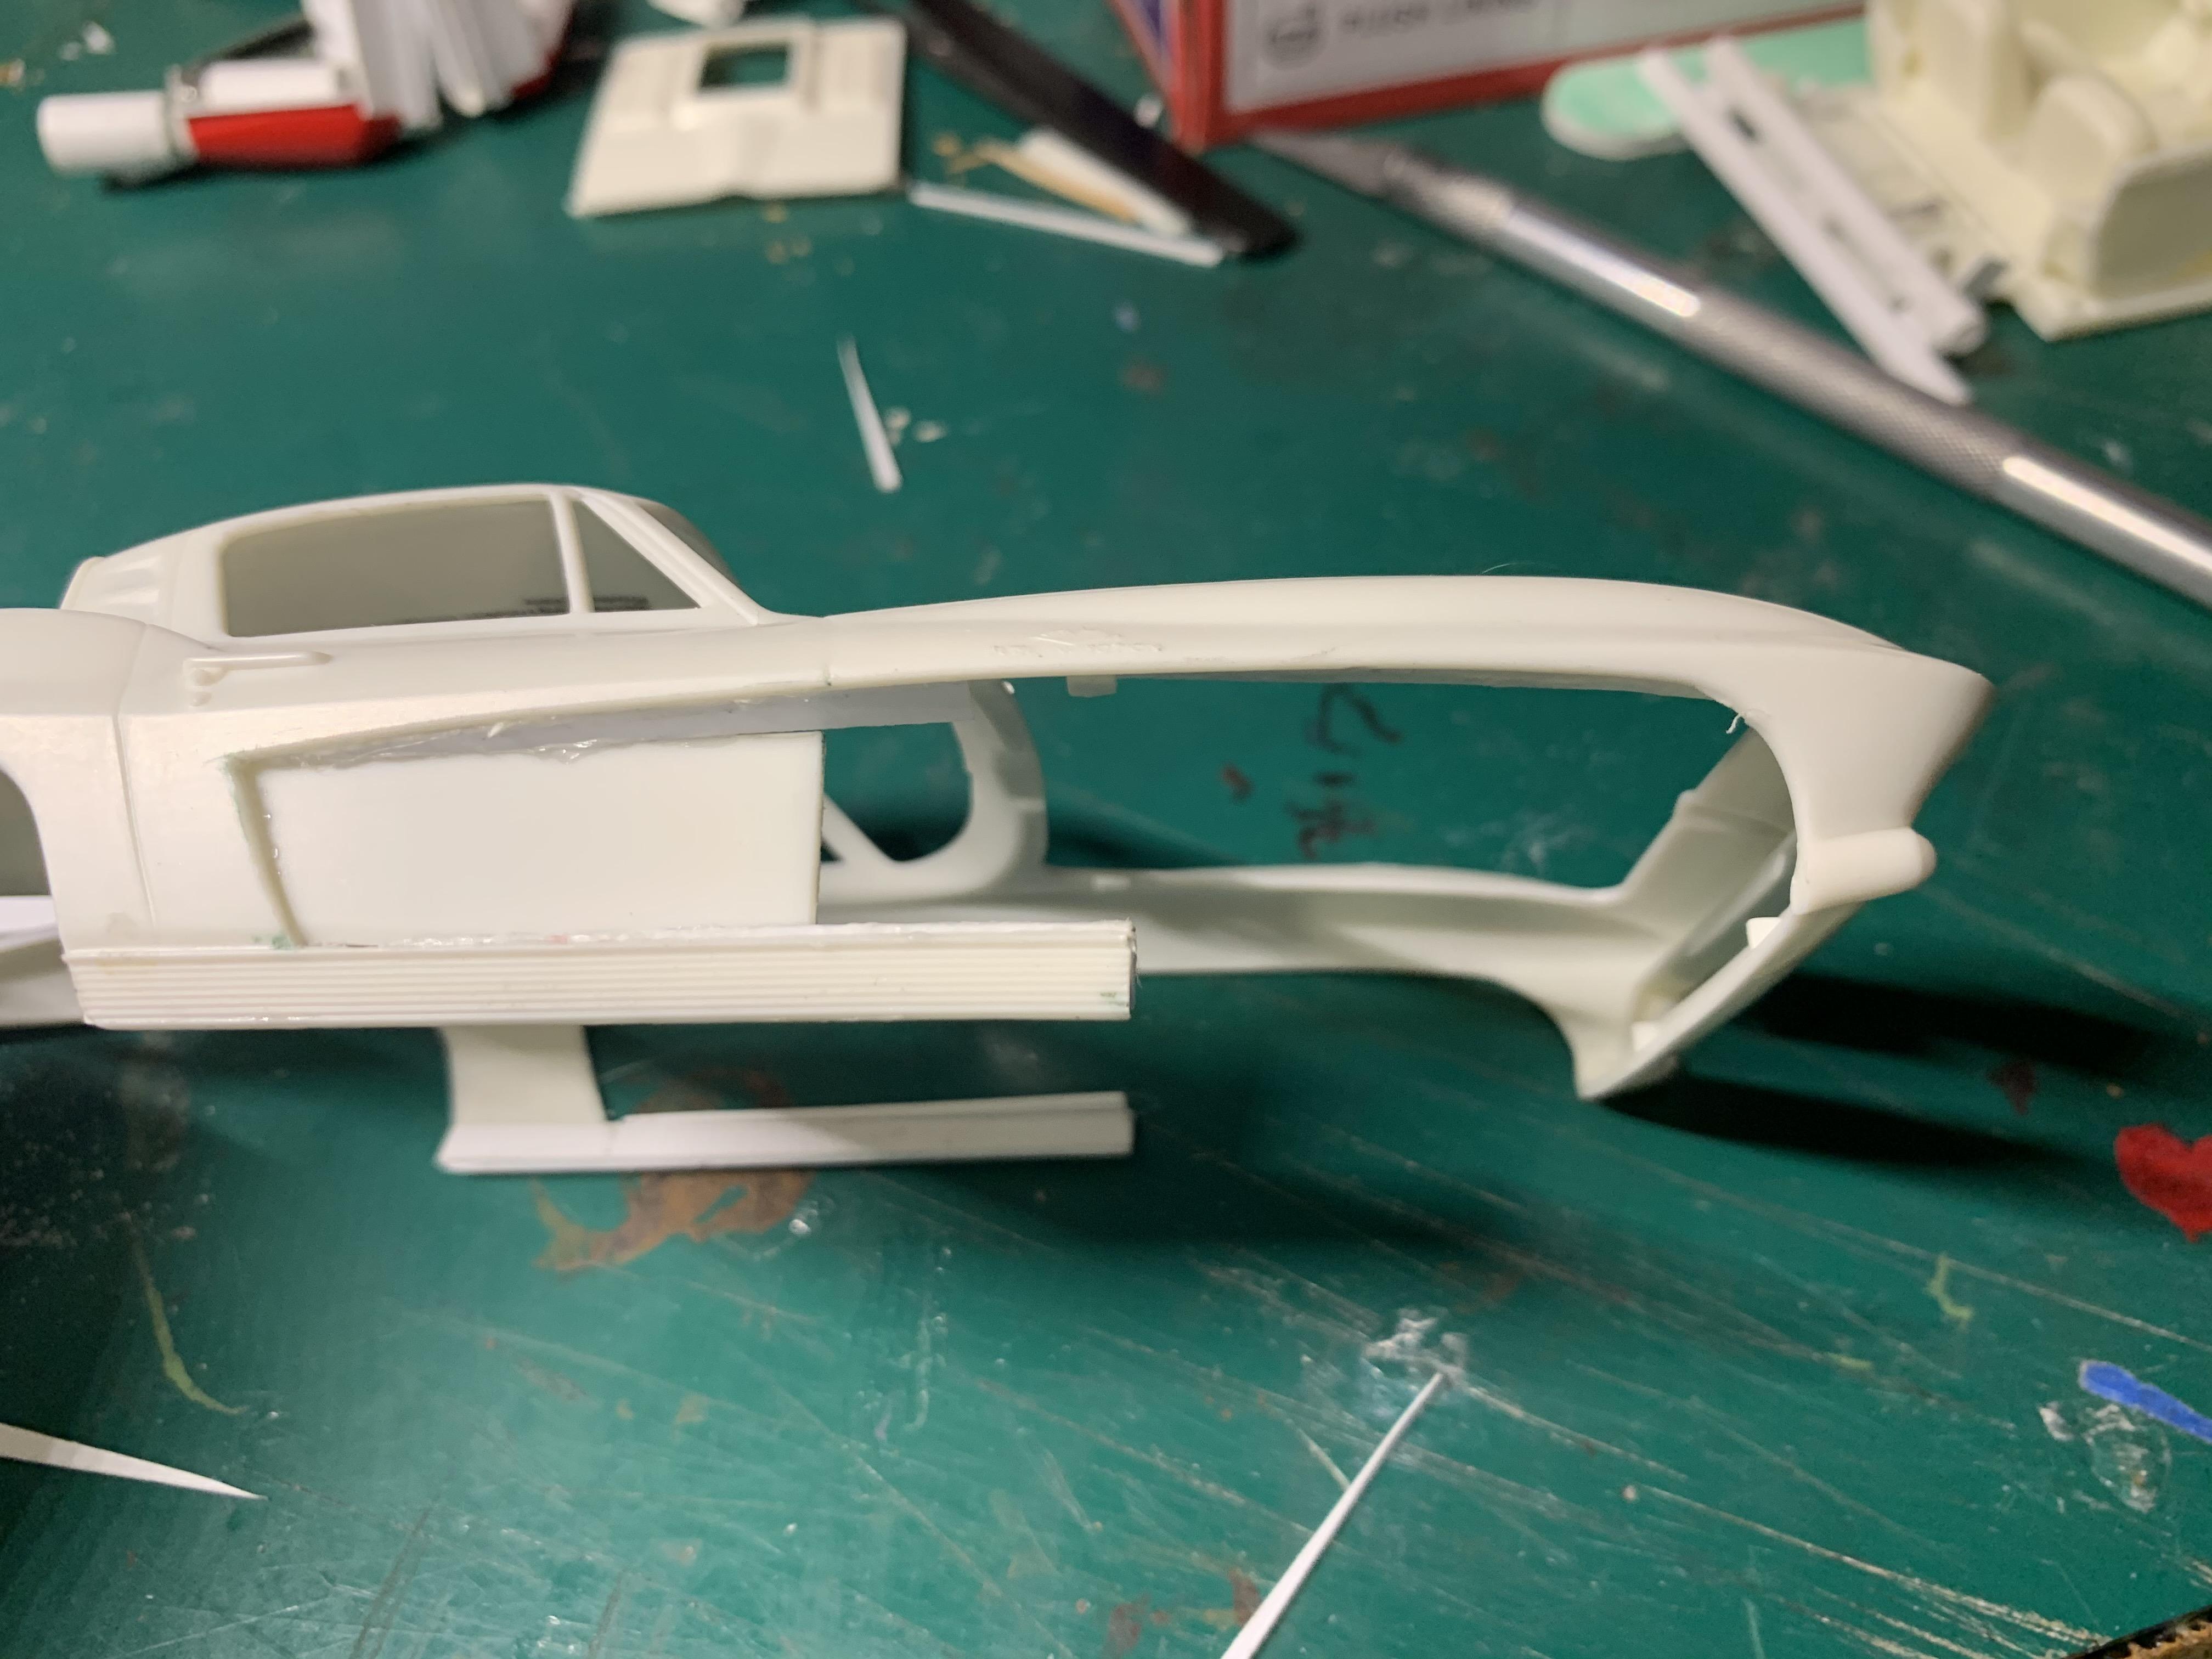
Here is the build of my 63 Jetvette. I hesitated on this one for the longest time. I'm a big fan of weathered and rusted vehicles. Being that the Corvette body is Fiberglass, I had a tough time figuring out what the final product was going to look like. I just started building it. It's often the way these jet cars work out for me. I almost always start by crafting the turbines. These are made from 3/8" and 1/2" Styrene tube. I also cut away the body for some vents that I plan to add. I also cut out of each front fender from the top of the wheel arch to the door. I marked where the door relief will be on the photo above. I used the piece that was removed, along with some Styrene to create the door reliefs. Don't want that Fiberglass to melt! The front turbine exhaust will fit on the channel of the door. I wish that I had taken better photos of the parts that make up the four "wheel" turbines. They come from the leg/calf section of one of the Gundam kits that I've scavenged. I had two of these legs, which split into 4 usable turbines. 2 right and 2 left. I doctored them up with some Styrene tubes for exhaust and a front intake grill. I'll get more pics up soon!
-
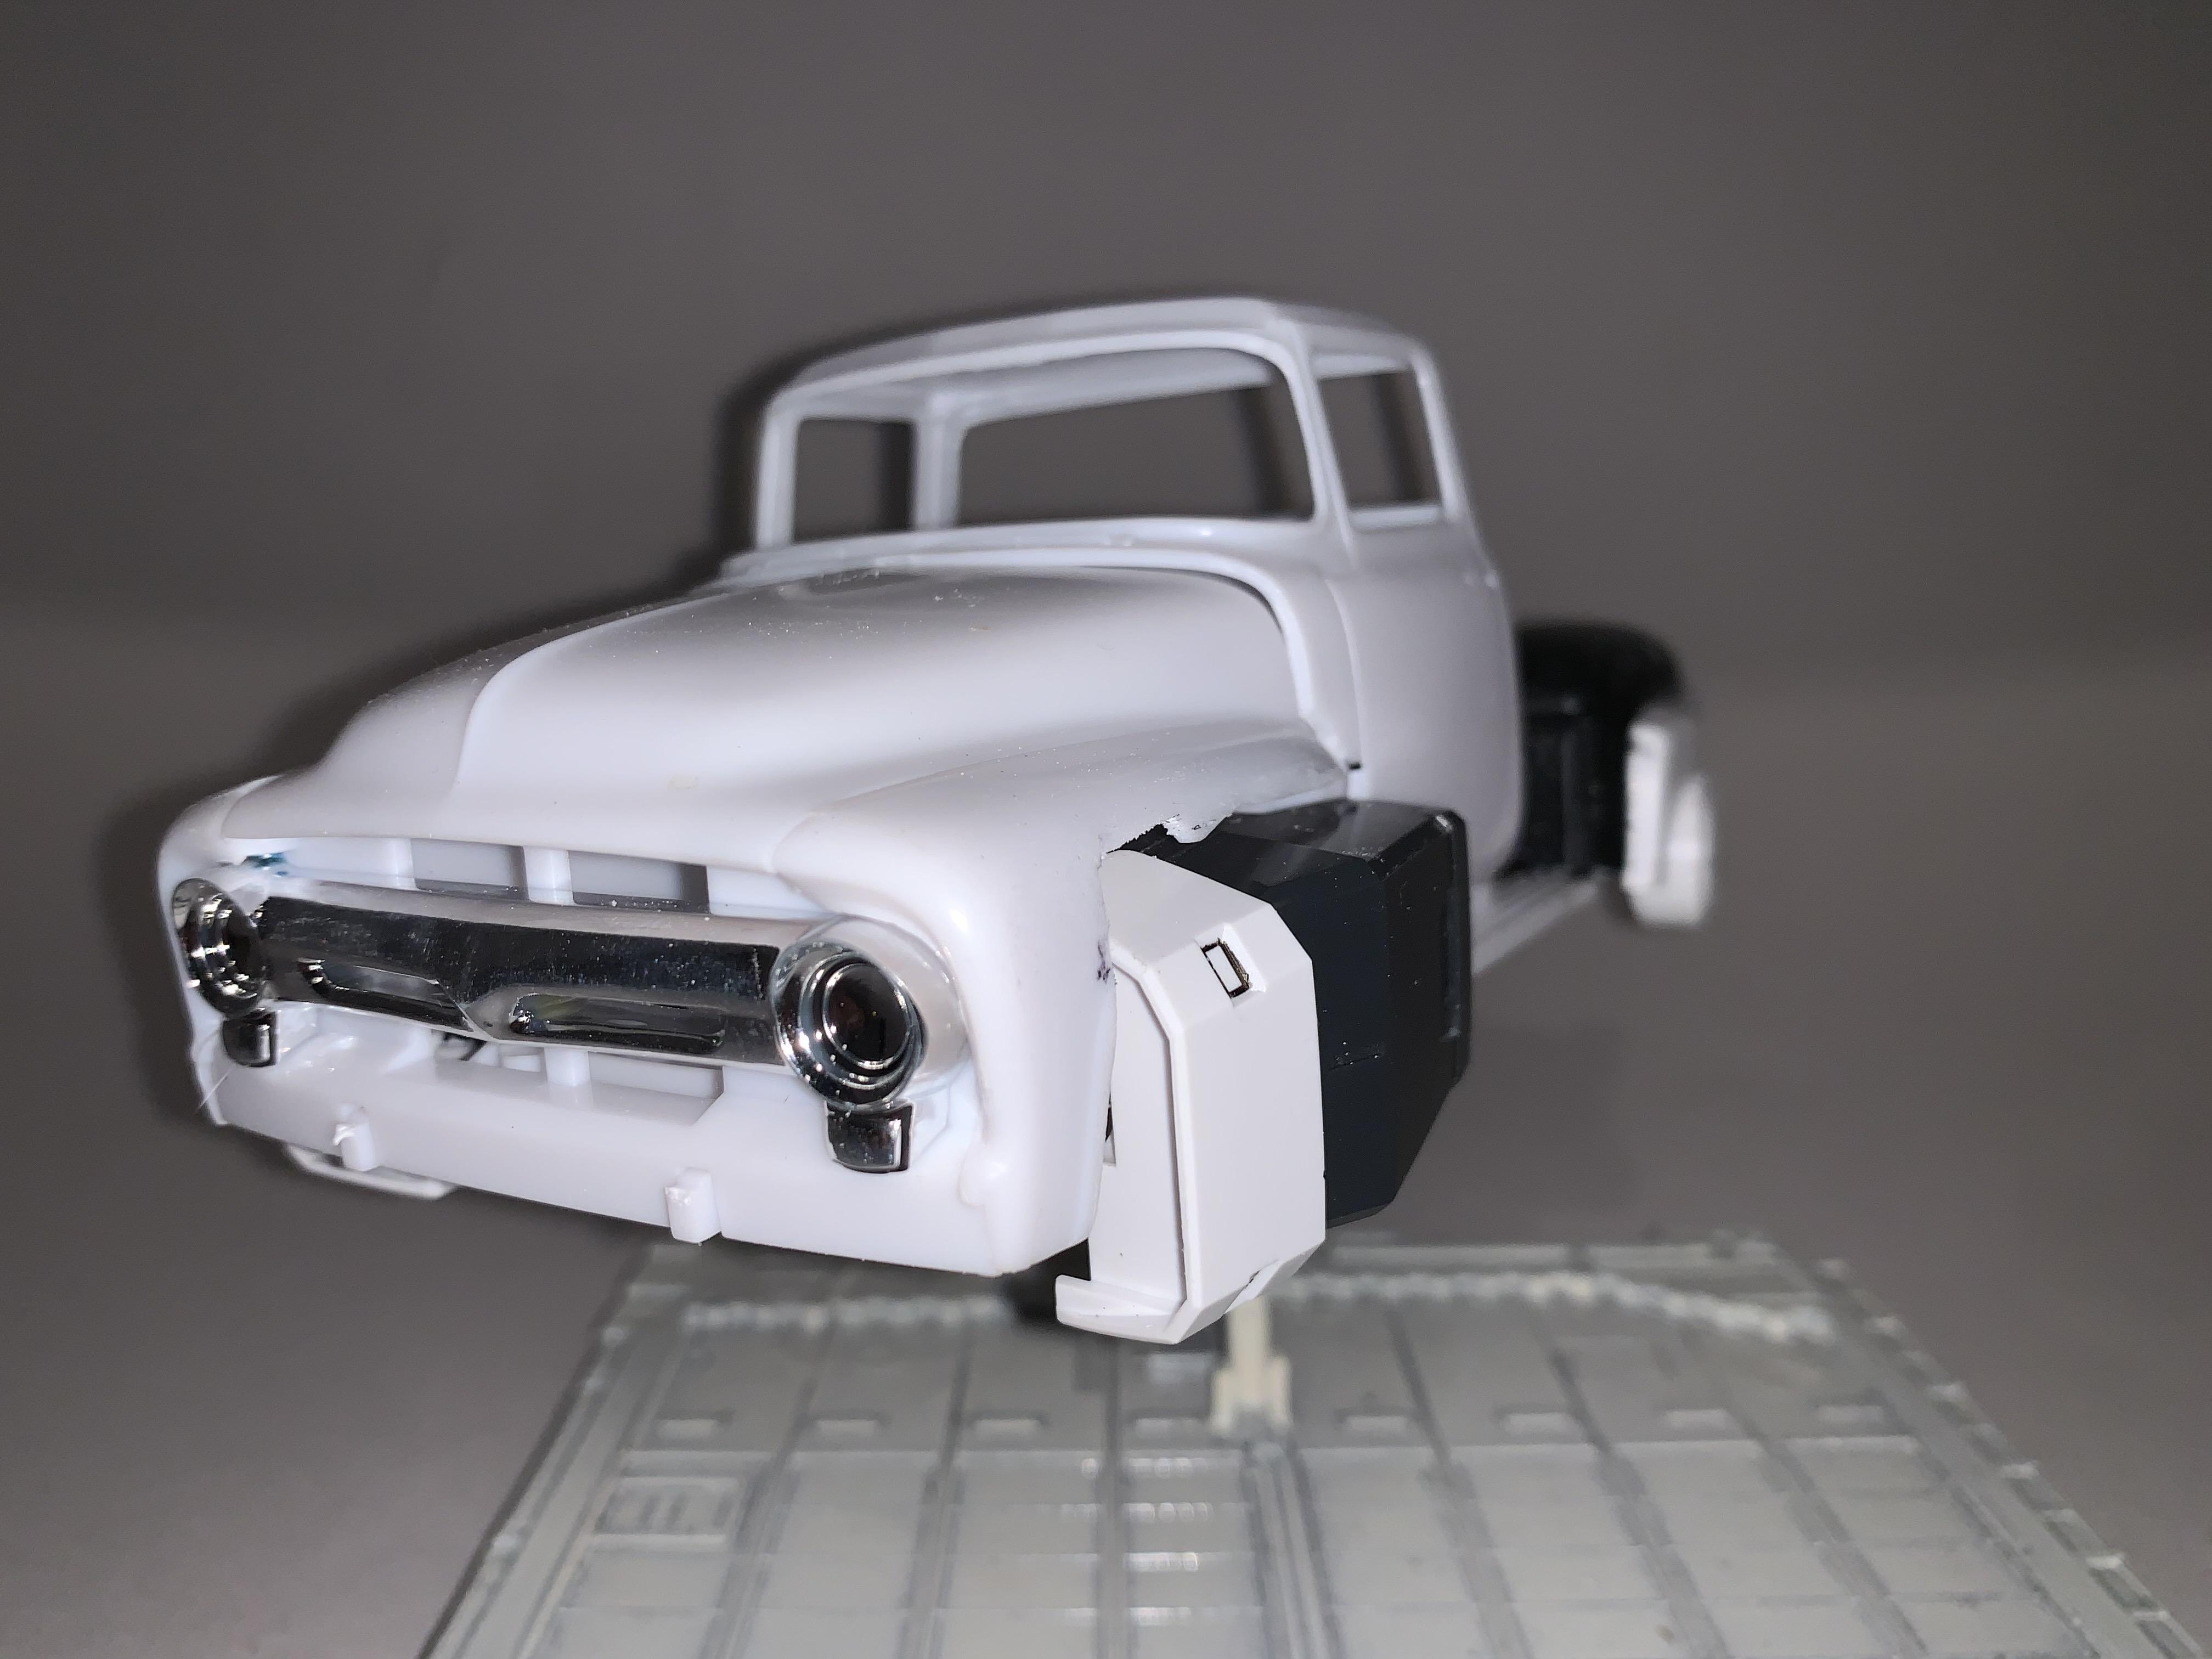
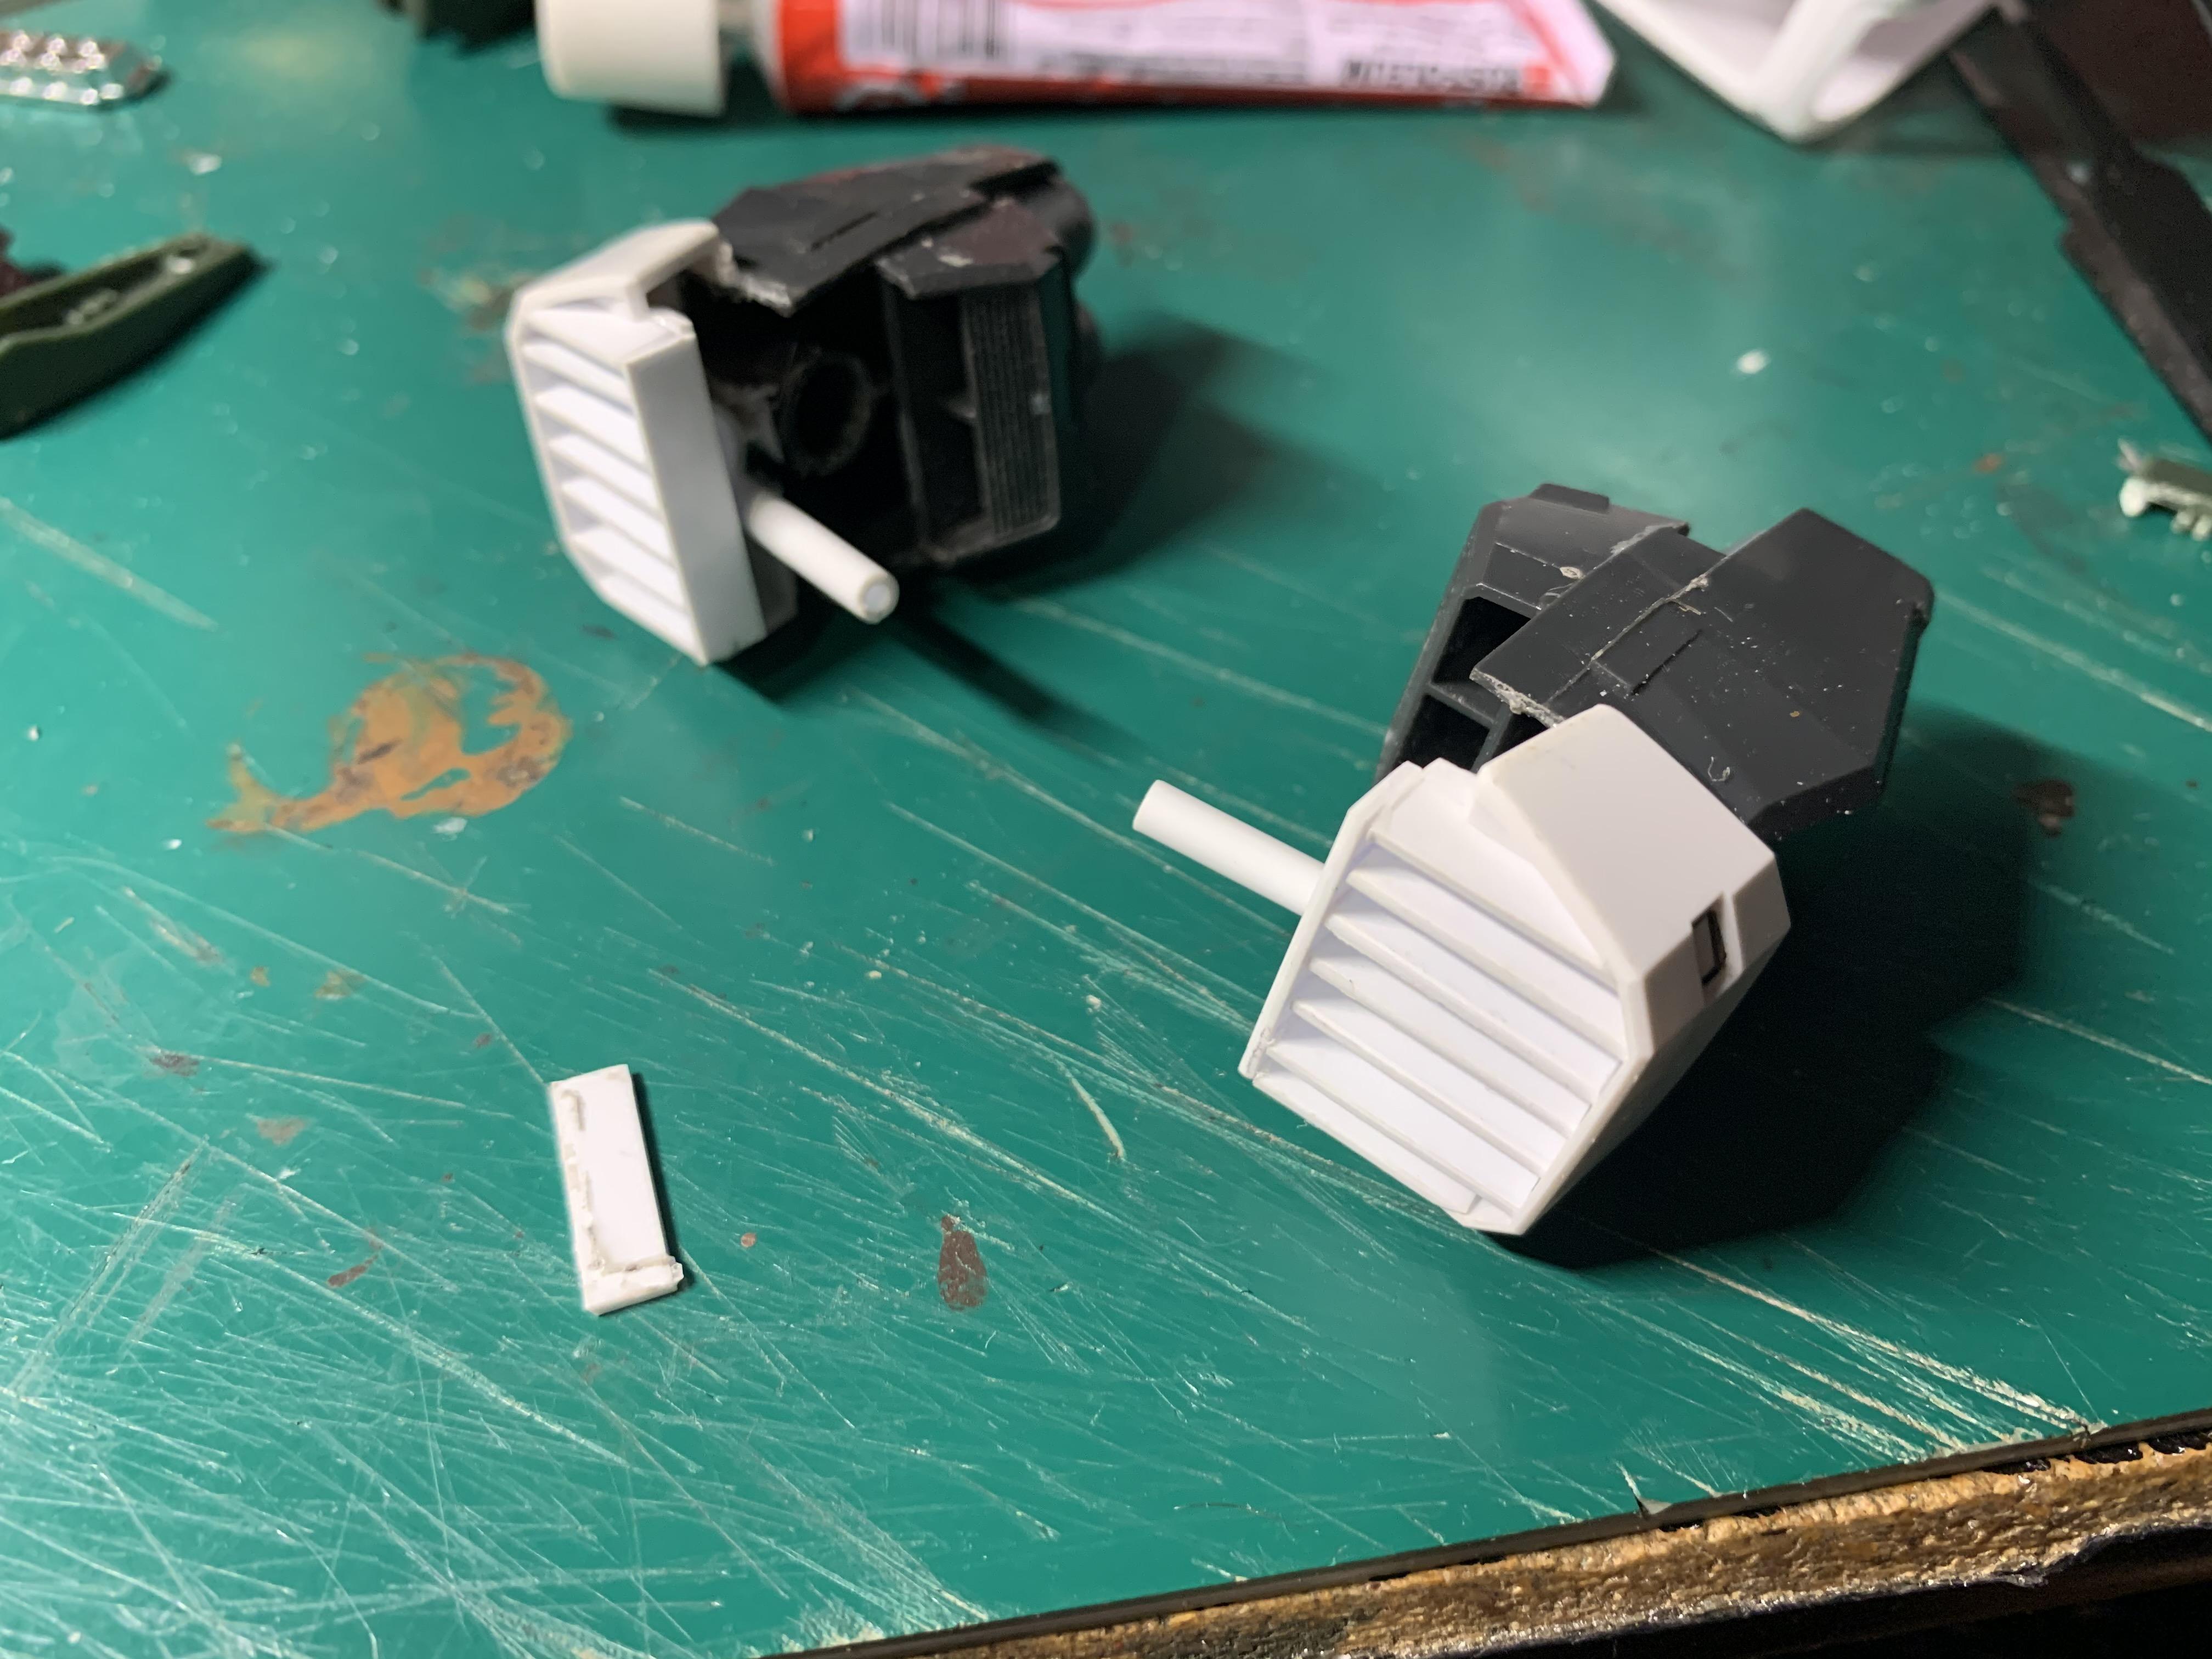
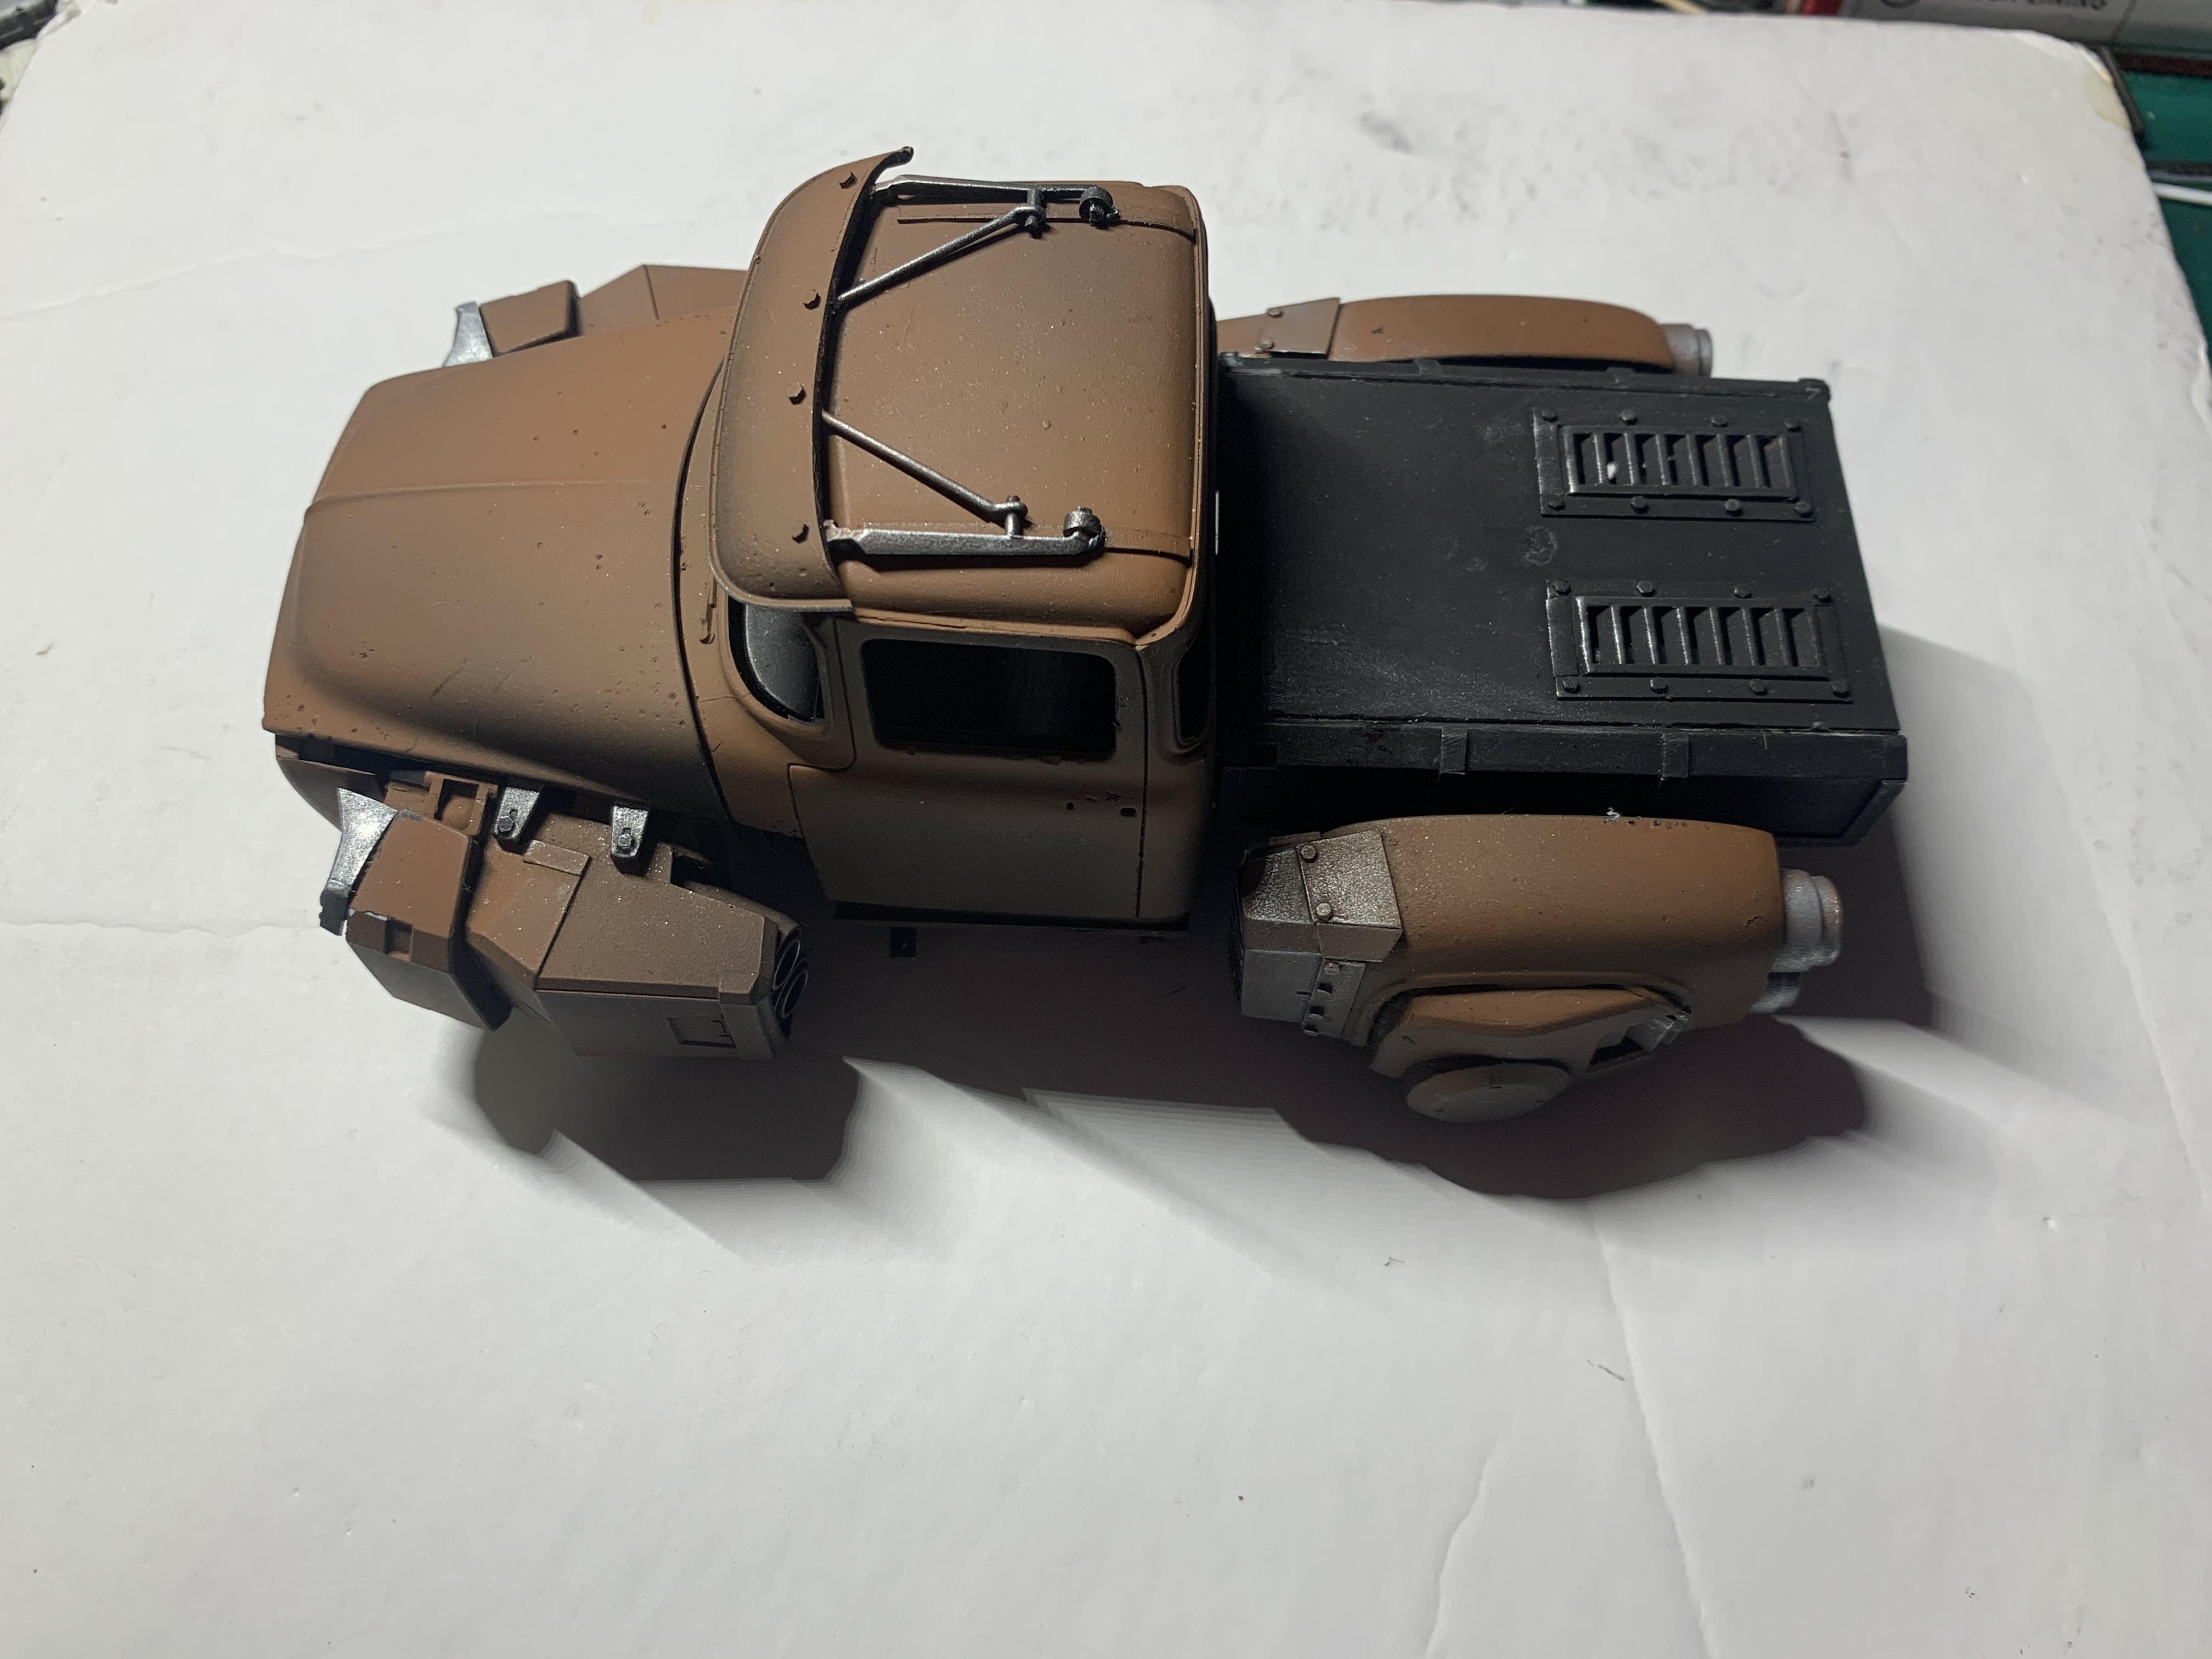
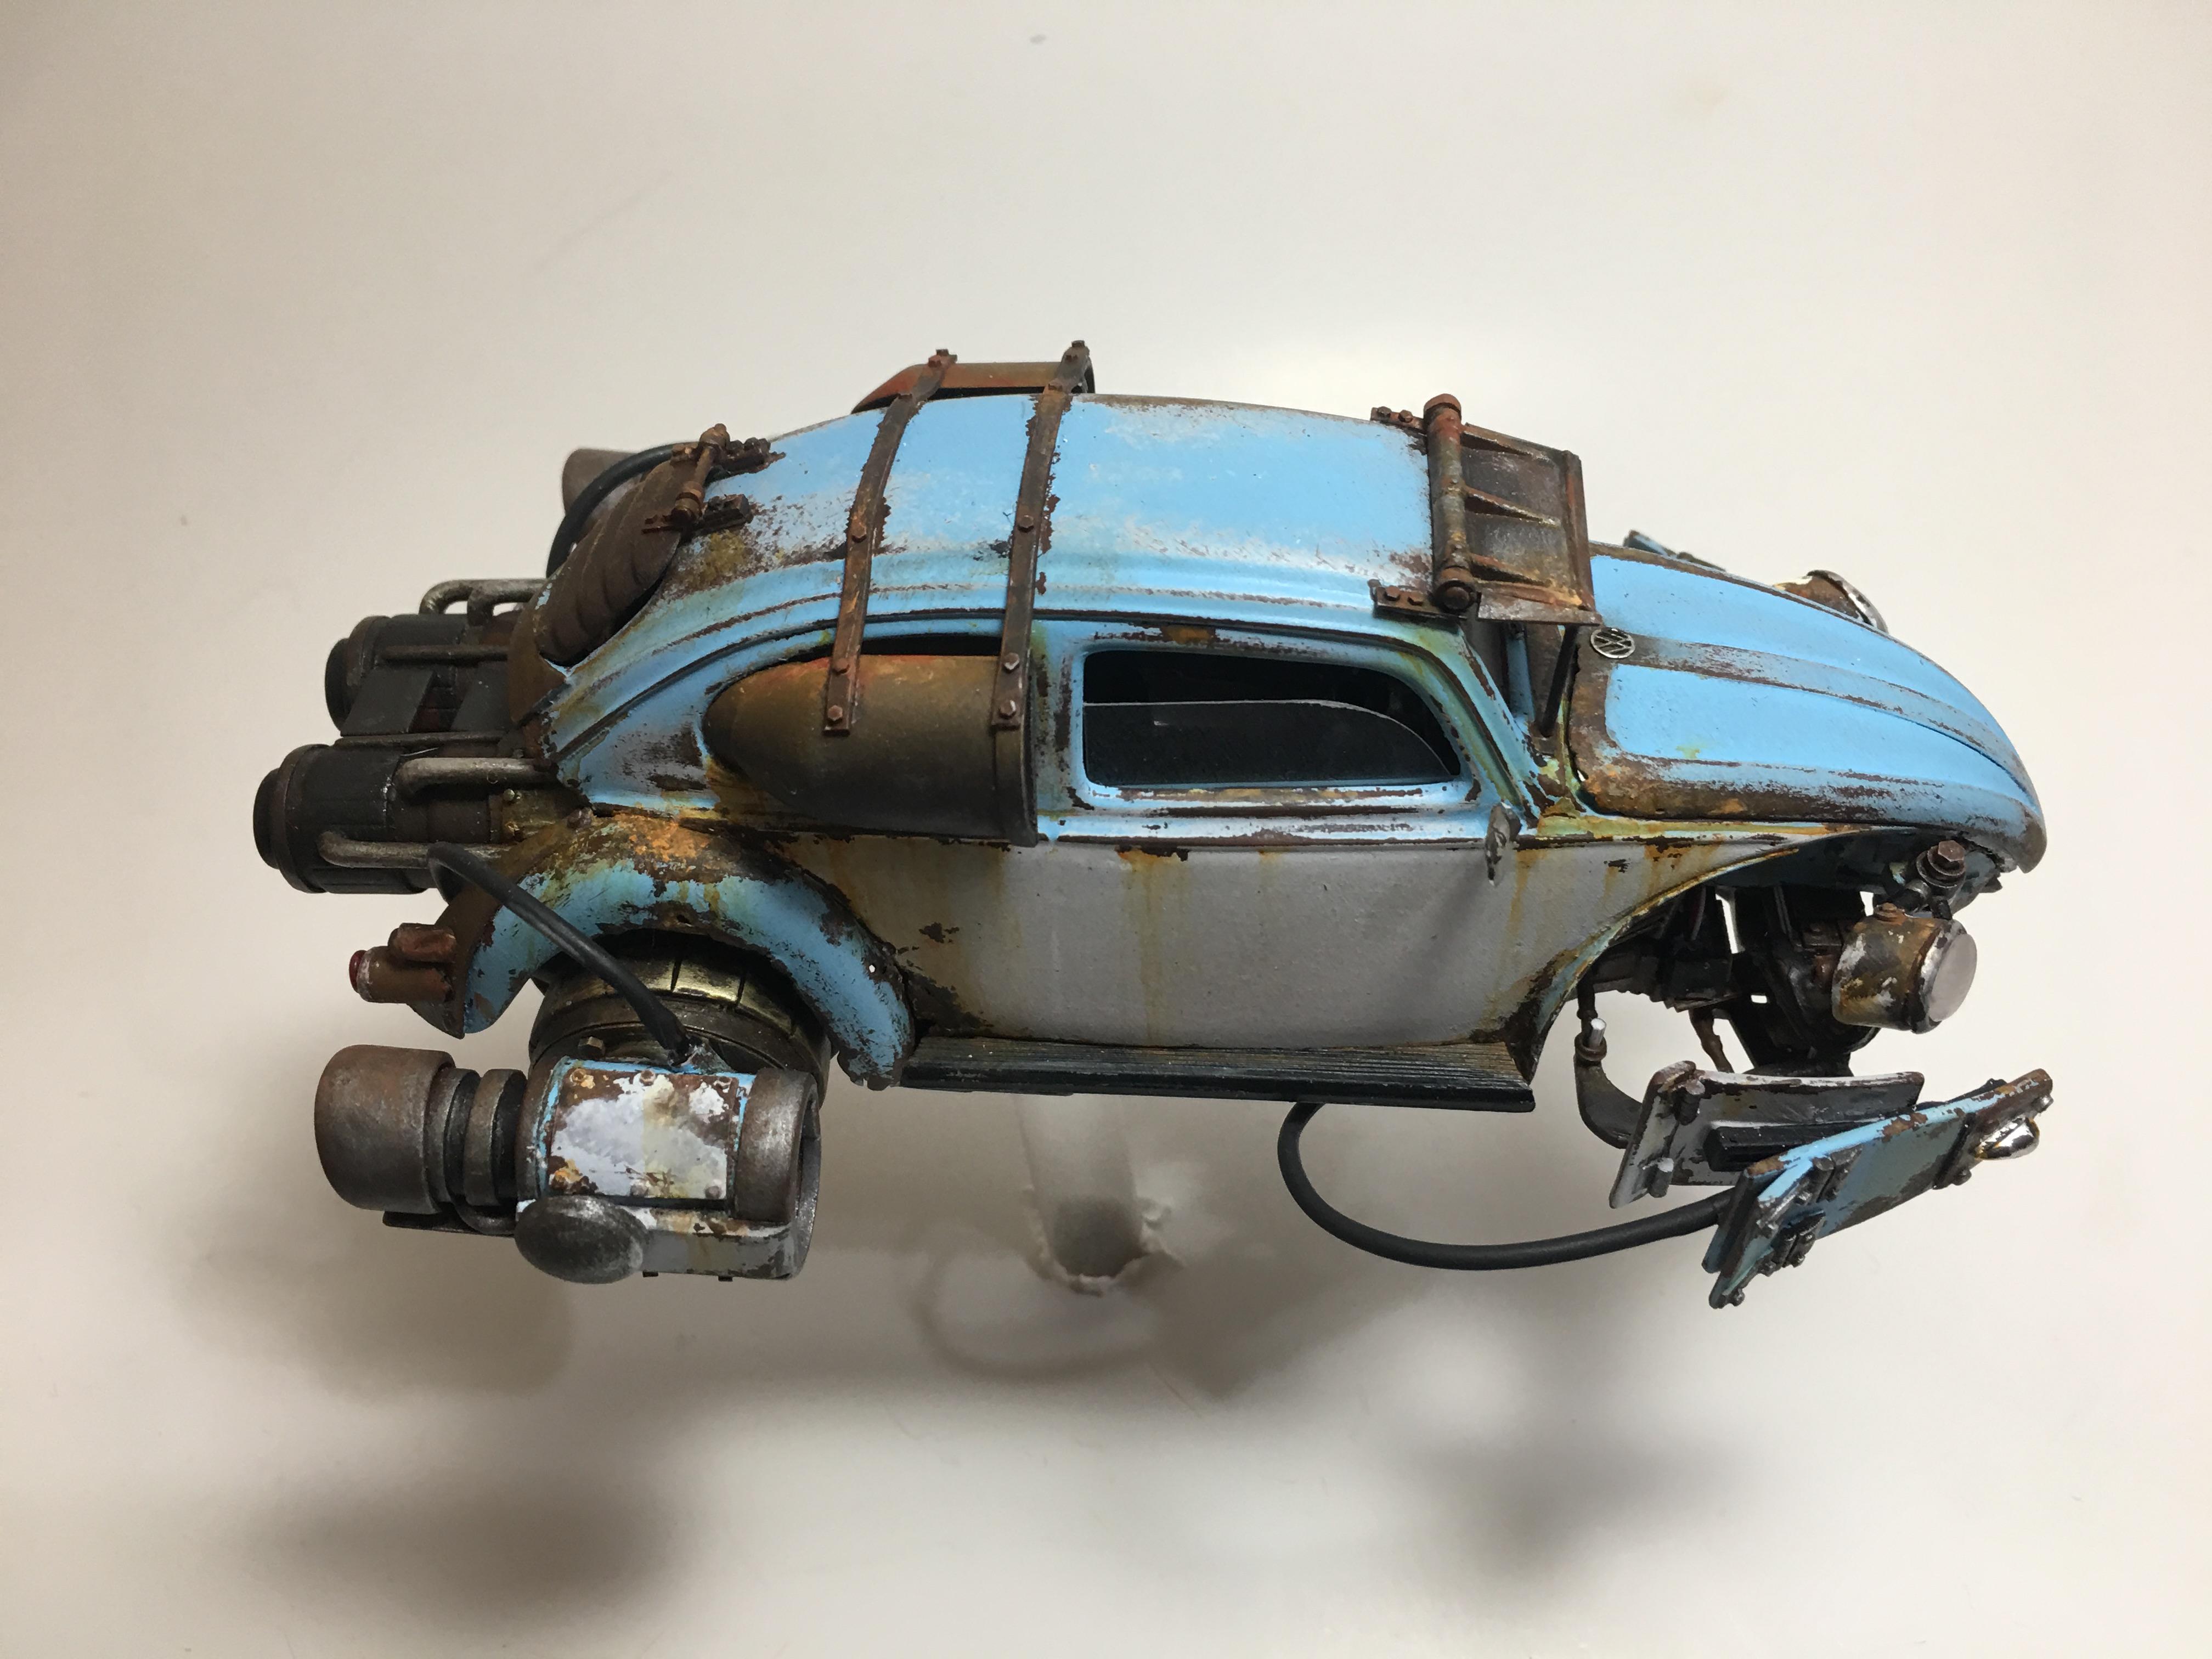
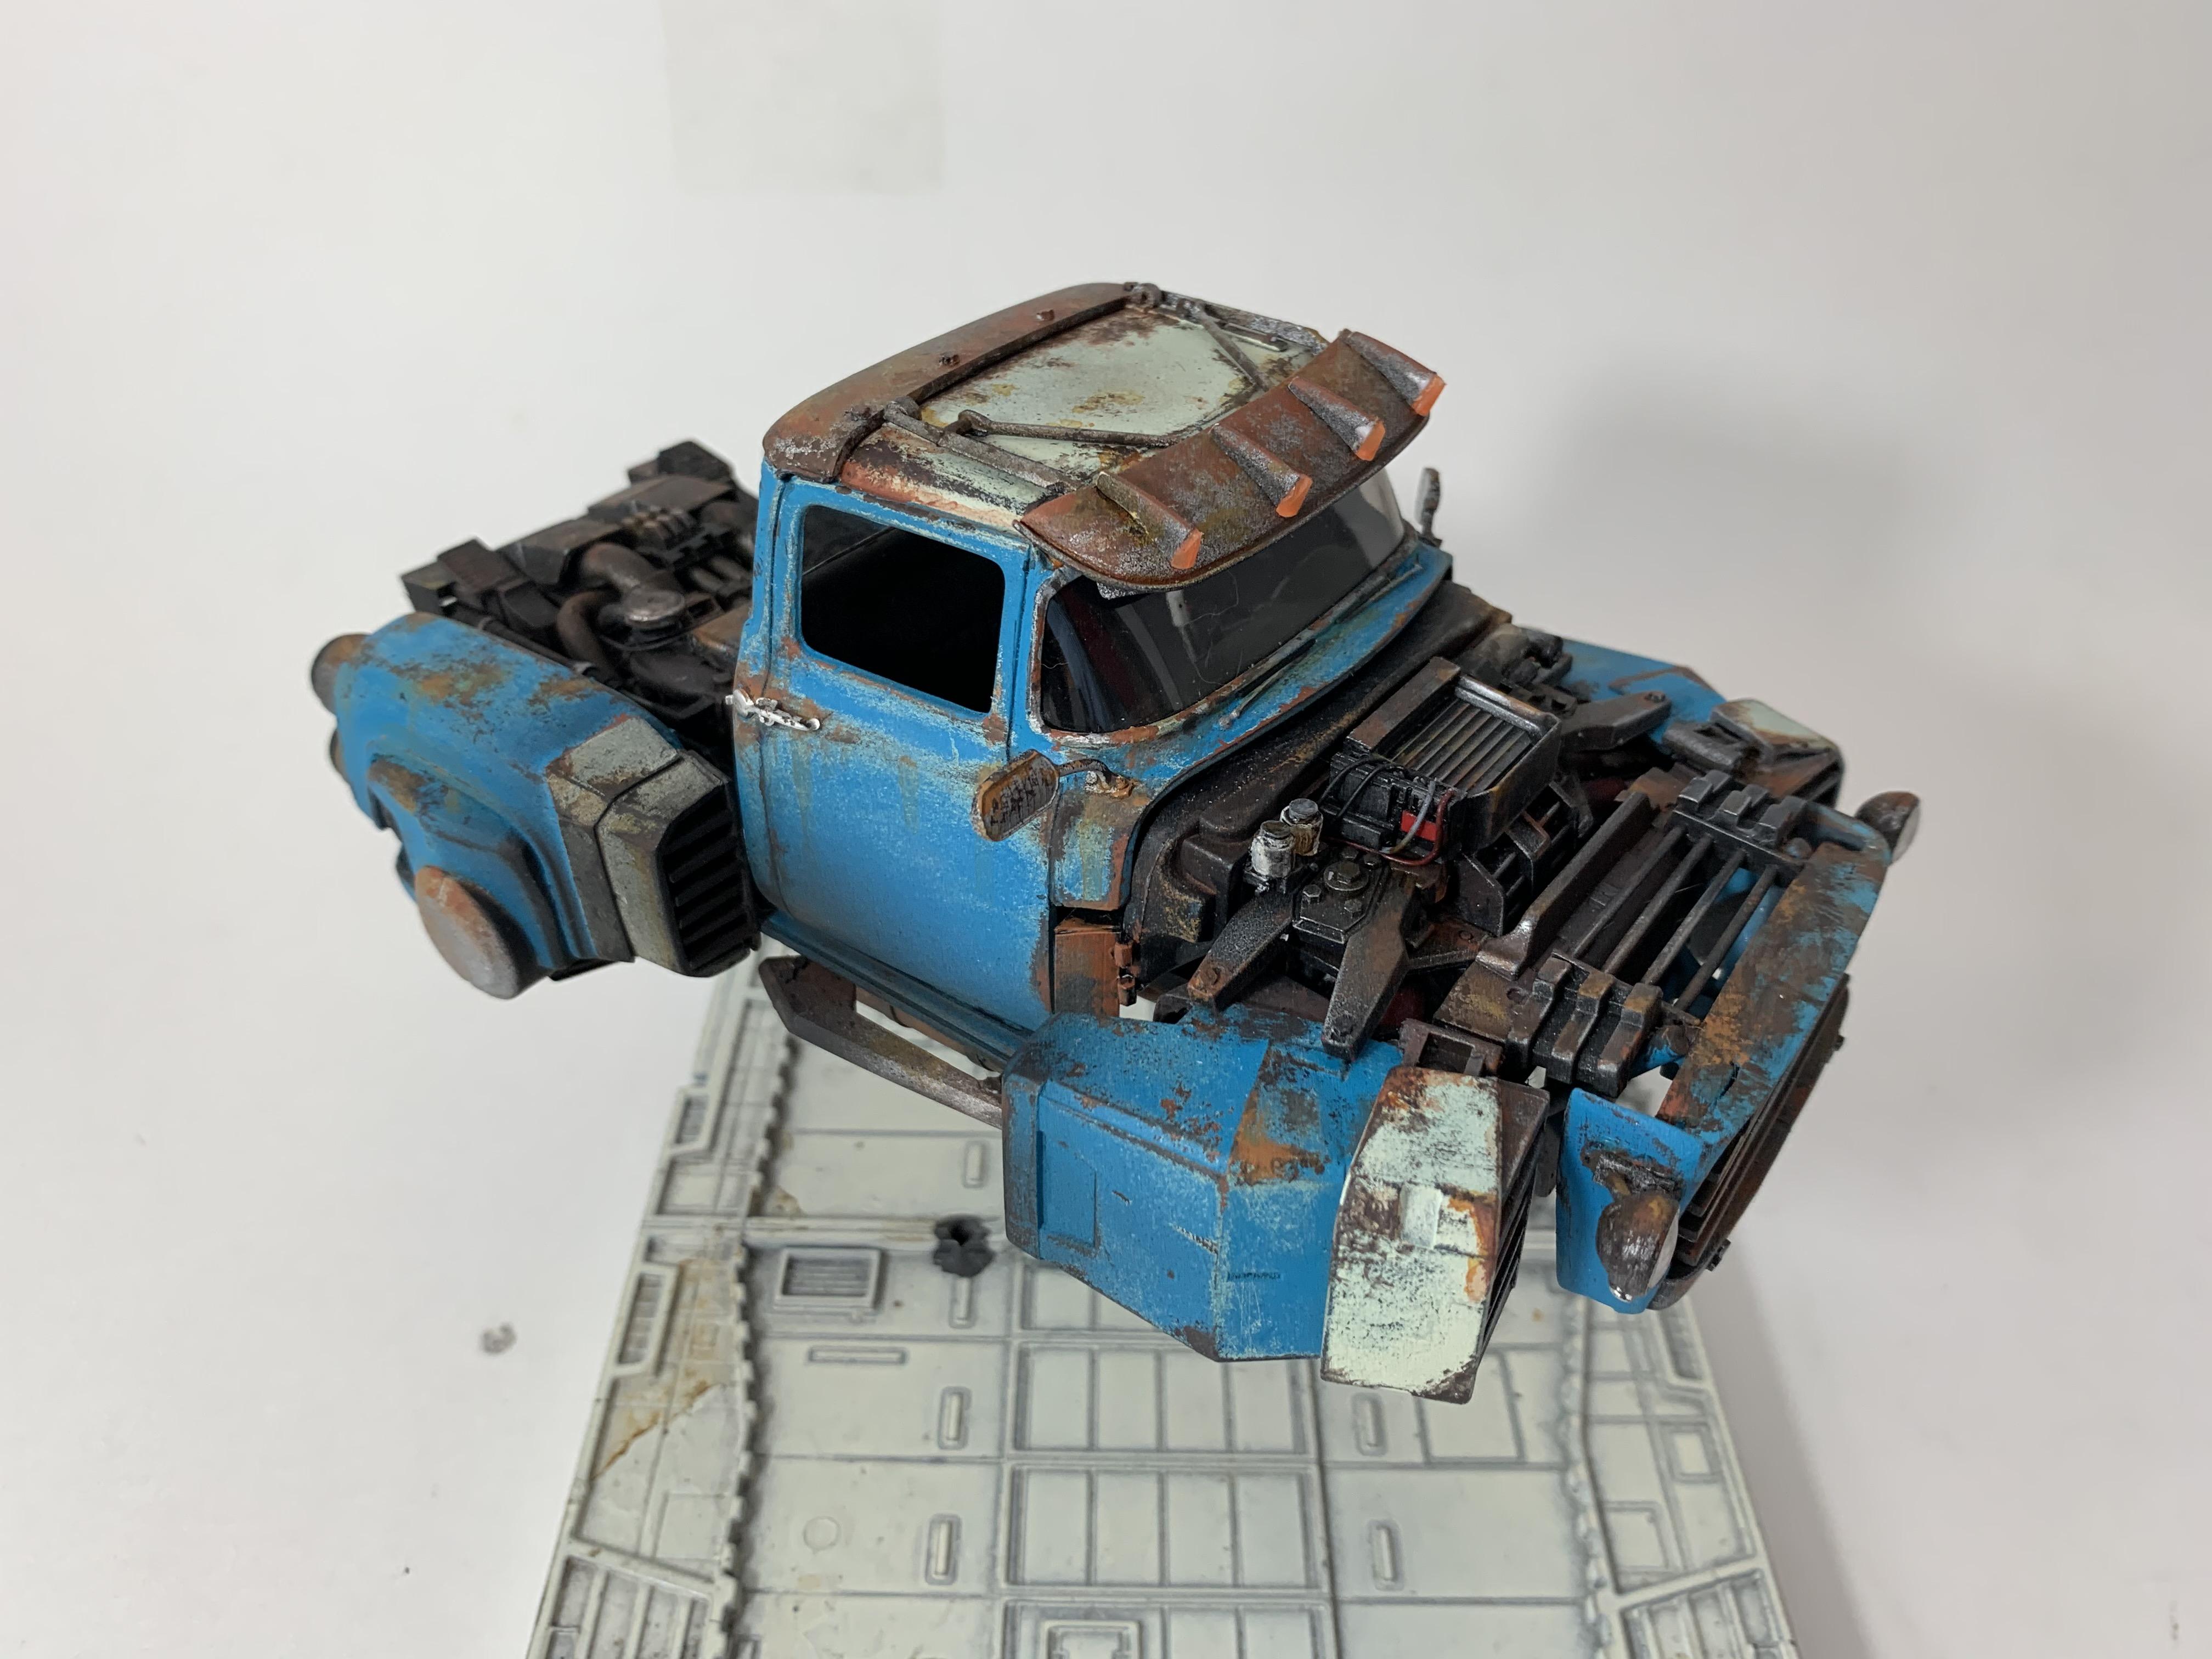
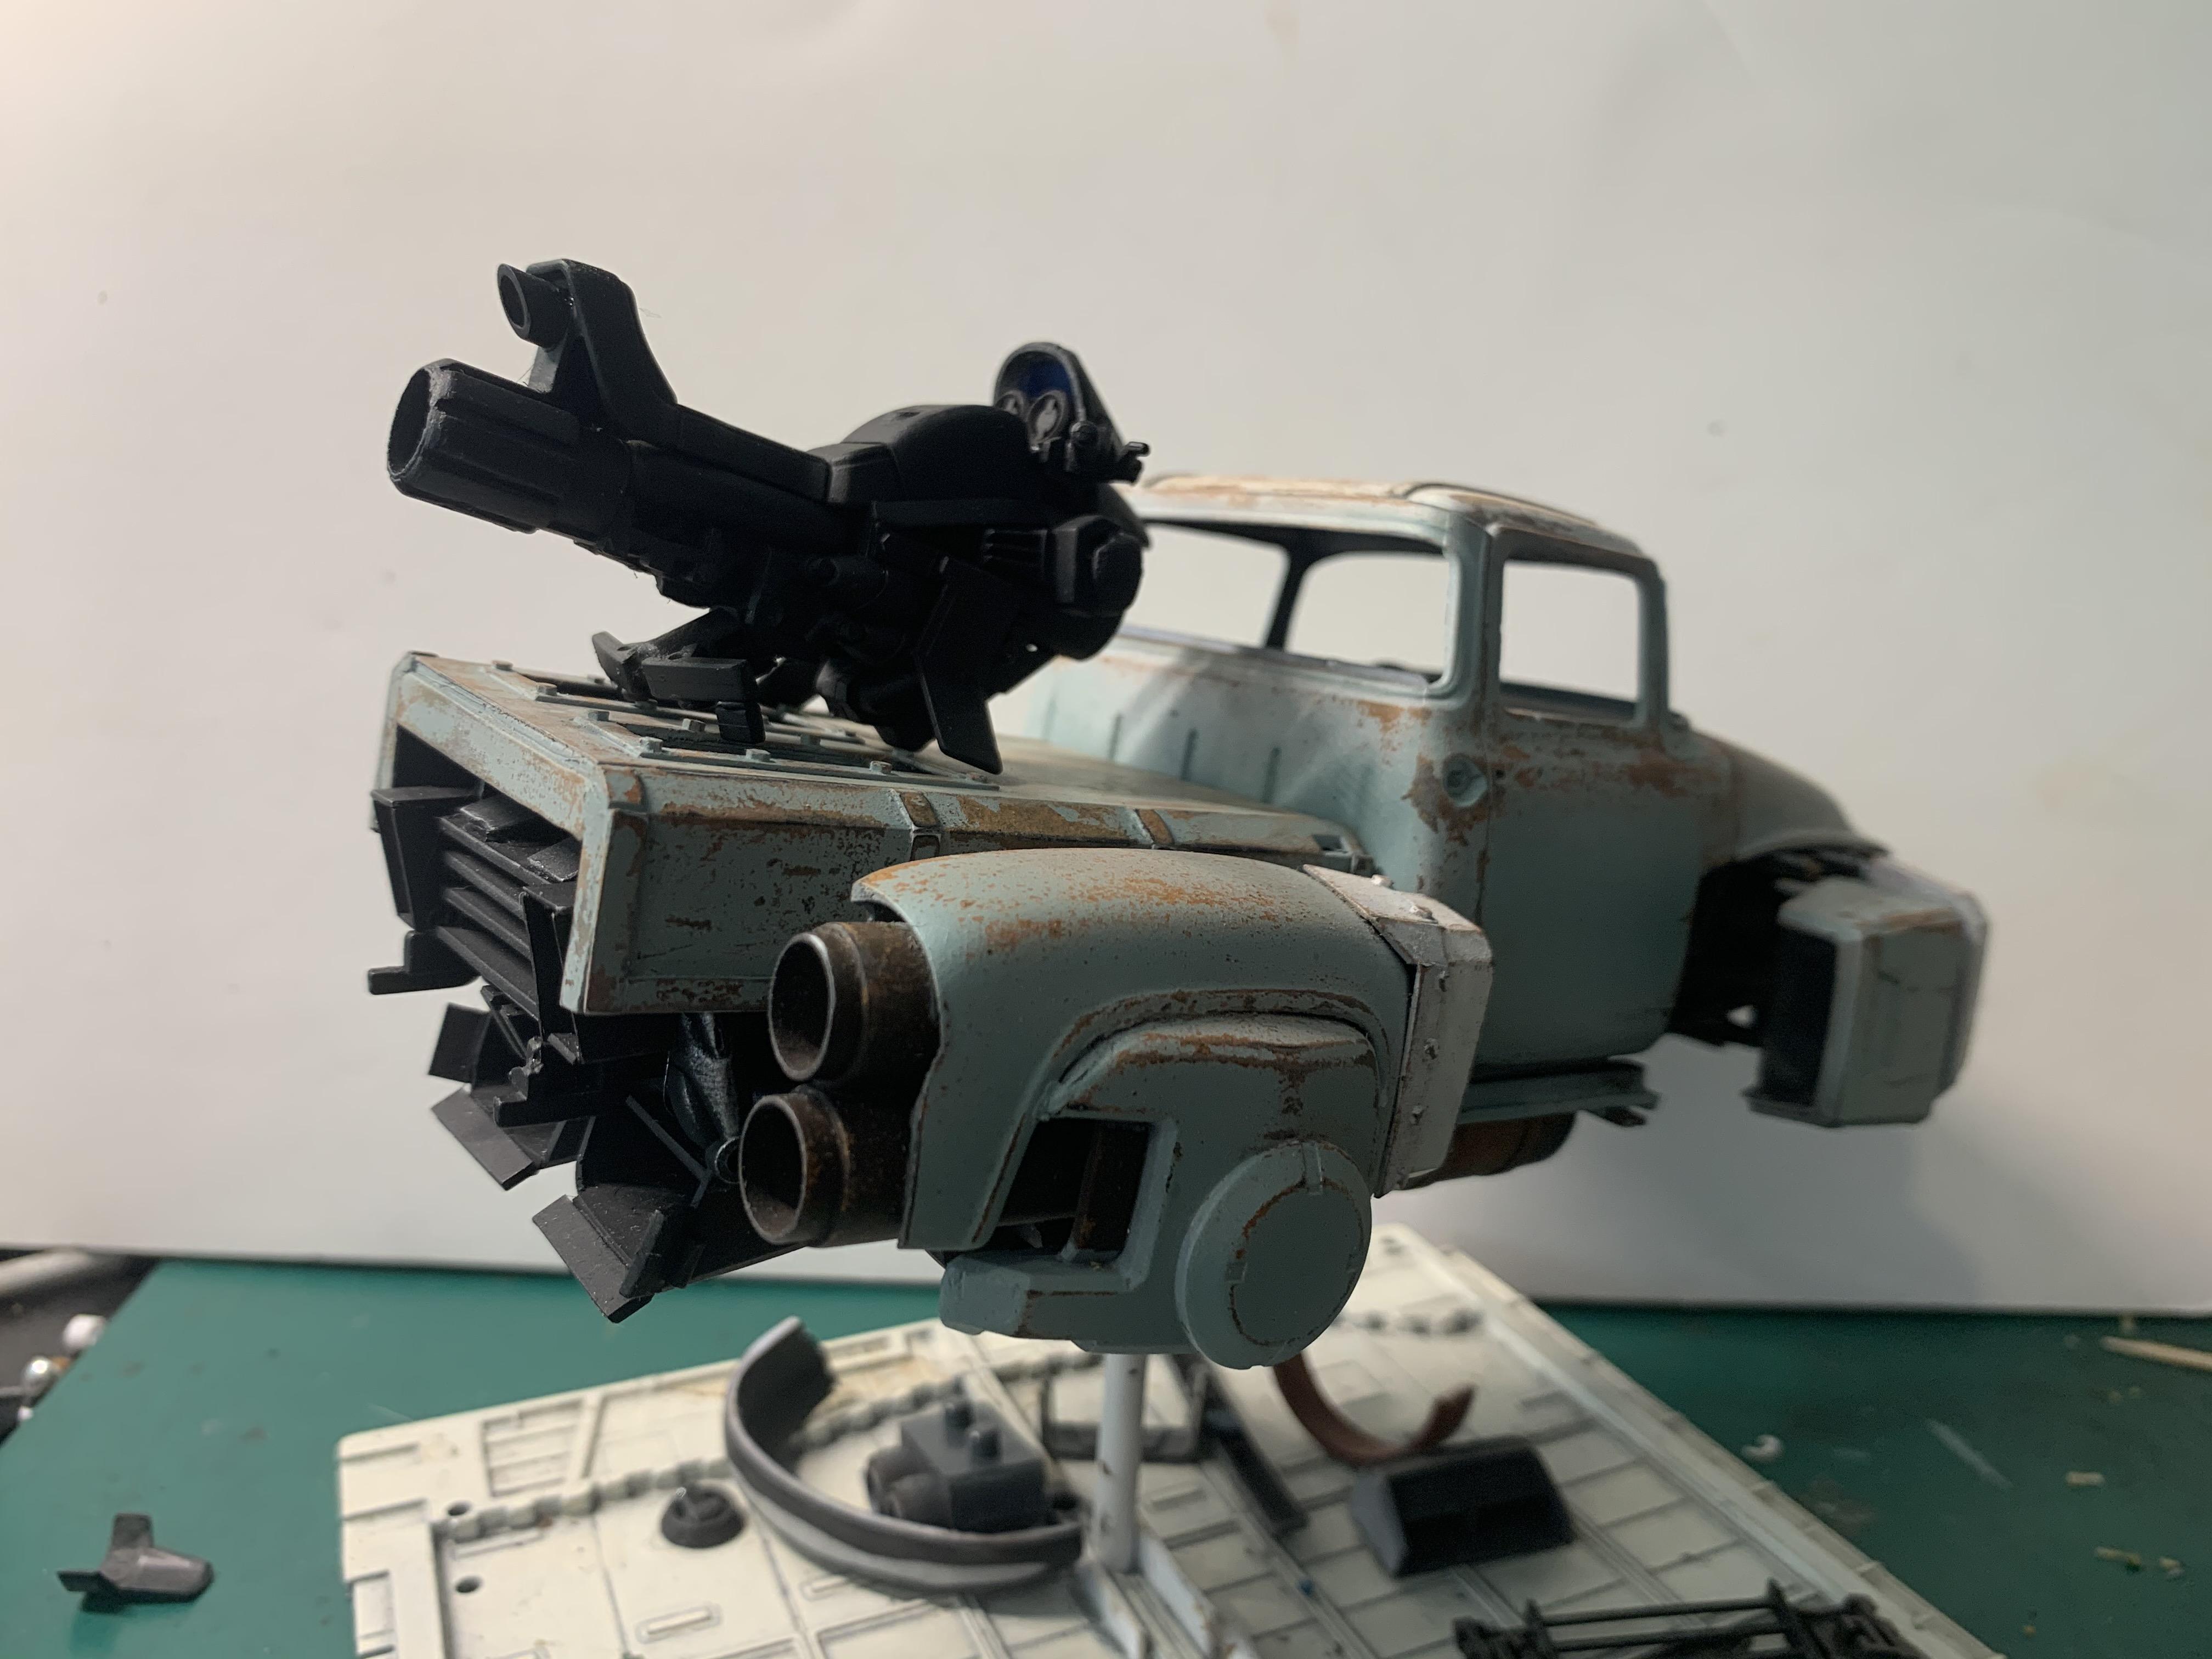
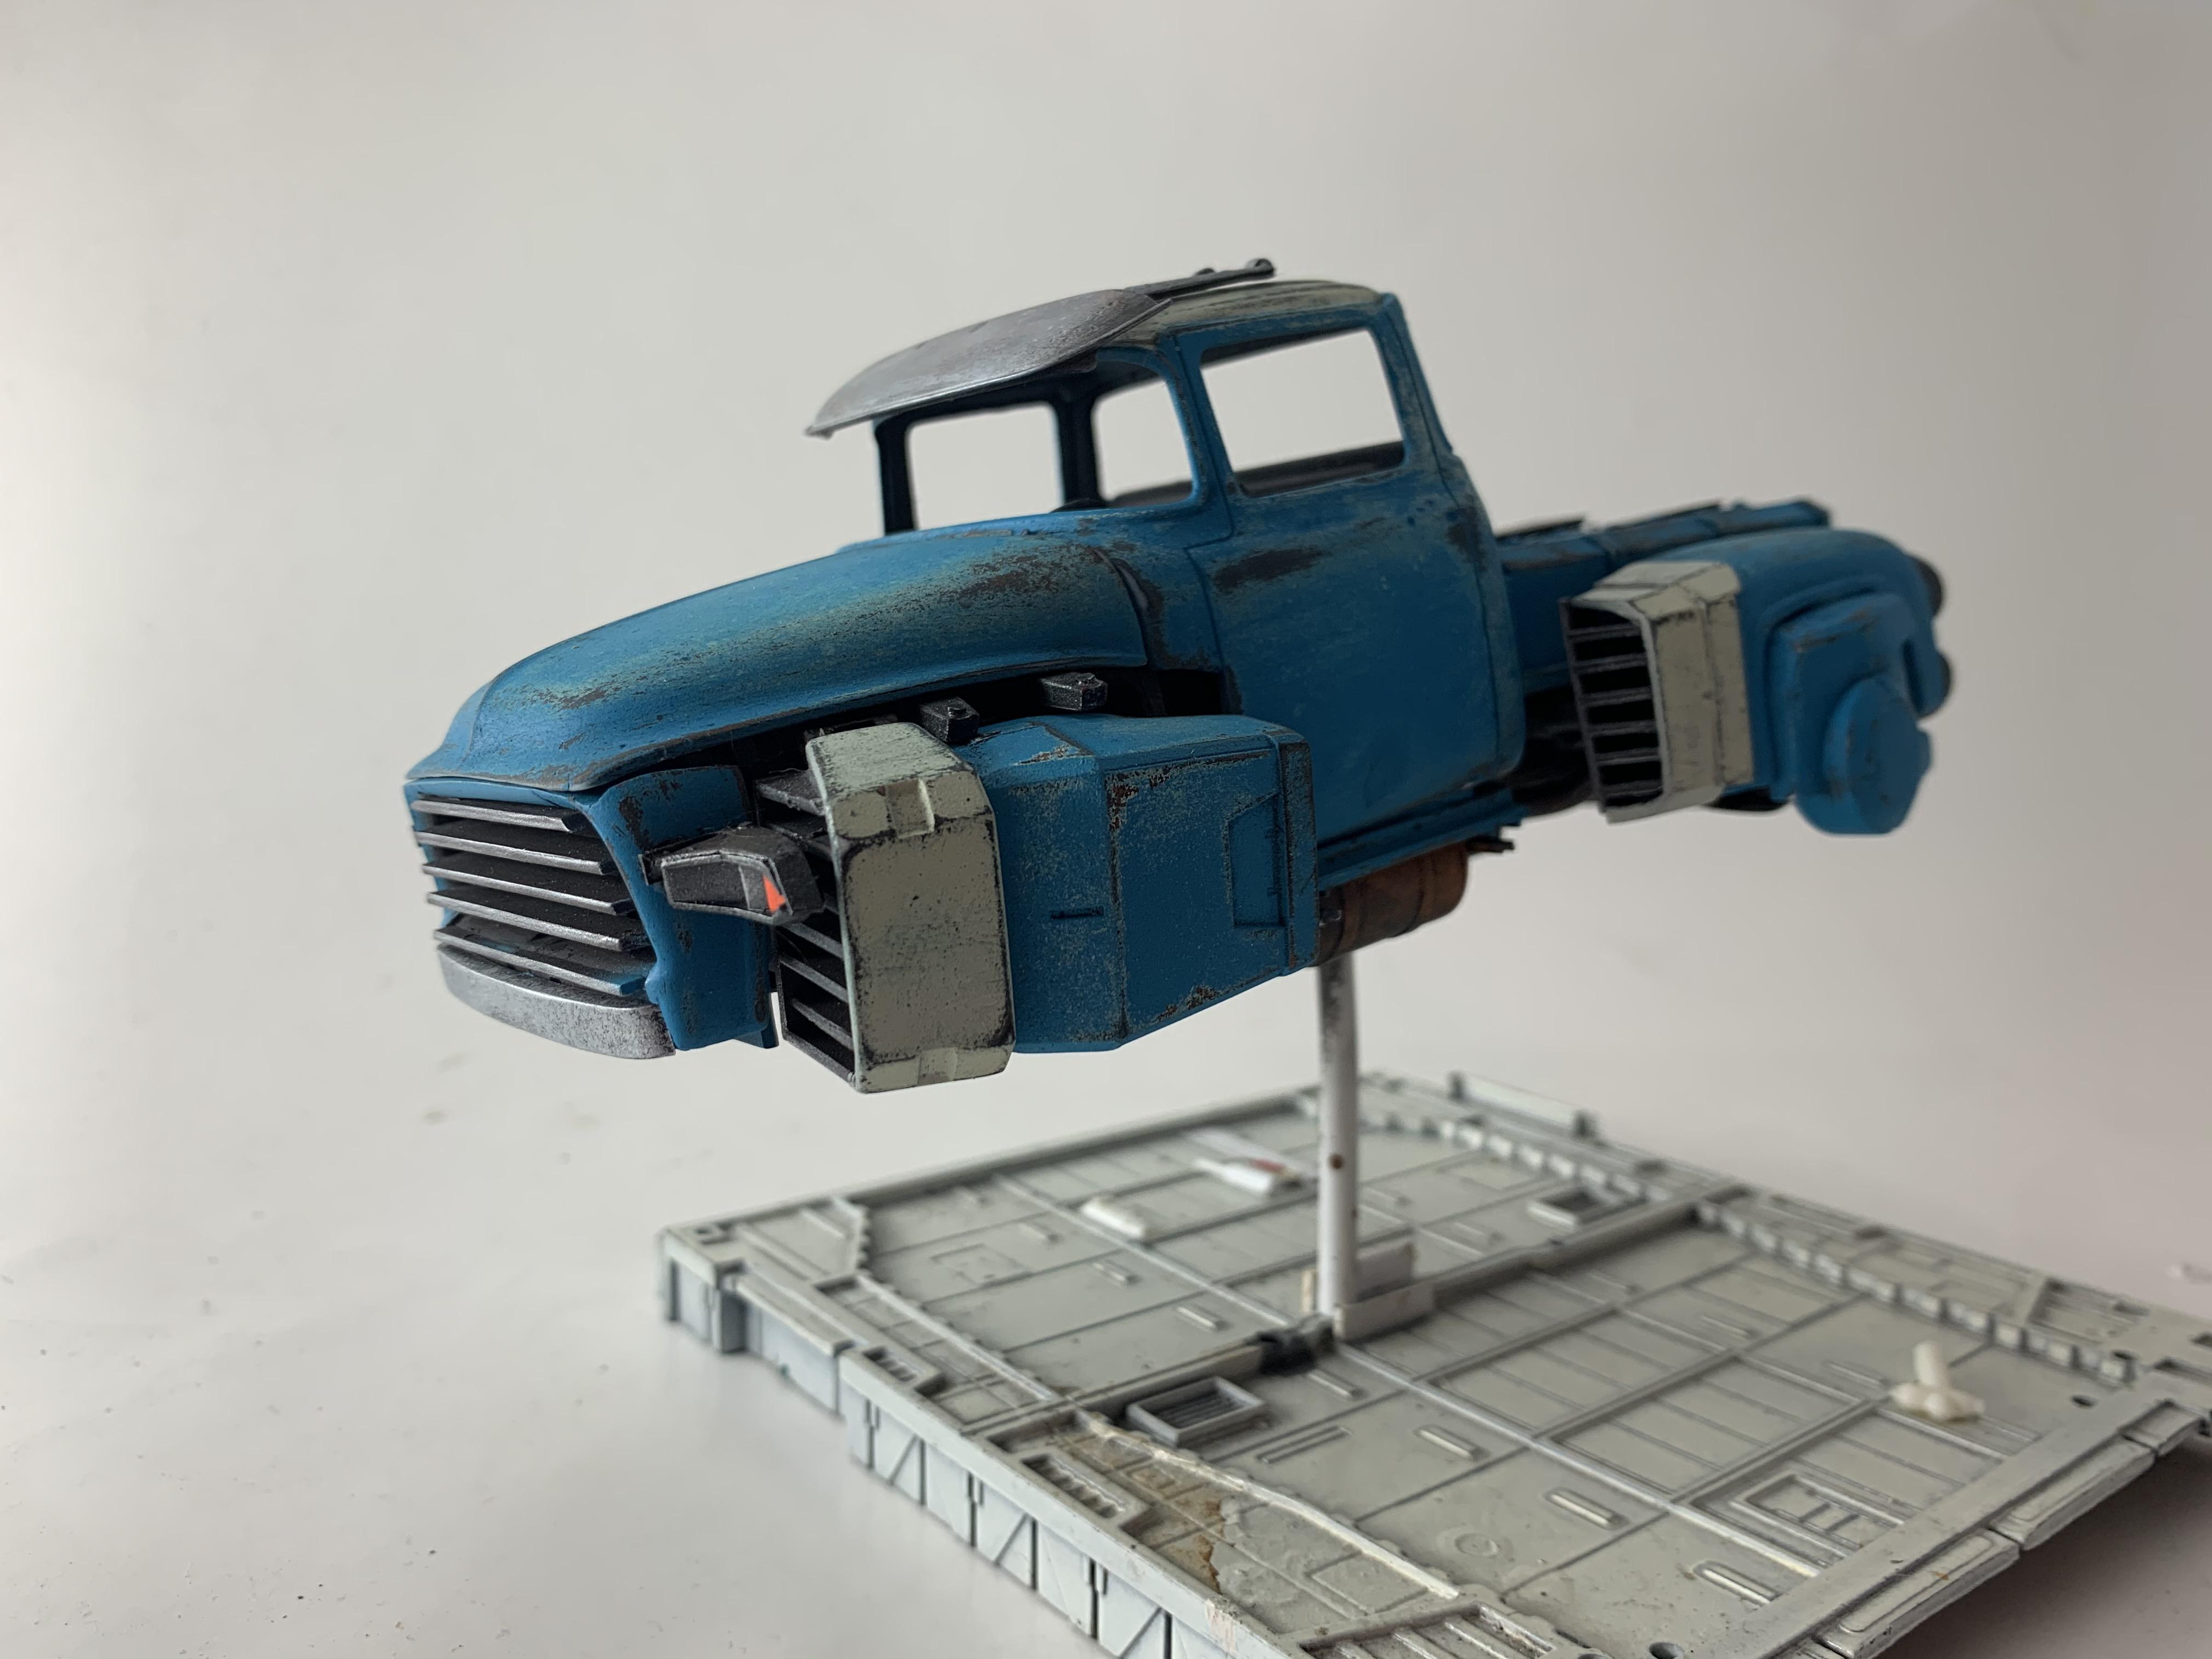
Hello all. Here's my version of the 56 Foose pick up. This was another fun build. Once I built the two front turbines, I was on a roll. Most of the extra flight details are Gundam parts. The two front turbines are from Gundam Virtue's shoulder armor. It's been modified to fit where the front fender was. I like to add large intakes for a dieselpunk vibe. The grill housing has been narrowed down a bit. I debated back and forth about leaving the truck bed on or off. Decided to leave it off to show the rear engines and gadgetry. The two front thrusters have two turbines inside the housing. You can see in these pics. I thought it was important to match the rear turbines as well, one on top of the other. I always try to stick to a sliver of realism. I like the mechanical bits to look like they serve a purpose, not just some random parts glued on haphazardly. I am really happy with the front visor. If you've built this kit, you''l l know that the roof comes separate from the cab roof. I cut the roof in thirds and used the 2 ends to create the visor assembly. Here's under the hood. Lots of miscellaneous stuff put together. I'll try to get some of the smaller details up later. Thanks for looking.
-
56 Ford FD100 Pick Up
Daxman replied to Daxman's topic in WIP: Model Trucks: Pickups, Vans, SUVs, Light Commercial
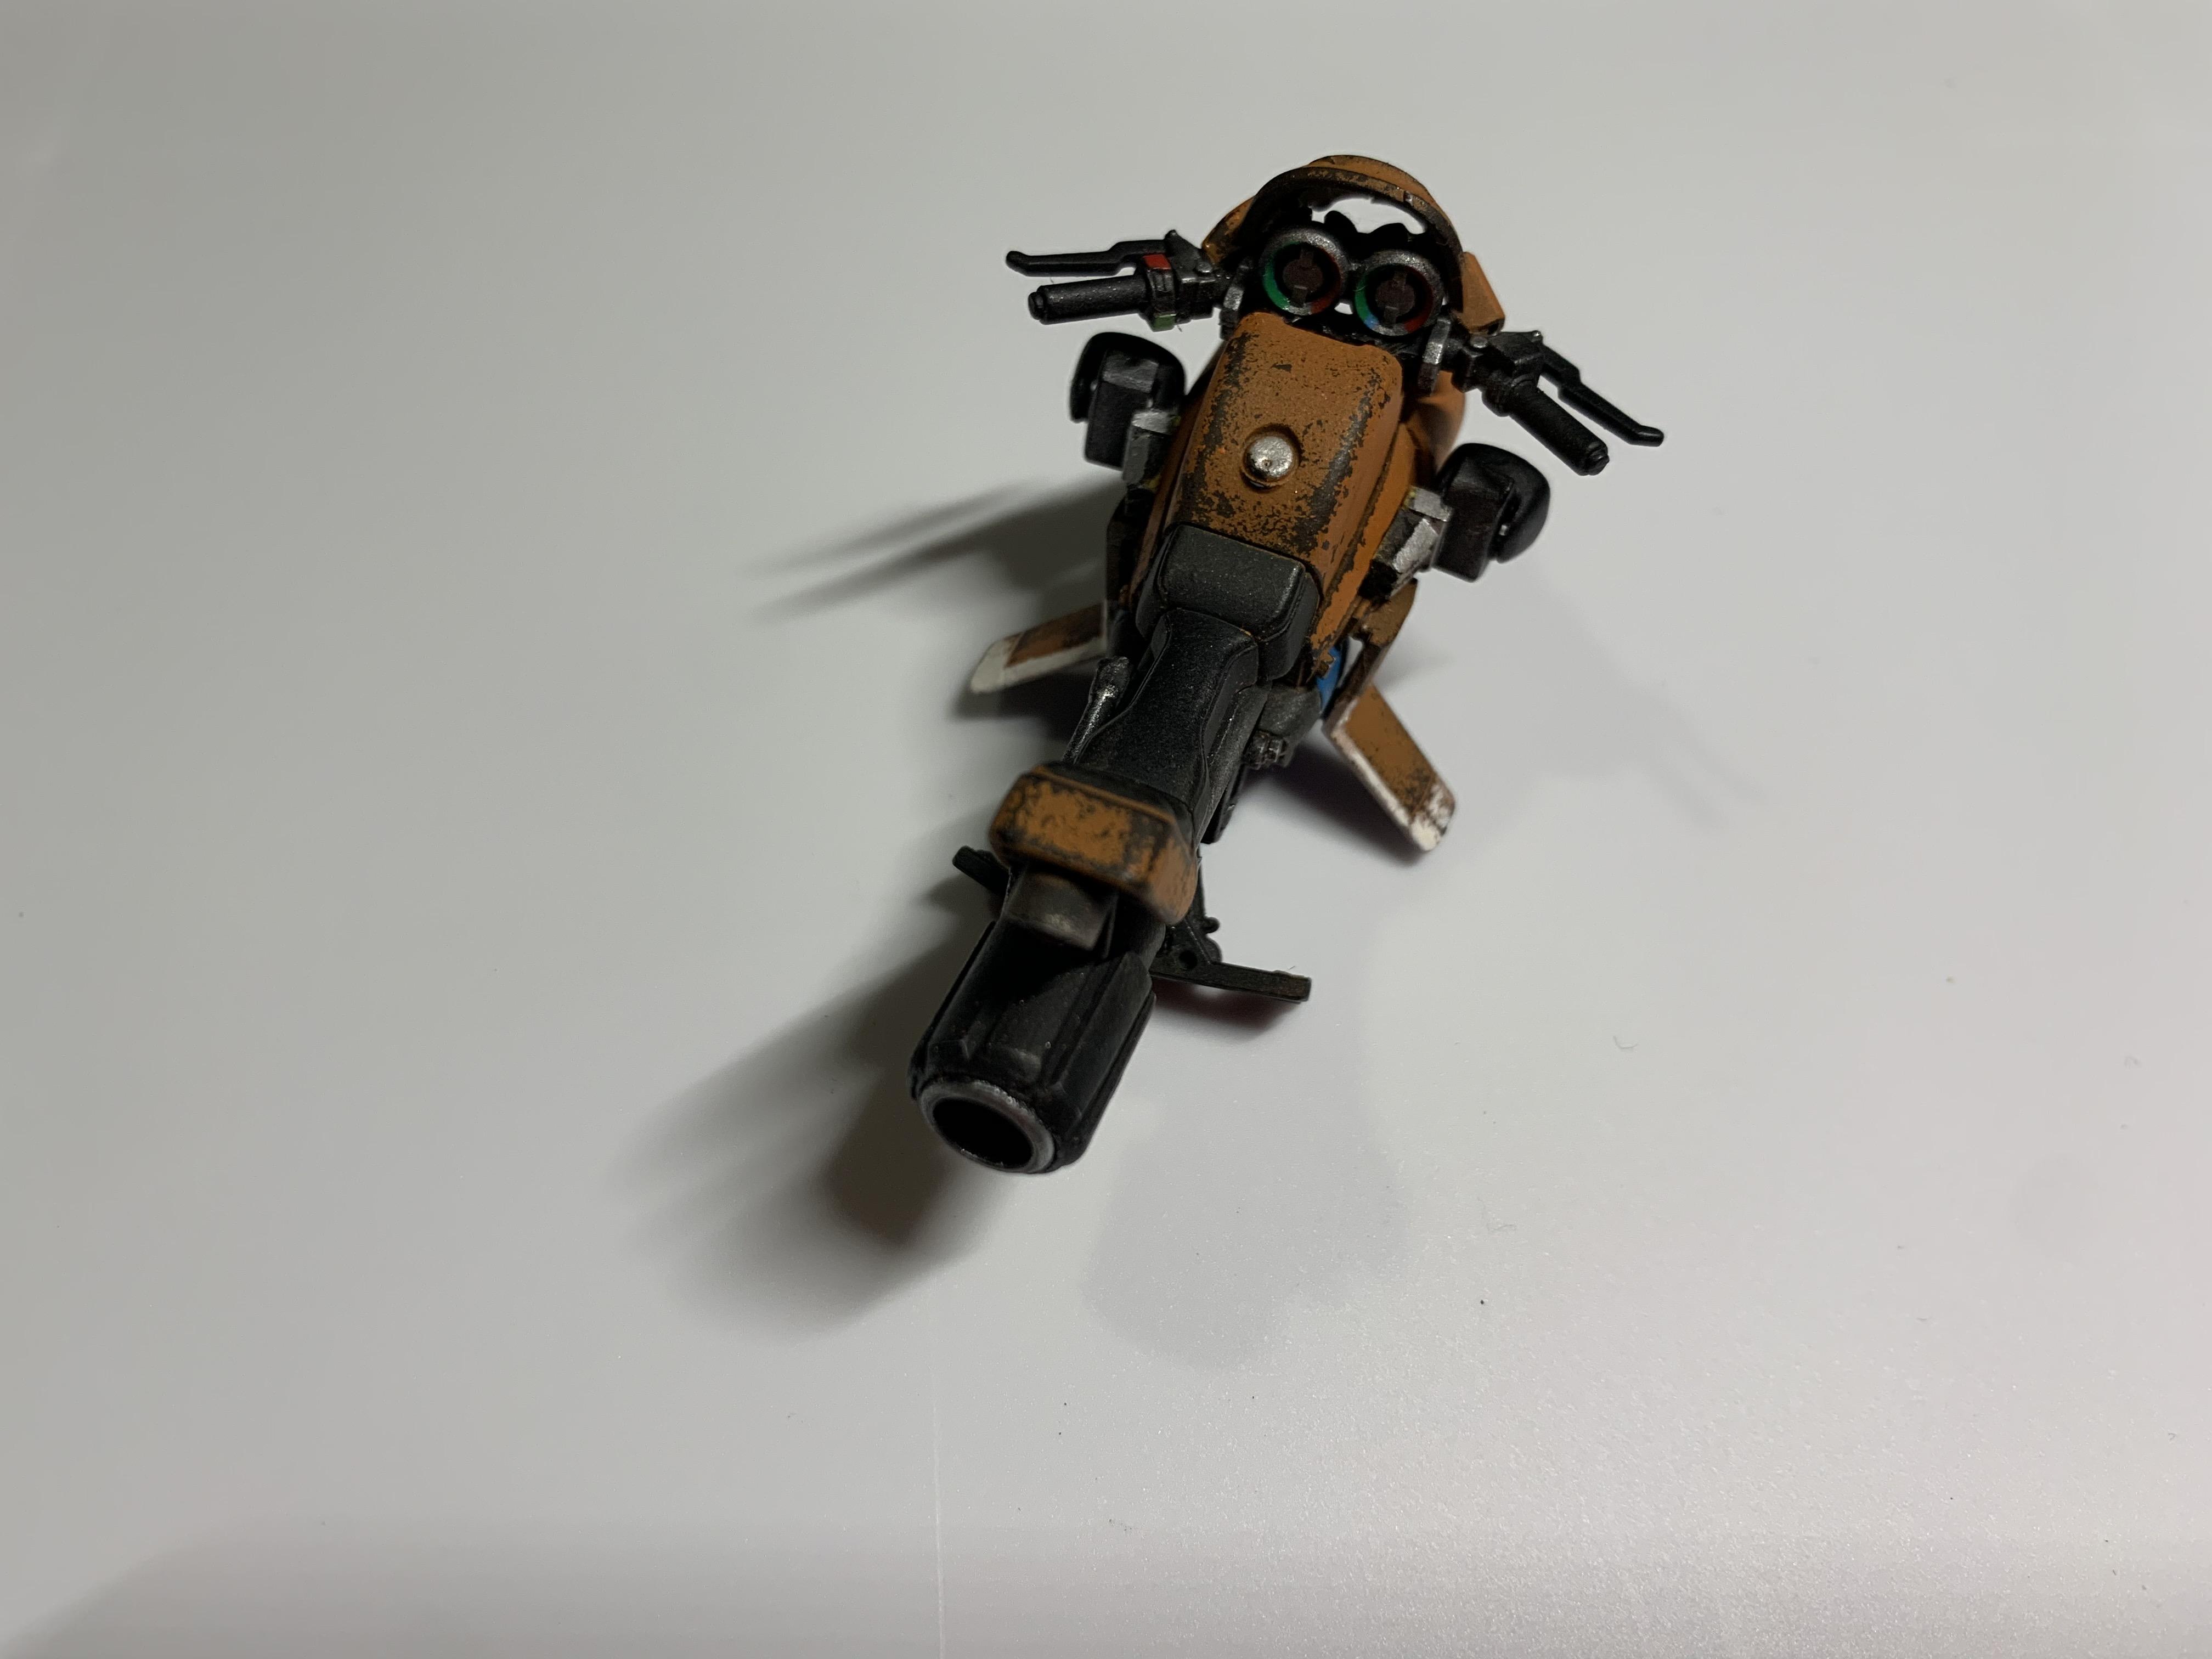
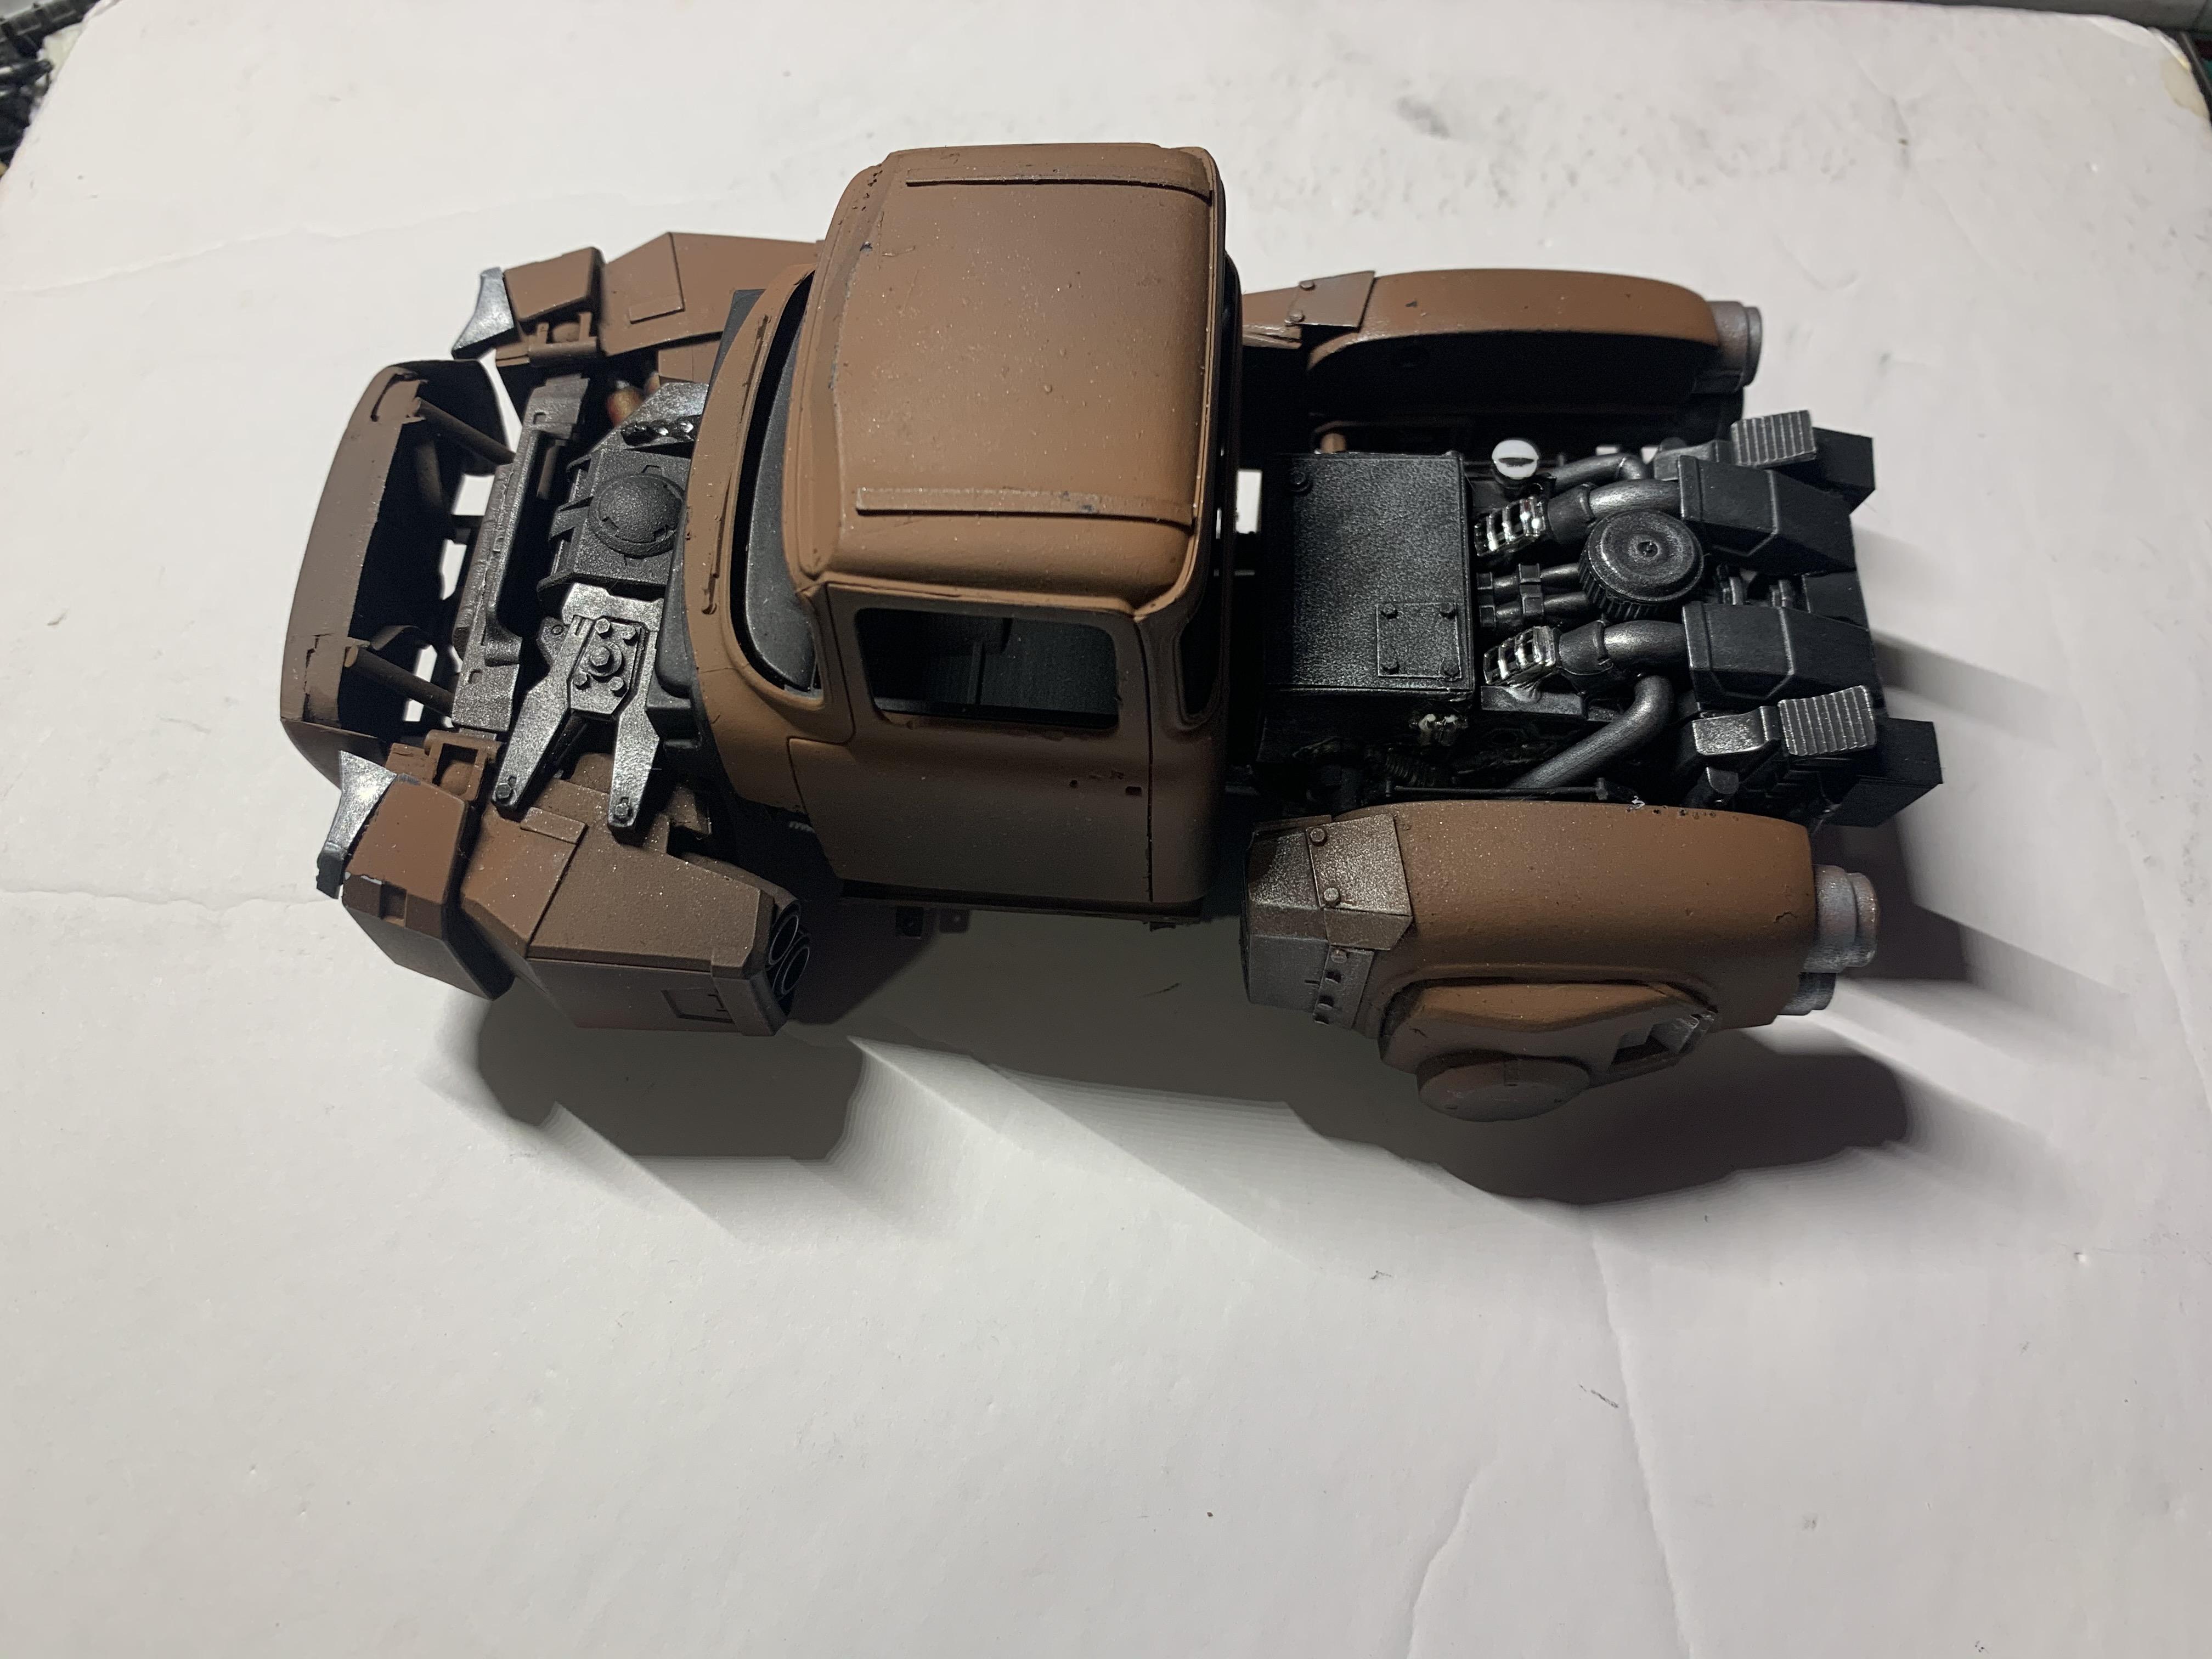
Thank you both! Much appreciated! So if you follow my builds, you'll know that I am the master of the strip and re-paint. I can't remember the last build that didn't get painted at least different two colors. For the first color to be stripped, I chose this light blue-grey with a bright white accent. I also build my first jet bike. The handlebars, gas tank and seat came from a Japanese model kit. Kotobukiya Hexagear - Rayblade Impulse. Another donation from my son. The rest of the pieces on the bike were from Gundam kits and styrene tube. The plan was to mount the bike on the back on the truck bed like in the photos. This jet bike was really fun to make. I want to make more!!! After all this I won't be including the bike with the truck. After a week of looking at the truck with the dull blue-grey, I stripped the paint and started over. I painted it a more brilliant blue. More contrast. Thanks!!!!
-
56 Ford FD100 Pick Up
Daxman replied to Daxman's topic in WIP: Model Trucks: Pickups, Vans, SUVs, Light Commercial
Thank you! The undercarriage needed some attention as well as the back of the truck. Most of this wont be seen, but I'll make it so the bed comes off for inspection. I preferred the truck bed a little raised like a flatbed. So I filled in between the frame with miscellaneous parts. There's a fuel tank made from styrene sheet. A VW cylinder head, mustang taillight trim, suspension parts, an oil pan....you name it. It looks like it does something important. \ I cut some exhaust vents at the back of the truck bed. I know what you're thinking....It just made the whole flatbed useless. You'd be right. But it looks really cool, and that's all that matters.
-
56 Ford FD100 Pick Up
Daxman replied to Daxman's topic in WIP: Model Trucks: Pickups, Vans, SUVs, Light Commercial
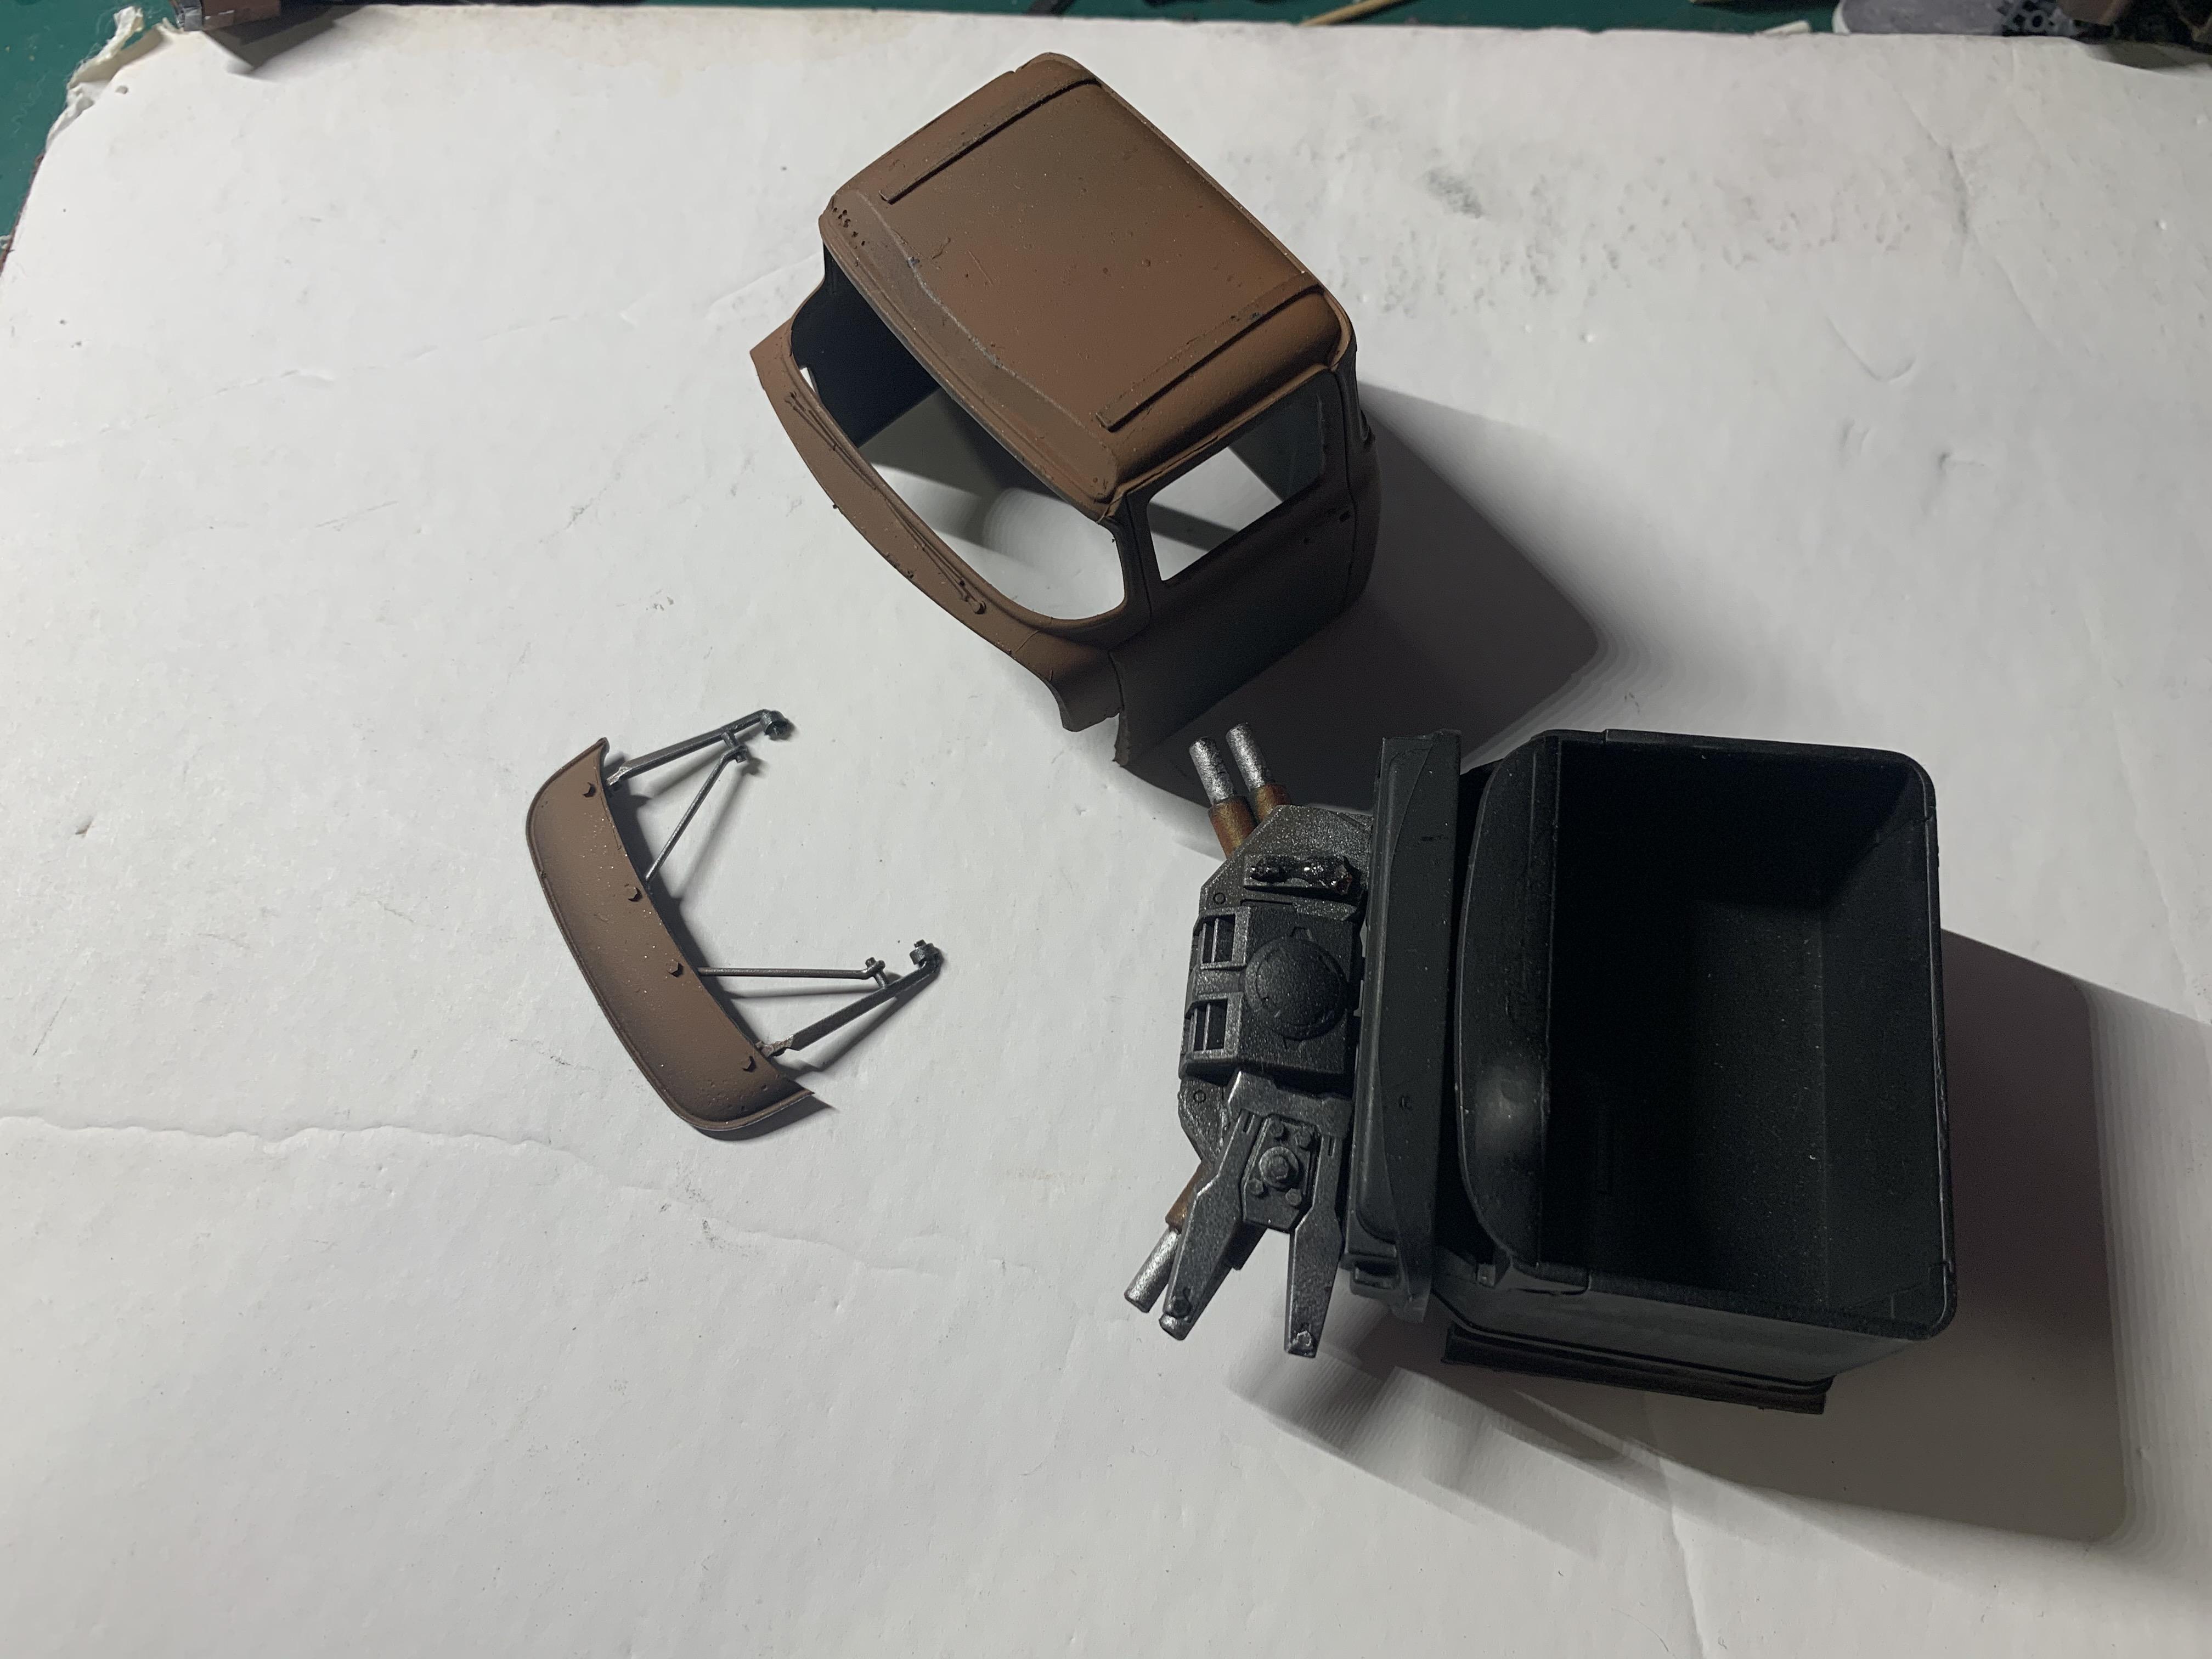
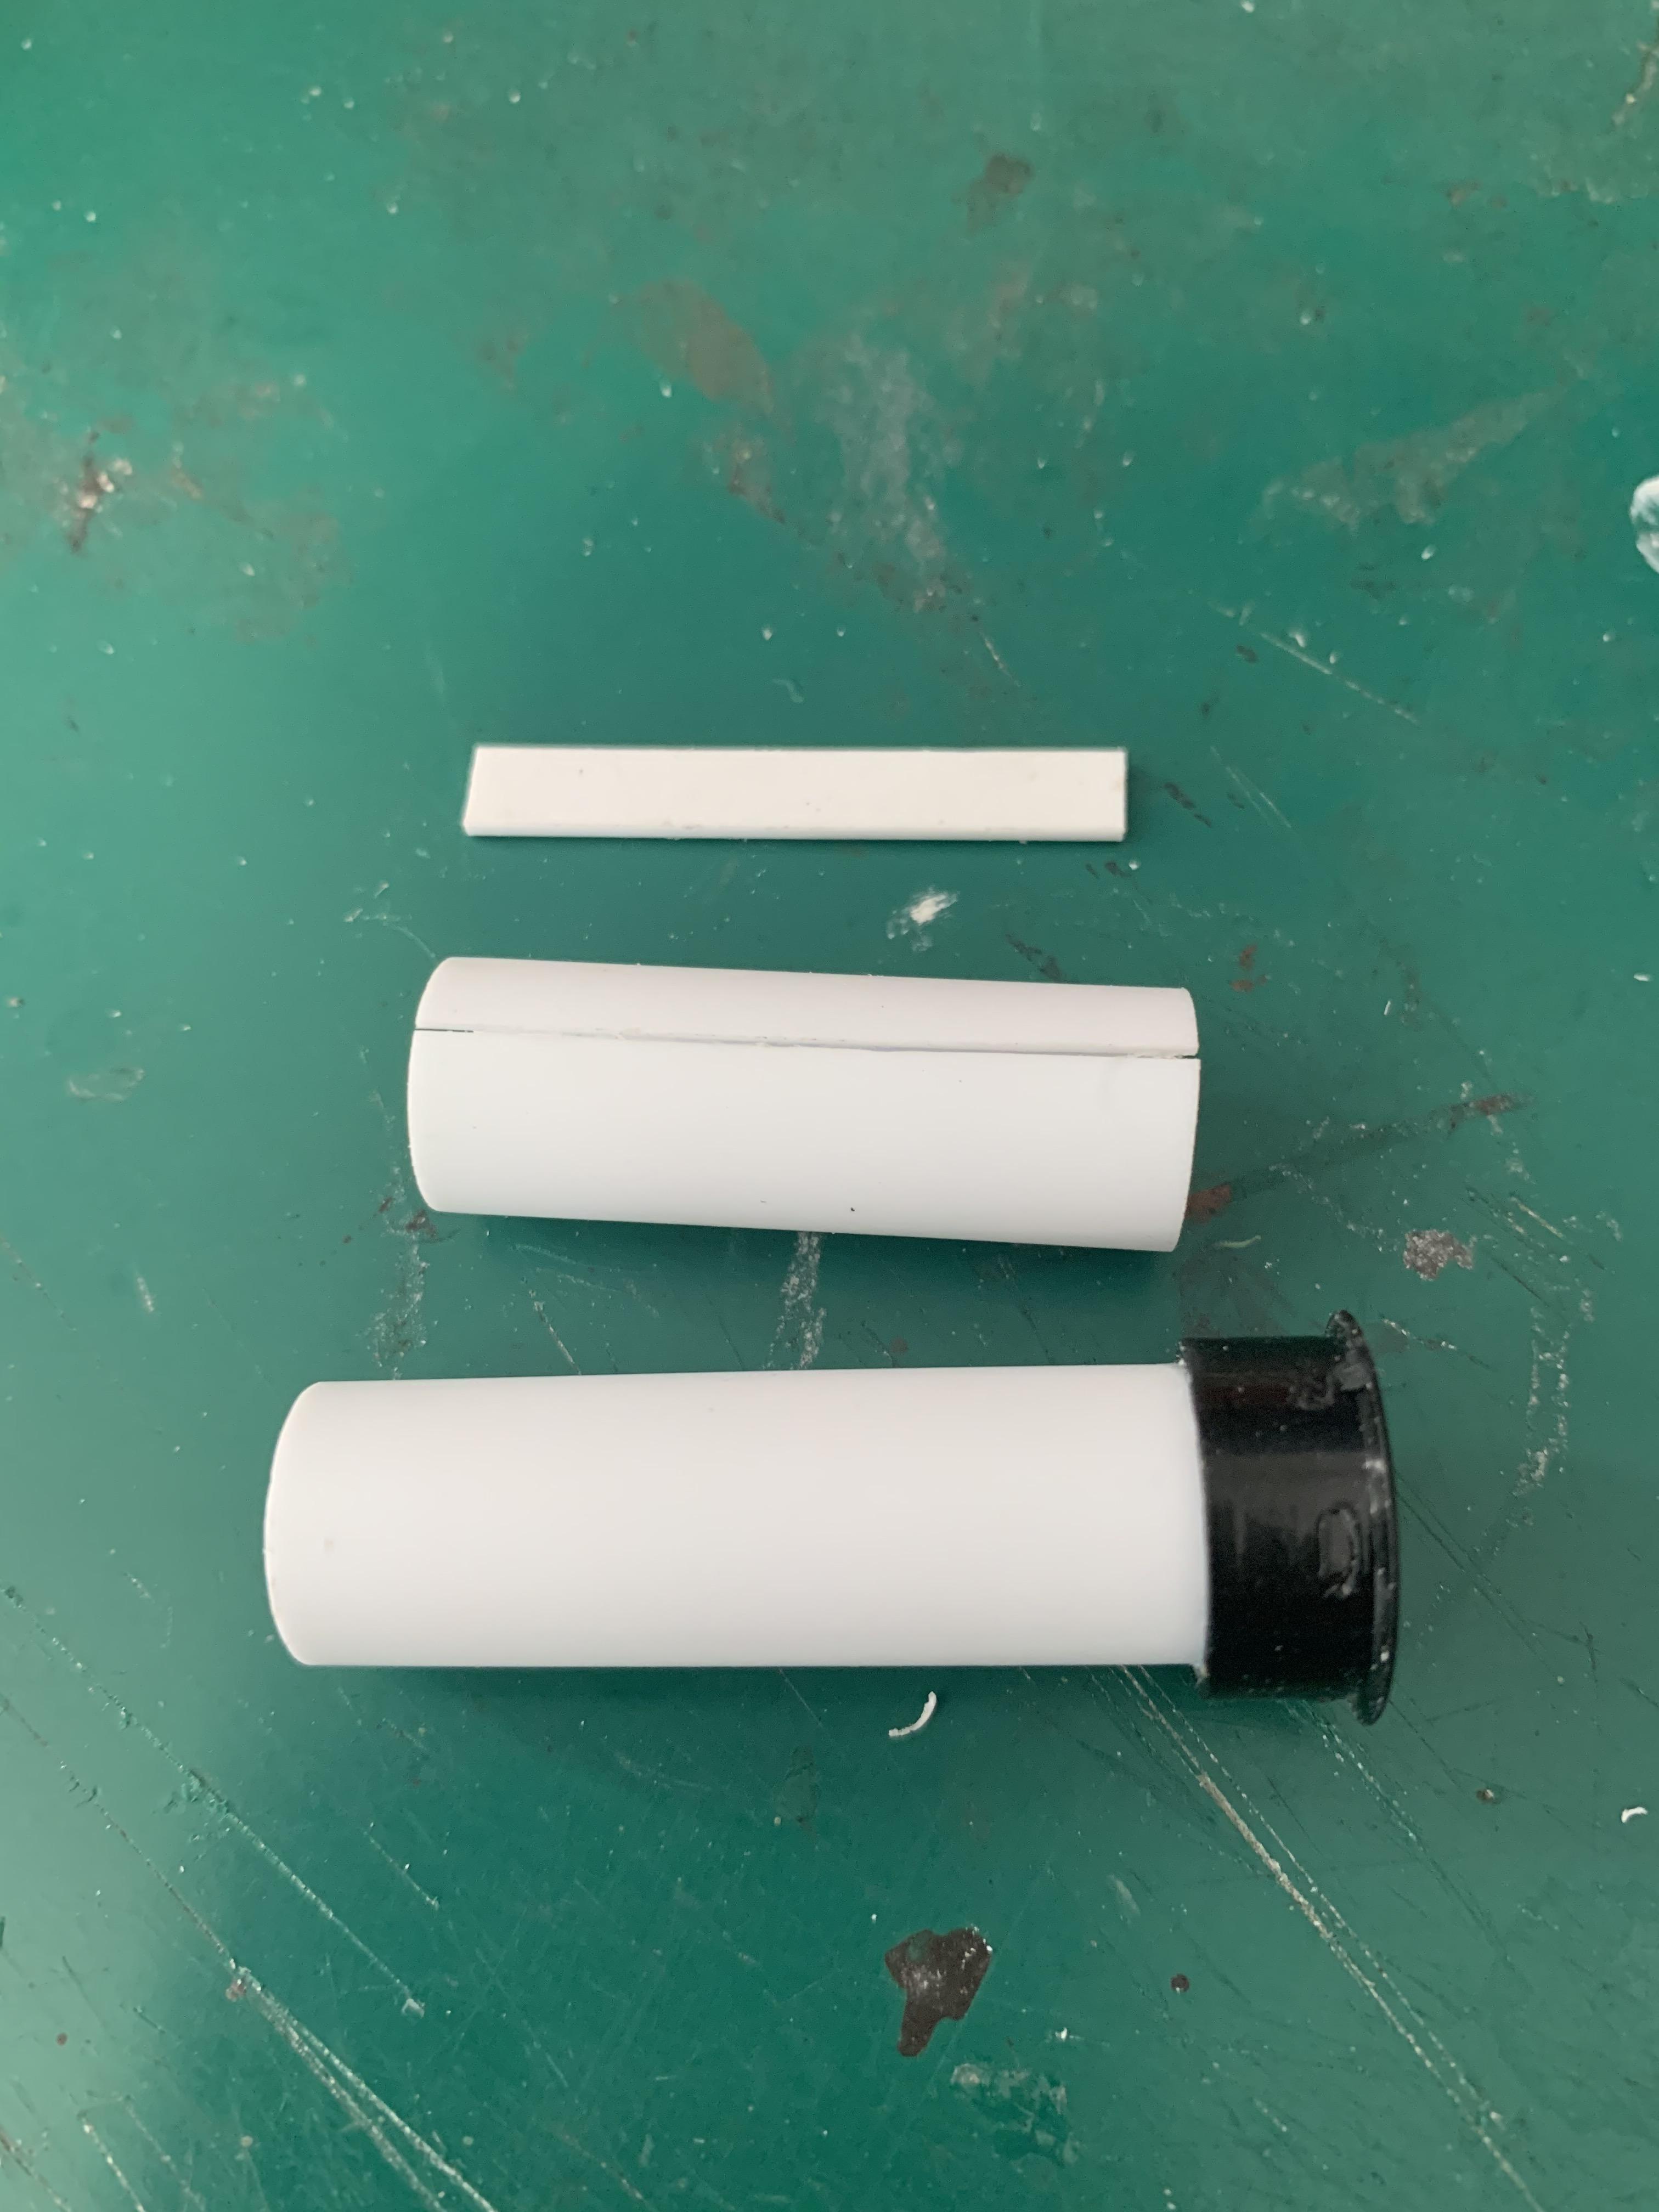
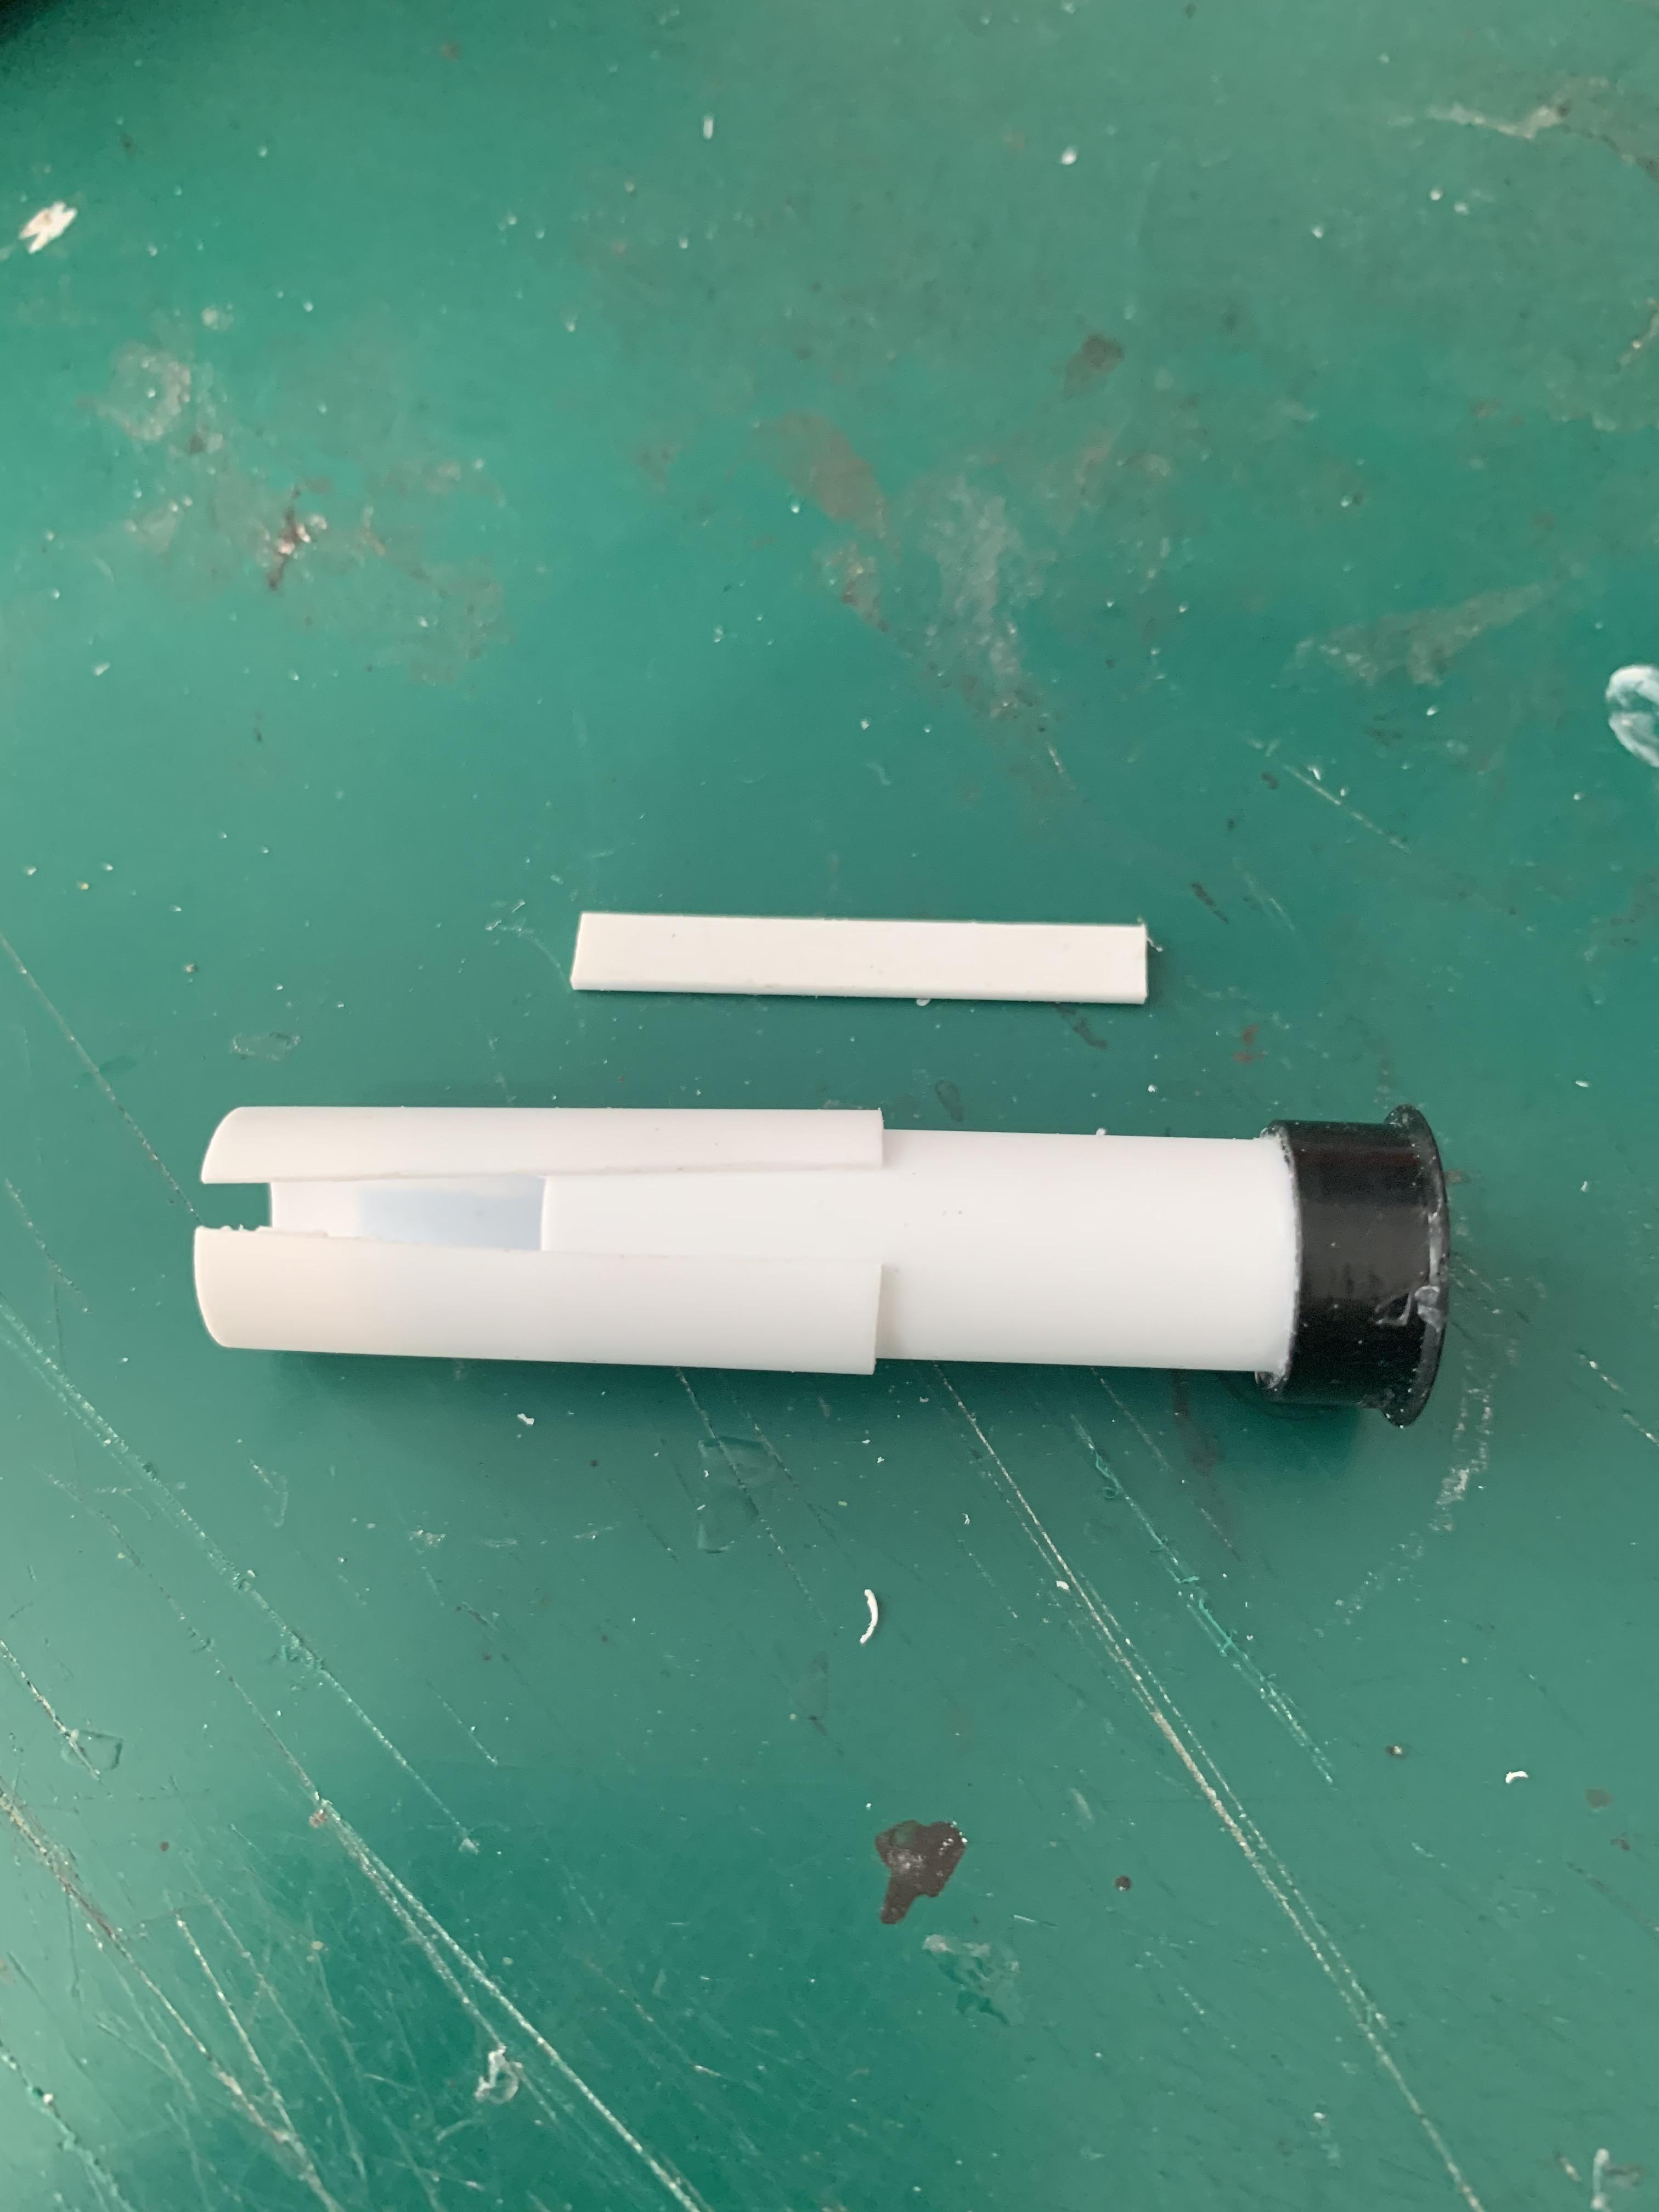
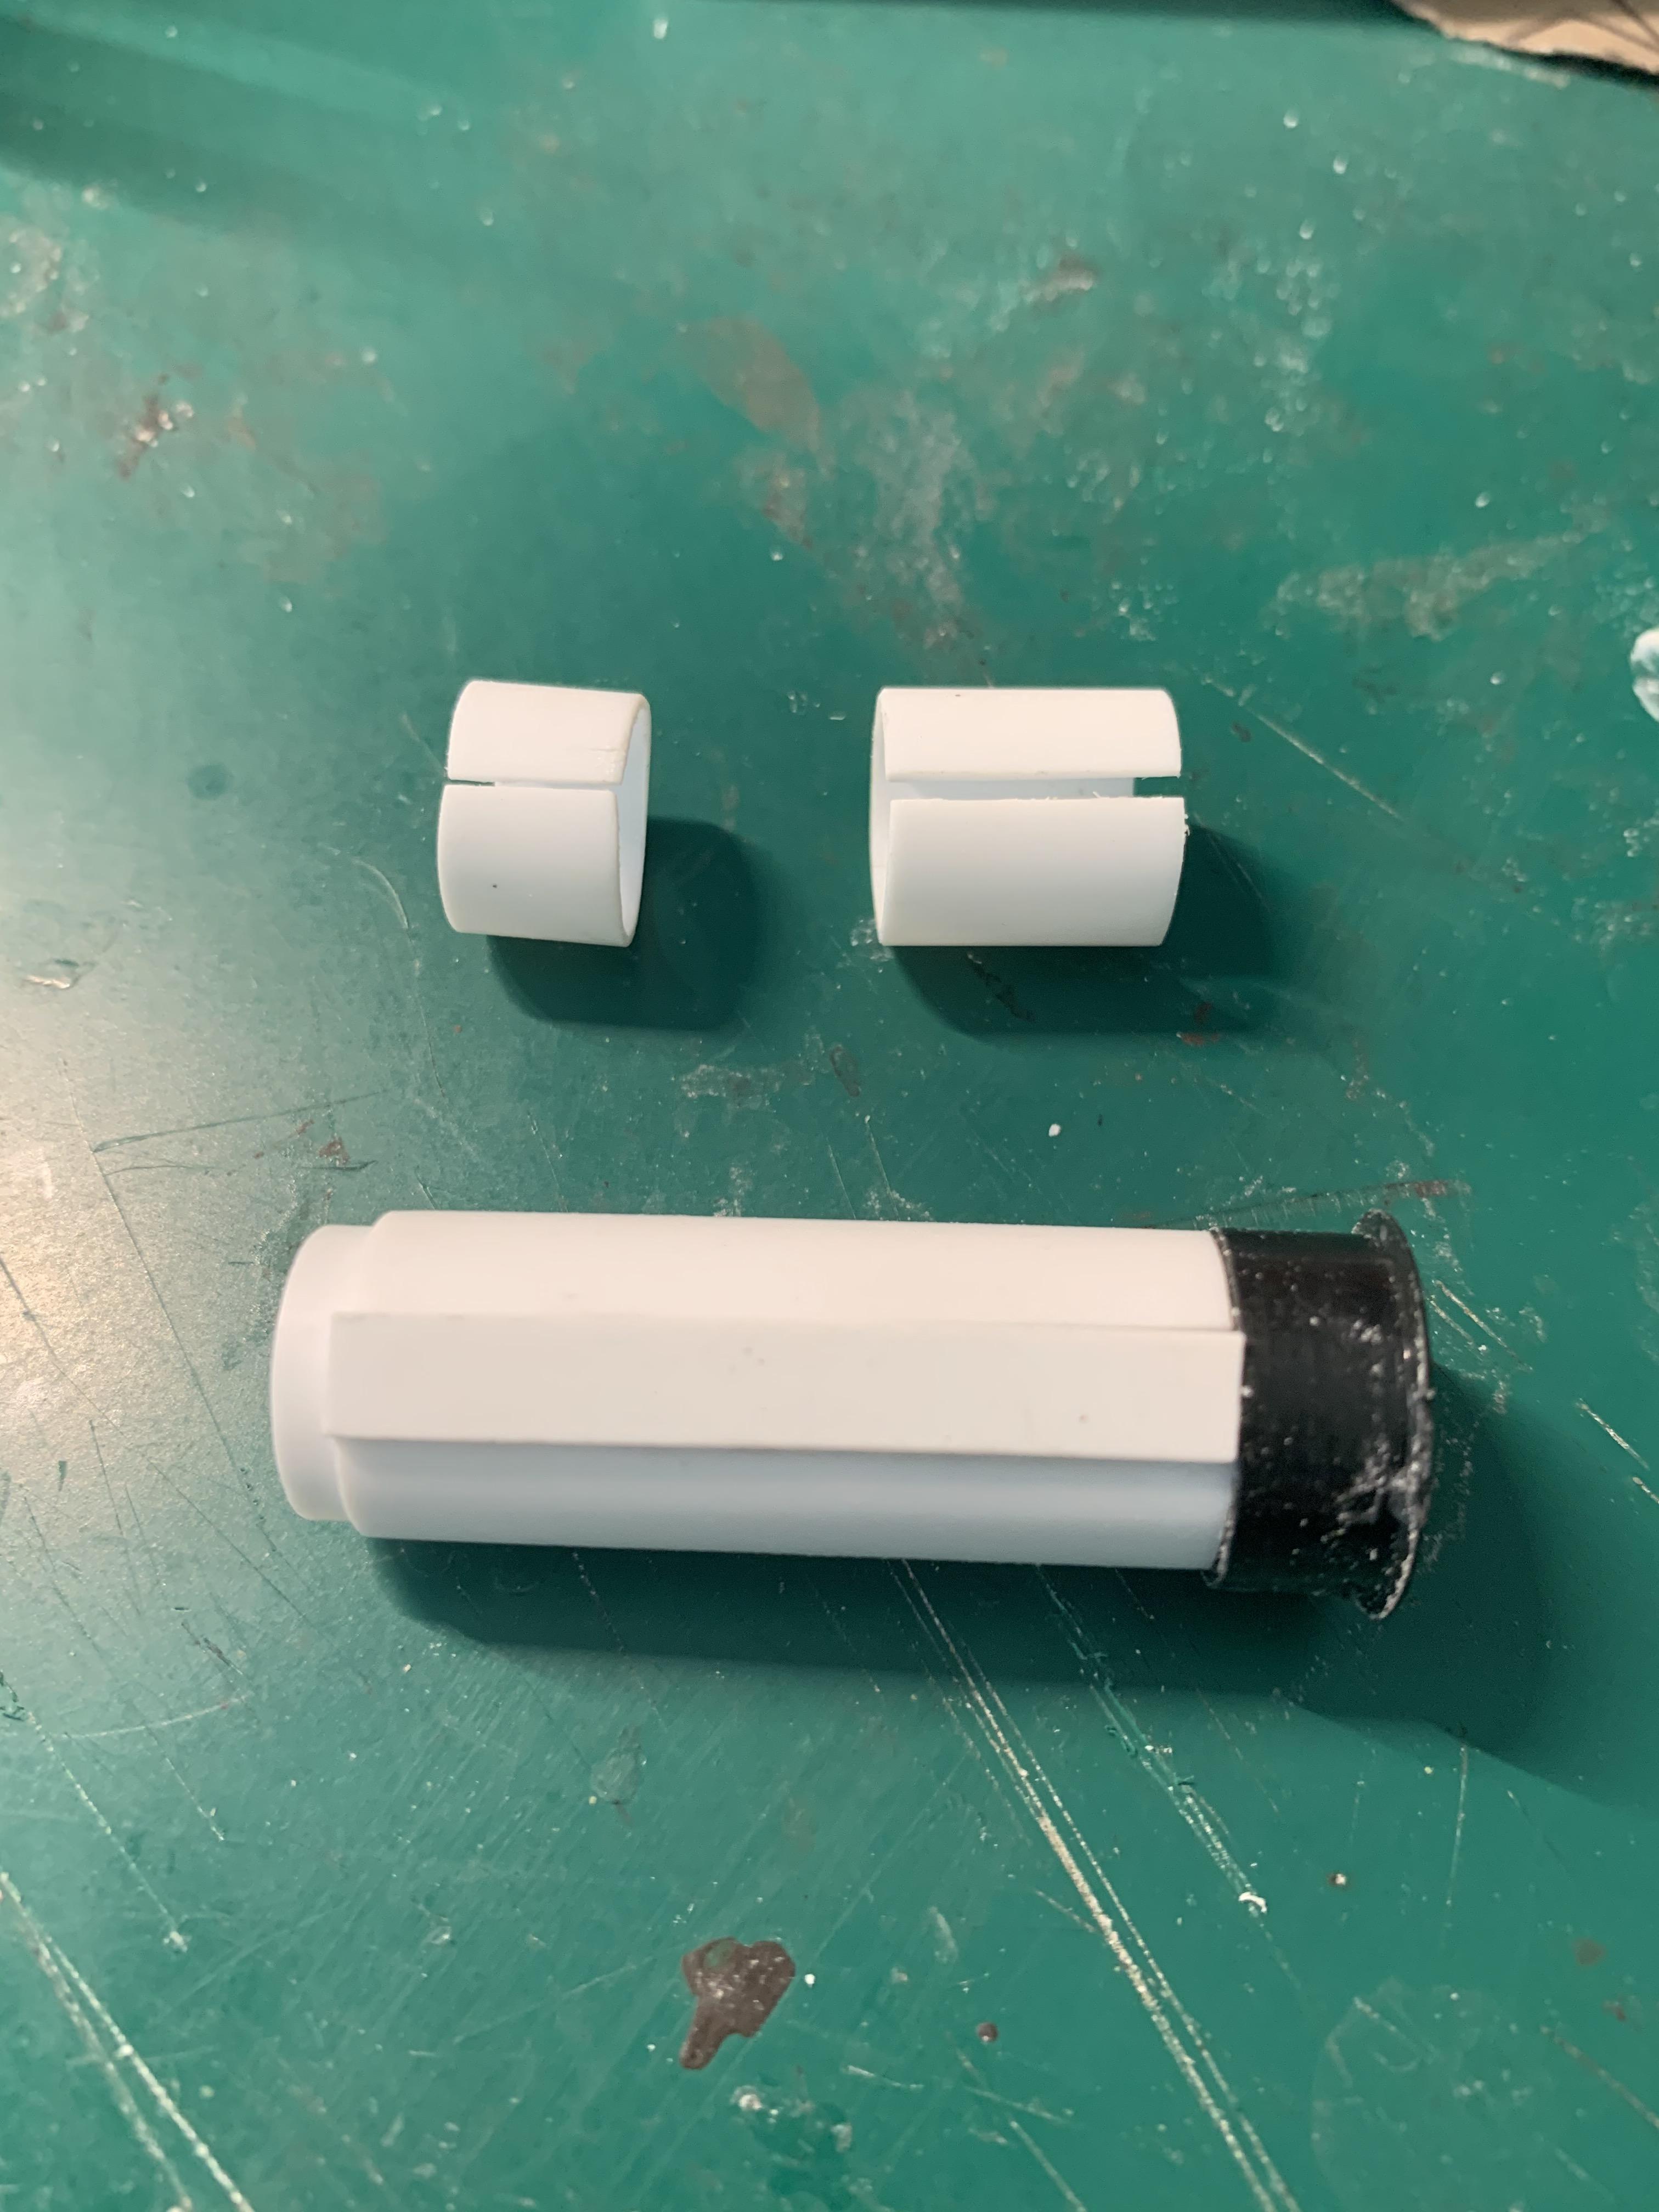
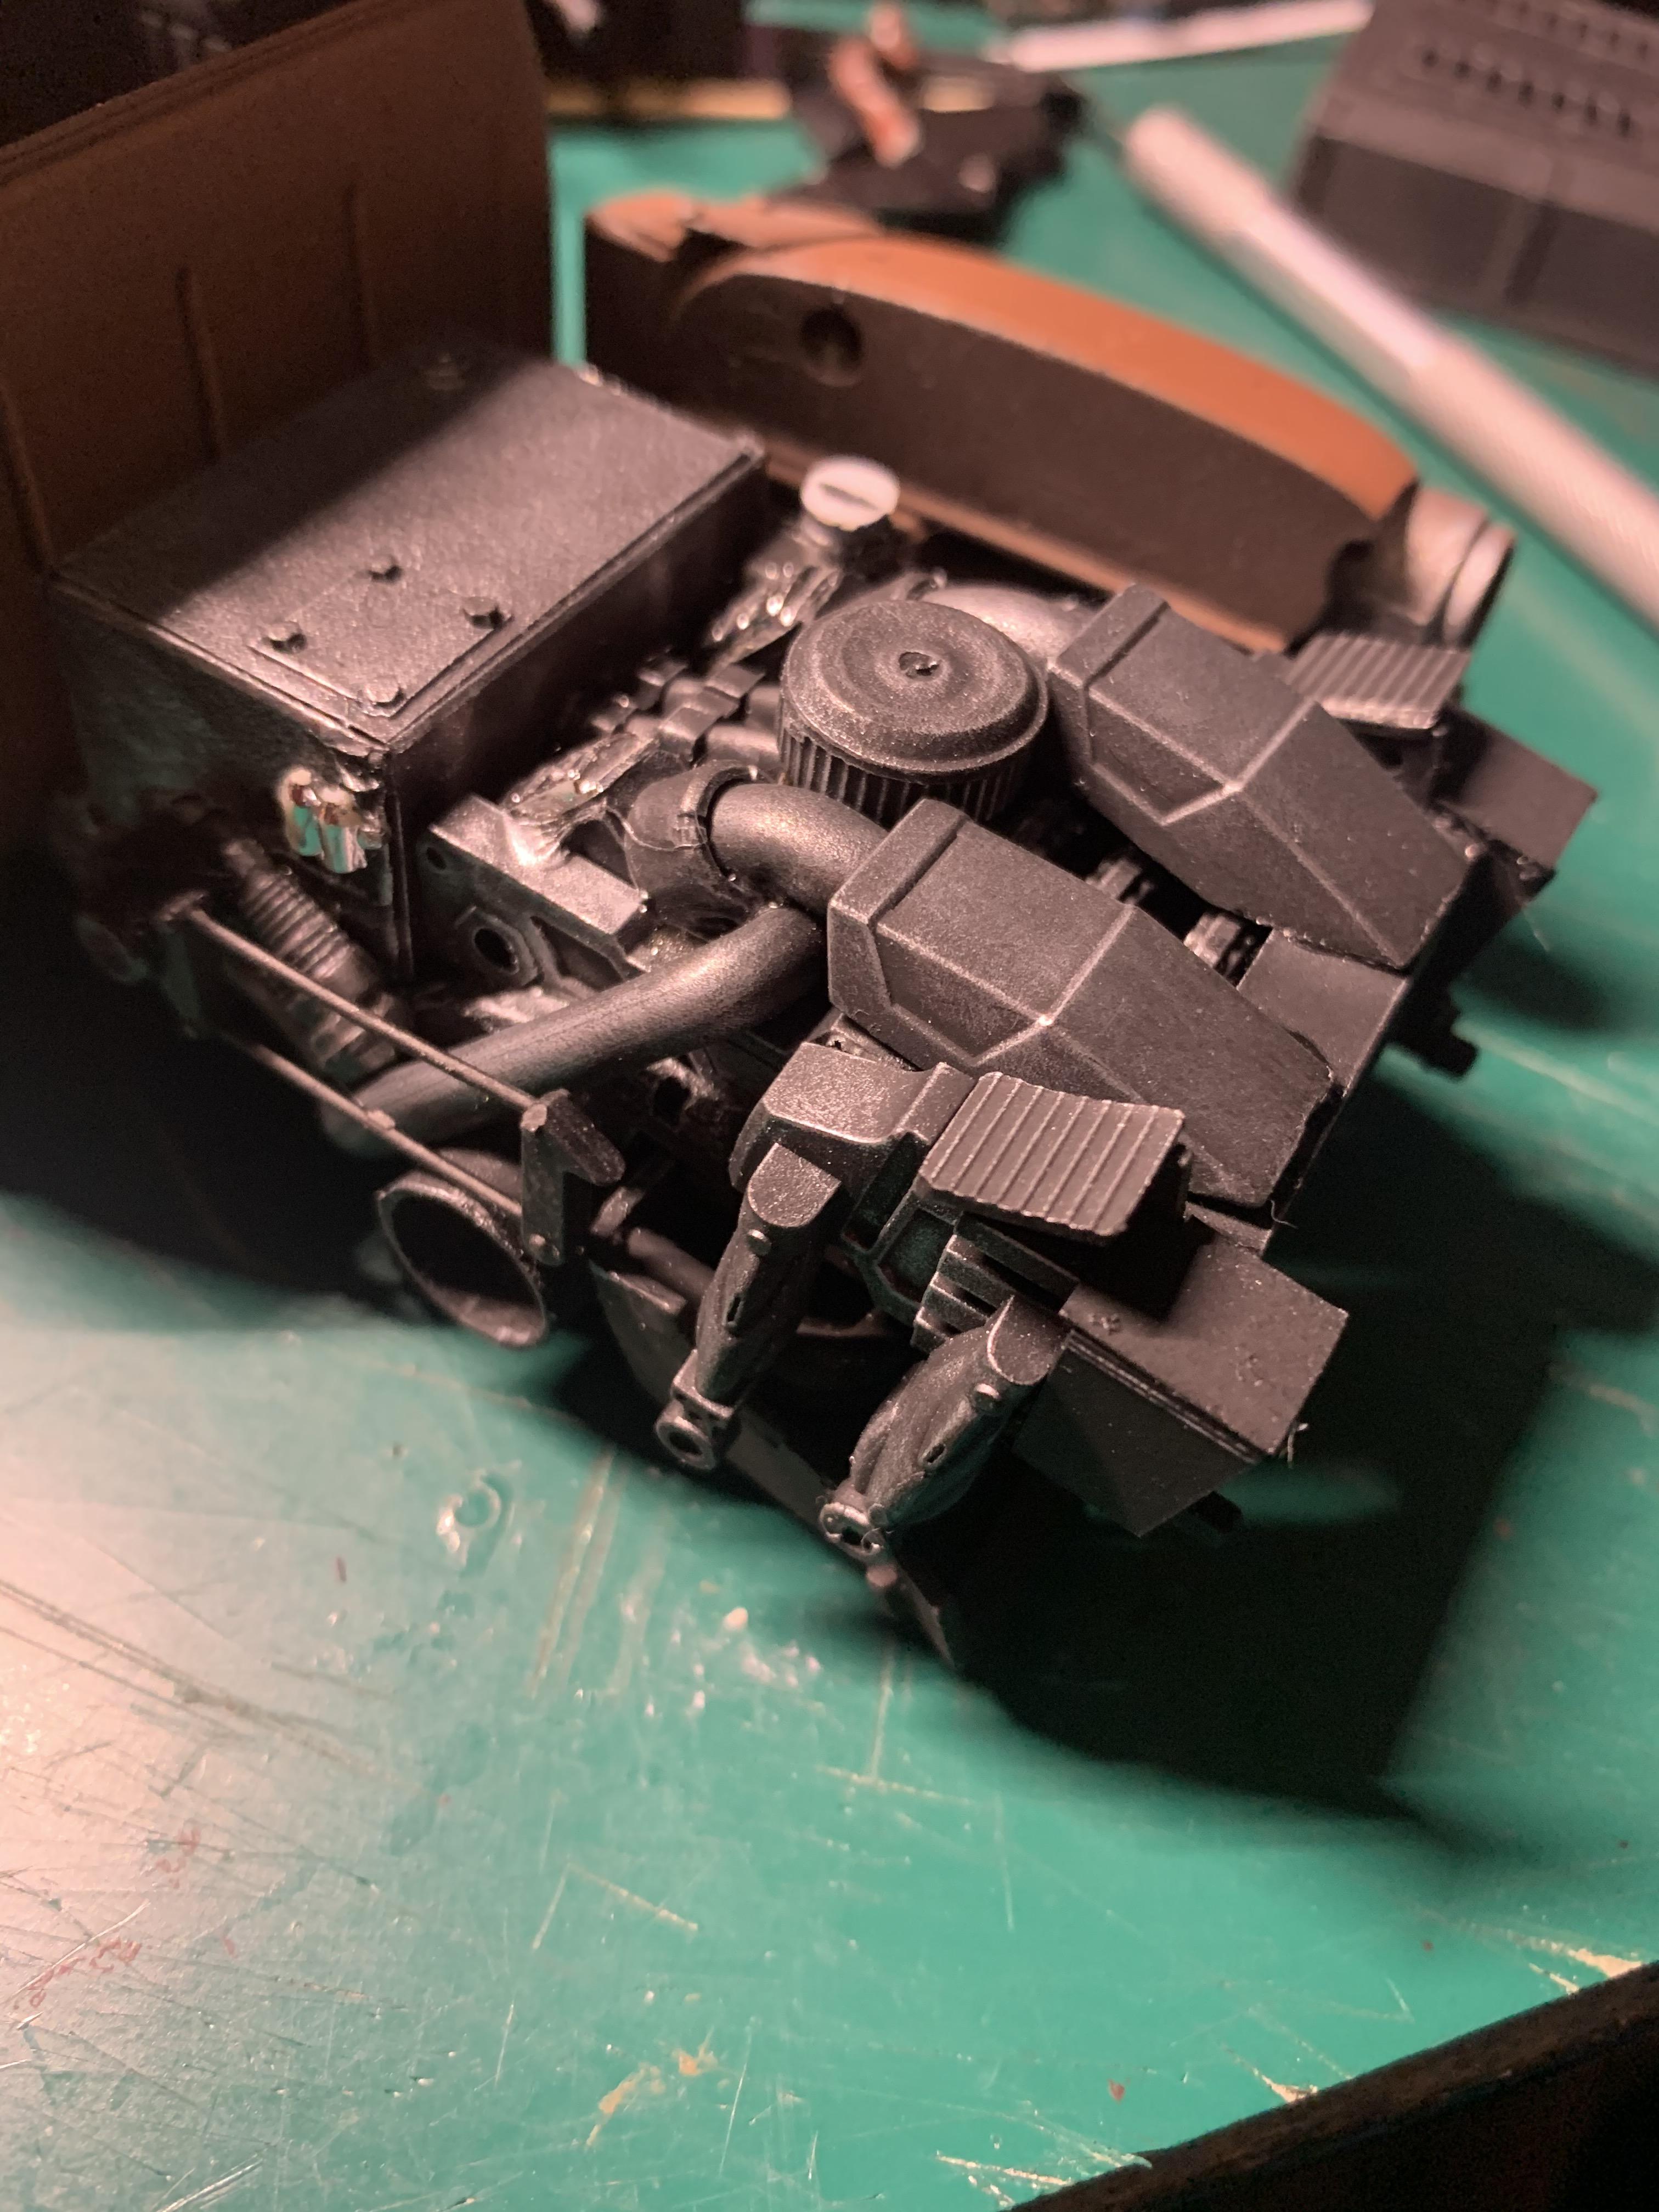
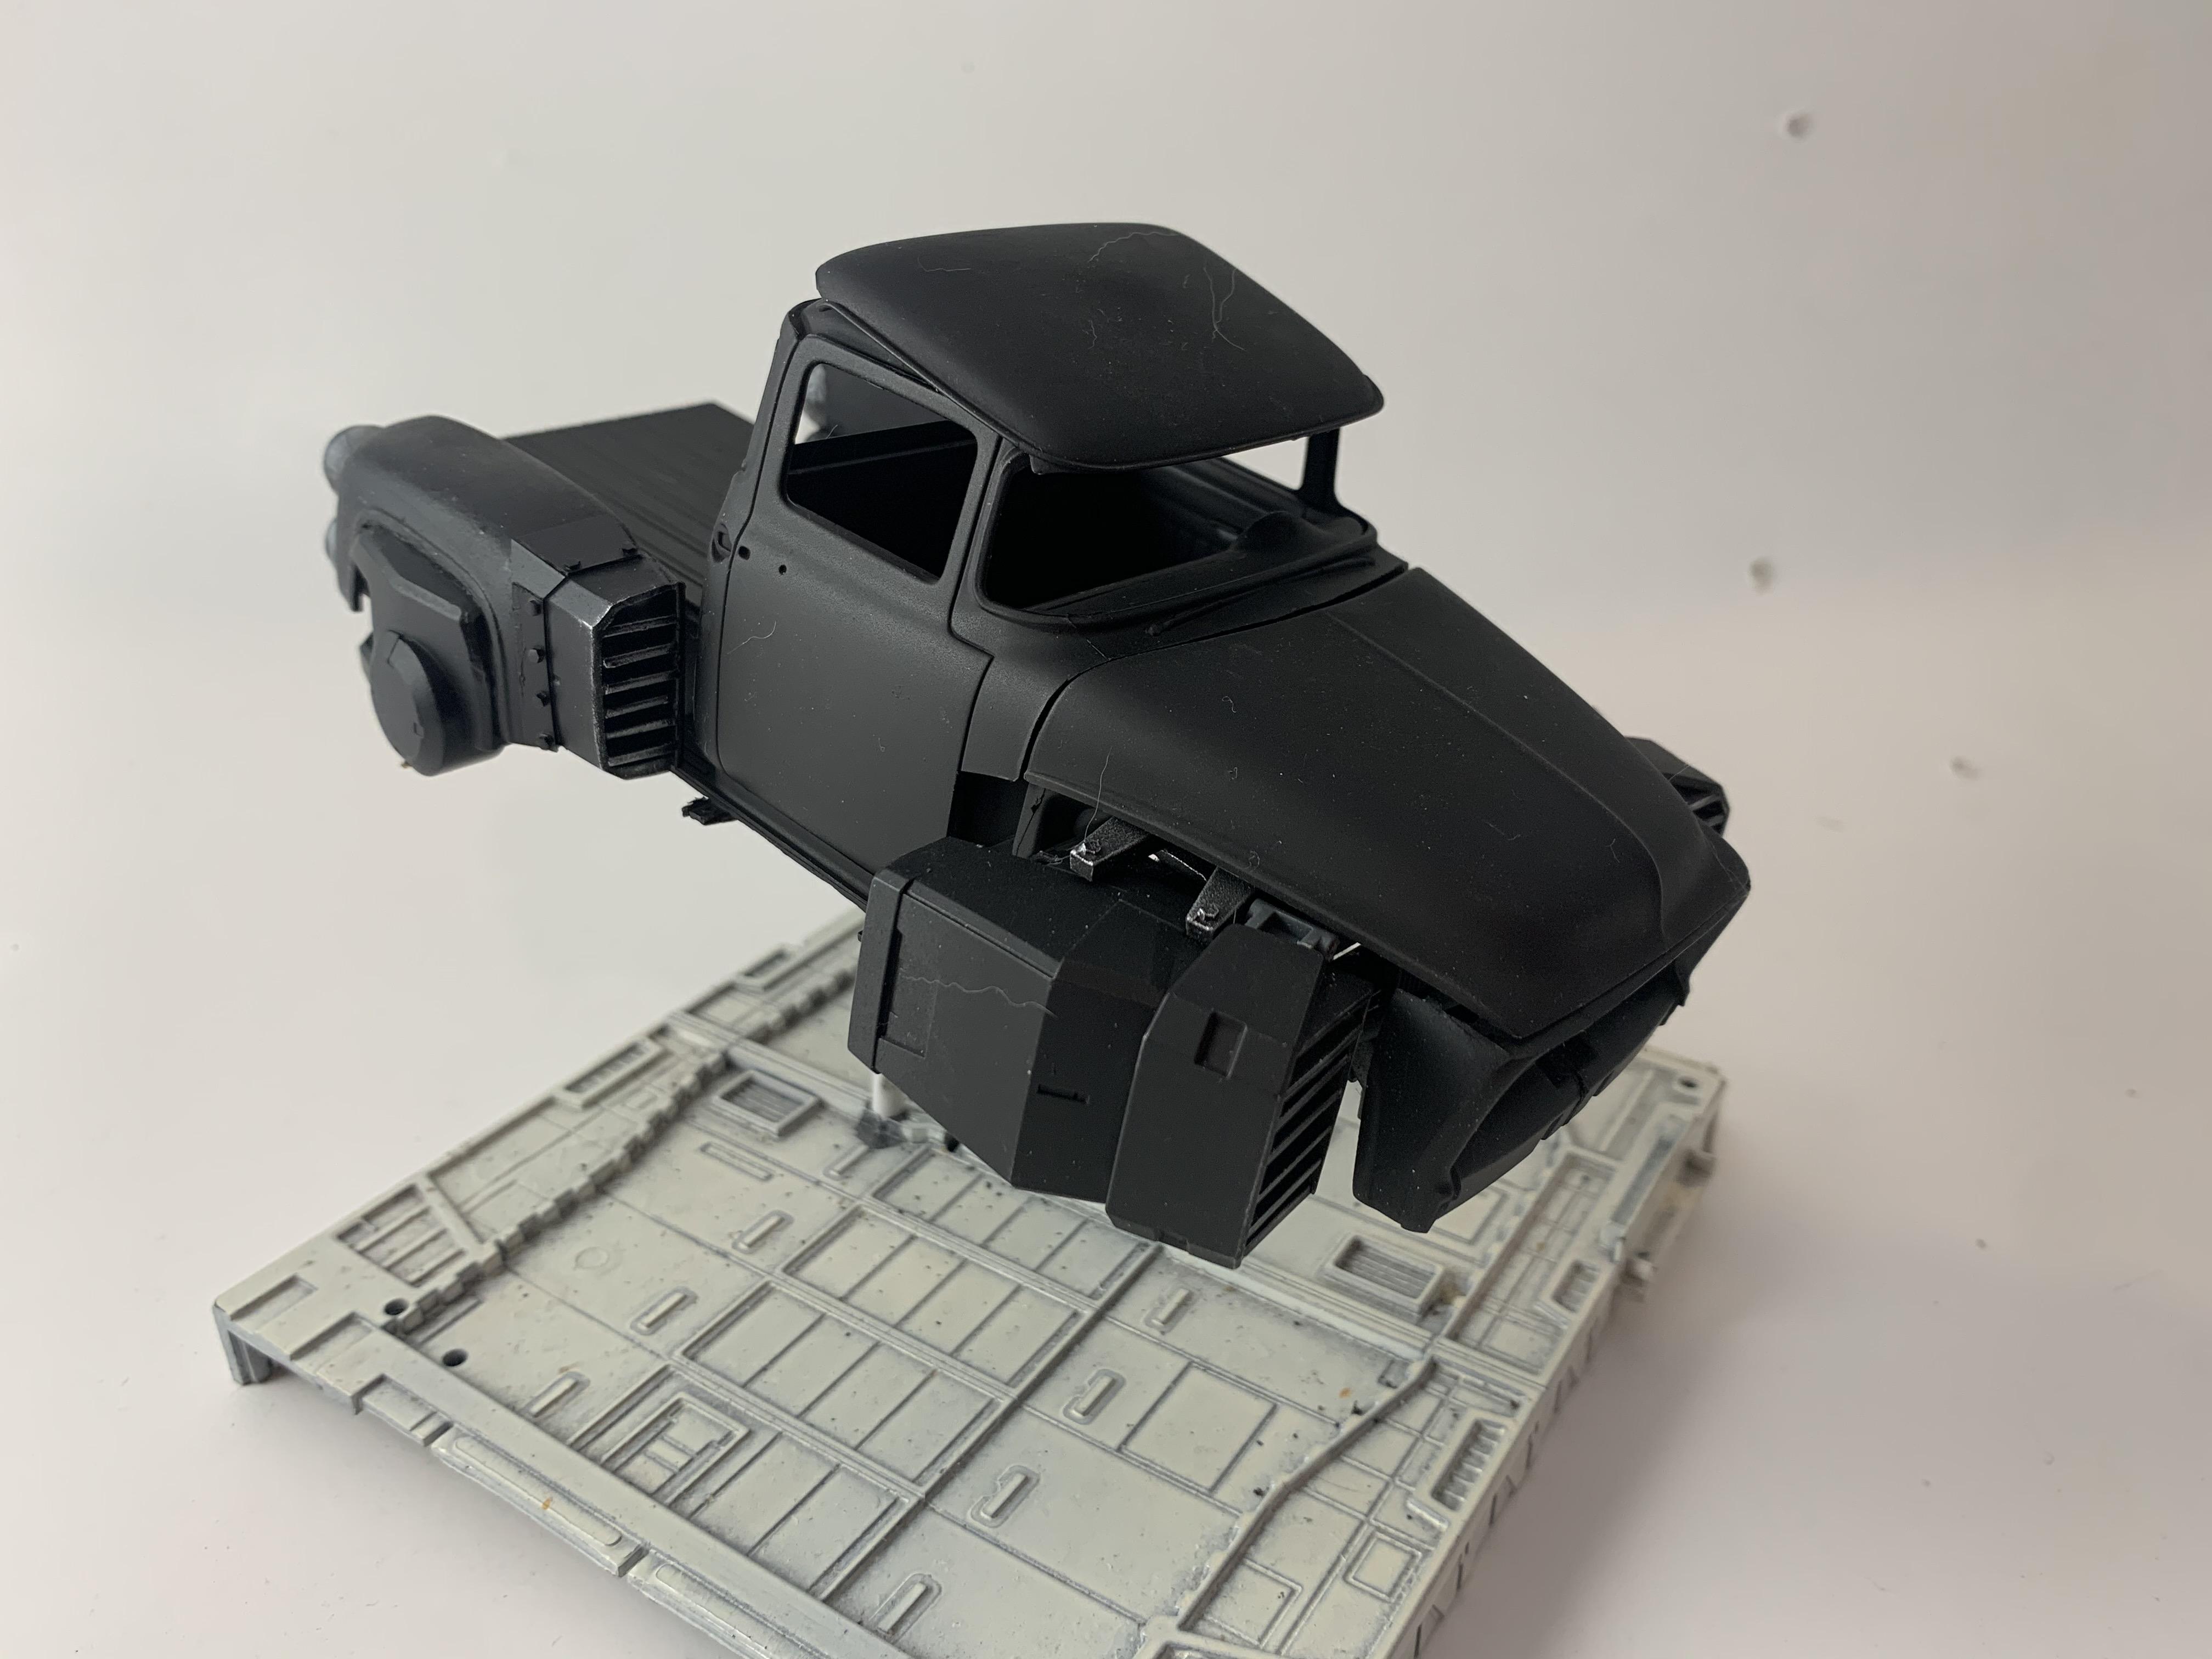
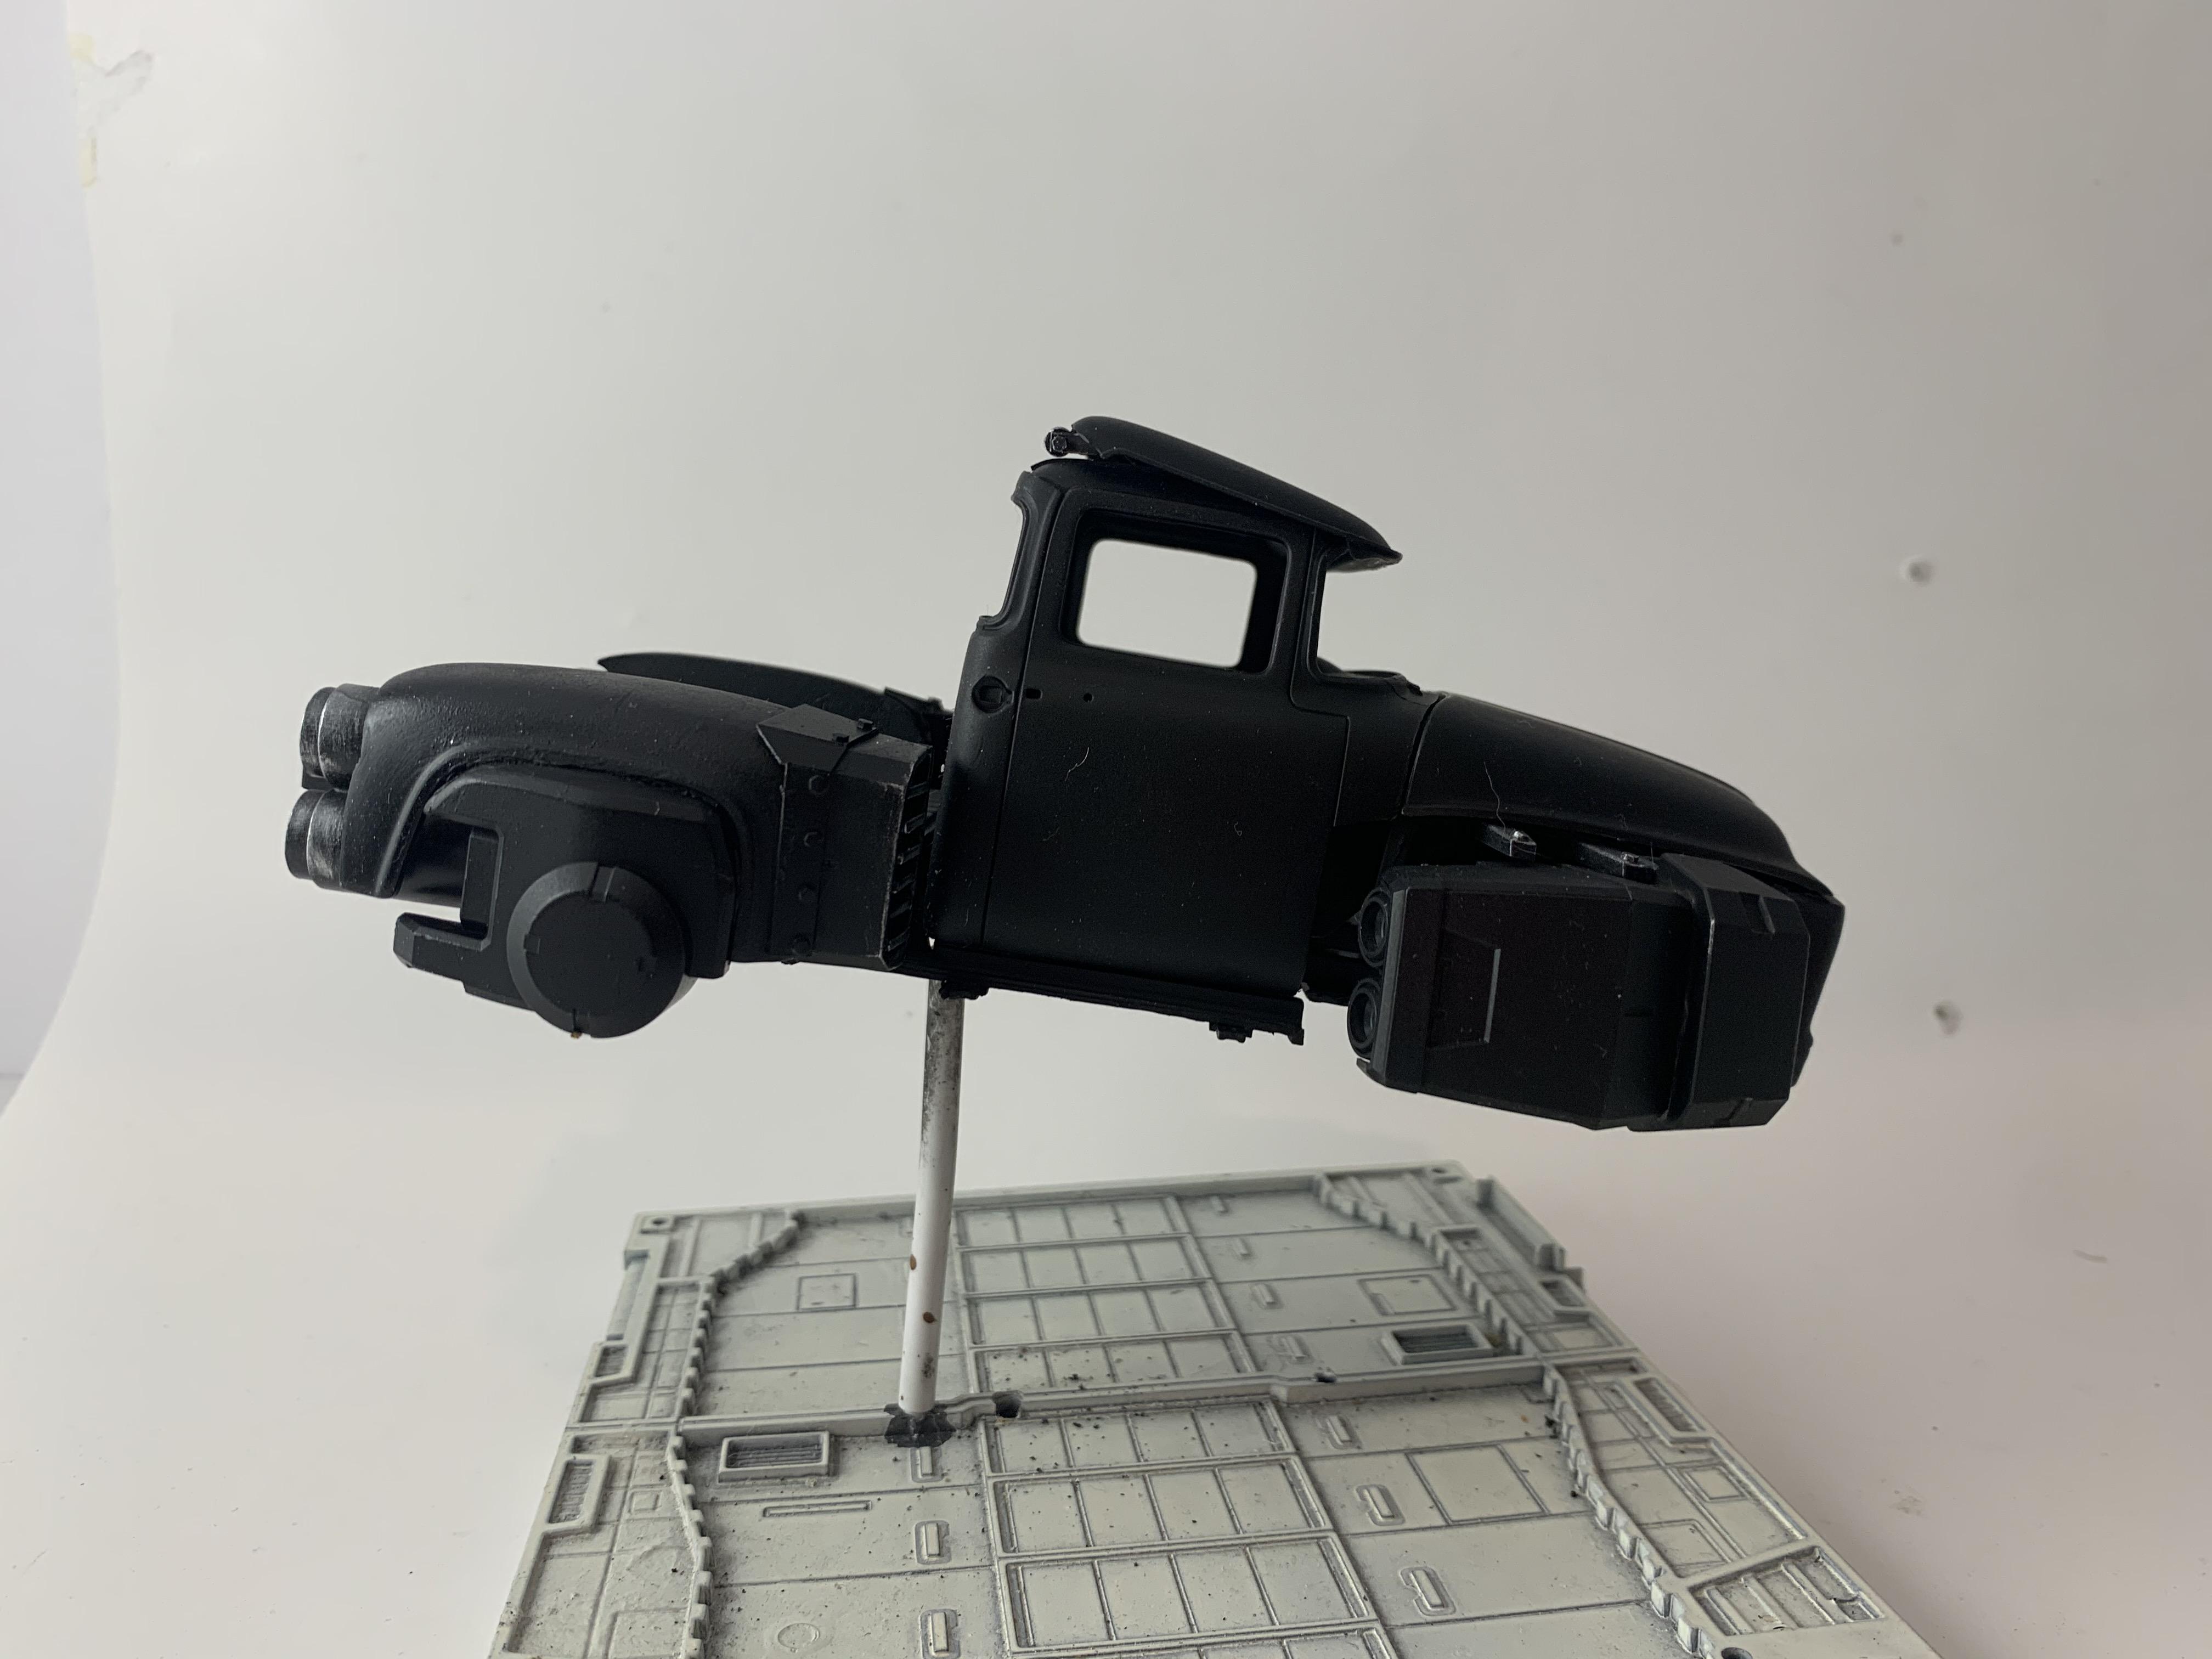
I primed it in flat black because it helps me see the overall picture better. Plus I like to highlight some of the mechanical parts in steel which looks great over the black. As I stated above, things will change from the beginning. The rear intakes in the previous photos were changed to these below. They match the fronts a little more closely now in size and shape.. This kit comes with a detachable roof. I used it to try to make a visor over the windshield. I added two tracks and rollers that pivot the roof up and forward. Looks cool right?! Well, don't get stuck on it because that's gonna change as well. The two little steel control arms sticking out from under the hood to the front thrusters.These added so much to the overall look. Remember the arm mechanism from the bed of the truck? It's now under the hood. Somebody looks angry. Miscellaneous junk added to the undercarriage. I try to fill all the bare spots with something, but at the same time it has to look like it serves a purpose.


.JPG.409b8daf617e20c295daac8e260f0a94.JPG)


.JPG.2bb4e84de14249987b24b077bcff2745.JPG)
