MJO
-
Posts
41 -
Joined
-
Last visited
Content Type
Profiles
Forums
Events
Gallery
Everything posted by MJO
-
Just dropped a line to Dave and we will see if he might sell a set of parts complete or not as long as I can get the Custom Grill. I will keep you posted. MJO
-
So here is another angle, will Dave Natale have a spare Marmon grill he might sell as a separate piece I wonder? I will have to inquire as to that possibility. Then there becomes a few kit bashing possibles to create a suitable Mamon clone. Always kit bashing, another project in the works. MJO
-
I guess first thank you for that info. Second, let me know when you get the cab kit (pictures etc.) this way I will hav a clue as to buy or not. By the way, I did not see a translate option on the page, is there one I missed? Thanks again. MJO
-
Good morning! I am tryin to locate a Marmon 110 inch cabover resin body. The site I know of (American Industrial Truck Models) Dave Natale has not been casting much since the Covid-19 crisis so I am wondering if there might be another source. Drop me a line here or a notification either is good. Thanks all. MJO
-
Well, let me say this about that. As some of you have read my intro, I have been doing this for a very long time (I am 70 and building for 63 0f them) I still enjoy building, but now in a very different way. First of all, when I feel stress or frustration coming on I have learned to just put it down, Come back when I feel better and can see a better way to proceed. Next, I have found that you need to have a clear vision of what you are trying to build, but do not be afraid to change what or how you are going to do it. I call it letting the model tell me what is next not the other way around. I have really great ideas as to how and what I like and want but many times I was wrong and the model was right. So all in all have fun, put it down with no shame and most of all appreciate the work you do, it is your vision after all. MJO
-
Bronco Crawler Build
MJO replied to MJO's topic in Model Trucks: Pickups, Vans, SUVs, Light Commercial
That is good to hear, thank you very much. This build was a lot of fun. Figuring it all out, I do this a little different, there is a plan but nothing cut in stone, I let the model tell me where and what the next step is, this way it really has a flow all its own. MJO -
1:12 scale Ferrari 312T
MJO replied to JohnnyK's topic in WIP: Other Racing: Road Racing, Land Speed Racers
Well, today I have been lucky enough to go through some stuff and I also found a YouTube video. -
1:12 scale Ferrari 312T
MJO replied to JohnnyK's topic in WIP: Other Racing: Road Racing, Land Speed Racers
Just one more little tip bit, Model Rectifier Corporation is a Parent Company. They do not make any models but handle Companies Like Academy and Tamiya in the past. MJO -
1:12 scale Ferrari 312T
MJO replied to JohnnyK's topic in WIP: Other Racing: Road Racing, Land Speed Racers
Model Rectifier was the US importer that handled Tamiya early on and then Tamiya eventually took over all US imports themselves. Much better for Tamiya and probably for the US too. -
1:12 scale Ferrari 312T
MJO replied to JohnnyK's topic in WIP: Other Racing: Road Racing, Land Speed Racers
Item 12019-4000 12019 indicates a re-release. If the # had been 1219 chances are it would have been a Model Rectifier. Reason I ask is there are collectors and dealers who ask the same price for re-releases as the original. I found out several years ago before buying a LolaT-70 that the price that I thought to be excessive turned out to be just about right. This is when I found out about the difference. Hope you did not have to over pay for a super kit from Tamiya. There 1/12 kits are excellent and the quality never varied from original to re-release. Have a blast and keep up the excellent job you are doing. Later, MJO -
1:12 scale Ferrari 312T
MJO replied to JohnnyK's topic in WIP: Other Racing: Road Racing, Land Speed Racers
I have a question for you. What is the release number on the box and is it a Model Rectifirer kit. The number on old original Rectifier kits were 4 digits, re-releases have a extra digit (usually a 0) to indicate a re-release. No big deal, just curious. I have been building 1/12 kits since 1968, and have several of bot the original Rectifiers and some of the re-releases. Excellent work, wish I had the knowledge to build better kits back then when I was a kid. MJO WOW!!! -
This will effect the drying process and will be effected by the what is under it. Some paints are not compatible with one another because of the content of the paint. Once upon a time, there was only lacquers out there to use so compatibility was never an issue. Welcome to the 21st century.
-
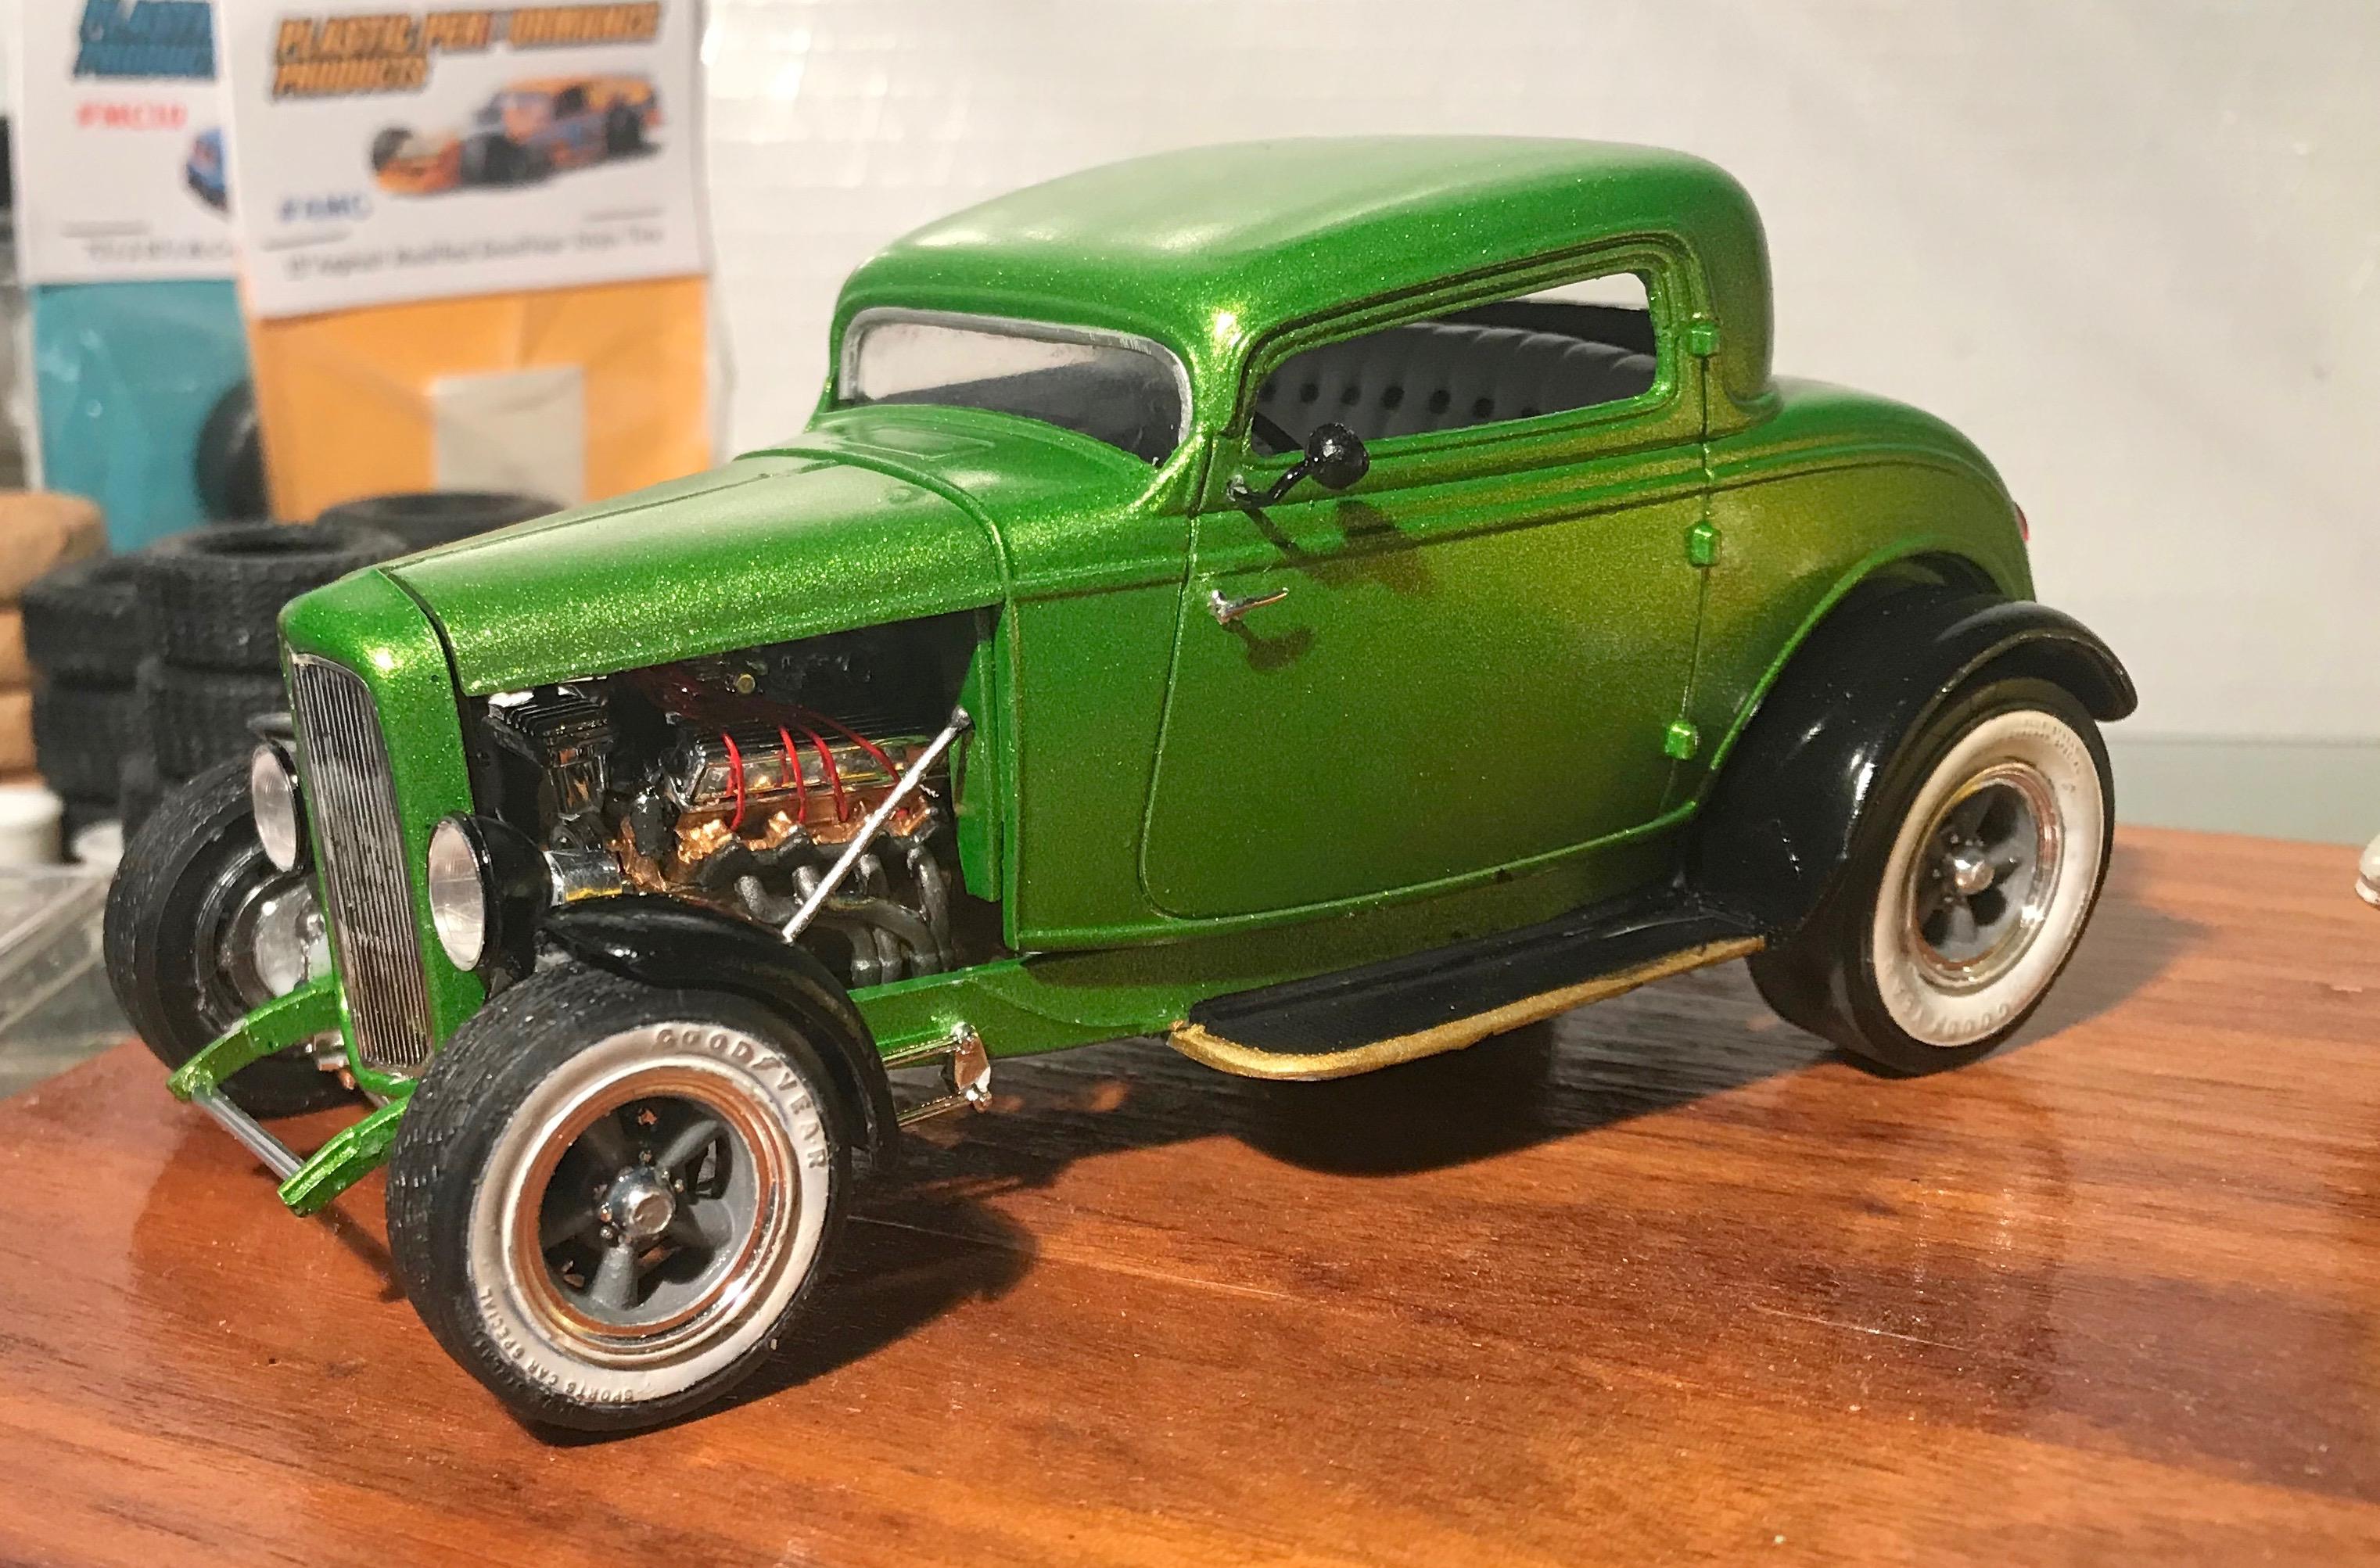
Hey you are welcome. You might take a look at my gallery , but I will just put it here. This is my '32 3 window with a 427 CID tucked (hehe) in it. Major firewall and floor tunnel to get it in, fun stuff!!

-
This is an interesting problem. I use to be in Aerospace (34 years) and one of my many functions was vehicle painting prep, priming and top coats. I see that Methyl Isobutyl Ketone is the same family tree as Methyl Ethyl Ketone, which was banned from use 25 years ago because it was cancer causing and also displayed to wide a variance in results. To flat, bubbling, and crinkling durning dry out processes. I do not know if this is the problem, but it could be. The two examples you show circled blue and red, which one came first, With or without Methyl Isobutyl Ketone. This is a big change in formula.
-
Pretty Nice build, clean and OMG a Ford engine in a Ford, good man, I am PROUD!!!
-
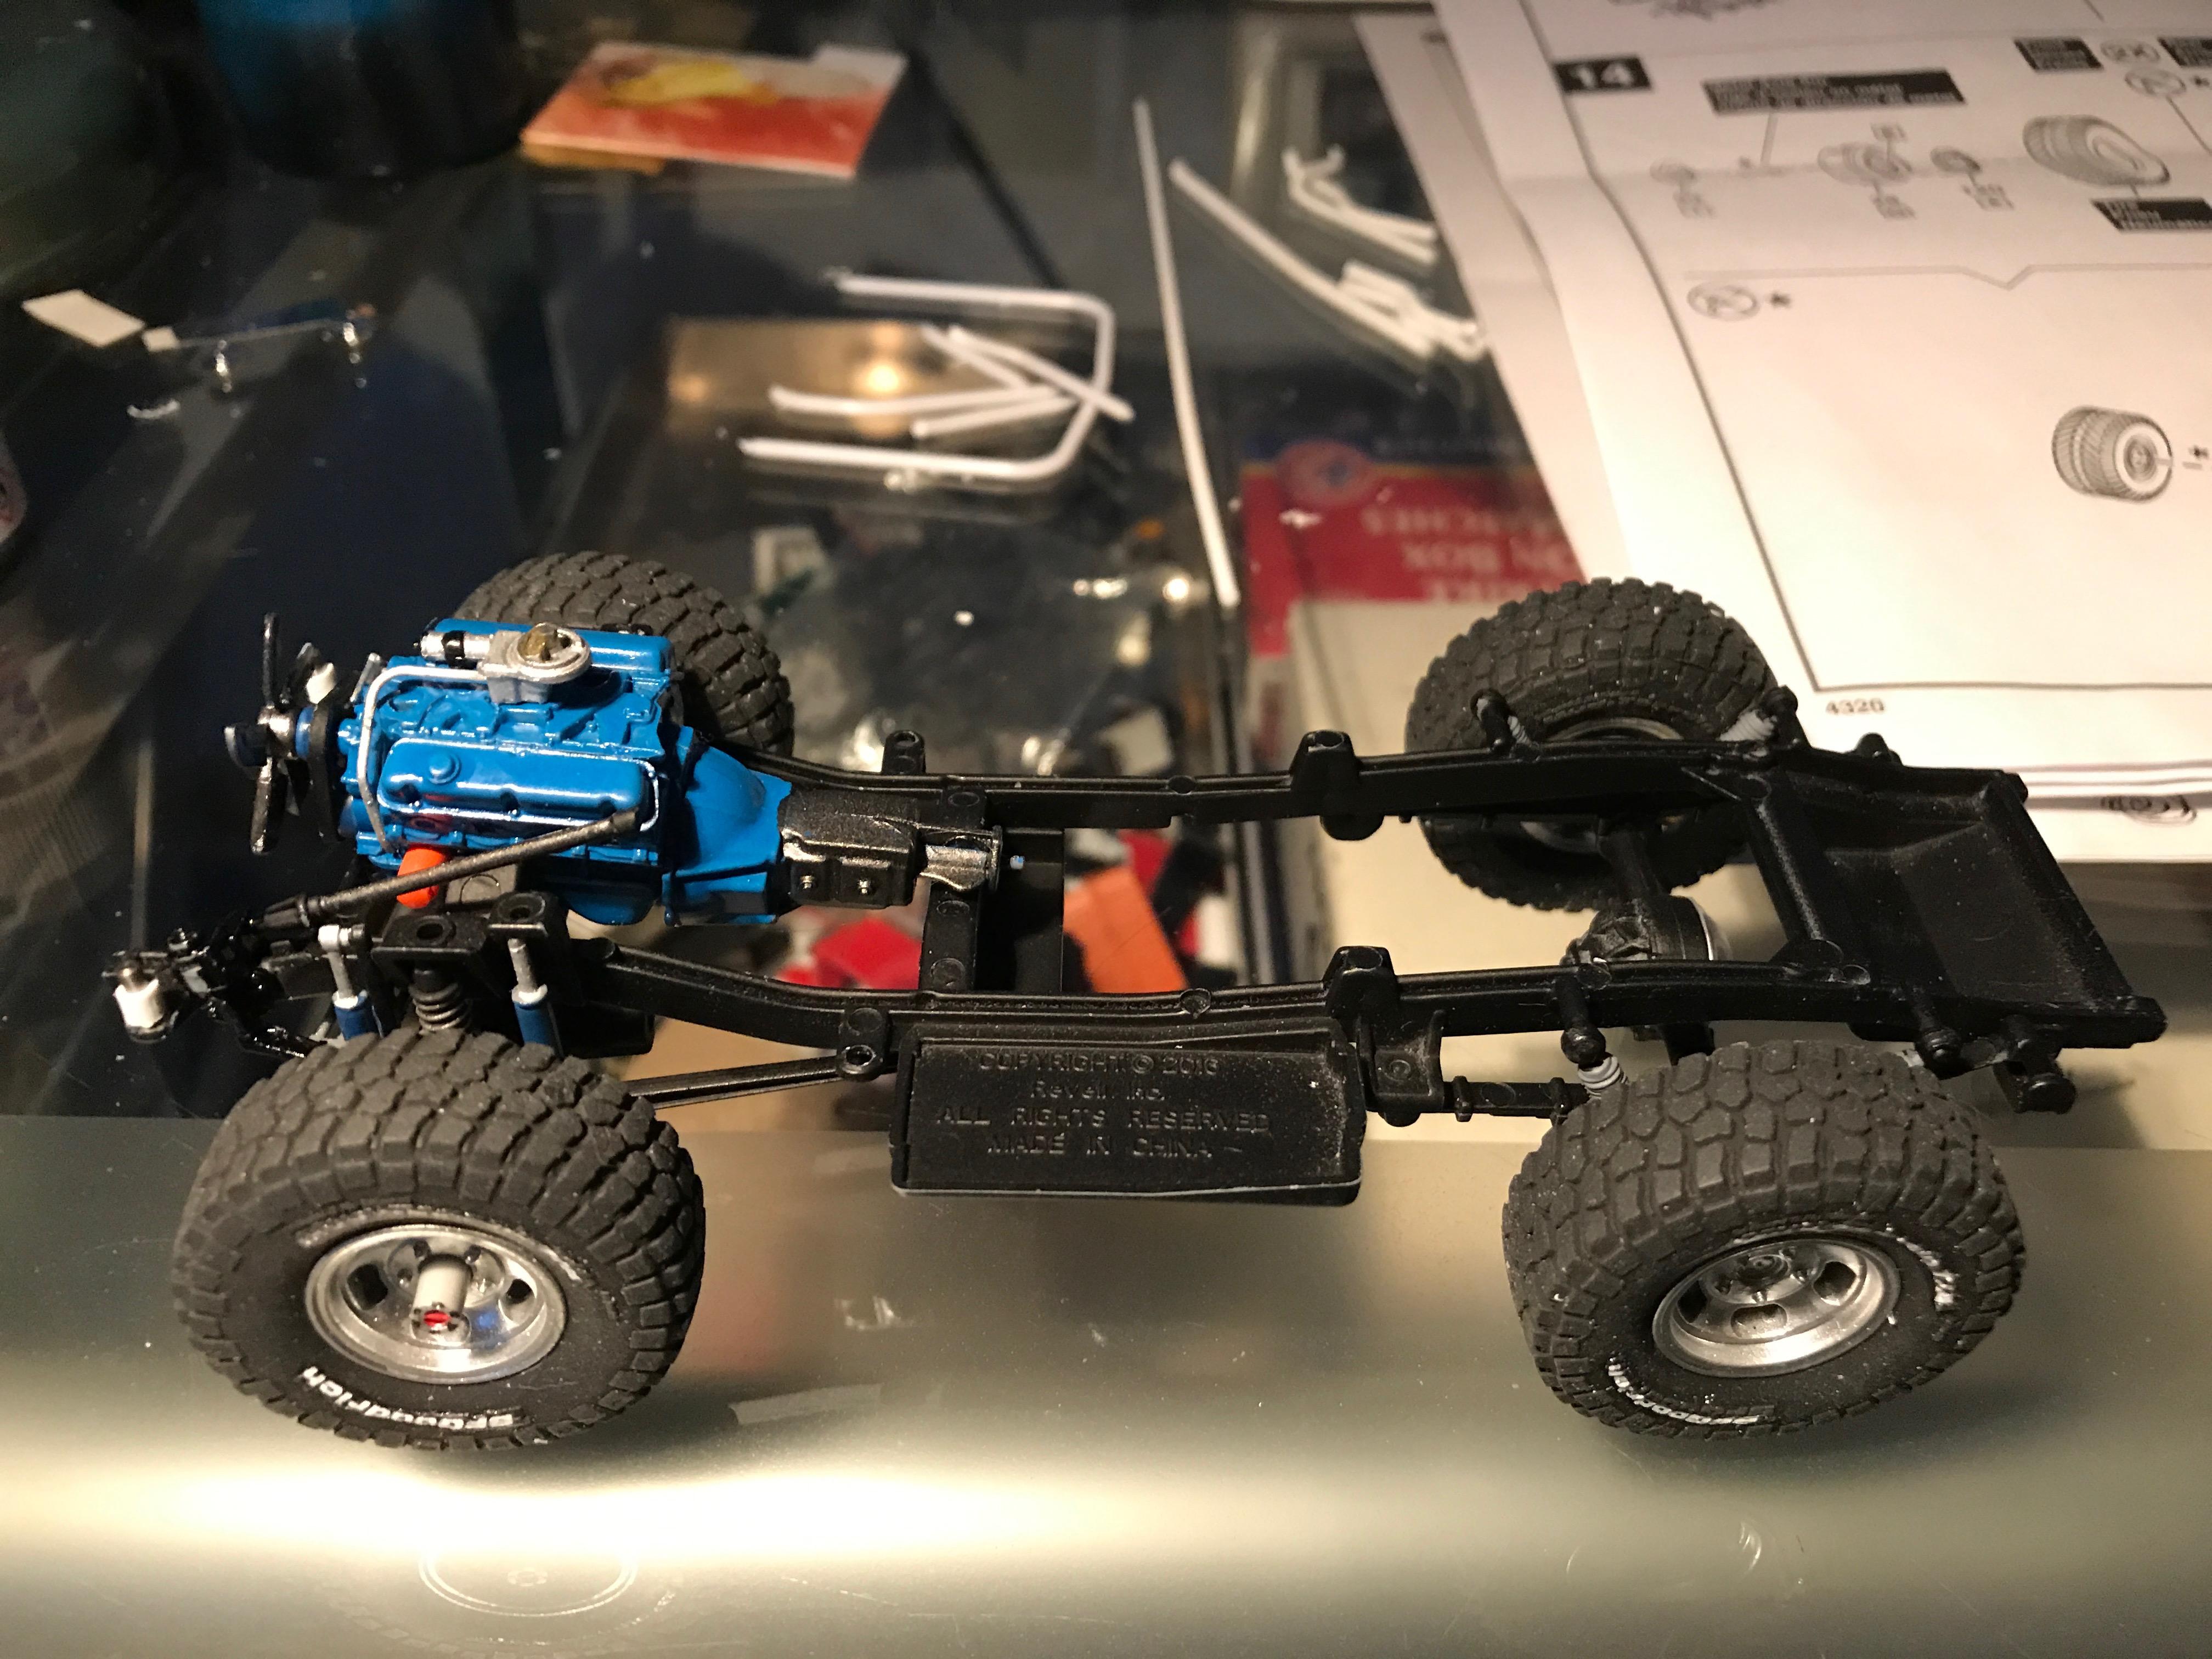
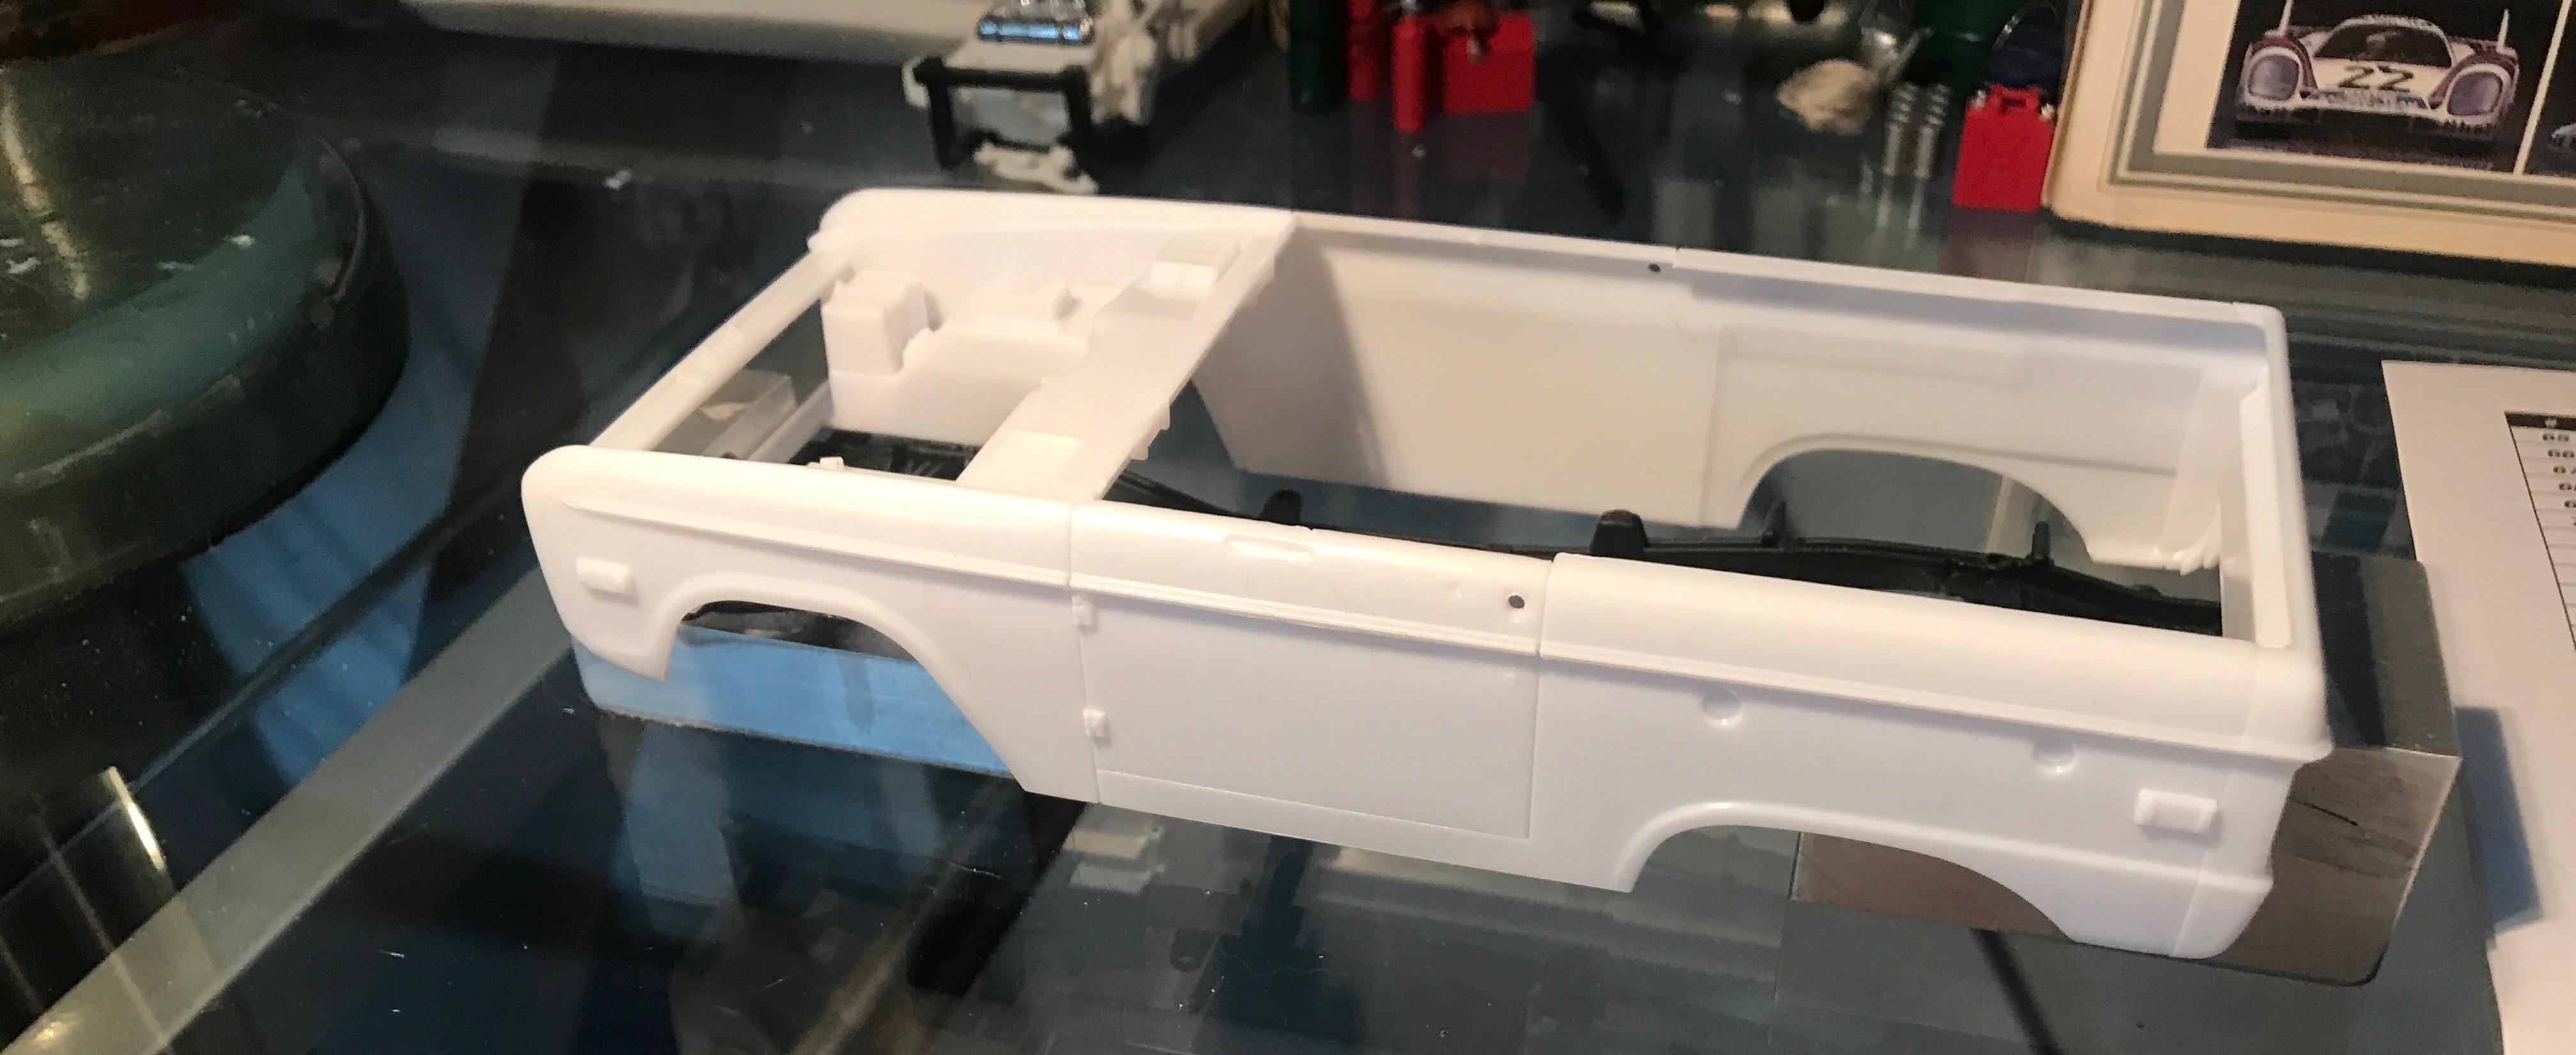
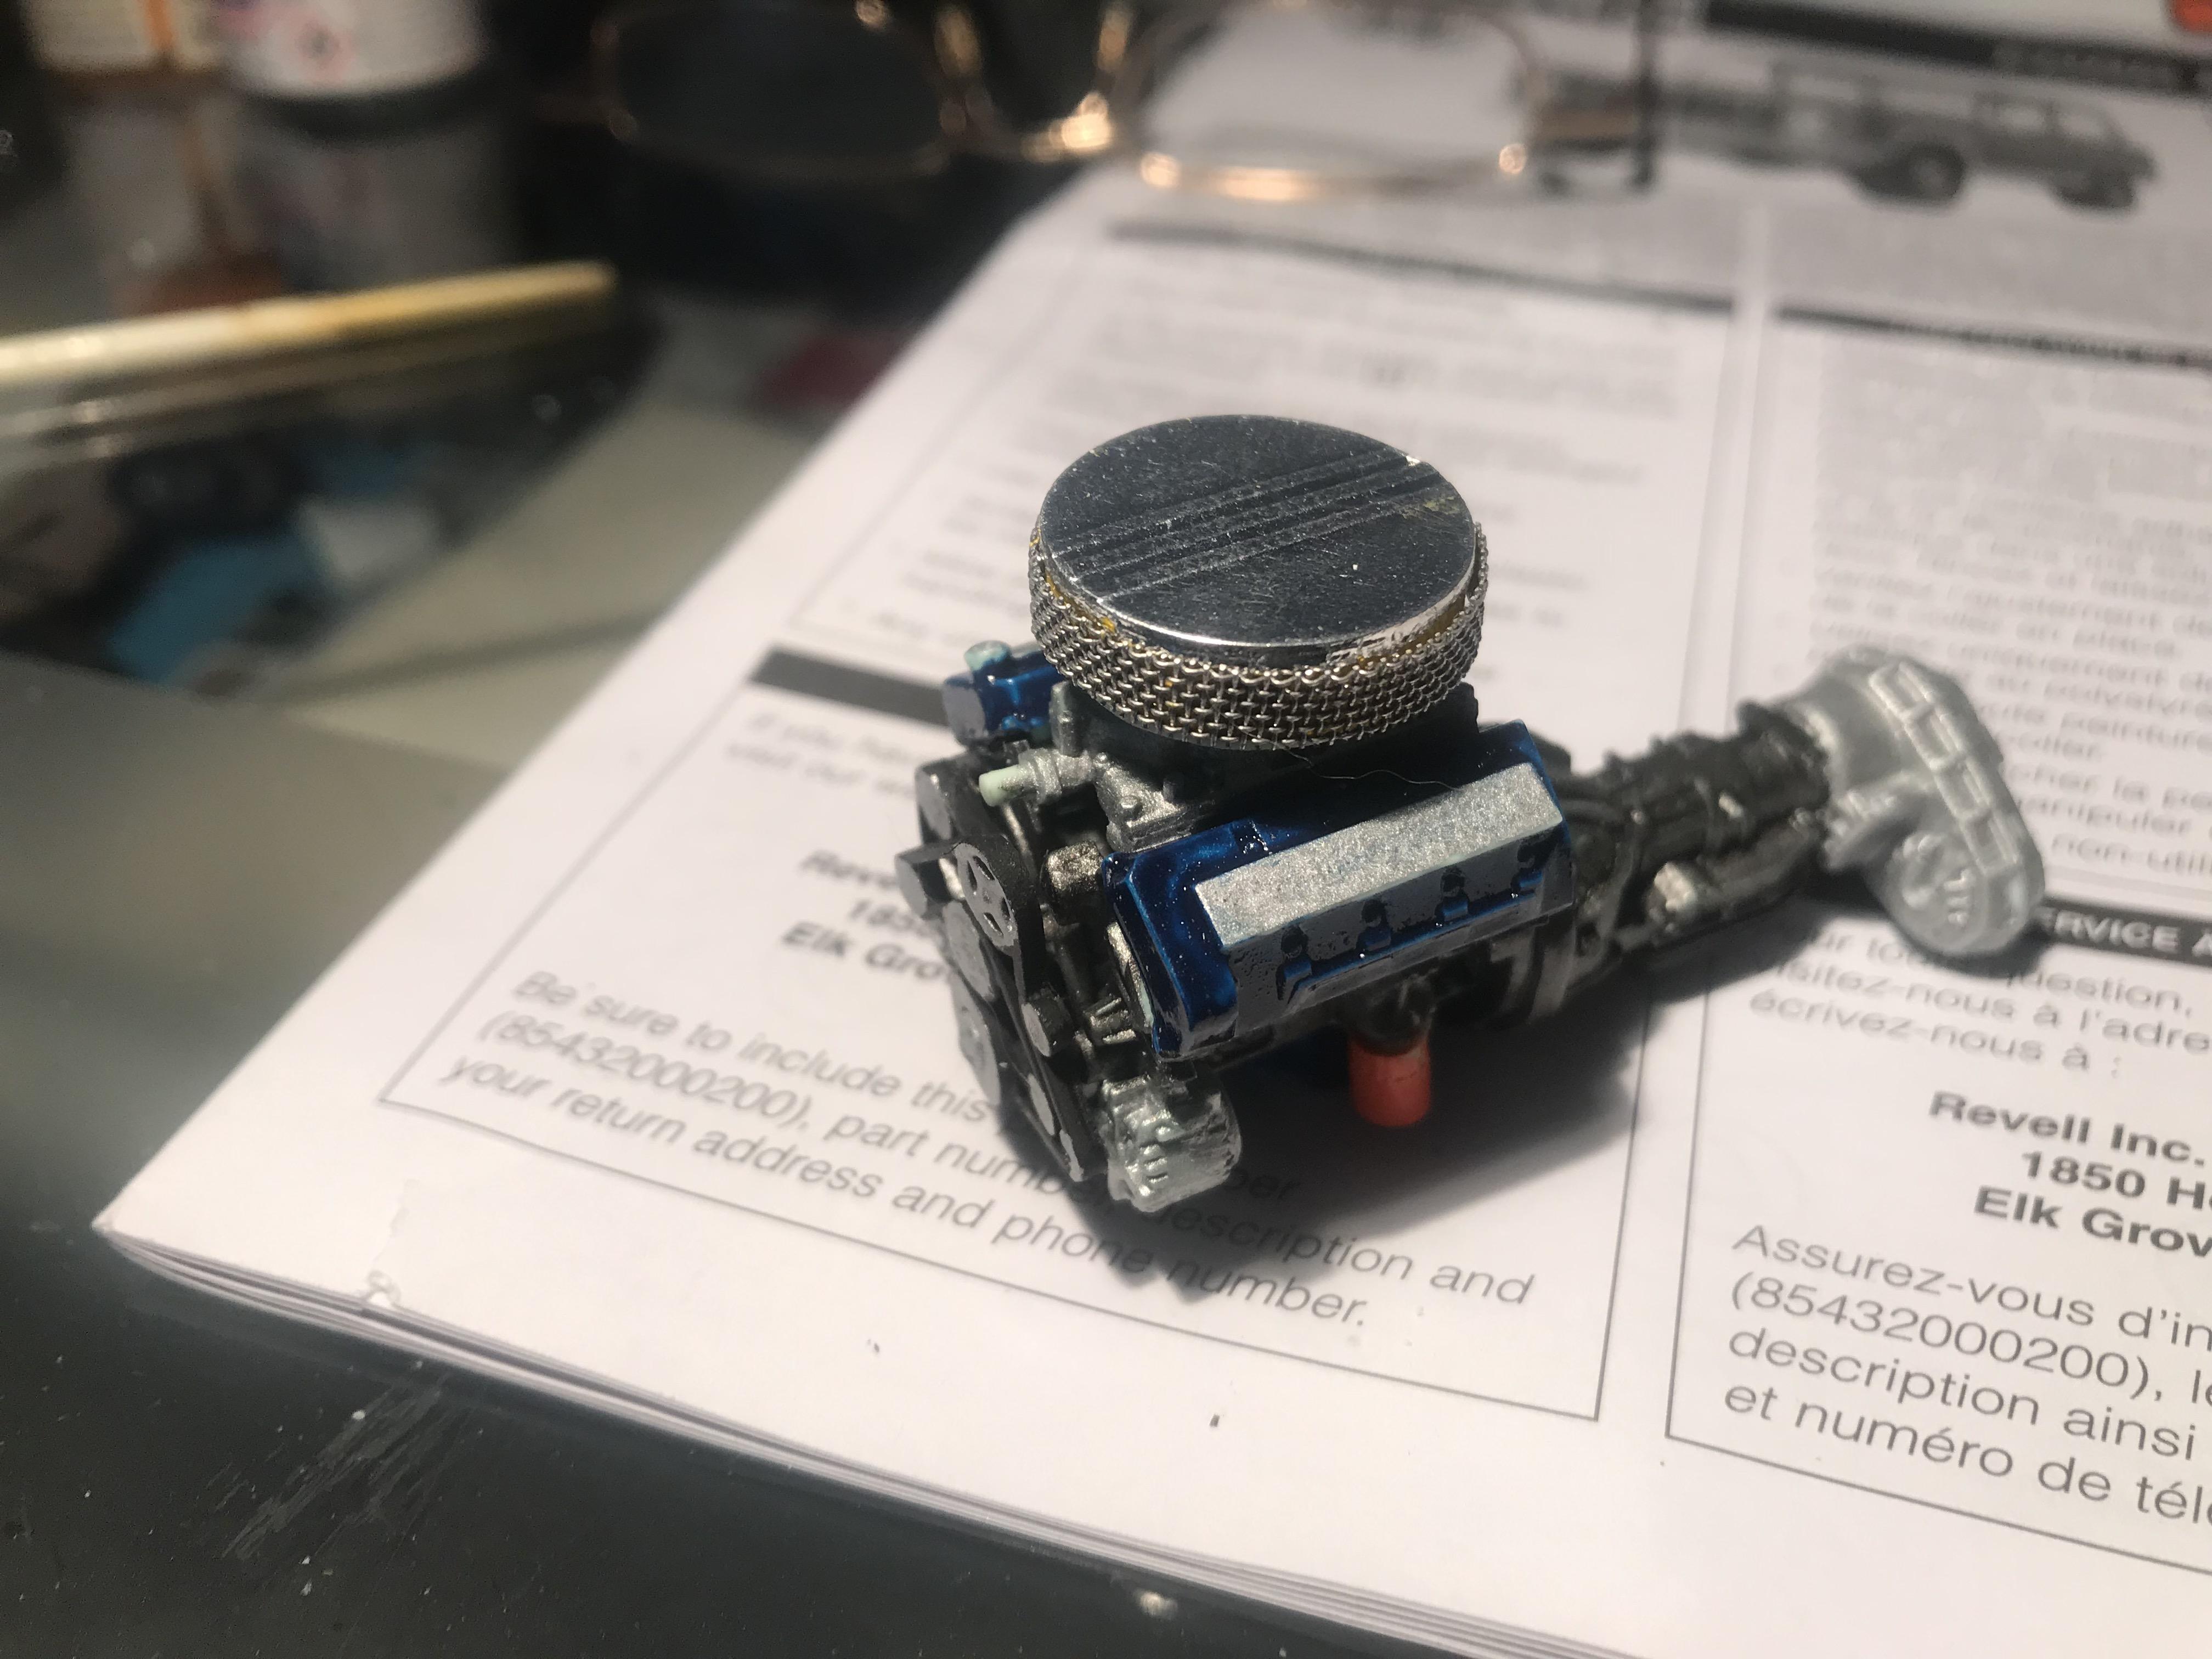
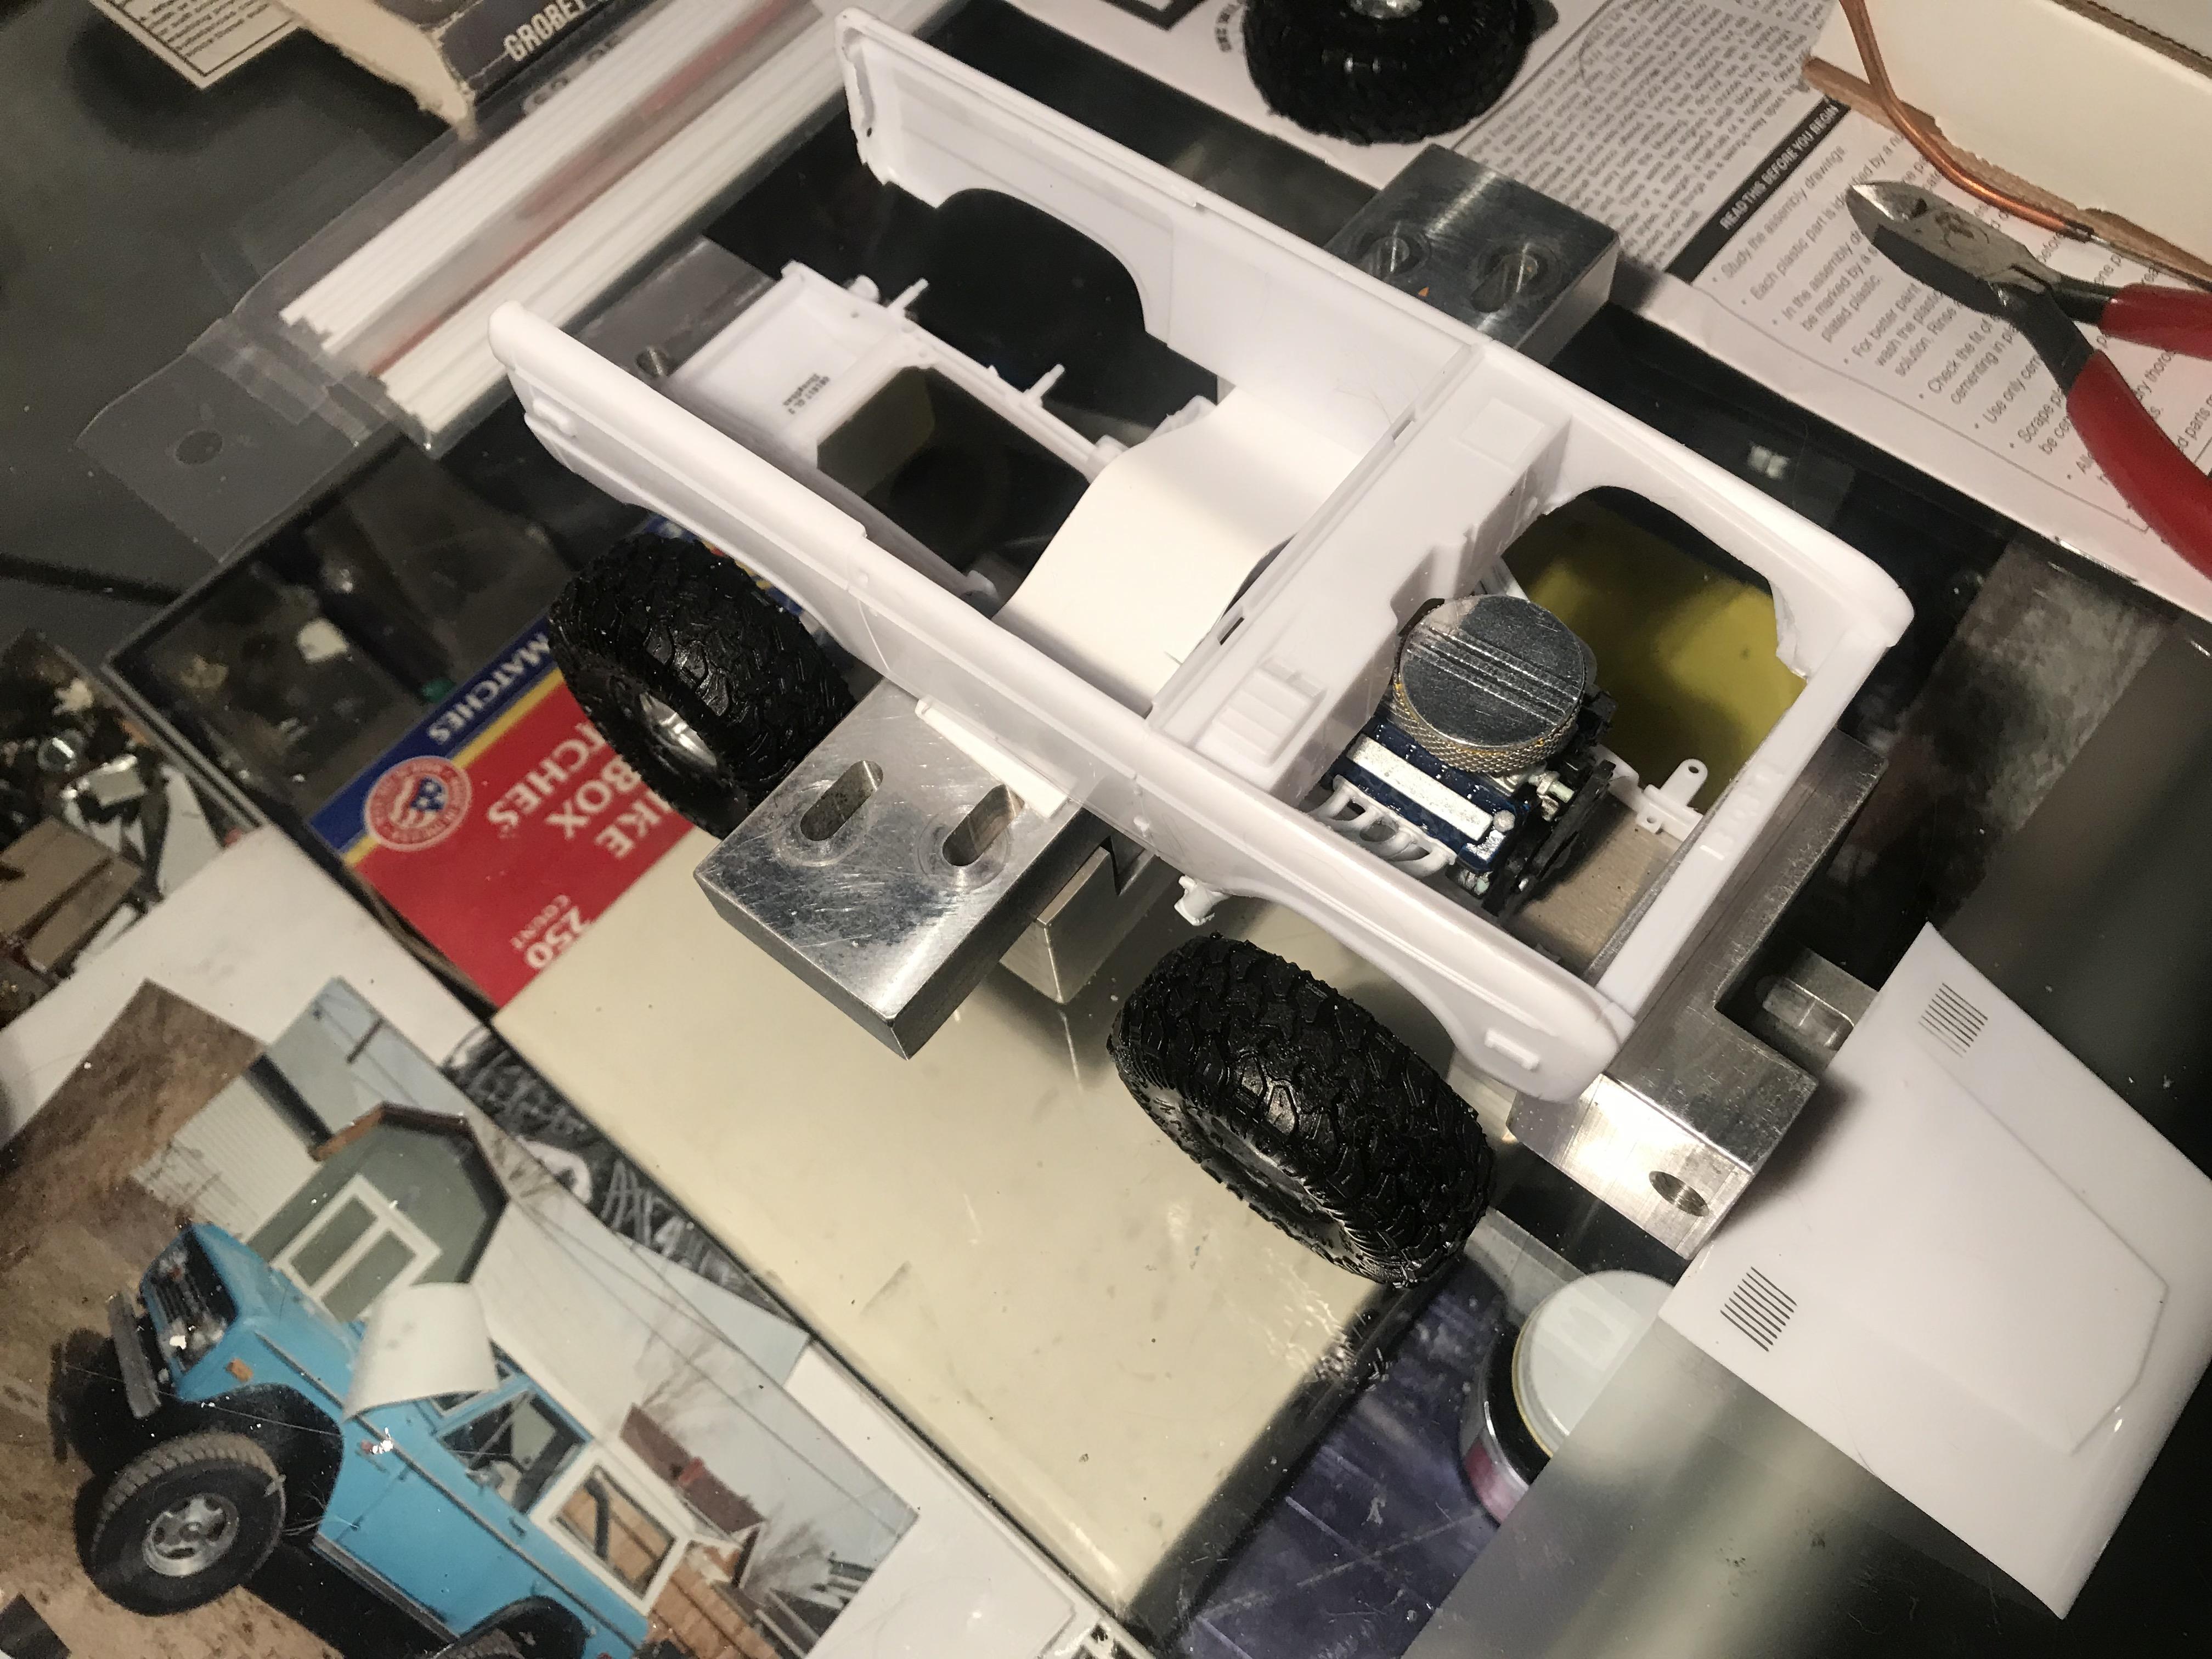
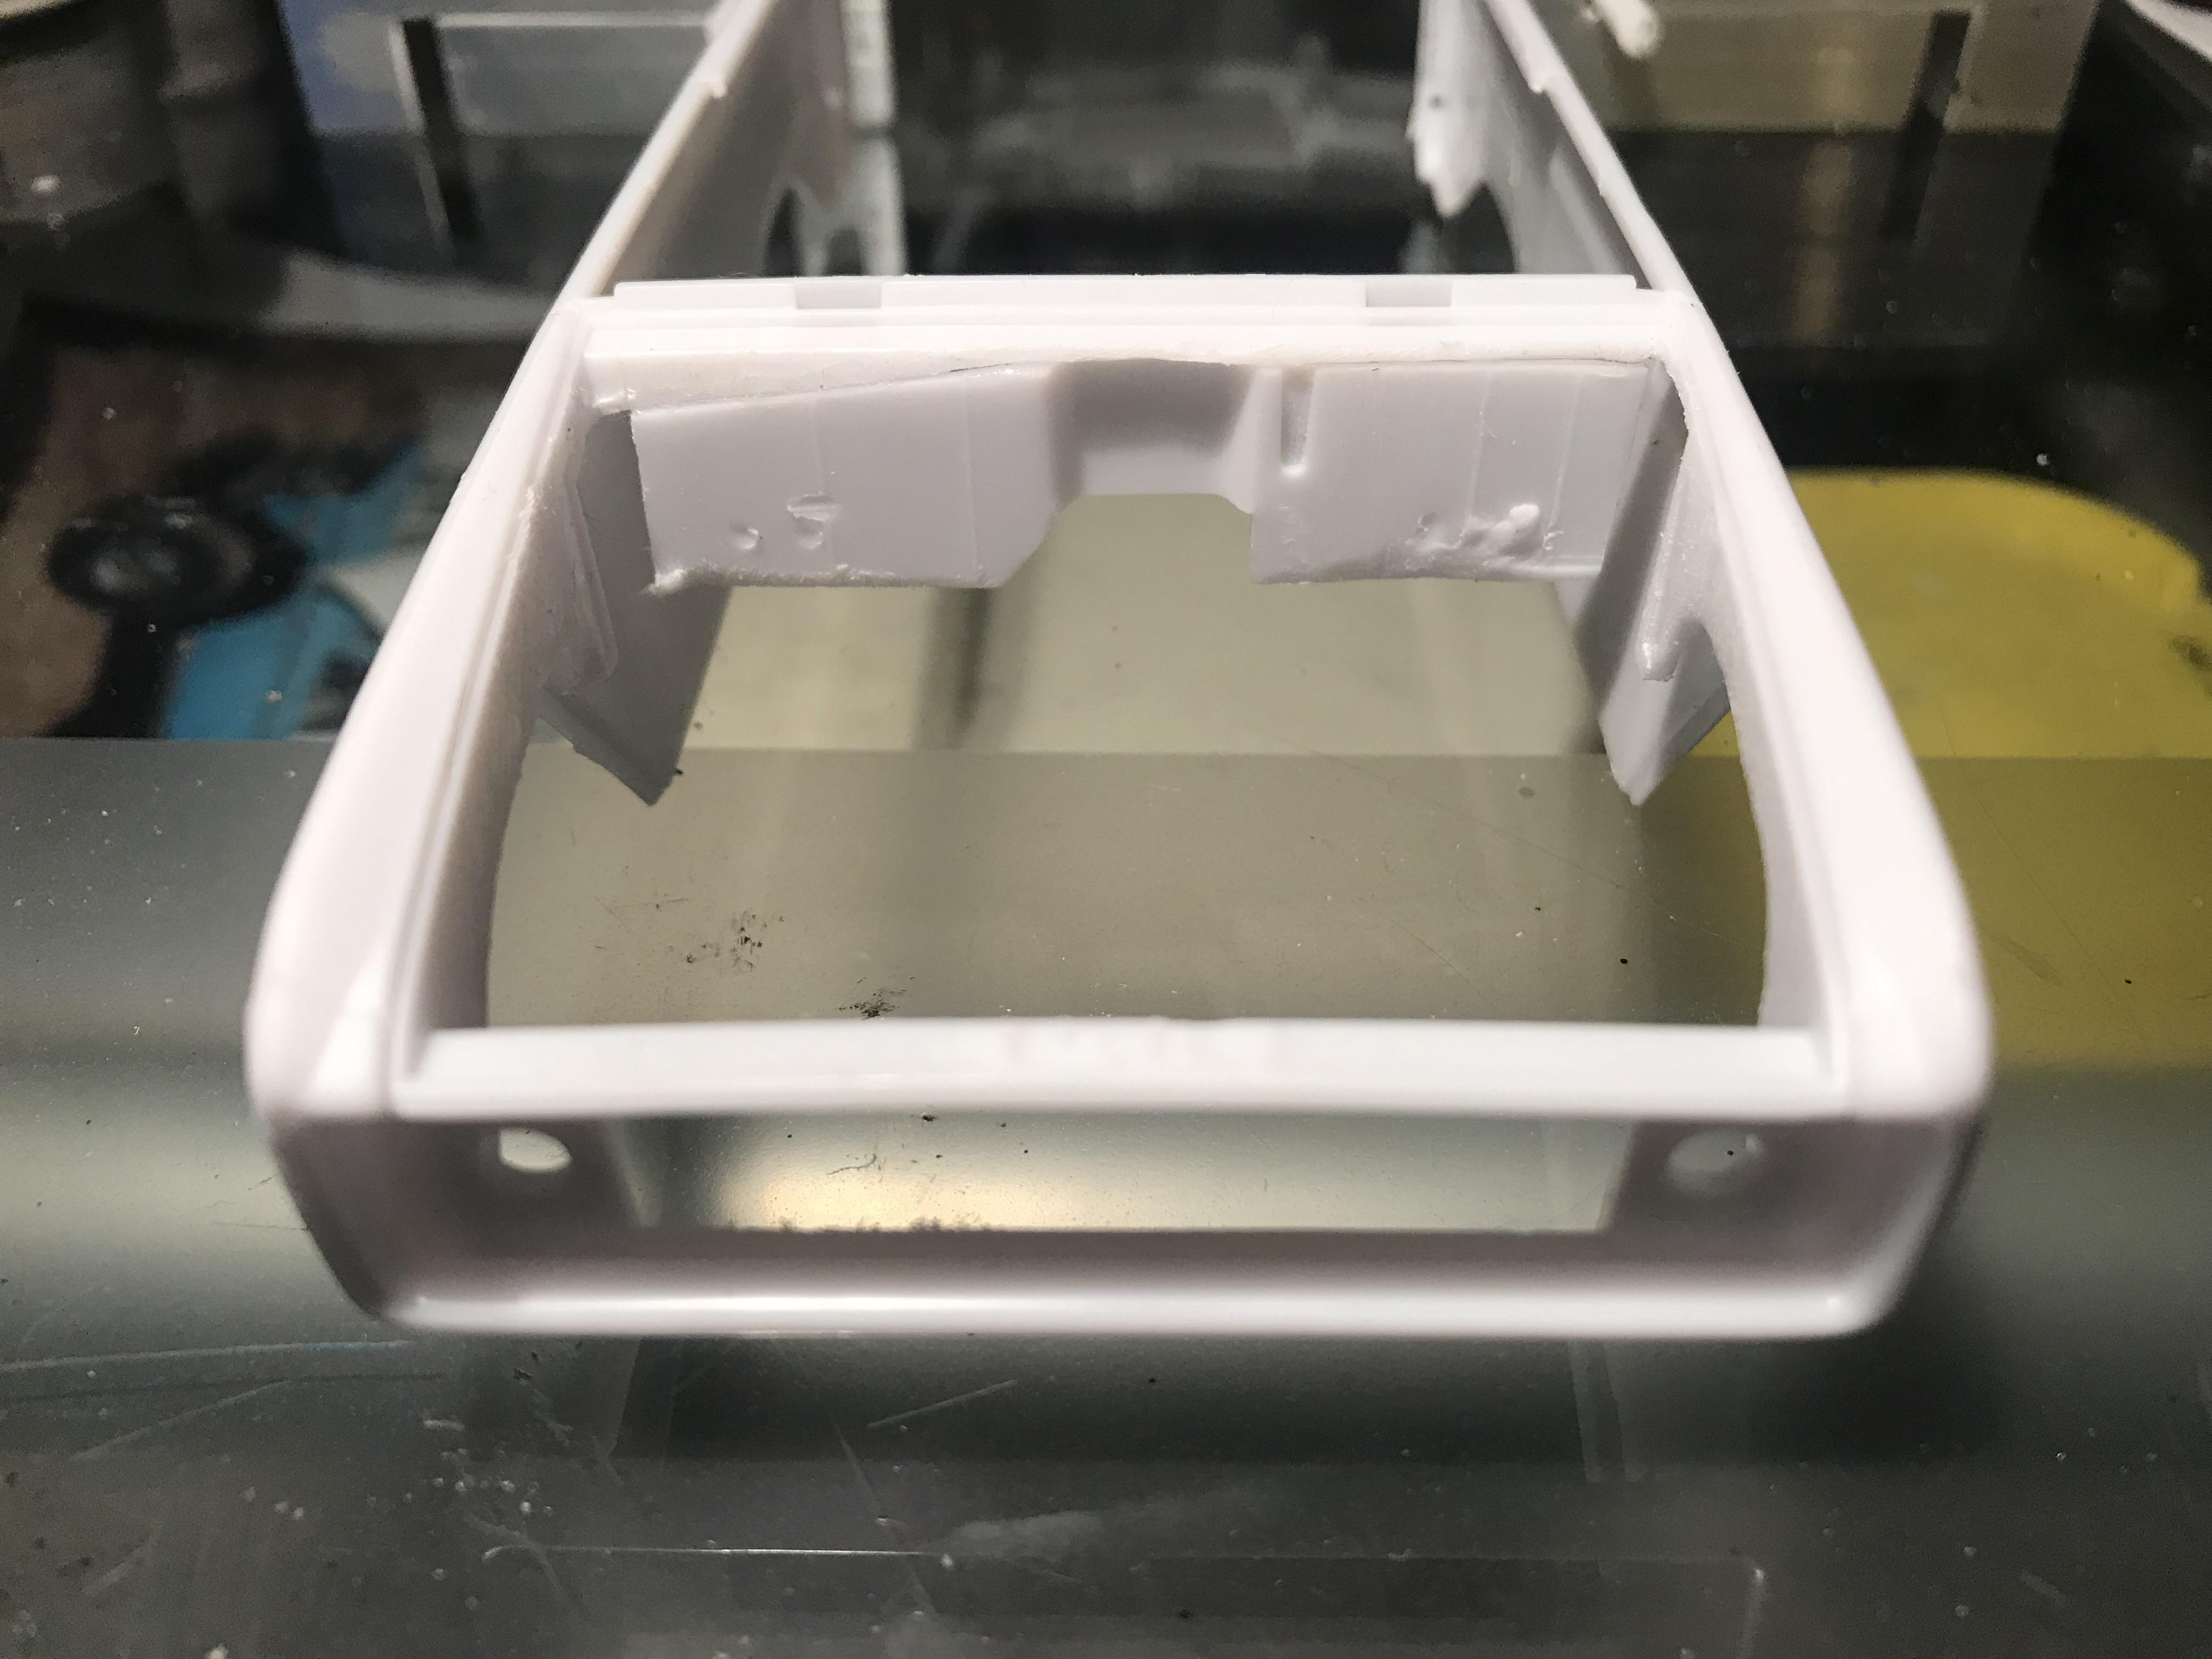
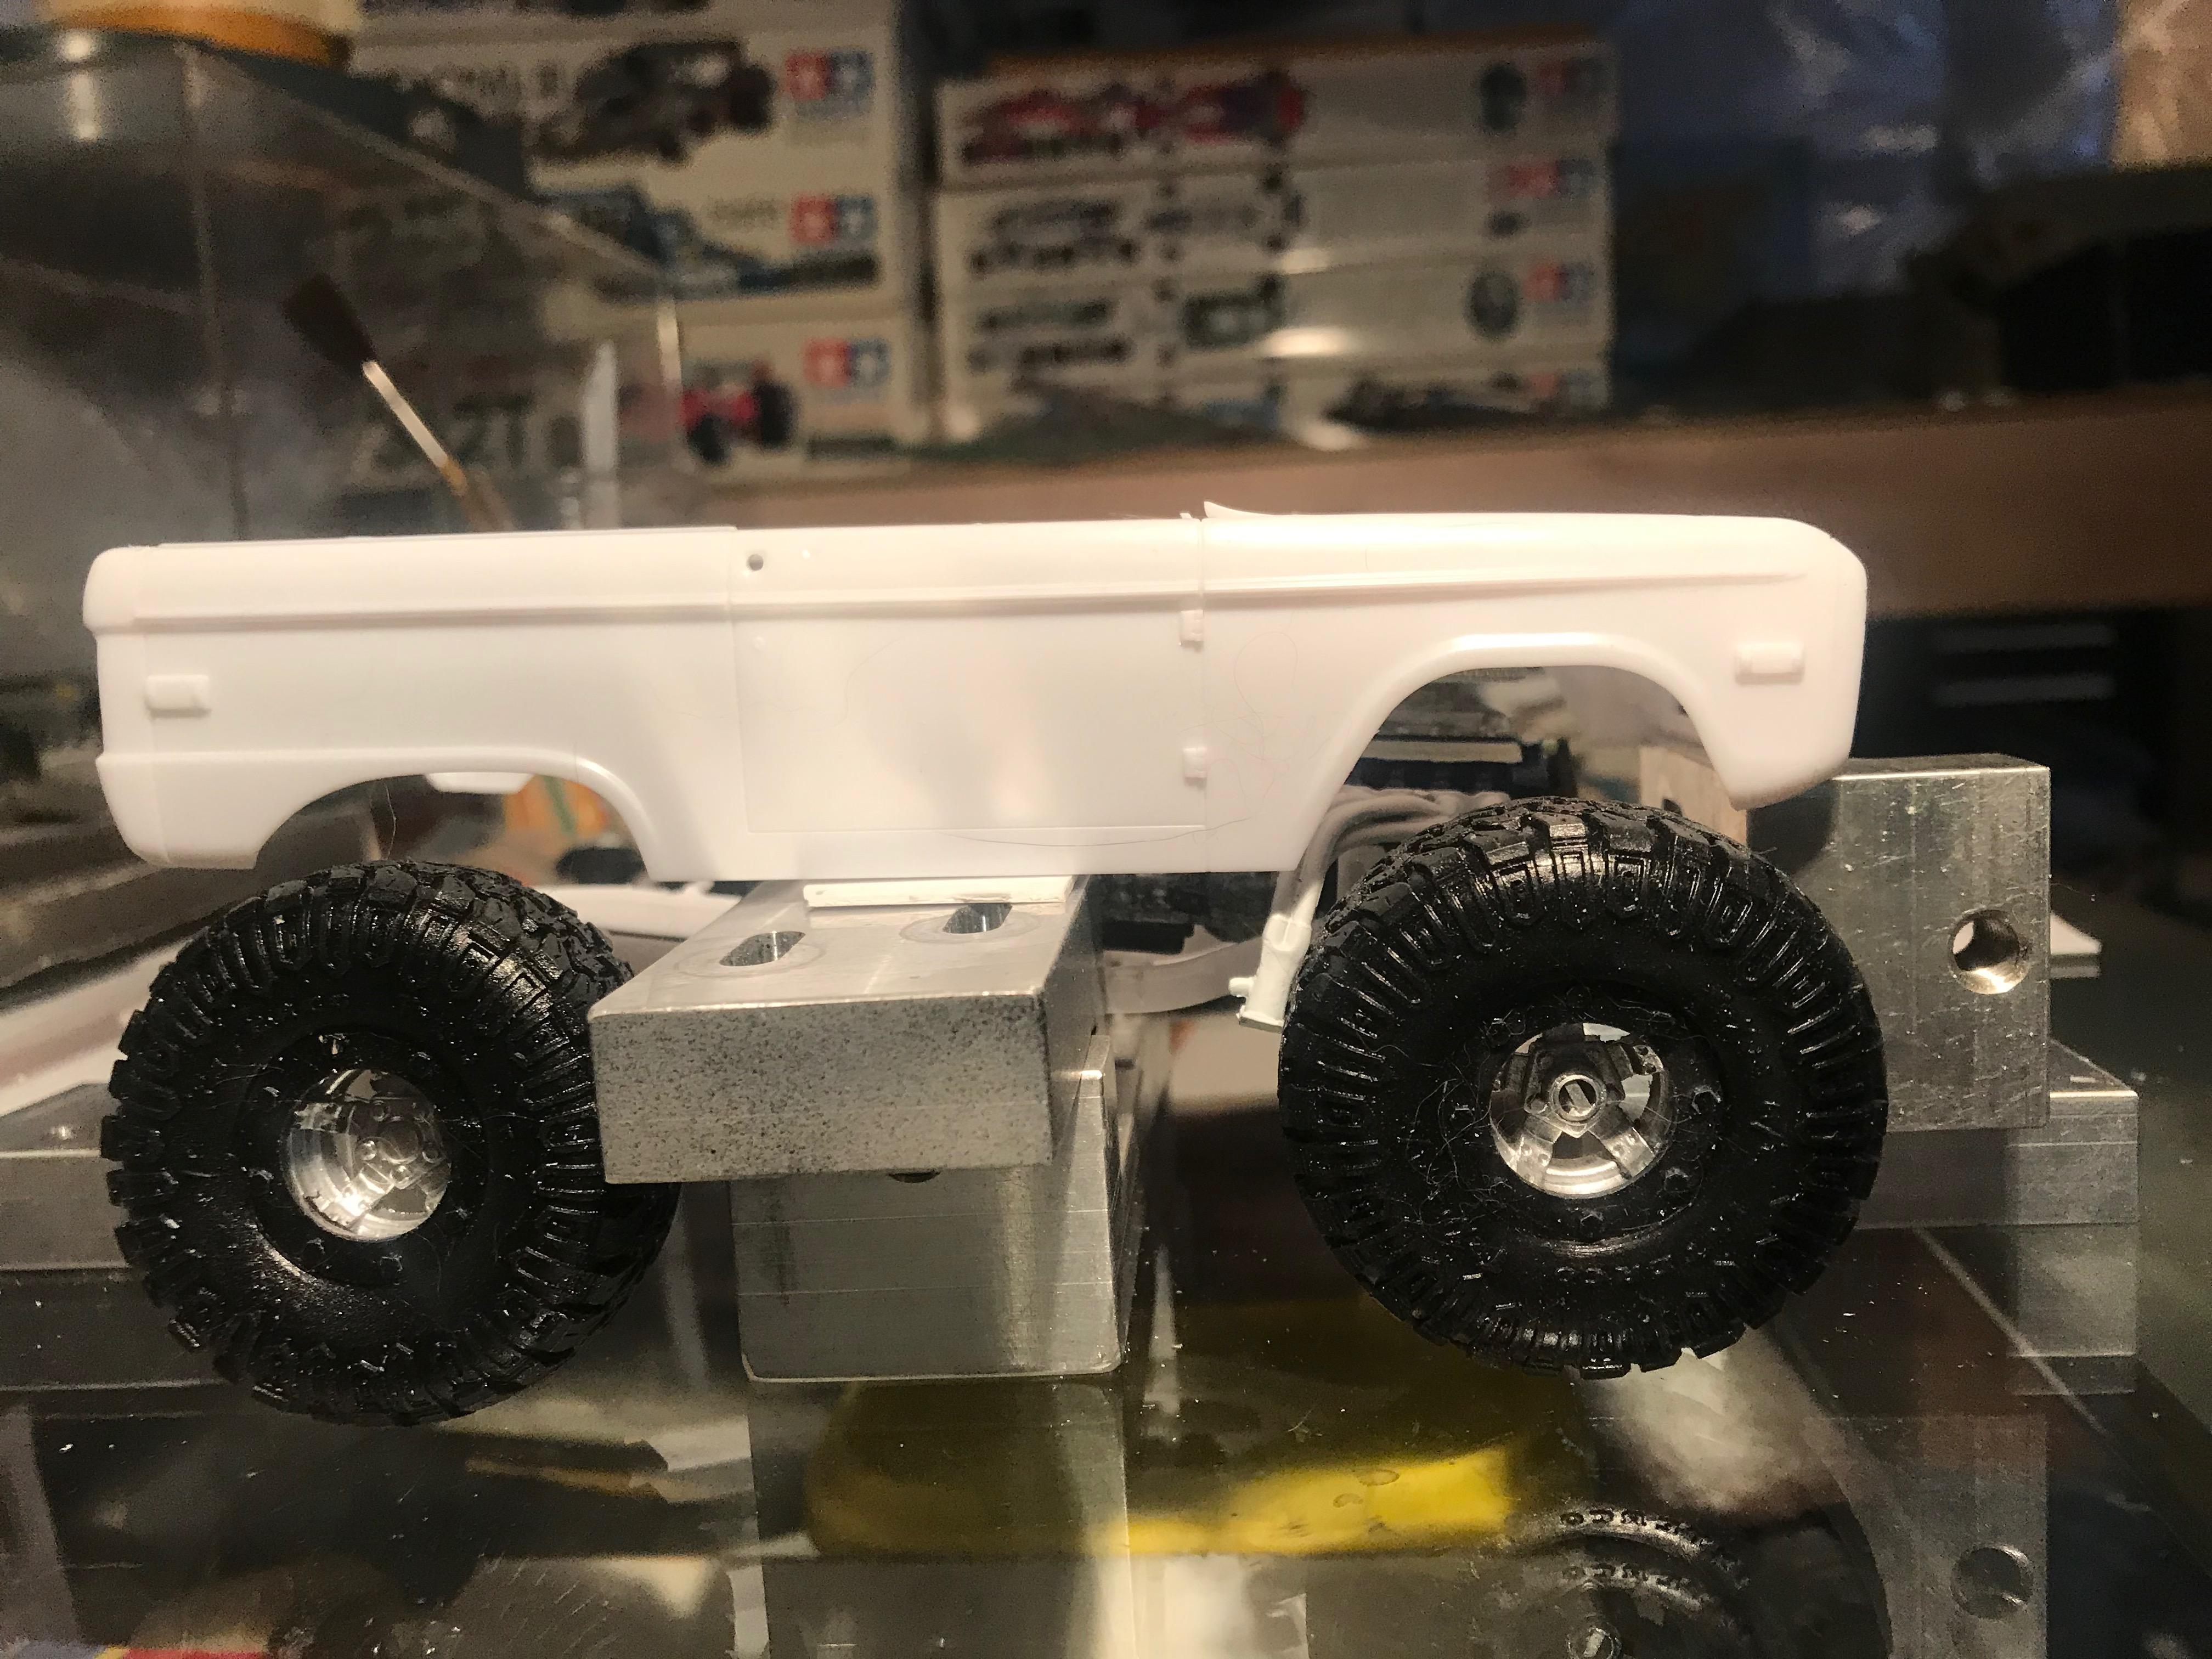
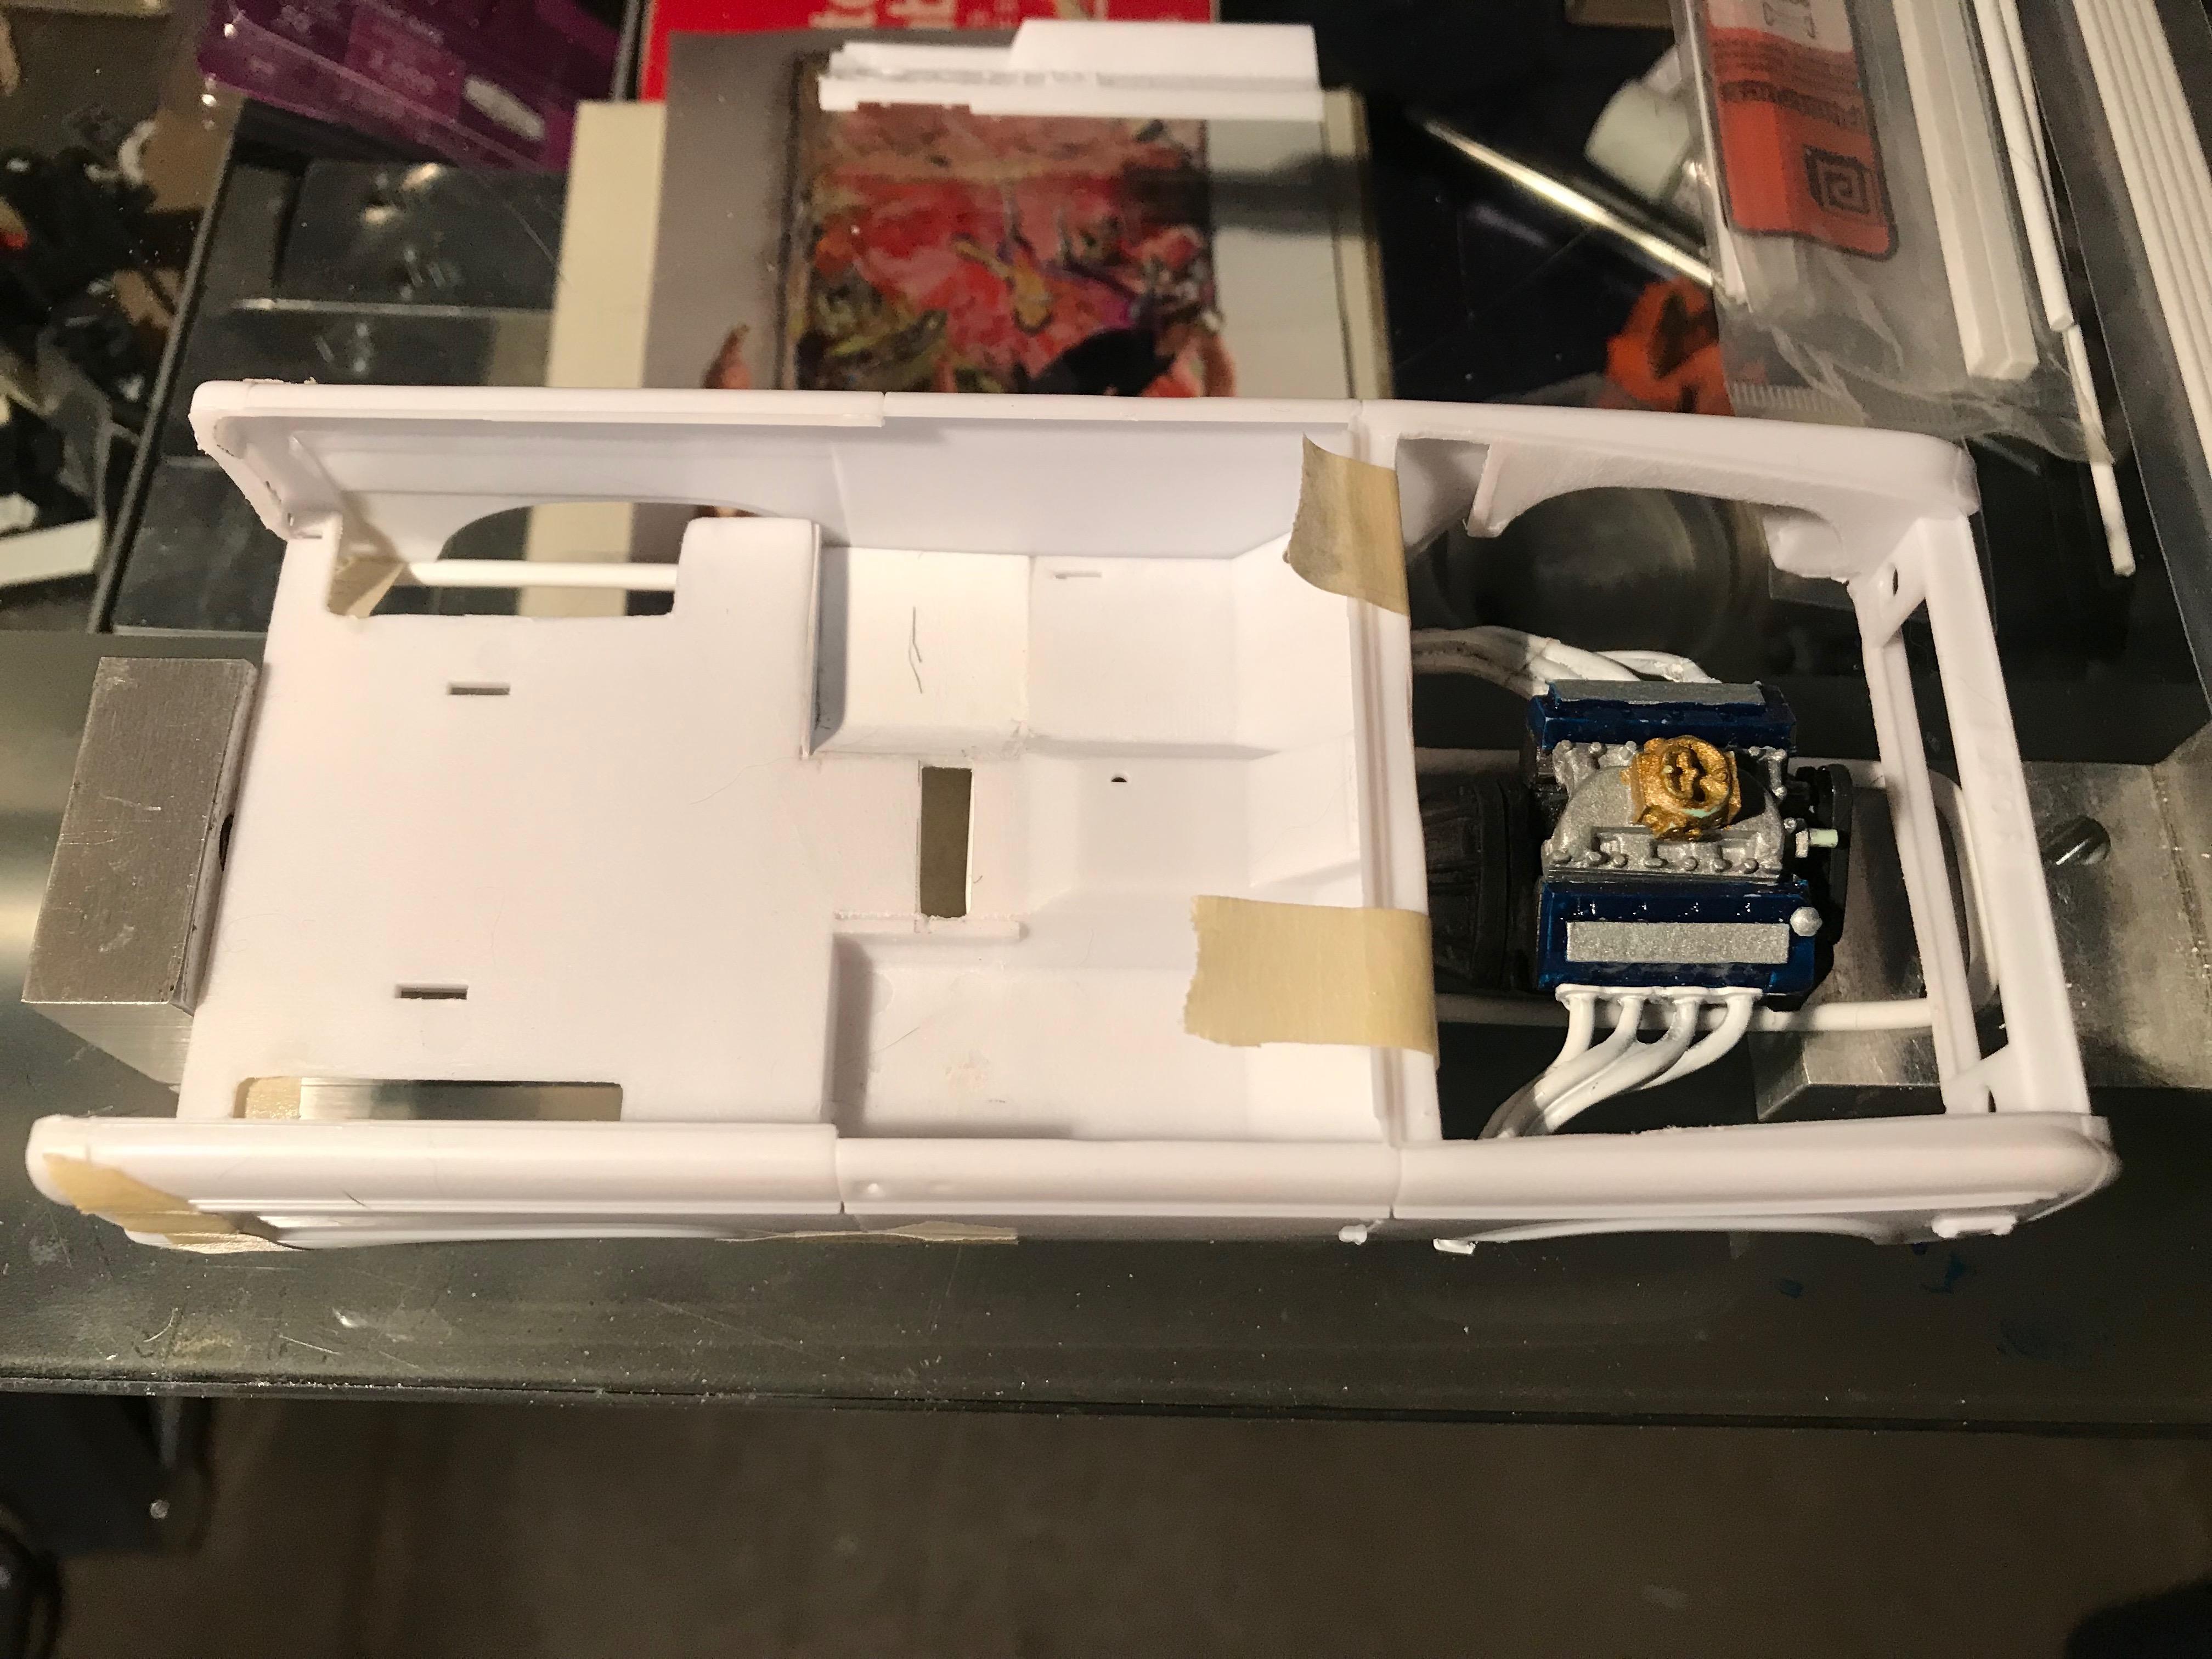
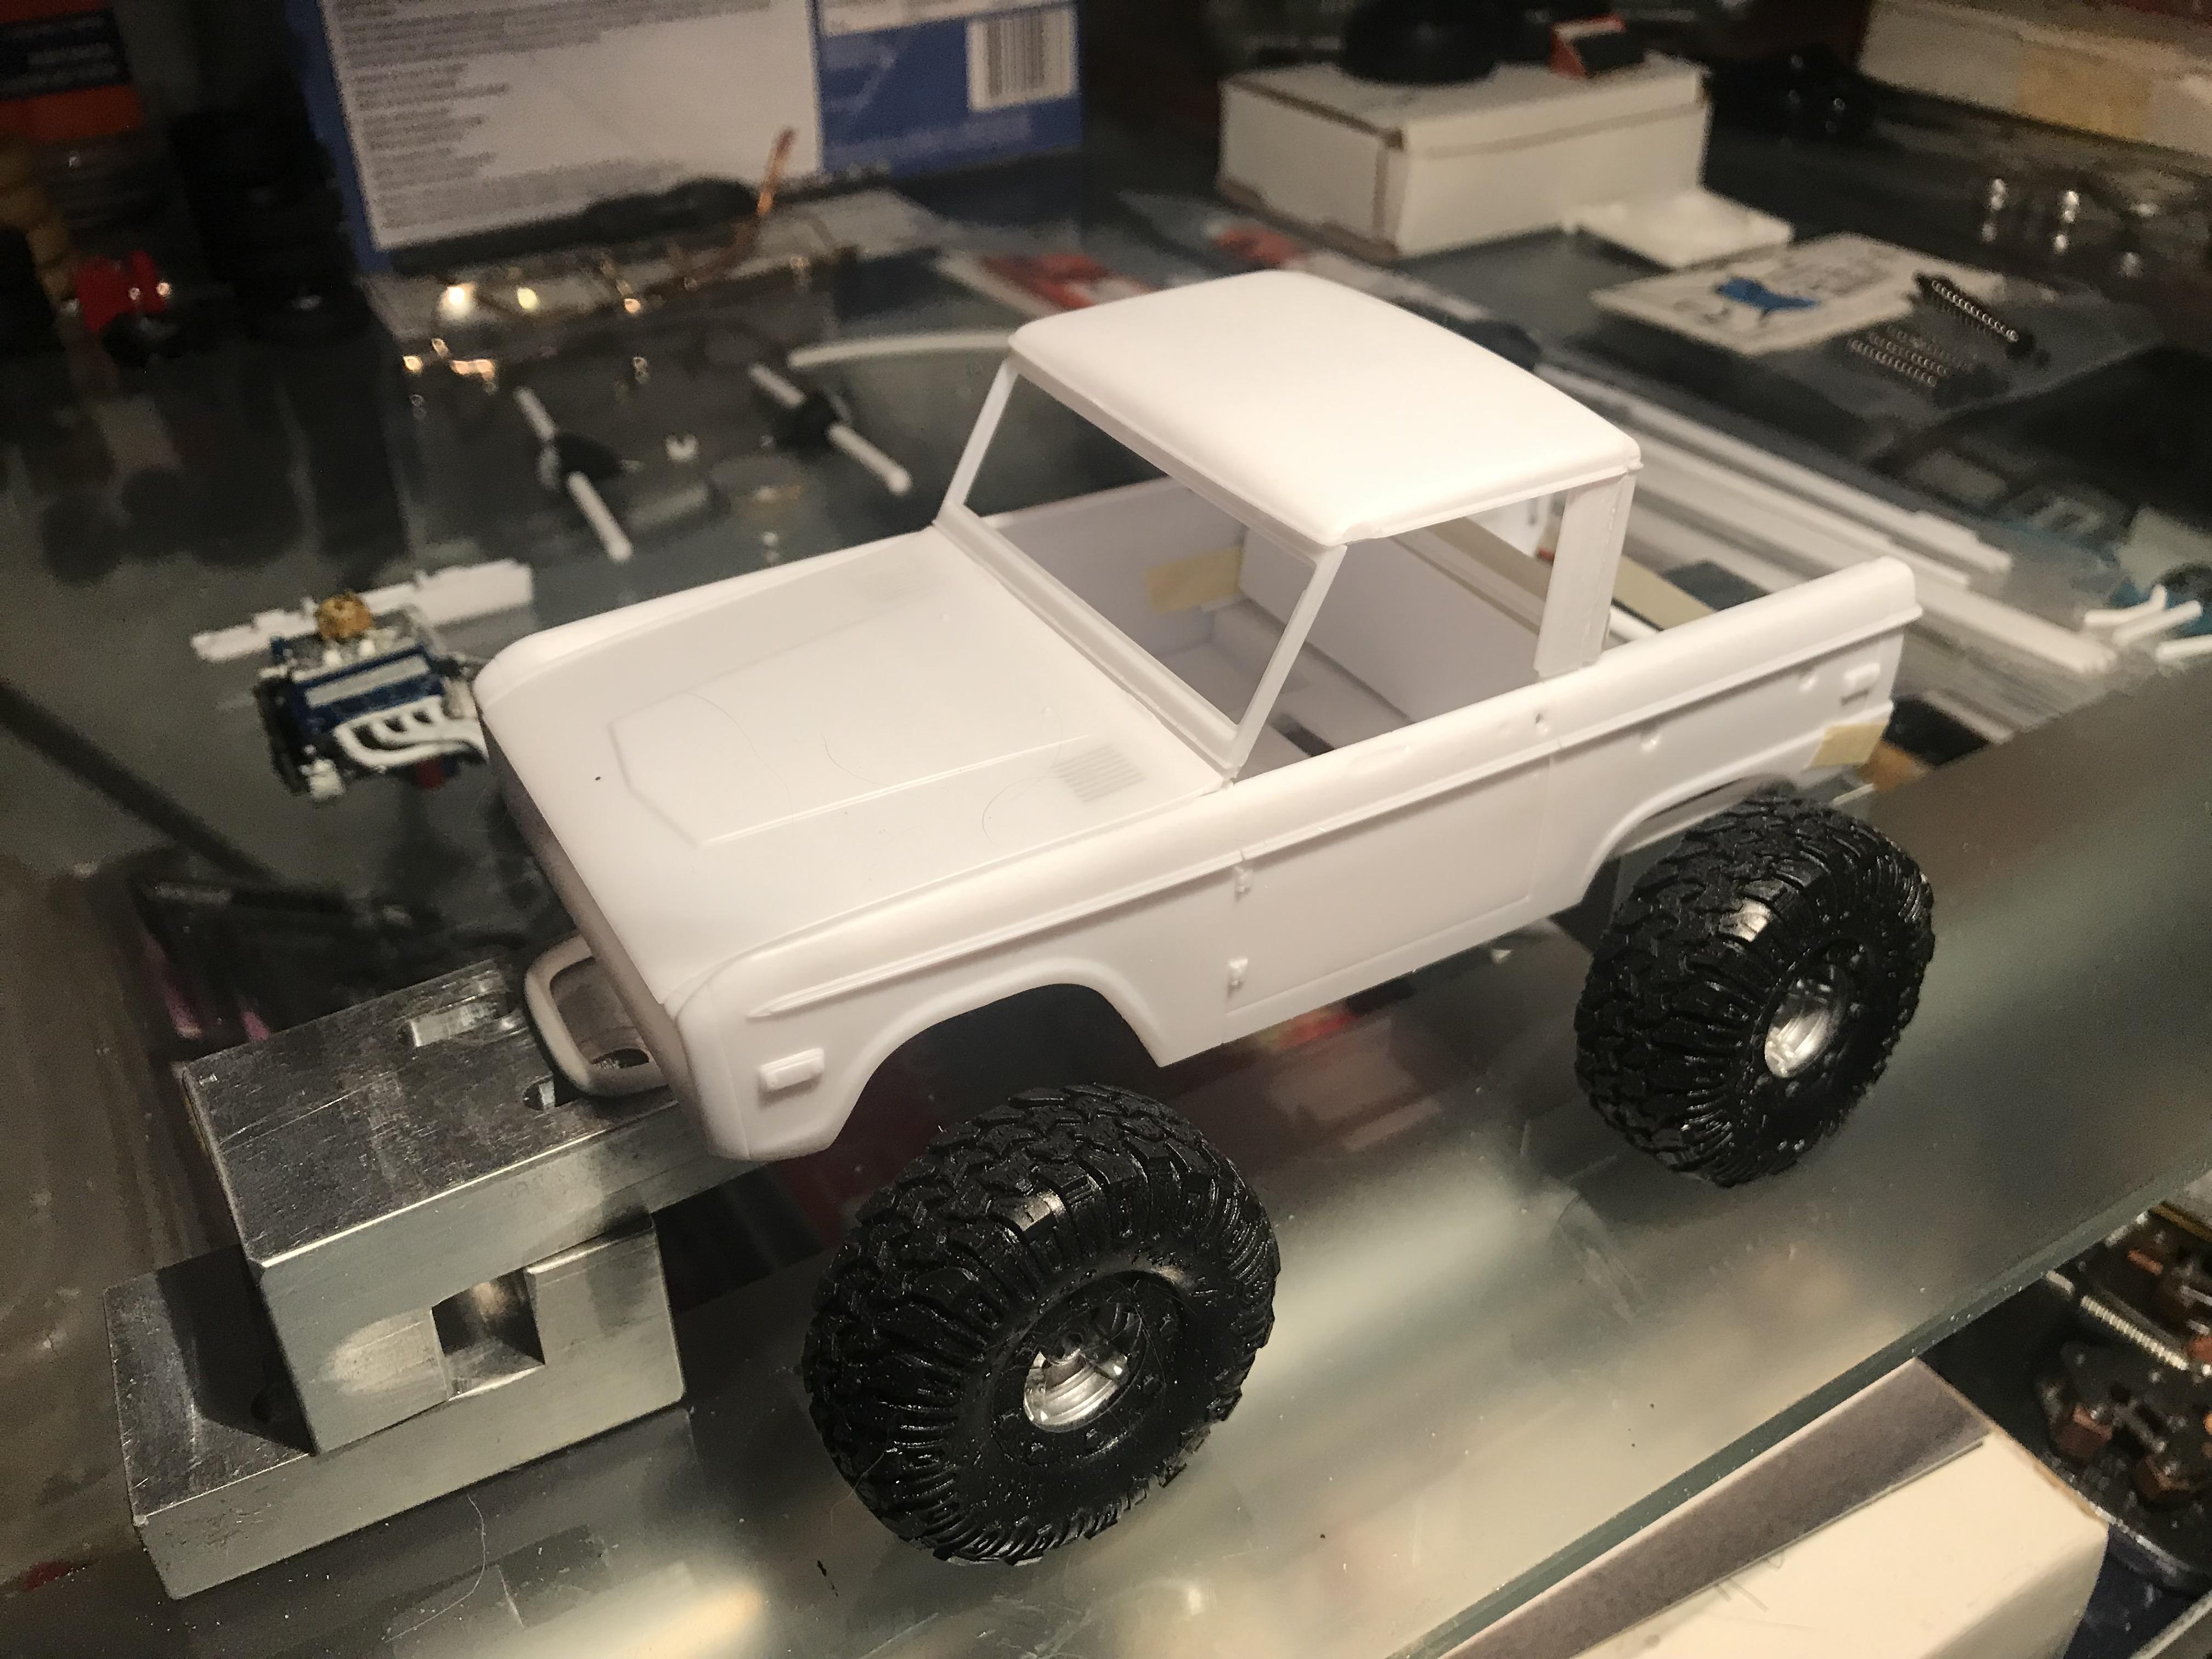
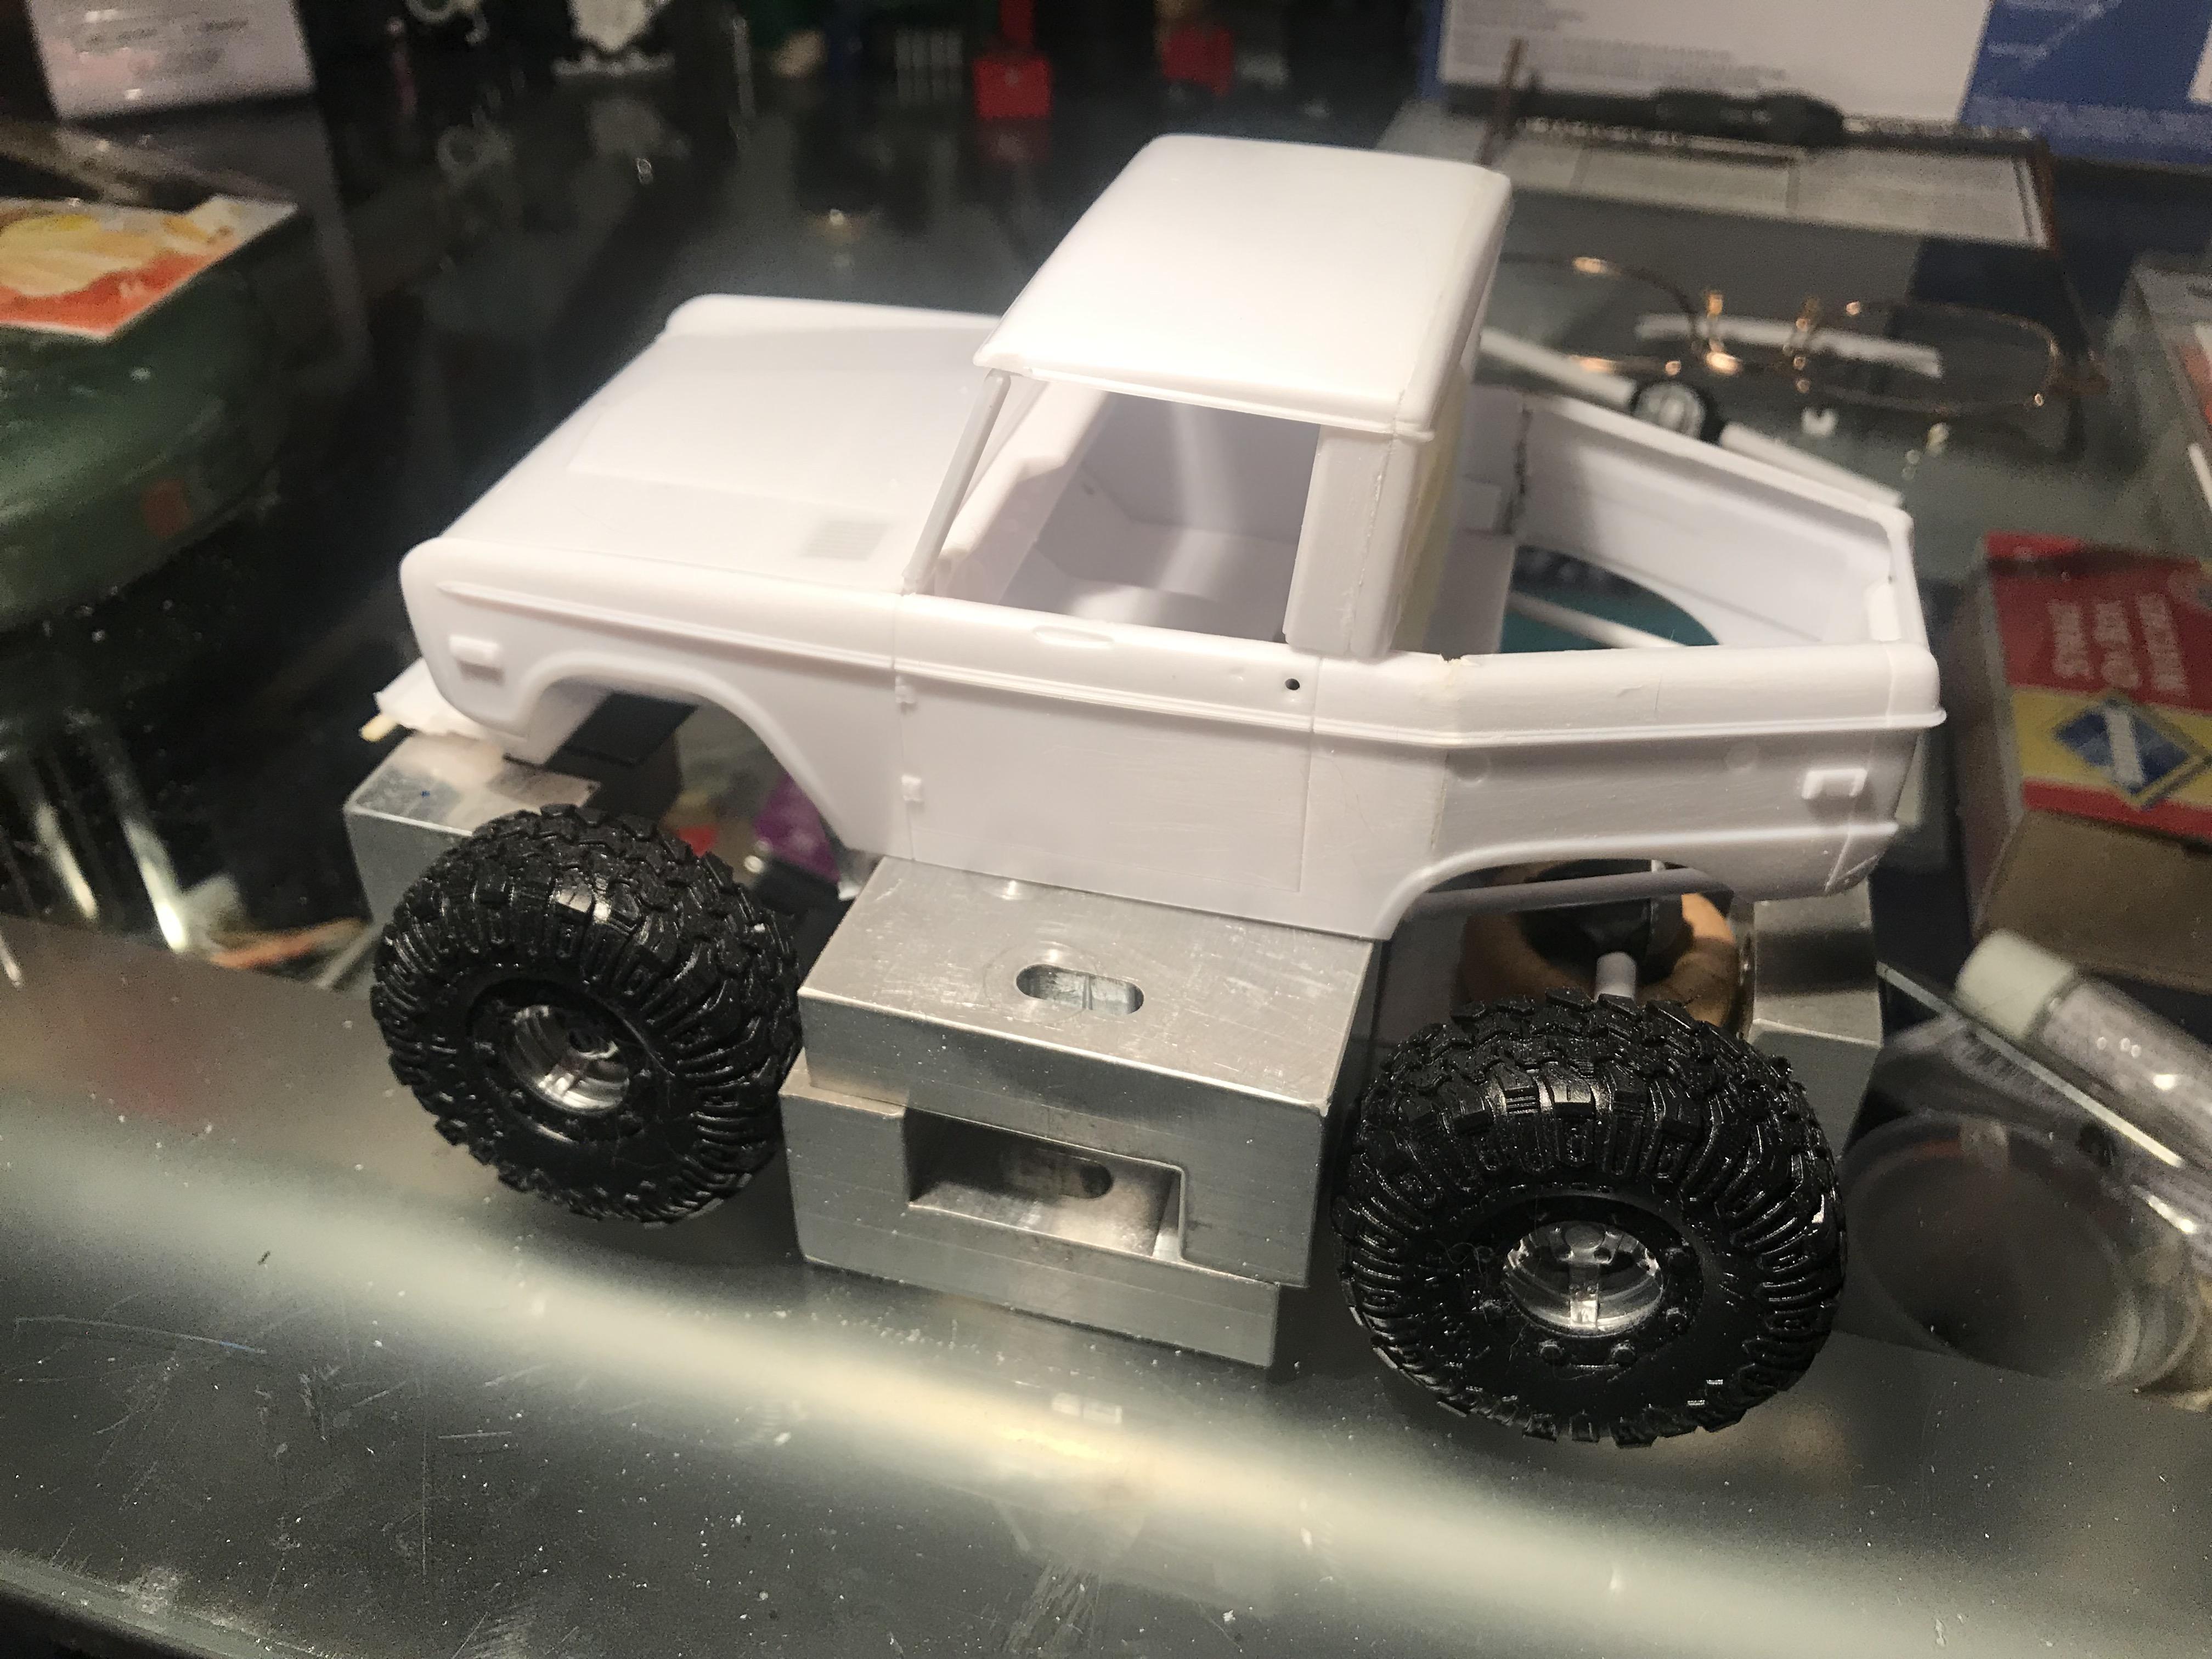
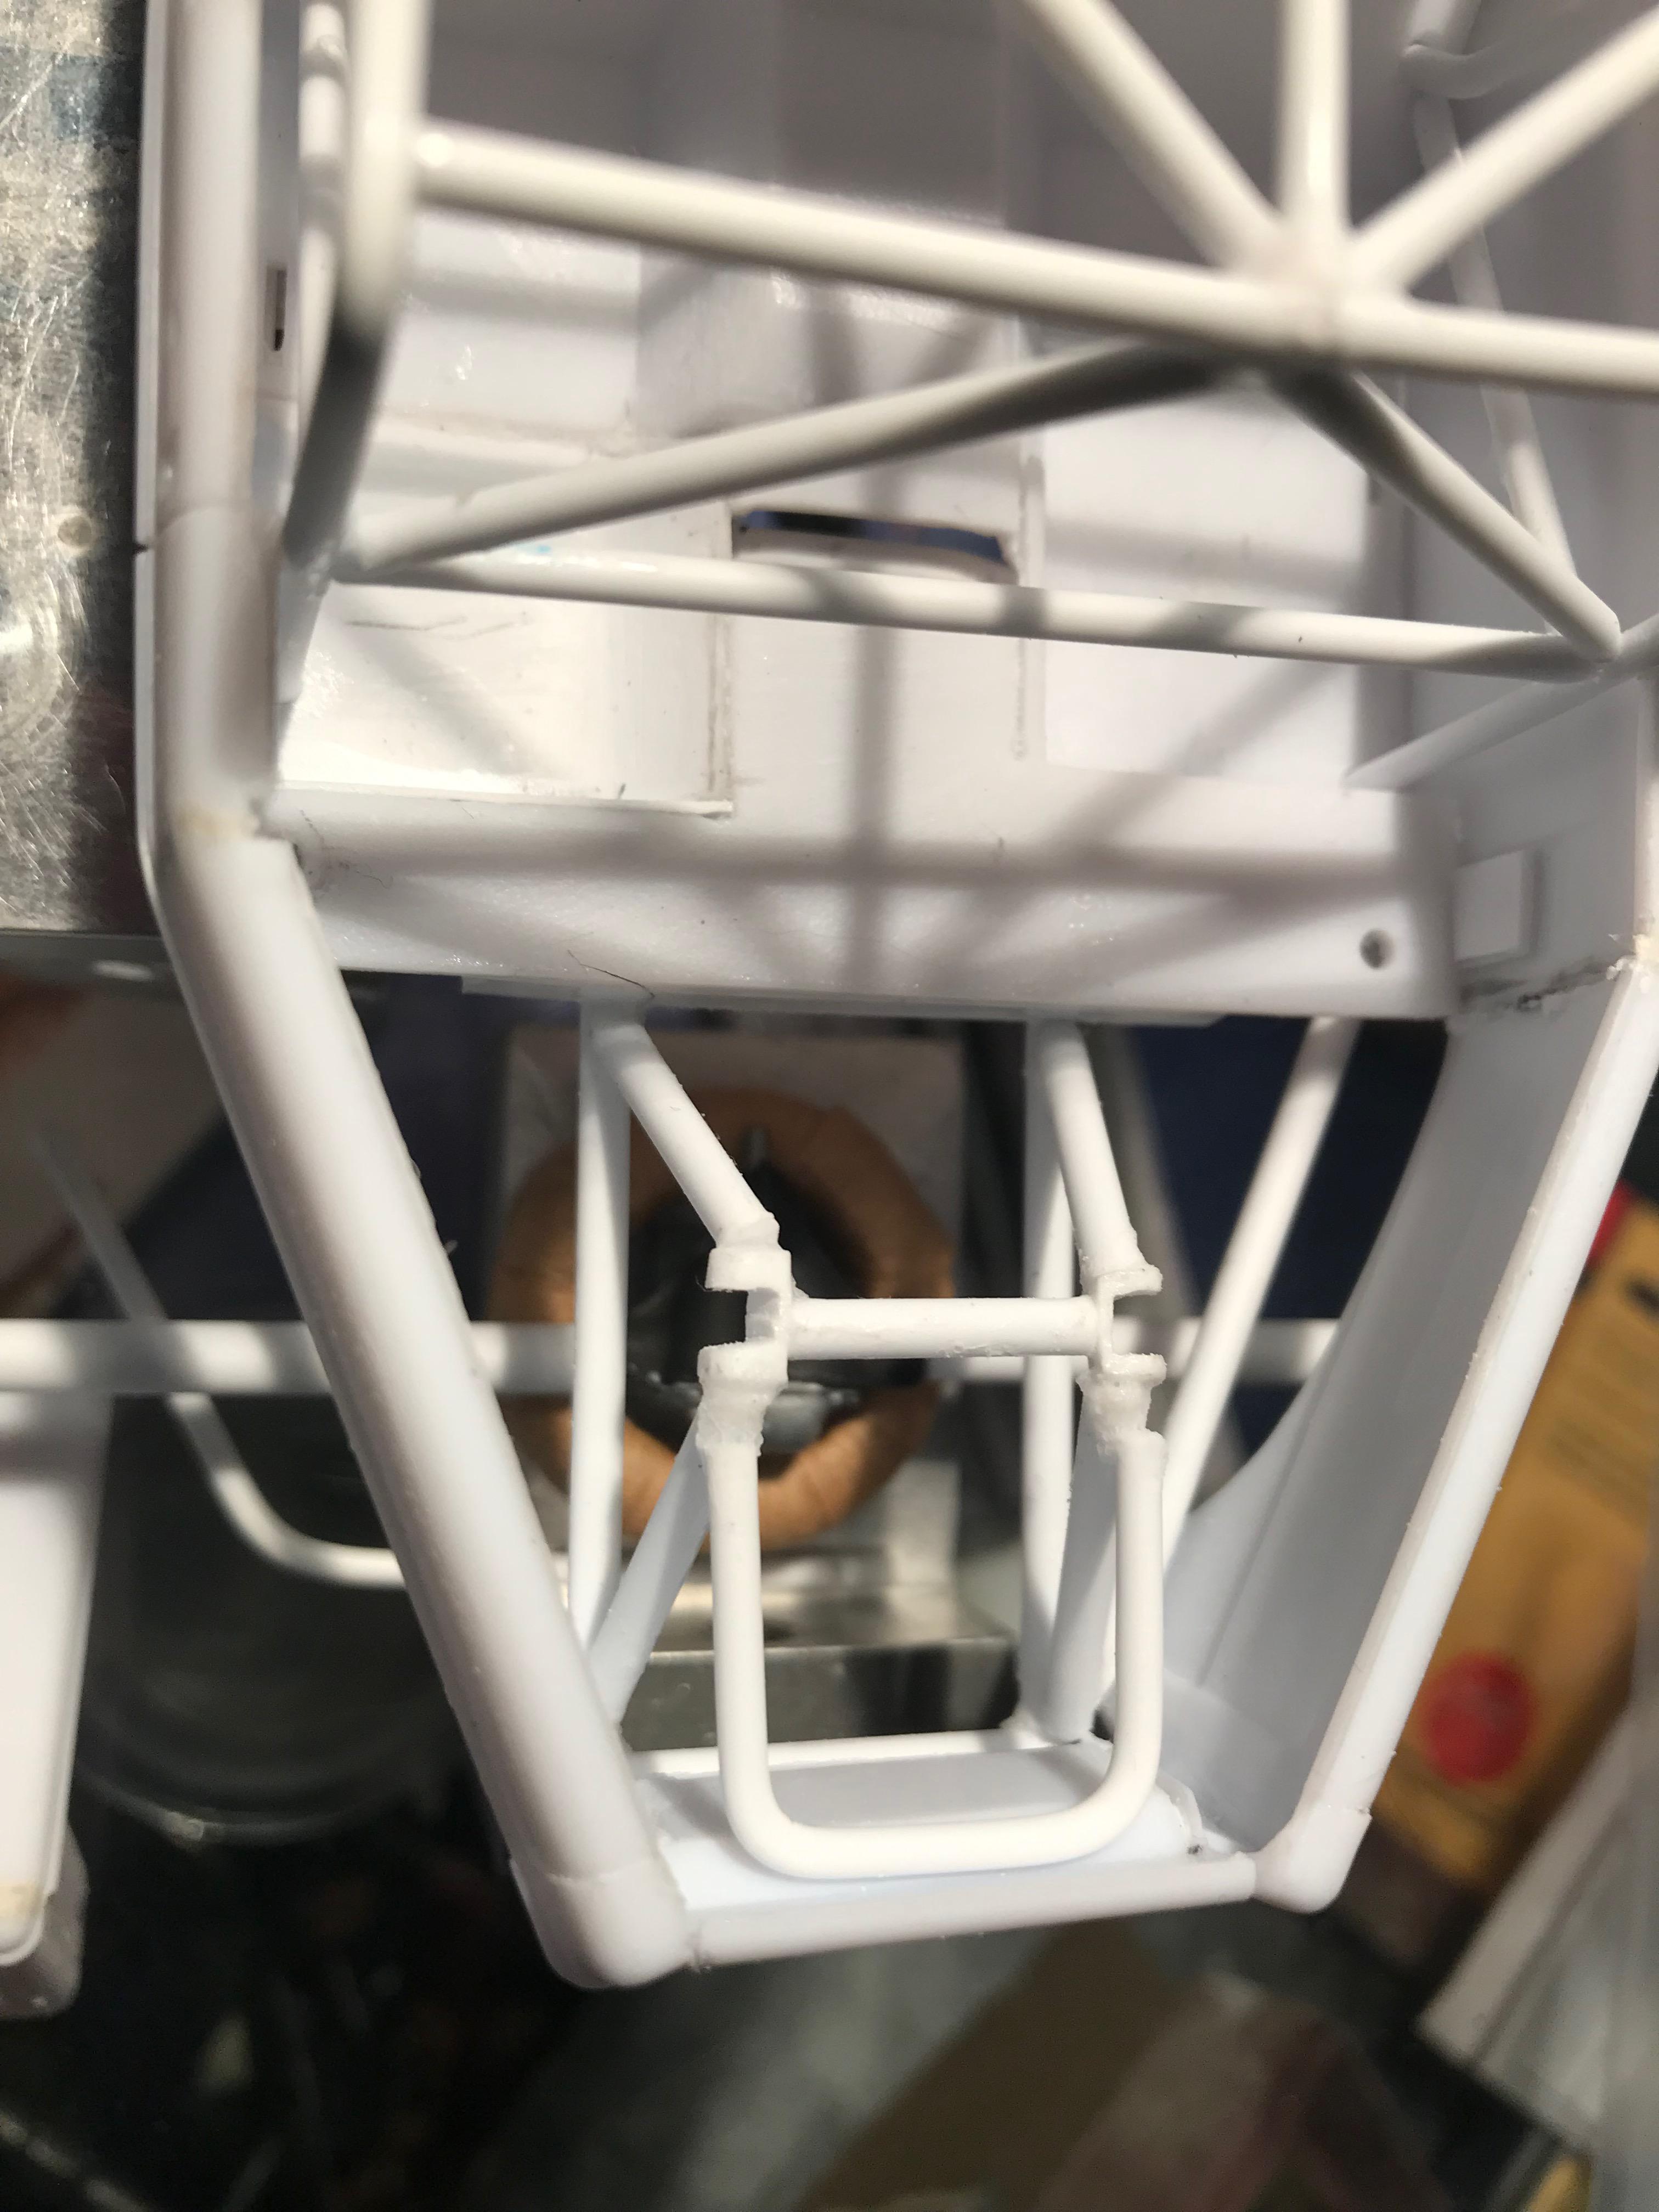
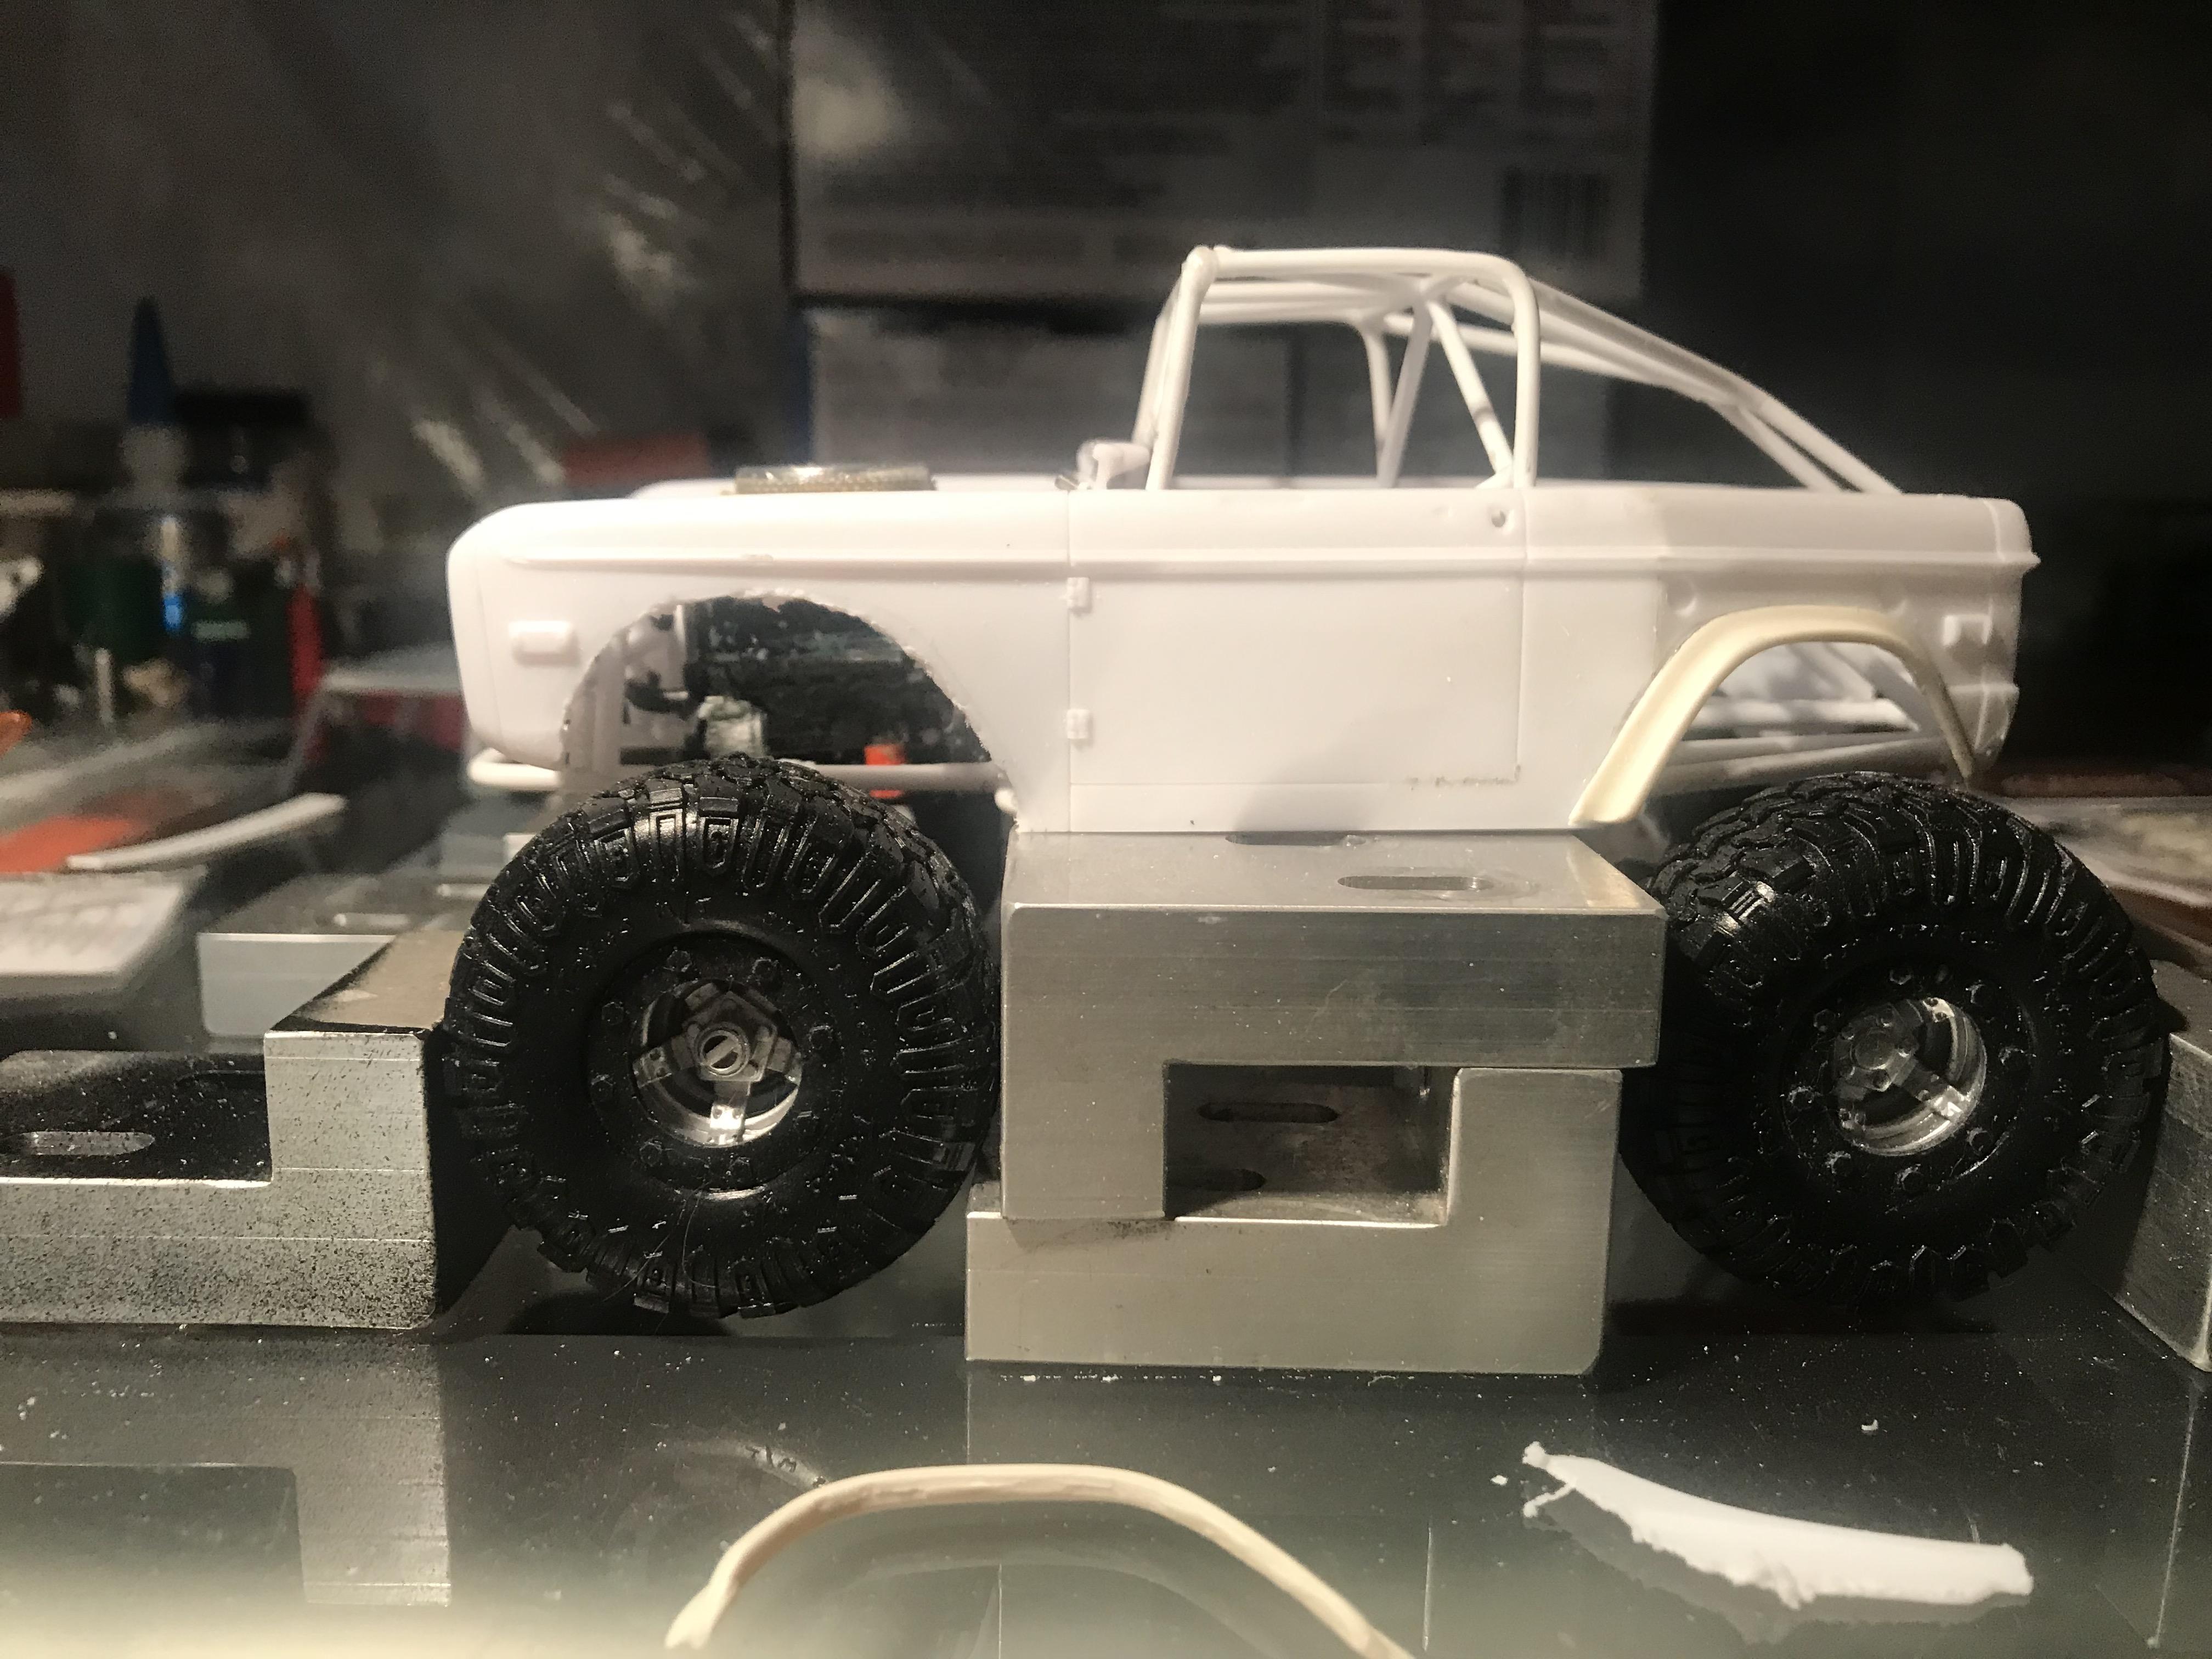
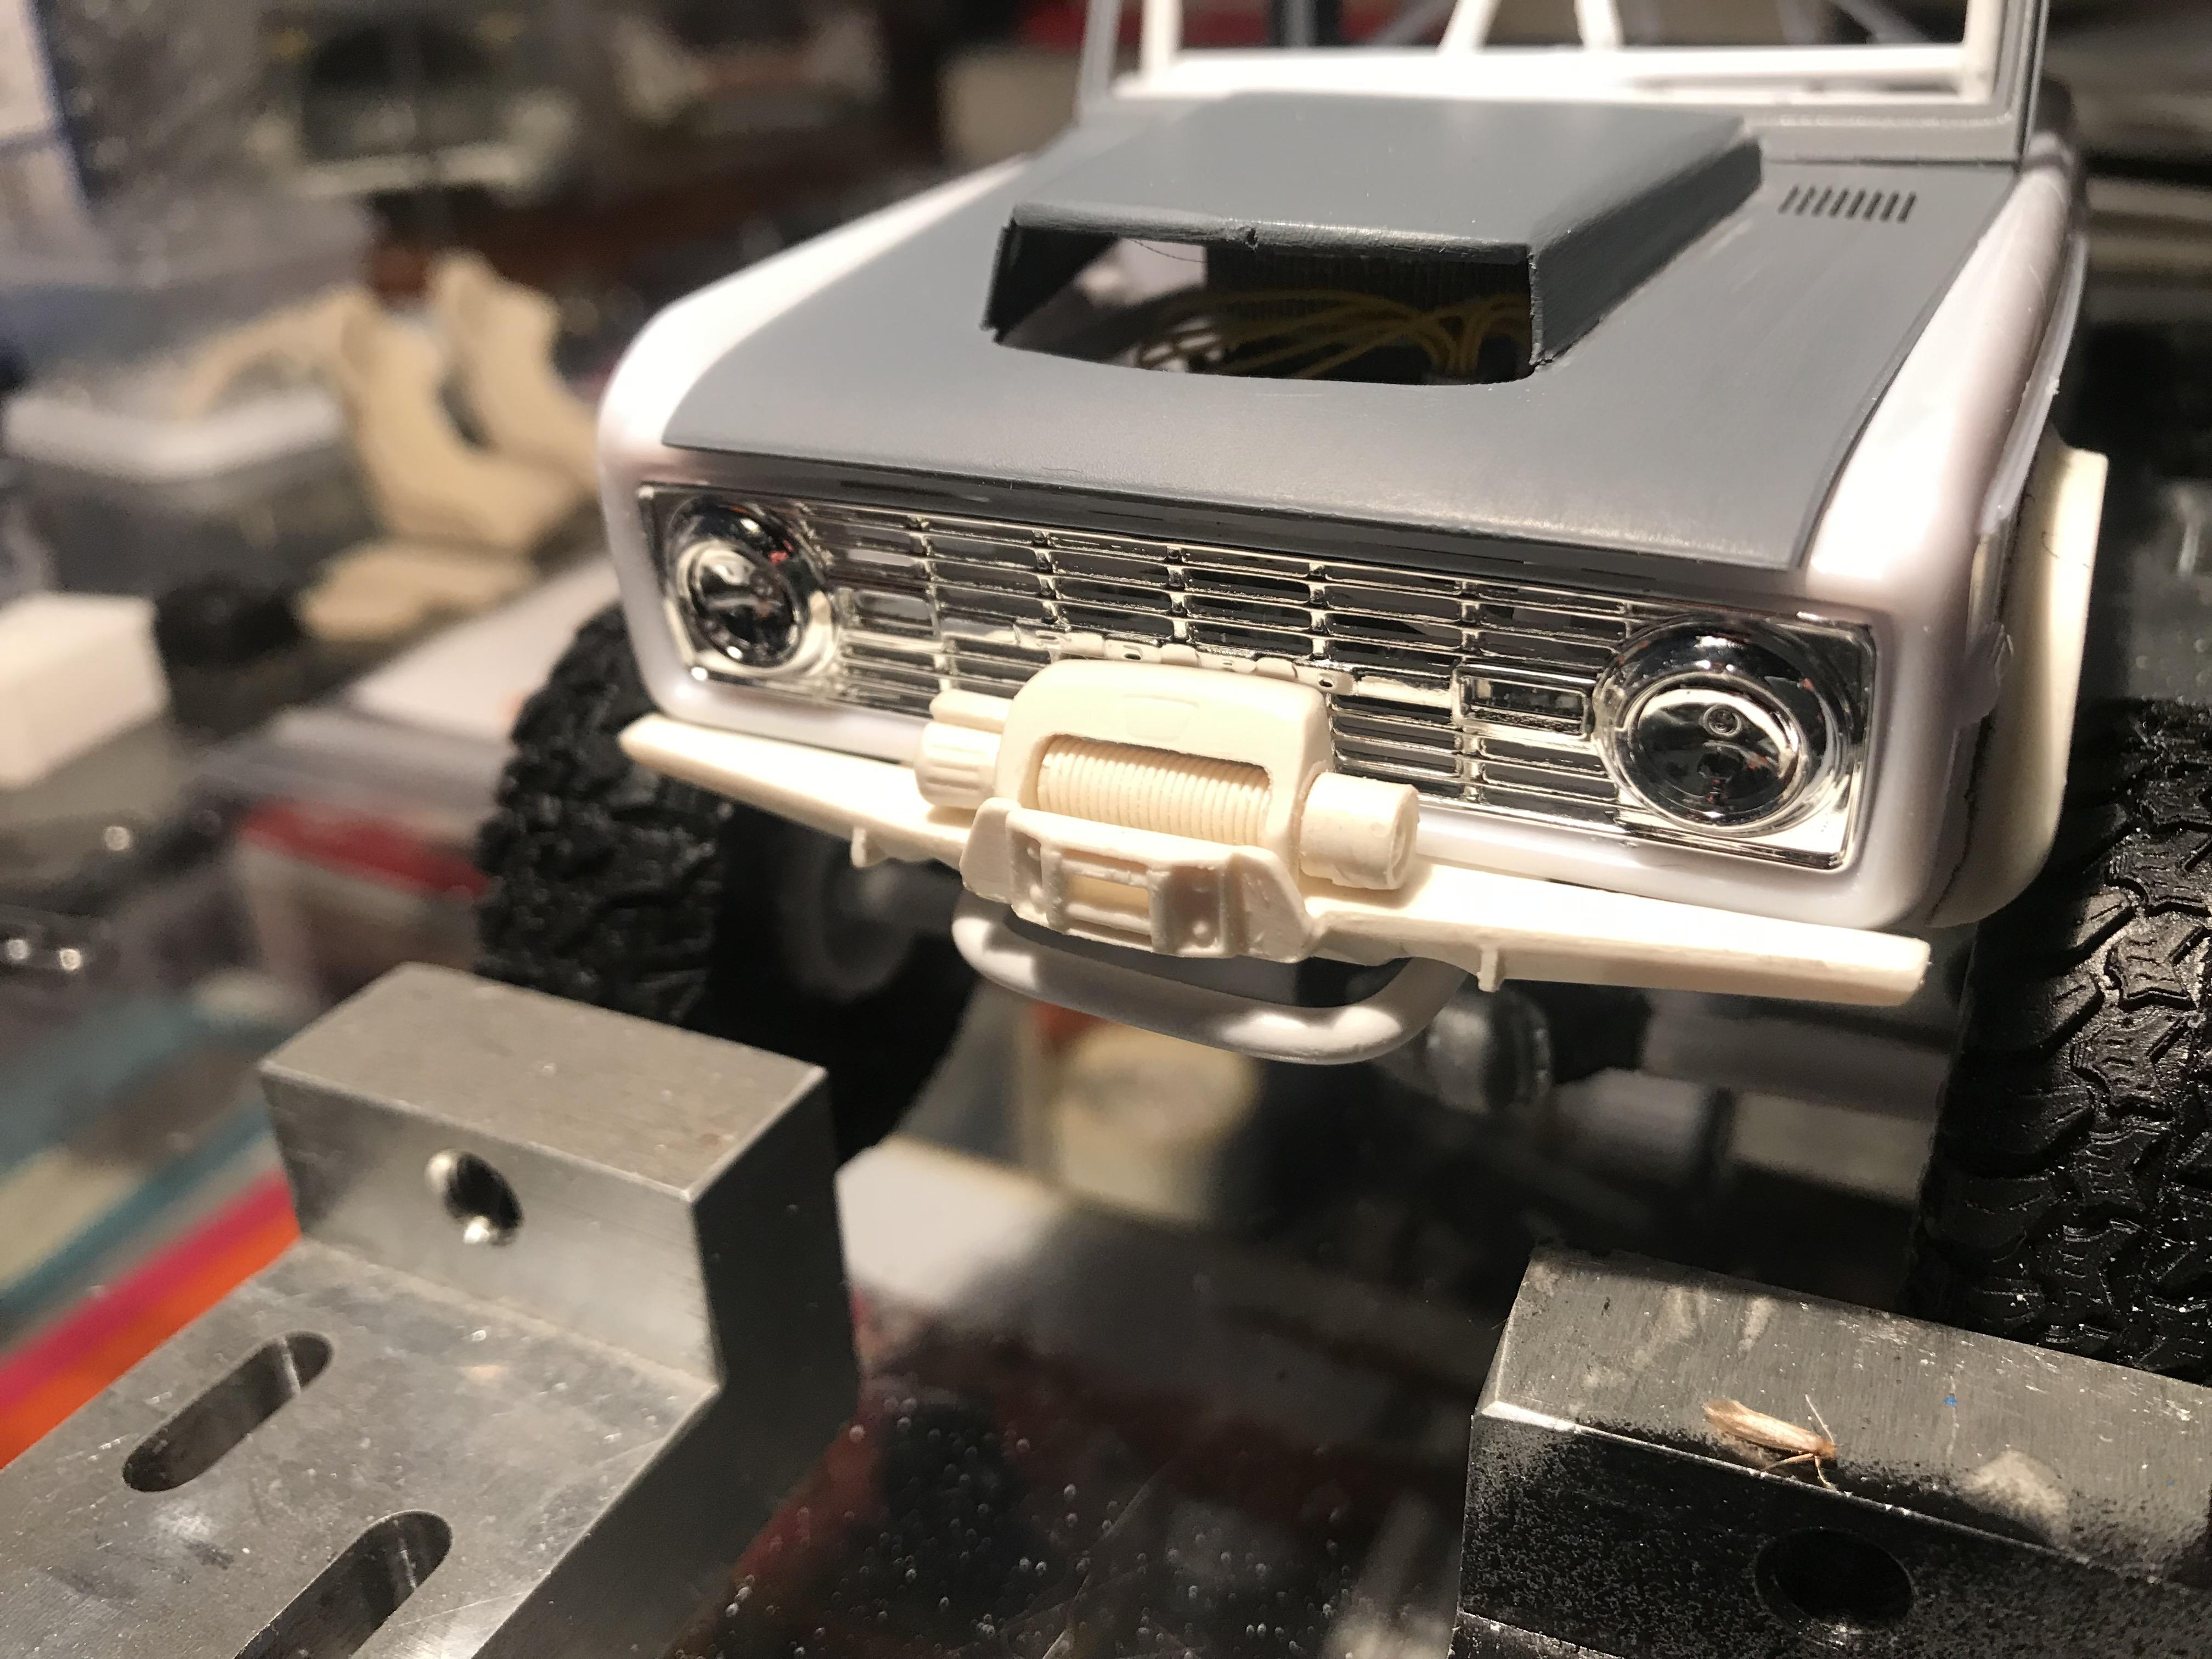
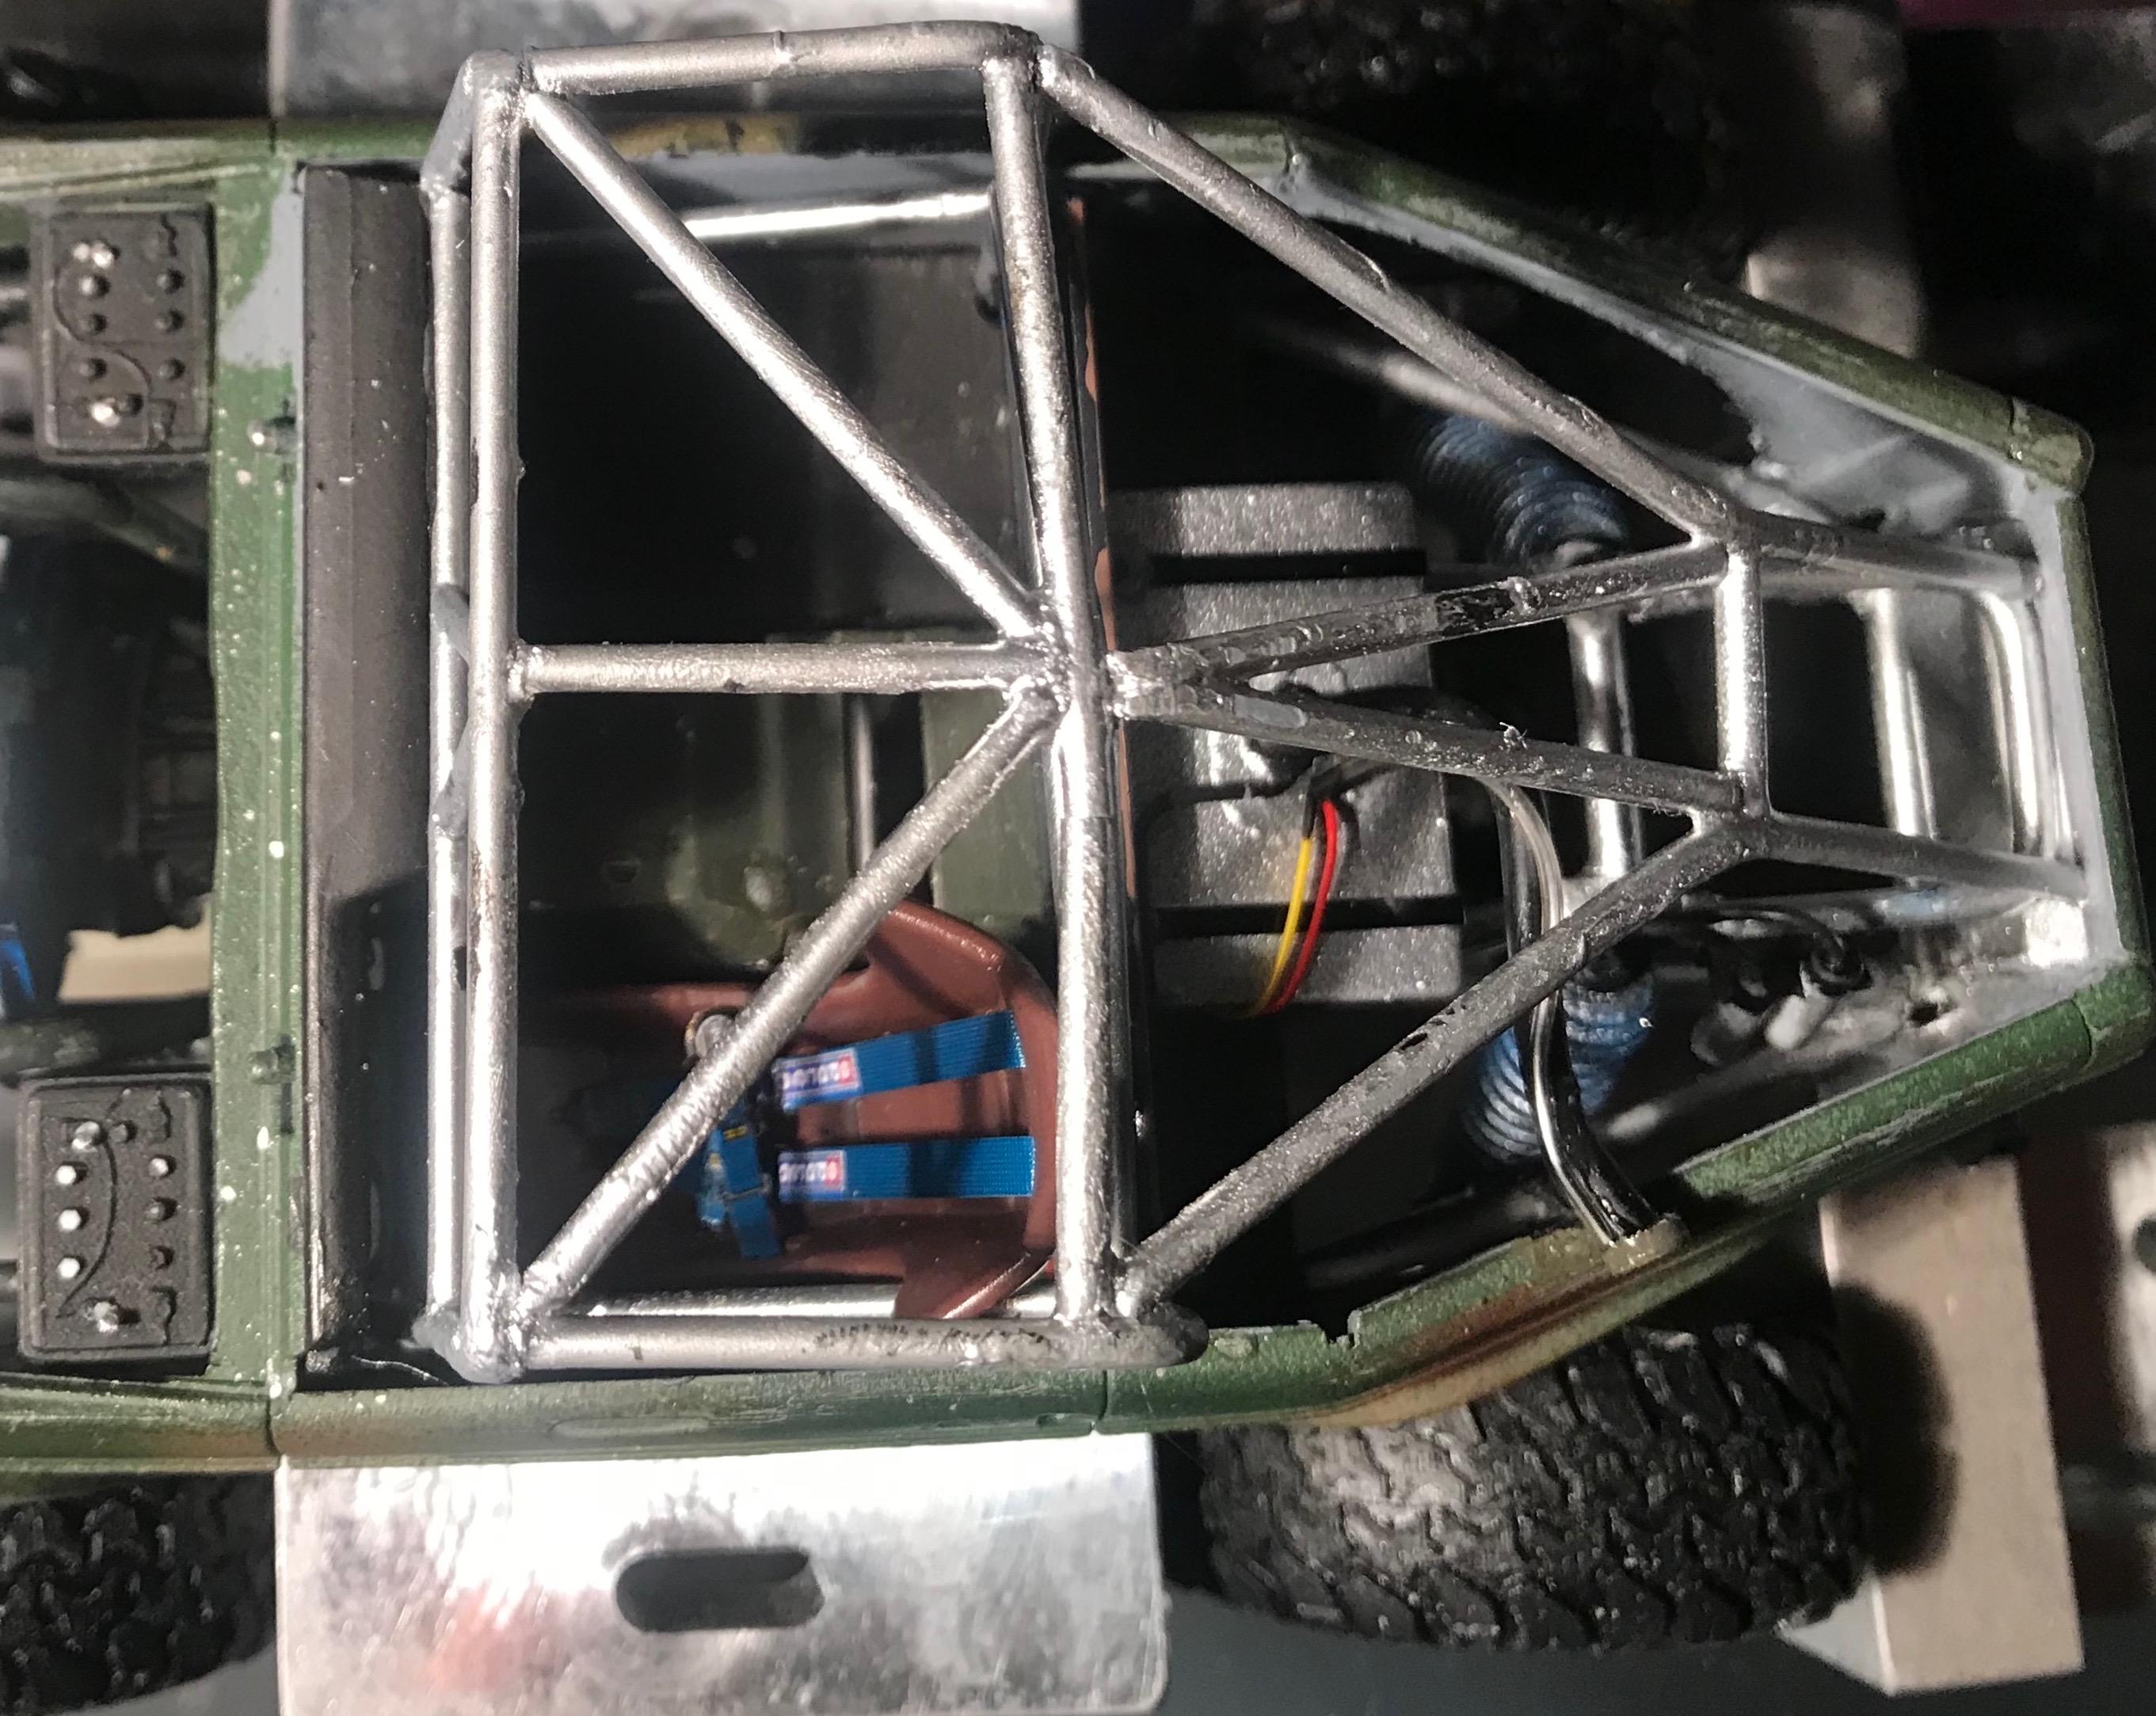
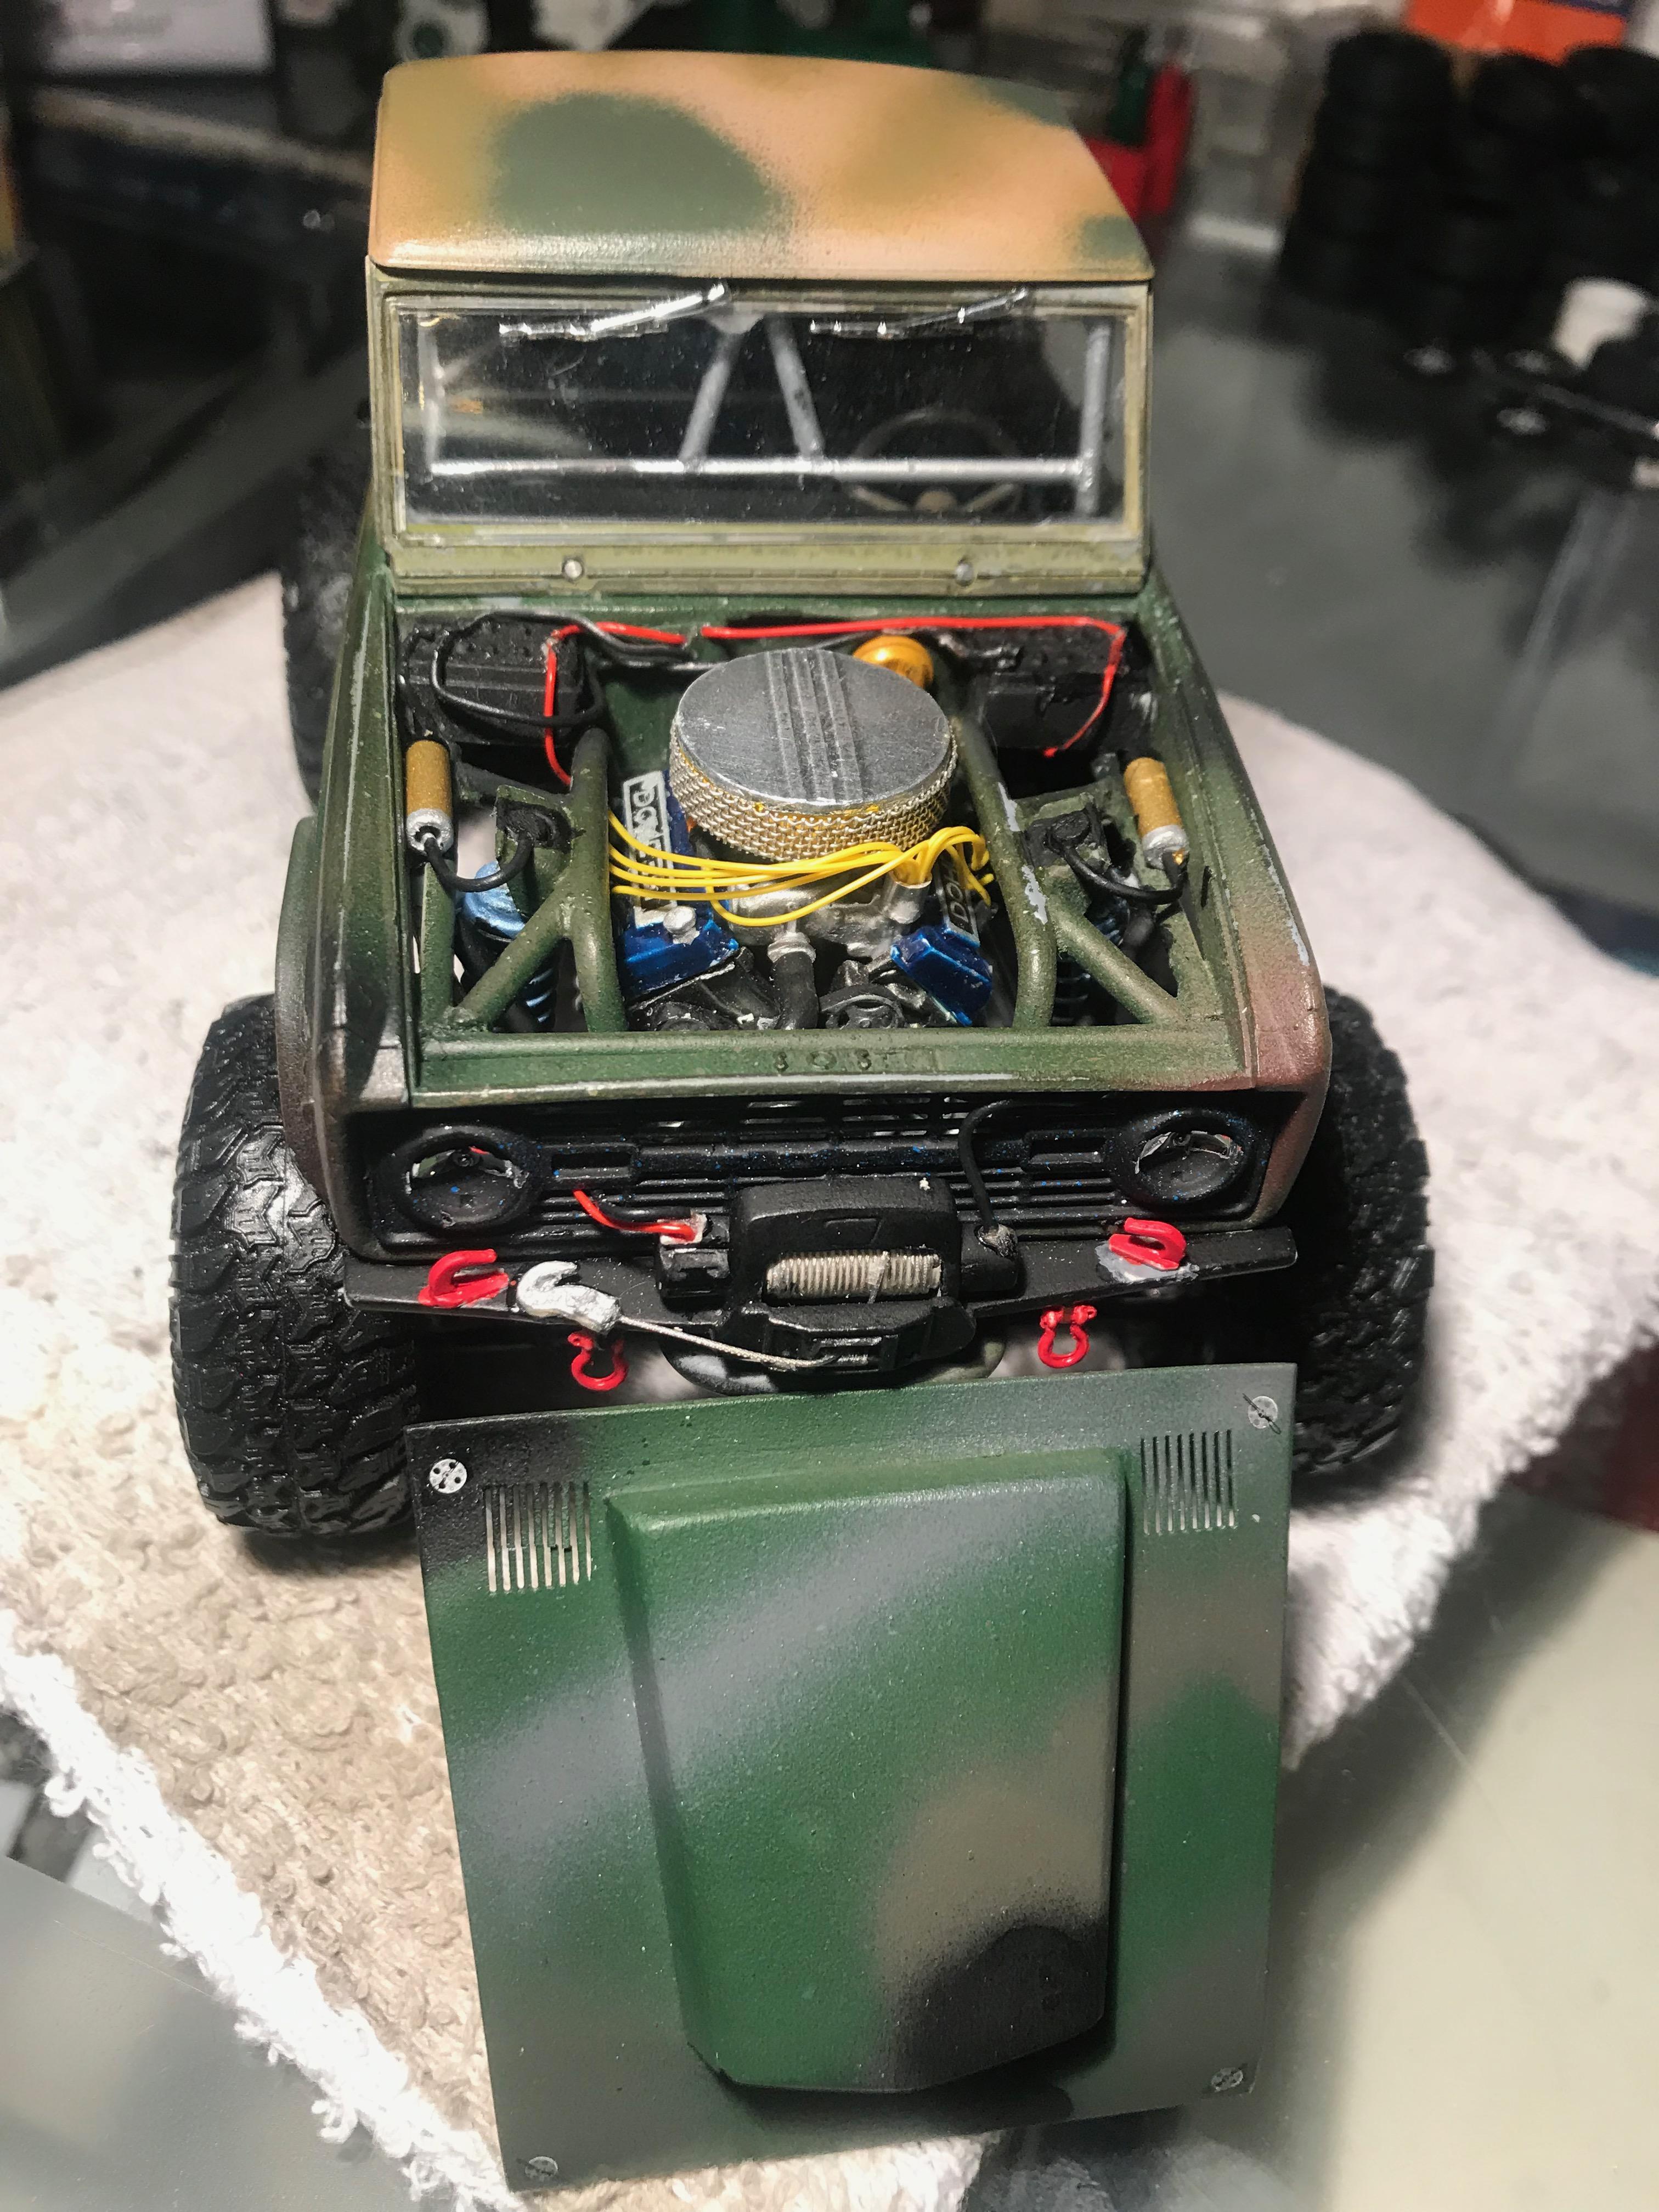
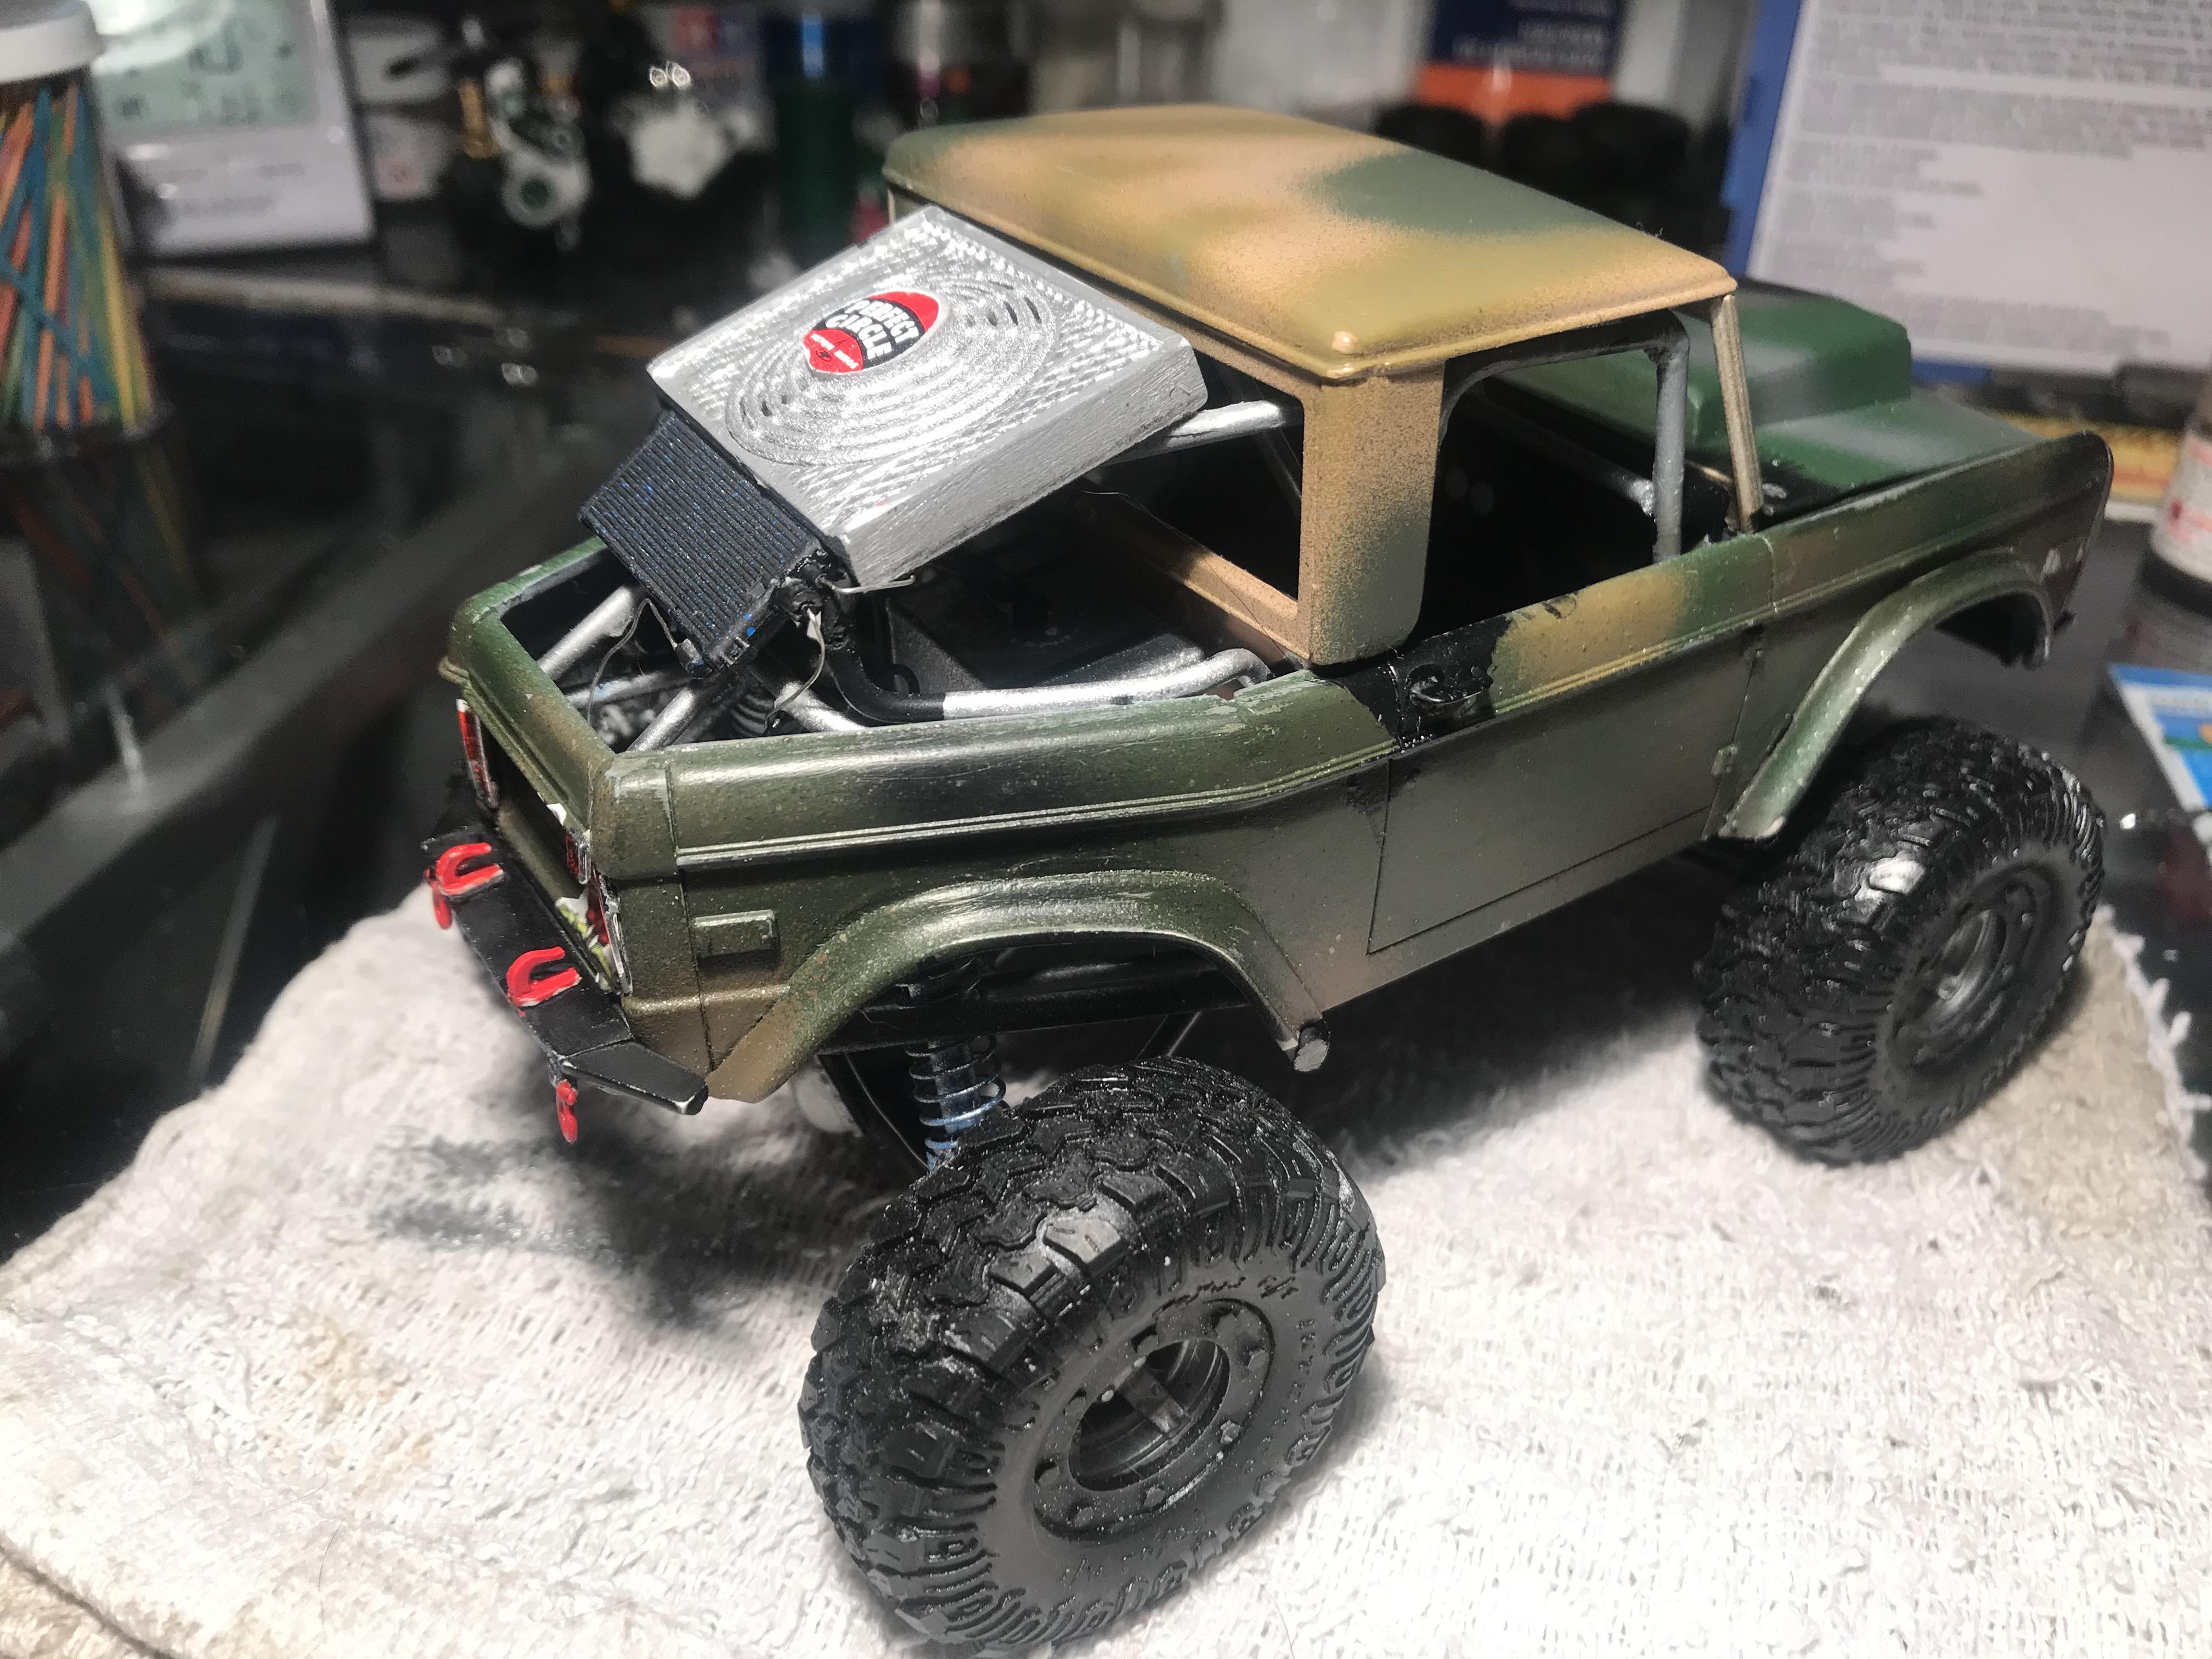
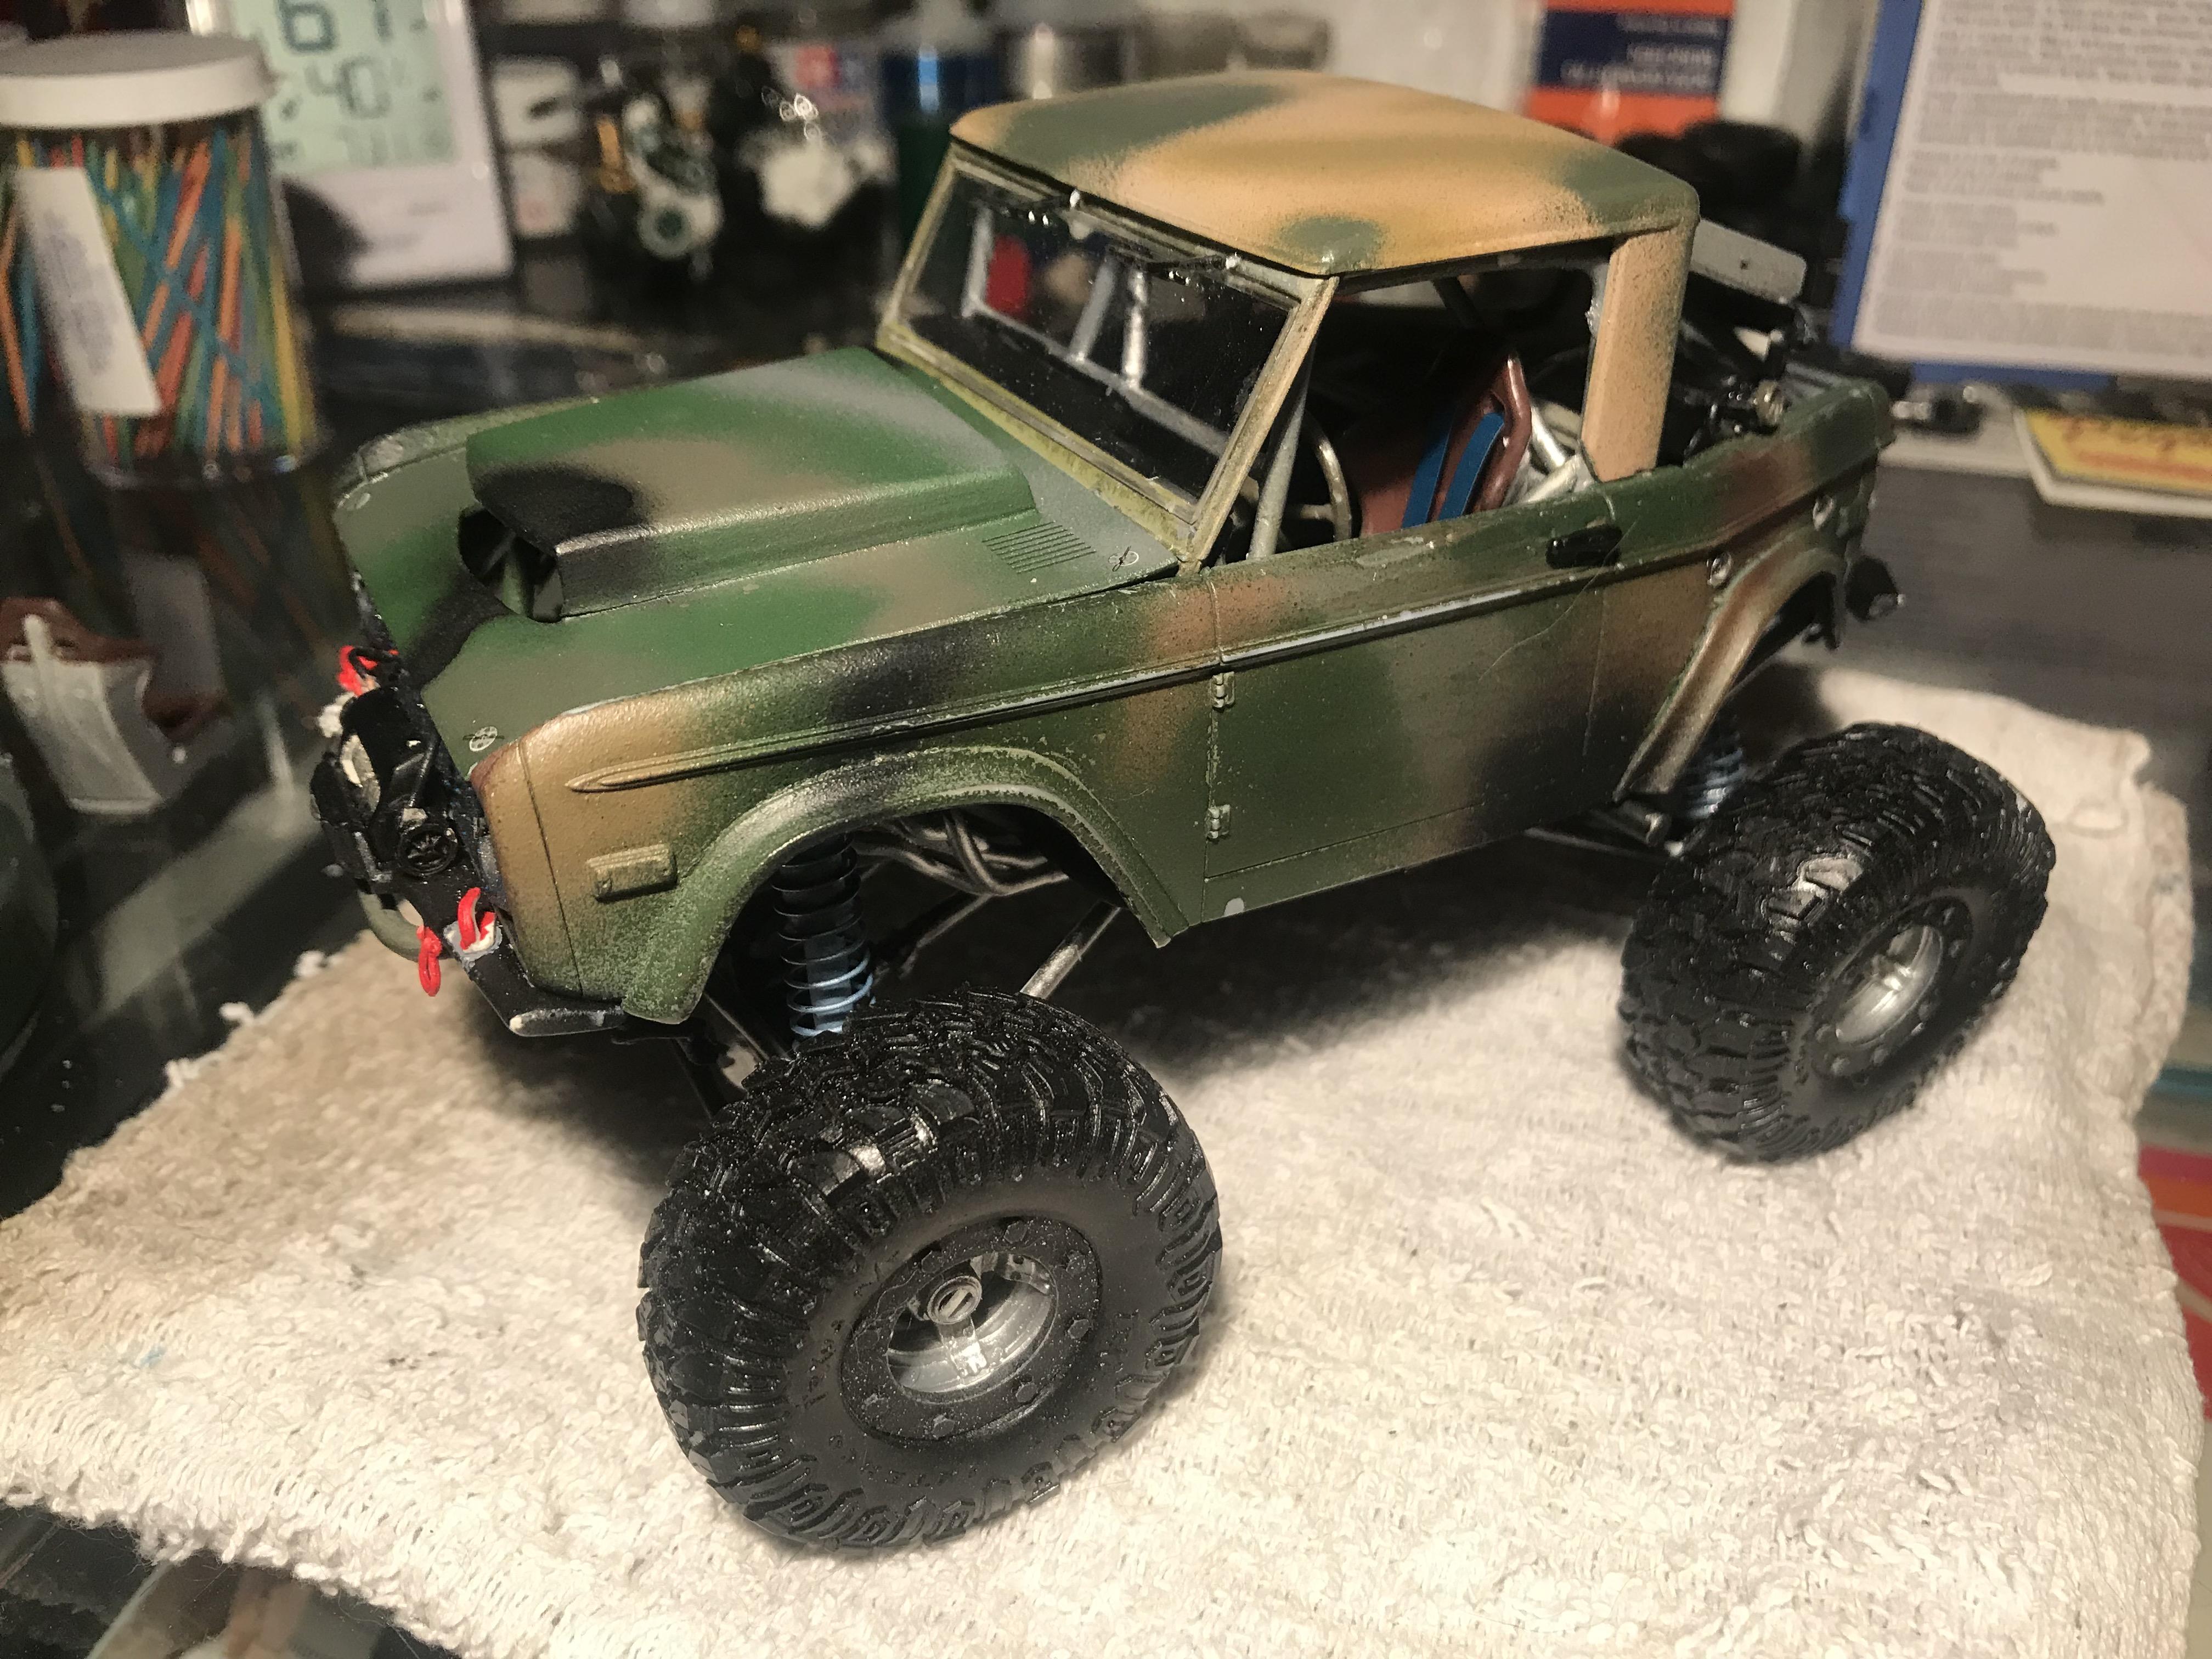
Here is my Bronco Rock Crawler, built from a starting point of a stock kit Bronco. Shot of stock Bronco under carriage for reference. I knew from the get go it would need a aftermarket engine, a 351CI dual overhead cam tuned ( in theory) and no mufflers to restrict flow was my ticket. I always start with what parts I think I want in order to mock up where things need to be more or less. First change needed was to move the fire wall back. The engine was too far forward to allow exhaust and cooling hoses to live in the front area. Reused this fire wall after removing vent areas for cab and heater. I included a stock setup shot from my stock Bronco for comparison, original to new. I also now needed to create a tubular frame to replace the narrow and really useless frame going forward, also scratch built my own custom front and rear axles. Engine mount and center member needed a little floor mod to accommodate this change.Removed inner wheel wells as the monster mudders will be too large to fit. Now a fun part. I decided to create a truck style Bronco not a full cab, so roof modification time.a quick mockup just to see stance, NICE! After looking at it a while it still was lacking something, left it on the blocks for a few days to ponder the what I was looking for. Now you can see, a pinched rear end was the what, and we are off again. This rear end change also meant a frame change as well. No good Rock Crawler enthusiast would drive without a super strong roll cage, here is mine, all scratch.the rear uprights for the shock mounts needed to tie into the cage assembly, so I have started these as well.Completed cage with a small twist. I designed the roof to be able to be on or off, both looking pretty good. More frame work design to create the front shock towers as part of the frame work. The 351 CID engine sits tall in the frame so added a scoop for air induction. Time to modify the wheel wells and add skirts, mostly for looks.Good finished look though, yes? Disc brakes, winch, grill, front bumper, and my favorite, a little camo paint to look rough. Here, finally changed the dump headers for a set of tuned headers, much better. Drivers seat with a 4 point belt system. Ratfink, a all time favorite of mine. Added a oversize cooling radiator and fan, transmission cooler, Straight exhaust, duel battery system, redundant charging system All shocks are gas assist, and the suspension system is a 4 link in the rear and a 3 link in the front, a normal setup for a Bronco. Break lines, bumpers and hooks, and hood pins. A fun build, think it turned out pretty good, my son is a four wheeler, (1976 Ford F-250, he thought it was good too. Thanks for looking. MJO
-
Totally agree 89AKURT, a flat back does not provide anything that looks realistic. CURVED is the way!! MJO
-
Good to see I might be on trac for good headlights. My Porsche 917K looks really good in low or bright light settings with bare metal backers, so thanks GeeBee. Also thank all you builders for your input, there is always something to learn here at MCM. Thanks
-
I see I was not clear, excuse the pun, what I was wondering is how to get that reflective light from the rear of the headlight. I understand, and thank you for your lens input, but it is the reflection from behind I was attempting to ask. MJO
-
Please forgive my fat fingers. Should say One side for the bucket, one side to mount the bare metal, then attach the lens.
-
I am sure this subject has been disgust many times, please forgive me but I am a newbie of sorts. I just wondering what all of you tried or have found to work the best. (Best being highly subjective) I use bare metal behind the lenses and attach it to to headlight bucket with double back tape. One side for the bucket, onesie ti mount the bare metal, then attach the lens. MJO
-
There is a lot of history to be found and perhaps if you are like I am, the story historically with regard to the Tuskegee Airmen and the amazing job they did while serving this country joes along way to show their Patriotism and valor. Thanks Jim B
-
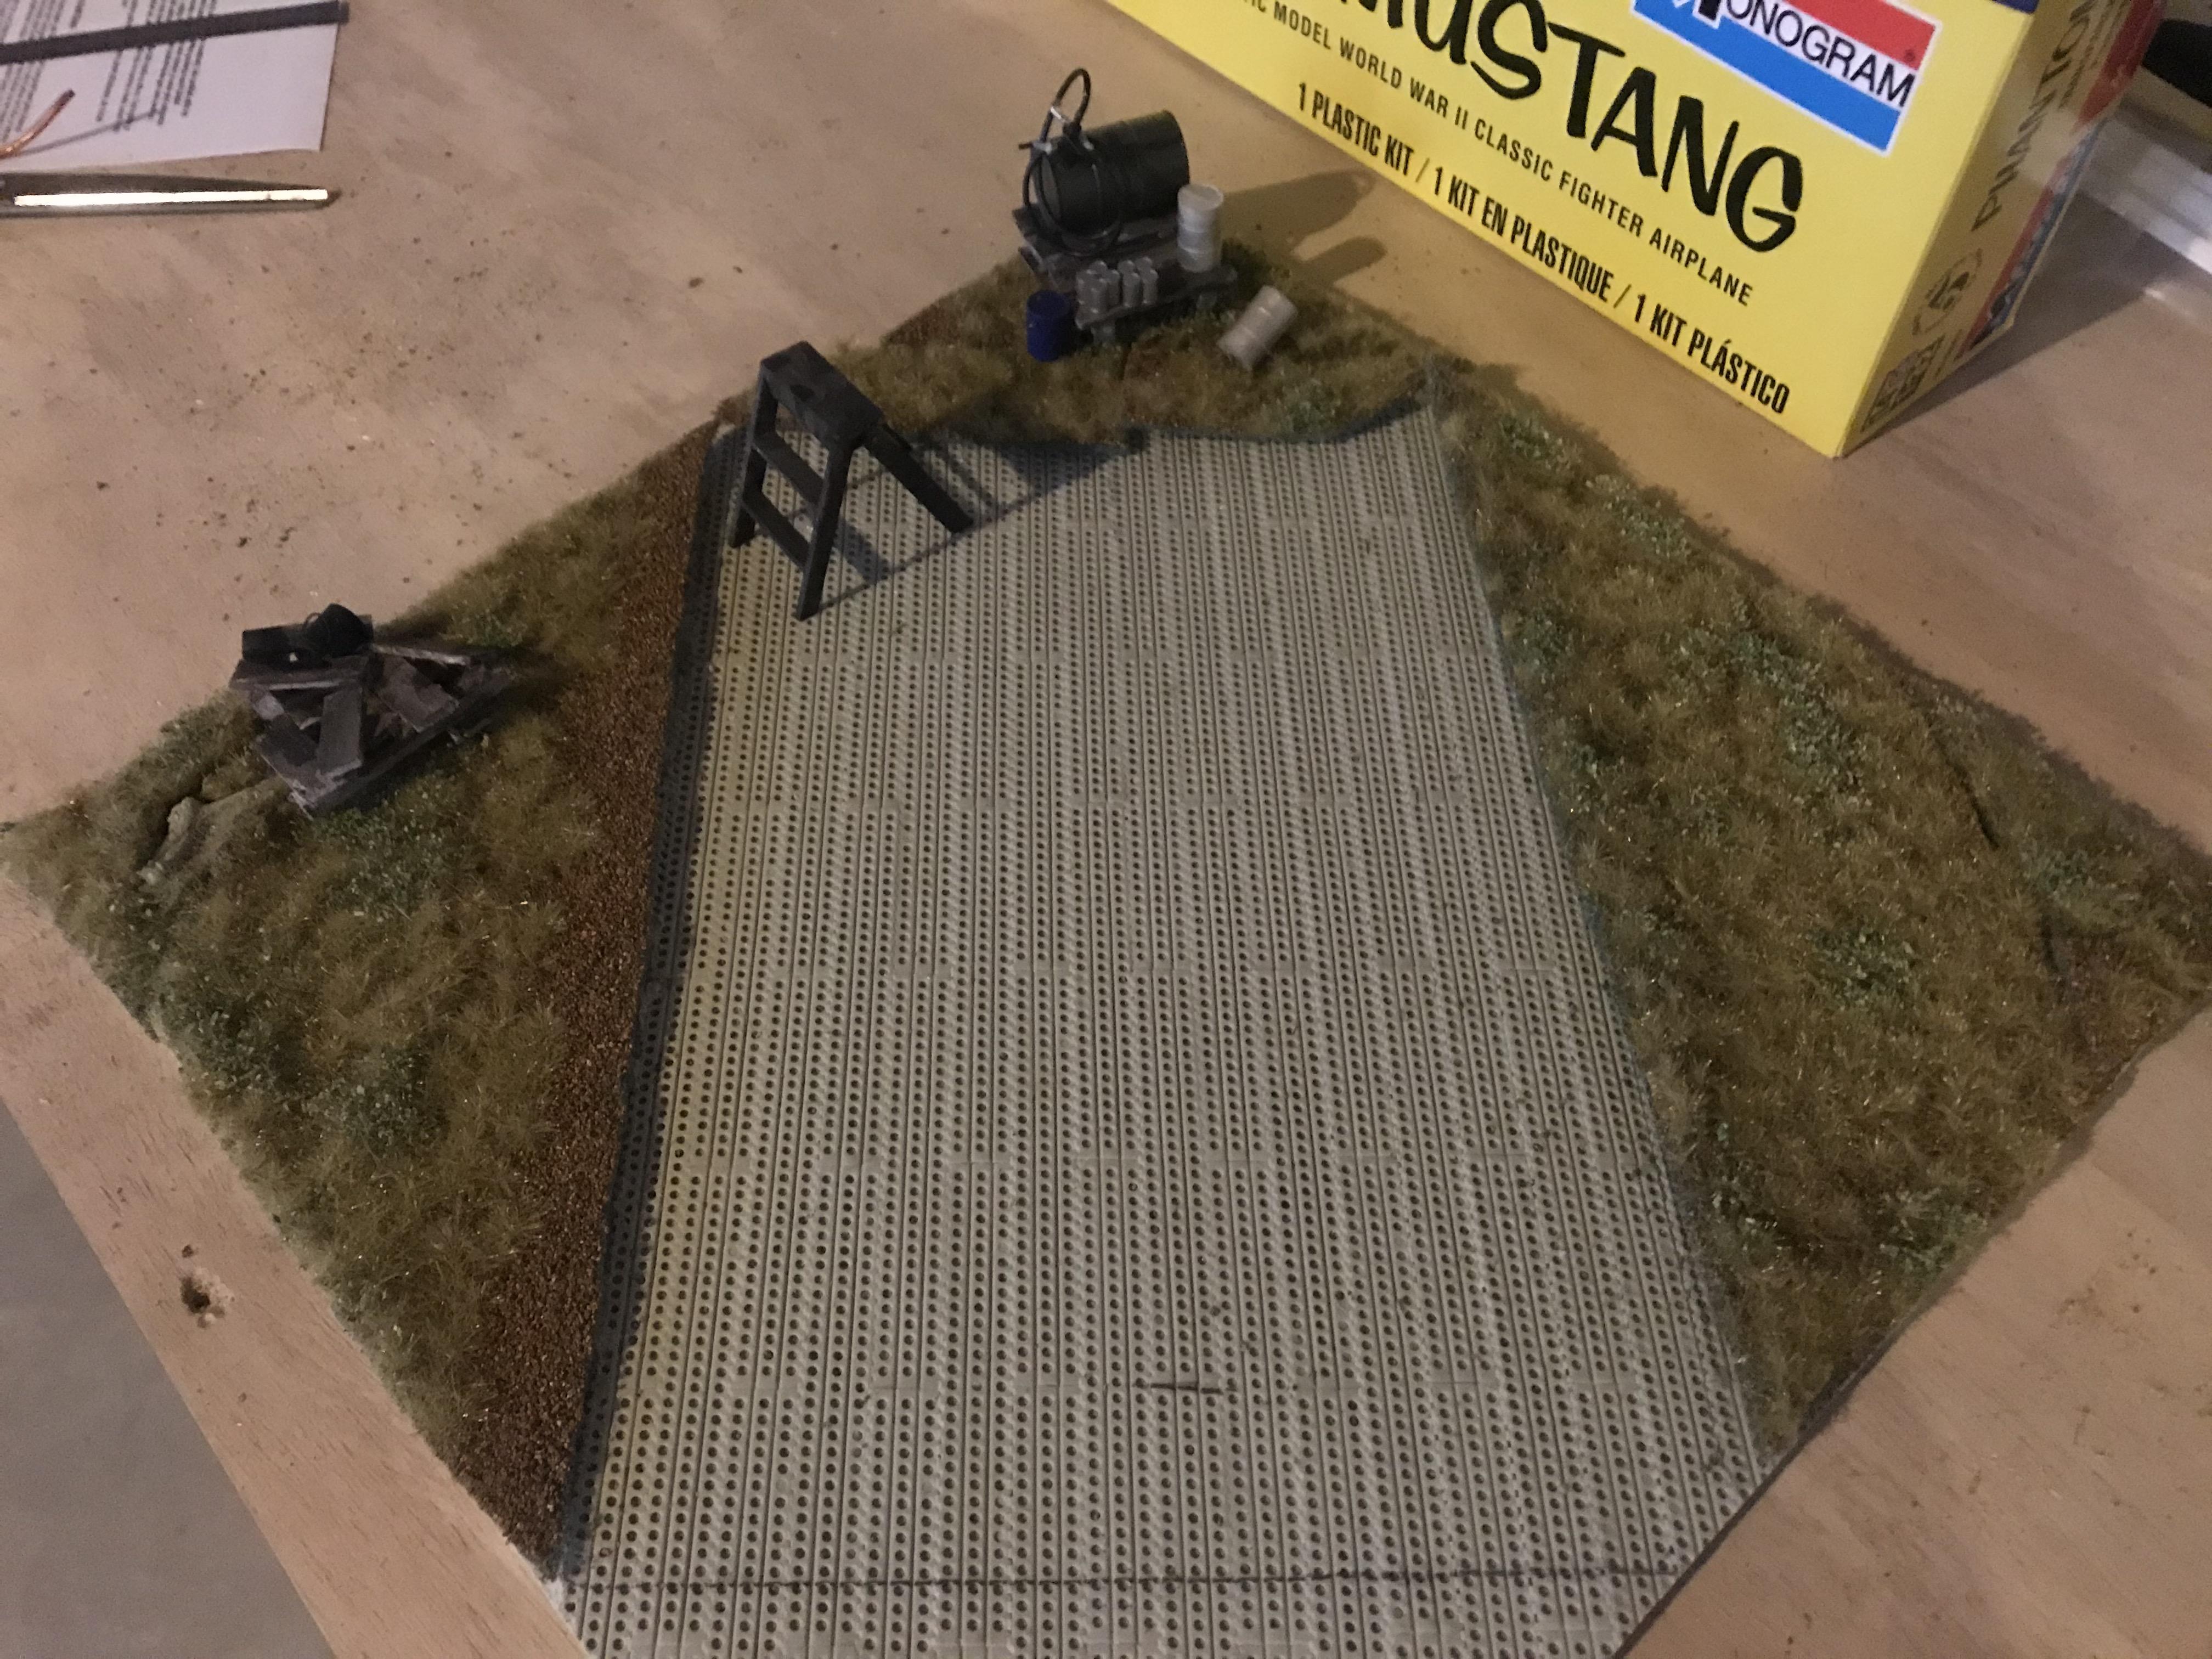
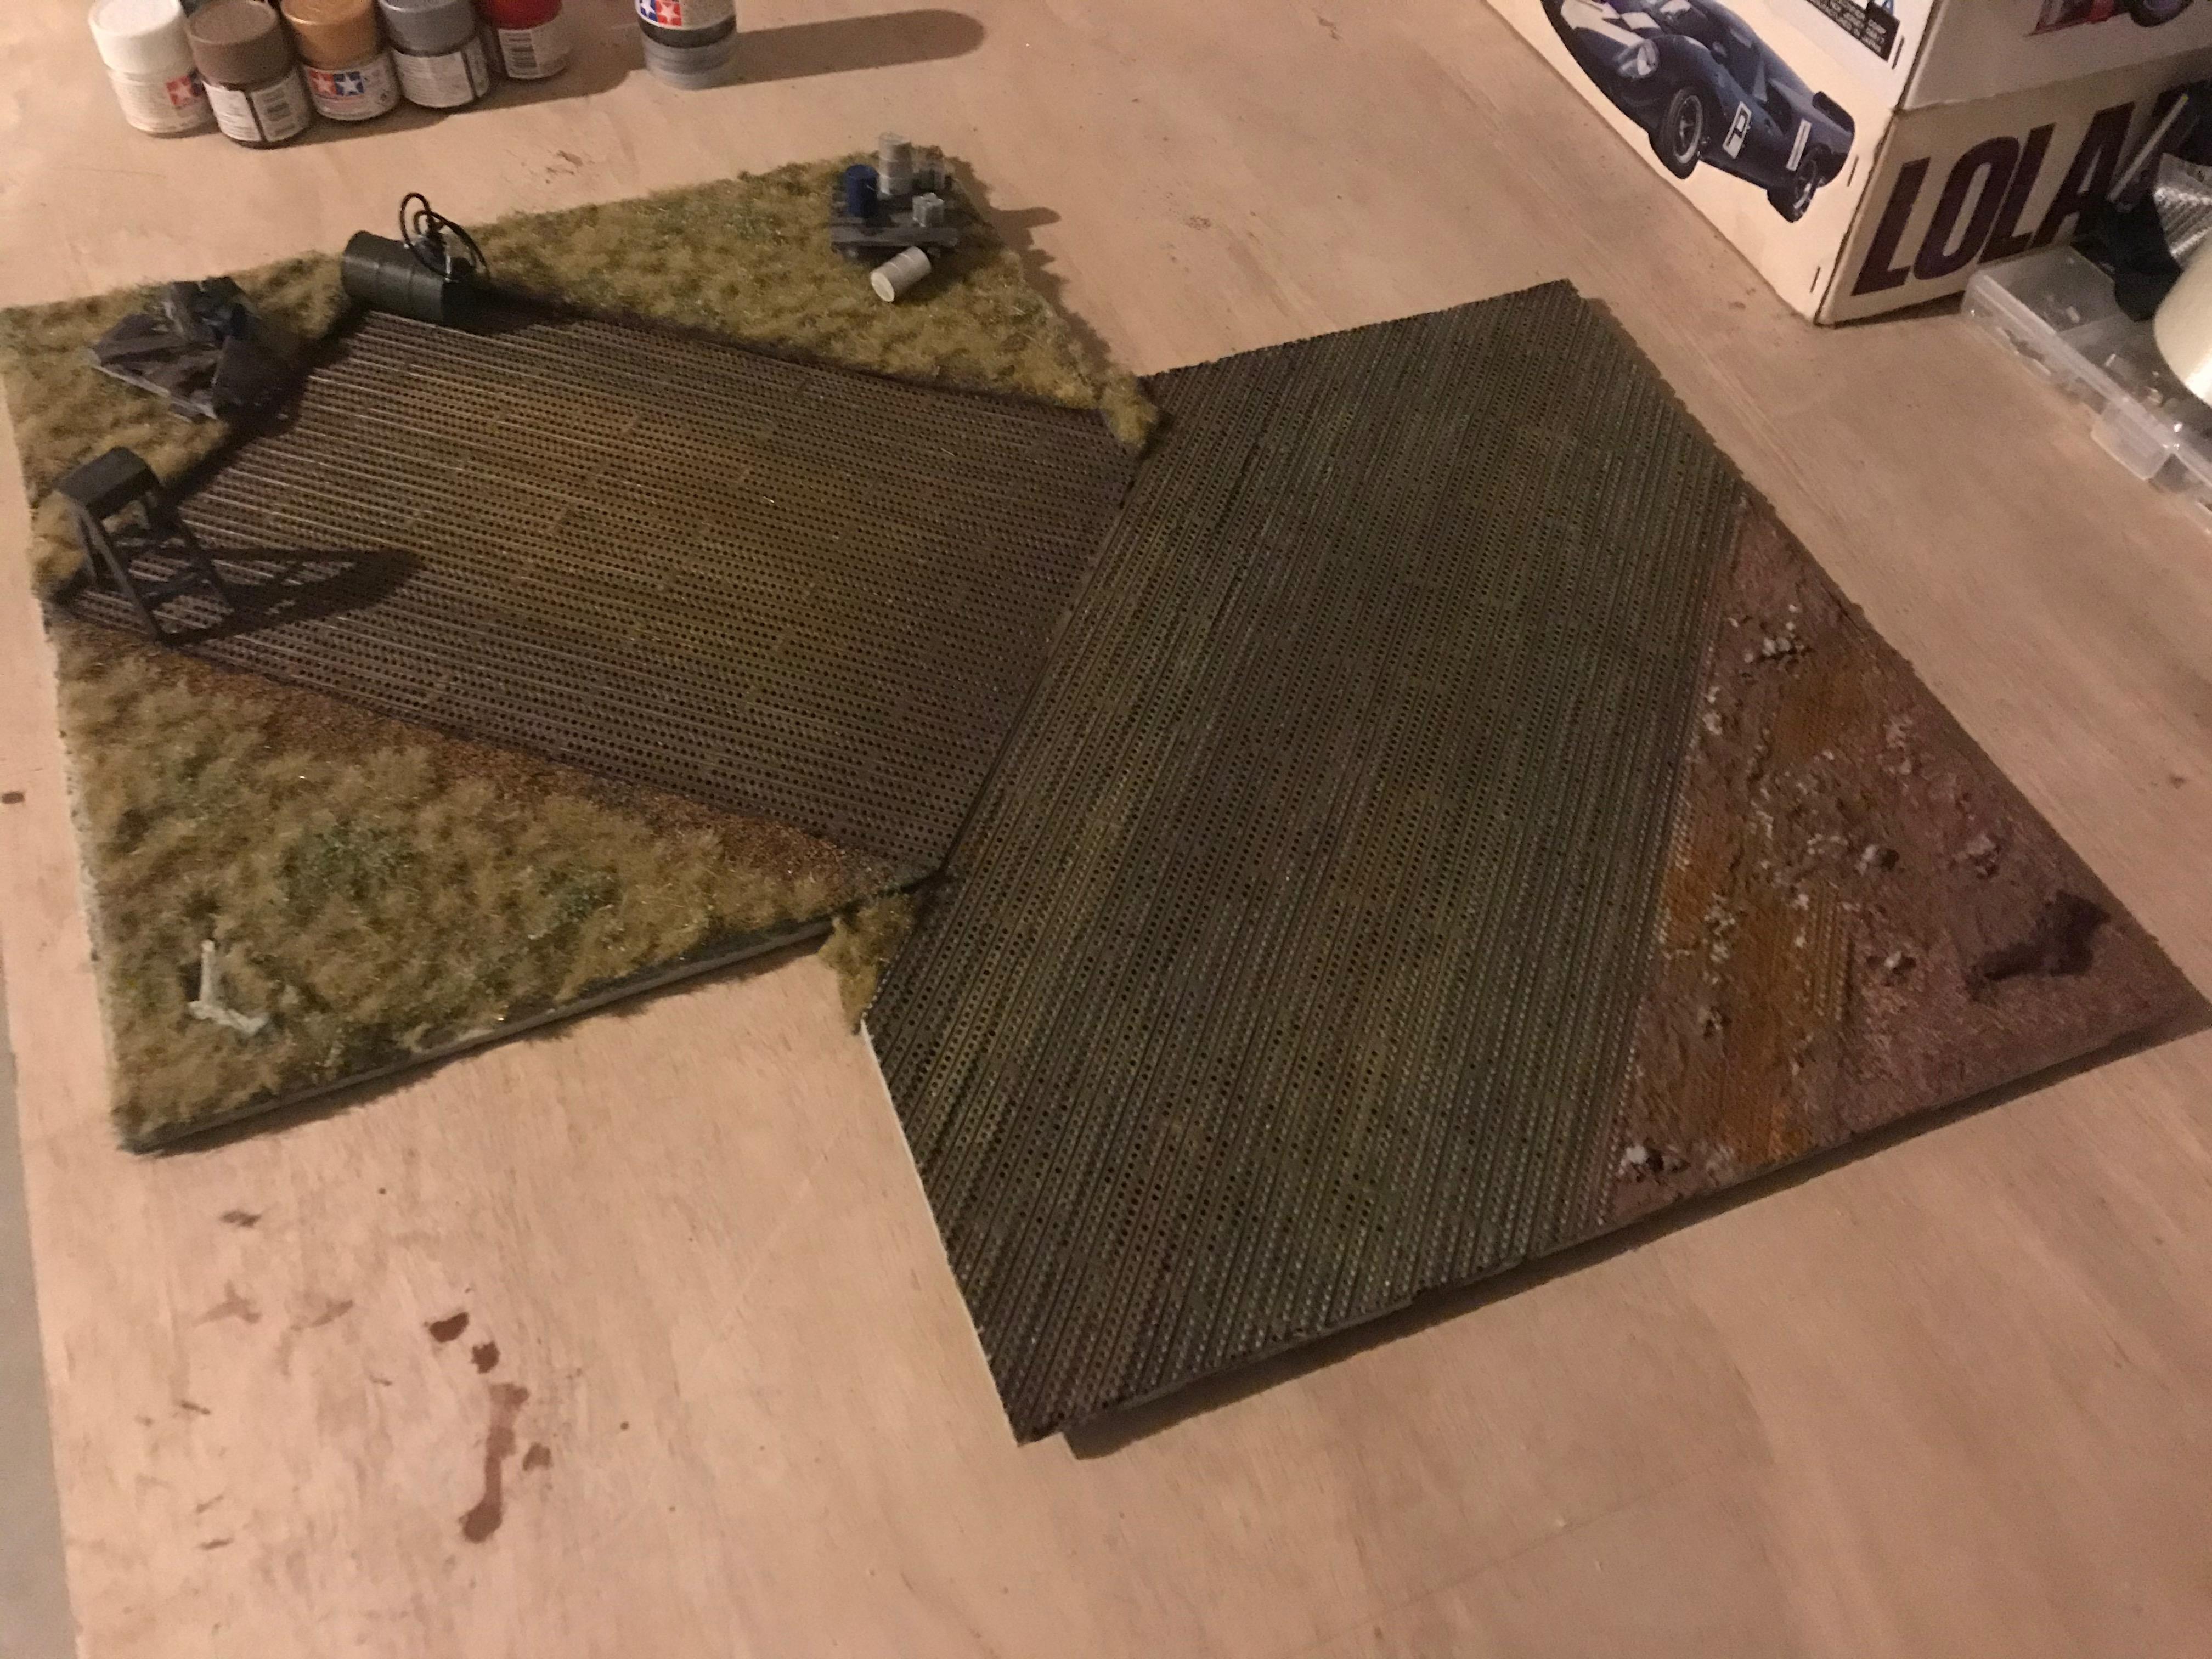
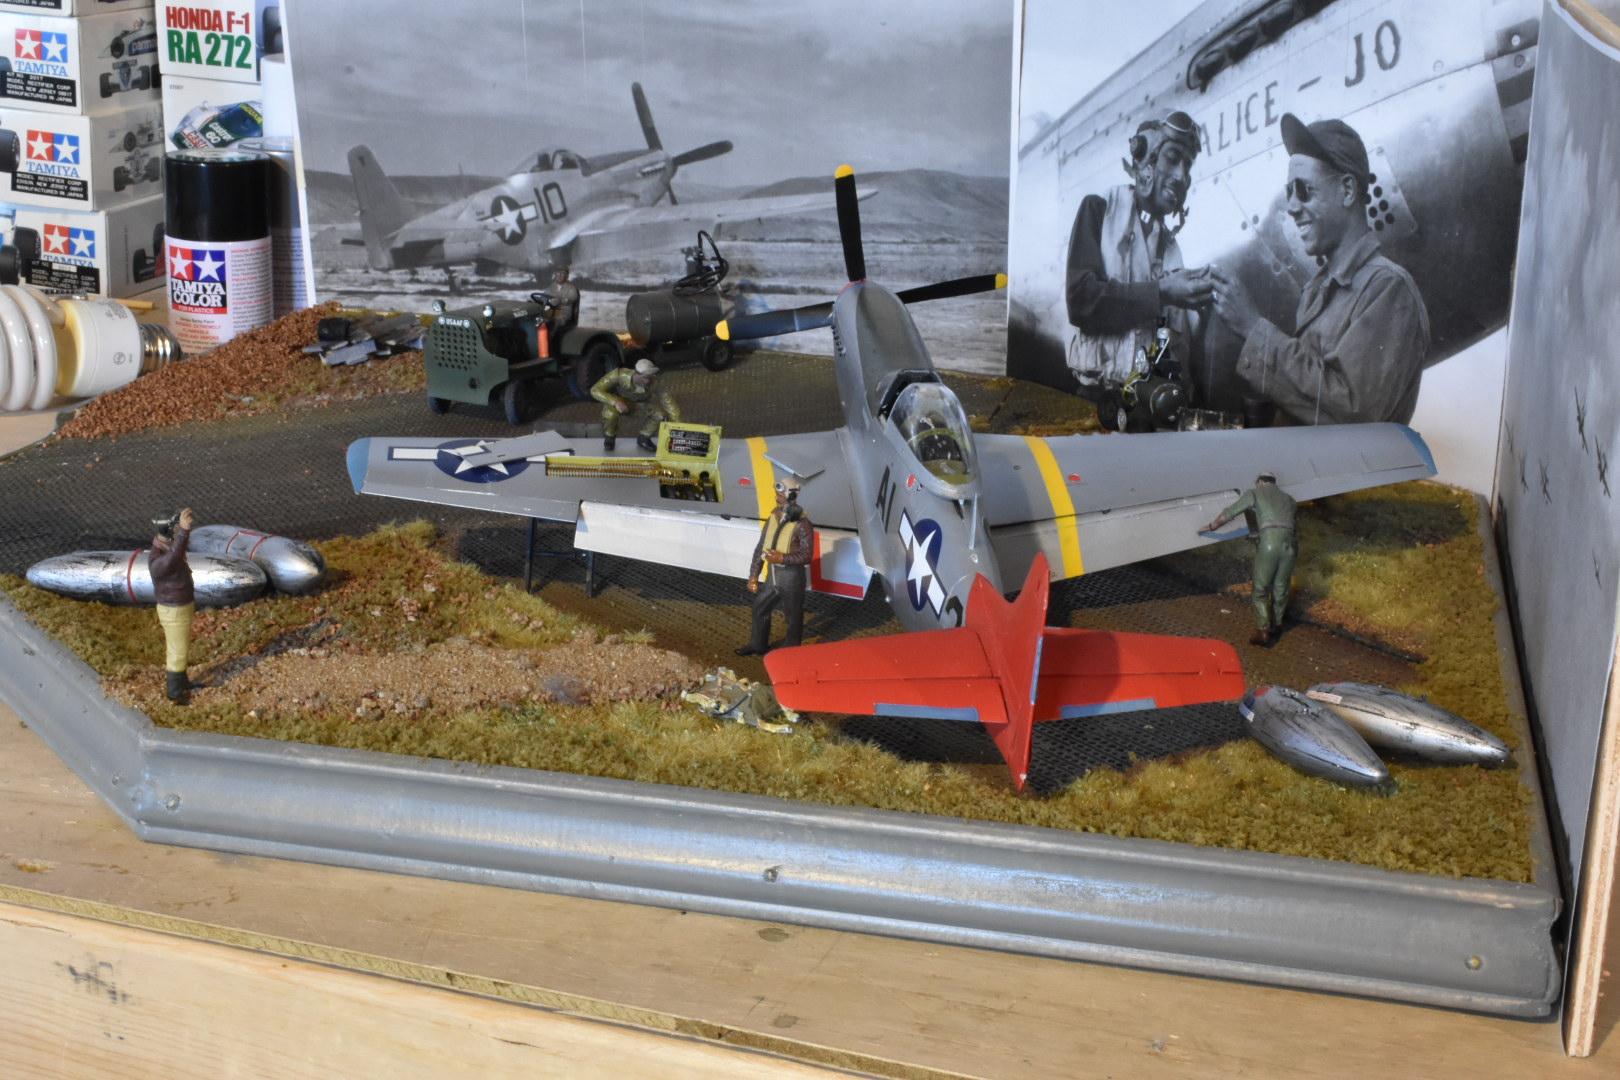
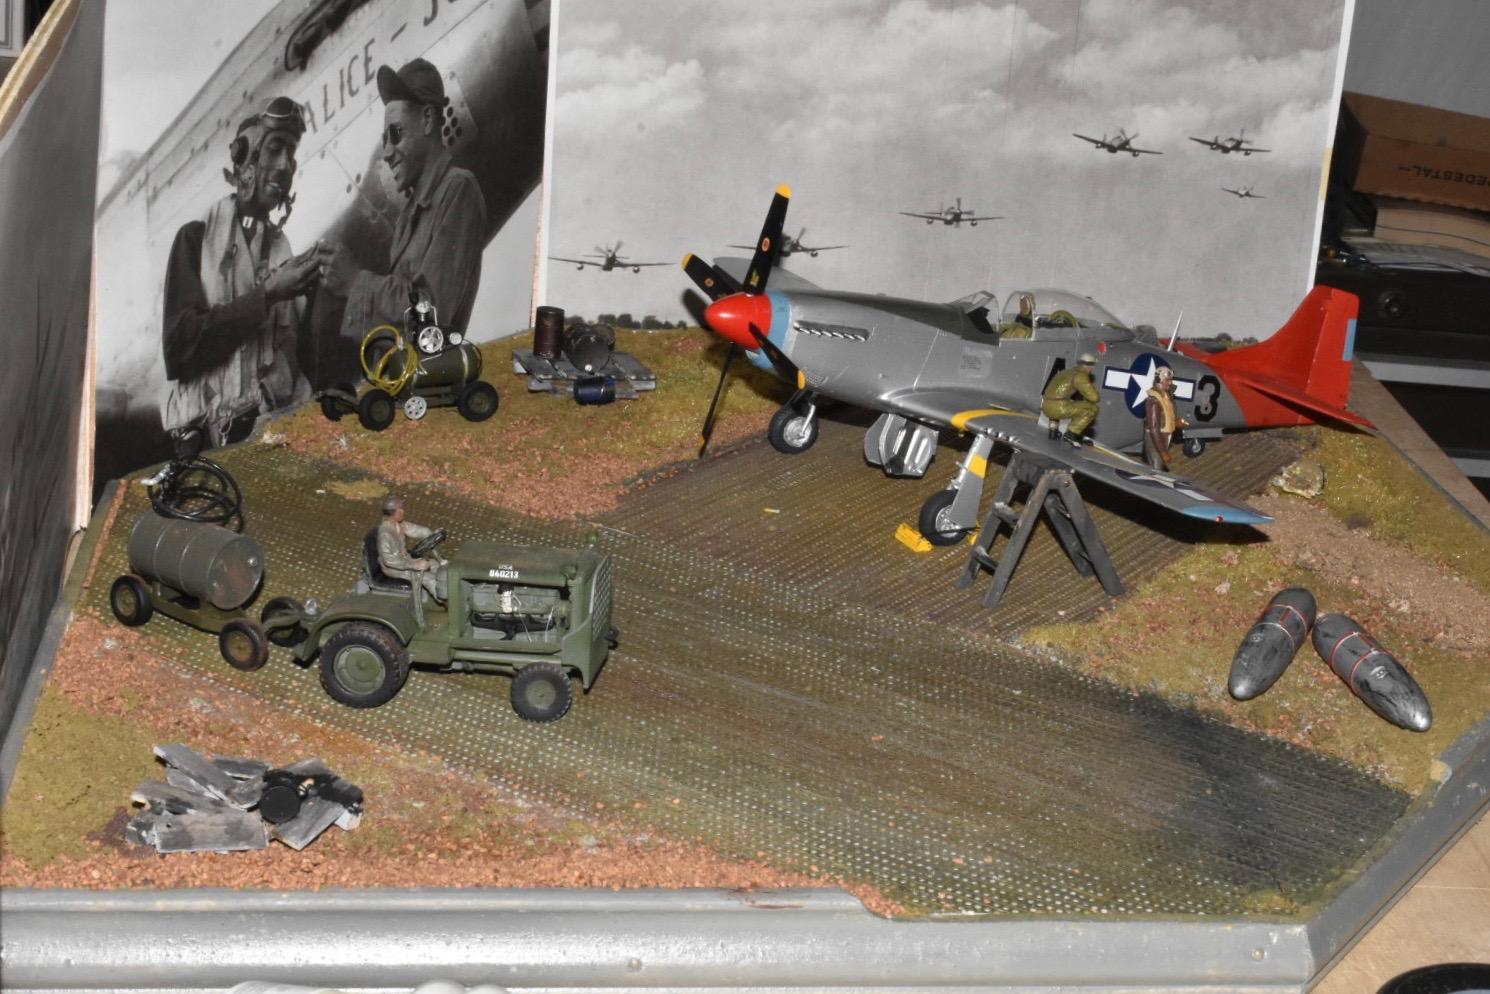
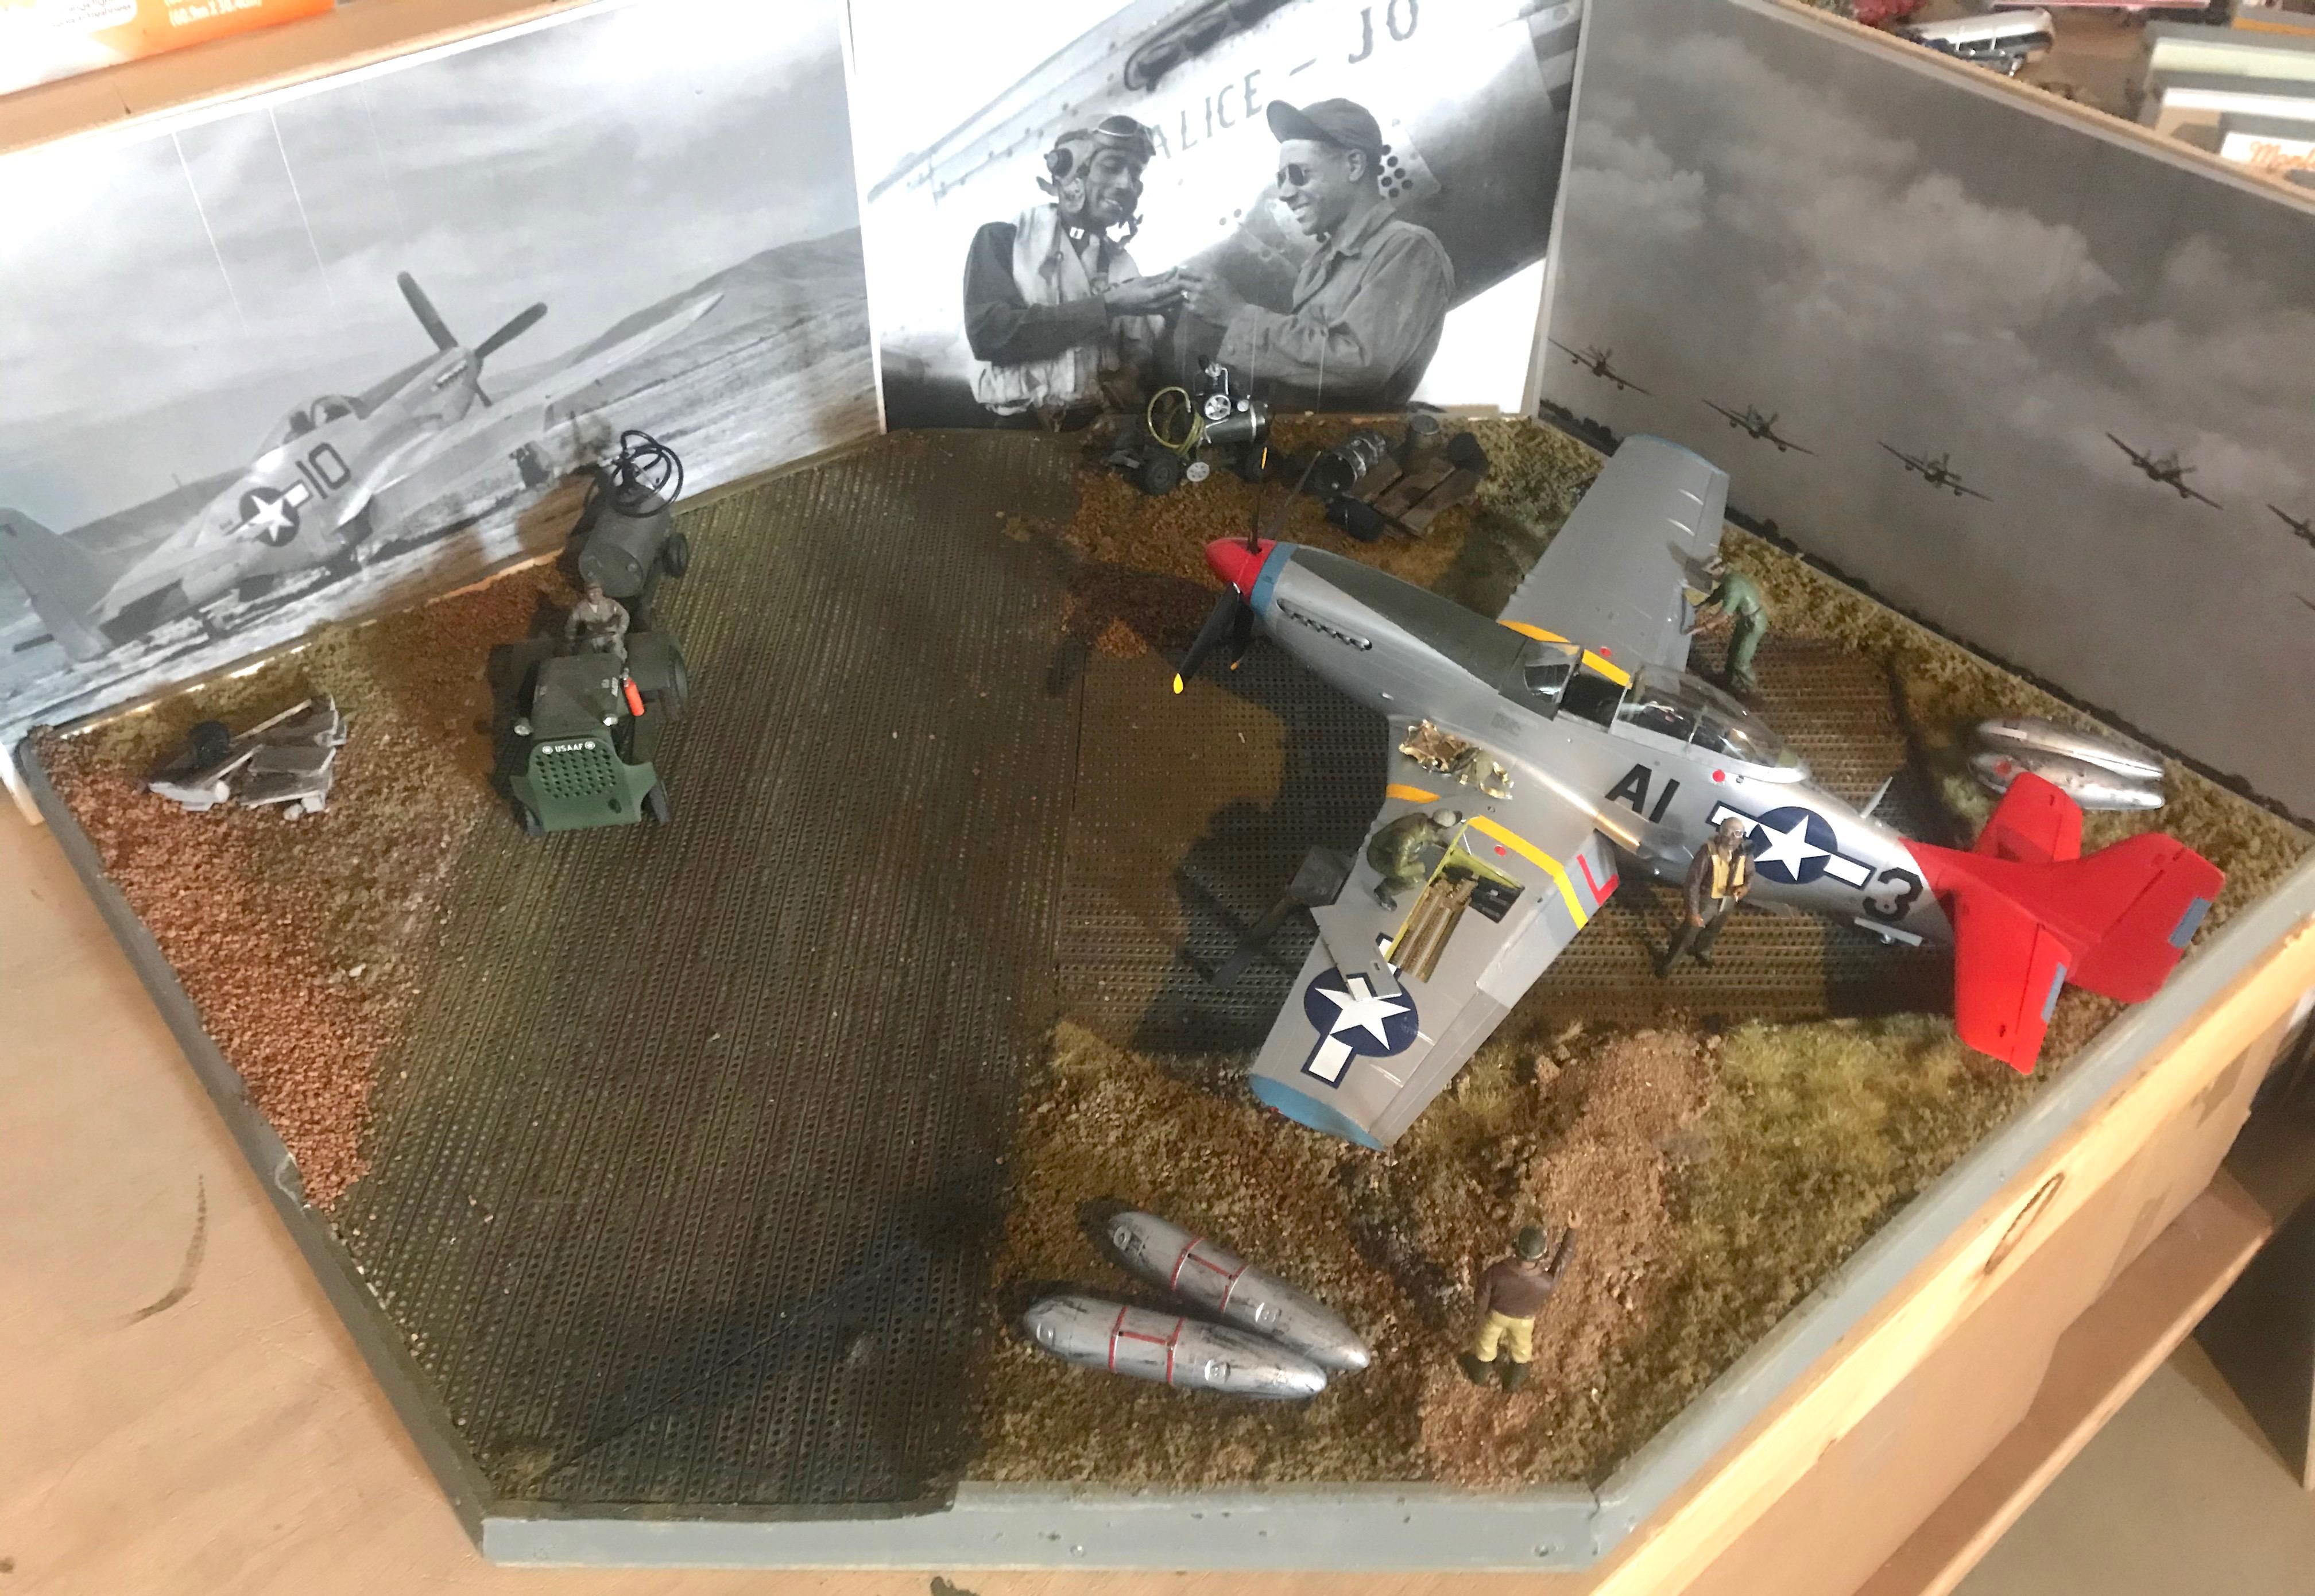
Well, I had wanted to build a WWII diorama with a fighter from that era for some time. My Father served as a gunner radio operator on a B-24 Liberator, hence my fascination with aircraft from all eras but WWII in particular. This diorama started off modestly but as all of you know, the first thought is not necessarily what the final product will be. So, I have included some starter photos and then of course the final outcome. This particular Mustang is not the Tamiya but rather the Revell P-51D-5NA. I detailed it as though it was the Tamiya kit and the results you can evaluate for yourself. I really like the airfield, using many WWII photos from Ramitelli Airfield and the particular P51D is intact an unidentified by pilots name from Ramitelli circa 1947-48. I also include the photo I used to create my Mustang. One side light (photos included), the tail on a 5NA was incorrect for a P51D, and made the necessary change to back date it. Hoping you enjoy seeing this as much as I enjoyed creating it, thanks.
-
Hey thanks and I did find the sight. Great that you have helped us Ford GT40 builders kit bash the curbside model world with a super quality engine befitting a Ford GT40 / Ferrari killer. Cool!!!
-
Hello all, I am MJO, yes been building model everything since I wa six. Still enjoy the pleasure and believe it or not, the calming effect it brings, both durning and of course the final product. I have posted a couple of my efforts and look forward to seeing others finished models. Thanks for a cool spot to talk and show for all of us.